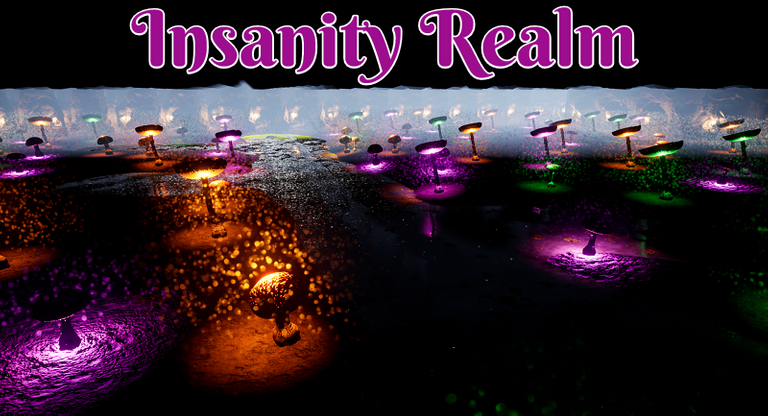
This is another one of those maps where the name really defines the vision I have and what I ended up trying to accomplish with how it looks. Where I see bright colorful colors all around the bigger areas of the map leaving the smaller passageways almost untouched like what was just seen never happened. There is also this high level of chaos that embodies my thought of the word insanity. Along with the general thought of something being unusual for the eye to gaze on as the player walks into another cave wondering if they have slowly gone insane.
Mushroom Cave
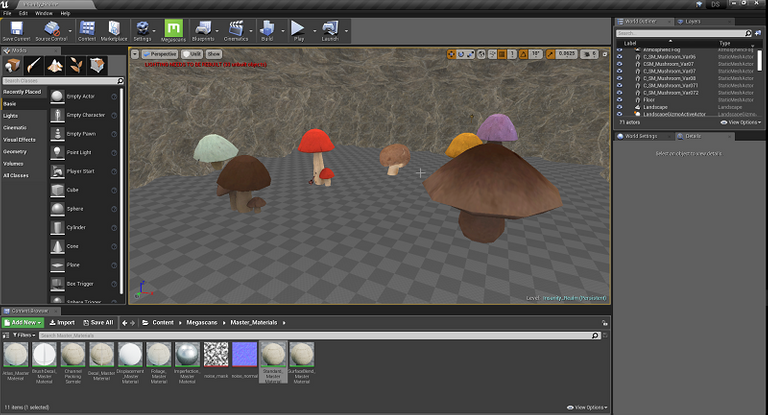
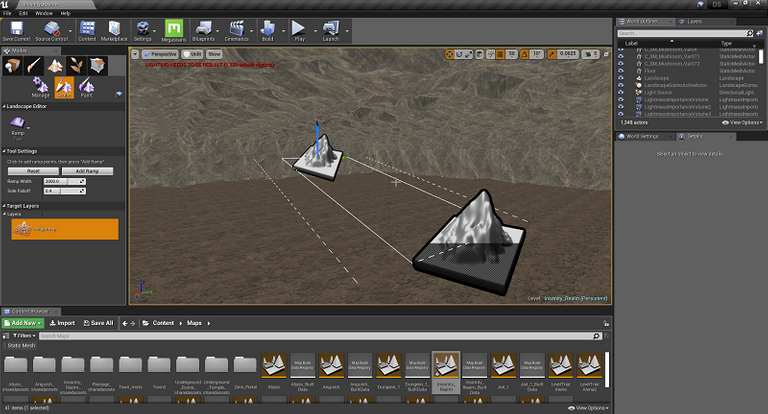
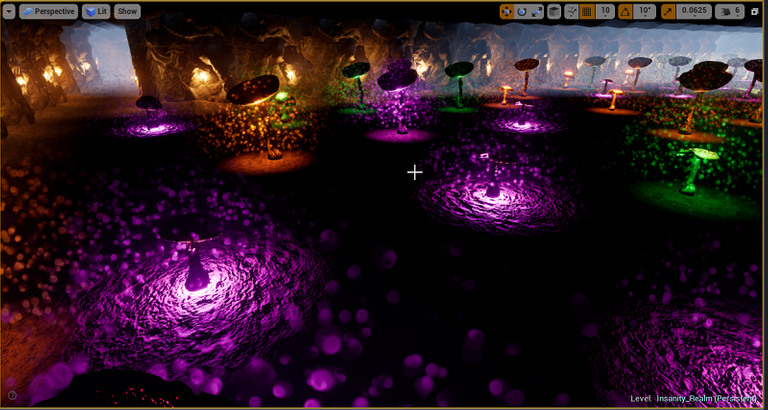
For the vision, I had in my mind I was going need some oversized mushrooms that I would add lighting and some other effects onto. As a result, I ended up creating a little side pocket on my map to test out the couple of mushrooms I had access to from UE4.
I was not very happy with any of them. They also were not made to be in sized this large. So they looked not so great close up. With some lines showing up in the patterns themselves making things not look great.
I checked the UE4 store to see if there were some paid-for options. While I did see one I was not willing to spend that price just for a single asset. Thankfully I ended up finding another solution and even more stuff I’ll need to learn in greater detail in the future to fully utilize the opportunities it will open up for me.
Quixel Megascans
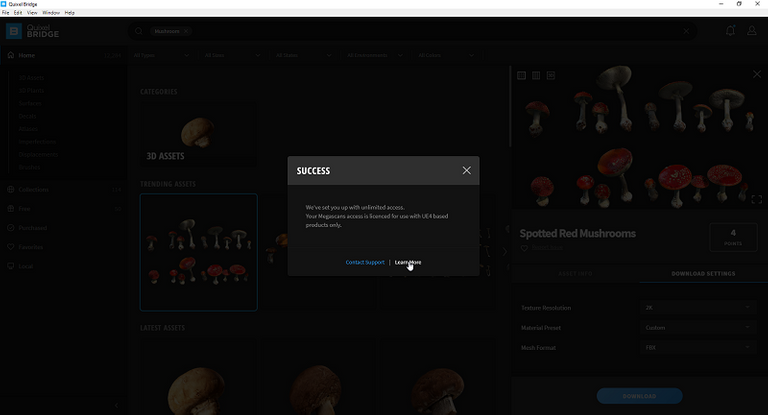
One of the nice benefits of developing a game on Unreal Engine 4(UE4) is they are quite big on delivering a lot of value to those who use the platform. Since I’ve started creating my game I’ve noticed they have been going on quite the buying spree. One thing UE4 has been amped up about is their acquisition of Quixel.
Last Friday they announced they were doing a live stream with Quixel and while it was more geared towards educators they did stop a few times to talk about the platform in general. They scan high-resolution images of objects and upload them for game developers to use in their games. They also have another platform called Quixel Mixer to edit those scans if you wish.
The great thing is along with my UE4 licensing I get unlimited points to purchase for commercial use the over 12k objects in their database. They have another tool called Quixel Bridge that quite a lot of industry professionals in game development use to search and export into several formats and programs those scans.
For those who are not developing on UE4, they still allow people to buy points and prices depend on how big of a studio you are regarding their pricing. Stuff costs from a single point up to at least four if not more. So I’m thankful it’s included for me to use and I do not have to buy lots of points just to test stuff out.
One thing they had that I wanted to test out for my Insanity Realm map was some high scanned resolutions of mushrooms. Outside of them being higher resolution than I like compared to my other maps. This does create some performance and map size increase for using them which I’m going to work on at a later date to bring performance more in line with the rest of my maps. They worked perfectly for the application I had in mind.
The downside is stuff like this is rather a professional-grade and many consider it an industry standard. AKA its not consumer idiot proof for people like me. I was rather frustrated by the night's end and even managed to break my version of UE4 to the point it would no longer load. I might have said something about it on Twitter.
I’m used to more plug and play click next a few times and everything works out. That is not how “professional” grade software tends to work. What I did not notice and they did not run a check for is downloading the wrong version of the mod for the version of UE4 I had. Consumer-grade software I would have to expect a popup going “hey stupid!!!” that will break your UE4! It installed the latest version of the mod since I didn’t know I need to change it.
Things also did not magically line up folder wise. Between where my EU4 was installed and checks and where by default Quixel Bridge download assets into. As a result when I tried to import it gave me port error issues. This had nothing to do with my ports thank you very much. Rather things not being sent to the correct folders.
Finally, some of their assets came in a sheet with a bunch of others like their mushrooms did. The version of UE4 I’m using does not automatically split that up. As such it imported the sheet as a single mesh with all of the mushrooms merged onto each other. I was not looking to go for an alien look so even more troubleshooting to find a solution. I could not even get there Quixel Mixer to resolve that issue for me either.
Some times when you want to try new things they just don’t go according to plan. Adding an extra 12 hours of time spent over a couple of mushrooms sounds like pure insanity. I might have thought twice if I had known that was the kind of trouble I was going get into.
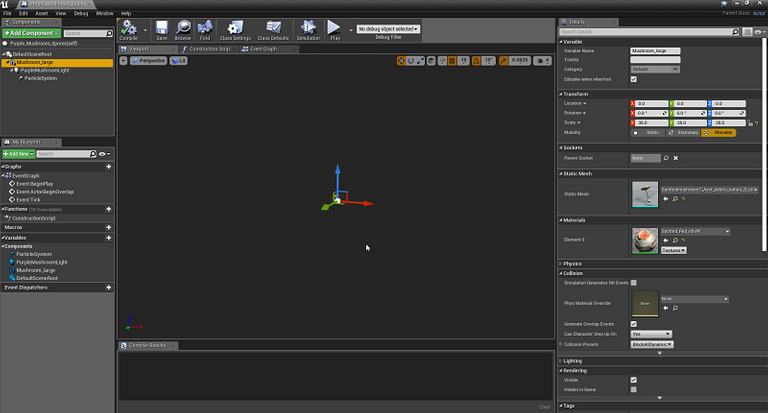
As far as the mushrooms themselves they were still not up to par with what I wanted so some things needed to be added. I added a particle effort that looked like spores to them that are provided by UE4 from one of their libraries of assets. I also added a spotlight to each of the different mushrooms I was looking to use to add some variety. I might play around with settings a bit in the future when I make another pass on my maps regarding lighting and some more advanced touchups.
I also changed several settings. These things where 2k resolution scans and they were hammering performance with how many I used. My overall map ended up hitting 1.5 GB for the main map file. This is in some cases twice or three times what they normally are.
While these mushrooms were tiny and needed to be almost increased by 35 times to get the bigger than a character size I wanted. I’m glad I stuck with it and got it all to work. Now in the future, if I want to check out the Quixel library and further develop out editing and modifying scanned images for use in a game I now have a place to go. With the bonus, it’s included for commercial use at no extra cost to me developing on the UE4 platform.
Working On The Map Itself
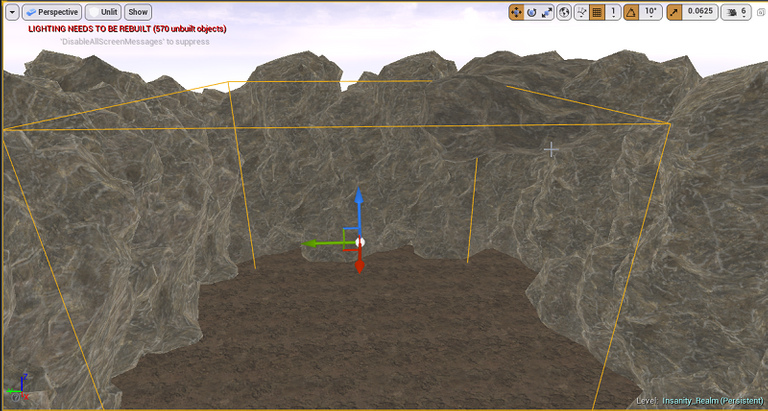
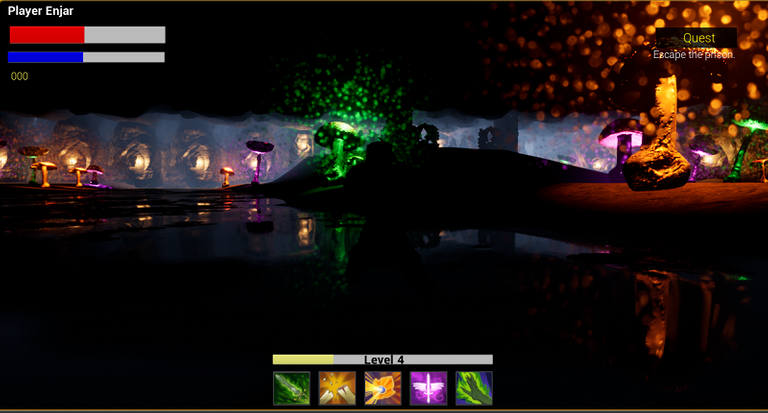
This was going to be quite an earthy, wet, cave. As the insanity part with the colorful mushrooms would need a place to grow to such a huge proportion. This map also ended up being quite the run time of around 8 to 11 minutes depending on how much the player will end up going around in the biggest area (it’s massive).
One element I wanted to play with a couple of times on this map was some elevation changes. More than my usual little dips into the water table which is also on this map. For that, there is a very easy ramp tool. Where you can simply pick a starting point and then arrange where you want the ending point and boom a ramp is created. From there I smoothed out and raised the edges around the top to create a small area for the player to go onto.
This was not a tool I used often and I found it quite easy to use. It does require the map to have a landscape layer which not all of my maps do have. For this map, I wanted a dirt floor and had already created a material that included a dirt layer to quickly have one for any maps that I need it on.
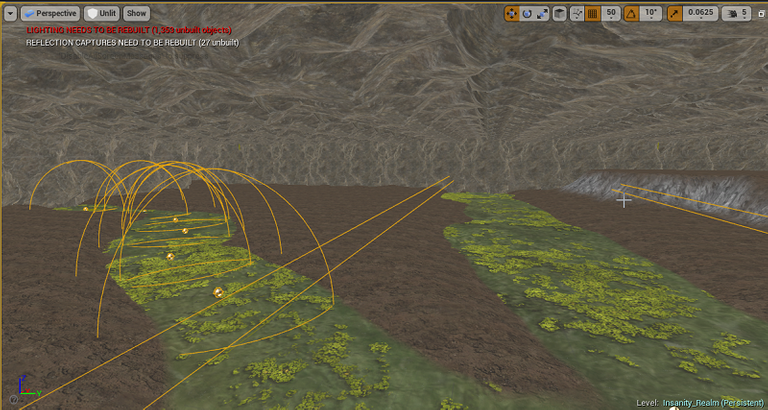
I ended up adjusting my light importance volumes a couple of times throughout this build which I had 25 in total. With how huge this map ended up being it took well over an hour for lighting to compile and build. So I went in after my first phase of creating these volumes to direct UE4 where it should focus its effort on lighting. I ended up shaving around 10 minutes with some adjustments. This will amply later on when lighting is rebuilt at a much higher quality where it will take many hours when I’m done with the map.
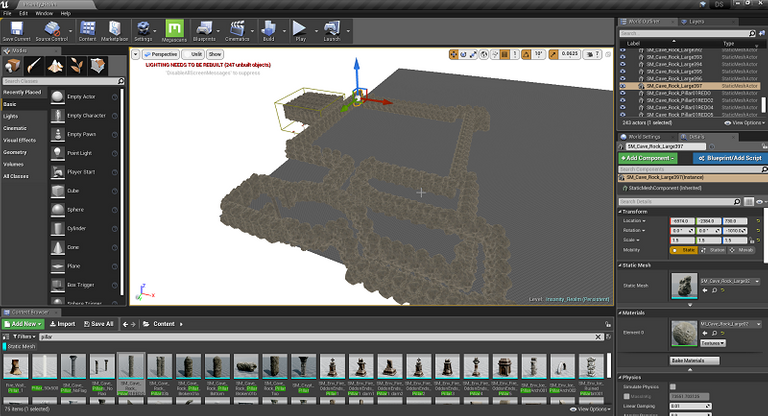
With those out of the way, I could add on a ceiling without stressing over trying work out volumes. While the main room is massive I did reframe from trying copy and paste to a large set of rows all at once. As that would leave quite an easy pattern at that scale for the player to notice even more so in the largest room.
While placing all of the rocks for the ceiling one at a time would have been even better than consumes more time than I was looking to commit. So I stuck to three layers across and that was how most of my map ended up going. You can kind of see in the screenshot above how things were doing in groups. It left enough of a human touch to break up most patterns which combined with the lighting was good enough.
One task after all the maps I’ve done that I’m starting to loath deeply is getting enough light sources into an indoor map. A lot of stuff you end up doing in making a game is quite repetitive and feels like its sucking the very soul right out of it. This map alone has 700 placed light sources.
Along with some exponential height fog to help scatter and brighten up the scene a bit as some parts were still to do dark when running around testing things out. I’ll admit in the biggest room I’m not 100% happy with how the fog looks in there. I played around with the settings for a while. Maybe I need to look into further documentation to see what all I can do with it.
I even left the sky and some other stuff in the scene. While in a lot of maps I’ll delete these to prevent light bleed through meshes into caves or indoor areas. I have a couple of gaps in my celling I’ve left or even made to add a little extra light in when it was needed.
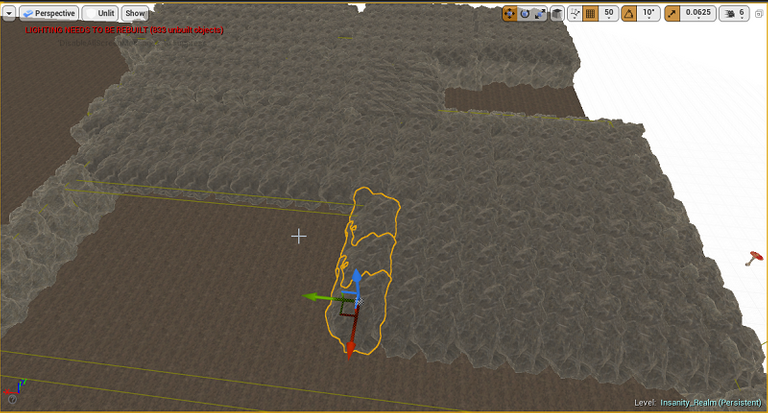
As far as the biggest area itself it has a river flowing right through it. With a couple of branches that are deadens that help takes up the massive space.
This is also where most of the reflection points I set up in this map ended up being focused. Since the river branches where a bit of an odd shape I ended up placing quite a few of them to cover the area. I did not want to use a single wide-range reflection point as not everything I wanted to have some kind of reflection of that material had it enabled in it. I was ok with a little over the river’s edge as somethings would get wet and might have a tiny reflection.
It is tempting to just sit in the main room for hours on end and have it running in the background as I do other things on the computer. The particle effects at some point I’m going play around with once I look into some more information regarding and get a better understanding of using them. Since this was not something I had planned to be implemented just yet into any maps I was not looking to spend the time now to deep diving further into it.
Final Thoughts
This concludes the first batch of maps I wanted to create. I am now going to go through them and plan to implement phases 2 and 3 for the rest of the month according to my roadmap. It’s also surreal thinking how much I’ve done in so little time. It seems like it was only last month I was struggling hard to find a workflow that worked for me so I could get alone of stuff done.
I’m not sure if all of these maps are going to make it into the final game. Unless I’m unable to fix some of the performance issues that are in the Insanity Realm map this one seems like a keeper. There was a couple I was rather unhappy with such as my third map and I’m unsure if I’ll be trying to fix them or just be done with them. I have a bunch more maps I’ll be making next year as well once I work out implementing and have items to drop along with creatures to fight.
Update posts are more than likely going to start slowing down. I have a lot of item descriptions to come up with and write. Along with working out values and other things in excel sheets. That kind of stuff does not have much of an interesting factor to share. I’ll more than likely be posting about other things.
Other Posts:
Information
Screenshots were taken and content was written by @Enjar. Screenshots are from Unreal Engine 4.


#posh for those slightly insane!
Looking great! Keep up the good work.
Thanks!
Woah this is really amazing! :O
Looking forward to further developments! Followed!
Thanks. Have a great week.