Hello everyone... 🌱
Hello to my dear Hiver and the dear community of artists #Jewelry, as always very pleased and excited to be here again, showing you my work made with love and especially for you.💕
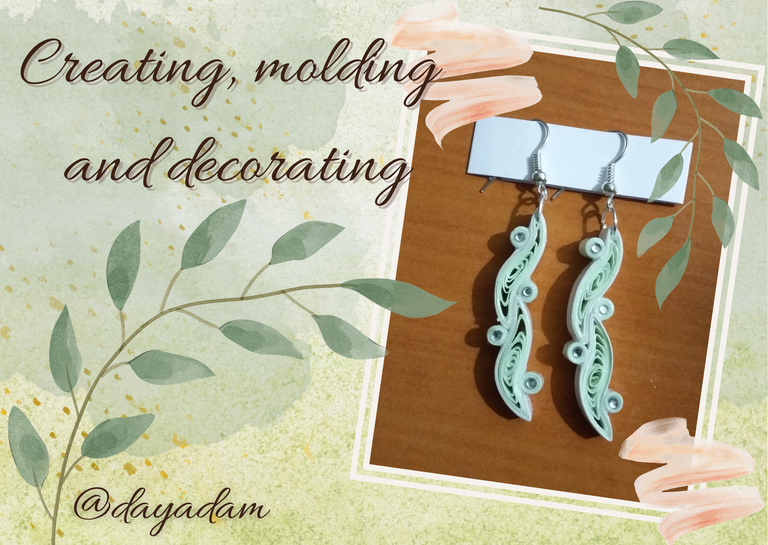
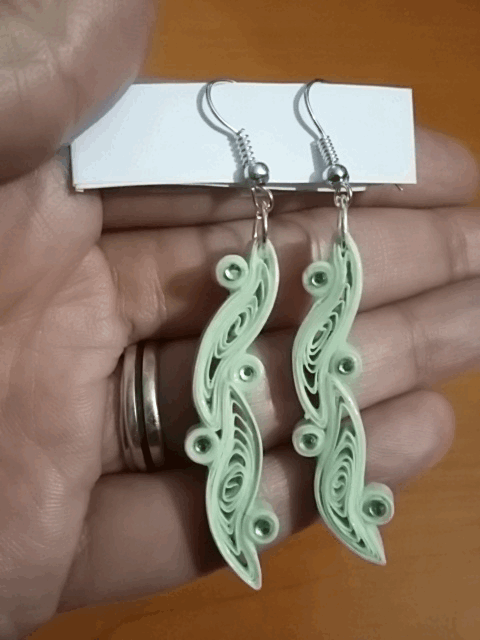
For today I bring you some very easy to make dangling earrings in the paper quilling technique, combining two figures. As you have been observing in my work with the technique, it is very versatile and we can make many models of pendants making different figures and combining them. Gradually I will be elaborating different models following these parameters, and you will see how we can obtain beauties simply by letting our imagination fly, creating, molding and decorating.
Let's begin:😃

Hola a Todos... 🌱
Hola a mis queridos Hiver y a la querida comunidad de artistas #Jewelry, como siempre muy complacida y emocionada de encontrarme por acá nuevamente, mostrándole mi trabajo hecho con mucho amor y especialmente para ustedes💕
Para hoy les traigo unos pendientes colgantes muy fáciles de realizar en la técnica de paper quilling, combinando dos figuras. Como han venido observando en mi trabajo con la técnica, la misma es muy versátil y podemos realizar muchísimos modelos de dijes elaborando diversas figuras y combinando entre sí. Paulatinamente les iré elaborando diferentes modelos siguiendo estos parámetros, y verán cómo podremos obtener bellezas simplemente dejando volar la imaginación, creando, moldeando y decorando.
Comencemos:😃

• Cintas de quilling de 6mm de ancho, blanco perlado y verde perlado.
• Aguja para quilling.
• Regla con diversas medidas de circunferencias.
• Tijera.
• Pega blanca extra fuerte.
• Cristales de bisutería pequeños.
• Pinza punta fina.
• Argolla de bisutería mediana.
• Base para zarcillos colgantes (anzuelos).
• Alicate punta fina.
- Quilling ribbons 6mm wide, pearl white and pearl green.
- Quilling needle.
- Ruler with different circumference measures.
- Scissors.
- Extra strong white glue.
- Small costume jewelry crystals.
- Fine tip tweezers.
- Medium size costume jewelry ring.
- Base for hanging tendrils (hooks).
- Fine-nosed pliers.

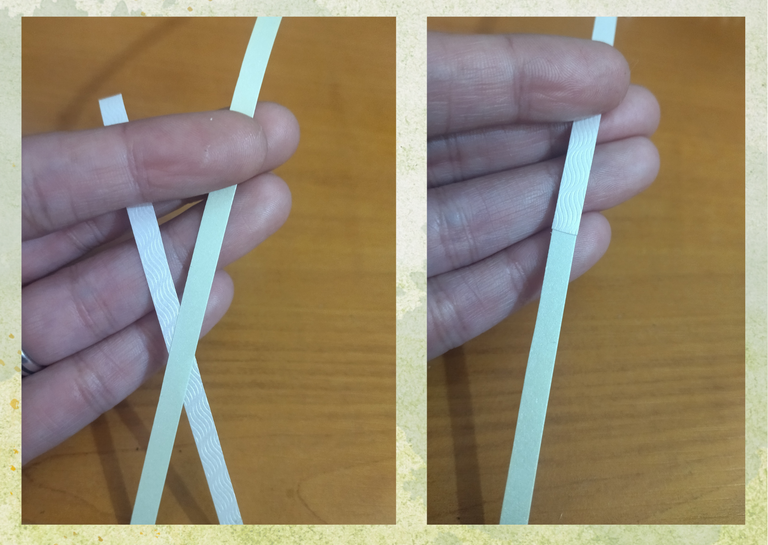
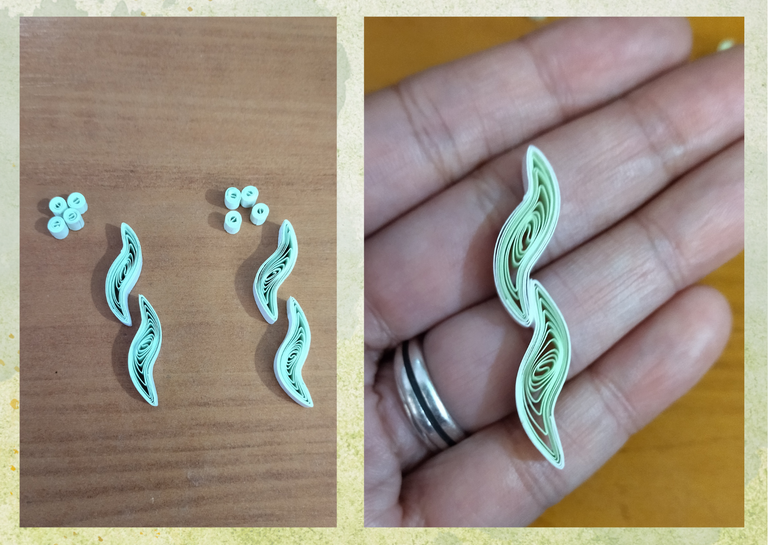
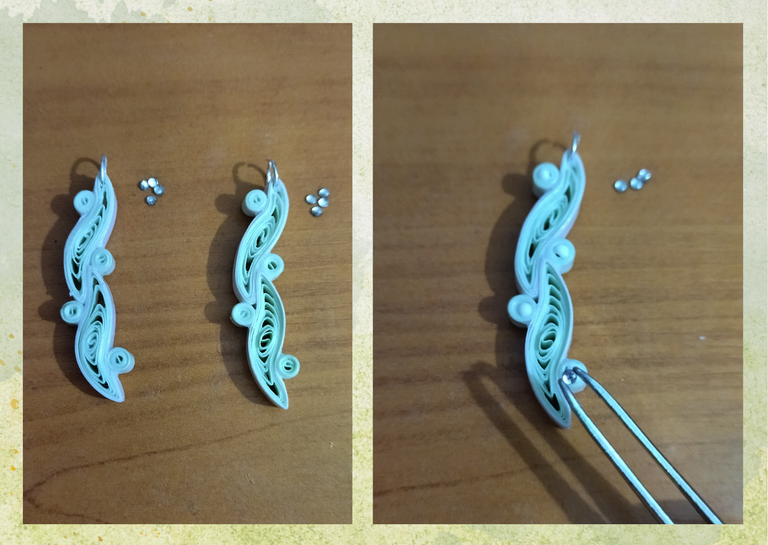
- Let's start by taking a 6mm wide x 25cms long pearl green quilling ribbon, and a 6mm wide x 12.5cms long pearl white quilling ribbon, we will join both ribbons with an extra strong glue stitch to form a single ribbon.
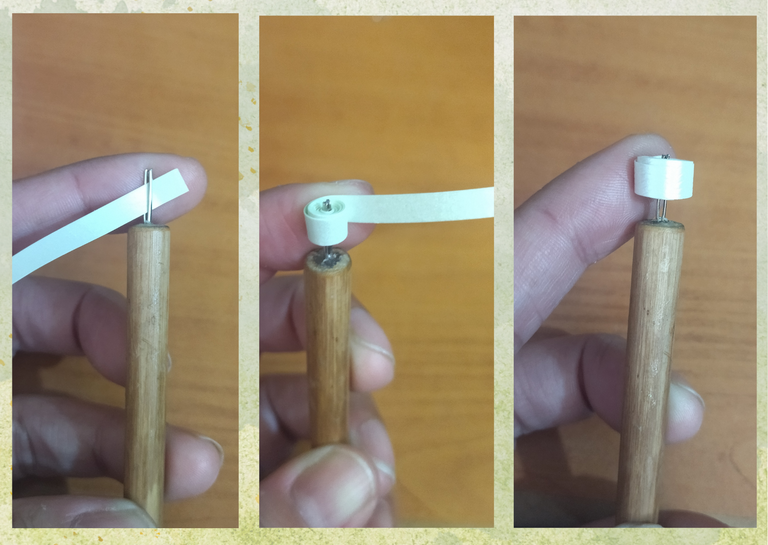
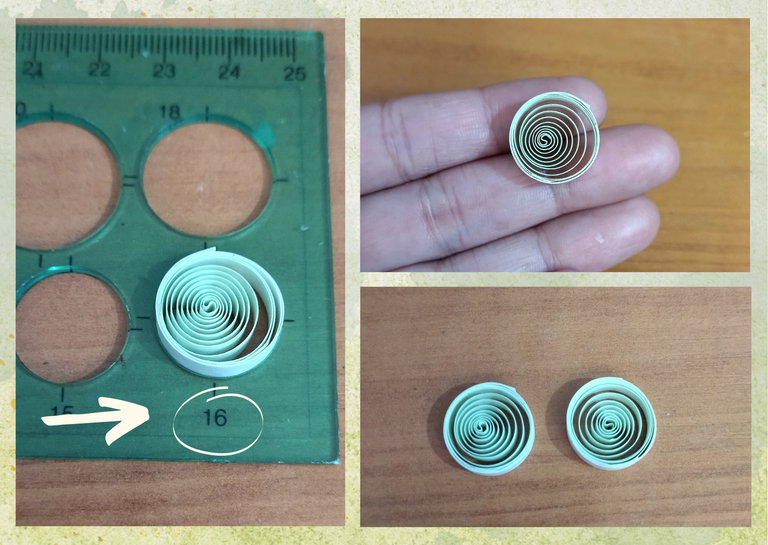
- With the quilling needle we are going to begin to roll our ribbon starting with the green pearl side, when we finish with all the ribbon, we take it out of the needle and we are going to put it in the circumference ruler in the circle number 16, we take it out of the ruler and seal it with extra strong white glue, in this way we will obtain an open circle. For the realization of each tendril we will need 2 circles like this one.

• Vamos a comenzar tomando una cinta de quilling color verde perlado de 6mm de ancho x 25cms de largo, y una color blanco perlado de 6mm de ancho x 12.5cms de largo, vamos a unir ambas cintas con un punto de pega extra fuerte para formar una sola cinta.
• Con la aguja para quilling vamos a empezar a enrollar nuestra cinta comenzando por el lado verde perlado, al finalizar con toda la cinta, sacamos de la aguja y vamos a meter en la regla de circunferencia en el círculo número 16, sacamos de la regla y sellamos con pega blanca extra fuerte, de esta manera obtendremos un circulo abierto. Para la realización de cada zarcillo vamos a necesitar 2 círculos como este.
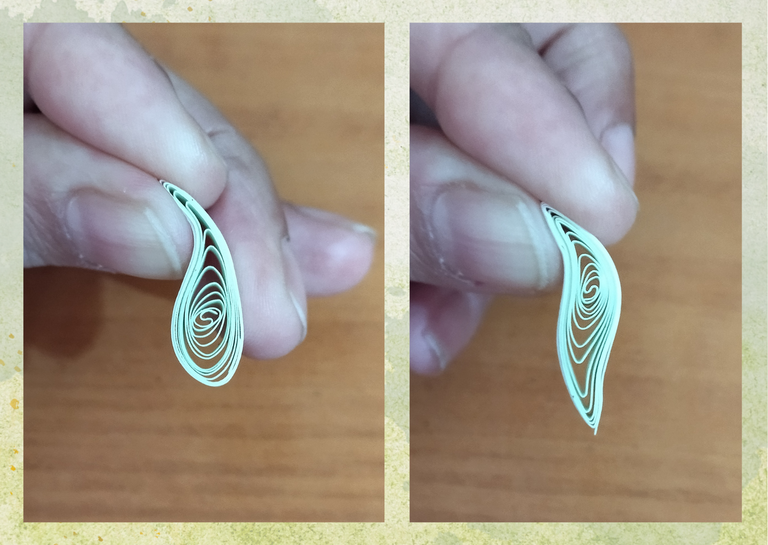
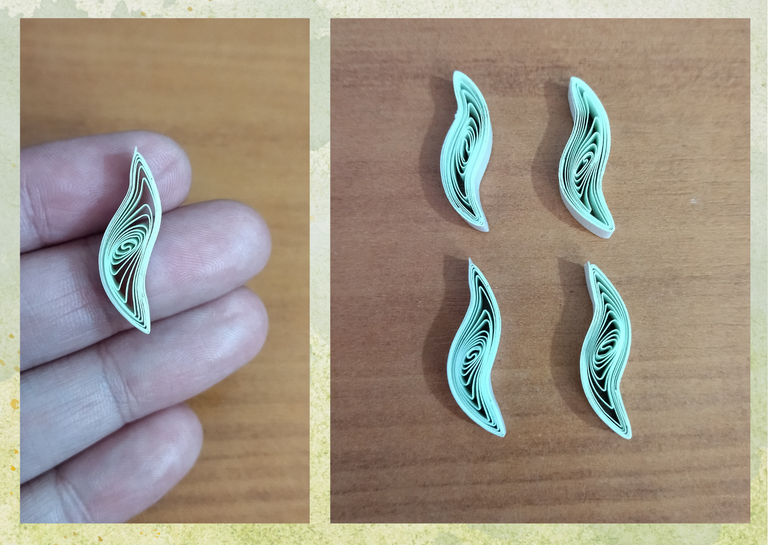
- We are going to mold our circle, to form the piece with which we will make our earrings, with the help of our fingers we will pinch on the top and turn to the left, on the bottom we will do the same, but we turn to the right side, as I said before for each earring we will need two, and for the pair we will need 4 pieces like these, (we reserve).
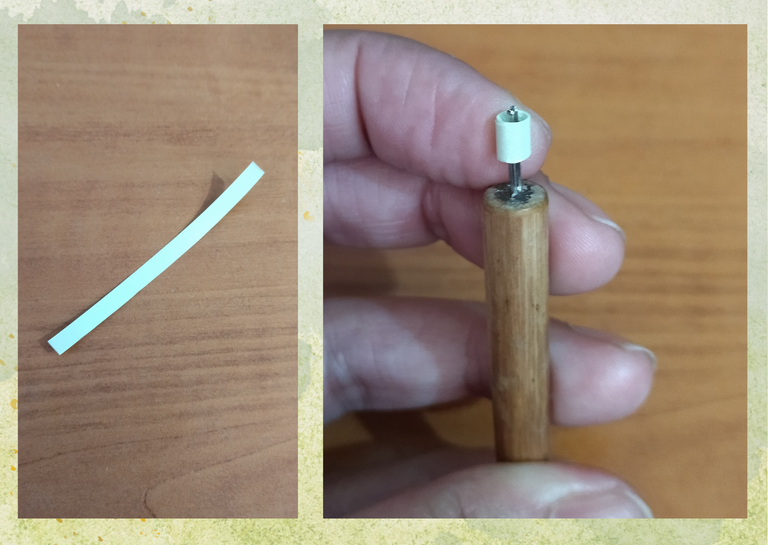
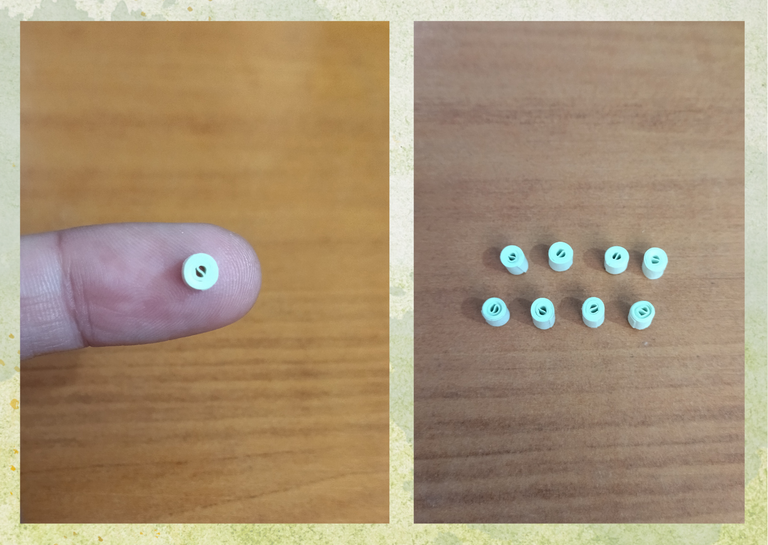
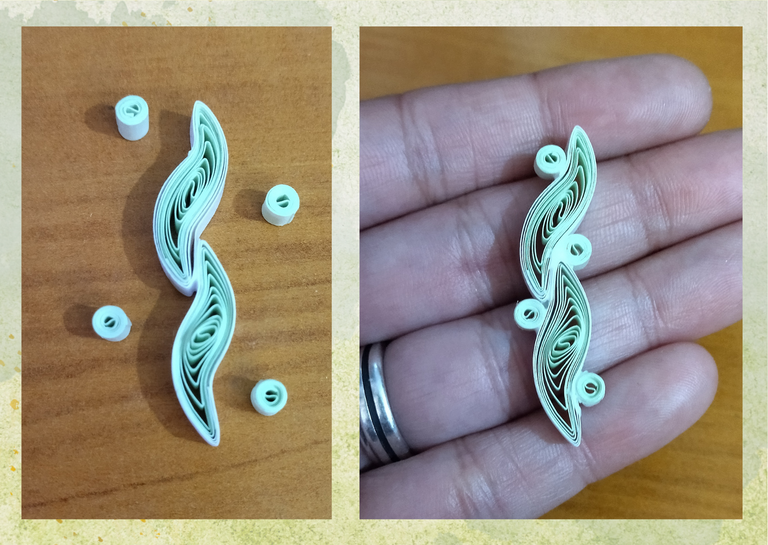
- We take a piece of pearl green quilling ribbon 6mm wide x 6cms long, we will roll it with the quilling needle, when we finish rolling we seal it with extra strong white glue, we take it out of the needle, we will obtain a small closed circle which we will use to decorate our earrings, for each tendril we will need 4 circles, that is to say that for the pair we will make 8 equal circles.
• Vamos a moldear nuestro círculo, para formar la pieza con la que haremos nuestros pendientes, con la ayuda de los dedos pellizcaremos en la parte de arriba y giramos había la izquierda, en la parte de abajo haremos lo mismo, pero giramos hacia el lado derecho, como dije anteriormente para cada pendiente necesitaremos dos, y para el par serian 4 piezas como estas, (reservamos).
• Tomamos un trozo de cinta para quilling color verde perlado de 6mm de ancho x 6cms de largo, enrollaremos con la aguja para quilling, al terminar de enrollar sellamos con pega blanca extra fuerte, sacamos de la aguja, obtendremos un pequeño círculo cerrado el cual utilizaremos para decorar nuestros pendientes, para cada zarcillo necesitaremos 4 círculos es decir que para el par realizaremos 8 círculos iguales.
- We are going to assemble our earrings, we take the two big pieces and we are going to glue them one under the other applying extra strong white glue, and to decorate we will place the small circles on the sides, let them dry well.
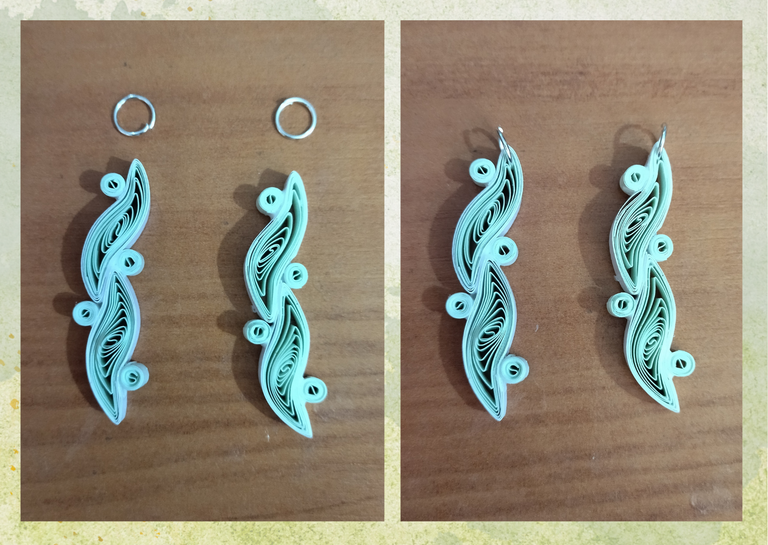
- We are going to place a medium size bijouterie ring on the top of each of the earrings.
• Vamos a armar nuestros pendientes, tomamos las dos piezas grandes y las vamos a pegar una debajo de la otra aplicando pega blanca extra fuerte, y para decorar colocaremos los pequeños círculos a los lados, dejamos secar bien.
• Vamos a colocar una argolla de bisutería mediana en la parte de arriba de cada una de los pendientes.
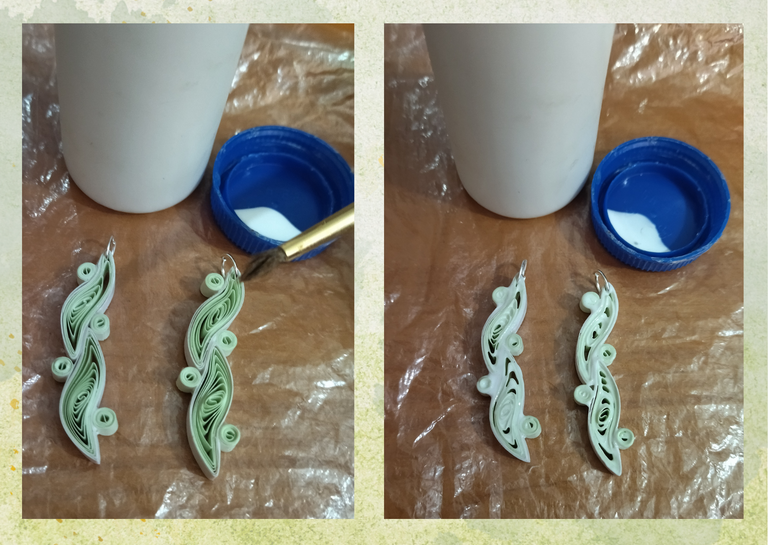
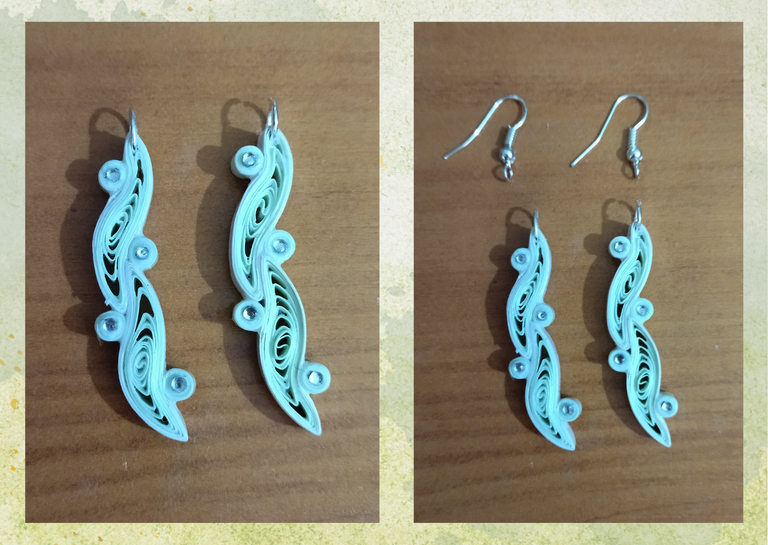
- Protect the pieces, with the help of a brush we add several layers of extra strong white glue, letting dry between one and another.
- Once the tendrils are dry we are going to place in the circles that we added to the sides of our earring with a touch of glue, some small crystals of costume jewelry to decorate, to give it more color, shine and detail. These small crystals, I had them recycled from a bluejeans that was already quite damaged.
- Finally we put our earrings on their base for hanging tendrils (hook), and in this way they will be ready for use.
• Protejamos las piezas, con la ayuda de un pincel añadimos varias capas de pega blanca extra fuerte, dejando secar entre una y otra.
• Una vez secos los zarcillos vamos a colocar en los círculos que añadimos a los lados de nuestro pendiente con un toque de pega, unos pequeños cristales de bisutería para decorar, para darle mayor vistosidad, brillo y detalle. Estos pequeños cristales, los tenia reciclados de un bluejeans que ya estaba bastante dañado.
• Por ultimo le colocamos a nuestros pendientes su base para zarcillos colgante (anzuelo), y de esta manera estarán listo para su uso.

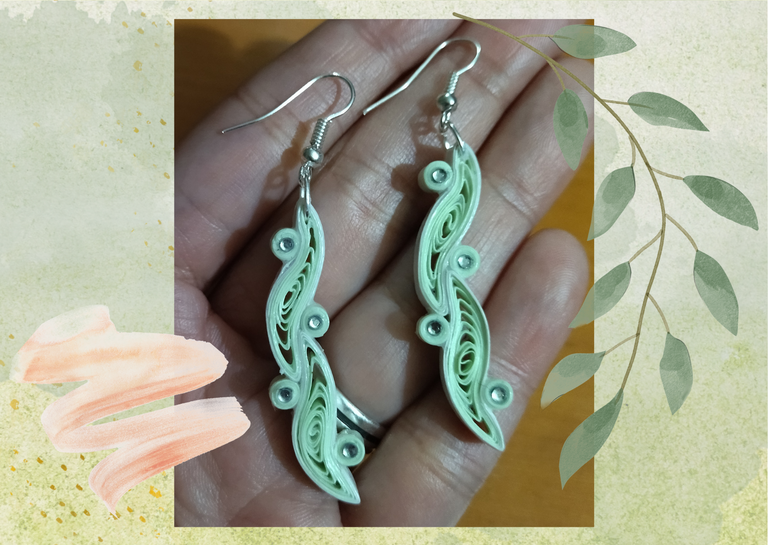
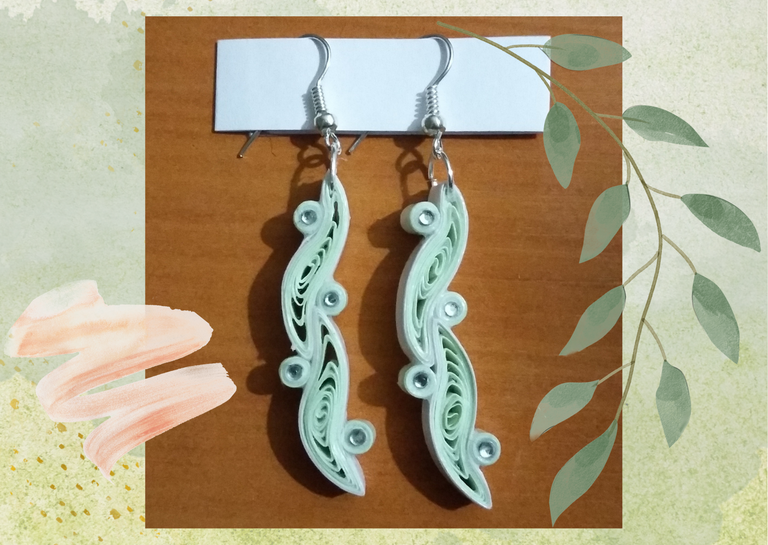
What did you think, did you like it?
I hope you did, I hope you liked my explanation, procedure and photos, I made them with love for you.
"Let out that muse that inspires you, and let your imagination fly".
Thank you all, see you next time. 🌱
¿Que les pareció, les gustó?
Espero que sí, que les haya gustado mi explicación, procedimiento y fotos, los hice con mucho cariño por y para ustedes.
"Deja salir esa musa que te inspira, y deja volar tu imaginación".
Gracias a todos, nos vemos en la próxima. 🌱
Los invito que apoyen a "La Colmena", dale tu voto ✨
 Vote la-colmena for witness By @ylich
Todas las fotos usadas en este post son de mi autoría y han sido sacadas en mi celular personal un Redmi 9T y editadas Canva Banner y separador hecho por mí en Canva Traducido con la ayuda de DeepL

~~~ embed:1627147164546699270 twitter metadata:MTI2ODQxNjE2ODUwMDUyNzEwNHx8aHR0cHM6Ly90d2l0dGVyLmNvbS8xMjY4NDE2MTY4NTAwNTI3MTA0L3N0YXR1cy8xNjI3MTQ3MTY0NTQ2Njk5MjcwfA== ~~~
The rewards earned on this comment will go directly to the people( @dayadam, @chacald.dcymt ) sharing the post on Twitter as long as they are registered with @poshtoken. Sign up at https://hiveposh.com.
Thanks @poshtoken ✨
https://leofinance.io/@dayadam/re-leothreads-j6pt25j3
The rewards earned on this comment will go directly to the people ( @dayadam ) sharing the post on LeoThreads.
Thanks @poshthreads ✨
Gracias por el apoyo @mayvileros ✨
Que bonita te ha quedado la tecnica. Muy bien hech, pulcro y lindo.
Gracias bella por pasar y por tu comentario. Me alegro mucho que te gustará el trabajo. Que pases un bello fin de semana. Bendiciones @divergente1 🌱
Una belleza de trabajo amiga. Amé el color y el diseño y sobre todo lo prolijo de tu trabajo.
Gracias por compartir
Gracias hermosa. Me alegra mucho que te gustará el trabajo. Y lastima que la cámara no muestra los tonos tal cual como son y me gustaría que los vieran, son cintas perladas blancas, verdes y tienen hasta un acabado tipo encaje. Te agradezco mucho tu lindo comentario. Gracias pro visitar mi humilde blog. Bendiciones. Que tengas un bello carnaval 🌱
Que bello trabajo Daya.... me encantó la combinación de colores y los detalles de las perlitas brillantes quedaron perfectos. Me gustan mucho los aretes largos.
👏🏼👏🏼 Magnífico trabajo!
🎆🎇🎉🎊🌧️💐✨🌾🌱🌹🌙🌿🍃🥀⚡🌺☘️🍀🌈🌷⭐🪴🌵🌸🌟💮🌴🌳💫☀️💮☔🌲🌳🌍🌌🌠☄️🏵️🐝🌻🌼🍄🐞🦋💙☕💜🍍🎆🎇🎉🎊
!LADY
!PIZZA
View or trade
LOHtokens.@chacald.dcymt, you successfully shared 0.1000 LOH with @dayadam and you earned 0.1000 LOH as tips. (1/4 calls)
Use !LADY command to share LOH! More details available in this post.
Thanks @ladytoken 🌱
Gracias mi bella amiga. Siempre me alegra tenerte de visita, y leer tus bonitas palabras hacia mi trabajo. Me alegro mucho que te gustarán los pendientes, son muy sencillos de realizar.
Un abrazo bella. Que tengas un lindo carnaval @chacald.dcymt 🌱🌹❤️
I gifted $PIZZA slices here:
@chacald.dcymt(3/5) tipped @dayadam (x1)
Join us in Discord!
Thanks @pizzabot ❤️
It's a different design. I love the uniqueness of handcrafted products. health to your hand
Thank you very much, I'm glad you like it. Blessings @ipexito 🌱
Una belleza, de verdad admiro tu talento!
Gracias por compartir tan bellos trabajos.
Saludos.
Gracias mi bella @elmundodebetty, aprecia mucho tus palabras. Yo también te admiro mucho. Éxitos y bendiciones 🌱
Thank you for sharing this post on HIVE!
Your content got selected by our fellow curator desro & you just received a little thank you upvote from us for your great work! Your post will be featured in one of our recurring compilations which are aiming to offer you a stage to widen your audience within the DIY scene of Hive. Stay creative & HIVE ON!
Please vote for our hive witness <3
Thank you for your support @diyhub 🌱
@dayadam amiga que maravilla, te quedaron bellisimos tiene una delicadeza que le da un toque romántico y sutil. Como siempre benditas sean tus manos.
Que bella mi @karelysk89. Gracias por pasar, me alegra que te gustaran. Un abrazote, bendiciones, y mil veces amennnnn...
OMG ¡que belleza Dayitaaa! Me quedo impresionada siempre con lo que haces, para eso se necesita mucha paciencia, recuerdo una prima que hacía cosas para agendas con esta técnica, eran una belleza, pero ella no tenía paciencia y lo abandonó 😅😅 siento que me pasaría igual.
Pero yo compraría esos zarcillos sin pensarlo si vivieras cerca ¡Son unas piezas únicas! Felicidades @dayadam 🤗💖