Hello everyone... 🐱🐾💕
Hello to my dear Hivers and the dear community of artists #Jewelry, as always very pleased and excited to be here again, showing you my work made with love and especially for you.
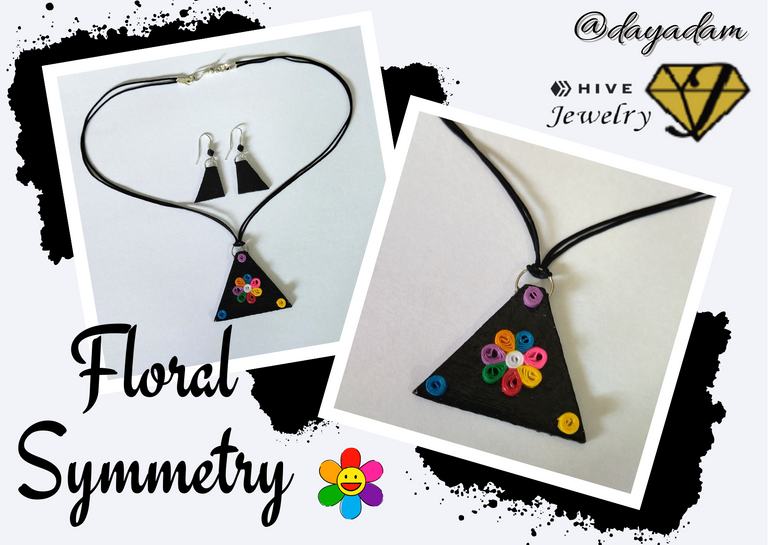
For today I bring you a work in cardboard and paint, combined with the quilling technique. I decided to make a geometric figure, decorate it with a colorful flower and another small touch of color. A simple work, in which you can have a nice and casual set of accessories in a very short time.
I love to do this work, I hope very soon to create several figures of this style decorated in different ways, to share them with you.
I hope you like it:
Let's get started:😃

Hola a todos... 🌺✨
Hola a mis queridos Hivers y a la querida comunidad de artistas #Jewelry, como siempre muy complacida y emocionada de encontrarme por acá nuevamente, mostrándole mi trabajo hecho con mucho amor y especialmente para ustedes.
Para hoy les traigo un trabajo en cartonaje y pintura, combinado con la técnica de quilling. Decidí realizar una figura geométrica, adornar con una flor colorida y otro pequeño toque de color. Un trabajo sencillo, en el que se puede lograr tener un conjunto de accesorios bonito y casual en muy poco tiempo.
Me encanto mucho hacer este trabajo, espero muy pronto crear diversas figuras de este estilo decoradas de distintas maneras, para compartirlas con ustedes.
Esperando sea de su gusto:
Comencemos:😃

• Trozo de hoja blanca.
• Trozo de cartón 1 en kilo.
• Lápiz.
• Pintura negra al agua.
• Pincel.
• Aguja punta fina.
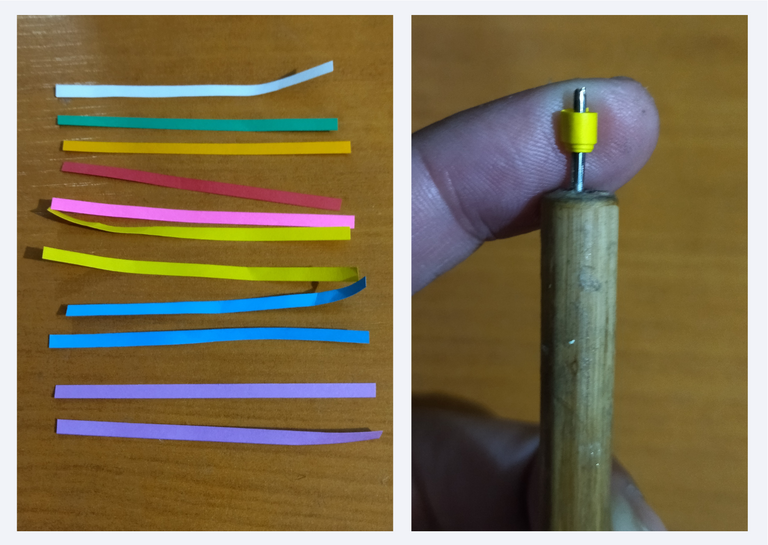
• Cintas de quilling de 3mm de ancho blancas, amarillo, azul, verde, naranja, rosado, morado, fucsia (o del color de tu preferencia).
• Regla con diversas medidas de circunferencia.
• Pega blanca extra fuerte (de carpintería).
• Tijera.
• Argolla mediana de bisutería.
• Hilo chino fino negro.
• Tapanudos.
• Argollas de bisutería pequeñas.
• Anzuelo.
• Alicate punta fina.
• Pinza punta fina.
- Piece of white sheet.
- Piece of cardboard 1 in kilo.
- Pencil.
- Black water-based paint.
- Paintbrush.
- Fine point needle.
- 3mm wide quilling ribbons of white, yellow, blue, green, orange, pink, purple, fuchsia (or the color of your choice).
- Ruler with different circumference measurements.
- Extra strong white glue (carpentry glue).
- Scissors.
- Medium size costume jewelry ring.
- Thin black Chinese thread.
- Knot cover.
- Small costume jewelry rings.
- Hook.
- Fine-nosed pliers.
- Fine-nosed pliers.

Base of the pendant:
- I sta
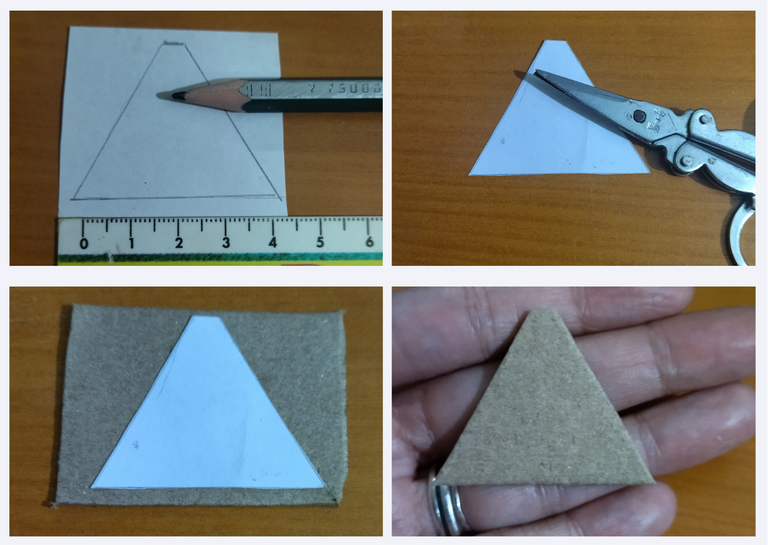
rted by taking a piece of white paper and making a pattern, I painted with a pencil a 4x3.5x3.5cms triangle with a flat tip, once ready I cut it out with a scissors.
- I took a piece of cardboard 1 in kilo that I had available (my daughter is studying architecture and I have some cardboard left over in my house that I consider thick enough to create a firm and durable pendant, I cut the mold that I had made in white paper in that cardboard.
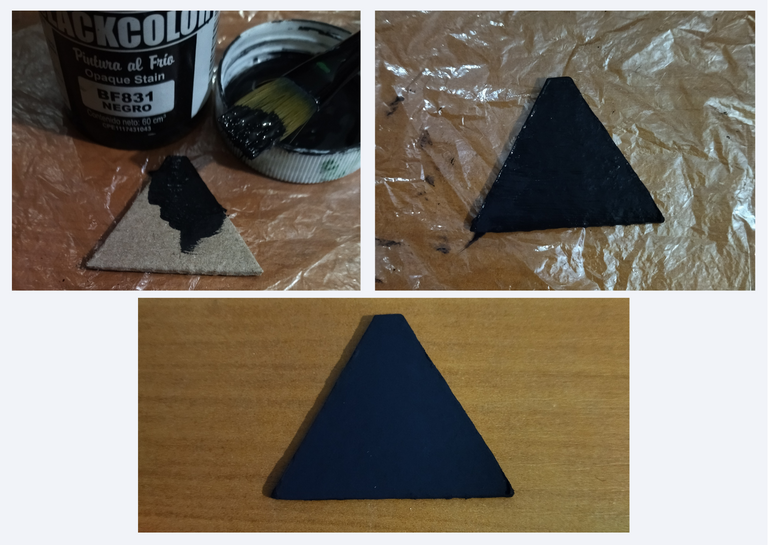
- Now I proceeded to take black water-based paint, and with a brush I painted the triangular piece.
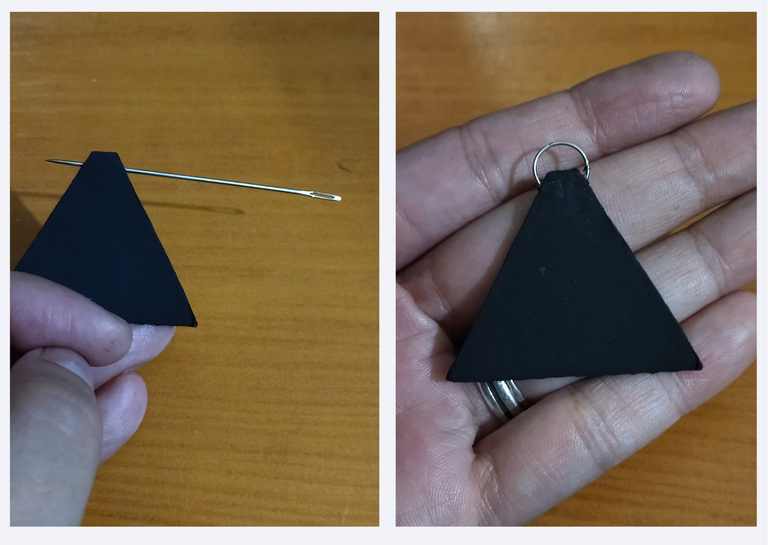
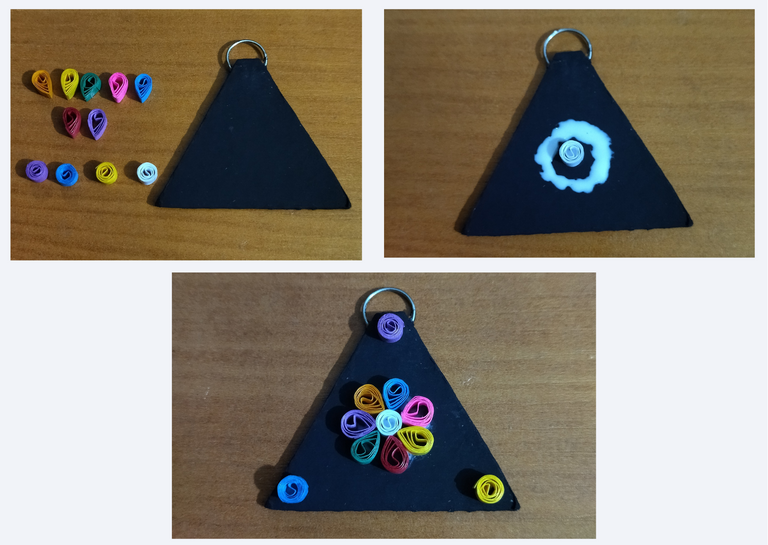
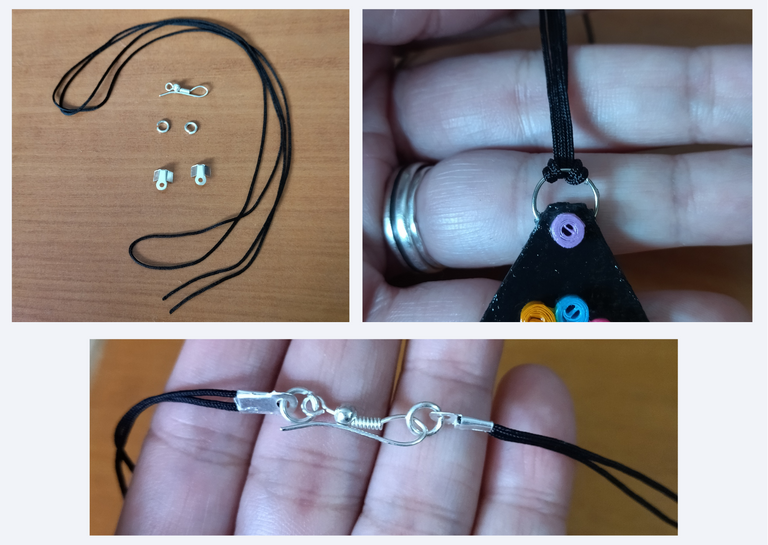
- Once dry, I took a pin and made a hole in the top of the triangle vertically, through which I inserted a medium-sized costume jewelry ring (reserve).

Base del dije:
• Comencé tomando un trozo de hoja blanca y realizando un patrón, pinté con un lápiz un triángulo de 4x3.5x3.5cms con una punta plana, una vez listo recorte con una tijera.
• Tome un trozo de cartón 1 en kilo que tenía disponible (mi hija estudia arquitectura y diversidad de cartones son los que sobran en mi casa y que considere que es lo suficientemente grueso para crear un dije firme y duradero, recorte el molde que había realizado en papel blanco en dicho cartón.
• Ahora procedí a tomar pintura negra al agua, y con un pincel pinté la pieza triangular.
• Una vez seca, tomé un alfiler e hice un agujero en la parte de arriba del triángulo de forma vertical, por allí introduje una argolla mediana de bisutería (reservamos).
Adornment of the pendant:
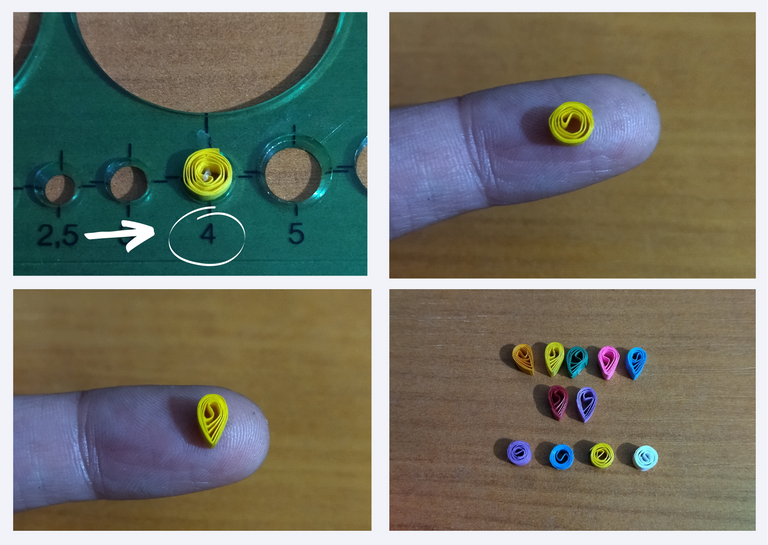
- We will take quilling of 3mm wide x 7cms long of various colors, in my case I used, 1 white ribbon, 1 red, 2 blue, 1 green, 2 purple,1 fuchsia, 2 yellow and 1 orange, we will roll with the needle for quilling and measure on the ruler of various measures of circumferences in the circle number 4, we take out of the ruler and seal with extra strong white carpentry glue.
- We will take 1 of each of these circles and pinch on its tip to form a leaf, we will only leave 4 in circular form, 1 white, 1 blue, 1 yellow, and 1 purple.
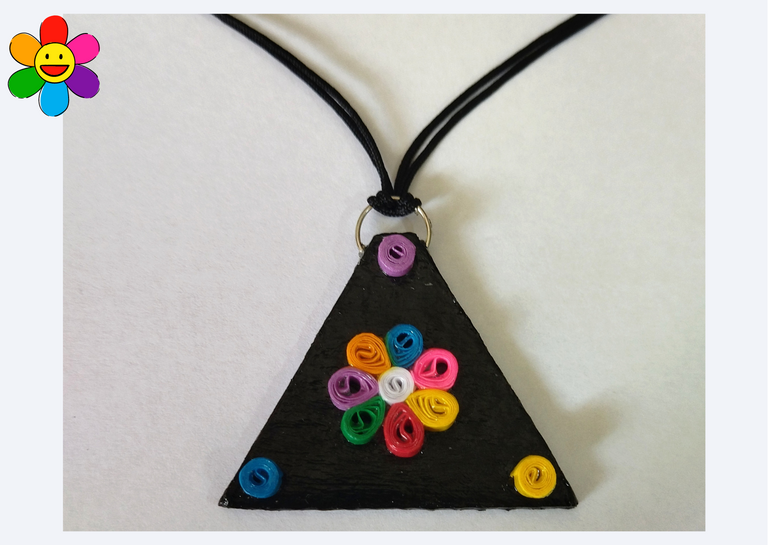
- Now we will take the triangular piece and we will glue the quilling figures in the following way, in the middle will go the white round one and on its sides all the ones that have the shape of leaves since we will make a flower, at the end we will only place the 3 remaining circles, one in each corner of the triangle.
Adorno del dije:
• Vamos a tomar quilling de 3mm de ancho x 7cms de largo de diversos colores, en mi caso use, 1 cinta blanca, 1 roja, 2 azul, 1 verde, 2 moradas,1 fucsia, 2 amarillas y 1 naranja, enrollaremos con la aguja para quilling y mediremos en la regla de diversas medidas de circunferencias en el círculo número 4, sacamos de la regla y sellamos con pega blanca extra fuerte de carpintería.
• Tomaremos 1 de cada uno de esos círculos y pellizcaremos en su punta para formar una hoja, solo dejaremos 4 en forma circular, 1 blanco, 1 azul, 1 amarillo, y uno morado.
• Ahora tomaremos la pieza triangular e iremos pegando las figuras de quilling de la siguiente manera, en el medio ira la blanca redonda y a sus lados todas las que tienen forma de hojas ya que realizaremos una flor, al finalizar solo colocaremos los 3 círculos restantes, uno en cada esquina del triángulo.
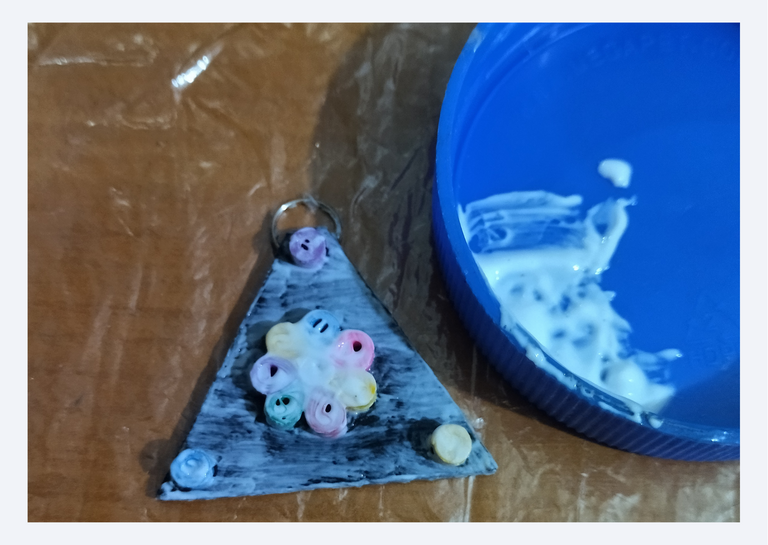
- Now we have the pendant assembled and we are going to place its liquid protection (plasticized), we will apply with the help of a brush several layers of extra strong white glue and we will let it dry very well between one layer and the other.
- Then we will take a piece of fine black double Chinese thread, we will introduce it through the ring of the triangle and we will make a simple knot, we will place in its ends its respective knot cover, rings and a hook as a locking ring, to complete a simple necklace for our pendant.
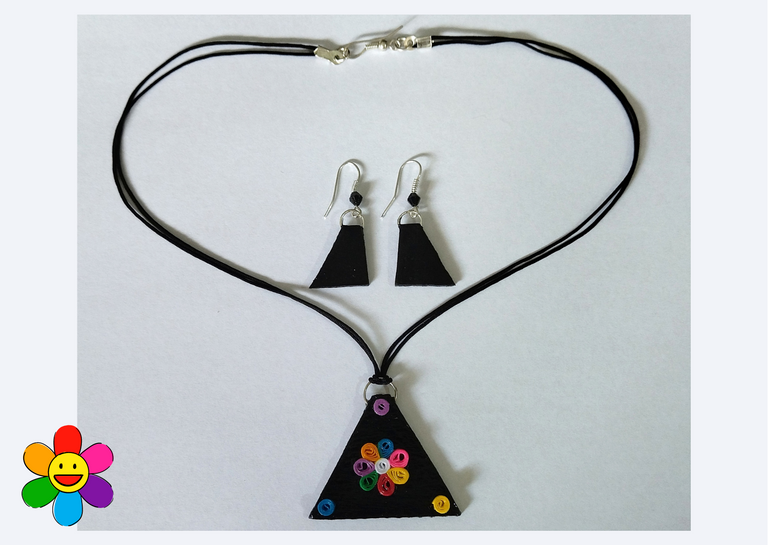
- Once the pendant was finished, I decided to take two small pieces of cardboard, cut some small geometric figures, with which I made some simple black unicolor earrings, to complement the pendant and have a complete set. I simply painted the figures, placed a costume jewelry ring, its liquid protection (plasticized), and placed its base for hanging tendrils (hook), to which I placed a black Czech glass to give it more showiness.
• Ya tenemos el dije armado y vamos a colocarle su protección liquida (plastificado), aplicaremos con ayuda de un pincel varias capas de pega blanca extra fuerte y dejaremos secar muy bien entre una capa y otra.
• Luego tomaremos un trozo de hilo chino fino negro doble, lo introducimos a través de la argolla del triángulo y haremos un nudo simple, le colocaremos en sus extremos su respectivo tapanudos, argollas y un anzuelo como trancadero, para completar un sencillo collar para nuestro dije.
• Finalizado el dije, decidí tomar dos trocitos de cartón, corte unas pequeñas figuras geométricas, con las cuales realice unos sencillos pendientes negros unicolor, para complementar el dije y tener un conjunto completo. Simplemente pinte las figuras, le coloque una argolla de bisutería, su protección liquida (plastificado), y coloque su base para zarcillos colgante (anzuelo), al cual le coloque un cristal checo negro para dar mayor vistosidad.


What did you think, did you like it?
I hope you did, I hope you liked my explanation, procedure and photos, I made them with love for you.
"Let out that muse that inspires you, and let your imagination fly".
Thank you all, see you next time. 🌹✨
¿Que les pareció, les gustó?
Espero que sí, que les haya gustado mi explicación, procedimiento y fotos, los hice con mucho cariño por y para ustedes.
"Deja salir esa musa que te inspira, y deja volar tu imaginación".
Gracias a todos, nos vemos en la próxima. 🌹✨
Todas las fotos usadas en este post son de mi autoría y han sido sacadas en mi celular personal un Redmi 9T y editadas Canva Banner y separador hecho por mí en Canva Traducido con la ayuda de DeepL

https://leofinance.io/threads/chacald.dcymt/re-leothreads-357ld7qdo
https://leofinance.io/threads/dayadam/re-leothreads-govmv9zw
The rewards earned on this comment will go directly to the people ( chacald.dcymt, dayadam ) sharing the post on LeoThreads,LikeTu,dBuzz.
You're really so creative..
This is cute !LADY
View or trade
LOHtokens.@jane1289, you successfully shared 0.1000 LOH with @dayadam and you earned 0.1000 LOH as tips. (4/5 calls)
Use !LADY command to share LOH! More details available in this post.
Thank you beautiful. I'm glad you liked it. Have a nice day and thanks for stopping by my blog @jane1289 ✨
Hermoso trabajo @dayadam ....que piezas más lindas y creativas. Te felicito.
Mil bendiciones a tus manos creadoras.
!DIY
Gracias mi bella, por tu hermoso comentario y por el apoyo. Amen, amen, y amen. Mil bendiciones para ti también. Un abrazote @chacald.dcymt 💕
Hermoso como.siempre,.me encanta el toque del color negro con los.colorws vivos de las flores, lo hacen resaltar bastante y se ve llamativo, un conjunto hermoso amiga ❤️
Gracias mi bella. Me encanta que te haya gustado. La verdad me gusto mucho como quedo, y como resaltan de sobre manera los colores. Abrazos @yolimarag ✨
Hermoso me encantó cómo utilizaste la técnica, muy delicado y la combinación de colores es estupenda.
Gracias! Me alegra mucho que te gustara. Siempre es un placer cuando aprecian mi trabajo. A la orden por acá. Saludos @lorennys ✨
Si quieres formar parte de nuestro trail de curación ingresa a HIVEVOTE, haciendo clic en la imagen del capybara aristocratico. Capybaraexchange tu casa de cambio, rapida, confiable y segura
Gracias por el apoyo @capybaraexchange ✨
We are sending you HUESO tokens to appreciate your work and the effort you make to share your content with us.
Gracias por los tokens @newnow497 ✨
Amiga que hermosa técnica. Lindo trabajo. Exitos
Gracias hermosa. Me alegro que te gustara. Bello día para ti @yanethstars ✨
To fold cardboard papers will be my biggest challenge. I'm new to jewelry but I want to improve my strength all day. I love following your work.
Doblar papeles de cartón será mi mayor reto. Soy nueva en la joyería pero quiero mejorar mi fuerza todo el día. Me encanta seguir tu trabajo.
Try it honey, I know you'll love it.
If you have any questions I am at your service. Thank you for your words.
Beautiful day to you @agbogo ✨
Intentalo cariño, se que te va a encantar.
Ante cualquier duda estoy a la orden. Gracias por tus palabras.
Bello día para ti @agbogo ✨
God bless and be with you.
Que Dios os bendiga y os acompañe.
Que si me gusto? Claro que si. Quedó hermoso. Los colores se destacan muy bien sobre el fondo negro- Es un magnifico diseño.
Que linda. me alegro mucho que te gustara. Hice este trabajo como quien dice tirando flechas, pero así somos los creativos, por un momento dude pensé que no iba a quedar bien, y al terminar me encanto el resultado final jajaja. Un abrazo, que tengas bello día @artsugar ✨
hermosas piezas @dayadam 😍
Podríamos decir entonces que la formación académica de tu hija contribuyó directamente en esta pieza ¿no? Dando un resultado único con valor agregado de impulsar el aprovechamiento e implementación de los básicos de la arquitectura. De ahí sacamos una idea de marketing endógena o un proyecto de labor social para arquitectos jajajajaja.
Congratulations @dayadam! You received a personal badge!
Wait until the end of Power Up Day to find out the size of your Power-Bee.
May the Hive Power be with you!
You can view your badges on your board and compare yourself to others in the Ranking
Check out our last posts:
Demasiado hermoso! @dayadam Me encanta todo lo que haces, cada pieza es única... Gracias por enseñarnos en un paso a paso excelente.
Vaya! Esta super hermosa esta creación amiga. Felicidades.
Gracias mi linda. Me alegro mucho que te gustara. Que tengas bello domingo @divergente1 ✨
Hola amiga, están preciosos. Todos los colores resaltan de una forma armoniosa. 😊🌻✨
Gracias bella, me alegra que te gustaran. Abrazos @jessiencasa ✨