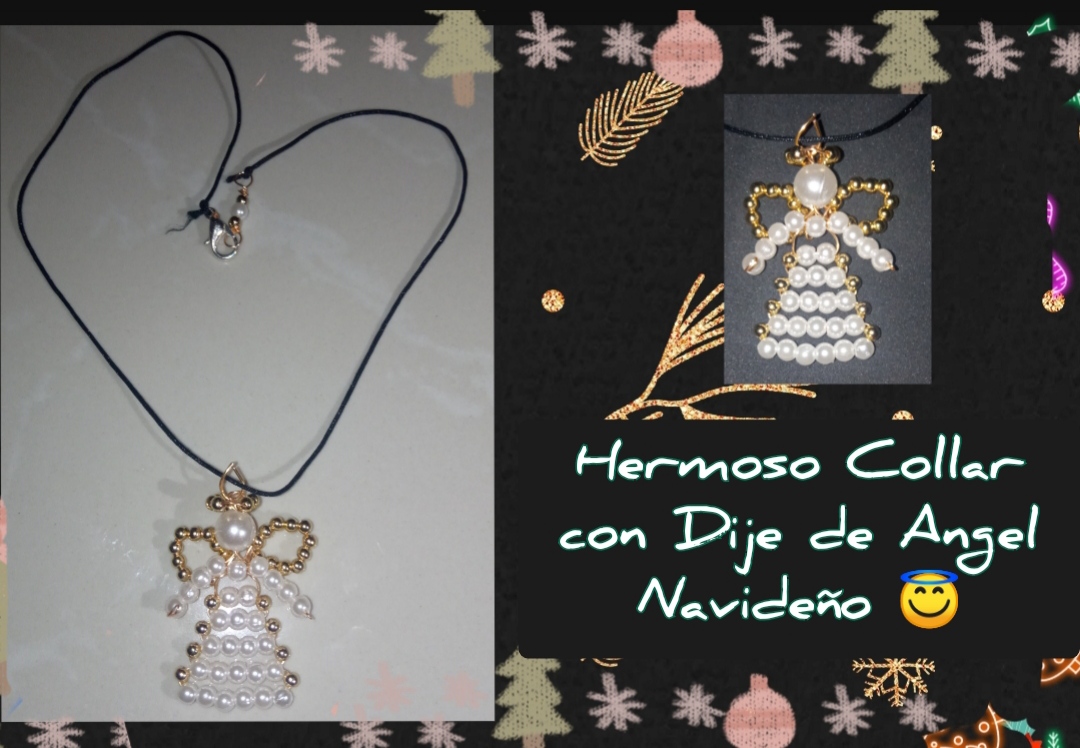
Saludos queridos amigos creativos y talentosos de esta bella comunidad, feliz día para todos ustedes, es un placer saludarlos el día de hoy y compartir una vez más con ustedes acá donde se reúne todo el talento de joyería de hive, en esta oportunidad les traigo un hermoso collar con un dije en forma de lindo angel Navideño. Pues con motivo de estar en vísperas de las navidades quise elaborar algo acordé a la ocasión, algo sencillo pero Hermoso y elegante.
Greetings dear creative and talented friends of this beautiful community, happy day to all of you, it is a pleasure to greet you today and share once again with you here where all the hive jewelry talent meets, this time I bring you a beautiful necklace with a pendant in the shape of a cute Christmas angel.
Well, because of being on the eve of Christmas I wanted to make something according to the occasion, something simple but beautiful and elegant.
Este diseño es muy especial pues desde el primer momento mi deseo fue elaborar un lindo angelito para realizarle un collar a mi pequeña, pero por circunstancias que les comentaré luego esto no salió en su totalidad tal cual lo planifique.
Realice un tutorial para compartir mi procedimiento con todos ustedes
This design is very special because from the first moment my desire was to make a cute little angel to make a necklace for my little girl, but due to circumstances that I will tell you about later, this did not come out as planned.
I made a tutorial to share my procedure with all of you.
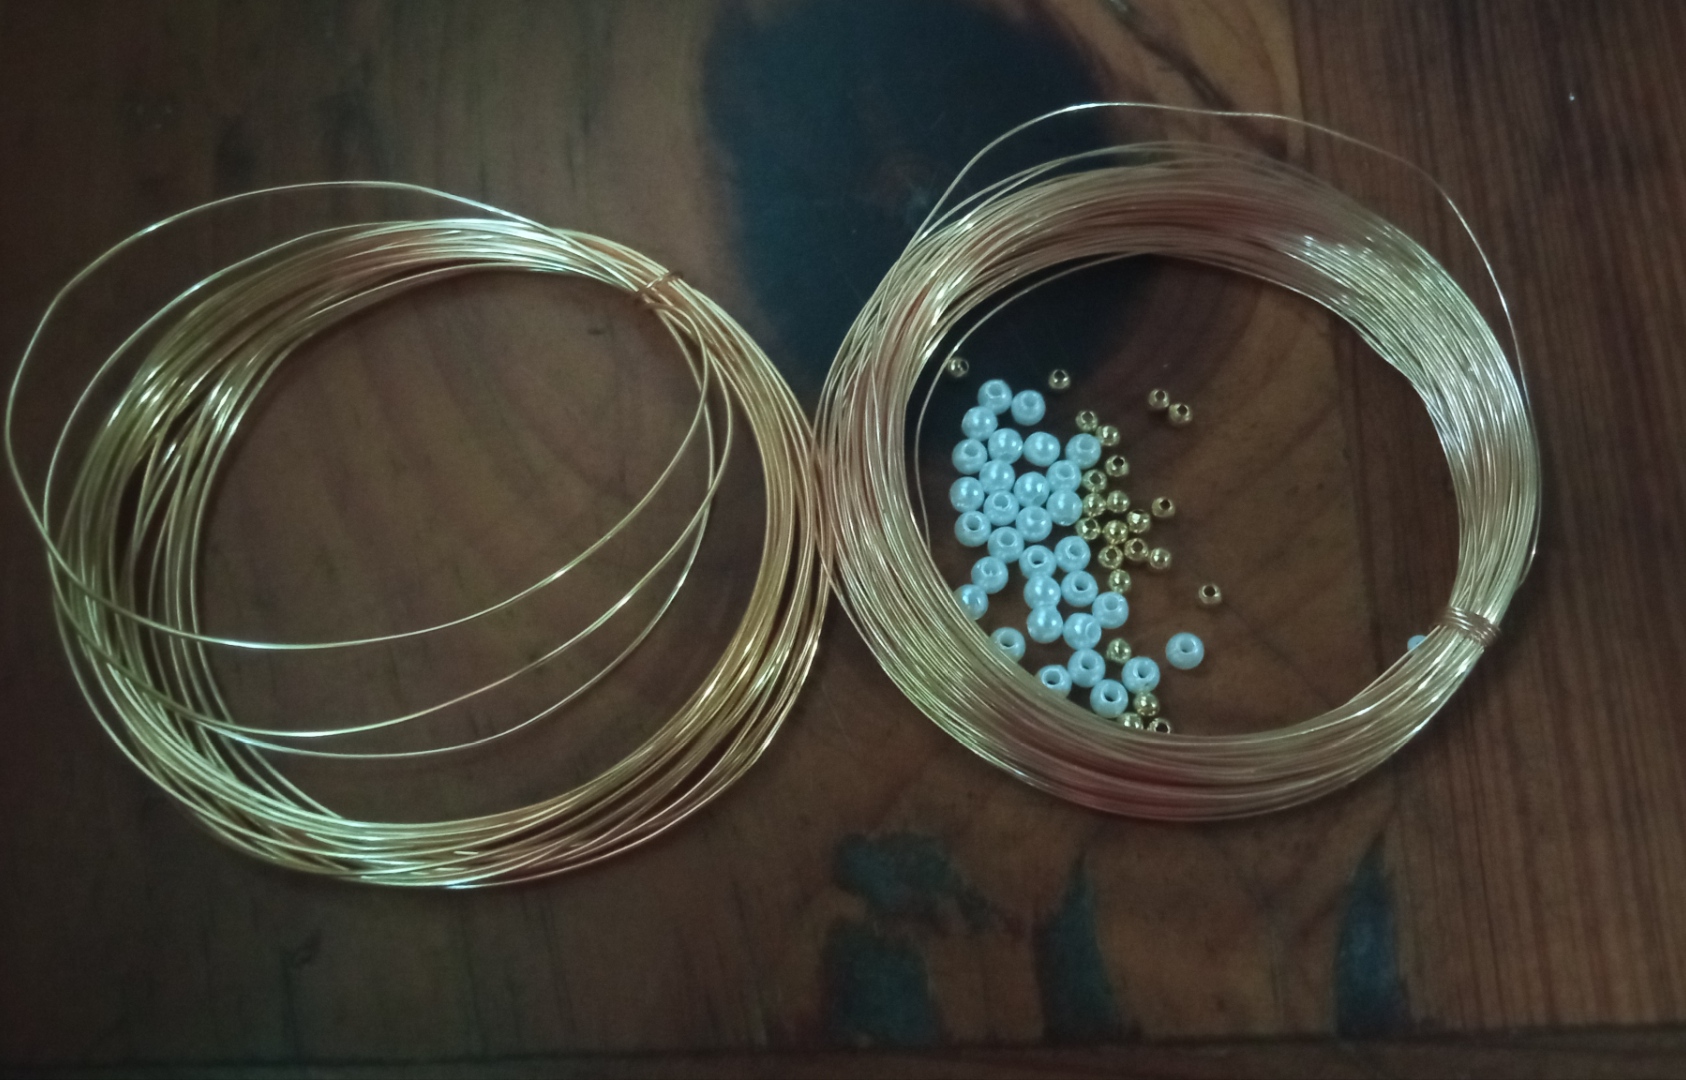
✴️ Que necesitas:
- Alambre de bisutería calibre 26.
- Piedritas perladas.
- Piedras pequeñas doradas.
- Pinza de bisutería.
- hilo chino negro.
- Terminar de cadena.
✴️ What do you need:
- 26 gauge jewelry wire.
- Pearly stones.
- Small golden stones.
- Jewelry tweezers.
- black Chinese thread.
- End of chain.
😊Paso a Paso
😊Step by Step
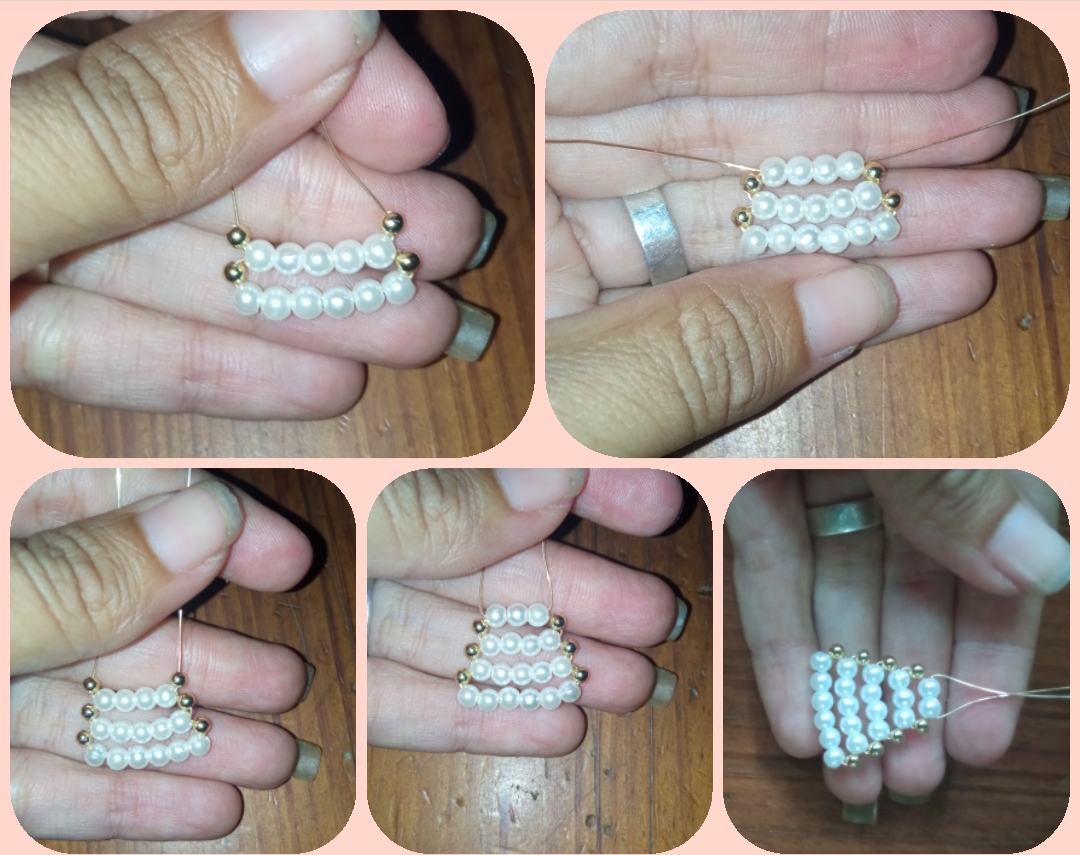
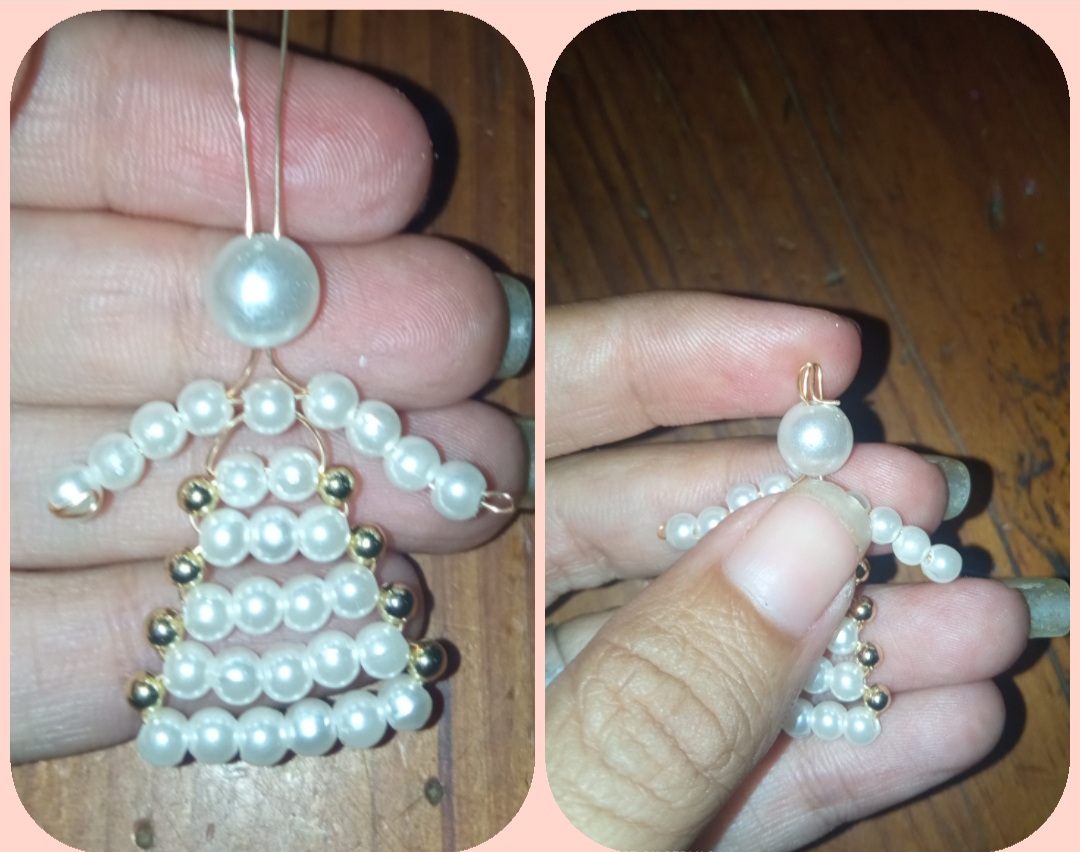
⭐ Paso 1: Primeramente tomaremos el alambre de bisutería calibre 26 y cortaremos un pedazo de aproximadamente 20cm, por este Introducimos 6 Pichitas perladas las cuales llevaremos al centro del alambre y por cada extremo introducimos una pequeña piedra dorada.
Seguidamente por el lado izquierdo Introducimos 5 piedras perladas y la punta derecha del alambre la Introducimos de derecha a izquierda por estás 5 Pichitas, es decir debemos intercalar los alambres por las piedras y jalar los extremos para que tome la forma, quedando encima de las primeras 6 piedras blancas.
⭐ Step 1: First we will take the 26 gauge jewelry wire and cut a piece of approximately 20cm, for this we will introduce 6 pearled Pichitas which we will take to the center of the wire and at each end we will introduce a small golden stone.
Next, on the left side, we introduce 5 pearl stones and the right tip of the wire. We introduce it from right to left through these 5 Pichitas, that is, we must insert the wires through the stones and pull the ends so that it takes the shape, remaining on top of the first 6 white stones.

⭐ Paso 2: Después Introducimos una piedra dorada por cada punta, y 4 piedras blancas en las cuales cruzaremos los extremos del alambre y jalamos para unir las formas, esto irá tomando forma de piramide.
Y seguirémos realizando el mismo procedimiento cada escalón con menos piedras blancas hasta llegar a dos piedritas blancas.
⭐ Step 2: Then we introduce a golden stone for each end, and 4 white stones in which we will cross the ends of the wire and pull to join the shapes, this will take the shape of a pyramid.
And we will continue to carry out the same procedure on each step with fewer white stones until we reach two white stones.
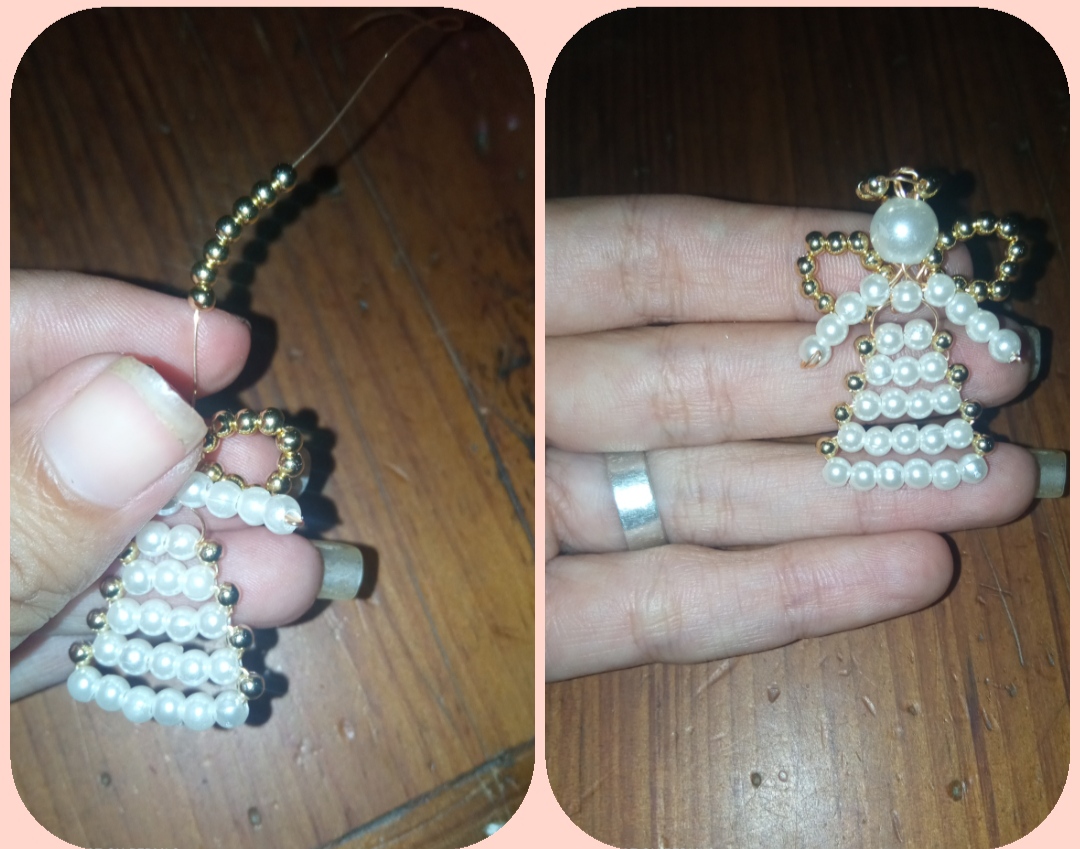
⭐ Paso 3: ahora Introducimos una piedrita perlada por un lado y le cruzamos el alambre del otro extremo, como podrán observas nos quedará un pedazo de alambre de cada lado.
Por cada lado introducimos 4 Pichitas perladas y el alambre lo doblamos y volvemos a introducir por estás 4 piedritas hasta unirlo con el otro extremo en la parte superior.
⭐ Step 3: now we introduce a pearl stone on one side and we cross the wire at the other end, as you can see, we will have a piece of wire on each side.
On each side we introduce 4 pearled Pichitas and we bend the wire and reintroduce these 4 pebbles until we join it with the other end at the top.
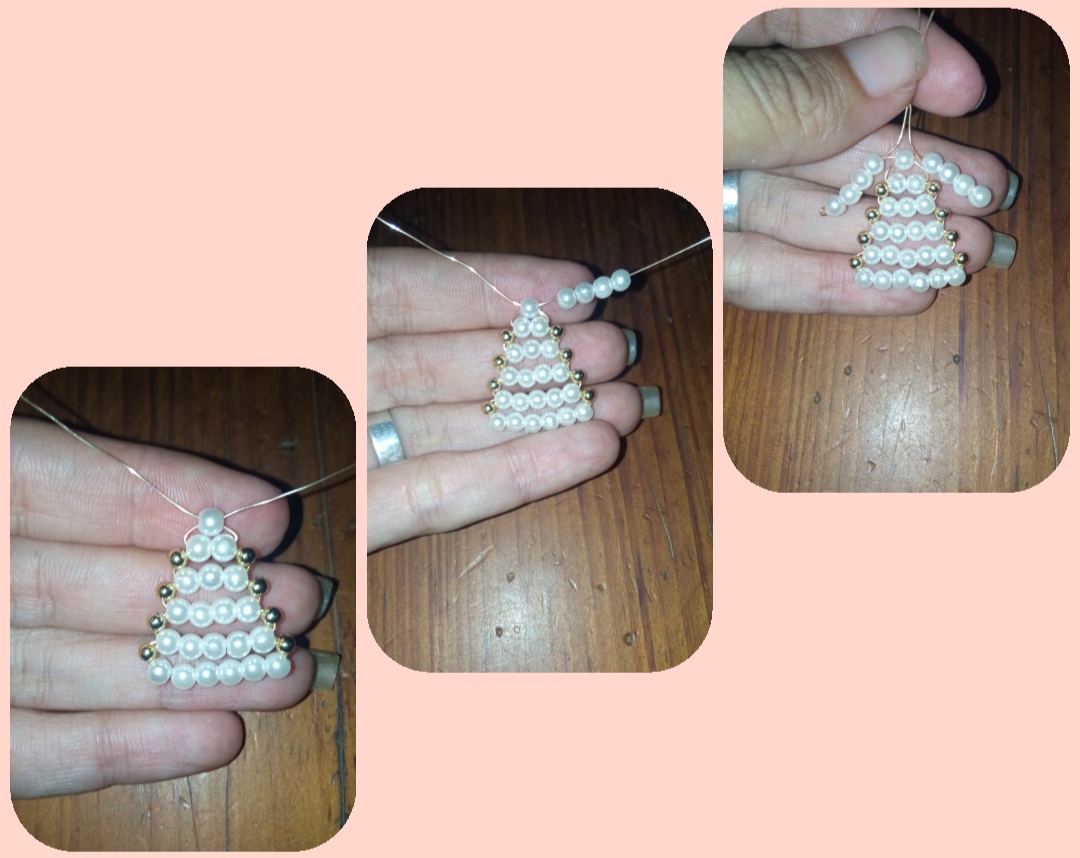
⭐ Paso 4: por ambos extremos del alambre Introducimos una piedritas perlada mediana que será la cabecita de nuestro angelito, y el extremo del alambre lo doblaremos en la parte superior del angel realizando una forma ovalada.
⭐ Step 4: at both ends of the wire we introduce a medium pearlized stone that will be the head of our little angel, and we will bend the end of the wire at the top of the angel, making an oval shape.
⭐ Paso 5: después tomaremos otro pedazo de alambre y cortaremis 10cm más. Por este Introducimos 11 picricas doradas, unimos los extremos del alambre y damos forma de ala, e Introducimos 11 más para elaborar la otra ala
Está forma la llevamos y la sujetamos en la parte de atrás de él pequeño angel, subimos el alambre encima de la cabeza del angel e Introducimos 6 Pichitas doradas con las cuales realizamos un circulo y está será el aureola del angel.
⭐ Step 5: then we will take another piece of wire and cut it 10cm more. For this we introduce 11 golden picrics, join the ends of the wire and shape a wing, and introduce 11 more to make the other wing
We take it this way and hold it on the back of the little angel, we raise the wire above the angel's head and we introduce 6 golden Pichitas with which we make a circle and this will be the angel's halo.

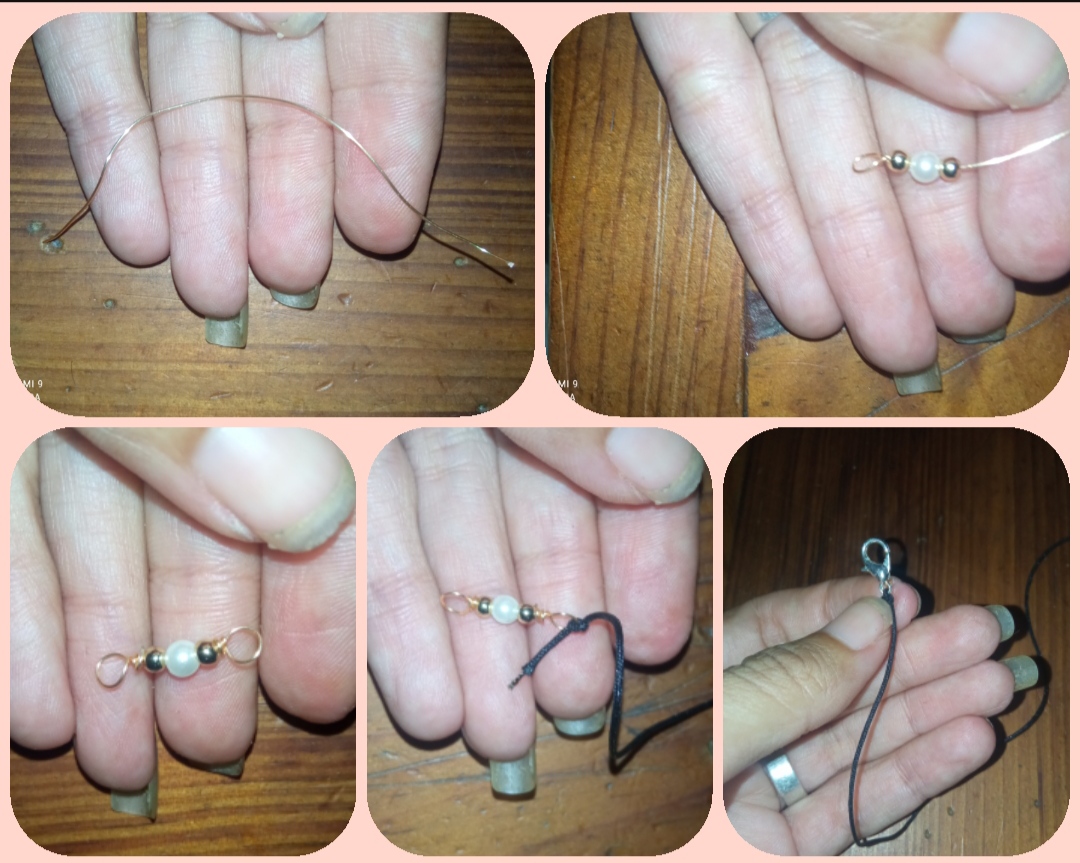
⭐ Paso 6: ahora tomamos el pedazo de hilo chino y lo cortaremos a nuestra medida dependiendo q tamaño usted lo desee, acá guindaremis nuestro pequeño angelito por la forma que dejamos en la parte superior de nuestro ángel.
Y por un extremo colocaremos el terminal de cadena y por el otro realizaremos una pequeña argollita y colocaremos en la otra pierna.
⭐ Step 6: now we take the piece of Chinese thread and we will cut it to our size depending on what size you want it, here we will guindarem our little angel by the shape that we left in the upper part of our angel.
And at one end we will place the chain terminal and at the other we will make a small ring and place it on the other leg.
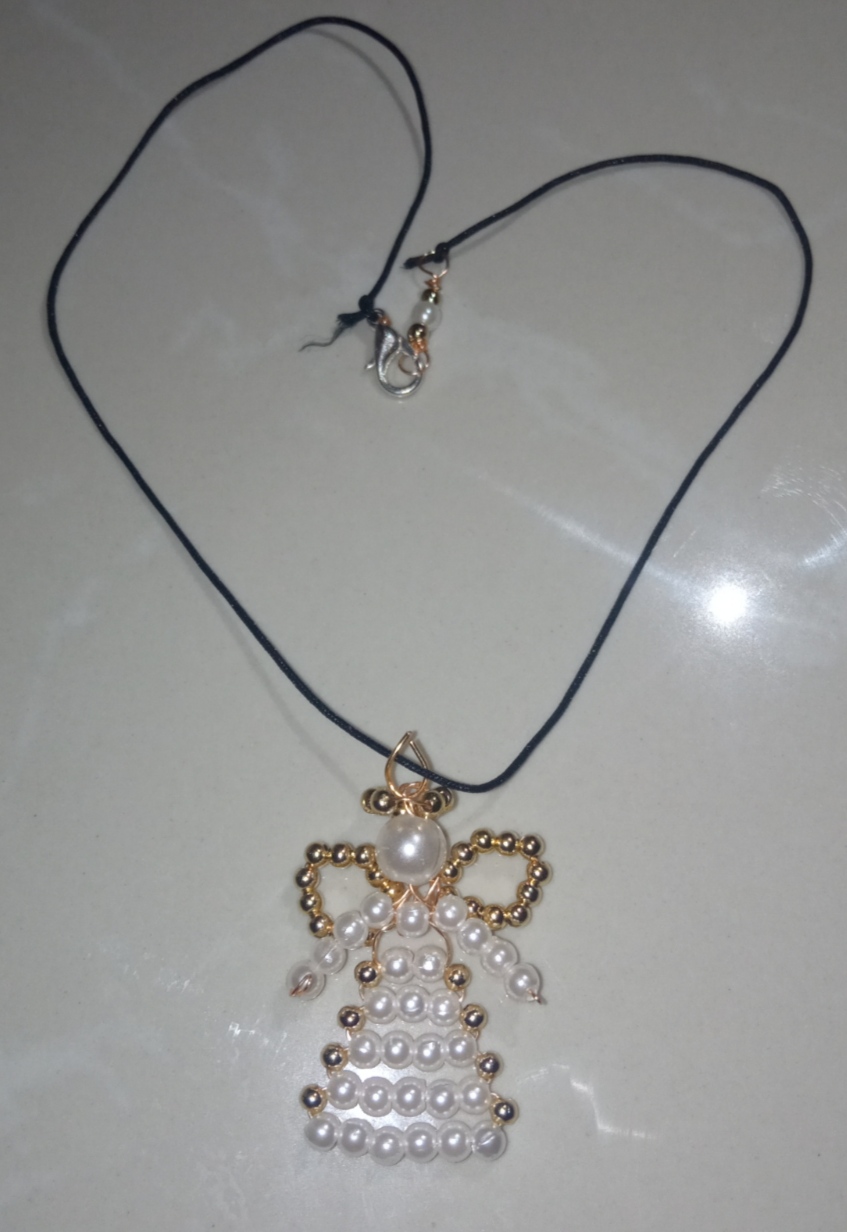
⭐ Dije con Forma de Angel Navideño 😇⭐
⭐ I said in the shape of a Christmas Angel 😇⭐
Y así queridos compañeros podemos elaborar este bello y sencillo angelito.
Yo a pesar que no logré lo que quería pues este no pudo ser para mi niña pues mis canculos fallaron y este angelito quedó muy grande para mi niña de 2 años, pero para un adulto si es perfecto. Y pues yo quedé encantada con el, ahora me corresponde comprar Pichitas un poco más pequeña para complacer a mi niña.
And so dear companions we can make this beautiful and simple little angel.
Despite the fact that I did not achieve what I wanted, this could not be for my girl because my canculos failed and this little angel was too big for my 2-year-old girl, but for an adult it is perfect. And well, I was delighted with it, now it's up to me to buy Pichitas a little smaller to please my girl.
Mis Queridos amigos espero que está hermosa creación que les sea de su total agrado, y que este muy tutorial les pueda ser de utilidad.
Me despido hasta una nueva oportunidad, agradeciendo su visita y apoyo.
My Dear friends, I hope that this beautiful creation is to your liking, and that this very tutorial can be useful to you.
I say goodbye until a new opportunity, thanking you for your visit and support.
las fotos fueron tomadas con mi teléfono Redmi 9, contenido exclusivo para Hive. Y la traducción fue realizada a través de Google.
photos were taken with my Redmi 9 phone, exclusive content for Hive. And the translation was done through Google.
Te quedo precioso este hermoso angelito, que malo que a tu hija le quedo grande pues esta precioso, lo bueno es que te quedo a ti, gran trabajo 👏
Muchas gracias, me alegra su comentario.
Saludos.
Bello angelito, ¡Gracias por compartir!
Gracias por su comentario amiga, Saludos.
Thank you for sharing this post on HIVE!
Your content got selected by our fellow curator jasonmunapasee & you just received a little thank you upvote from us for your great work! Your post will be featured in one of our recurring compilations which are aiming to offer you a stage to widen your audience within the DIY scene of Hive. Next time make sure to post / cross-post your creation within the DIYHub community on HIVE and you will receive a higher upvote ;) Stay creative & HIVE ON!
Please vote for our hive witness <3
Está bellísimo este angelito, me encanta, además se sencillo de hacer 👍
Si amiga es muy fácil y hermoso. Gracias por su comentario. Saludos.