Waivio gives you intuitive and simple tools to create and manage a menu for your restaurant.
While this is a follow-up tutorial focused on restaurant menus, you can use the same approach to manage lists of places, companies, wiki pages and all other types of objects.
In a previous tutorial, you can learn how to create restaurant listings on the Hive blockchain.
Here are a Few Steps to Create a Restaurant Menu:
- Find a restaurant menu and convert it into text (if necessary)
- Create a menu on HIVE with multiple sub-menus and sections
- Add dishes
- Change the order of the dishes
- Add a note to the menu or its subsections
- In case of a mistake, delete the incorrect item
Learn more about Waivio & follow my channel 😉
1) Find a Restaurant Menu and Convert it into Text (if necessary)
Most restaurant menus are already available in text form and can be found on the restaurant's website. However, if you only have an image of the menu, you can use any online OCR tool to convert it into text format.
In this example, I am using NewOCR.com
Please follow five simple steps:
- click on the "Choose file" button & upload your Image
- click on the "Preview" button
- select a region*
- click on "OCR"
- copy & paste the text to any text editor
- *If a menu has multiple columns, it is important to select only one column -> then click on "OCR" -> copy & paste the text to any text editor. Then repeat these steps with other columns.
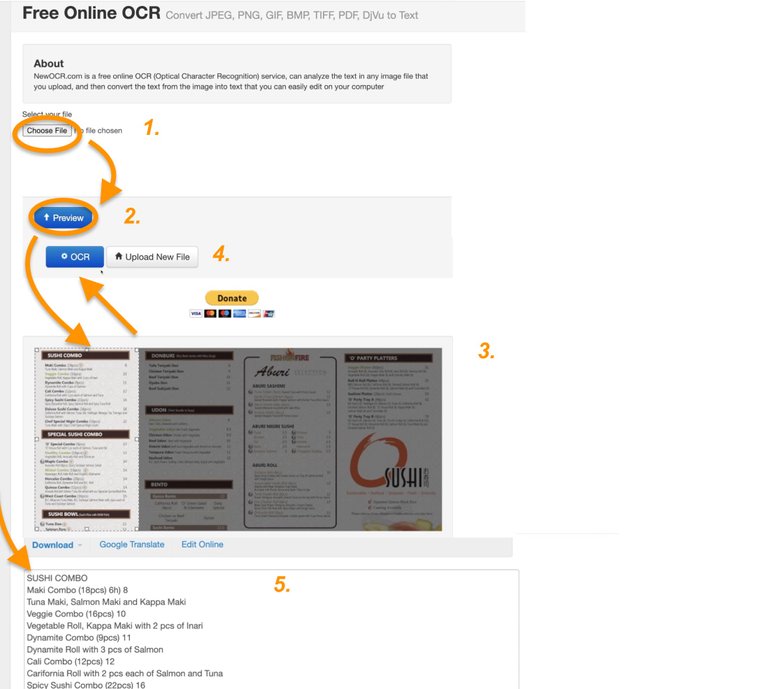
You may use any text editor to compare the original image with the OCR text, make changes and format it for easy copying.
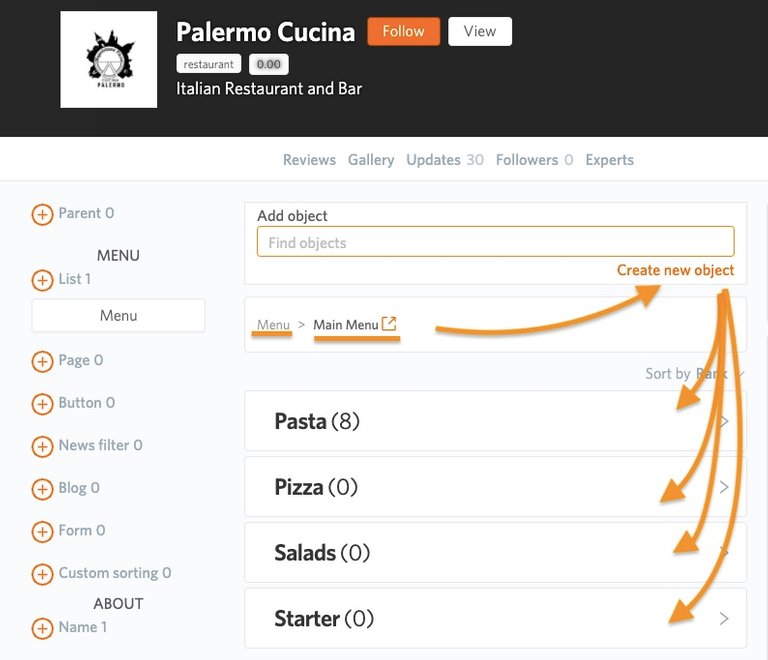
2) Create a Menu on HIVE
Now we are ready to create a menu for Palermo Cucina.
Go to your restaurant page -> switch to the Edit mode, and you will see a "MENU" subsection in the left column. Click on "+ List" to link the restaurant to a new menu. To create a new menu, simply click on "Create new list."
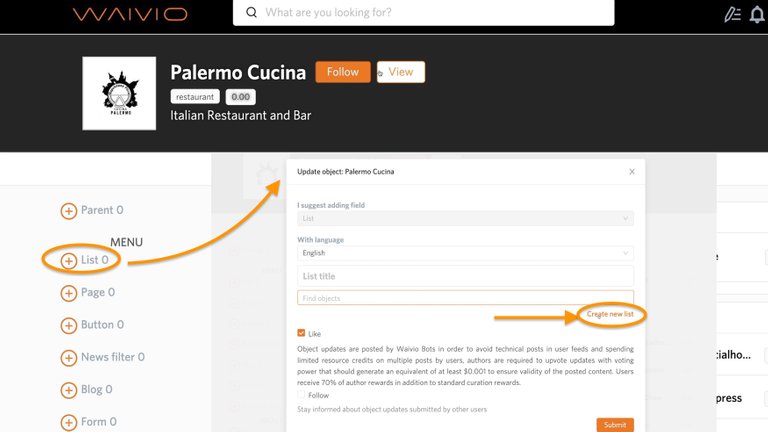
If a menu already exists, it can be located using the "Search objects" tool.
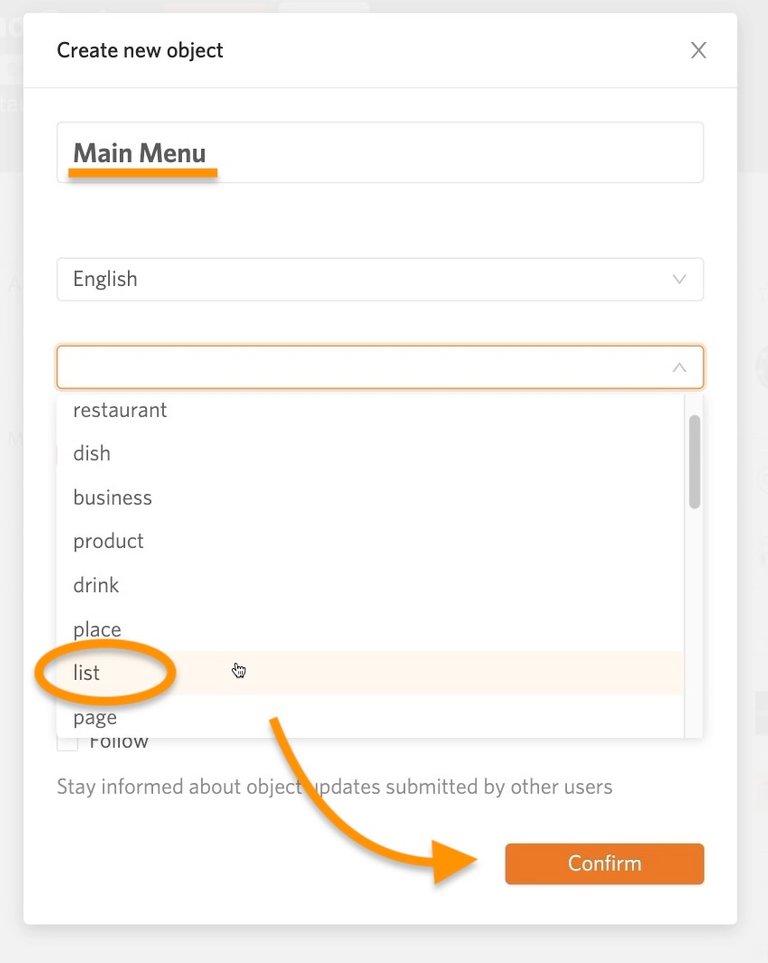
Once the first Menu is created, it is possible to create additional menus such as "Lunch Menu," "Dinner Menu," "Bar Menu" and so on. These embedded lists can be made by clicking on the "Create new object." For Palermo Cucina, I created "Main Menu" and "Bar Menu."
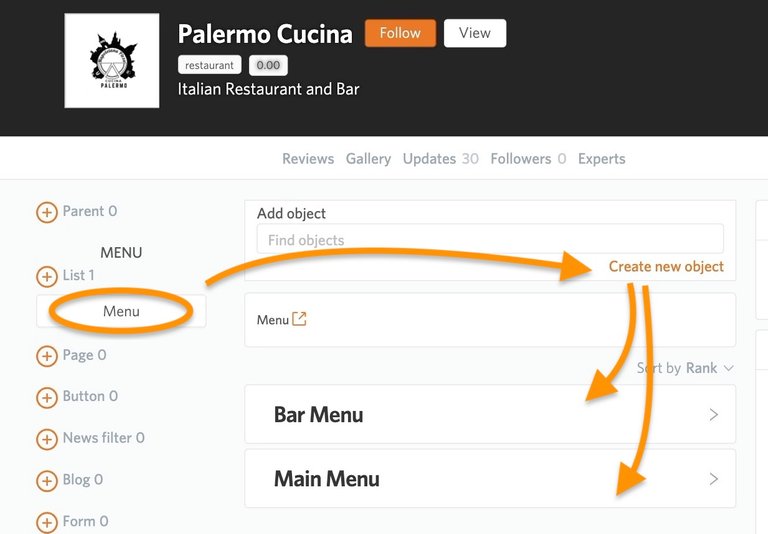
When creating embedded menus, please make sure to select "list" from the options.
Similarly, you can further create sub-menus and subsections. For example, Palermo Cucina's Main Menu has four sections: "Pasta", "Pizza", "Salads" and "Starter", so I created these sections under the Main Menu.
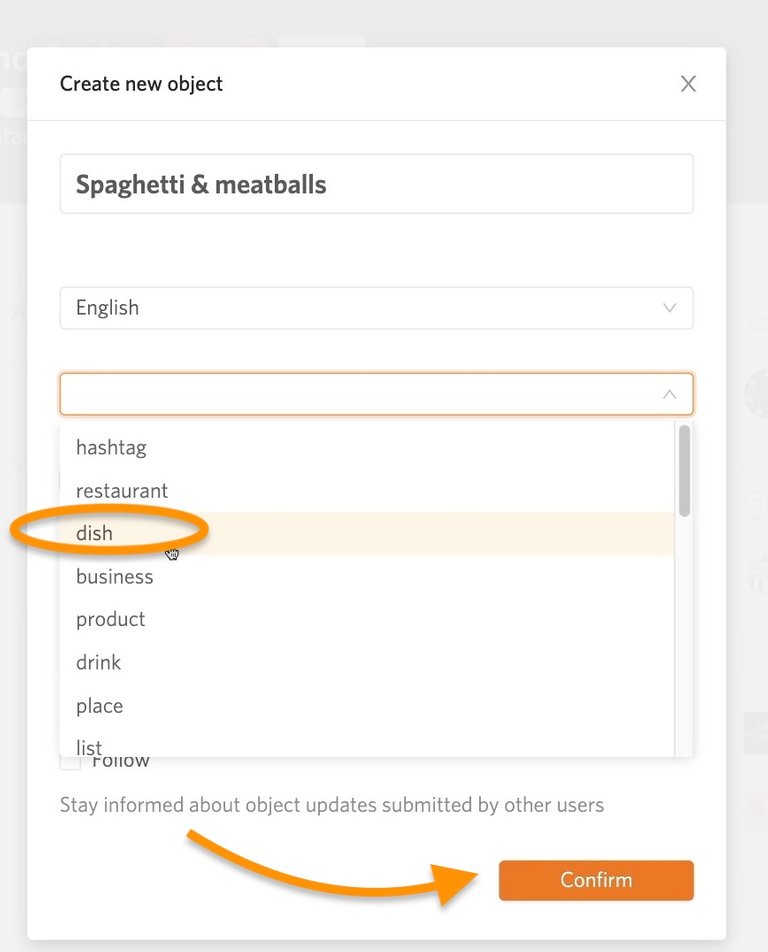
3) Add Dishes
Once the menu structure is prepared, you can start adding dishes to menu sub-sections.
When adding dishes, make sure that you select the "dish" object type from the drop-down menu.
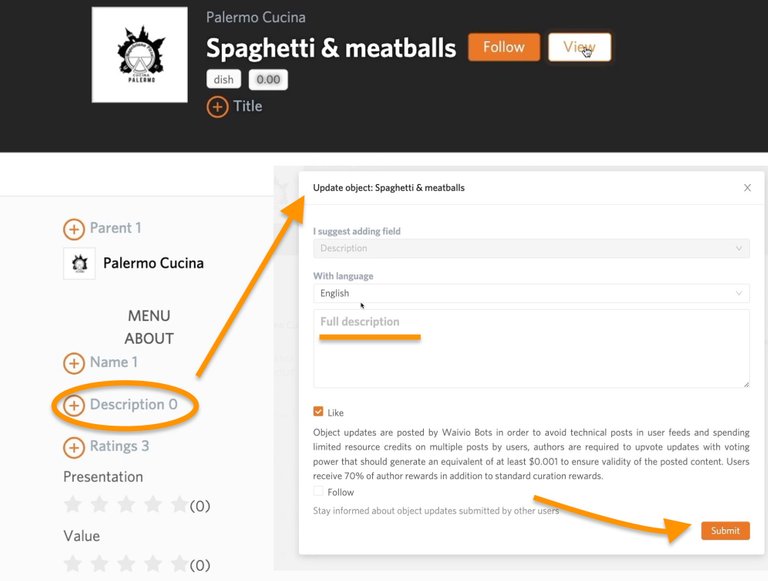
Then open the dish in a new window to enter additional information about the dish, such as Title (max. 100 characters), Description, Price, Image, etc.
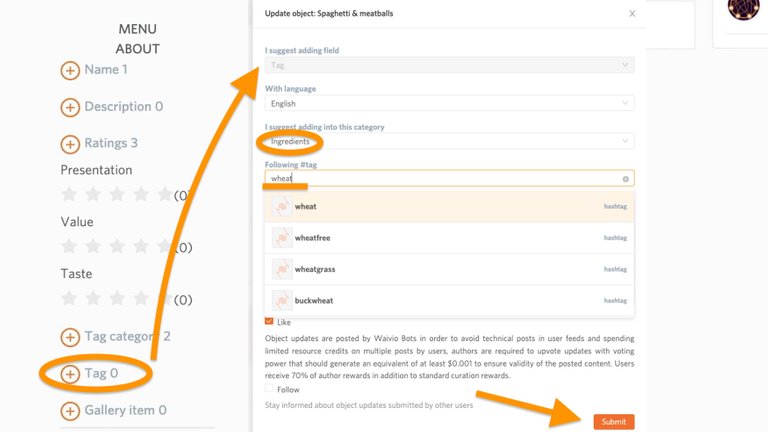
Tags can improve the discoverability of dishes by allowing customers to filter dishes by ingredients or categories, such as "vegetarian" or "gluten-free."
Please note that tags are limited to hashtags already used on the Hive platform.
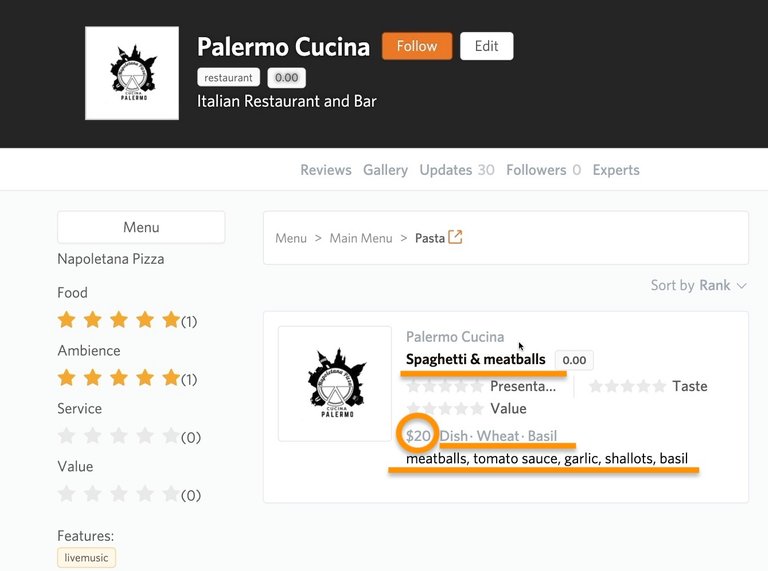
When you go back to the restaurant page, all the key information about the dish, such as the name, description, price, ratings, will be displayed in the menu listing.
If you didn't add a dish image (avatar), it would be displayed with the image of its parent object; in this case, it is the restaurant.
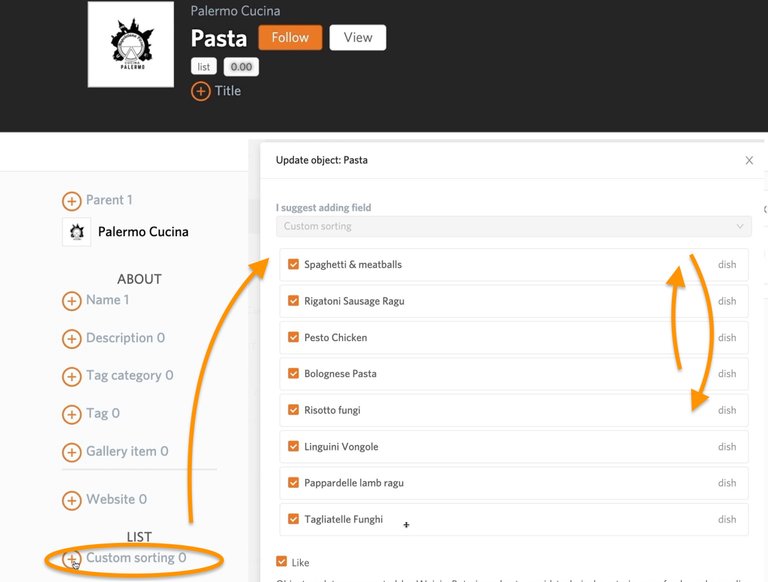
4) Change the Order of Dishes
The dishes in the menu are sorted according to their Rank, reflecting the dish's popularity in customer reviews.
However, if the items need to be organized in a specific order, you need to open the list (ex. Pasta) in a new window -> then click on "+ Sorting."
Here you can move elements up and down to change their order. Once the custom sorting is saved, it will be used instead of sorting by Rank.
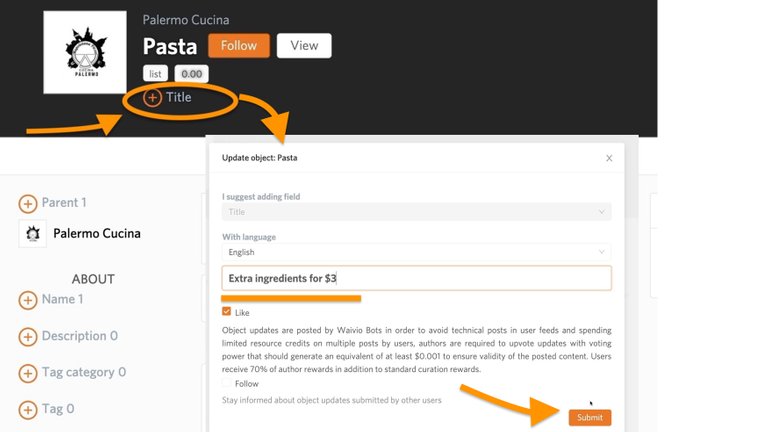
5) Add a Note to the Menu or its Subsections
Sometimes menus or sub-sections require additional notes, such as hours of operation or additional items that come with each dish in that section. This note can be included as a Title for the list.
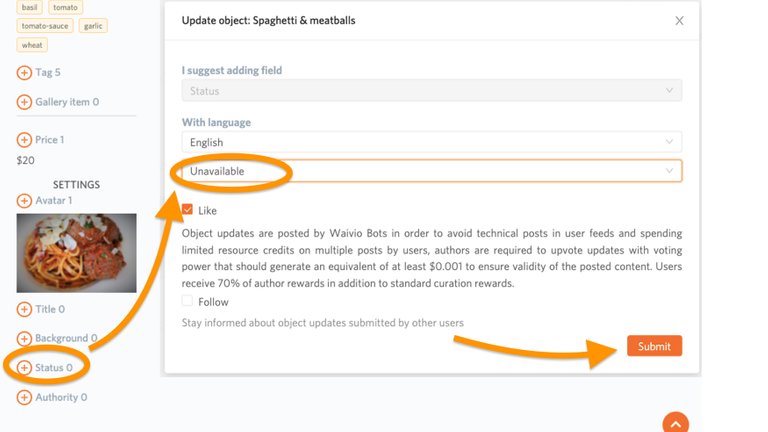
6) In Case of Mistake, Delete the Incorrect Item
There are two ways to delete an item.
The first way is to mask the item from the blockchain: open the item's page in a new window -> click on the edit mode -> click on "status" -> and choose unavailable.
Another way is to delist the item. Open the list in a new window -> click on Edit mode -> go to Updates -> look for the item you want to delist -> and "Reject" it. If you are the one who made the original update, then your Reject vote should be sufficient to delist the item.

The focus of this tutorial was on restaurant menus, but a similar approach can be used to create catalogues, shopping lists, complex document structures and more.
Check out other useful features and tools on Waivio.
👋Follow Crypto Dive for tutorials and videos like this one
#waivio Dining.Gifts #hive #restaurant #restaurantreview #restaurants #hivebusiness #hivetutorial #hivetutorials #hive-tutorials
Congratulations @cryptodive! You have completed the following achievement on the Hive blockchain and have been rewarded with new badge(s):
Your next target is to reach 300 upvotes.
You can view your badges on your board and compare yourself to others in the Ranking
If you no longer want to receive notifications, reply to this comment with the word
STOPSupport the HiveBuzz project. Vote for our proposal!