Hello guys,
Welcome to my blog,
This blog is to describe my begin of Arduino programming (LED Blinking program).
I started learning Arduino Programming.
It is evident that when anyone starts learning any new language he must start with the basic program of printing a “Hello World!” message,
same as for i started with the basic LED blinking program.
LED blinking is treated as the very beginner program in arduino, because it is so simple and easy to understand.
What is to be done is:
Turns an LED on for one second, then off for one second, repeatedly.
Actual saying is, to blink an LED with described delay of time between each blink of LED.
We will now see how it is done.
Basic or default setup for Arduino programming:
void setup() {
  // put your setup code here, to run once:

}

void loop() {
  // put your main code here, to run repeatedly:

}
Now the actual led program.
LED program:
// LED Blink Program

void setup() {
  pinMode(13, OUTPUT);
}

void loop() {
  digitalWrite(13, HIGH);
  delay(1000);
  digitalWrite(13, LOW);
  delay(1000);
}
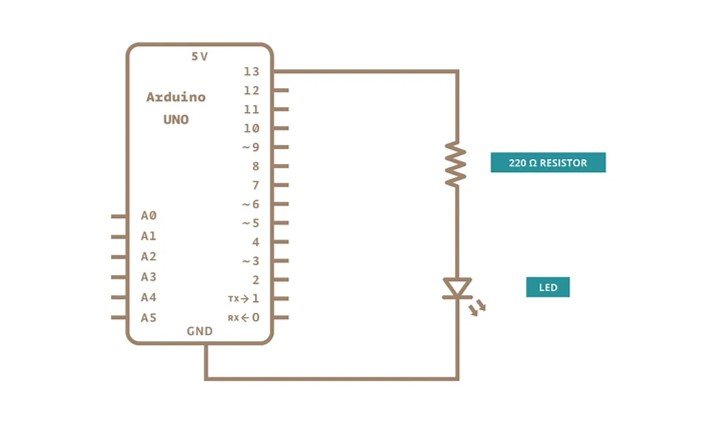
Hardware Connection:
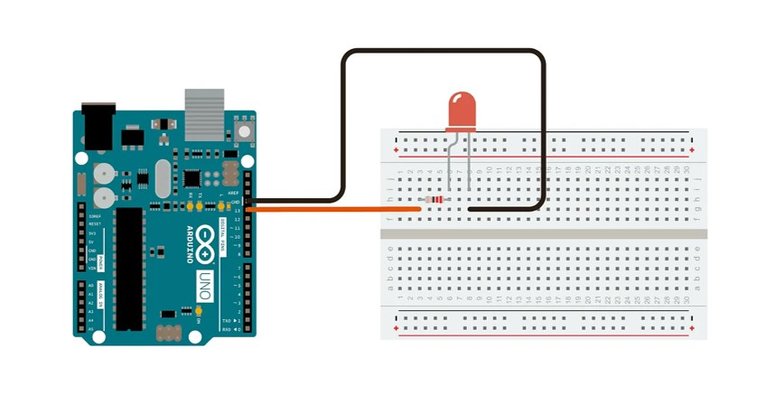
Circuit Diagram:
You can find the detailed explanation of LED blink program on Arduino Documentation.
Later on the great projects and ideas based on Arduino and IoT are coming, so please continue supporting me.
Finally, thanks for reading my post,
If you like my post, please do support me.
More Details:
Youtube Channel: A1 EduTech
Peakd blogs: A1 EduTech
Artstation: Asad Ali Art
DTube Channel: A1 EduTech
My first time encountering Arduino. Seems interesting. Are
setup()andloop()the default functions that you have to fill?Yes mam, they are required functions in arduino, otherwise it will show compilation errors.
The code that you put inside void setup() will only run once, and that will be at the beginning of your program, Code within void loop() function repeat consecutively until Arduino is turned off.
Oh nice to know. At least I learned something. Thanks for explaining!
Thanks so much friend for Sharing with us
Congratulations @a1edutech! You have completed the following achievement on the Hive blockchain And have been rewarded with New badge(s)
Your next target is to reach 20 posts.
You can view your badges on your board and compare yourself to others in the Ranking
If you no longer want to receive notifications, reply to this comment with the word
STOPTo support your work, I also upvoted your post!
Check out our last posts:
This is the kind of thing we need to see more of in hive.
!PIZZA !PGM !BBH
@wanderingmoon, sorry! You need more $BBH to use this command.
The minimum requirement is 1000.0 BBH balance.
More $BBH is available from Hive-Engine or Tribaldex
BUY AND STAKE THE PGM TO SEND A LOT OF TOKENS!
The tokens that the command sends are: 0.1 PGM-0.1 LVL-0.1 THGAMING-0.05 DEC-15 SBT-1 STARBITS-[0.00000001 BTC (SWAP.BTC) only if you have 2500 PGM in stake or more ]
5000 PGM IN STAKE = 2x rewards!
Discord
Support the curation account @ pgm-curator with a delegation 10 HP - 50 HP - 100 HP - 500 HP - 1000 HP
Get potential votes from @ pgm-curator by paying in PGM, here is a guide
I'm a bot, if you want a hand ask @ zottone444
$PIZZA slices delivered:
@wanderingmoon(1/10) tipped @a1edutech