Drawing graphics on the screen is an essential part of developing games. Sure, some text-based games exist but let’s face it, those are too specialized and only a few people understand how good they are (if they are).
To capture the most audience (gamers) as a developer, you must produce a game that is graphical. Hence the need to know how to draw graphics on the screen.
![]()
In my Views and Dialog Boxes Tutorial, @Shariq asked:
I am trying to flip the image of a Sprite horizontally.. can you please share a code snippet?
Thanks for asking me how to do this. A code snippet for doing just that is simple (skip below if that’s what you came here for).
But let me offer something better.
A guide to understanding the basic canvas transforms and how they could be used together to manipulate images based on your game’s needs.
Note: This guide is about games made with Flutter using the Flame game engine and the Dart language. The canvas refers to dart:ui‘s Canvas class.
If you want to create mobile games with Flame and Flutter but no idea how to start, check out my tutorial series for beginners or the introduction tutorial.
All the code for this tutorial is available for viewing and download on this GitHub repository.
What are canvas transforms anyway?
Canvas transforms, as the names imply, are modifications to the canvas itself.
When you draw an image on a canvas, the draw command and the image itself still things that the canvas is flat and normal.
Transforms are applied to the canvas itself, so it affects anything that is drawn.
Just like a real physical painting on a canvas. If you tilt the canvas, the paint goes with the tilted canvas and the whole image appears tilted.
The same thing happens if you rotate the canvas upside down.
Canvas states
A canvas starts out without any transformations applied to it.
The origin is set to the upper-left corner of the canvas (which is synonymous to saying the upper-left corner of the screen for full-screen games).
Increasing the value for the x-coordinate means going to the right. On the other hand, increasing the value of the y-coordinate means going down. This is opposed to the mathematical cartesian plane y-axis where positive values are going up.
When you add any transformation on the canvas, it is applied for all subsequent drawings on the canvas. You can remove the transformation by applying the same type of transformation negative but same values. This works for a simple one-time transformation. More often than not, if you deal with canvas transforms, you’ll likely to use more than one.
This could easily get out of hand.
Luckily, you can save and restore canvas states. Even better, states are saved on a stack. This means that you can save multiple stack states and restore to the latest ones if needed.
// where c is an instance of `Canvas`

c.save(); // saves the current canvas state

c.restore(); // restores the last saved state
Drawing origin
One other important concept is the origin. This where (0, 0) is when you draw anything on the canvas.
But what’s more important to remember is that canvas transforms are applied with their center on the origin.
Keeping in mind (tracking) where the origin is as you write your render code will make things easier than if you don’t.
Canvas transforms
The following are the most common canvas transform operations sorted by how I frequently use them (opinionated, based on personal experience).
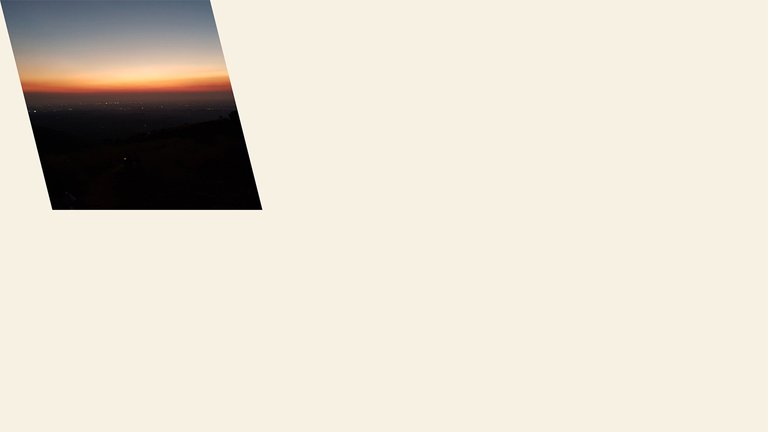
We start off with the following code from the accompanying project:
void render(Canvas canvas) {
  // return if the screen size is not yet determined
  if (screen == null) return;

  // draw a background color
  canvas.drawRect(screen, Paint()..color = Color(0xfff7f1e3));

  sunset.renderRect(canvas, Rect.fromLTWH(0, 0, 200, 200));
}
That code produces the following screen:
![]()
From this point onward, we’ll be focusing on the part after drawing the background color.
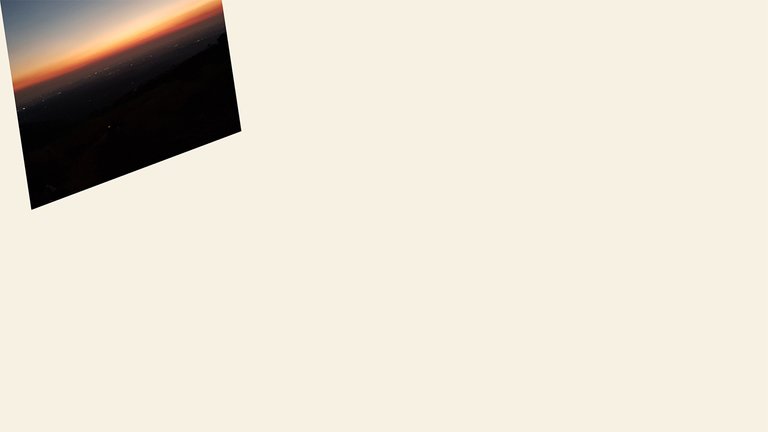
Translate
This canvas transform moves the origin by the amount you pass in as parameters.
Translate accepts two parameters, the first one is for the x-coordinate and the other is for the y-coordinate.
Remember that positive x is going to the right and positive y is going downward.
The following code translates the origin to the center of the screen.
canvas.save();
canvas.translate(screen.center.dx, screen.center.dy);
sunset.renderRect(canvas, Rect.fromLTWH(0, 0, 200, 200));
canvas.restore();
![]()
I’ve added a red dot on the new (translated) origin. This is the expected result of the previous code since images are drawn with its origin on the canvas origin.
To center the image properly we have to subtract half of the image’s width to the x-coordinate and half of the image’s height to the y-coordinate.
canvas.save();

canvas.translate(screen.center.dx, screen.center.dy); // center screen
canvas.translate(-100, -100); // compensate for image size

sunset.renderRect(canvas, Rect.fromLTWH(0, 0, 200, 200));
canvas.restore();
![]()
I’ve added another dot to show the new origin after the second translate.
Scale
Scaling resizes the canvas based on the values you pass to it. The first value affects the x-coordinate (left to right scaling) and the second one affects the y-coordinate (top to bottom).
If only one parameter is passed, it affects both x and y-coordinates.
The following code resizes the canvas (along with anything drawn to it) to be double in size.
canvas.save();

canvas.scale(2);

sunset.renderRect(canvas, Rect.fromLTWH(0, 0, 200, 200));
canvas.restore();

When using the scale transformation, a value of 1 means 100% of the original size. The value used above (2) means 200% (or double) of the original size.
The next example scales down the image:
canvas.save();

canvas.scale(.5);

sunset.renderRect(canvas, Rect.fromLTWH(0, 0, 200, 200));
canvas.restore();

If 1 means 100%, .5 should mean 50% (or half) of the original size as seen in the screenshot above.
Next, we’ll try separate values for the parameters:
canvas.save();

canvas.scale(1, 2);

sunset.renderRect(canvas, Rect.fromLTWH(0, 0, 200, 200));
canvas.restore();

As you can see above, the canvas has been stretched along with the image. Since it was only stretched on the y-axis and left the x-axis alone, the image looks tall.
Another possibility is to supply two different values for the parameters to get a really unique stretch.
canvas.save();

canvas.scale(2, .5);

sunset.renderRect(canvas, Rect.fromLTWH(0, 0, 200, 200));
canvas.restore();

The canvas was scaled up on the x-axis by a factor of 2 (double of the original) and scaled down on the x-axis by a factor of .5 (half of the original). This makes the image look short and wide.
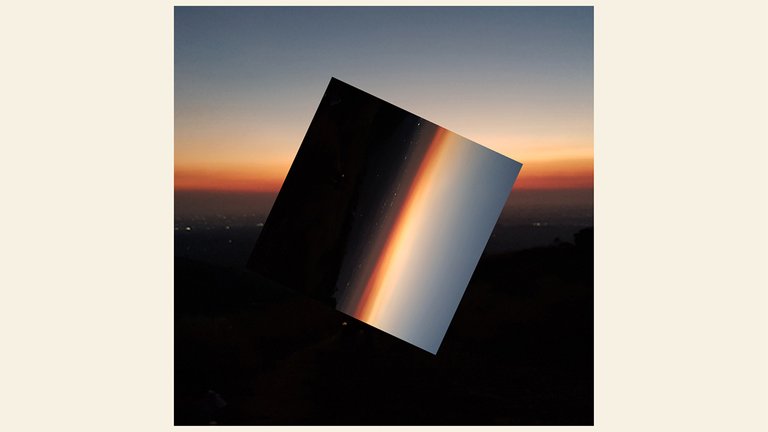
Rotate
Rotating images and graphics could be useful in games especially those using top-down views.
The rotation is applied to the origin of the canvas. It expects one parameter that will control how much rotation will be done. This parameter should be a double (data type) and the value should be in radians.
Radians is a type of angular measurement based on the radius of the circle. This article explains it better.
According to the Flutter documentation, positive values should rotate the image clockwise.
Let’s look at an example:
canvas.save();

canvas.rotate(.5);

sunset.renderRect(canvas, Rect.fromLTWH(0, 0, 200, 200));
canvas.restore();

The screenshot above shows the canvas rotated with a value of .5 (positive, so clockwise) which is about 28.6479°.
Skew
This transform, as the name implies, skews the canvas by an amount provided in the parameters in radians. It requires two parameters, the first for the horizontal skew and the other for the vertical skew.
In my experience, I have never used this transform in game development. That’s just me though so here are some examples:
canvas.save();

canvas.skew(.25, 0);

sunset.renderRect(canvas, Rect.fromLTWH(0, 0, 200, 200));
canvas.restore();
canvas.save();

canvas.skew(0, .75);

sunset.renderRect(canvas, Rect.fromLTWH(0, 0, 200, 200));
canvas.restore();

canvas.save();

canvas.skew(.15, -.375);

sunset.renderRect(canvas, Rect.fromLTWH(0, 0, 200, 200));
canvas.restore();
This last example skews the canvas on both axes, positive for the horizontal and negative for the vertical.
I guess you could use this to mimic a 3D effect.
Mixing transforms
It’s also possible (and probably more useful) to use different transforms together.
// save the original state
canvas.save();

// center the origin (then save this state)
canvas.translate(screen.center.dx, screen.center.dy);
canvas.save();

// resize the canvas up by 2 (double)
canvas.scale(2);

// render image (with size compensation)
canvas.translate(-100, -100);
sunset.renderRect(canvas, Rect.fromLTWH(0, 0, 200, 200));

// restore back to just the centered origin
canvas.restore();

// rotate the canvas
canvas.rotate(2);

// render image again (with size compensation)
canvas.translate(-100, -100);
sunset.renderRect(canvas, Rect.fromLTWH(0, 0, 200, 200));

// restore the original state();
canvas.restore();
The key thing to remember when using multiple transforms is the order in which they are called.
Each transform will be applied in whichever order they are called.
An example would be to translate to the center of the rotation first before rotating the canvas.
Flipping an image horizontally
Now, to answer the question that started this whole guide.
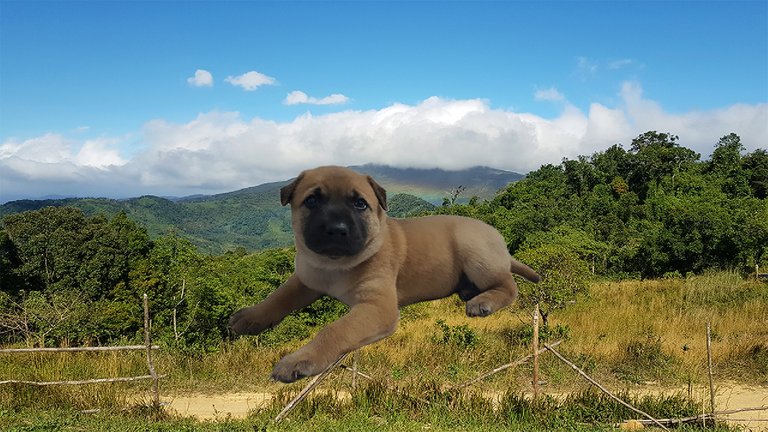
Here’s an example of rendering a non-flipped image that we’ll edit so the image is flipped later.
// render background and save the original state
scene.renderRect(canvas, screen);
canvas.save();

// translate the origin to bottom-center of screen
canvas.translate(screen.center.dx, screen.height);
// compensate for the image height
// horizontally the image will be centered
// vertically the image will sit at the bottom
canvas.translate(-150, -300);

// draw my cute then-puppy
aero.renderRect(canvas, Rect.fromLTWH(0, 0, 300, 300));

// restore original state
canvas.restore();
To flip an image we need to think outside the box.
Remember scale?
Our examples just scale the canvas up (greater than 1) or down (less than 1) using positive values.
Ever wonder what happens when you supply a negative number?
Magic!
Let’s try it out:
// render background and save the original state
scene.renderRect(canvas, screen);
canvas.save();

// translate the origin to bottom-center of screen
canvas.translate(screen.center.dx, screen.height);
// compensate for the image height
// horizontally the image will be centered
// vertically the image will sit at the bottom
canvas.translate(-150, -300);

// try flipping
canvas.scale(-1, 1);

// draw my cute then-puppy
aero.renderRect(canvas, Rect.fromLTWH(0, 0, 300, 300));

// restore original state
canvas.restore();

It flipped alright. But the pivot point for the flip was the current origin of the canvas by the time scale was called. The origin was 150 logical pixels to the left of the screen’s center.
This is where the order – in which the transforms are called – matters.
We want to flip the canvas when we are at a point in the runtime where the origin of the canvas is at the center (before compensating for the image size).
Let’s try it in the code again:
// render background and save the original state
scene.renderRect(canvas, screen);
canvas.save();

// translate the origin to bottom-center of screen
canvas.translate(screen.center.dx, screen.height);

// flip horizontally
canvas.scale(-1, 1);

// compensate for the image height
// horizontally the image will be centered
// vertically the image will sit at the bottom
canvas.translate(-150, -300);

// draw my cute then-puppy
aero.renderRect(canvas, Rect.fromLTWH(0, 0, 300, 300));

// restore original state
canvas.restore();
Success! We have flipped our image horizontally.
I’ll leave the vertical flipping for you to experiment on. If you encounter any obstacles, drop a comment below, send me a message, or talk to me on my Discord server.
Conclusion
That’s it! Congratulations on learning how to apply transformations to the canvas. It’s a very useful skill to have in your arsenal when creating games.
These operations are needed when you have one image for the character and you don’t want to have another image when facing the other direction.
I hope you enjoyed learning these techniques. Have fun creating your games!