Scoring and keeping the highest scores are essential for any game. Some games base the score on the number of coins collected, some base it on enemies killed, and some base it on survival time.
We can’t ignore sound effects and background music either. Combined, those two could make or break a game.
Besides a great game isn’t really a great game if it’s too quiet.

Welcome to the fourth part of the game development tutorial series with Flame and Flutter. We’re picking up where we left off and if you haven’t read the previous parts, I recommend you start with them.
Here’s the whole series:
- Introduction to game development
- Set up a playable game
- Graphics and animation
- Views and dialog boxes
- Scoring, storage, and sound (you are here)
- Finishing up and packaging
Prerequisites
- All the requirements from the previous part.
- More graphics assets – Graphics assets can be found all over game resource sites on the internet (Open Game Art for example). Just make sure to credit the makers.
- Sound and music assets – Similar to graphics assets audio files can also be found on game resource sites like Open Game Art. There are even resource sites dedicated to audio resources like BenSound.com. Again, same with graphics, just make sure you understand the license and credit the creators if necessary.
We will be using the conventions from the previous parts regarding code and file path references.
All the code for this tutorial is available for viewing and download on this GitHub repository.
Another Resource Pack
In this part, we have another resource pack. This pack contains additional graphics, background music, and some sound effects.

Click the image above or this link to download!
Important Note: The resource pack above can be used if you’re following along with this tutorial. It is part of the Langaw project on GitHub which is licensed with a CC-BY-NC-ND license.
It means that you can share, copy, and redistribute the material in any medium or format with some restrictions.
- You must give appropriate credit, provide a link to the license, and indicate if changes were made.
- You may not use the material for commercial purposes.
- If you remix, transform, or build upon the material, you may not distribute the modified material.
- You may not apply legal terms or technological measures that legally restrict others from doing anything the license permits.
Learn more about the CC-BY-NC-ND license by clicking here.
Let’s continue the build
In this part, we’ll be focusing on two main things: scoring and sound effects.
We will be using another Flutter plugin for storing the high scores. We need to store the highest score that the player achieves.
As for the sound, we’ll use an audio library that is already included with Flame.
Step 1: Scoring
The game’s goal, for now, is just to tap flies endlessly until the player misses. Aside from that, there’s no goal, no reward.
Let’s add in another goal. Let’s make it so that when a player taps and hits a fly, one point will be rewarded and added to the current score. Like any other game, the score starts at zero and resets to zero whenever a game is started.
A variable to keep the score
Let’s jump into the code and open up ./lib/langaw-game.dart. Add in another instance variable using the following code:
int score;
Just a quick refresher, instance variables are grouped together just below the class LangawGame line.
Inside the initialize method, let’s initialize the value of the score variable as soon as possible with the following line:
score = 0;
We need to reset this value every time the start button is clicked (every time a game is started).
Jump over to ./lib/components/start-button.dart and add the following line inside the onTapDown handler:
game.score = 0;
Displaying the score
So far so good! Next, we need to display the score.
The rendering code can be inside the game class. But, since rendering text on the canvas is quite a handful, let’s encapsulate that logic in its own component.
Create a component in ./lib/components/score-display.dart:
import 'dart:ui';
import 'package:flutter/painting.dart';
import 'package:langaw/langaw-game.dart';

class ScoreDisplay {
  final LangawGame game;

  ScoreDisplay(this.game) {}

  void render(Canvas c) {}

  void update(double t) {}
}
Let’s break it down: Starting with the import statements at the top, dart:ui gives us access to the Canvas and Offset classes; package:flutter/painting.dart gives us access to the TextPainter class; and package:langaw/langaw-game.dart gives us access to the game class.
Note: We already have an instance variable named game and this must be provided when creating an instance of this class. The same as all other components, controllers, and views we’ve defined in the previous parts.
Let’s add three more instance variables: painter is the TextPainter that we’ll use to render the value of the score on the screen; textStyle contains the styles that will control how the score is rendered; position will contain the Offset where the score will be painted on.
TextPainter painter;
TextStyle textStyle;
Offset position;
Then we have the constructor where we initialize the values of the instance variables.
ScoreDisplay(this.game) {
  painter = TextPainter(
    textAlign: TextAlign.center,
    textDirection: TextDirection.ltr,
  );

  textStyle = TextStyle(
    color: Color(0xffffffff),
    fontSize: 90,
    shadows: <Shadow>[
      Shadow(
        blurRadius: 7,
        color: Color(0xff000000),
        offset: Offset(3, 3),
      ),
    ],
  );

  position = Offset.zero;
}
Breakdown: First, we initialize the painter variable with a new instance of TextPainter. We set its textAlignproperty to center since we’ll be rendering the score horizontally centered on the screen. The textDirectionproperty is set to LTR (left-to-right) since the game is in English (which has a written direction of left to right).
Next, the textStyle property is initialized with an instance of TextStyle. Three properties are set: color is set to Color(0xffffffff) (which is solid white); font size is set to 90 logical pixels; and the shadowsproperty is set to a List of Shadows that contains only one item. This item defines a shadow that is offset to 3 logical pixels to the right and to the bottom. This gives the rendered text depth and contrast against the background in case the score is rendered on top of another white object (like the clouds).
To learn more about logical pixels please check the Flutter documentation about it.
The update method actually happens before the render (both initially and during the game loop) so let’s write it in first.
void update(double t) {
  if ((painter.text?.text ?? '') != game.score.toString()) {
    painter.text = TextSpan(
      text: game.score.toString(),
      style: textStyle,
    );

    painter.layout();

    position = Offset(
      (game.screenSize.width / 2) - (painter.width / 2),
      (game.screenSize.height * .25) - (painter.height / 2),
    );
  }
}
Breakdown: To avoid unnecessary recalculation of the text layout, nothing really happens if the text property (of the text property) of the painter variable is equivalent to the string form of the current score.
This is done with the following check:
(painter.text?.text ?? '') != game.score.toString()
The left part of the boolean expression might be a little confusing, so let me explain. This expression uses Dart’s null-aware operators.
The ?. operator checks if the object just before it is null, if it is, immediately stop the whole expression and return null. We already know that painter is initialized and not null so we don’t check it. We’re not sure though if the text property of painter is null or not, so we use this operator.
Another operator used is ??. This operator returns the left-hand side expression if it’s not null, if it is, the operator returns the right-hand side expression.
With the whole expression, if painter‘s text property is not set, the whole of painter.text?.text returns null. Since it’s followed by ??, if the value returned is an empty string. This final value is what gets compared to game.score.toString(). On the other hand, if painter‘s text property is set, the actual current score is returned.
You can read more about null-aware operators from this article. If you have more questions, don’t hesitate to ask me on my Discord server.
Now if the painter‘s text is not the same as the current score, we update its text property with a new instance of the TextSpan class that takes in the current value of the score variable in game and the reusable textStylevariable. Then the layout method is called so the TextPainter can calculate the dimensions of the new text it was just assigned.
Then we calculate a new instance of Offset and assign it to the position variable. We want the score to be horizontally centered. As for the vertical position, let’s place the score’s vertical center in about a quarter of the screen’s height from the top.
If you need an explanation about this calculation, just let me know.
Finally, inside the render method, add the following line of code:
void render(Canvas c) {
  painter.paint(c, position);
}
One line breakdown: We render the score by calling painter‘s paint method and supplying the parameters it requires: a canvas to draw on and an Offset to tell the painter where to draw the score.
The whole ./lib/components/score-display.dart should look like this:
import 'dart:ui';
import 'package:flutter/painting.dart';
import 'package:langaw/langaw-game.dart';

class ScoreDisplay {
  final LangawGame game;
  TextPainter painter;
  TextStyle textStyle;
  Offset position;

  ScoreDisplay(this.game) {
    painter = TextPainter(
      textAlign: TextAlign.center,
      textDirection: TextDirection.ltr,
    );

    textStyle = TextStyle(
      color: Color(0xffffffff),
      fontSize: 90,
      shadows: <Shadow>[
        Shadow(
          blurRadius: 7,
          color: Color(0xff000000),
          offset: Offset(3, 3),
        ),
      ],
    );

    position = Offset.zero;
  }

  void render(Canvas c) {
    painter.paint(c, position);
  }

  void update(double t) {
    if ((painter.text?.text ?? '') != game.score.toString()) {
      painter.text = TextSpan(
        text: game.score.toString(),
        style: textStyle,
      );

      painter.layout();

      position = Offset(
        (game.screenSize.width / 2) - (painter.width / 2),
        (game.screenSize.height * .25) - (painter.height / 2),
      );
    }
  }
}
Rendering the score component
To actually render the score display component, we must add it to the game class and include it when executing the game loop.
Let’s open up ./lib/langaw-game.dart and do the usual steps. Import the class file we just created:
import 'package:langaw/components/score-display.dart';
Then let’s add an instance variable that will hold an instance of ScoreDisplay:
ScoreDisplay scoreDisplay;
Add the following inside the initialize method (after resize has been called) to create a new instance of ScoreDisplay and assign it to the scoreDisplay variable (mind the capitalization), preferably below the button initializations:
scoreDisplay = ScoreDisplay(this);
Inside the update method, check if the current view is set to View.playing, and if it is, call scoreDisplay‘s update method. You can put this line anywhere.
Putting it as the last line (just above the method closing brace) is fine.
if (activeView == View.playing) scoreDisplay.update(t);
Then inside the game class’ render method, we do the same thing but call the render method instead. Remember that the order that you write the lines inside this method is the actual order the graphics are drawn on the screen with.
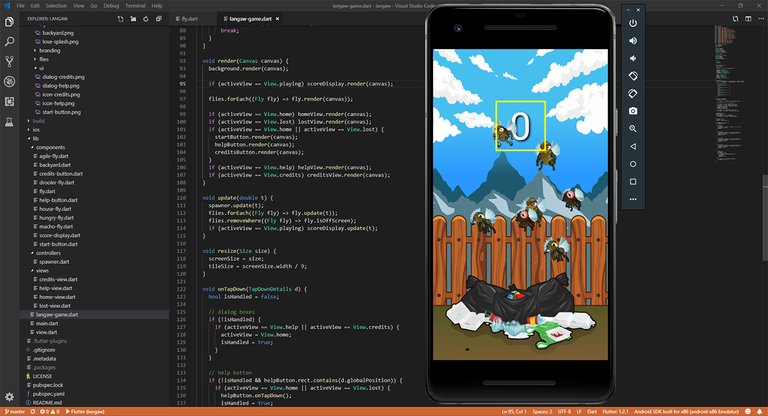
We want the score to be just above the background but behind everything else so flies can fly over it. So put the following line just after rendering the background:
if (activeView == View.playing) scoreDisplay.render(canvas);
With the above lines of code added, you should see something like this when you run the game:
Score for every fly
For players to earn score points, flies must be tapped and dropped.
To have this functionality, open up ./lib/components/fly.dart. Let’s import the View enum file as we will be needing access to the View values below.
import 'package:langaw/view.dart';
Inside the onTapDown handler, replace the existing single line of code with the following block:
if (!isDead) {
  isDead = true;

  if (game.activeView == View.playing) {
    game.score += 1;
  }
}
Breakdown: When a fly is tapped, we first check if it’s alive (!isDead). Nothing happens if the fly is already dead. If it’s alive, we set its isDead property to true to let the component know that this fly is now dead (just like what we previously had in here).
After that, we check if the current view is the “playing” view. We don’t need to add scores if the player is not playing. If the player is currently playing, we add 1 to the score variable. This should trigger an update in the ScoreDisplay instance.
Try running the game at this point to see something like the screenshot below.

Smarter flies
Flies don’t just fly around, they eat too. Besides, it would be boring if the player just waits and carefully taps the flies to not miss.
Let’s add another losing condition.
As soon as a fly appears on screen, it shows a countdown timer. This counter corresponds to how much the flies have eaten. When the timer hits zero, it means that the fly is full and the player loses.
This way, the game becomes more challenging and a little less boring.
We have to make sure that the player notices this countdown timer and see which flies are about to get full. We’ll use the callout graphics from the resource pack to show this countdown timer.
Let’s add the callout graphics from the resource pack into our assets directory under ./assets/images/ui/callout.png. Then we make sure to add it in ./pubspec.yaml using the following line along with the other assets:
- assets/images/ui/callout.png
Then open up ./lib/main.dart and add ui/callout.png to the list of preloaded images. This is inside the array that is a parameter to the Flame.images.loadAll call.
Flame.images.loadAll([
  // all the other images
  'ui/callout.png',
]);
Next, create a component for this callout in ./lib/components/callout.dart.
import 'dart:ui';
import 'package:flame/sprite.dart';
import 'package:langaw/components/fly.dart';

class Callout {
  final Fly fly;
  Rect rect;
  Sprite sprite;
  double value;

  TextPainter tp;
  TextStyle textStyle;
  Offset textOffset;

  Callout(this.fly) {}

  void render(Canvas c) {}

  void update(double t) {}
}
Breakdown: Here we create yet another component that is pretty standard. Except that our reference to the parent is not to game but to a fly. This is because a Fly class will instantiate this instead of the game class. Like a sub-component of the fly component.
This class has additional instance variables that will be used for painting the value inside the callout.
Let’s proceed by initializing the values inside the constructor:
Callout(this.fly) {
  sprite = Sprite('ui/callout.png');
  value = 1;
  tp = TextPainter(
    textAlign: TextAlign.center,
    textDirection: TextDirection.ltr,
  );
  textStyle = TextStyle(
    color: Color(0xff000000),
    fontSize: 15,
  );
}
Breakdown: Don’t be confused, the body is actually just four lines. The last two are expanded vertically for readability. Inside the constructor, we just assign initial values to our instance variables.
Inside the update method, we subtract a certain amount to the value variable and if gets down to zero, we set the game’s active view to the “you lose” view. All this should only happen if the game is currently in to the “playing” view. Put the following block into the update method.
if (fly.game.activeView == View.playing) {
  value = value - .5 * t;
  if (value <= 0) {
    fly.game.activeView = View.lost;
  }
}
Breakdown: First we check if the current view is View.playing, if it is we subtract .5 * t from value. The tvariable contains a fraction of the second from the last time update was called. This calculation makes sure that a fly has a lifetime of two seconds.
Then we check if the value has hit zero. If it has, we tell the game that the player loses.
After that, we make sure that the rect variable for this callout is updated so that the render method places it correctly relative to the parent fly. This block of code goes just below the value deduction block.
rect = Rect.fromLTWH(
  fly.flyRect.left - (fly.game.tileSize * .25),
  fly.flyRect.top - (fly.game.tileSize * .5),
  fly.game.tileSize * .75,
  fly.game.tileSize * .75,
);
Breakdown: Just like all other Rect initializations we’ve done so far, this is just one line spread vertically. The last two parameters are the Width and Height of the rect which are both set to three-quarters of the game tile size. The value for Left is just the same as the Left of the fly’s rect minus a quarter of the game tile size. The Top value uses the same logic but subtracts half of the game tile size.
Still inside the update method, the last block of code updates the text painter which draws the current value inside the callout graphics.
tp.text = TextSpan(
  text: (value * 10).toInt().toString(),
  style: textStyle,
);
tp.layout();
textOffset = Offset(
  rect.center.dx - (tp.width / 2),
  rect.top + (rect.height * .4) - (tp.height / 2),
);
Breakdown: Since we already initialized the tp variable with an instance of the TextPainter class, we just set its text property into an instance of the TextSpan class passing in the current value multiplied by ten converted to an integer and then to a string.
The value is multiplied by ten to make it look like it’s counting from nine down to zero.
Then we call the layout method so that the tp knows how big the text is going to be given the string of text and the style provided to it.
Next, we update the value of textOffset with a new Offset passing in a calculation that will center the text inside the white area of the callout.
Finally, write the render method to look like the following block of code:
void render(Canvas c) {
  sprite.renderRect(c, rect);
  tp.paint(c, textOffset);
}
First, we render the callout graphics, which should be a familiar line of code now. Then we draw the text using TextPainter‘s paint method passing the textOffset variable that we just updated in the update method.
The whole callout class file should look like this:
import 'dart:ui';
import 'package:flame/sprite.dart';
import 'package:flutter/painting.dart';
import 'package:langaw/components/fly.dart';
import 'package:langaw/view.dart';

class Callout {
  final Fly fly;
  Rect rect;
  Sprite sprite;
  double value;

  TextPainter tp;
  TextStyle textStyle;
  Offset textOffset;

  Callout(this.fly) {
    sprite = Sprite('ui/callout.png');
    value = 1;
    tp = TextPainter(
      textAlign: TextAlign.center,
      textDirection: TextDirection.ltr,
    );
    textStyle = TextStyle(
      color: Color(0xff000000),
      fontSize: 15,
    );
  }

  void render(Canvas c) {
    sprite.renderRect(c, rect);
    tp.paint(c, textOffset);
  }

  void update(double t) {
    if (fly.game.activeView == View.playing) {
      value = value - .5 * t;
      if (value <= 0) {
        fly.game.activeView = View.lost;
      }
    }

    rect = Rect.fromLTWH(
      fly.flyRect.left - (fly.game.tileSize * .25),
      fly.flyRect.top - (fly.game.tileSize * .5),
      fly.game.tileSize * .75,
      fly.game.tileSize * .75,
    );

    tp.text = TextSpan(
      text: (value * 10).toInt().toString(),
      style: textStyle,
    );
    tp.layout();
    textOffset = Offset(
      rect.center.dx - (tp.width / 2),
      rect.top + (rect.height * .4) - (tp.height / 2),
    );
  }
}
Now we just need to add an instance of the callout component into the Fly class. This process should be familiar as we have done it repetitively in the previous parts. Open up ./lib/components/fly.dart and import the Callout class file:
import 'package:langaw/components/callout.dart';
Then add an instance variable that will hold the callout:
Callout callout;
Inside the Fly constructor, initialize the callout variable and pass this as the callout’s reference to “this fly”:
callout = Callout(this);
The callout itself must be updated if the fly is not dead, so inside the Fly‘s update method write the following line at the bottom of the else (the fly is not dead) block.
callout.update(t);
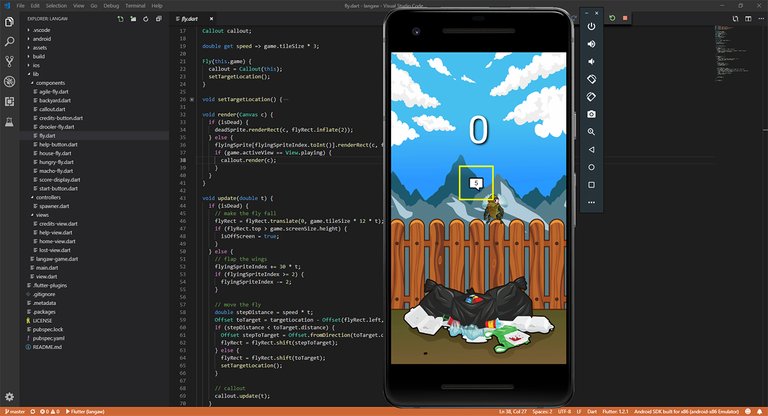
Lastly, render the callout if the fly is not dead (inside the else block) and the game’s current view is set to “playing”. Put this inside the render method:
if (game.activeView == View.playing) {
  callout.render(c);
}
If you run the game now, you should see something like this:
View the code at this step on GitHub.
Step 2: High score storage
Gaining those precious points to add to the score would be a waste if the highest score is not recorded by the game.
Let’s record the highest score so players have the opportunity to get better at the game by challenging the current best performance.
When recording the highest score, we only need to store one piece of information. Just the score, an integer.
This simple task can be accomplished by the shared_preferences plugin. This plugin contains the SharedPreferences class that handles storage of simple data (numbers, strings, and booleans). It also internally handles how to save the data based on what platform (iOS or Android) the game is running.
Prepare the data storage
Just like Flame, shared_preferences is a plugin for Flutter. To install this plugin, open up ./pubspec.yaml and add the following line under the dependencies: section just below the flame line.
shared_preferences: ^0.5.1+2
Note: Mind the indentation, ./pubspec.yaml is dependent on the indentation to know which lines are under what section.
Next, run flutter packages get in a terminal to make sure that the shared_preferences plugin is downloaded to your computer like so:
$ flutter packages get
Alternatively, if you’re following by using VS Code, you can press Ctrl + Shift + P, type “flutter” and click Flutter: Get Packages.
To easily read and write data, we need an easily accessible instance of SharedPreferences in an instance variable in the game context.
Open up ./lib/langaw-game.dart and import the shared_preferences package file:
import 'package:shared_preferences/shared_preferences.dart';
Then add a final instance variable inside the LangawGame class. This makes having an instance of the SharedPreferences ready before even creating the LangawGame instance. Declare the instance variable like so:
final SharedPreferences storage;
Any instance variable that is marked final must have an initial value by the time it is declared or a value must be fed to it via the constructor. So let’s modify our constructor method so that it looks like the following block of code:
LangawGame(this.storage) {
  initialize();
}
In the constructor, when you require a parameter that is prefixed by a this. it means that whatever value passed to it will be the value of the variable that it’s referring to by name.
After that, let’s jump over the ./lib/main.dart file so we can initialize the game class properly.
First, we need to import the shared_preferences package file here too:
import 'package:shared_preferences/shared_preferences.dart';
Next, create an instance of the SharedPreferences inside the main function.
SharedPreferences storage = await SharedPreferences.getInstance();
Note: The .getInstance factory returns a Future so we must use the await keyword to pause the execution and wait for whatever the Future returns (which should be an instance of SharedPreferences). The mainfunction is already async so we can await for Futures in its body.
In the part of the code where you declare an instance of the LangawGame class, pass the storage variable we just declared as the first (and only) parameter. The code should look like the following:
LangawGame game = LangawGame(storage);
Now we should have access to the storage variable wherever we have access to the game (instance of the LangawGame class).
Display the high score
Our game should feature an always-displayed high-score. We can do this using another component similar to the ScoreDisplay class.
Create a class file in ./lib/components/highscore-display.dart and write in the following class:]
import 'dart:ui';
import 'package:flutter/painting.dart';
import 'package:langaw/langaw-game.dart';

class HighscoreDisplay {
  final LangawGame game;
  TextPainter painter;
  TextStyle textStyle;
  Offset position;

  HighscoreDisplay(this.game) {}

  void render(Canvas c) {}
}
As you can see, it’s a pretty standard class file without an update method since the score will be updated manually.
The instance variables must be initialized by the time an instance of this class is created so let’s modify the constructor with the following code:
HighscoreDisplay(this.game) {
  painter = TextPainter(
    textAlign: TextAlign.center,
    textDirection: TextDirection.ltr,
  );

  Shadow shadow = Shadow(
    blurRadius: 3,
    color: Color(0xff000000),
    offset: Offset.zero,
  );

  textStyle = TextStyle(
    color: Color(0xffffffff),
    fontSize: 30,
    shadows: [shadow, shadow, shadow, shadow],
  );

  position = Offset.zero;

  updateHighscore();
}
Constructor breakdown: The first part initializes the painter variable with an instance of the TextPainterclass with the required values for text alignment and text direction.
Next, we build a local Shadow variable that will help create a stroke effect when added to the textStyle that is initialized next. We put in four instances of the shadow variable so together when overlapped, they look like a text stroke.
The position variable is set to an initial value of zero (0, 0) as this will be calculated later.
Finally, we call a function named updateHighscore() which we haven’t defined or written yet. This handles the manual update of the high-score value and the text painted by the painter object.
Let’s build the manual update method by adding in the following function:
void updateHighscore() {
  int highscore = game.storage.getInt('highscore') ?? 0;

  painter.text = TextSpan(
    text: 'High-score: ' + highscore.toString(),
    style: textStyle,
  );

  painter.layout();

  position = Offset(
    game.screenSize.width - (game.tileSize * .25) - painter.width,
    game.tileSize * .25,
  );
}
Breakdown: In this method, we get the high-score value from the SharedPreferences instance we have saved in the storage variable of the game class. Since our scores (including the high-score) are just whole numbers we’ll store them as integers.
Then we update the painter‘s text property to a new instance of TextSpan passing in the high-score we just retrieved as the text. This is almost similar to the updating process in ScoreDisplay.
After calling layout (which determines the size of the text when painted), we set the position variable to a new Offset whose values will make the painted text’s right side at about one-fourth from the right edge of the screen and it’s top at the same distance from the top edge of the screen.
We finish the class by writing in the contents of the render method:
void render(Canvas c) {
  painter.paint(c, position);
}
Nothing complicated here, just a painting the high-score on the screen at the position pre-calculated in the updateHighscore method.
Here’s the whole class file:
import 'dart:ui';
import 'package:flutter/painting.dart';
import 'package:langaw/langaw-game.dart';

class HighscoreDisplay {
  final LangawGame game;
  TextPainter painter;
  TextStyle textStyle;
  Offset position;

  HighscoreDisplay(this.game) {
    painter = TextPainter(
      textAlign: TextAlign.center,
      textDirection: TextDirection.ltr,
    );

    Shadow shadow = Shadow(
      blurRadius: 3,
      color: Color(0xff000000),
      offset: Offset.zero,
    );

    textStyle = TextStyle(
      color: Color(0xffffffff),
      fontSize: 30,
      shadows: [shadow, shadow, shadow, shadow],
    );

    position = Offset.zero;

    updateHighscore();
  }

  void updateHighscore() {
    int highscore = game.storage.getInt('highscore') ?? 0;

    painter.text = TextSpan(
      text: 'High-score: ' + highscore.toString(),
      style: textStyle,
    );

    painter.layout();

    position = Offset(
      game.screenSize.width - (game.tileSize * .25) - painter.width,
      game.tileSize * .25,
    );
  }

  void render(Canvas c) {
    painter.paint(c, position);
  }
}
The only thing missing now is to add it to the game class. Let’s do that by opening the file ./lib/langaw-game.dart.
Import the HighscoreDisplay class with the following line:
import 'package:langaw/components/highscore-display.dart';
Then add an instance variable that will hold an instance of HighscoreDisplay.
HighscoreDisplay highscoreDisplay;
Inside the initialize method, initialize the highscoreDisplay variable (preferably below scoreDisplay):
highscoreDisplay = HighscoreDisplay(this);
Finally inside the render method, right after rendering the background (before rendering scoreDisplay), render the high score using the following code:
highscoreDisplay.render(canvas);
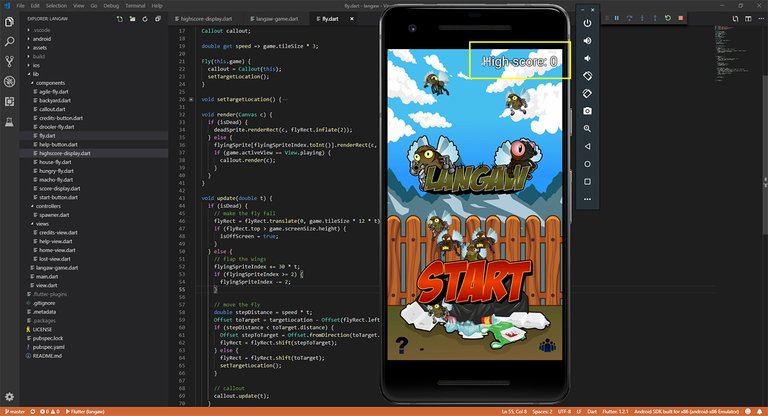
Try running the game and you should see some text on the upper-right corner of the screen indicating the current high-score (which is just zero for now).
Updating the high score
That high-score display is useless right now. It needs to be updated every time a player scores as long as the following conditions are met:
- The player is currently playing (the view is set to “playing”)
- The current score is higher than the current high-score
To do this, let’s open the file ./lib/components/fly.dart. Inside the onTapDown handler, we already have an if block that checks if the player is currently playing.
Inside that block, just below the line where we add a value of 1 to the score, insert the following block:
if (game.score > (game.storage.getInt('highscore') ?? 0)) {
  game.storage.setInt('highscore', game.score);
  game.highscoreDisplay.updateHighscore();
}
Breakdown: This block just checks if the new score is higher than what is currently saved as high-score. At this point, we already know that the player is playing because of the enclosing if block.
If the condition is satisfied, first we call the setInt method passing over the string 'highscore' and the new value. This method is the equivalent of getInt but writes the passed value in the string key reference instead of reading a value.
After that, we update our HighscoreDisplay instance manually to show the player that his new score is now the current highest.
The changed section should look like this:

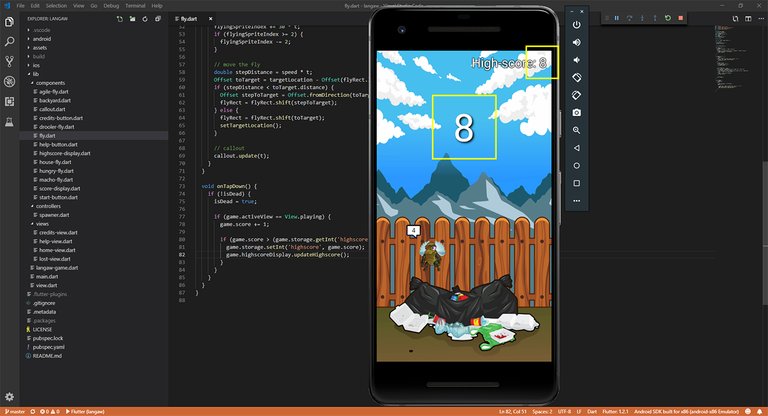
Try running the game now and you’ll see that every time you get a higher score than what is displayed in the high-score (upper-right), that value will be updated.
It should start from zero and follow along as you score. If you play another game, you should see that the previous high-score is retained. This should challenge the player to beat his own record.
View the code at this step on GitHub.
Step 3: Sound effects
What’s a game without sound effects right? Fortunately for us, Flame made adding sound to a game really easy.
First, we need to create a directory in the assets folder that will contain our sound effects files. Create the directory ./assets/audio/sfx and paste all the files inside the ./audio/sfx folderin the resource pack.
You should have the following file structure:
./assets
./assets/audio
./assets/audio/sfx
./assets/audio/sfx/haha1.ogg
./assets/audio/sfx/haha2.ogg
./assets/audio/sfx/haha3.ogg
./assets/audio/sfx/haha4.ogg
./assets/audio/sfx/haha5.ogg
./assets/audio/sfx/ouch1.ogg
./assets/audio/sfx/ouch2.ogg
./assets/audio/sfx/ouch3.ogg
./assets/audio/sfx/ouch4.ogg
./assets/audio/sfx/ouch5.ogg
./assets/audio/sfx/ouch6.ogg
./assets/audio/sfx/ouch7.ogg
./assets/audio/sfx/ouch8.ogg
./assets/audio/sfx/ouch9.ogg
./assets/audio/sfx/ouch10.ogg
./assets/audio/sfx/ouch11.ogg
Next, we need to tell Flutter that we want these new files to be included in the asset bundle during compilation. So open up ./pubspec.yaml and add the following block of code under the asset section (the asset section has been included for reference).
  assets:
    - assets/audio/sfx/haha1.ogg
    - assets/audio/sfx/haha2.ogg
    - assets/audio/sfx/haha3.ogg
    - assets/audio/sfx/haha4.ogg
    - assets/audio/sfx/haha5.ogg
    - assets/audio/sfx/ouch1.ogg
    - assets/audio/sfx/ouch2.ogg
    - assets/audio/sfx/ouch3.ogg
    - assets/audio/sfx/ouch4.ogg
    - assets/audio/sfx/ouch5.ogg
    - assets/audio/sfx/ouch6.ogg
    - assets/audio/sfx/ouch7.ogg
    - assets/audio/sfx/ouch8.ogg
    - assets/audio/sfx/ouch9.ogg
    - assets/audio/sfx/ouch10.ogg
    - assets/audio/sfx/ouch11.ogg
Again, with ./pubspec.yaml file, you must mind the indentation or leading spaces as they control which section an item is under.
Then let’s go to ./lib/main.dart and add the following block inside the main function:
Flame.audio.disableLog();
Flame.audio.loadAll(<String>[
  'sfx/haha1.ogg',
  'sfx/haha2.ogg',
  'sfx/haha3.ogg',
  'sfx/haha4.ogg',
  'sfx/haha5.ogg',
  'sfx/ouch1.ogg',
  'sfx/ouch2.ogg',
  'sfx/ouch3.ogg',
  'sfx/ouch4.ogg',
  'sfx/ouch5.ogg',
  'sfx/ouch6.ogg',
  'sfx/ouch7.ogg',
  'sfx/ouch8.ogg',
  'sfx/ouch9.ogg',
  'sfx/ouch10.ogg',
  'sfx/ouch11.ogg',
]);
Breakdown: The first line disables extra debug logging so that it does not write too much log information into the debug console. If you have no idea what this is, you can ignore it, for now. I’ll try to discuss this in a separate article in the future.
The next lines are actually just one line, a function call that has a parameter that is an array. The values of the array have been spread vertically for readability. This preloads all the sound effects files so that they are cached and ready to be played by the game anytime.
You might have noticed that this is the same format as preloading the images.
The next step is to play the sounds at the appropriate places.
We basically have two sound effects. An “ouch” and a “haha”. The ouch sound is played when a player taps a fly and kills it. The haha sound is played every time the player loses.
You might be wondering why we have eleven hahas and five ouches.
Let me share a little game development secret
Anything repetitive is boring. I get it, most of the things in life is repetitive (breathing, days, game loop), but we can make our game’s sounds a little less boring by using different versions of that sound effect every time it’s played. If we play the same sound every time the player kills a fly, it could get really boring really fast. We might as well skip adding sound effects.
To do this every time we need to play a sound we get a random number (from game‘s rnd variable) and play that corresponding variation of “the same” sound.
Let’s open up ./lib/components/fly.dart and import Flame into this file:
import 'package:flame/flame.dart';
Then add the following block of code inside the onTapDown handler, right after checking if the tapped fly is not yet dead.
Flame.audio.play('sfx/ouch' + (game.rnd.nextInt(11) + 1).toString() + '.ogg');
Breakdown: We just call the play method of Flame’s audio library passing in the filename of the audio file we want to play.
Let me get into detail with the randomizer part — (game.rnd.nextInt(11) + 1). The function nextInt takes in an integer parameter and returns and integer with a random value from zero up to (but not including) the passed parameter. So if we pass 11, we could get any number from 0 to 10. We then add 1 to it so the returned set becomes 1 to 11 matching our filenames (ouch**1**.ogg, ouch**2**.ogg, …, ouch**11**.ogg).
If you try the game right now, you’ll notice that flies now “react verbally” when you tap them. It’s impossible to demo this using a screenshot so I’ll reserve the demo to the final video demo.
Let’s now work on the sound effects for losing a game.
Open up ./lib/langaw-game.dart and modify code inside the if block that checks if the player “is playing” and just tapped on the screen but missed a fly.
if (activeView == View.playing && !didHitAFly) {
  Flame.audio.play('sfx/haha' + (rnd.nextInt(5) + 1).toString() + '.ogg');
  activeView = View.lost;
}
Breakdown: We’ve added the same call to play a sound effect but pass in the “haha” file randomized to five variations.
We also have one other losing condition so let’s take care of that by opening ./lib/components/callout.dartand importing Flame to the file.
import 'package:flame/flame.dart';
Inside the update method, modify the if block that checks if value is now less than or equal to zero so it looks like the following:
if (value <= 0) {
  Flame.audio.play('sfx/haha' + (fly.game.rnd.nextInt(5) + 1).toString() + '.ogg');
  fly.game.activeView = View.lost;
}
Breakdown: It’s basically the same code as above, the difference is how we access the game’s rnd object. We don’t have a direct reference to the game instance in this class so we pass through the fly reference first, then fly‘s game reference, then on to the rnd object.
Try running the game now. Again, the demo will be in the final video demo at the end of this part.
View the code at this step on GitHub.
Step 4: Background music
Let’s add in some background music while we’re at it.
BGM (or background music) sets the mood for the game or the current screen the player is on. For this game, we’ll have two different BGMs one for the playing screen and another for all the others.
First, let’s copy the files inside ./audio/bgm in the resource pack into our game directory and place them in ./lib/assets/audio/bgm to have a file structure that looks like this:
./assets
./assets/audio
./assets/audio/bgm
./assets/audio/bgm/home.mp3
./assets/audio/bgm/playing.mp3
These files need to be included in the bundle too so let’s include them in ./pubspec.yaml assets section (the assets and the first sfx lines are included for reference):
  assets:
    - assets/audio/bgm/home.mp3
    - assets/audio/bgm/playing.mp3
    - assets/audio/sfx/haha1.ogg
BGM files will be looped so let’s just include them in the preload list. Let’s open ./lib/main.dart and include the BGM files in the array passed to Flame.audio.loadAll:
Flame.audio.loadAll([
  'bgm/home.mp3',
  'bgm/playing.mp3',
  'sfx/haha1.ogg',
With SFX (or sound effects), we can just play them and forget about them since they play only once. With BGMs though we need to have a reference to their players so we can control them with operations like pause, resume, and seek.
We’ll store the variables that will keep these references in the game class so let’s open up ./lib/langaw-game.dart.
First thing’s first, we need access to the AudioPlayer class so let’s import that first:
import 'package:audioplayers/audioplayers.dart';
Next, we need instance variables that will hold the reference to the audio players for each of the BGM files.
AudioPlayer homeBGM;
AudioPlayer playingBGM;
Inside the initialize method, we initialize these variables, pause the players, and play the home BGM using the following block:
homeBGM = await Flame.audio.loop('bgm/home.mp3', volume: .25);
homeBGM.pause();
playingBGM = await Flame.audio.loop('bgm/playing.mp3', volume: .25);
playingBGM.pause();

playHomeBGM();
Breakdown: The first line gets an instance of an AudioPlayer with the passed filename loaded. We’re using the loop method so this will immediately start playing the BGM. We cancel this effect by immediately following it with homeBGM.pause() which should be self-explanatory.
You may notice that we have the volume set to .25 which is one-fourth of its original volume. This is because of personal gaming experience where the music is just too loud and it drowns more important aspects of the game. Feel free to play with this value. Valid values are from 0 (muted) to 1 (full volume).
The next two lines do the same thing but for the playing BGM.
Lastly, we call playHomeBGM() (a method we’re yet to write) to start playing the home BGM. Let’s write this function and it’s playing equivalent:
void playHomeBGM() {
  playingBGM.pause();
  playingBGM.seek(Duration.zero);
  homeBGM.resume();
}

void playPlayingBGM() {
  homeBGM.pause();
  homeBGM.seek(Duration.zero);
  playingBGM.resume();
}
Breakdown: These two methods do the same thing but one is for home BGM and the other is for playing BGM. They’re basically opposites or mirrors of each other.
With playHomeBGM, we pause the playingBGM and set its position back to the beginning (Duration.zero). On the other hand, playPlayingBGM does the same thing but swap homeBGM and playingBGM.
Every time the player loses, we should revert back to the homeBGM, so inside the onTapDown handler and inside the miss condition (just below playing the “haha” SFX), add the following line to pause and reset the playingBGM and play the homeBGM.
playHomeBGM();
Then quickly jump over to ./lib/components/callout.dart and add the following line inside the lose condition (if block to check if value is less than or equal to zero) just below the line that plays the “haha” SFX:
fly.game.playHomeBGM();
Finally, the last step is to play the playing BGM when starting a game (tapping the start button) so let’s open up ./lib/components/start-button.dart and add the following line just before closing the onTapDown method:
game.playPlayingBGM();
It’s time to run the game and listen to the awesome BGMs our game now has. View the final demo video below to listen if you’re not yet following along with your own code.
View the code at this step on GitHub.
Step 5: BGM and SFX control
It’s generally nice to have sound and music in the game, but it’s not for everyone (or every situation). There are times where you just want to play a game in silence.
To do this we will provide our players with two buttons, one mutes the music and the other mutes the sound effects.
Control buttons
The two buttons we’ll be making will have two states: enabled and disabled. We already have graphical representations for both buttons and both states (four in all) in the resource pack.
Let’s copy the remaining icons from the ./images/ui/ folder of the resource pack to our assets directory in ./assets/images/ui/ to have a file structure that looks like this:
./assets
./assets/images
./assets/images/ui
./assets/images/ui/icon-music-disabled.png
./assets/images/ui/icon-music-enabled.png
./assets/images/ui/icon-sound-disabled.png
./assets/images/ui/icon-sound-enabled.png
Just like all the other assets, we need to add these files to ./pubspec.yaml‘s assets section to let Flutter know we want these files to be included in the build bundle.
    - assets/images/ui/icon-music-disabled.png
    - assets/images/ui/icon-music-enabled.png
    - assets/images/ui/icon-sound-disabled.png
    - assets/images/ui/icon-sound-enabled.png
Then let’s go to ./lib/main.dart to preload these icons. Add the following lines to the array of filenames that are passed to the call to Flame.images.loadAll:
'ui/icon-music-disabled.png',
'ui/icon-music-enabled.png',
'ui/icon-sound-disabled.png',
'ui/icon-sound-enabled.png',
Now we’ll create the buttons and add them to the game class. These buttons are similar to the help and credits buttons with minor differences.
Create the class file ./lib/components/music-button.dart and add write the following class:
import 'dart:ui';
import 'package:flame/sprite.dart';
import 'package:langaw/langaw-game.dart';

class MusicButton {
  final LangawGame game;
  Rect rect;
  Sprite enabledSprite;
  Sprite disabledSprite;
  bool isEnabled = true;

  MusicButton(this.game) {
    rect = Rect.fromLTWH(
      game.tileSize * .25,
      game.tileSize * .25,
      game.tileSize,
      game.tileSize,
    );
    enabledSprite = Sprite('ui/icon-music-enabled.png');
    disabledSprite = Sprite('ui/icon-music-disabled.png');
  }

  void render(Canvas c) {
    if (isEnabled) {
      enabledSprite.renderRect(c, rect);
    } else {
      disabledSprite.renderRect(c, rect);
    }
  }

  void onTapDown() {
    if (isEnabled) {
      isEnabled = false;
      game.homeBGM.setVolume(0);
      game.playingBGM.setVolume(0);
    } else {
      isEnabled = true;
      game.homeBGM.setVolume(.25);
      game.playingBGM.setVolume(.25);
    }
  }
}
Breakdown: Since this is similar to the help and credits buttons, I’ll only break down the different parts.
Instead of keeping just one sprite variable to store the button’s sprite. We have two variables, one that holds the enabled sprite and one that holds the disabled sprite. The button is positioned on the upper-left corner of the screen with it’s left and top edges at one-fourth of a tile away from the left and top edges of the screen, respectively.
We also have another variable called isEnabled which is a boolean meaning it can hold either true or false. This variable can be manipulated to toggle the state of the button and to render the appropriate sprite as can be seen inside the render method.
The most important difference though, is the onTapDown handler. There’s an if block that checks if isEnabledis set to true. If it is, the value is flipped to false and the volume of both homeBGM and playingBGM (in gameinstance) is set to zero. If isEnabled is already set to false, it toggles the value back to true and set’s the volume of both BGMs back to .25 (the initial value).
Let’s create the other control button at ./lib/components/sound-button.dart with the following code:
import 'dart:ui';
import 'package:flame/sprite.dart';
import 'package:langaw/langaw-game.dart';

class SoundButton {
  final LangawGame game;
  Rect rect;
  Sprite enabledSprite;
  Sprite disabledSprite;
  bool isEnabled = true;

  SoundButton(this.game) {
    rect = Rect.fromLTWH(
      game.tileSize * 1.5,
      game.tileSize * .25,
      game.tileSize,
      game.tileSize,
    );
    enabledSprite = Sprite('ui/icon-sound-enabled.png');
    disabledSprite = Sprite('ui/icon-sound-disabled.png');
  }

  void render(Canvas c) {
    if (isEnabled) {
      enabledSprite.renderRect(c, rect);
    } else {
      disabledSprite.renderRect(c, rect);
    }
  }

  void onTapDown() {
    isEnabled = !isEnabled;
  }
}
Breakdown: You’ll notice that this is almost exactly like the MusicButton class with its position is set to the upper-left corner of the screen but a little to the right. Also, the onTapDown handler is just a simple flip/toggle of the boolean value. This is because we don’t need to mute the SFX players due to their “play and forget” nature.
For these buttons to show up in the game, we need to add them to the game class. Let’s open up ./lib/langaw-game.dart and import the buttons we just created:
import 'package:langaw/components/music-button.dart';
import 'package:langaw/components/sound-button.dart';
Then the instance variables that will hold instances of our button classes:
MusicButton musicButton;
SoundButton soundButton;
We need to initialize these buttons inside the initialize method, below help and credits button initialization is fine:
musicButton = MusicButton(this);
soundButton = SoundButton(this);
Next, we need to call their render methods from the game class’ own render method. Please have these buttons rendered last (but before dialog boxes) so that they’re available anytime in the game except when viewing the help and credits dialog boxes:
musicButton.render(canvas);
soundButton.render(canvas);
Lastly, we need to forward the tap down events to the button’s onTapDown handlers. Remember that objects on top should receive tap events first. Since our buttons will be behind the dialog boxes, the hit test for these buttons should be just below the check for dialog boxes tap down handler.
// music button
if (!isHandled && musicButton.rect.contains(d.globalPosition)) {
  musicButton.onTapDown();
  isHandled = true;
}

// sound button
if (!isHandled && soundButton.rect.contains(d.globalPosition)) {
  soundButton.onTapDown();
  isHandled = true;
}
Sound effects control
The MusicButton class is already handling the volume of the BGMs. The only thing missing now is having the SoundButton‘s state affect the actual SFX.
What we’ll want to do is check the state of the sound button before trying to play a sound effect. This can easily be done by enclosing the “play” call with an if block that checks if the soundButton‘s isEnabled property is set to true.
We have to change three places to achieve this, first in ./lib/langaw-game.dart (inside the onTapDownhandler):
if (soundButton.isEnabled) {
  Flame.audio.play('sfx/haha' + (rnd.nextInt(5) + 1).toString() + '.ogg');
}
Second, in ./lib/components/callout.dart (inside the update method):
if (fly.game.soundButton.isEnabled) {
  Flame.audio.play('sfx/haha' + (fly.game.rnd.nextInt(5) + 1).toString() + '.ogg');
}
And last, in ./lib/components/fly.dart (inside the onTapDown handler):
if (game.soundButton.isEnabled) {
  Flame.audio.play('sfx/ouch' + (game.rnd.nextInt(11) + 1).toString() + '.ogg');
}
View the code at this step on GitHub.
Gameplay test
Here’s a demo of game’s current state. If you’ve been following along, you should have something that looks the same.
Conclusion
That should take care of all the goals we had for this part. We have a scoring system, high-score storage, sound effects, background music, and buttons that mute the SFX and BGM.
Before moving on, let me present a challenge. There’s one little feature that I intentionally left out. The state of the sound and music control buttons reset to “enabled” every time the player launches the game.
By this time, you should have enough knowledge and experience to modify the buttons so that their states are saved. So try it out.
If you find it difficult, don’t hesitate to contact me by sending me an email or dropping a comment below. You could also join my Discord server so we can communicate in real time.
What’s next
The final part is next. We’ll be addressing some bugs and publishing our game to Google Play Store. I hope to see you on the finish line!
Hi japalekhin,
Visit curiesteem.com or join the Curie Discord community to learn more.
Congratulations @japalekhin! You have completed the following achievement on the Steem blockchain and have been rewarded with new badge(s) :
You can view your badges on your Steem Board and compare to others on the Steem Ranking
If you no longer want to receive notifications, reply to this comment with the word
STOPVote for @Steemitboard as a witness to get one more award and increased upvotes!
The effort you put in that you like is remarkable. do not stop. but mostly thanks for sharing what you know with the steemit community.
Thank you, words like these are what keep me going.
Great write up you have there, find the time to teach all these things in the first place really talks that you have a great heart for others.
I really enjoyed reading your tutorials and I know many gamers along the blockchain will find it really interesting to learn. Great work and keep the sharing spirit up always
Posted using Partiko Android
Thank you @ferrate!
You are humbly welcome
Posted using Partiko Android