
Why would someone want to own their own instance of WordPress instead of using WordPress.com?
Cost/Benefit
For a new user of the platform doing things this way will give you access to features you wouldn't normally get such as far more theme and design freedom without paying for the "Personal" tier; CDN$60 for an annual plan, or CDN$9/month at CDN$108 over a year.
However the biggest selling point to having your own installation is that you can make use of the huge library of plugins without paying for the "Business" tier; CDN$396 for an annual plan, or CDN$45/month at CDN$540 over a year. A complete breakdown of what you get for each tier is available on the WordPress website.
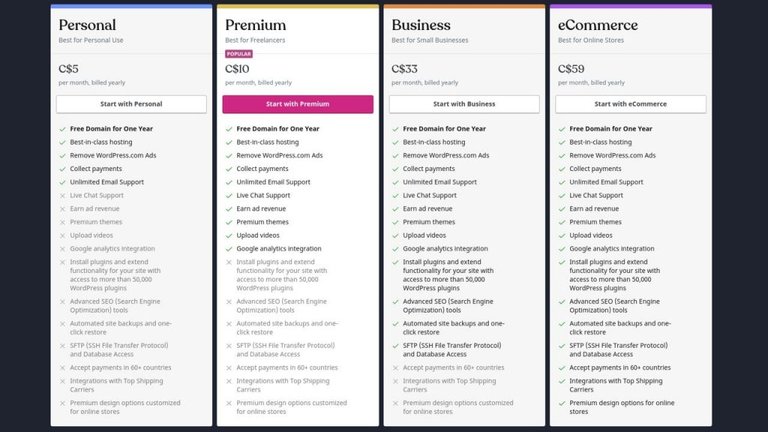
With this guide you can do it all completely free on your own computer running in a virtual machine(VM), around CDN$50 if you want to run it on a Raspberry Pi(depending on the model, I tested with a Pi4 4GB). If you want your website to be visible publicly I used a a very basic virtual private server(VPS) for CDN$6/month. I also purchased this domain name for ~CDN$33 for the year; when paired with the VPS that comes to CDN$105 for the year. That's more than WordPress "Personal", a little less than "Premium", but way cheaper than "Business" to get access to the plugin library.
Cons
Only a VPS or other hosting service will make your blog public to the internet, but the other installation options will allow you to explore WordPress in full with minimal to no cost.
There are some down sides:
- You are your own tech support.
- Security and data safety are in your own hands.
- Search engine optimisation is up to you to optimise.
- Some advanced features, like eCommerce, could be a little difficult at first
- but I haven't really looked into what is involved beyond getting a blog going just yet.
In most cases everything that WordPress, the company, would do for you there is likely already a plugin for that, except for the tech support. Your time is going to be the trade off for the savings, but it makes for a fun project and you'll learn a lot if you start to go down this rabbit hole.
DISCLAIMER: Certain email notification features of WordPress will not be usable from just following this guide. Setting that up may be a follow up post at some point but is outside the scope here.
Background & Prep
Most guides out there will install WordPress on what is called the LAMP stack; short for Linux, Apache, MySQL, and PHP. It can be installed with Windows Server, or the WAMP stack but I won't be going into that. My install script is intended to be used with Ubuntu Server 20.04. I've replaced Apache with NGINX, which is dubbed the LEMP stack.
For this installation MariaDB is replacing MySQL, which is a fork of the latter's code base. To the best of my knowledge MariaDB comes with no drawbacks, where as using NGINX does come with some trade-offs that can be read about in more detail from WordPress Support.
My choice of VPS provider that my blog is hosted on is Vultr. However there are many others to choose from. Digital Ocean is another great choice who offer a "1-Click App" install using the above mentioned LAMP stack. When constructing my install scripts a large amount of the credit must go to Digital Ocean guide by Lyn Muldrow and the subsequent authors of the prerequisite guides:
Whether installing Ubuntu Server 20.04 in a VM(install OpenSSH when installing the VM), on a RaspberryPi, or on a VPS, please setup that system and return once you have logged into it with SSH.
- RaspberryPi:
ssh [email protected] - VM:
ssh [email protected] - VPS:
ssh [email protected]
With a VPS install you may start with only a root user. In this case you will need to create a new user, and give it super user privileges with the following commands. Replace "newUser" with your desired username, and assign a strong password; preferably one strong enough that you'd forget if not written down. Other information you are prompted for is unnecessary.
adduser newUser
usermod -aG sudo newUser
Exit the root SSH session and log back in with the new user.
Secure Your Server's SSH
If on a RaspberryPi or in a VM, as it's not open to incoming connections from the internet, you don't need to do the next step. Although feel free to do so for practice as it will convey some security concepts if you do ever move to a setup public on the internet. Windows users will now need to install Putty or another SSH utility.
Enter this command on your local machine to create an RSA key-pair. You will be prompted to encrypt the key with a password and please make it as secure as, but unique from, your new user's password. Replace "key_name" with whatever you want to call it.
ssh-keygen -f ~/.ssh/key_name -t rsa -b 4096Print out and copy the public key with this command on Linux/Mac(the ".pub" at the end is necessary), or copy what is printed out after generating the key with Putty.
cat ~/.ssh/key_name.pubAdd the public key to the "authorized_keys" file on your server with these commands when logged in as your new user.
mkdir .ssh
export PUB_KEY="paste_what_you_copied_here"
echo $PUB_KEY >> ~/.ssh/authorized_keys
Test that you can now successfully log into your server without being prompted for a password. I do not recommend leaving SSH capabilities accessible with a password. We will now lock-down the SSH connection. Open the SSH configuration file with:
sudo nano /etc/ssh/sshd_configThree parameters we are looking for are "Port", "PermitRootLogin", and "PasswordAuthentication". Change those lines to look like the following, pick an actual number for "Port"(not these literal words), and add the fourth to the bottom of the file:
Port (Private Port's 49152 - 65535)
PermitRootLogin no
PasswordAuthentication No
Protocol 2
Close the file, accept the changes, and save. Using the nano text editor do so with these commands.
Ctrl + x
Ctrl + y
Enter
Restart SSH.
sudo systemctl reload sshSet up the firewall to allow ssh through your newly assigned port number, and enter "y" to accept the risk of interrupting SSH. Check that the port is allowed.
sudo ufw allow xxxxx
sudo ufw enable
y
sudo ufw status
Open a new SSH session before closing your current one. Set the new port number and log in with your new user.
ssh -p xxxxx [email protected]If unsuccessful return to your previous session's windows and make sure the port number in your SSH configuration file, and from the ufw status output match. Then restart SSH again after making any adjustments to the configuration file and try again. Or start over.
When successful your VPS is now in lock-down so make sure to back up the key-pair from Putty or your .ssh/ folder, along with the password for both it and your server's user. If those are lost you are not getting back into your server, but neither will anyone else... Probably.
Install LEMP & WordPress
These instructions can begin to be followed from my GitHub repository here: https://github.com/AustinFoss/wp-on-lemp
Software that will be installed:
- net-tools
- Fail2Ban
- PHP
- WordPress
- NGINX
- MariaDB
- *Certbot
Now, logged in as your new user, download the installation scripts:
git clone https://github.com/AustinFoss/wp-on-lemp && cd wp-on-lempYour setup will determine how you will install the software. In a VM or on a Raspberry Pi not accessible from outside your network and without a static IP assigned to them you can use:
sudo ./install-no-ssl.shOn a VPS where you can access your server from anywhere with internet access you will want some kind of SSL encryption. If you do not have a domain name registered use:
sudo ./install-self-sign.shIf you do have a domain name registered use:
sudo ./install-certbot.shIn all three cases you will be prompted for some information to set up the secure SQL installation. Enter the user password, answer "n" to changing the password, and "y" to the rest.
Enter current password for root (enter for none):
Change the root password? [Y/n] n
Remove anonymous users? [Y/n] y
Disallow root login remotely? [Y/n] y
Remove test database and access to it? [Y/n] y
Reload privilege tables now? [Y/n] y
In the "self-sign" case you will also be prompted for information regarding the new SSL certificate; for testing purposes you can leave it all blank, and it will then take a while to generate.
Country Name (2 letter code) [AU]:
State or Province Name (full name) [Some-State]:
Locality Name (eg, city) []:
Organization Name (eg, company) [Internet Widgits Pty Ltd]:
Organizational Unit Name (eg, section) []:
Common Name (e.g. server FQDN or YOUR name) []:
Email Address []:
Once the script is done nine definition lines will be printed out:
define('AUTH_KEY', 'SOME_RANDOMNESS');
define('SECURE_AUTH_KEY', 'SOME_RANDOMNESS');
define('LOGGED_IN_KEY', 'SOME_RANDOMNESS');
define('NONCE_KEY', 'SOME_RANDOMNESS');
define('AUTH_SALT', 'SOME_RANDOMNESS);
define('SECURE_AUTH_SALT', 'SOME_RANDOMNESS');
define('LOGGED_IN_SALT', 'SOME_RANDOMNESS');
define('NONCE_SALT', 'SOME_RANDOMNESS');
define( 'FS_METHOD', 'direct' );
Copy the above block of text and go to:
sudo nano /var/www/wordpress/wp-config.phpFind the matching placeholder block of text in the file and replace it with what you copied. Then find the following three lines near the top of the file and edit them to look like this.
define( 'DB_NAME', 'wordpress' );
define( 'DB_USER', 'wordpressuser' );
define( 'DB_PASSWORD', 'password' );
Note that the password of the MariaDB user is "password". After all the emphasis I've put on security and password strength this is the one password I'm really not concerned about. However if you really want to change it 'another_password' you can make it whatever you want in this file just make sure to change it with these commands, where 'another_password' is the password you set in "wp-config.php".
sudo mariadb
ALTER USER 'wordpressuser'@'localhost' IDENTIFIED BY 'another_password';
exit
Next we need to edit some lines in the NGINX configuration file if you used the "certbot" install script.
sudo nano /etc/nginx/sites-available/wordpressFor both "no-ssl" and "certbot" installs there is a single server{} block in the file, where as "self-sign" has two. In each server{} block look for a line that reads "server_name _;" and replace the underscore with the name of your website. In the case of "no-ssl" and "self-sign" use the IP address of the server you used for the SSH login. With a "certbot" installation change the line to look like this:
server_name your_domain.tld www.your_domain.tld;Now save and close the file the same way as previous files.
Ctrl + x
Ctrl + y
Enter
Check the configuration file for errors and then reload NGINX.
sudo nginx -t
sudo systemctl reload nginx
Installs using the "self-sign" method shows this error due to the nature of the certificate. Ignore it.
nginx: [warn] "ssl_stapling" ignored, issuer certificate not found for certificate "/etc/ssl/certs/nginx-selfsigned.crt"If you own a registered domain and you used the "certbot" installation you can now generate the valid SSL certifacte.
sudo certbot --nginx -d your-domain.tld -d www.your-domain.tldWith any luck you can now either navigate to "your_domain.tld" or directly to the server's IP address, "xxx.xxx.xxx.xxx", in a browser. For "self-sign" installs you will see security warning due to the nature of the SSL certificate, it's authenticity cannot be verified, but traffic is being redirected over HTTPS to port 443 which you can see in the NGINX configuration file.
If you arrive at the WordPress setup page CONGRATULATIONS, you now have your own WordPress server. The rest of the process is pretty self explanatory. When asked set another, unique, password for your admin user. Feel free to explore the wp-admin dashboard, watch tutorials, mess around with themes, download all the plugins you want.
In Closing
DISCLAIMER: I need to cut this guide here as it has gone quite long but it must be mentioned that more needs to be done to secure the website from attacks if visible to the internet. At the very least install and activate these two plugins, configure your wp-admin to appear as a non-standard URL, and then look into the topic further after you've had a chance to enjoy what you've put together.
- https://wordpress.org/plugins/change-wp-admin-login/
- https://wordpress.org/plugins/better-wp-security/
There is also a Docker image available: https://hub.docker.com/_/wordpress/
Hope this helps someone get their website started!
Featured Image Credit: "Print press" by Herkie (Dave Herholz) is licensed under CC BY-SA 2.0
Posted from my WordPress Blog, LAB ADAPPT, using Exxp & statically hosted on Fleek with IPFS