T-shirt
When making the blouse, the correct way of taking measurements will be taken into account, using the reference points to trace the
Basic rectangle will be used the measures of blouse and fourth part of the bust.
Necessary Measures
1.- Front length
2.- Long behind
3.- Bust
4.- Contour of hips
5.- Neck circumference
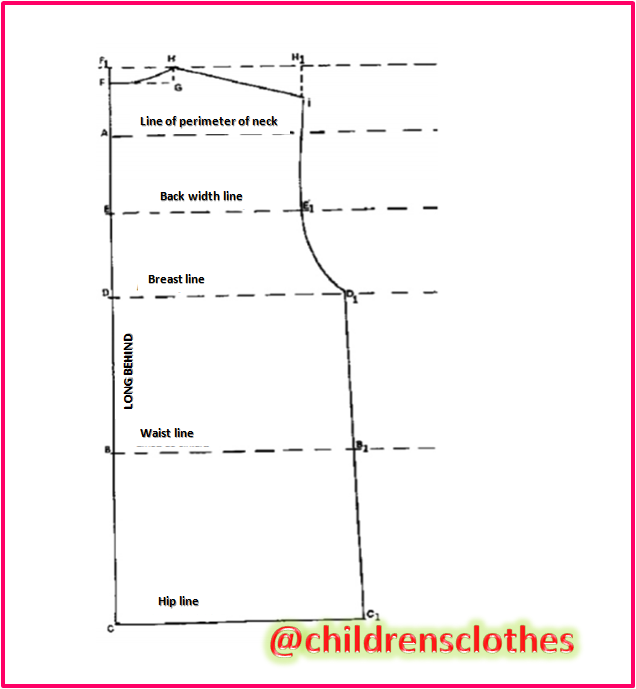
Rear
BF: Long back
FF ': 2 cm FG: 1/6 neck perimeter + 1 cm
GH: 2 cm, join FH with a little curve
pronounced
HH ': Back length + 1 cm
H 'I: 3.5 cm, join with the rule H I
EE ': 1/2 back width + 1 cm
DD ': 1/4 chest + 2 cm
CC ': 1/4 of hips + 2 cm
Join E'D 'with a curve D'C' with a straight line.
This blouse can be used as a base that can be transformed.
The canesus and cuts can be flat, because there is no chest clip.
Front of
Trace the horizontal lines across the width of the paper:
AB: Front length; waist line.
D: Midpoint between AB;
DD1: Chest line
E: Midpoint between AD;
EE1: Back width line
BC: Height of hips; hip line
AY: 1/6 neck perimeter + 2 cm, join FA with a curve
FF ': Back length + 1/2 cm
F'G: 3, 5 cm, join FG with an oblique line
EE ': 1/2 back width front + 1 cm
DD ': 1/4 of the size of the bust + 2 to 4 cm (depending on the width
desired)
CC ': 1/4 of the width of hips + 2 to 4 cm (depending on the desired width)
Join G-E'-D 'with a curve D'C' with a straight line.


Sleeve for the straight blouse
Necessary measures
- Total length of the arm
- Length to the elbow
- Arm outline
- Contour of the wrist

Straight fist
This is a rectangle with wide thread: 2 times the height of the desired fist.
Length: wrist contour + 5 cm (2 cm cruising and 3 cm clearance)
Shaped fist
Height of 7 to 12 cm
Make a rectangle like for a right fist
Cut out, make 3 slits in the length and open them (see sketch).
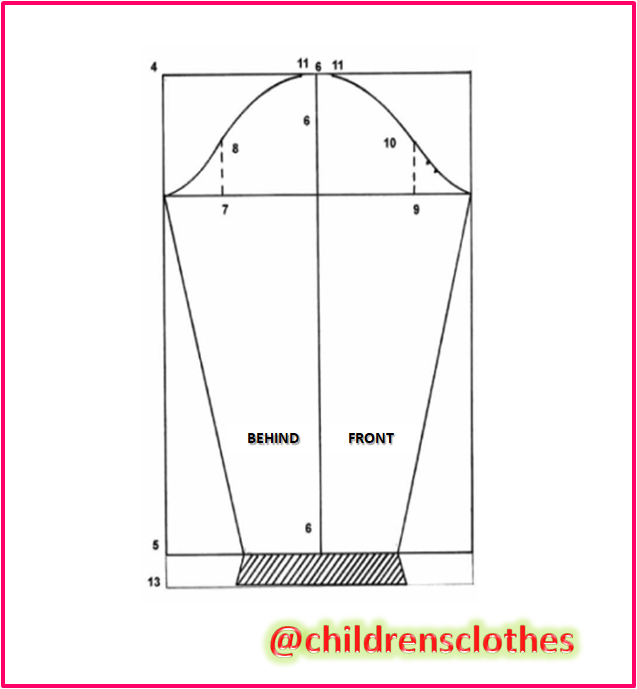
Procedures
1 Draw a right right angle
1-2 Sleeve length
1-3 Sleeve head height
1-4 Sleeve width (table)
2-5
4-5 Join these points with a straight line
6 Mark half of line 1-4
4ª-7 Log in back
7-8 Back up
3-9 Enter the front
9-10 Climb to the front
6-11 Measure 2 cm on both sides
6-12 Half of the fist on both sides
2-13 5-13 Increase 3.5 cm for the round
The sleeve is made in the total height of the arm
It should be shortened by making a fold at the height of the elbow as measured by the fold: height of the wrist -2 cm.
Stroke pattern for trousers
Front pattern
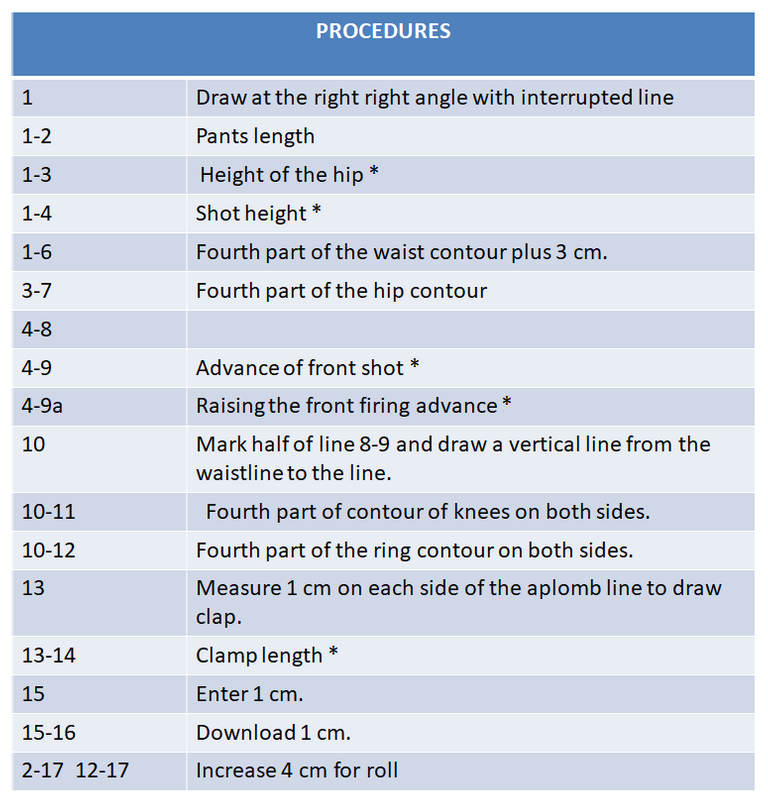
Note:
Observe that when joining points 7 and 11 on the side, point 8 should be outside the line.
Apply symbology in the line, next to the middle line.

Front pattern
Initial rectangle: quarter of contour decays by the length of trousers; to which we add to the right ½ ½ ¼ contour hip for the shot.
In the initial rectangle we do the same as in the skirt up to the hip height, the clip will be 10 cm long. In the addition we have made to the initial rectangle we mark the height of the shot that is the central seam of the pants. We make a curve that unites us
the central vertical line of the trousers with the end of the line that we have marked for the top of the line.
We mark the knee length that is measured from the hip height. In the lower line of the rectangle we mark half of the fourth part of the hip contour plus the addition we have made, this
point we join with the end of the clip with a straight line.
On both sides of this point we mark 8 cm which will be the bottom of the pants. One of the points we unite with the hip correcting the curve and the other point we join with the end of the curve of the shot, making a curve when approaching up.
Back pattern. Back.
Initial rectangle: length of trousers per quarter of hip contour to which we add the length of trousers by ½ ¼ hip contour.
We make the clip as in the skirt 11 cm long. The curve of the hip must rise 0.5 cm above the initial rectangle. In the addition we mark the shot. The central seam of the pants will not be the right straight of the initial rectangle as in the front.
A slightly inclined line will be drawn that will enter 1.5 cm from the upper right corner of the rectangle and rise 2 cm above it (point A). We mark half the width of the rectangle added above the line of fire in the initial rectangle
(point B). We join A and B with a line. In addition we join A with the end of the hip by means of a slightly upturned curve extending the lines of the clamp. We make a curve from point B to the line that marks the shot.
Finally we finish as in the front dialing 9 cm on each side of the center for the bass.
To shape the waist we make the folds in the paper and on them we make the correct waist. By putting the zipper in front you add a rectangle to the shot of 18 by 4 cm.
Making
We cut, we pass threads, we string and we test. If it's okay, we sew and overcast.
To place the zipper, we cut a rectangle of folded fabric that we thread under the zipper on the left side looking from above.
The folded fabric will be placed at the height of the right (end) of the zipper and above on the left.
To attach it to the trousers, we take 1 cm, more or less, out of the loose threads the left part of the opening, we join the zipper with the fabric that we have put underneath and we stitched by the
shore. Then we stitched the other side giving shape on the bottom and being careful not to catch the fabric under the zipper. This stitching is passed 2.5 cm from the edge that yes it will be the mark of the loose threads. To finish we overcast.
The waistband will be placed the same as in the skirt and cut the same way.
Contact Data.
In addition we will have channels available for questions, suggestions and personalized attention through email and discord.
[email protected] or chat with @childrensclothes#7556 on our Discord
You can also enjoy updated information on events and models from our Aurora collection, follow the Instagram account: Vastagocasademodas.
We accept payments in Cryptocurrencies Steem, Sbd.
Why support @childrensclothes?
By supporting this productive social program will be contributing to a solidarity project for children in Venezuela who have no shelter, food and medicine, will be strengthening the productive apparatus and the ability to generate jobs to mothers head of households, will also contribute to maximize the level educational with training for entrepreneurs in various trends, financial, commercial, business, personalized courses, will also be promoting the inclusion of special children Autism, Down syndrome, and children with cancer that occupy a special place. Preventive measures to care for the environment The use of the blockchain will be established as a technology with purpose, and to empower leaders in action to form their own companies, in a self-sustaining model through efficient resource management.
"If society improves, it will improve the performance of the company. You can not be happy alone, I can not do well in the middle of a failed society "
FASHION WITH PURPOSE: THE BEST COAT, IT'S LOVE
YEAR 2019. The goal is to enjoy childhood in all its colors, aromas and flavors.
We thank our collaborators:
@fundition,@adollaraday, @pennsif

Hello! I find your post valuable for the wafrica community! Thanks for the great post! We encourage and support quality contents and projects from the West African region.
Do you have a suggestion, concern or want to appear as a guest author on WAfrica, join our discord server and discuss with a member of our curation team.
Don't forget to join us every Sunday by 20:30GMT for our Sunday WAFRO party on our discord channel. Thank you.
Congratulations @childrensclothes! You have completed the following achievement on the Steem blockchain and have been rewarded with new badge(s) :
You can view your badges on your Steem Board and compare to others on the Steem Ranking
If you no longer want to receive notifications, reply to this comment with the word
STOPTo support your work, I also upvoted your post!
Vote for @Steemitboard as a witness to get one more award and increased upvotes!
This project is being supported by @Fundition the next-generation, decentralized, peer-to-peer crowdfunding and collaboration platform, built on the Steem blockchain.
Read the full details of Fundition Fund program
Learn more about Fundition by reading our purplepaper
Join a community with heart based giving at its core
Fundition is a non profit project, by supporting it with delegation you are supporting 200+ projects.
50SP100SP200SP500SP1000SP2000SP5000SP10000SP