This guide it's meant for Fire TV and Fire TV stick mainly. But it can be applied to many devices. But it must have debugging mode activated or be rooted. If your phone has not debugging mode activated and you can't control it, then the easiest way to handle it its to flash a pre-rooted ROM into it. If there it's not such ROM in there then you must modify the system.img to include the root . There are plenty of guides for that and it will not become the focus of this guide. '
The Fire TV and the Fire TV stick are very interesting crunching devices thanks to their low power, always on, often IDLE devices. Also, having the HDMI plug gives them higher thermal dissipation capabilities than most consumer ARM products.
Now. Lets us keep with what we are focusing. The first step it's to enable adb debugging, also called developer mode. In the case of the Fire TVs its here : 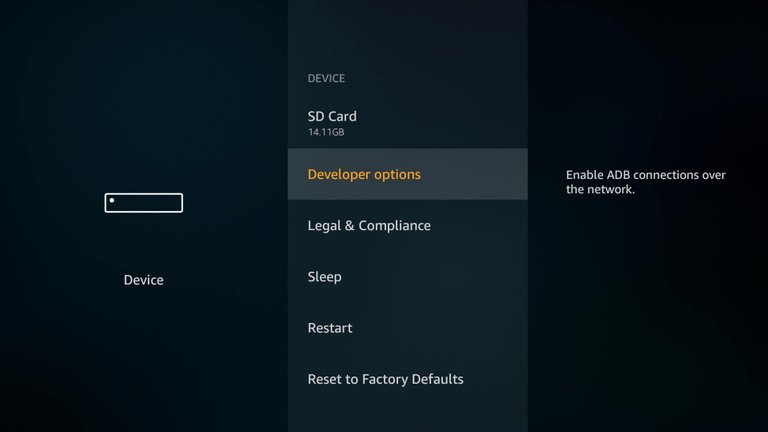
Then we must install the adb tools . No specific driver needed.
Now we need to connect to our device using adb. We can use two methods , one connecting it directly via USB, which is the one i would recommend since its much faster and easier. The other its to connect to it specifiying the IP of the device in the command : adb connect 192.168.X.XX
Once connected, we need to install BOINC . But not a normal version of BOINC, we need a debuggable version of BOINC (users with root may skip this step). It does have nothing special about it, besides a flag indicating that a shell may use all the privileges of the app, which it's something you would want to avoid in any app holding sensitive data. The process of making it is quite tedious, as it involves unpacking, editing, repacking, signing... So i made a version for you all. Im a nice guy.
First, if you have BOINC installed, we are going to remove, with adb uninstall edu.berkeley.boinc
Now. It is necessary to download the debbugable apk i edited : https://www7.zippyshare.com/v/KKheSRPY/file.html
And we install it . adb install deb.apk
Now things are going to get a bit harder
We enter the shell interface of the device using adb shell.
We initialize the app using this command : am start -a android.Intent.Main -n edu.berkeley.boinc/.SplashActivity
Wait 30 seconds. Then unplug the device for rebooting and plug it again. Enter the adb shell again.
Now we can access the files using the debuggable options. We use run-as edu.berkeley.boinc . Root users may just cd into /data/data/edu.berkeley.boinc
we use cd client/ .
We start the boinc client in the background using ./boinc & and we wait for it to initialize. \
Once initialized we can configure it using ./boinccmd : https://boinc.berkeley.edu/wiki/Boinccmd_tool
To be the most useful and brief to the largest amount of people i will skip to using an account manager such as grcpool.com .
First, you will probably want to keep the networking aspect always active. Do so with ./boinccmd --set_network_mode always .
Then, to join the account manager : ./boinccmd --join_acct_mgr grcpool.com username password .
If you don't want to wait 24~ hours before it syncs again, you may use ./boinccmd --quit_acct_mgr and repeat the command, so it will sync.
If you are interested on keeping the settings to default then we ought to be finished here.
But if you want to use all 4 cores, then we must use a global_prefs_override.xml . But, without a text editor on the shell we only have two options, Either we edit it line by line using echo >>, or we download it, as a textfile, from elsewhere. Using the raw format of pastebin or of github must be the easiest way to do. As a template this is mine : http://pastebin.com/raw/y0Gg7MgE
And to download it : curl -L http://pastebin.com/raw/y0Gg7MgE > global_prefs_override.xml
And now we are done here . Only thing it's left its to reboot the device.
As a proof of concept, here is my Fire TV stick . Seems like it has gotten unlucky on the task it received, but it surely works well : https://universeathome.pl/universe//show_host_detail.php?hostid=493768 .
It's been computing for an small time, but i figure it has the capability of keeping a mag between 1 and 2 without problems.
I'm not sure which is more impressive, the fact that you can set up your Fire TV stick to do BOINC work, or the fact that it is capable of generating 1-2 magnitude. That's really crazy.