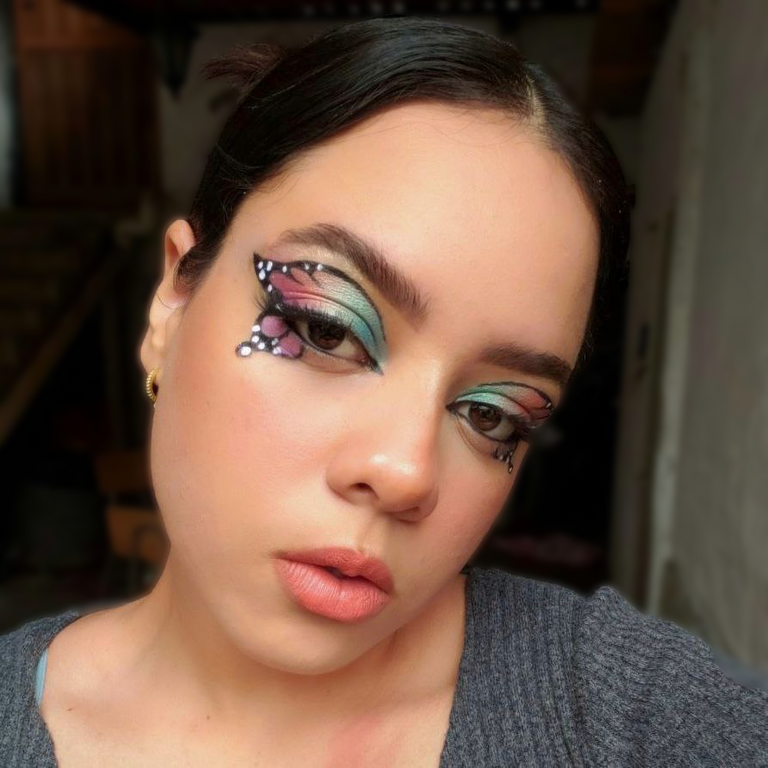
¡Hola, gente linda de Hive! Espero estén pasando un maravilloso fin de semana, y que el día de mañana la pasen muy bien con sus madres en su día (para Venezuela). El día de hoy les traigo este tutorial paso a paso, enseñando minuciosamente cómo hacer este maquillaje que es una fantasía. 😍 Amé el resultado, de verdad se ve mágico e increíble. Me emocionaba muchísimo mostrarselos y aquí está. Si quieren saber coómo hacer este hermoso maquillaje, sigan leyendo!
*Hello, beautiful people of Hive! I hope you are having a wonderful weekend, and that tomorrow you have a great time with your mothers on their day (for Venezuela). Today I bring you this step by step tutorial, showing you how to do this fantasy makeup. I loved the result, it really looks magical and incredible. I was so excited to show it to you and here it is. If you want to know how to do this beautiful makeup, keep reading!
Procedimiento / Process:

Yo comencé ya con las cejas maquilladas, un poco más fuertes de lo que las suelo hacer. No les puse el paso a paso porque no hice nada fuera de lo habitual. Ustedes haganlas como siempre la hacen.
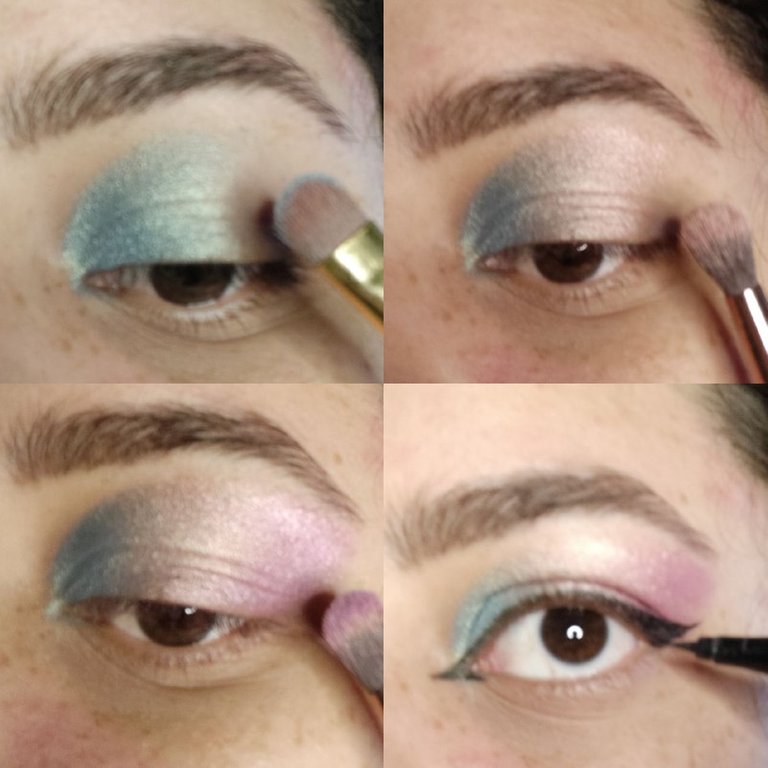
Lo primero que hice fue aplicar sombra satinada color azul pastel desde el lagrimal, extendiendola por el párpado móvil y cuenca hasta la mitad del ojo aproximadamente.
Ahora elegí una sombra de tono pastel también pero de color rosa y la apliqué justo en el centro, esta sombra servirá de transición entre el azul y el siguiente color.
Ahora aplicaremos en la última parte (con forma inclinada para dar aspecto rasgado), una sombra satinada también pero de color morado.
Ahora haremos un delineado con delineador líquido en negro, un delineado normal con cola en el lagrimal.
I started with the eyebrows already made up, a little stronger than I usually do them. I didn't put the step by step because I didn't do anything out of the ordinary. You do them as you always do.
- The first thing I did was to apply pastel blue satin eye shadow from the tear trough, extending it across the eyelid and eye socket to about the middle of the eye.
- Now I chose a pastel shade of pink and applied it right in the center, this shade will serve as a transition between the blue and the next color.
- Now we will apply in the last part (with a slanted shape to give a torn look), a satin shadow also but in purple color.
- Now we will do an eyeliner with liquid eyeliner in black, a normal eyeliner with a tail on the eyelid.

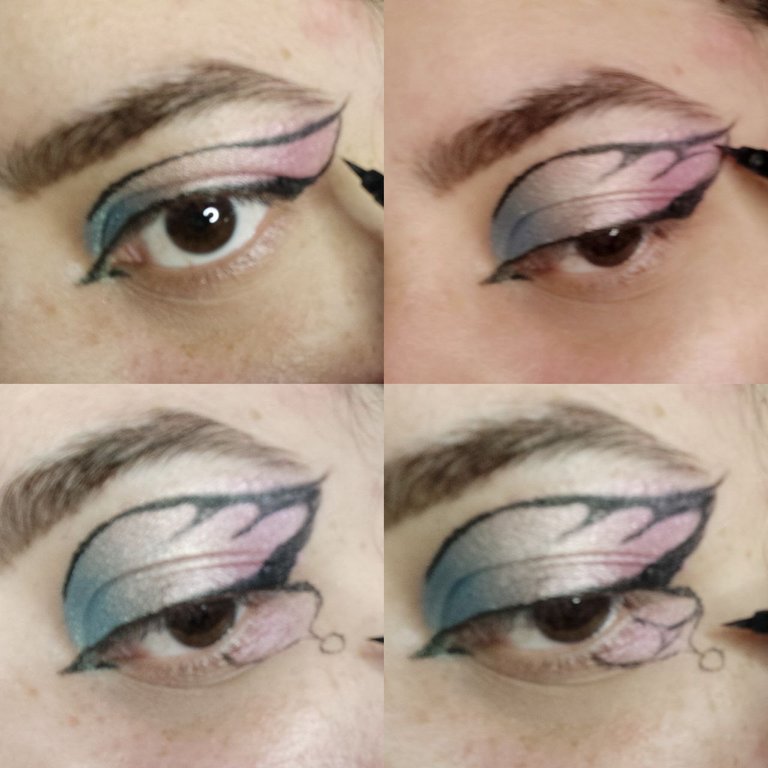
Ahora el delineado que hicimos lo conectaremos con un delineado de cuenca. No tiene ninguna dificultad, si se dan cuenta es el mismo de abajo solo que en la cuenca y las colas van conectadas como se ve en la imagen.
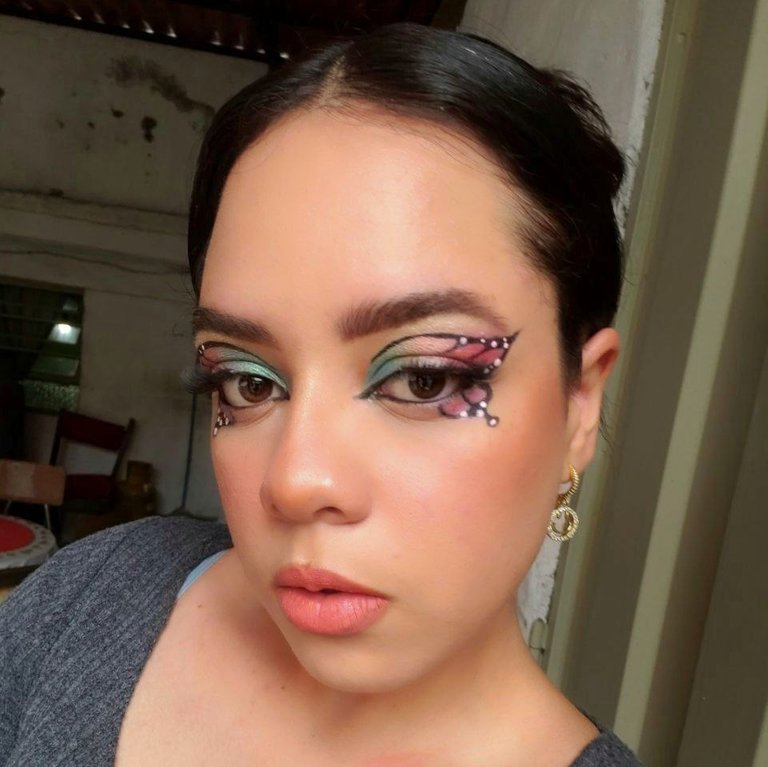
Ahora viene una parte un poco más complicada y es hacer las formas. Trazaremos 3 semicírculos inclinados como se ve allí. Luego rellenaremos el exterior de esos semicírculos.
Ahora nos iremos al párpado inferior del ojo y trazaremos una especie de campana. Luego en su interior dibujaremos una (M) invertida y nuevamente rellenaremos el exterior y también el círculo pequeño.
- Now the eyeliner we did we will connect it with a basin eyeliner. It has no difficulty, if you notice it is the same as below only in the socket and the tails are connected as shown in the image.
- Now comes a more complicated part and that is to make the shapes. We will draw 3 inclined semicircles as you can see there. Then we will fill in the outside of those semicircles.
- Now we will go to the lower eyelid of the eye and draw a kind of bell. Then inside it we will draw an inverted (M) and again we will fill in the outside and also the small circle.

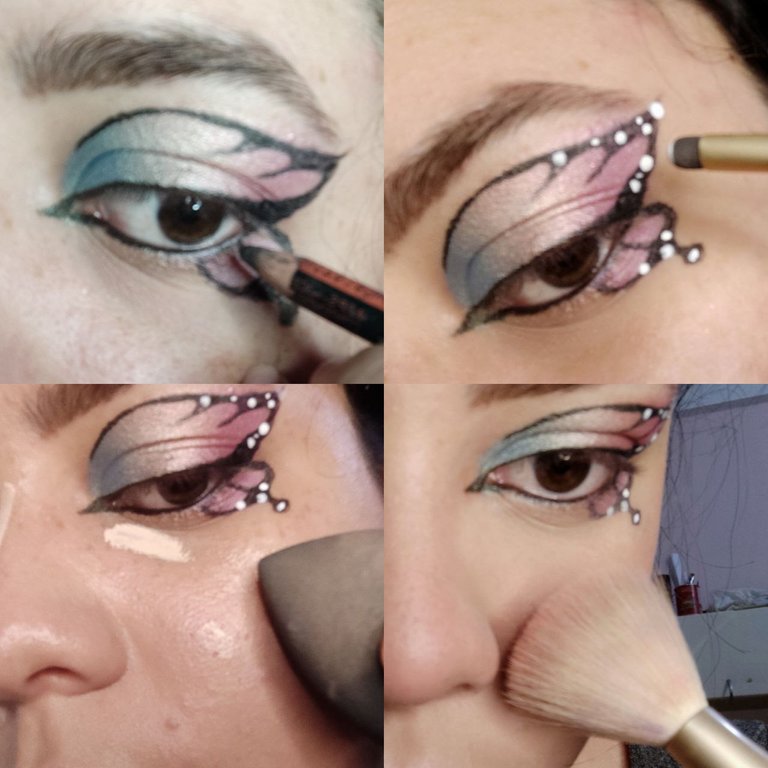
Ahora buscaremos un delineador cremoso negro para la línea de agua y la delinearemos.
Ahora con un corrector o pintura facial blanca, haremos puntos de diferentes tamaño al rededor del contorno del ala de la mariposa.
Llegando a los toques finales aplicaremos base y corrector.
Es importante que apliques una cantidad generosa de blush e iluminador para el aspecto fantasioso.
- Now we will find a black creamy eyeliner for the waterline and outline it.
- Now with a white concealer or white face paint, we will make dots of different sizes around the outline of the butterfly's wing.
- When we get to the final touches we will apply foundation and concealer.
- It is important to apply a generous amount of blush and highlighter for the fantasy look.
🎉LOOK FINAL 🎊✨
Muchas gracias por leer mi post, como siempre estoy muy agradecida con el apoyo que todos ustedes me dan. Espero que les haya encantado este maquillaje, los quiero y espero leerlos en los comentarios con su recomendaciones y sugerencias ! los espero en el siguiente post! besos 😘
Thank you so much for reading my post, as always I am very grateful with the support you all give me. I hope you loved this makeup, I love you and I hope to read you in the comments with your recommendations and suggestions ! I wait for you in the next post ! kisses 😘.
Siempre he tenido la intención de maquillarme así, pero siento que el pulso no me ayudará 😁. Muy bonito te quedó este maquillaje @marilife. La mariposa muy linda 🦋
!discovery 25
Muchas gracias.💚Creeme que a mi, el pulso me cuesta mucho, pero hay que practicar! Intentalo😁
This post was shared and voted inside the discord by the curators team of discovery-it
Join our community! hive-193212
Discovery-it is also a Witness, vote for us here
Delegate to us for passive income. Check our 80% fee-back Program
Your content has been voted as a part of Encouragement program. Keep up the good work!
Use Ecency daily to boost your growth on platform!
Support Ecency
Vote for new Proposal
Delegate HP and earn more
Hermosos acabados, ¡me encantó!
Éxitos @marilife
Muchas gracias 😘
Excelente amiga.. como siempre hermosa. Buen trabajo ❣️
Gracias linda 😘 un abrazo!
Thank you for sharing this amazing post on HIVE!
Your content got selected by our fellow curator @stevenson7 & you just received a little thank you via an upvote from our non-profit curation initiative!
You will be featured in one of our recurring curation compilations and on our pinterest boards! Both are aiming to offer you a stage to widen your audience within and outside of the DIY scene of hive.
Join the official DIYHub community on HIVE and show us more of your amazing work and feel free to connect with us and other DIYers via our discord server: https://discord.gg/mY5uCfQ !
If you want to support our goal to motivate other DIY/art/music/homesteading/... creators just delegate to us and earn 100% of your curation rewards!
Stay creative & hive on!
Thank you!