As a photographer, one of the most important elements to consider when creating a stunning image is lighting. While natural light can be beautiful, using light fixtures can help add depth and dimension to your photographs. Experimenting with different light setups can be intimidating, but it can also be incredibly rewarding. So why not challenge yourself to try something new and explore the possibilities of light fixtures in your photography with what you have around the house? You might be surprised at the results!
Context
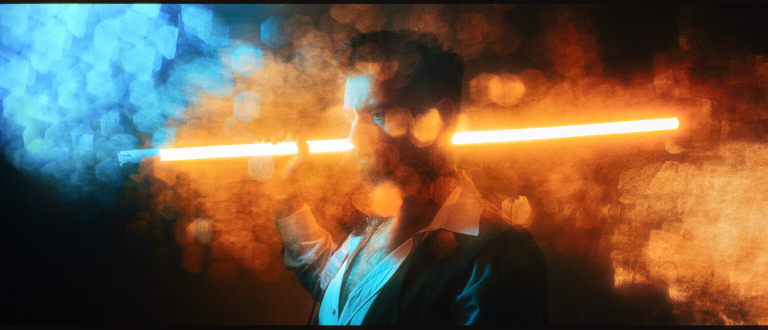
It’s been a while since I’ve shot inside, and now that winter is here, I’m excited to dust off my light stands and experiment with lighting. Recently, I was inspired by the TV series Andor and wanted to try creating a similar color grading in my photos. So, I spent an afternoon playing around in the studio, building my light setup one by one until I got a shot that I was happy with.
Gear & light setup
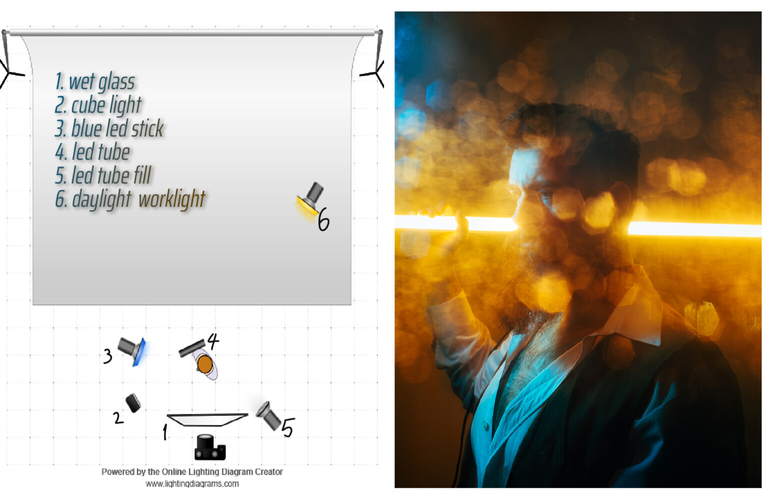
For this shoot, I set up my camera on a tripod with an HDMI cable going to an old TV for monitoring. I used a 50mm lens to allow some room to move and a shallow depth of field. I also used wireless triggers and a piece of glass about 20cm (8 inches in front of the camera, which I sprayed with water to get it wet. I wanted the water droplets to transform into bokeh so I started with light number 6 blasting toward the camera. This made the out of focus water visible, and it also acted as a kicker light to separate the subject from the background. Next up I added an RGB light (number 3) set to cyan, which I used as the main light to illuminate my face and add color contrast to the bokeh. Right next to it, I placed a small cube light (number 2) to create a catch light in the eye, which makes any subject look more alive. Light number 5 was a tube light that acted as fill light to add detail to the shadowy parts of the face. And finally, the light on my shoulder was a happy accident. I was moving the lights around to get a good hair light, and I realized it could be part of the composition and add interest to the image, so I kept it there.
Composition
I wanted to create a simple blue-to-orange gradient over the out-of-focus water droplets diagonally, with the subject in the center of the frame and the overall impression of looking through a window. Managing the water droplets was a bit challenging, but I liked the mysterious effect they created. I also considered using a dry cloth to create an opening for the subject to be more visible, but ultimately decided against it.
Exposure
Since some of the lights I’ve used are household items and have no way to control their output so the entire exposure was built off them this pushed me to start with ISO 200 as they were not powerful enough. Here the live monitoring came in clutch as I could always see what I was doing in real-time. Goals here were to keep the shutter speed above 1/50s to freeze the motion. After this, I could play with the aperture to control the size and shape of the bokeh. I settled on f7.1 to get hexagons. I feel that because of their pointiness, they fit better with a masculine look than smooth circles, and here, having the lens a bit dirty helps with creating some more texture in the out-of-focus shapes.
Post-processing
I started by applying a custom-made lens profile to remove the heavy vignette and correct the distortion. Next, the perspective needed correction as it seems my camera was a bit too high and it seems to be looking down on the subject while the aim was a more level perspective.
The first order of business was correcting for the tint of various lights. Household lights are not as accurate as photography lights. They have different tints even when they output the same light temperature. To address this I created loose radial masks and used the WB sliders to nudge the colors together for a more coherent look. With that out of the way, I used the HSL to get most of the tones on the orange-blue zone, and curves to add some tonal contrast and darken the overall look for a contrast-heavy grade. In the colo grade panel, I added orange in the shadows and a by of cyan in the highlights. Lastly, I used the clarity and texture sliders on a mask targeting the hexagons to add some grime thinking a soft shot would not fit the angry facial expression that I had. Now was photoshop time.
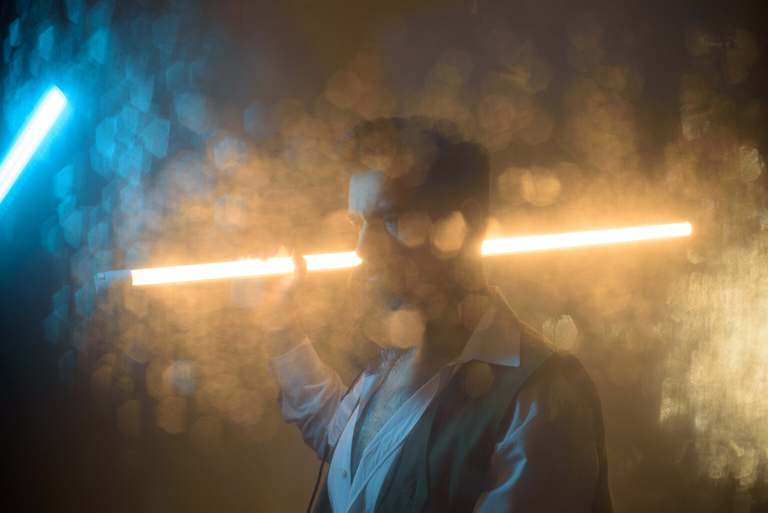
I used content aware scale to make the shot fit into an anamorphic aspect ratio, clone-stamped the blue light out of the shot, and did some light dodge and burning that you can see roughly represented below.

For the final touches, I injected some magentas into the oranges for deeper tones and opened the shot in Dehancer to add grain and a lot of bloom.
While I do think the cinematic aspect ratio works well here, I do prefer the vertically cropped version I used for the light diagram and in conclusion, I do want to encourage you to experiment with whatever lights you have on hand in your spare time. It’s a fun way to learn how to light a scene especially if you fashion yourself a way to check the effect that moving lights around has in real time as I did here with the camera screen mirrored on a TV.
Really cool pic
Love the walk thru and breakdown of your process. I've done a shoot through glass with water drops and I didn't have the light pointing at the glass so much so the water drops weren't as visible. I'll have to try it again with that new tip. 👌
Congratulations @vmoldo! You have completed the following achievement on the Hive blockchain And have been rewarded with New badge(s)
Your next target is to reach 20000 upvotes.
You can view your badges on your board and compare yourself to others in the Ranking
If you no longer want to receive notifications, reply to this comment with the word
STOPCheck out our last posts:
Support the HiveBuzz project. Vote for our proposal!