I did it! I have successfully made my own "Sourdough Starter" for baking bread. It was a lot easier than I thought it would be. I had not tried it up to this point as I felt it would be too much work, wow, was I wrong.
Today, I will share the process with you in the hopes that you will begin making your very own to enjoy.
Sourdough Starter
Ingredients:
1/2 cup unbleached all-purpose flour
1/2 cup whole wheat flour
1/2 - 1 cup cold water
1-quart size mason jar
Day 1.
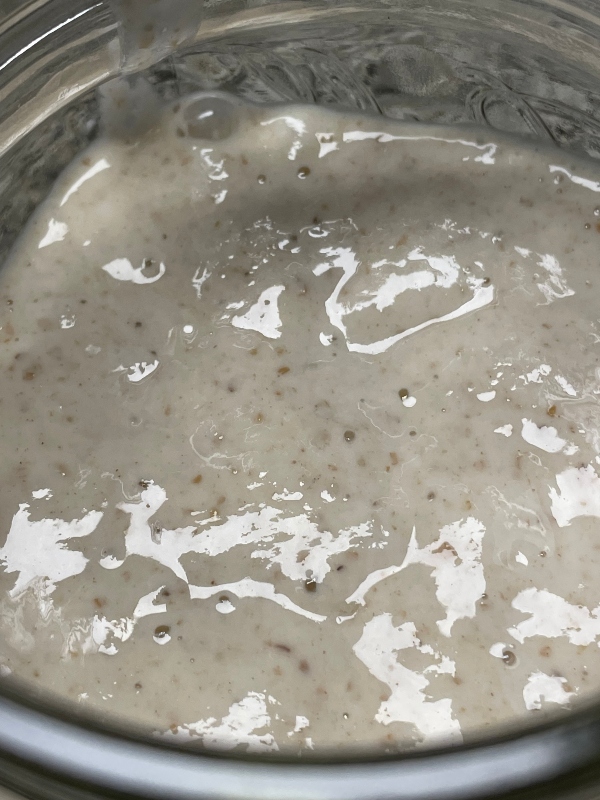
Combine 1/2 cup of all-purpose flour, 1/2 cup of wheat flour, and 1 cup of warm water in a large jar. Stir until the mixture is smooth and free of lumps. It should look like pancake batter, not too thick and not too thin either.
Cover the jar with a paper towel, coffee filter, or cloth and secure it with a rubber band. Let the starter sit at room temperature for 24 hours.
- Note: Always use a glass container and never plastic or metal as it can react with the ferment.
.jpg)
Day 2.
After 24 hours, in the morning discard half of the mixture and add 3/4 cup of all-purpose flour and 1/2 cup of warm water. Stir until the mixture is smooth and free of lumps. Do your best to keep the batters consistent like pancake batter. If you need you can add a bit more water.
In the evening, about 12 hours later, repeat the process of discarding and adding flour and water again. Stiring well.
- Note: Removing half the starter insures that the jar does not spill out the top during the fermenting stage.
Day 3 - 5.
Repeat this process for 3-5 days, twice a day by discarding half of the mixture and adding 3/4 cup of all-purpose flour and 1/2 cup of warm water each time. Your starter should be starting to smell a bit sour at this point.
- Note: If by chance you see any dark mold begin to form on top of the batter, discard the whole thing and start over with a new batch.
Day 6.
The starter should now have a vinegary and yeast-like fragrance, as well as, you should see lots of air pockets in the starter mix to tell you it is very active. You are now ready to bake your first loaf of bread.
- Note: If you continue to keep your mixture on a counter you will have to feed it daily. Otherwise, you can now place your jar in the refrigerator and feed it once a week if you do not plan on using it every day to bake. Just let it sit at room temperature before using it.
History of Sourdough Bread
Sourdough bread has been around for thousands of years, with evidence of its use dating back to ancient Egypt. It was likely first made by accident when wild yeast and bacteria in the air fermented the dough. The sourdough process was then refined over time, and it eventually became a staple in many cultures.
In the United States, sourdough bread was popularized by the California Gold Rush miners in the mid-1800s. The miners used a starter made from wild yeast and flour to make their bread, and it became known as “San Francisco Sourdough”. The starter was kept alive by feeding it with flour and water, and it was passed down from generation to generation.
Today, sourdough bread is still popular in many parts of the world, including the United States. It is made by combining a starter with flour, water, and salt, and then allowing the dough to ferment. This fermentation process gives the bread it's signature tangy flavor and chewy texture. Sourdough bread is often used in artisan bread, and it is also a popular choice for making pizza crusts.
- Note: The history of Sourdough Bread was generated using an AI program.
Baking Sourdough Bread
Ingredients:
1/2 cup to 1 cup sourdough starter
1/4 cup sugar
3 tbsp. oil
2 cups warm water
1 tbsp. salt
6 cups flour
Add all ingredients, holding back two cups of flour, into a mixer or large bowl. Blend well, adding the remaining 2 cups of flour, or enough flour until the bread starts to form into a ball.
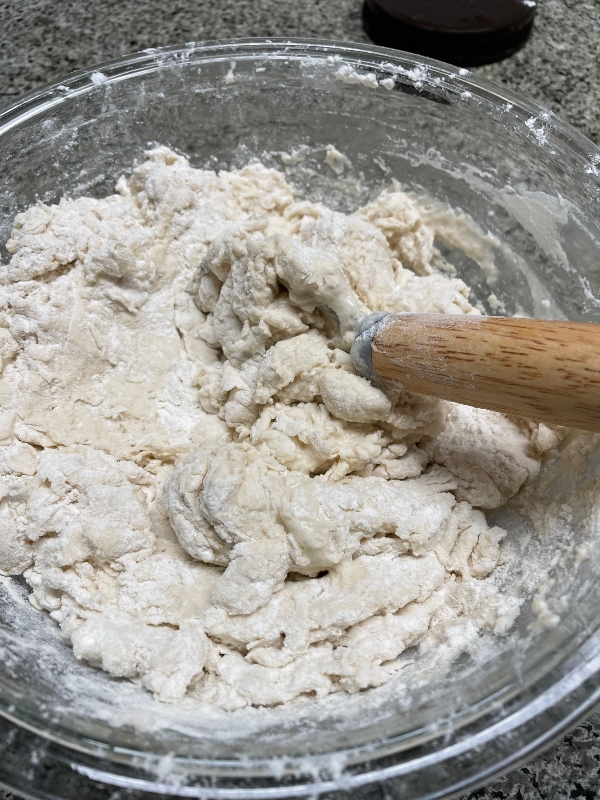
Turn out onto a floured surface (step 1) and begin kneading (step 2), after about ten minutes the dough should be smooth and elastic.
- Note: Flour the dough as needed during kneading. The dough should be tacky but not too sticky.
.jpg)
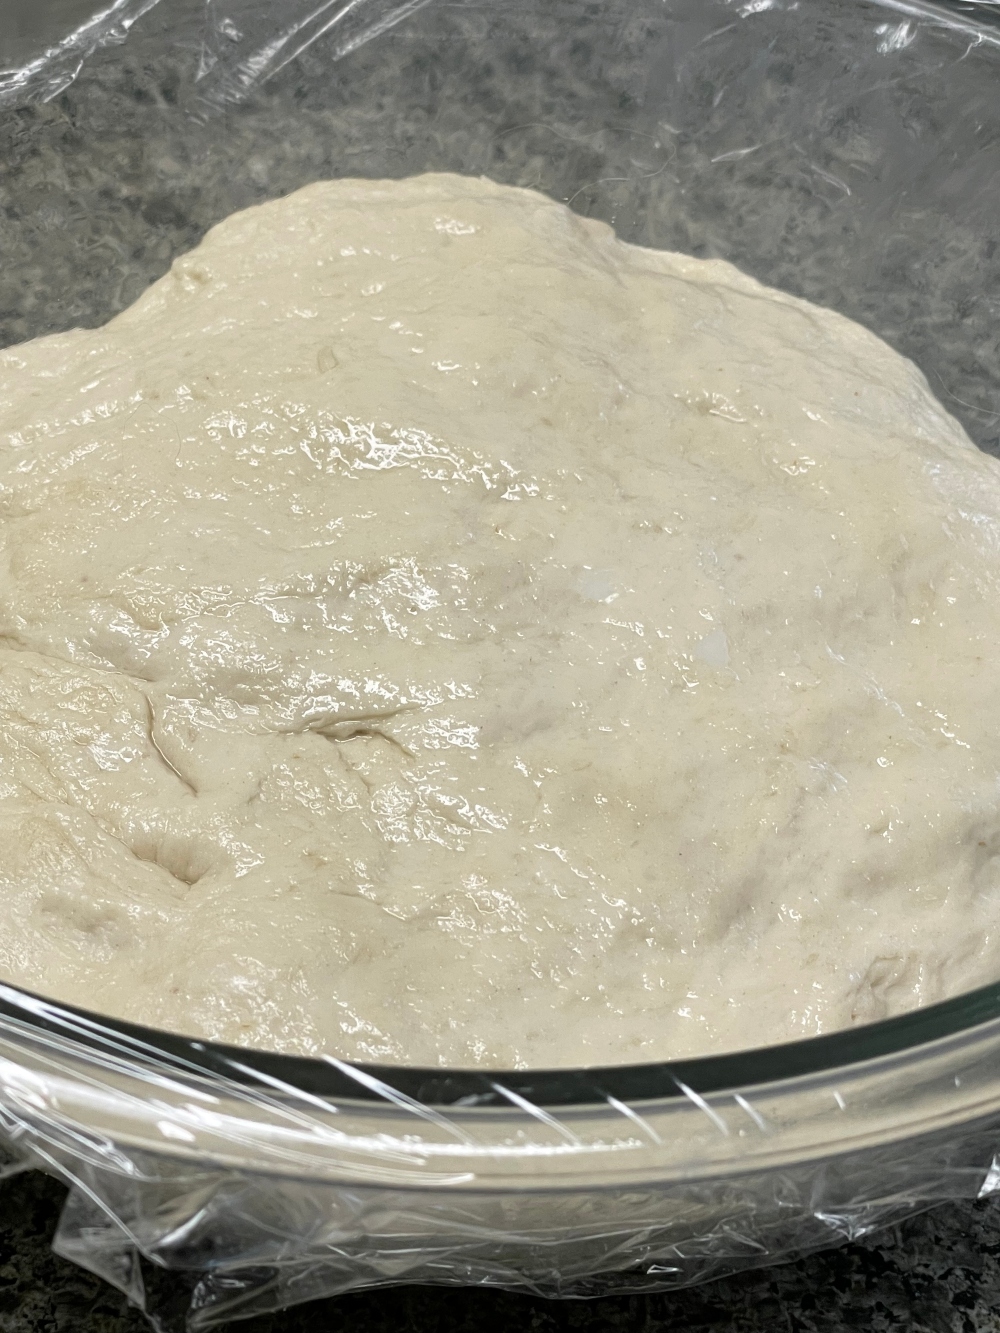
Put the dough into a greased bowl, cover it with plastic wrap, and leave it in a warm place to rise for 12-14 hours.
Punch down the dough and turn it out on a floured surface. Knead again for 2-3 minutes, lightly flour if necessary.
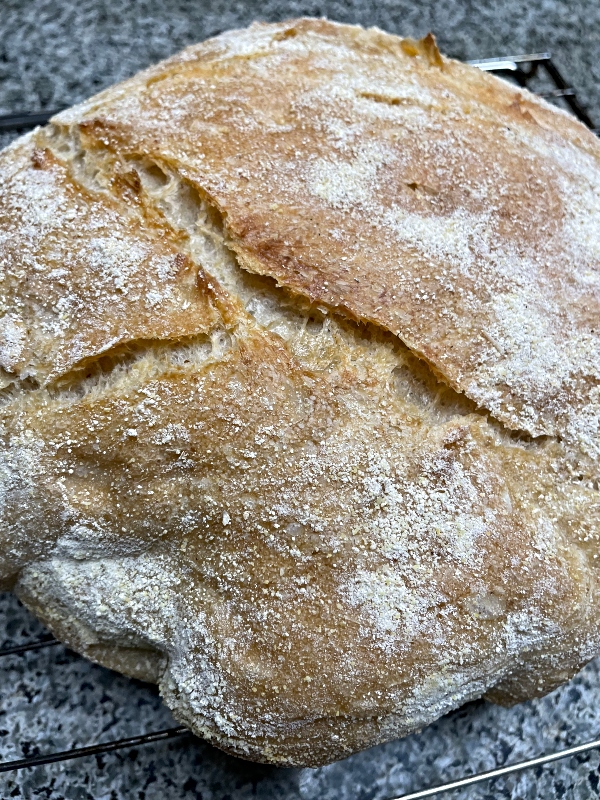
Form a round loaf and lightly dust the outside of the loaf with flour or cornmeal. Let it rise on the counter for 2-3 hours.
Preheat the oven to 375°F. Place a dutch oven (with lid) into the oven to preheat. Carefully place your risen dough ball into the pan as it will be very hot and return it to the oven with the lid on. Bake the bread covered for 30 minutes.

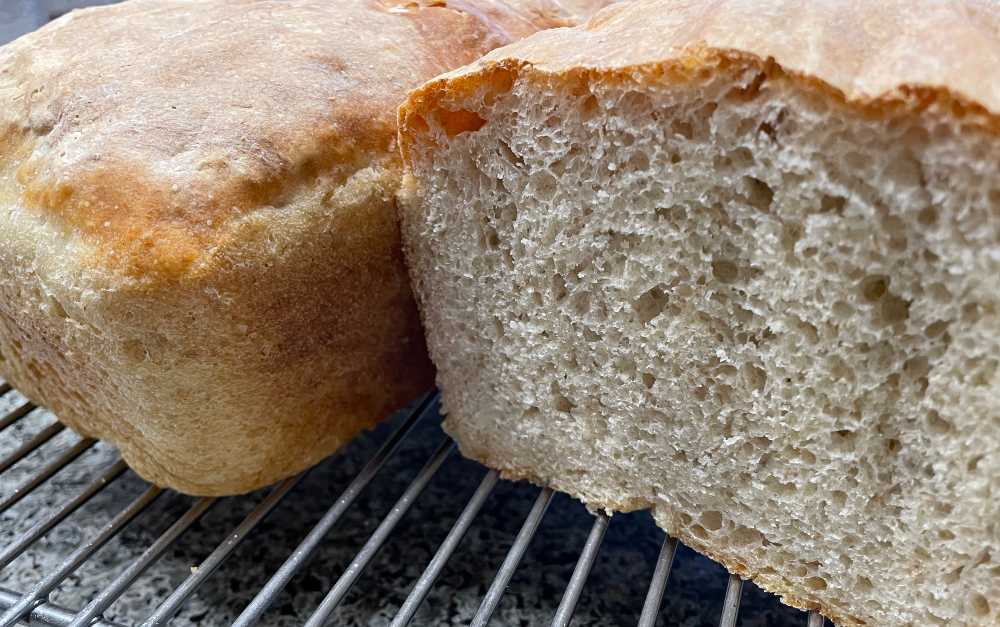
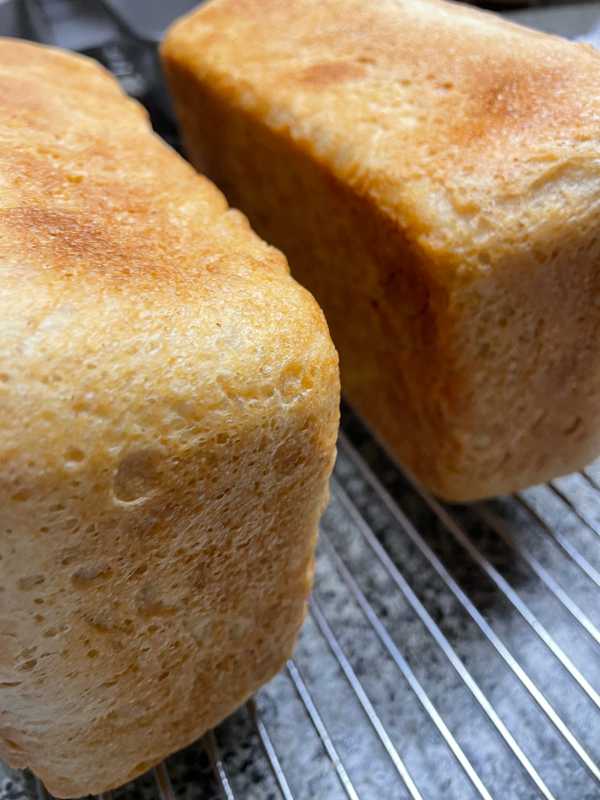
After 30 minutes, remove the lid from the dutch oven and continue baking for another 30 minutes until it is golden, crispy, and hollow sounding.
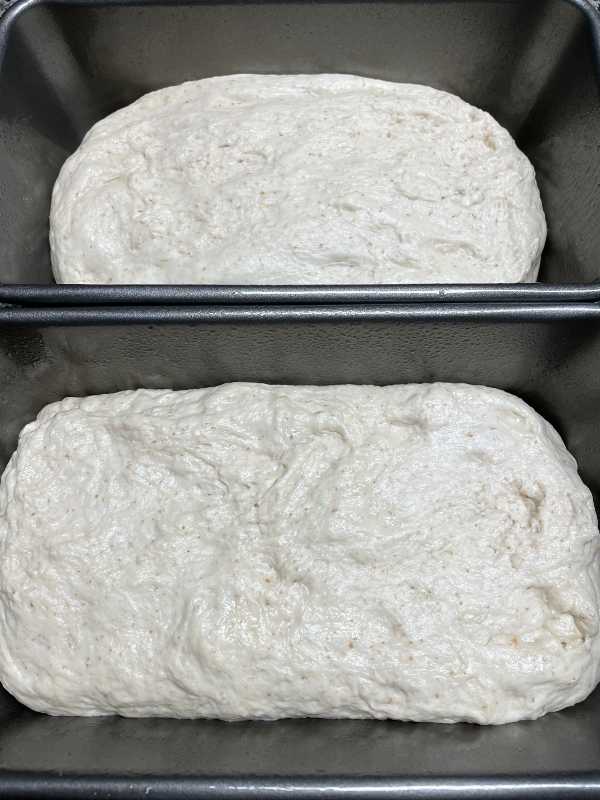
You can bake bread in a Dutch Oven, Cast Iron Skillet, or Loaf Pans.
- Note: If using regular loaf pans to bake the bread instead of a dutch oven, let the dough rise the second time in buttered loaf pans. Place the loaves into the preheated oven and bake for 35-40 minutes. The bread should be golden brown and sound hollow when tapped.
Turn the loaf onto a cooling rack before slicing.
There are some things in life that bring a great deal of satisfaction and making my first "Sourdough Bread" is one of those moments. I hope you give it a try yourself as I think you would be as satisfied as I am.
Until next time, this is Sunscape
Sun. Scape. Ing Your Day

Well done!
Mine died fifth day just cause I changed flour brand, totally forgot to check the protein % (which was less than previously used), still not ready to give it another chance and still having the desire to make it and dry it.
Thank you, @alt3r it was something I have wanted to do for years but was too afraid of the process. The sourdough bread is so worth it. At our local grocery, it is now over $6.00 per loaf. I think adding some of the whole wheat into the starter was the big difference for the success.
I didn't even want to research the price on our market, because artisan bakeries are very rare, but that is a serious price for a bread.
Whole wheat is a huge game changer high protein %, unfortunately I can only buy all purpose flour here, must start searching for a windmill.:D
Not being able to get the flour you want makes it pretty tough. I would have to save for a grinding mill and get whole grains from the local farm stores or wherever they sell good grains. I am so happy with the results so far and I am now in the habit of baking weekly so it works well for me.
Join the foodie fun! We've given you a FOODIE boost. Come check it out at @foodiesunite for the latest community updates. Spread your gastronomic delights on and claim your tokens.
Thank you very much, I appreciate the support.
This is such an excellent tutorial and post. It's making me want to give it a shot. I'm just scared I'll end up with the mold but I am definitely given this a go.
Your bread is a masterpiece!
Thanks for your tutorial.