english - please scroll down
Liebe Hivianer,
warum überhaupt einen Witness Node betreiben? Weil es nie dezentral genug sein kann. Je mehr Nodes die Hiveblockchain spiegeln, desto besser.
Wie versprochen, hier eine Schritt-für-Schritt-Anleitung für IT-Newbies. Ich bin selbst kein Experte und falls Du einen Fehler findest, schreib´ es in die Kommentare. Bei Fragen natürlich auch. Ich beziehe mich hauptsächlich auf dieses Tutorial von @rishi556. Es basiert auf einer Methode (von mehreren möglichen), einen Witness aufzusetzen, die ursprünglich hier von @someguy123 zusammengefasst wurde. Die Dokumentation ist sehr gut, aber nicht 100% selbsterklärend für Laien, sodass ich einige Male gestolpert bin, aber dank @rishi556 alle Fragen beantwortet wurden. Das heisst, mit dieser Anleitung werdet Ihr hoffentlich die gröbsten Anfängerfehler vermeiden können! Ich benutze fallweise Laiensprache, um anschaulicher zu sein, daher an alle Profis, bitte um Nachsicht!

1 - Einen Server besorgen
Ein Server ist im Prinzip ein Computer, der Tag und Nacht läuft, da er in Echtzeit mit der Hive-Blockchain verbunden ist und jederzeit bereit sein muss, einen Block zu signieren (wenn man als Witness nach dem Zufallsprinzip dafür ausgesucht wird). Man kann ihn zu Hause laufen lassen, oder man mietet sich einen (sucht unter "vServer mieten"). Ich habe die Mietlösung gewählt, da es bequemer für mich war (und ausfallsicherer), aber letztlich müsst Ihr es Euch durchrechnen, was günstiger kommt. Die Mindestanforderungen sind: 500GB Speicher (besser noch mehr), und zwar NVME, nicht SSD (das ist schneller), 32GB RAM und 6-8 CPU Cores. Linux (Ubuntu) ist in den meisten Fällen schon vorinstalliert. In meinem ersten Versuch hatte ich nur 16GB RAM und 400GB SSD, das war definitiv nicht genug.
Viele Witnesses haben den Server bei Privex gemietet, dort gibt es sogar einen "Hive-Node-in-a-box" im Angebot, wo das Hive-docker-Programm und ein Blockchainsnapshot schon vorinstalliert sind, aber es geht ja auch um Dezentralisation, und Hive begibt sich in eine unnötige Abhängigkeit, wenn zuviele Witnesses den gleichen Serverlieferanten haben. Daher habe ich bewusst einen anderen gewählt, die Installation der nötigen Programme ist das geringste Problem und geht sowieso im Nu. Unter 40€-50€ im Monat werdet Ihr vermutlich nichts Passendes finden. Bitte gebt mir bescheid, falls doch!
2 - Mit dem Server kommunizieren
Als nächstes braucht Ihr ein Programm, um Euch mit dem Server zu verbinden (der irgendwo steht), damit Ihr ihm Befehle von zu Hause aus geben könnt. Von meinem Provider habe ich PuTTY empfohlen bekommen, da ich einen Windows-Rechner habe (für iOS oder Linux gibt es vermutlich andere, aber das wird Euch Euer Provider schon sagen). Auf der Downloadseite müsst Ihr Euer Betriebssystem auswählen und die entsprechende PuTTY-Version installieren. Nach dem Öffnen sollte so etwas erscheinen:
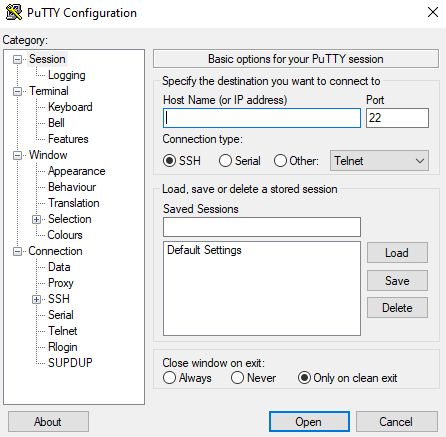
Jetzt einfach die IP-Adresse von Eurem Server eintragen, alles andere ignorieren und auf "Open" klicken - und schon seit Ihr verbunden. Es sollte sich ein Fenster öffnen, das nach einem Login fragt:

Die Einloggdaten dazu solltet Ihr ebenfalls von Eurem Provider im Zuge des Bestellvorgangs bekommen haben. Achtung: Beim Eingeben des Passworts ändert sich der Cursor nicht, das ist kein Fehler. Einfach das pw eingeben und auf Enter drücken. Alles weitere spielt sich ausschliesslich in diesem Eingabefenster ab (auch "Shell" genannt), das leider keine Mausunterstützung hat, d.h. Hin- und Herspringen im Text geht nur über die Pfeiltasten. Wenn am Server gerade ein Programm läuft, und Ihr das Fenster schliesst (oder Euer Rechner ausgeschaltet ist oder crasht), könnt Ihr es jederzeit wieder neu öffnen und Euch neu einloggen - das Programm am Server ist davon unbeeinträchtigt und läuft im Hintergrund weiter! Einen laufenden oder nicht reagierenden Prozeß/Befehl (z.B. die Echtzeit-Ansicht der einzelnen hinzugefügten Blöcke) könnt Ihr jederzeit mit CTRL-C abbrechen.
3 - Programme installieren und Blockchain hochladen
So, nach diesen Vorarbeiten geht es richtig los!
Ihr müsst nacheinander diese Befehle eingeben, um einige Programme zu installieren (und warten, bis alles ausgeführt wird - das merkt Ihr, indem die Kommandozeile wieder da ist):
sudo apt-get update -y
sudo apt-get upgrade -y
sudo apt-get install git -y
sudo apt-get install screen -y
git clone https://github.com/someguy123/hive-docker.git
Generell wechselt man mit "cd" den Ordner (change directory), in diesem Fall wollen wir in den neu installierten Order "hive-docker" gehen, daher geben wir
cd hive-docker
ein (Achtung auf die Groß/Kleinschreibung, Linux ist da sehr pingelig!). Übrigens: Mit cd .. kann man ins übergeordnete Verzeichnis zurückwechseln und mit ls kann man sehen, welche docs und Unterordner im aktuellen Verzeichnis zu finden sind.
Abschliessend noch das eingeben
./run.sh install_docker
./run.sh install
und zuletzt
./run.sh start
Dadurch wird die komplette Blockchain auf Euren Server übertragen. Das kann dauern, denn die ist mittlerweile ca. 375GB groß! Aber in ca. 3 Tagen sollte es erledigt sein. Woran merkt man es, dass Eure Blockchainversion "synchron" ist (also in Echtzeit Blöcke anhängt)?
Ganz einfach, mit dem Befehl ./run.sh logs.
Zunächst wird so etwas erscheinen, alle 30-60 Sekunden werden 10000 Blöcke geladen, Ihr seht am Datum, wo Ihr gerade seid (in diesem Fall war es noch 2018).

Je näher in Richtung 2022, desto länger dauert es vermutlich, da die jüngeren Blöcke mehr Daten beinhalten (Splinterland sei dank😁, dessen JSON-Operationen derzeit den meisten Traffic verursachen (Quelle)).
Wenn Ihr in der Gegenwart angekommen seid, sieht es anders aus. Jetzt wird - in Echtzeit - ca. alle 3 Sekunden ein Block angehängt, das sieht dann so aus:
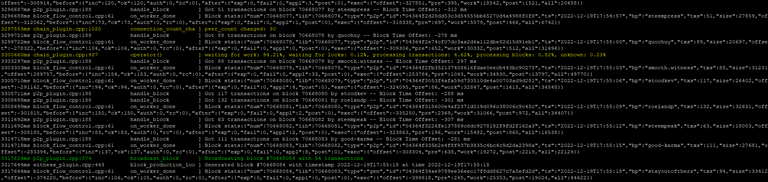
Zufälligerweise war gerade einer von mir dabei, daher ist eine Zeile als grün markiert.
Wenn Eure Chain also synchronisiert ist, dann ist es Zeit für den nächsten Schritt.
4 - Witness-Schlüssel erzeugen
Gebt diesen Befehl ein:
./run.sh wallet
Das startet die Wallet des Nodes. Wenn Ihr das zum ersten Mal macht, sollte diese Aufforderung erscheinen: "Please use the set_password method to initialize a new wallet", daher macht erst einmal das, um ein Passwort für Eure Wallet zu generieren:
set_password XYZ, wobei anstatt "XYZ" Ihr ein Passwort wählt, das Ihr Euch gut merken müsst!
Danach kommt das:
unlock XYZ, das öffnet Eure wallet (anstatt XYZ nehmt Ihr natürlich das Passwort von vorhin😃).
Nachdem die wallet als "unlocked" gekennzeichnet ist, kreiert Ihr mit
suggest_brain_key
ein Schlüsselpaar (plus einem "brain key", den Ihr aber nicht wirklich braucht). Das sieht ca. so aus:

Wichtig sind der private Schlüssel ("wif_priv_key") und der öffentliche (pub_key). Kopiert sie und speichert sie an einem Ort Eures Vertrauens gut ab, da Ihr sie später braucht.
Mit CTRL+D könnt Ihr jetzt die Wallet schliessen. Eure Daten werden in einem File namens "wallet.json" verschlüsselt gespeichert (im Ordner "data"). Falls was schief läuft, könnt Ihr jederzeit dieses File mit rm wallet.json (zuerst in den Ordner gehen mit cd data) löschen (rm = remove) und von vorne beginnen (also die wallet neu starten mit ./run.sh wallet).
5 - Config.ini anpassen
Als nächstes müsst Ihr Eure Daten in eine config.ini-Datei eintragen, damit der Node überhaupt weiß, wer Ihr seid.
./run.sh shm_size 24G
Damit erweitert Ihr Euren Speicher.
nano data/witness_node_data_dir/config.ini
Damit öffnet Ihr die config.ini-Datei im Editiermodus
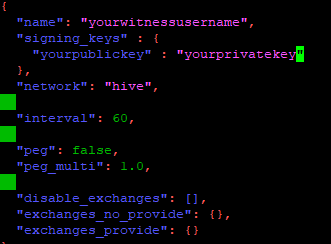
Es erschein ein sehr langer Text, in dem Ihr mit den Pfeiltasten runterscrollt, bis Ihr bei der Witness-Konfiguration angelangt seid:
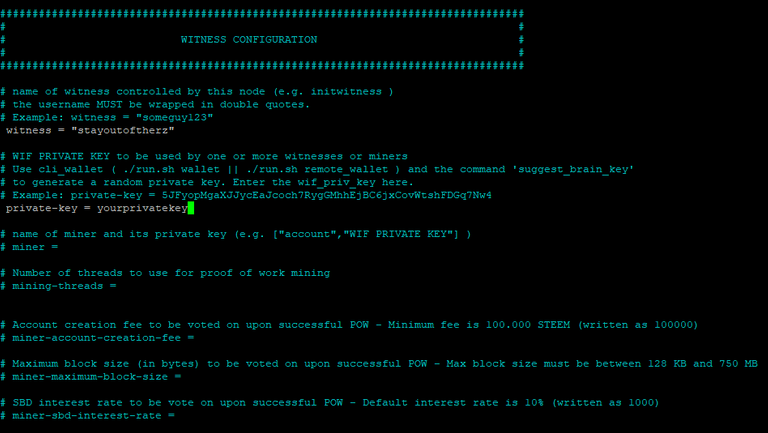
Hier müsst Ihr jetzt Euren Hive Usernamen eingeben, anstatt meinen, bzw. den, auf den der Witness laufen soll (manche ziehen es vor, einen eigenen Account für den Witness zu kreieren, das ist aber nicht nötig und kompliziert die Dinge nur). Wichtig ist, das "#" am Beginn der Zeile zu entfernen, wie abgebildet (ansonsten würde der Code als Kommentar gewertet wie bei den anderen Zeilen und von Linux ignoriert werden), der Name ohne "@", aber in Anführungszeichen!
Die zweite Änderung in der Datei ist ein paar Zeilen drunter, bei "private-key" gebt Ihr jetzt den privaten Schlüssel ein (c&p funktioniert), den Ihr vorher mit der Wallet kreiert hattet, und zwar ohne Anführungszeichen (und wieder das "#" am Beginn der Zeile entfernen).
Das ist alles, ansonsten sind keine Änderungen nötig. Jetzt noch die Datei abspeichern (bei meinem Editor geht das mit CTRL+O plus anschliessendem "y". Danach den Editor mit CTRL+X schliessen.
6 - Den Witness aktivieren
Endlich ist es soweit! Zuerst öffnet Ihr wieder die Wallet mit ./run.sh wallet und unlock XYZ (hoffentlich habt Ihr Euch das Password aus Schritt 4 gemerkt).
Danach müsst Ihr für die nachfolgende Transaktion den "active key" Eures Hive Accounts (bzw. den von dem Account, den Ihr als Witness bestimmt habt) eingeben mit:
import_key 5KNrRurkm51XM3gWGrDZJJmofwuiefnw89fnwf87ner87, wobei anstatt dieses es natürlich Eurer sein muss.
Danach kommt die eigentliche Transaktion, die Euren Witness veröffentlicht:
update_witness "username" "https://example.com" "STM1111111111111111111111111111111114T1Anm" {"account_creation_fee":"3.000 HIVE","maximum_block_size":65536,"hbd_interest_rate":0} true
Achtet darauf, dass zwischen den einzelnen Teilen des Befehls je ein Abstand ist (ausser in dem Bereich innnerhalb der Klammer{}!
wobei
- "username" für Euren Witness-Account steht (wieder ohne "@")
- statt "https://example.com" könnt Ihr eine x-beliebe Seite auswählen, z.B. Eure Homepage oder Euer peakd-Userprofil
- statt dem "STM1111111..." gebt Ihr den öffentlichen Schlüssel ein, den Ihr vorhin erzeugt hattet
- die anderen Optionen könnt Ihr so lassen, wie sie sind
Das wars, gar nicht so schwer, oder? Eurer Witness sollte jetzt "enabled" sein. Auf https://peakd.com/me/witnesses könnt Ihr überprüfen, ob Euer Witness einen grünen Kreis hat,so sollte das aussehen:

Solange Ihr noch keinen Block signiert habt, steht dort "0.0.0", erst danach erscheint die Versionsnummer - derzeit 1.27.3 (brandneu seit einigen Tagen!).
Falls Euer Name gar nicht auftaucht in der Liste, könnte das daran liegen, dass peakd nur die ersten 500 gereihten Witnesses auflistet. Ihr könnt auch mit https://hiveblockexplorer.com/ checken, ob es eine Transaktion zu Eurem Account gab namenes "witness_update".
Da aber noch niemand davon weiß, wäre an der Zeit, unter den Hivianern die frohe Kunde zu verbreiten, dass Ihr jetzt Witness seid! Falls Ihr noch nicht unter den ersten 500 Witness seid, kann man für Euch gar nicht voten, zumindest über peakd. Praktischerweise gibt es das Tool https://vote.hive.uno/@stayoutoftherz, das auch in diesem Fall das Voten ermöglicht (einfach den Namen durch Euren ersetzen).
7 - Witness-Parameter anpassen / Witness disablen
Auf https://peakd.com/me/witnesses könnt Ihr nicht nur andere Witnesses voten, sondern jetzt auch für Euren ein paar Parameter ändern.
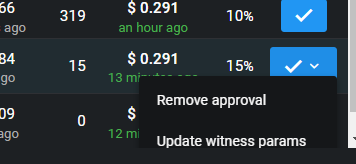
Wenn Ihr "Update witness params" auswählt, kommt Ihr in ein Menü, in dem Ihr einiges ändern könnt, unter anderem die Zinsrate für die HBD in den savings. Per default habt Ihr sie in der Transaktion oben auf 0 gelassen, ich habe sie auf 20% gesetzt, was derzeit Konsens ist). Alles andere habe ich gelassen, wie es ist.
Im gleichen Menü findet Ihr rechts oben auch einen Button "set to disabled". Dort könnt Ihr Euren Witness "abschalten", z.B. wenn Ihr ein Serverproblem habt oder aus irgendeinem Grund Ihr keine Blöcke signieren könnt (wenn also "missed blocks" entstehen) oder wenn Ihr offline gehen müsst wegen eines Upgrades (Softfork oder Hardfork). Wenn das Problem behoben ist oder das Upgrade ausgeführt, einfach Schritt 6 wiederholen und den Witness wieder enablen.
Zu guter letzt, wenn Ihr in peakd auf Eurer Startseite unter "Account Actions" auf "edit account profile" geht, seht Ihr jetzt neu eine "witness description", da könnt Ihr, wenn Ihr wollt, einen Text Eurer Wahl einsetzen, um Euren Witness zu beschreiben.
8 - Preisfeed etablieren
Keine Notwendigkeit, aber Usus ist es, einen Hive-Preisfeed anzeigen zu lassen. Dazu müsst Ihr ein separates Programm auf Eurem Server installieren und ausführen, es gibt aber auch andere Wege, nur übersteigen die meine Kenntnisse. Auch hier gibt es ein sehr gutes Tutorial von @rishi556: https://peakd.com/witness/@rishi556/how-to-setup-hive-witness-pricefeed-using-hivefeed-js
Damit sollte es in wenigen Minuten klappen. Wenn Ihr bis hierher gekommen seid, nehme ich an, dass Ihr so weit mit Euren Skills seid, dass Ihr dem Tutorial folgen könnt, im Prinzip lädt man hier auch ein paar Programme, genau wie im Tutorial beschrieben, personalisiert eine Datei namens "config.json", und führt das Skript mit pm2 start app.js --name priceFeed aus.
Zu beachten ist eigentlich nur, dass in der config.json-Datei beide Schlüssel von der Node-Wallet einzugeben sind, der öffentliche und der private (das kam im Tutorial nicht so rüber), und zwar in der Form:
9 - Upgrades
Ab und an wird die Hiveversion geändert (da es immer was zu Verbessern gibt), das reicht von kleinsten Änderungen, die man als User gar nicht bemerkt, bis zu größeren Hardforks (die aber relativ selten sind). Je nach Umfang können verschiedene Maßnahmen fürs Upgraden erforderlich sein.
Nur als Beispiel, für das gestern stattgefundene Upgrade von 1.27.2 auf 1.27.3 war das erforderlich:
Den Node auf "Disabled" setzen (falls Ihr keine Backup-Lösung habt), ansonsten würdet Ihr während der Offline-Zeit Blöcke verpassen.
./run.sh stop
Das stoppt den Node.
./run.sh install
Das lädt die aktuelle Version.
./run.sh replay --force-replay
Das startet die neue Version und gleicht die Änderungen ab (dauert ca. 10 Stunden auf einem schnellen Server, es kann aber auch 2 Tage dauern). Danach ist die neue Version online und synchron. Überprüfen könnt Ihr den Fortschritt wieder mit ./run.sh logs.
Am Schluß noch Schritt 6 ausführen, um Euren Witness wieder zu enablen. Es erscheint noch die alte Version neben dem grünen Kreis, erst wenn wieder ein neuer Block signiert wurde, ist die neue zu sehen.
Im Zweifelsfall (d.h. wenn nicht genau ersichtlich aus Announcement posts etc.) sich vor dem Upgraden schlau machen bei anderes Witnesses Eures Vertrauens, was genau zu tun ist!
Das war es auch "schon", ist doch ganz schön lang geworden, aber ich hoffe, es war dafür verständlich. Ich wünsche Euch Viel Erfolg bei Eurem Eigenen Witness Node!
Bei Fragen aller Art mir einfach Bescheid geben, auch auf Diskord unter stayoutoftherz#9879.
Wenn Ihr glaubt, das war hilfreich, könnt Ihr für mich als Witness voten ❤️!

Dear Hiveans,
why run a Witness Node at all? Because it can never be decentralized enough. The more nodes that mirror the Hiveblockchain, the better.
As promised, here's a step-by-step guide for IT newbies. I'm no expert myself and if you find a mistake, please post it in the comments. If you have any questions, of course too. I mainly refer to this tutorial by @rishi556. It is based on a method (of several possible) to set up a Witness, originally summarized here by @someguy123. The documentation is very good, hgowever not completely self-explanatory for laymen, so I stumbled a few times. But thanks to @rishi556 all questions were answered. That is, with this guide you will hopefully be able to avoid the grossest beginner mistakes! I use layman language in some cases to be more descriptive, so to all pros, please bear with me!
1 - Get a Server
A server is basically a computer that runs day and night, as it is connected to the Hive blockchain in real time and must be ready to sign a block at any time (if you are randomly chosen as a witness to do so). You can run it at home, or you can rent one (search for "vServer"). I chose the rental solution because it was more convenient for me (and more fail-safe), but ultimately you'll have to do the math to see what comes out cheaper. The minimum requirements are: 500GB storage (better even more) of NVME-type, not SSD (that's faster), 32GB RAM and 6-8 CPU cores. Linux (Ubuntu) is pre-installed in most cases. In my first attempt I only had 16GB RAM and 400GB SSD, that was definitely not enough.
Many witnesses have rented the server from Privex, there is even a "Hive-Node-in-a-box" on offer there, where the Hive-docker program and a blockchainsnapshot are already preinstalled, but it's also about decentralization, and Hive puts itself into an unnecessary dependency if too many witnesses have the same server supplier. That's why I deliberately chose another one, installing the necessary programs is the least problem and is done in no time anyway. You probably won't find anything suitable for less than 40€-50€ per month. Please let me know if you do!
2 - Connect to the Server
Next, you need a program to connect to the server (which can be located anywhere) so you can give it commands from home. I got PuTTY recommended by my provider, since I have a Windows machine (there are probably others for iOS or Linux, but your provider will tell you). On the download page you have to select your operating system and install the appropriate PuTTY version. After opening it you should see something like this:
Now just enter the IP address of your server, ignore everything else and click on "Open" - and you are connected. A window should open asking for a login:
The credentials to login you should have given as well from your provider during or after the order process. Please note, that the curser won´t move while you enter the password, it is not a bug, but a feature, just enter the letters anyway and press "Enter". Anything else will happen in that window (also called "shell"). It doesn´t have a mouse support, that means any scrolling through the text is only possible with the arrow keys of your keyboard!
If on your server a program is running and you close that window (or your computer/laptop crashes), you can anytime reopen it and login again - the program on the server won´t be affected and keeps running in the background. An ongoing or not reacting process in the shell you can typically terminate with CTRL-C.
3 - Installing some programs and loading the chain
Next you have to enter these commands (and wait until they are completed), this will install some programs
sudo apt-get update -y
sudo apt-get upgrade -y
sudo apt-get install git -y
sudo apt-get install screen -y
git clone https://github.com/someguy123/hive-docker.git
With "cd" one can change the directory, in this case we want to go to the newly installed
"hive-docker", therefore we enter
cd hive-docker
Please take care about upper and lower cases, all names in Linux are case sensitive. With cd .. you can go back to the higher-order directory and with ls you can retrieve a list of files and subdirectories in the current directory.
Afterwards you enter this:
./run.sh install_docker
./run.sh install
and finally
./run.sh start
This will load the complete Hive blockchain to your server. This will take a while because it is currently app. 375GB large! But in app. 3 days it should be accomplished. How do you recognize that your blockchainversion is up to date ("synced")? Just enter
./run.sh logs.
In the beginning it will look like this: every 30-60 secs. 10000 blocks are loaded, from the dates you can see where you are right now (in this case it was 2018)
The more you go towards 2022 the slower it will get as the more recent blocks contain more data (thanks to Splinterland😁 whose JSON operations make up the most traffic nowadays(src)).
Once you are in the present it will look differently: Now app. every 3s a new block will be added in real time.
Coincidentally there was one in the list which was signed by my witness node therefore it is shown in green.
If your chain is fully synced, it is time for the next step.
4 - Generate the witness-keys
Enter this command:
./run.sh wallet
This will startup the wallet of your node. If you do it the first time, this text should appear: "Please use the set_password method to initialize a new wallet", therefore make just that in order to create a password for your wallet:
set_password XYZ, and instead XYZ you choose a pw that you need to remember well!
Afterwards you enter:
unlock XYZ, this will open your wallet (instead of XYZ of course you take your own pw 😃).
After the wallet is marked as "unlocked" you create with
suggest_brain_key
a pair of keys (plus a "brain key", but actually you won´t need that). Something like this should appear:
The private key ("wif_priv_key") and the public one (pub_key) are important. Copy and save them at a trustworthy place, you will need them in the next steps.
With CTRL+D you can now close the wallet. Your keys are stored in the file "wallet.json" in an encrypted way (in the "data" directory). If something goes wrong, you can anytime delete it with rm wallet.json (first go to the correct directory with cd data) and restart the process (i.e. start the wallet again with ./run.sh wallet).
5 - Customize the Config.ini
Next you have to do some changes in the config.ini-file.
./run.sh shm_size 24G
This enlarges your storage.
nano data/witness_node_data_dir/config.ini
This opens the config.ini-file in editing mode.
A large text appears in which you have to scroll down until you reach a section called witness-configuration:
Here you have to replace my username with yours (or the name of the witness if you chose a separate one (some witnesses do but it is not needed at all and IMO complicates things only)).
It is importanat, that the "#" in the beginning of the line is deleted, as shown (otherwise the code is still marked as comment and will be ignored), the Hive username without "@", but in quotation marks!
The second change is a few lines below, as private-key you enter the private key which you have generated in the previous step, without quotation marks and the "#" again deleted.
That´s it, no other changes are needed. Now you have to save the file (in my editor it works with CTRL+O plus "y". Afterwords close the editor with CTRL+X.
6 - Activate your witness
Finally the time has come! First you have to open the wallet again with ./run.sh wallet and unlock XYZ (hopefully you have remembered your password).
Then you have for the following transaction provide the active key of your Hive account (or the account of your witness if you chose a different) like this:
import_key 5KNrRurkm51XM3gWGrDZJJmofwuiefnw89fnwf87ner87, whereby instead of the example one it must be yours.
After that this single transaction will activate your witness:
update_witness "username" "https://example.com" "STM1111111111111111111111111111111114T1Anm" {"account_creation_fee":"3.000 HIVE","maximum_block_size":65536,"hbd_interest_rate":0} true
Take care that between the parts of the command there is just one space (except the content of the {}.
whereby
- "username" stands for your witness Hive username (again without "@")
- instead "https://example.com" you can pick any site, e.g. your homepage or your peakd-profile page
- instead of "STM1111111..." you use the public key you have generated in step 4
- the other options you can leave as they are
That´s it! Your witness should now be "enabled". At https://peakd.com/me/witnesses you can check if it has a green circle. It should look like this:
As long as you haven´t signed a block it says "0.0.0", only thereafter the version number is shown - currently 1.27.3 (brandnew since a few days!).
If your witness isn´t yet showing up, it could be that e.g. peakd is showing only 500 witnesses. You can check also with https://hiveblockexplorer.com/, if there was a transaction "witness_update".
Now it would be time to let others know that you are a witness! If you are not among the top 500 witnesses nobody can vote for you (at least in peakd), but there is a decent tool https://vote.hive.uno/@stayoutoftherz which works in any case (just replace the username with yours).
7 - Adapt your witness parameters / disable the witness
At https://peakd.com/me/witnesses you can not only vote for other witnesses, but you can change some of the parameters
If you choose "Update witness params", a menu pops up where you can change items like the APR of the HBD which are in the savings. Per default you have kept it at 0 in the witness activation transaction, but I have changed it to 20% which is consensus now). Anything else I have left unchanged.
In the same menu in the top right corner you will find a button "set to disabled". There you can "switch off" your witness if e.g. there is a problem with the server or if you for any reason can´t sign blocks anymore (i.e. if you are creating "missed blocks"), or due to an upgrade/hardfork. After the problem is solved (or the version upgraded) you can anytime restart the witness by repeating step 6.
Finally, in peakd under "Account Actions" you can go to "edit account profile", then you will see a new line "witness description". You can enter any text to describe/explain your witness.
8 - Establish a pricefeed
Not mandatory, but done by almost all witnesses is the pricefeed. For this you have to install and run a different program on your server. @rishi556 has created a nice tutorial for this as well: https://peakd.com/witness/@rishi556/how-to-setup-hive-witness-pricefeed-using-hivefeed-js
If you have come this far, I assume that your skills have grown enough that you can follow the tutorial without any problems. In principle again you have to install some programs, adapt a file called "config.json", and finally run the script with pm2 start app.js --name priceFeed.
Just take care that in the "config.json"-file you have to enter both your keys from the node-wallet, the public and and the private one, like this:
9 - Upgrades
Every now and then the Hive version changes (there are always things to improve), ranging from very tiny changes, unnotible to users, up to large hardforks (which are quite rare though). Depending on the size, there could be different things to do in order to upgrade to the newest version.
Just as an example, for the most recent upgrade from version 1.27.2 to 1.27.3 I did those steps:
First the node needs to be set to "disabled" (unless you have a backup server), otherwise you would produce missed blocks.
./run.sh stop
This stops your node.
./run.sh install
This loads the new version.
./run.sh replay --force-replay
This restarts the new version and checks the blockchain for any changes needed (or other magic, I can´t really tell what´s happening). It will take about 10 hours on fast machines or more (app. up to 2 days), depending on your server specs. After completed, your node has the new version and is synced again. You can check the progress again using this: ./run.sh logs.
Finally repeat step 6 to reanable your witness. You should be marked as active again, but the version number will probably still show the old version, until you sign your next block, only then the correct one will be shown.
In doubt (e.g. if not obvious from the announcement posts, etc.) clarify e.g. with other witnesses what steps are necessary for a specific upgrade!
Well that´s all, it got way longer than expected but I hope it is pretty straightforward for you.
I wish you many success in setting up your witness!
In case anything is unclear, just let me know!
If you like, what you read, please vote for me as a witness ❤️!

The serverimage and the witness logo were made using MidJourney
I had no idea you are a new witness, great info and you have my vote! I have some similar goals with my node just need to get to work to make them become reality!
Thanks! Appreciated!
Late to this wonderful post. Here’s a !PIZZA
Thanks, you may consider to vote for me as witness too!
Yes, you will have my vote! !PIZZA
Awesome!
!hiqvote
@stayoutoftherz, the HiQ Smart Bot has recognized your request (1/2) and will start the voting trail.
In addition, @cryptothesis gets !PIZZA from @hiq.redaktion.
For further questions, check out https://hiq-hive.com or join our Discord. And don't forget to vote HiQs fucking Witness! 😻
Thanks a lot @stayoutoftherz !
That's a wonderful documentation work and very useful contribution. The time to go through all of it, to come back with questions and I'll do my best to adapt it in french most ..probably with some help & without forgetting to list contributors =)
Thanks.
Are the hardware reqs you mention still relevant today? I have been looking into running a node the past few weeks and am trying to find up-to-date information. Seem to not find anything so far. Perhaps you can give me some pointers? Where are you currently renting your server? I found also that some vps hosts don't allow applications for mining crypto. Does that also hold for hosting a witness?
I use a VPS XL NVMe from Contabo with 10 vCPU cores, 60GB RAM and 400+400 GB NVMe. There are no restrictions in terms of software used.
Thanks! Just got a vps there. They had really good black friday deals. In the progress of setting it up which, at this point, means loading the blocks for the next few days :D
👍
super erklärt für einen newbee :)
!PGM
!LOLZ
!BEER
!PIZZA
BUY AND STAKE THE PGM TO SEND A LOT OF TOKENS!
The tokens that the command sends are: 0.1 PGM-0.1 LVL-0.1 THGAMING-0.05 DEC-15 SBT-1 STARBITS-[0.00000001 BTC (SWAP.BTC) only if you have 2500 PGM in stake or more ]
5000 PGM IN STAKE = 2x rewards!
Discord
Support the curation account @ pgm-curator with a delegation 10 HP - 50 HP - 100 HP - 500 HP - 1000 HP
Get potential votes from @ pgm-curator by paying in PGM, here is a guide
I'm a bot, if you want a hand ask @ zottone444
Hi, habe einen VPS Anbieter gefunden, welche unter 45€ pro Monat liegt...
https://www.netcup.de/bestellen/produkt.php?produkt=2982
Wenn du dich dafür entscheidest, kann ich dir sogar noch einen Gutschein geben, welcher dir 1 Monat Rabatt gibt...
Klingt interessant, aber SSD könnte zu langsam sein, ich würde unbedingt NVMe empfehlen.
NVMe werden bisher nicht angeboten. Aber preislich fand ich die Konfiguration sehr attraktiv.
Klasse Tutorial wirklich leicht umzusetzen.
Was zahlst du für den Server wenn Du gemietet hast?
Mein vote bekommst Du natürlich auch. Bin nicht zu Hause zur Zeit. Werde das aber im neuen Jahr als erstes machen.
LG Michael
!invest_vote
Ca. 45€/Monat
cool. Meinen Witness Vote kriegst Du :)
Danke!
Zweierlei finde ich in meinem Verhalten überaus bemerkenswert:
Wissen mag somit eventuell ganz nebenbei bildend sein – doch kann das Wissen auch Hügel aufwerfen, die sich als schwer bezwingbar erweisen. Und damit wären wir wieder am Anfang: der möglicherweise geistigen Überforderung. :-)
Danke, klasse tutorial!!
🍀 Prosit 2023!! 🍀
lg aus dem schönen Tirol !PGM mit etwas !invest_vote 🤠
BUY AND STAKE THE PGM TO SEND A LOT OF TOKENS!
The tokens that the command sends are: 0.1 PGM-0.1 LVL-0.1 THGAMING-0.05 DEC-15 SBT-1 STARBITS-[0.00000001 BTC (SWAP.BTC) only if you have 2500 PGM in stake or more ]
5000 PGM IN STAKE = 2x rewards!
Discord
Support the curation account @ pgm-curator with a delegation 10 HP - 50 HP - 100 HP - 500 HP - 1000 HP
Get potential votes from @ pgm-curator by paying in PGM, here is a guide
I'm a bot, if you want a hand ask @ zottone444
Ich habe zwar im Moment nicht vor einen solchen Server aufzusetzen. Aber wer weiß, vielleicht später einmal. Und sicher ist dein Post für einige Leute sehr hilfreich.
Vielen Dank für diese grosse Arbeit und eine sehr verständliche Anleitung.
Es wäre ein spannendes Projekt einmal so eine Node einzurichten und eine Zeitlang laufen zu lassen.
Was mich bisher ein wenig abhält, sind die Kosten... Man muss schon relativ weit nach oben in der Liste kommen um zumindest nicht drauf zu legen. Ich fürchte ich habe nicht die nötige Reichweite um die Votes dafür zu bekommen.
Mit Deiner Anleitung wäre aber zumindest der technische Teil sicher kein Problem mehr 😀👍
Danke!
Als Nr. 90 ist es noch ein Verlustgeschäft, aber nicht allzusehr. Hängt auch von Hivekurs ab, der ist derzeit leider nicht da, wo er sein sollte.
This is something that I've considered more than once.. My only problem is that with the current power cuts in my country it's just not worth it, really saddening though.
I have to say I also fancy that build in the picture it looks kingly
:) The server in the pic ist just imaginary. I had prompted the AI with "futuristic server".
Oh laughs😂 it lools sock though.. Definitely a build I'll take no problem
Danke für die Erklärung. Ich habe auf meinen Waves Knoten am laufen, und bin am überlegen ob ich auf dem Server auch einen für Hive laufen lassen könnte. 32 GB ist allerdings schon ne Nummer, da müsste ich nachrüsten. Werde ich mir die Tage mal genauer anschauen. !BEER
Wow. Da hast Du Dir aber sehr viel Arbeit gemacht. Respekt!
!hiqvote
Danke! Dachte auch nicht, dass es so ausarten würde, aber wenn man alles genau erklären will, dauert es 😃.
Great guide to make it easier for someone wanting to run a witness node .let’s secure the network and expand decentralisation!
Thanks! That´s the idea!
Excellent instruction manual @stayoutoftherz, thank you.
Most welcome!
@prinzvalium, the HiQ Smart Bot has recognized your request (1/3) and will start the voting trail.
In addition, @stayoutoftherz gets !PIZZA from @hiq.redaktion.
For further questions, check out https://hiq-hive.com or join our Discord. And don't forget to vote HiQs fucking Witness! 😻
Yay! 🤗
Your content has been boosted with Ecency Points, by @xchng.
Use Ecency daily to boost your growth on platform!
Support Ecency
Vote for new Proposal
Delegate HP and earn more
!hiqvote
<
@beeber, the HiQ Smart Bot has recognized your request (1/2) but the daily limit has been reached or the mana is too low. Try again later.
As a consolation, @stayoutoftherz gets !PIMP from @hiq.redaktion.
For further questions, check out https://hiq-hive.com or join our Discord. And don't forget to vote HiQs fucking Witness! 😻
View or trade
BEER.Hey @stayoutoftherz, here is a little bit of
BEERfrom @eddwood for you. Enjoy it!Learn how to earn FREE BEER each day by staking your
BEER.@reiseamateur denkt du hast ein Vote durch @investinthefutur verdient!
@reiseamateur thinks you have earned a vote of @investinthefutur !
@mima2606 denkt du hast ein Vote durch @investinthefutur verdient!
@mima2606 thinks you have earned a vote of @investinthefutur !
$PIZZA slices delivered:
@dragon-ti(1/5) tipped @stayoutoftherz
cryptothesis tipped stayoutoftherz (x2)
hiq.smartbot tipped cryptothesis
Super Info. Wie läuft dein Node? Hast du irgendwelche Probleme in der zwischen Zeit gehabt?
Super Info. Wie läuft dein Node? Hast du irgendwelche Probleme in der zwischen Zeit gehabt?
Nein, läuft absolut reibungslos!