Muy buen día hivers y amantes de las costuras, hoy te voy hablar de un reto personal que me emociona mucho, se trata de una maxi muñeca, es decir una muñeca más grande de las que suelo hacer, esta mide 60 cm. Me atreví a hacer un patrón más grande porque siento es bueno darle una oportunidad más a mi talento, como ejercicio de salir de mis propios límites, también porque se que los detalles así son más vistosos, llaman mucho la atención y la apreciación.
Very good morning hivers and sewing lovers, today I am going to tell you about a personal challenge that excites me a lot, it is a maxi doll, that is to say a bigger doll than the ones I usually make, this one measures 60 cm. I dared to make a bigger pattern because I feel it is good to give my talent another chance, as an exercise to get out of my own limits, also because I know that the details are more colorful, they attract a lot of attention and appreciation.
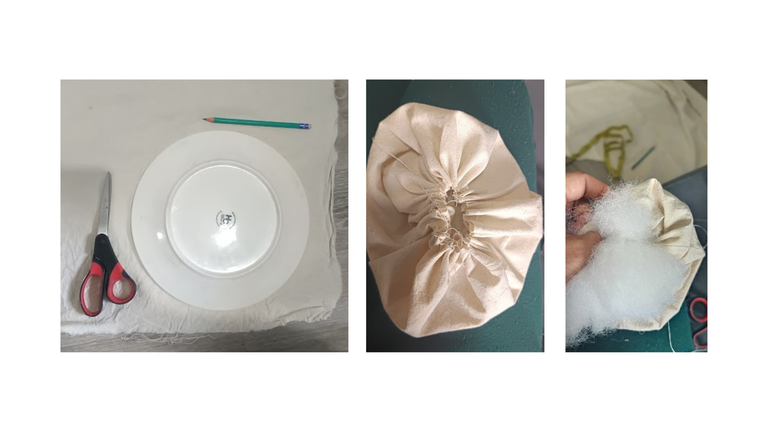
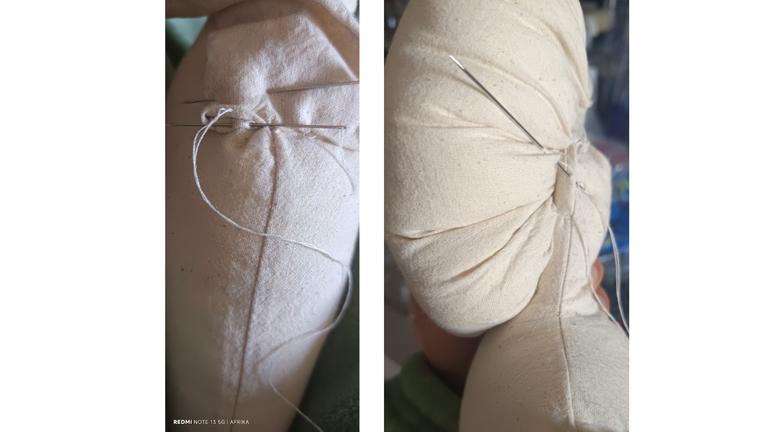
Vamos manos a la obra: cartulina para el patrón, cinta métrica, regla, lápiz, tijeras, tela de lienzo o cruda, pinturas, hilo, máquina de coser, aunque también puedes hacerlo a mano, alfileres, muchos alfileres jajaja. Yo empecé por la cabeza y directamente en la tela, con ayuda de un plato grande, si ese que usas para comer, marque la circunferencia con el lápiz y recorté. Luego, cosí arruchando los bordes cerrando un poco, quedando como bolsa, para así rellenarla con el algodón mientras le daba la forma de cabeza, una vez tensa pero suave, la cerré con varias costuras a mano.
Let's get to work: cardboard for the pattern, tape measure, ruler, pencil, scissors, canvas or raw fabric, paints, thread, sewing machine, although you can also do it by hand, pins, lots of pins hahaha. I started with the head and directly on the fabric, with the help of a large plate. Yes, that you use to eat, mark the circumference with the pencil and cut out. Then, I stitched the edges, closing them a little bit, so that I could fill it with the cotton while I gave it the shape of the head. Once it was taut but smooth, I closed it with several seams by hand.
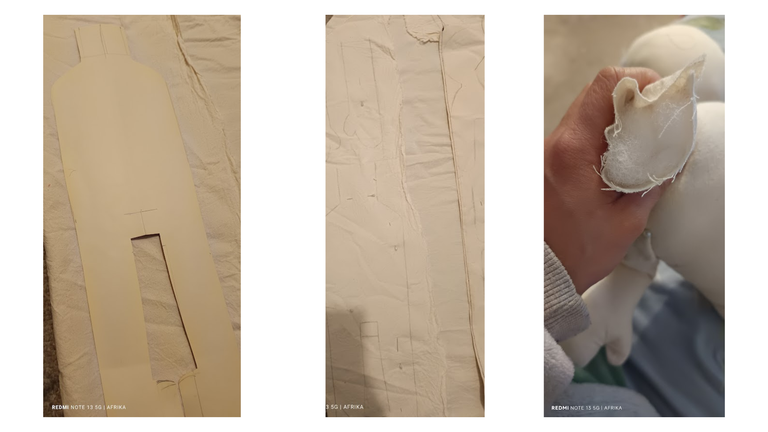
Ahora fue el turno de cuerpo, en la cartulina, puse la cabeza de allí media primero el rectángulo pequeño del ancho y grueso ideal para el cuello, al menos 6 cm de ancho. Luego uno más grande para el cuerpo y 2 más para las piernas, abajo le di formas curvas a los pies como de zapatitos. Para los brazos hice un rectángulo un poco más delgado que el de las piernas y corto también. una vez todas las piezas cortadas, lo traslade a la tela doble.
Now it was the turn of the body, on the cardboard, I put the head of there half first the small rectangle of the ideal width and thickness for the neck, at least 6 cm wide. Then a bigger one for the body and 2 more for the legs, below I made curved shapes for the feet like little shoes. For the arms I made a rectangle a little thinner than the one for the legs and also short. Once all the pieces were cut, I transferred it to the double fabric.
Tracé con lápiz y me fui a la máquina de coser, pasando por la costura a un cm de distancia de la línea dibujada, dejando abierta la entrepierna y el cuello, porque por allí es por donde voy a rellenar una vez cortada la pieza y dada la vuelta, dejando las costuras por dentro, hice lo mismo con los brazos. No corto la piezas antes porque eso me da más seguridad en los márgenes de costura.
I traced with pencil and went to the sewing machine, going through the seam one cm away from the drawn line, leaving open the crotch and neck, because that's where I'm going to stuff once the piece is cut and turned over, leaving the seams on the inside, I did the same with the arms. I don't cut the pieces before because that gives me more security in the seam allowances.
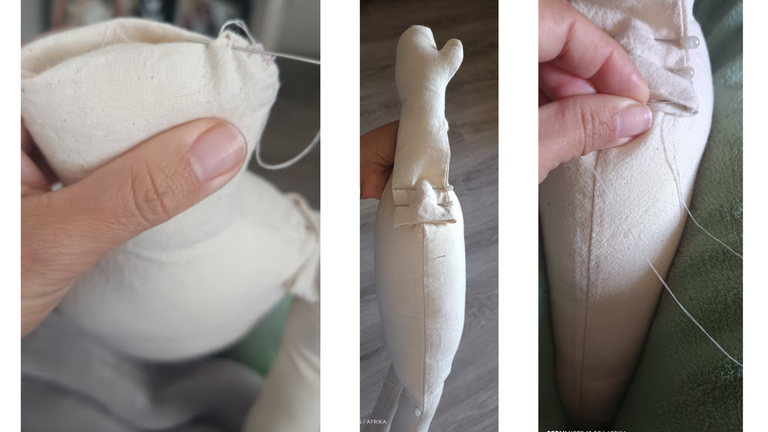
Una vez todas las piezas llenas con el algodón, procedo a cerrar con costura a mano en invisible la entrepierna y el cuello, guardado los bordes. Después, quise intentar otra técnica pasando una costura de división entre el cuerpo y las piernas, permitiendo que éstas se doblen y pueda sentarse la muñeca. Ahora es el turno de unir la cabeza al cuerpo, empecé desde el centro, asegurando bien y después por los bordes del cuello, procurando dejarla en centro y bien fijada.
Once all the pieces are filled with the cotton, I proceed to close the crotch and neck with invisible hand stitching, keeping the edges. Next, I wanted to try another technique by passing a dividing seam between the body and the legs, allowing the legs to bend and the doll to sit. Now it is the turn to join the head to the body, I started from the center, securing it well and then along the edges of the neck, trying to leave it in the center and well fixed.
Luego le tocó el turno a los brazos, acá ambie me aventure a una técnica nueva, la vez pasada, con ayuda de alfileres, puse los brazos en forma contraria, en vez de la posición normal, puse la base que los brazos dieran hacia arriba, y allí hice costura a mano escondida. Una vez bien cocidos y ajustados, al soltarlos ellos caen a la posición natural, quedando la costura por dentro, como pueden ver la imagen. Así queda todo el cuerpito.
Then it was the turn of the arms. Here I ventured to a new technique. Last time, with the help of pins, I put the arms in the opposite way, instead of the normal position, I put the base that the arms were facing up, and there I made hidden hand stitching. Once they are well sewn and adjusted, when they are released they fall to the natural position, leaving the seam on the inside, as you can see in the picture. This is how the whole body looks like.
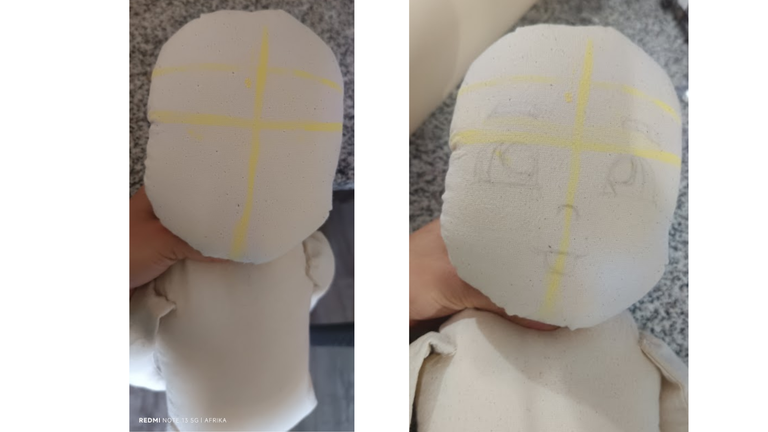
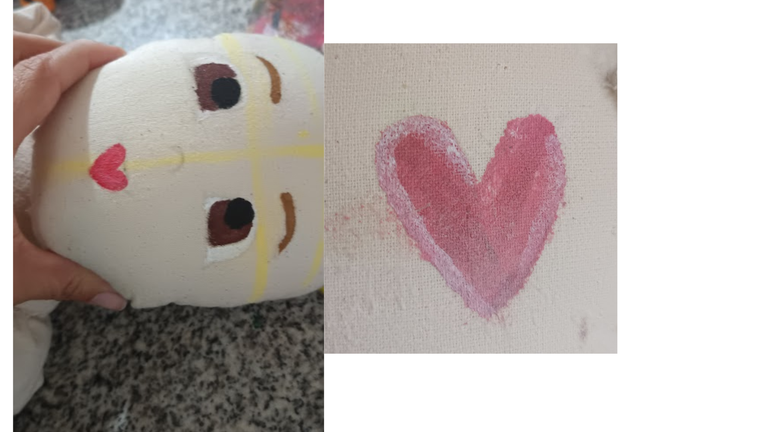
Ahora vamos a pintar el rostro, lo primero es marcar con tiza, líneas rectas con los centímetros necesarios para la frente, las cejas, la naríz, la boca y la barbilla. Luego con lápiz hago 3 círculos. Después con pintura y pincel hago los detalles, una vez seco el rostro, sacudo con brocha el exceso de tiza y también con rubor y sombra le voy dando el matiz necesario o hasta que me parezca que se ve bien el rostro. Y así quedó esta parte de la maxi muñeca.
Now we are going to paint the face, the first thing is to mark with chalk, straight lines with the necessary centimeters for the forehead, eyebrows, nose, mouth and chin. Then with pencil I make 3 circles. Then with paint and brush I make the details, once the face is dry, I brush the excess of chalk and also with blush and shadow I give the necessary shade or until I think the face looks good. And this is how this part of the maxi doll looks like.
Gracias hivers por la compañía y motivación, nos vemos en un próximo post, acepto sugerencias en los comentarios. Las fotos son registro propio, editadas en Canva. Nuevamente mi gratitud con ustedes y la comunidad de @needleworkmonday donde cada día puedes llenarte de inspiración para tus manualidades.
Thanks hivers for the company and motivation, see you in a next post, I accept suggestions in the comments. The photos are my own, edited in Canva. Again my gratitude to you and the @needleworkmonday community where every day you can be filled with inspiration for your crafts.

Felicidades, muy lindo tu trabajo 😊
Muchas gracias 😊
Great creativity and style you've got
THANKS A LOT