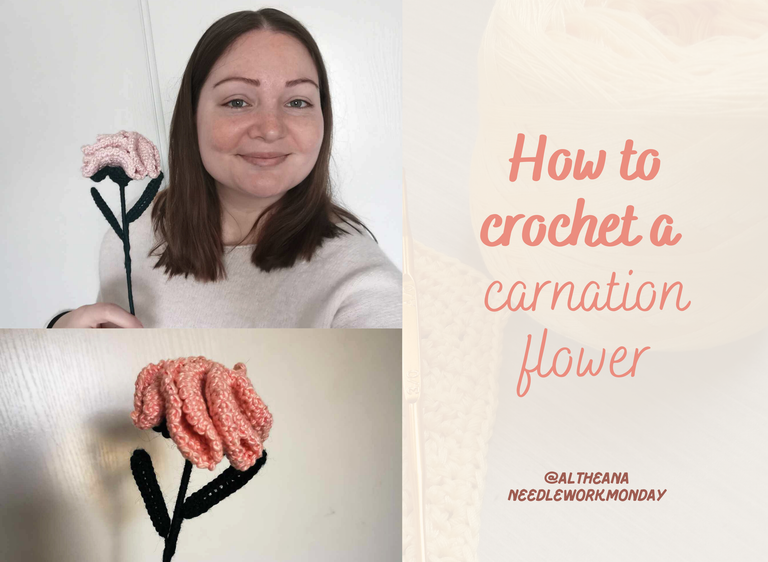
Hello friends and crochet lovers! I hope you're all doing well this week. ☀️
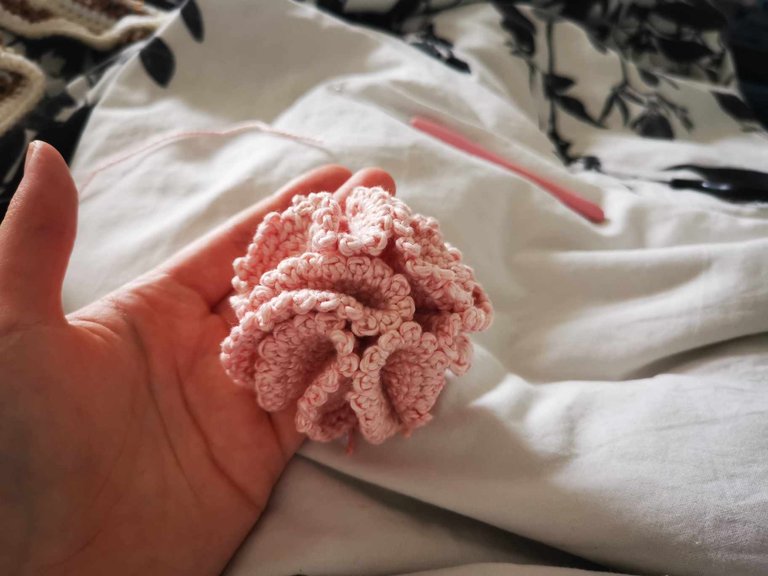
Last week, I crocheted a new flower: a carnation. 🌸
I thought it was a complicated flower to make, because from the outside, it looks a bit complex. But in reality, it's not at all.
It's really accessible to beginners. You just need to know how to make a magic ring, double crochets, chain stitches, and single crochets.
It's quite quick to make; the flower itself takes about 45 minutes.
Here's the tutorial I followed: YouTube video. It's in French.
But I'll try to share the steps as best I can so you can follow it in English and make pretty carnations for your bouquet! 💐
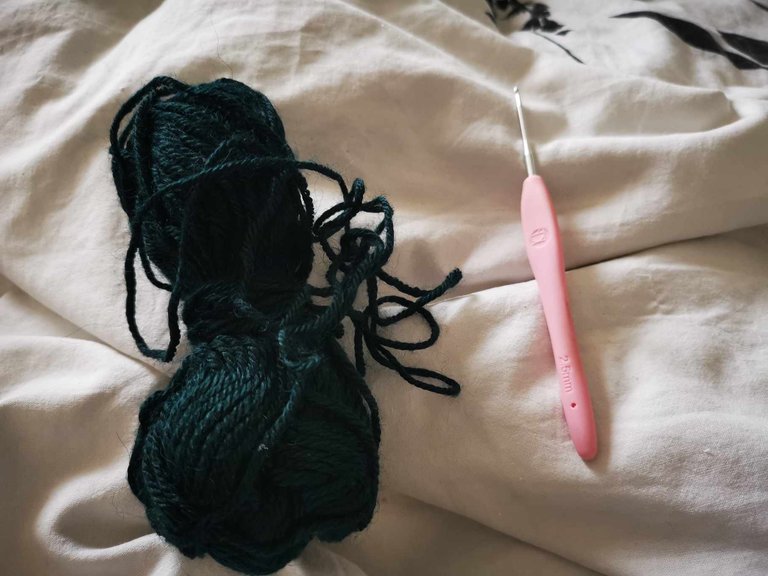
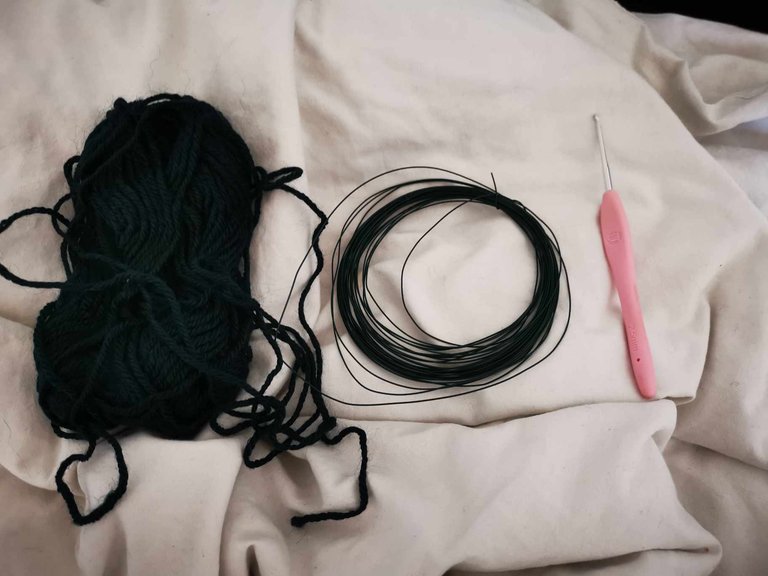
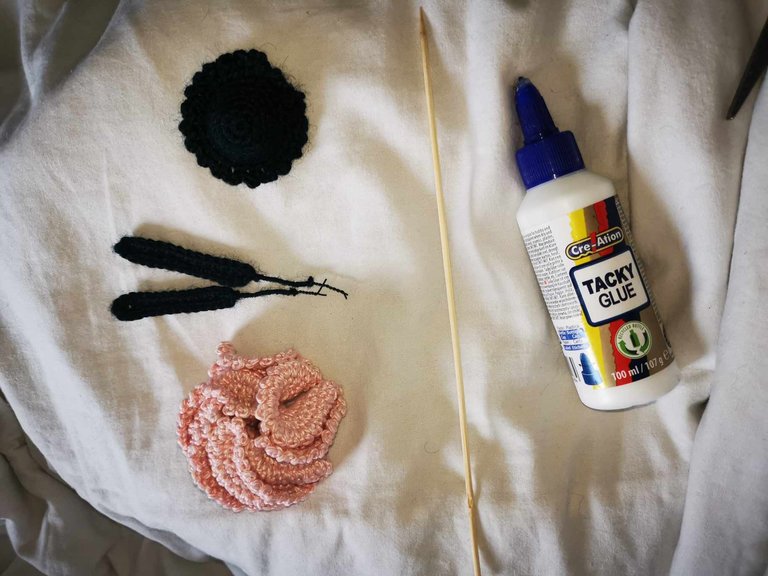
Materials
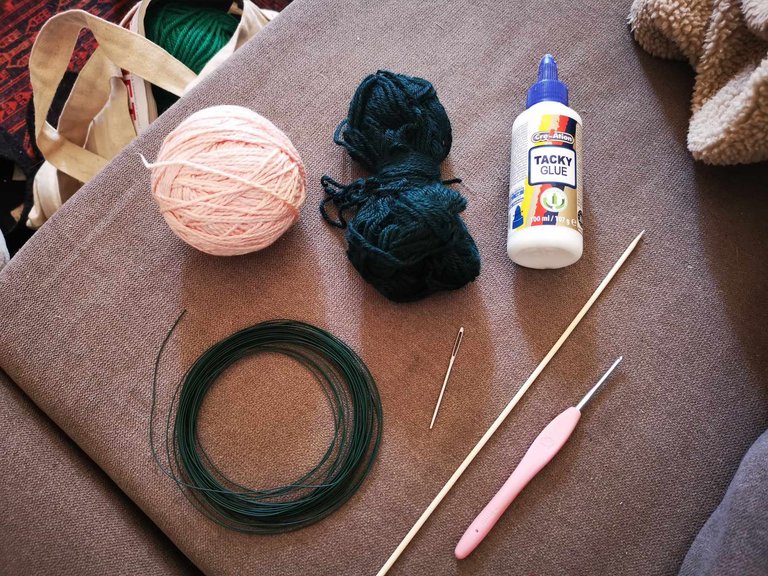
- 1 ball of yarn for the flower;
- 1 ball of green yarn for the stem, leaf, and receptacle;
- 1 2.5 mm crochet hook;
- 1 yarn needle;
- Glue;
- A skewer for the stem;
- Wire for the leaves;
- Scissors.
Steps
The flower
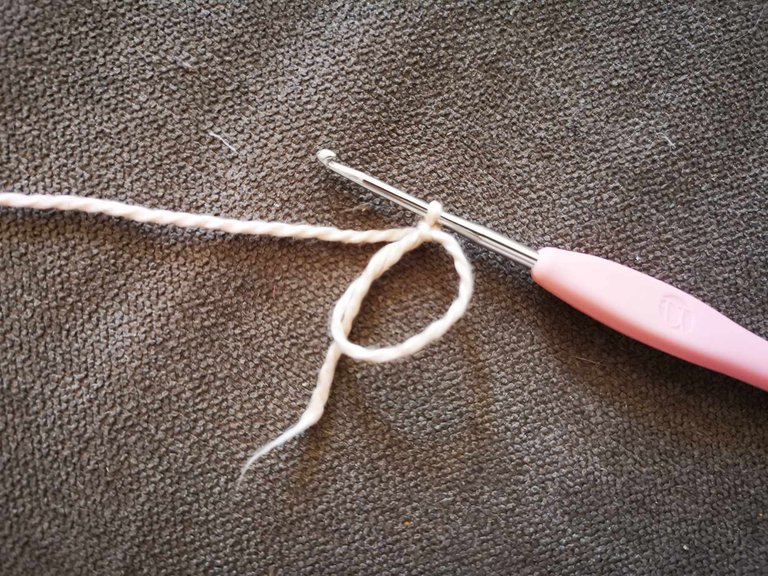
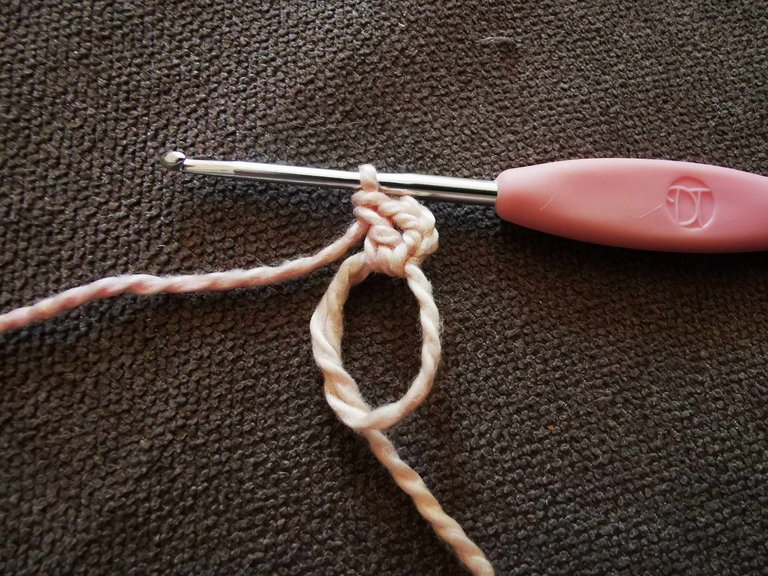
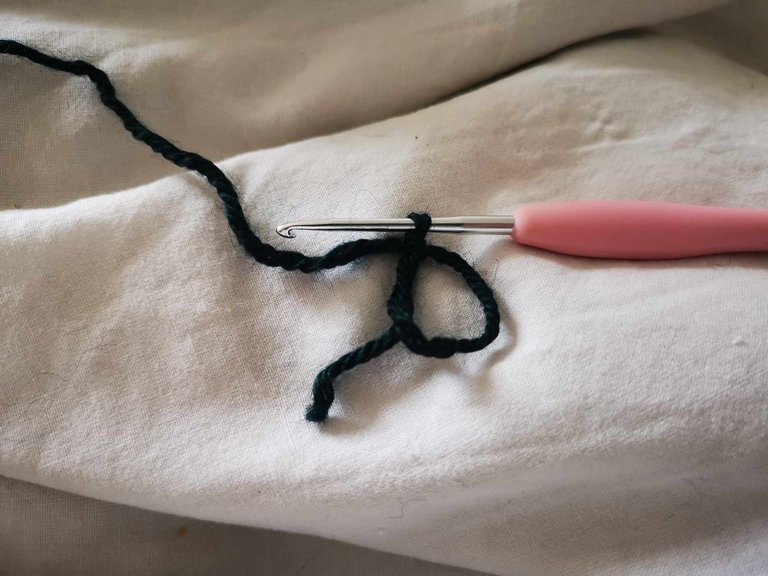
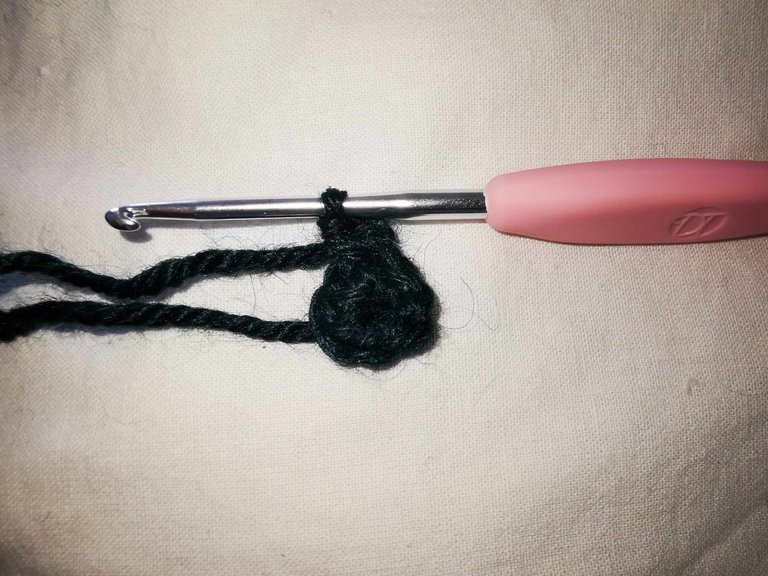
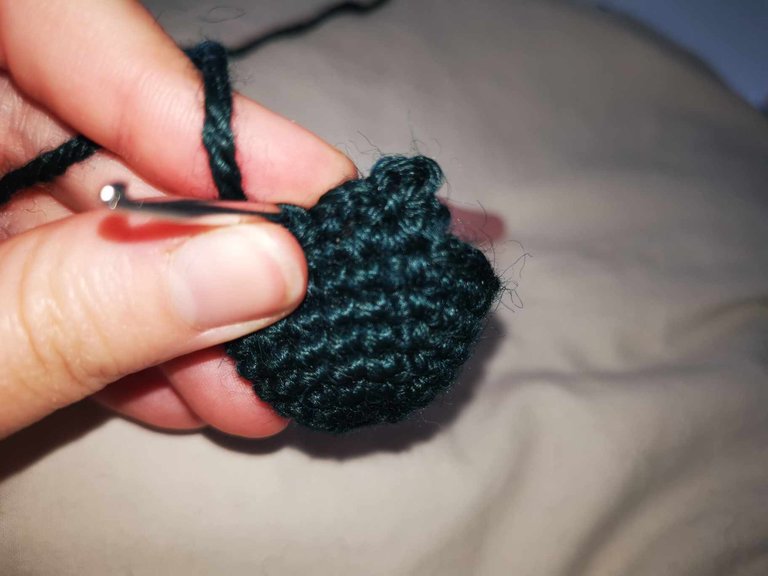
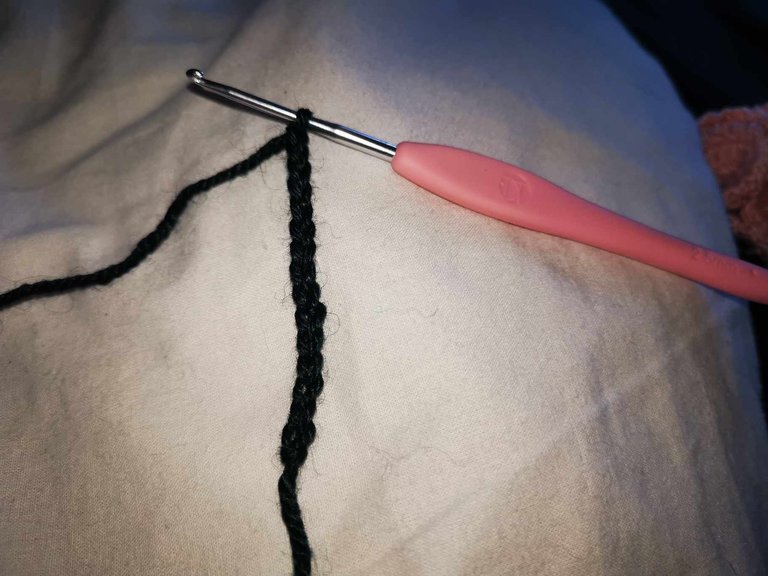
To begin the flower, make a magic ring:
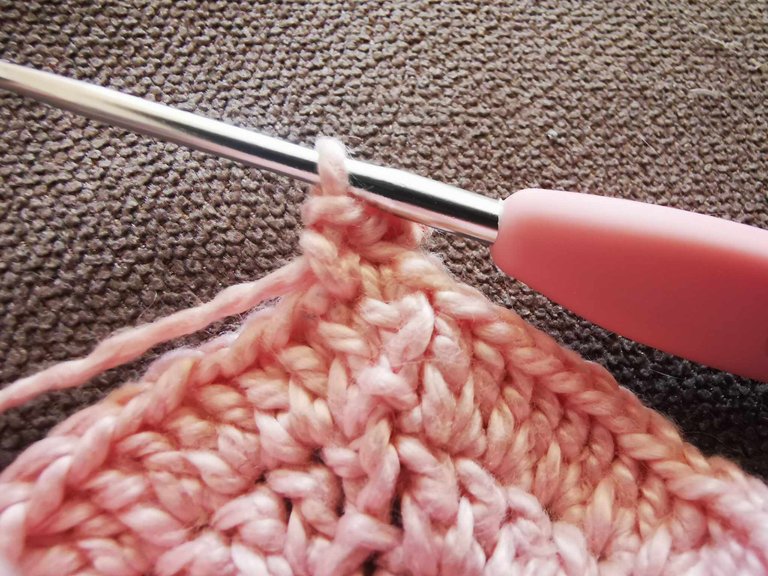
Next, cast on 3 chain stitches, which count as the first double crochet.
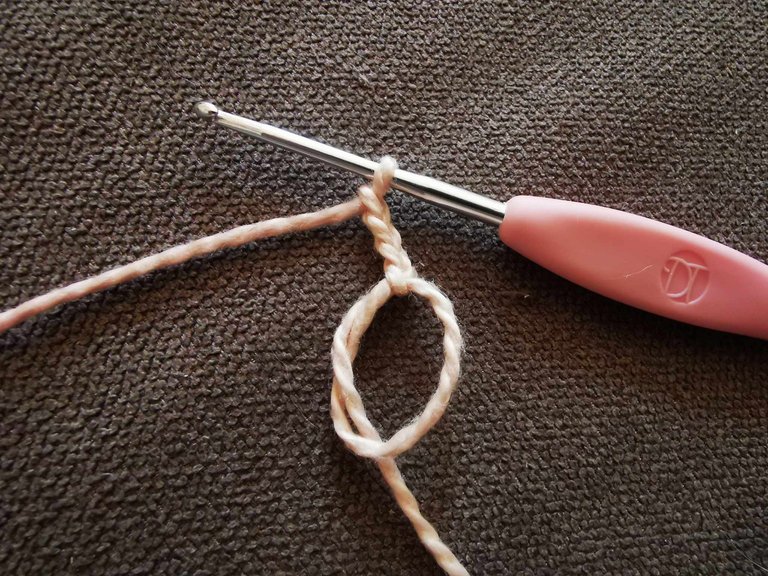
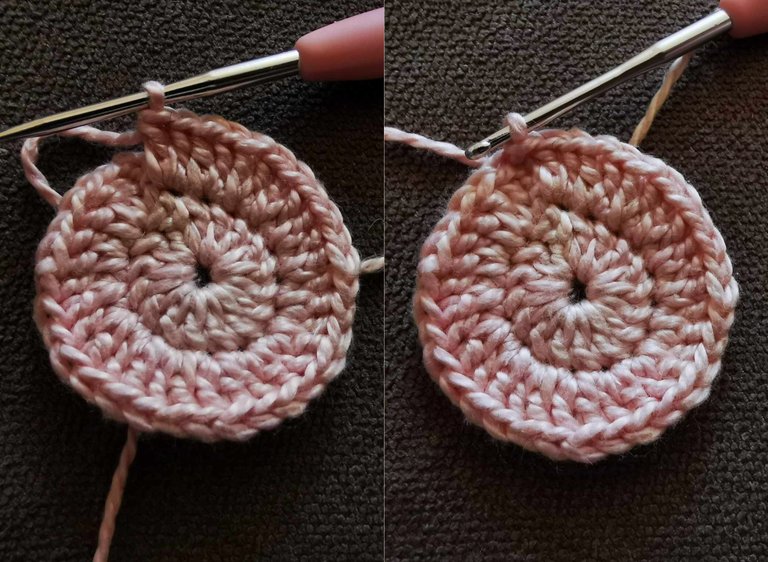
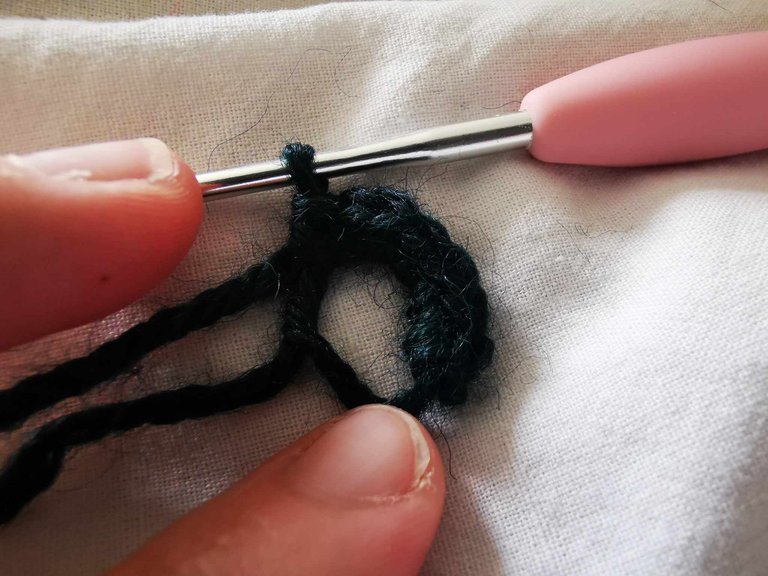
Next, add 15 double crochets into the ring.
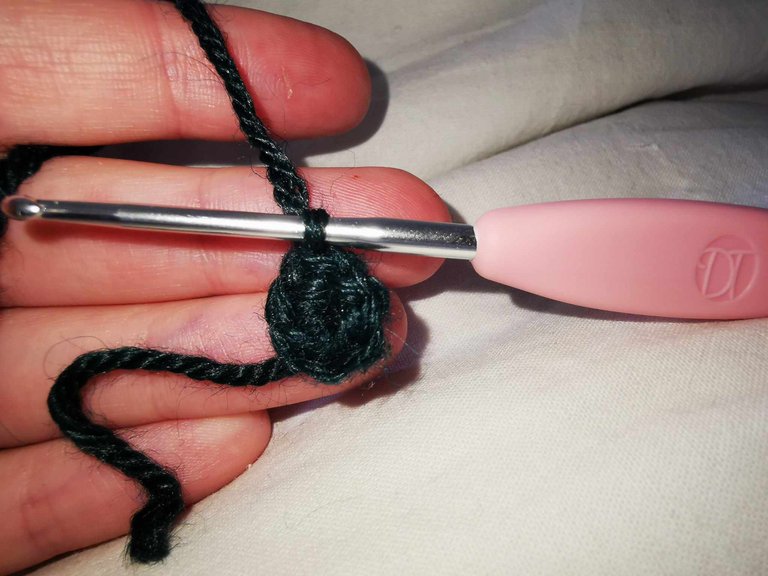
Once the 15 double crochets are made, close the magic ring by pulling on the excess yarn. Close the ring by slip stitching into the third chain stitch, forming the first double crochet.
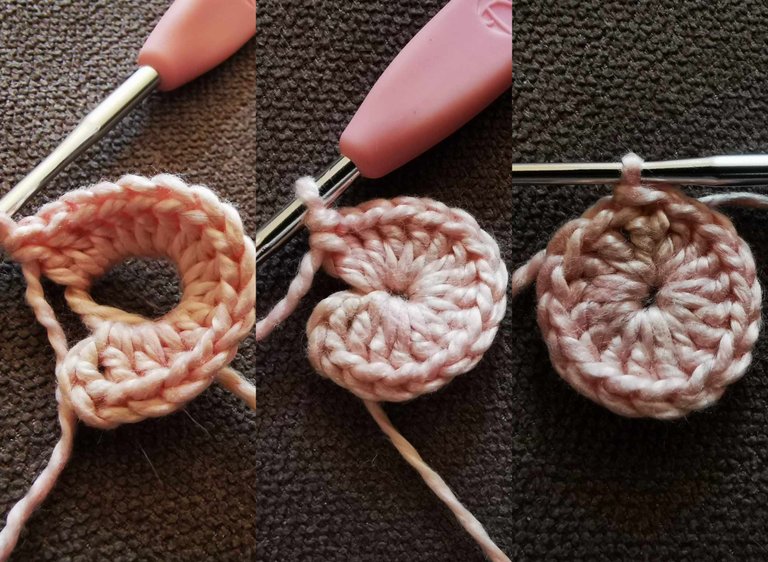
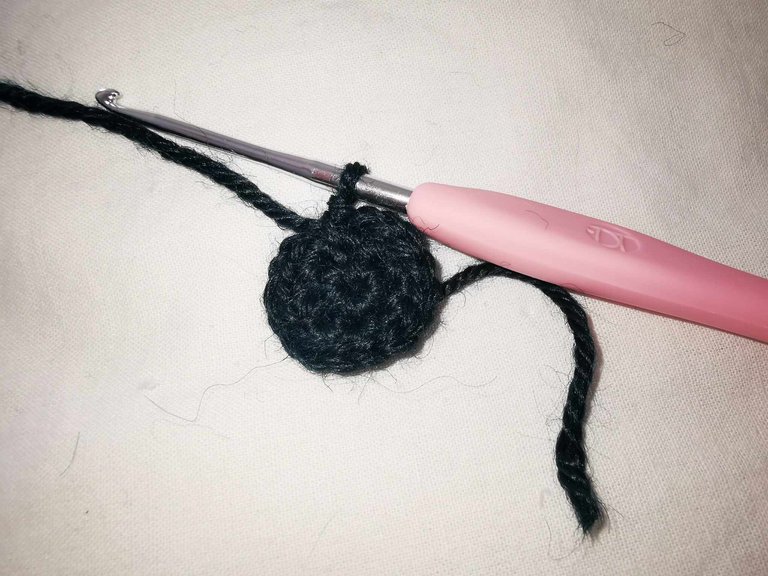
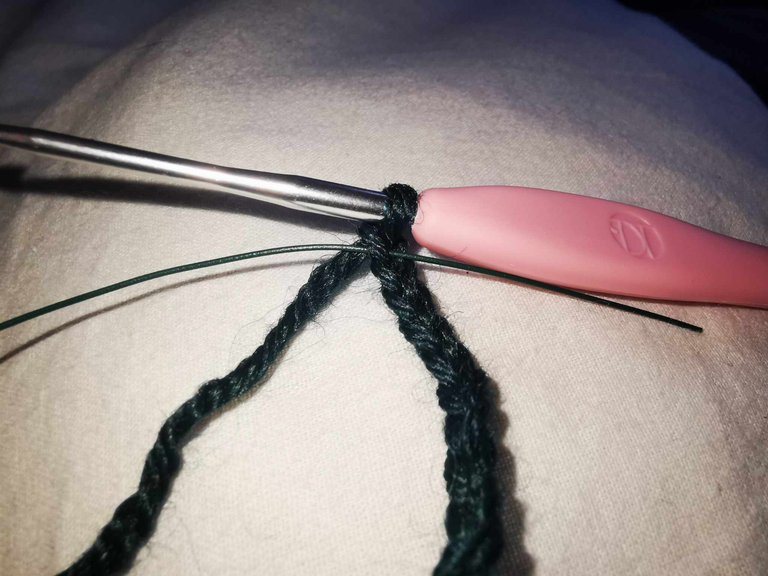
For the second row, start with 3 chain stitches.
Then double crochet into the same stitch as the 3 chain stitches.
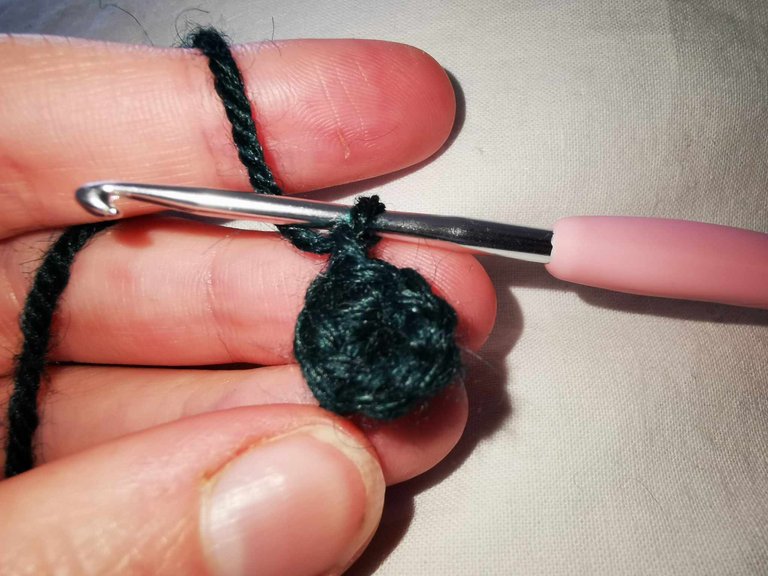
Next, make 2 double crochets in each stitch.
At the end of the row, close the circle with a slip stitch in the third chain stitch, which forms the first double crochet.
For the third row, it's not complicated; you just need to do exactly the same thing:
3 chain stitches and 1 double crochet in the same stitch;
2 double crochets in each stitch of the previous row;
1 slip stitch in the third chain stitch, which forms the first double crochet.
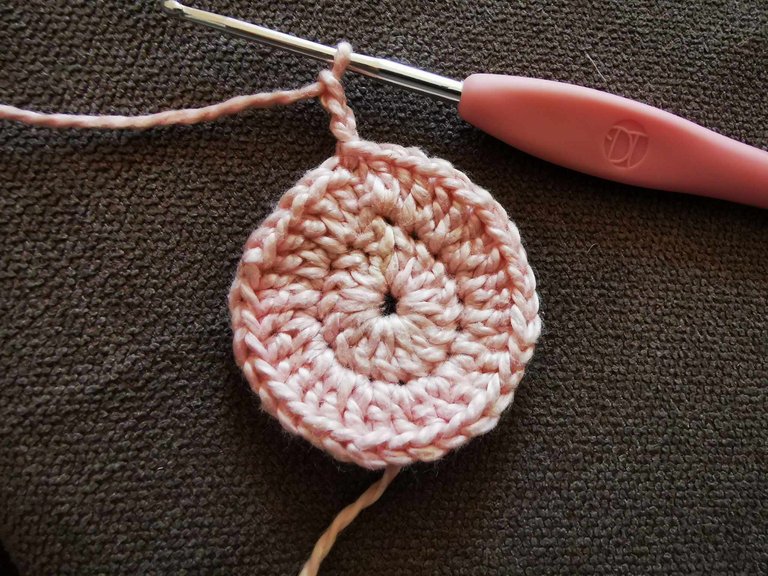

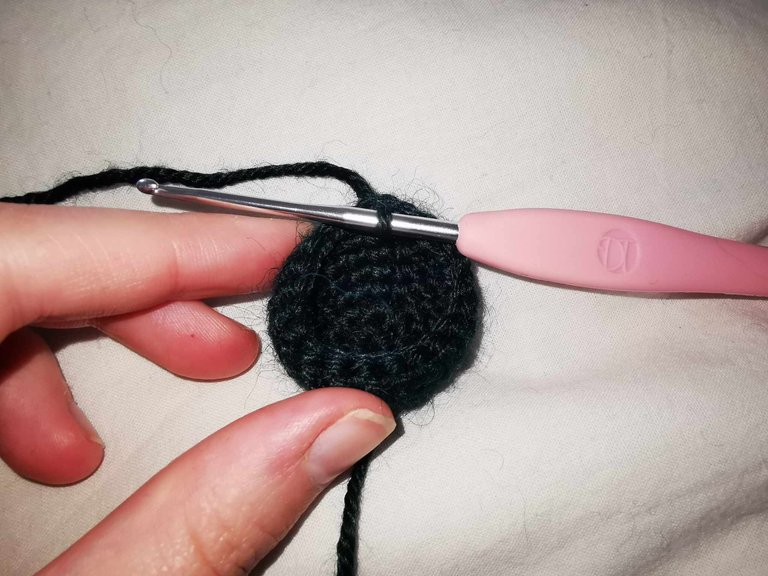
And for the fourth row, you need to do the same thing:
3 chain stitches and 1 double crochet in the same stitch;
2 double crochets in each stitch of the previous row;
1 slip stitch in the third chain stitch, which forms the first double crochet.
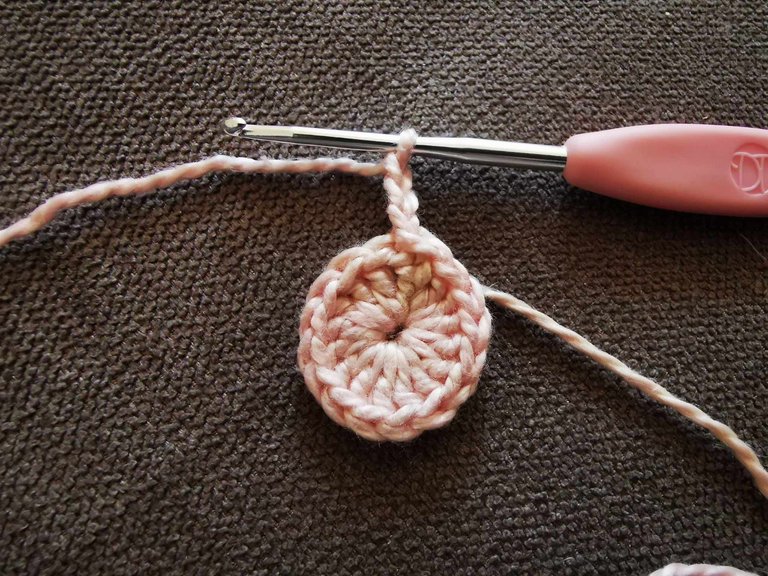
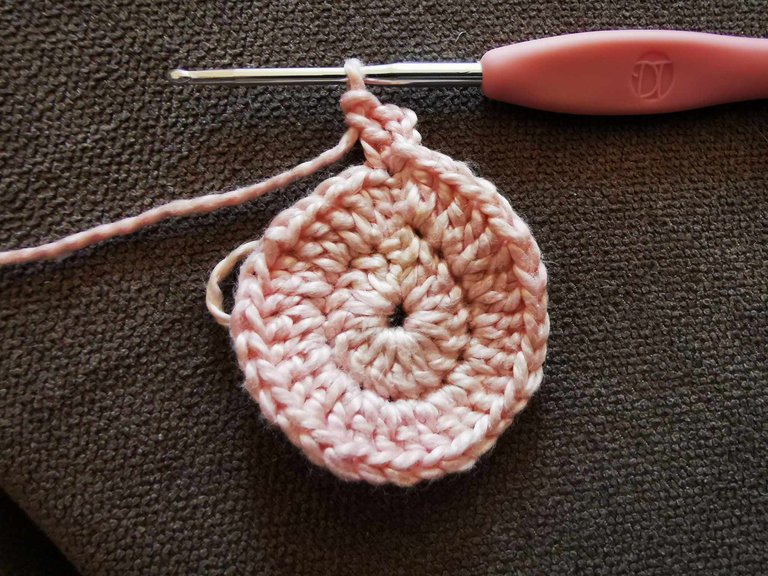
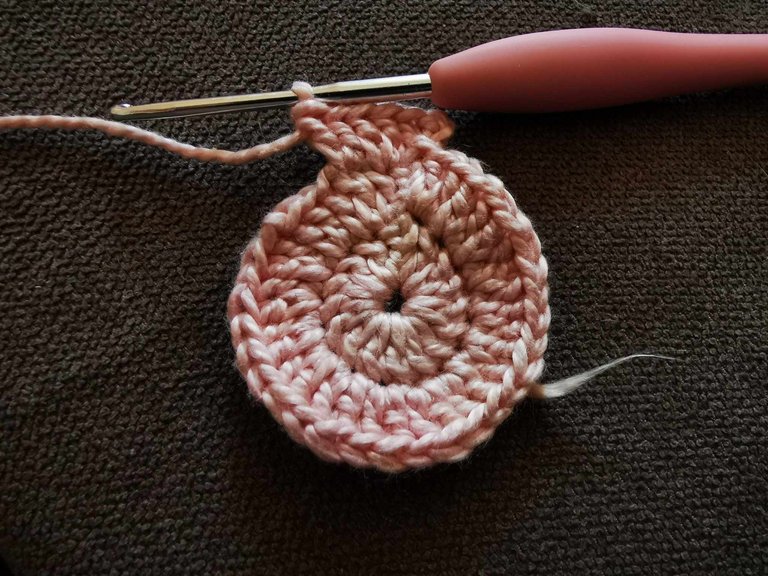
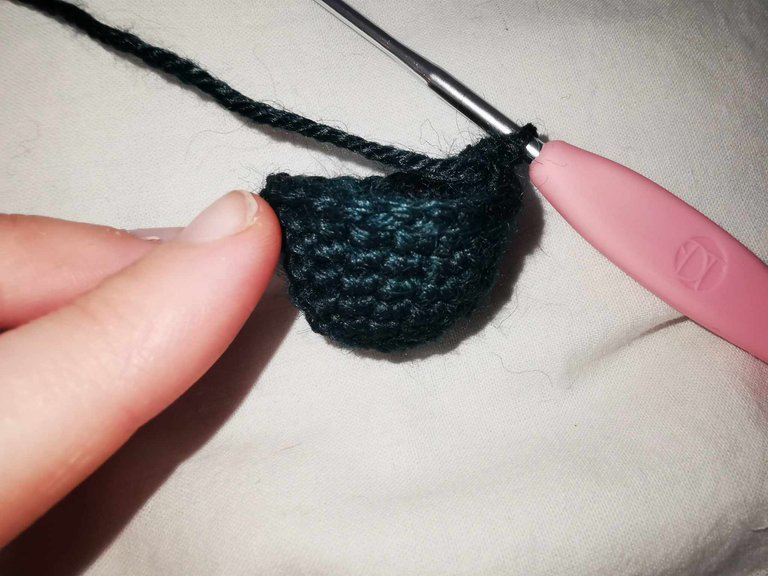
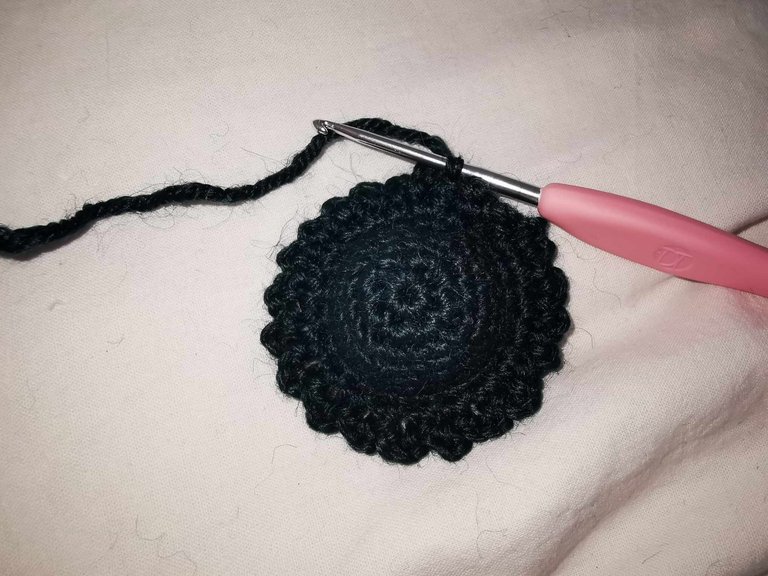
For the fifth row, you need to start with a chain stitch, then 1 single crochet in the same stitch.
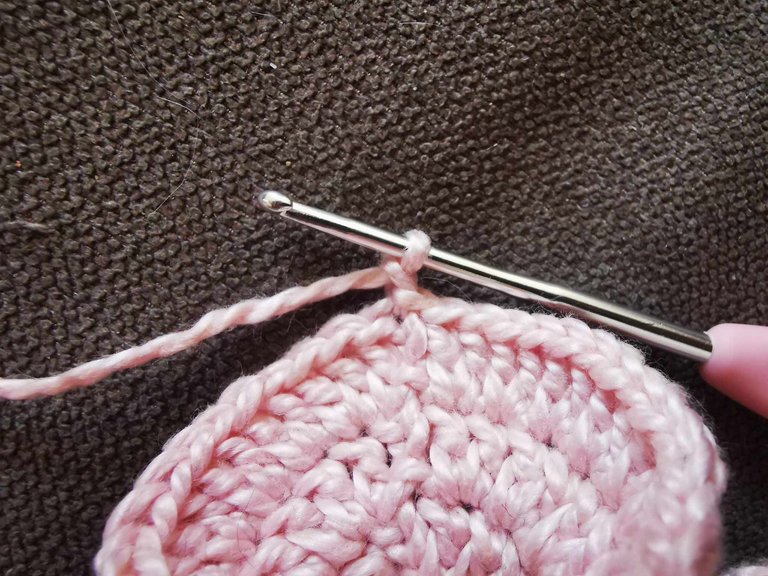

Next, cast on 3 chain stitches to make a picot. After casting on 3 chain stitches, slip stitch into the V corresponding to the single crochet.
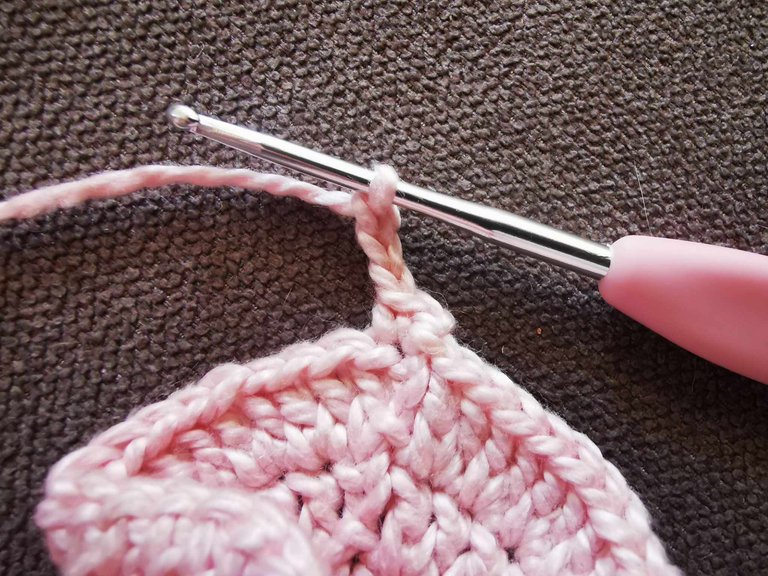
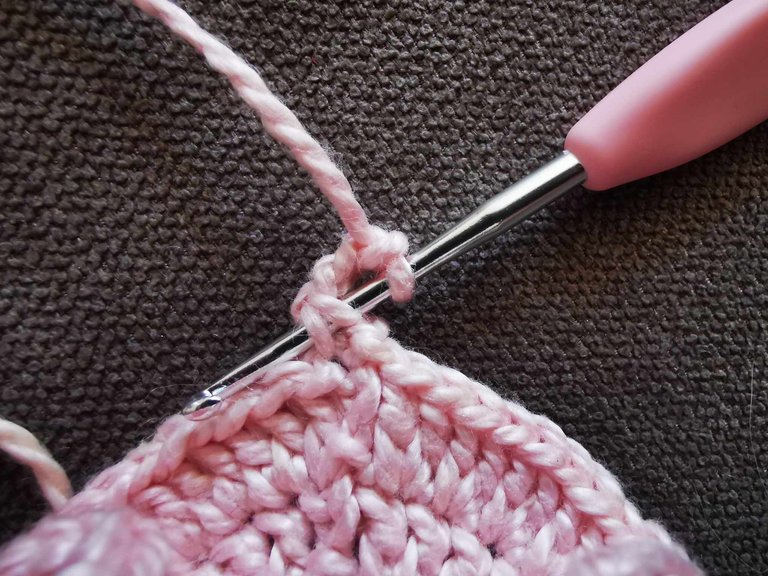
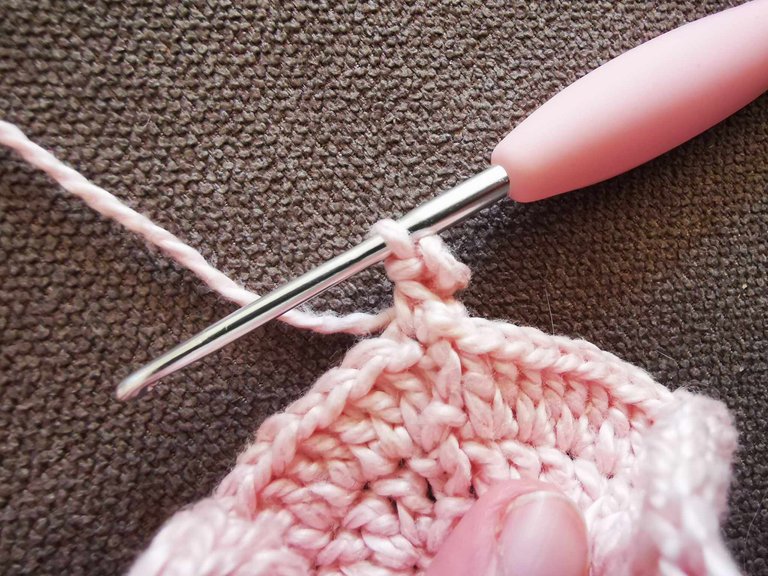
Then, slip stitch into the next stitch, cast on 3 chain stitches, slip stitch into the V of the single crochet, and so on.
Basically, you need to repeat the same process until the end of the row:
1 single crochet;
3 chain stitches;
1 slip stitch into the V of the single crochet;
1 single crochet;
3 chain stitches;
1 slip stitch into the V of the single crochet;
etc.
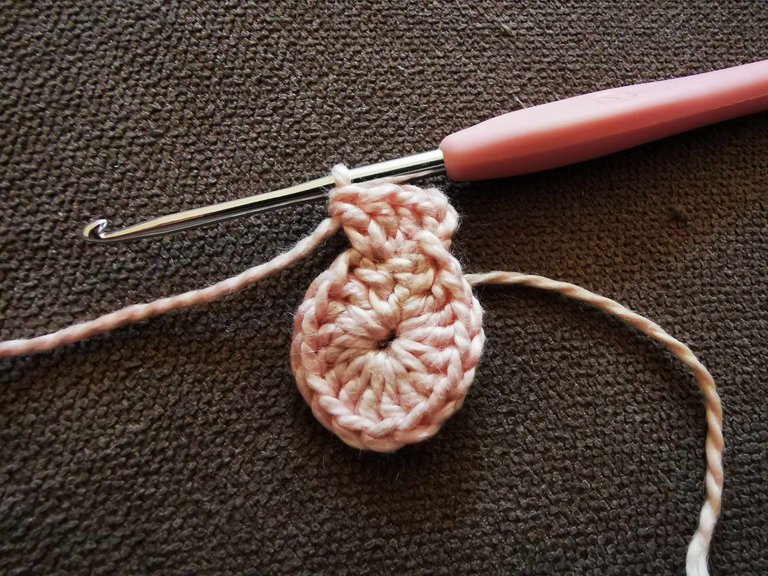
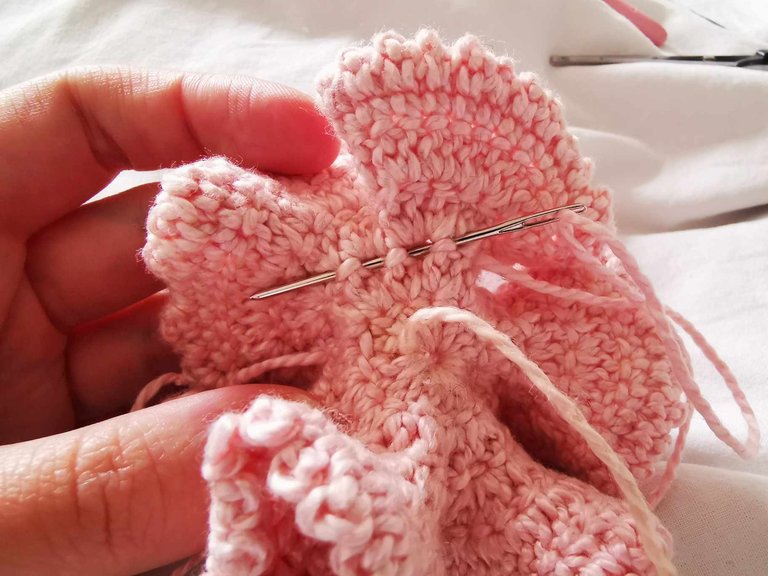
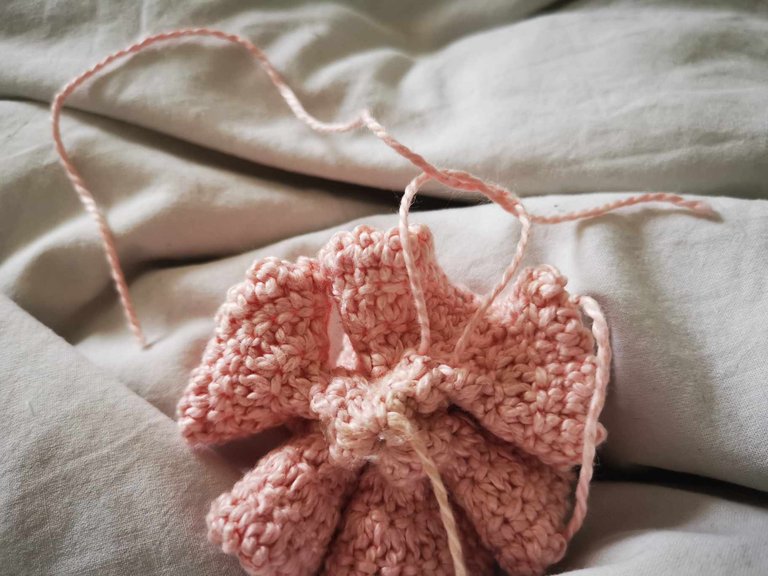
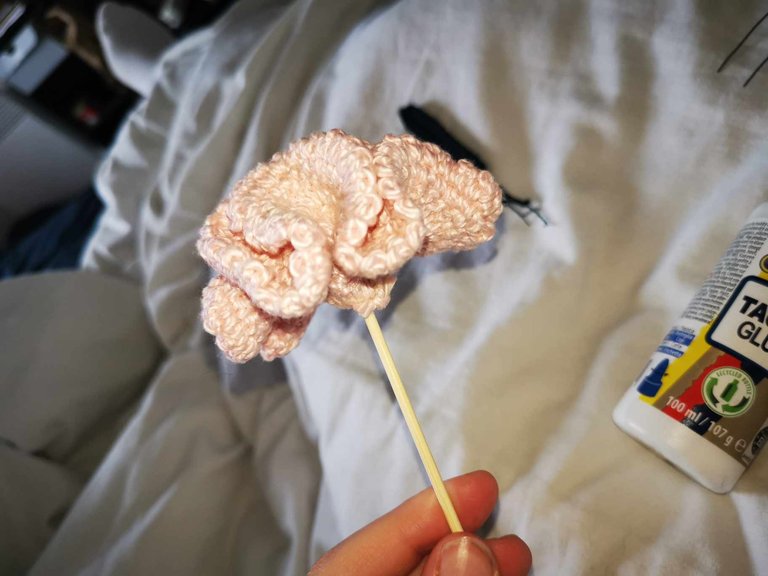
Once you reach the end of the row, slip stitch into the first stitch of the row. It's time to close the project and cut the yarn.
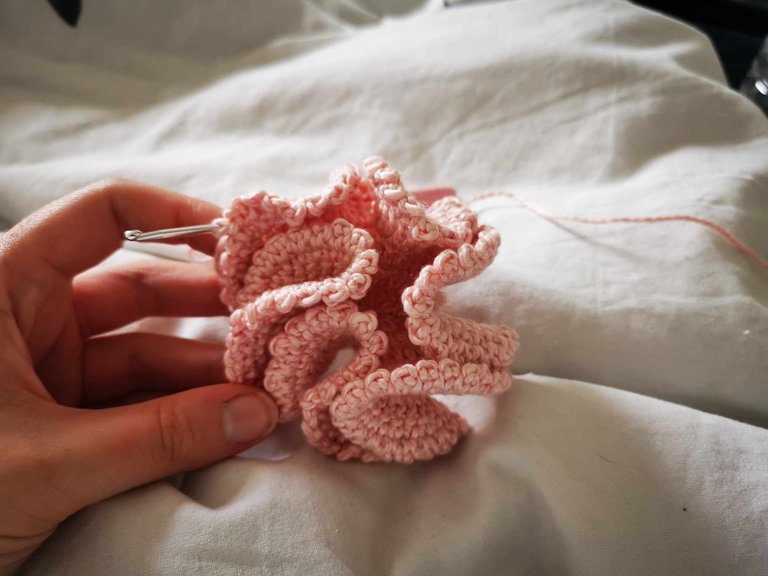
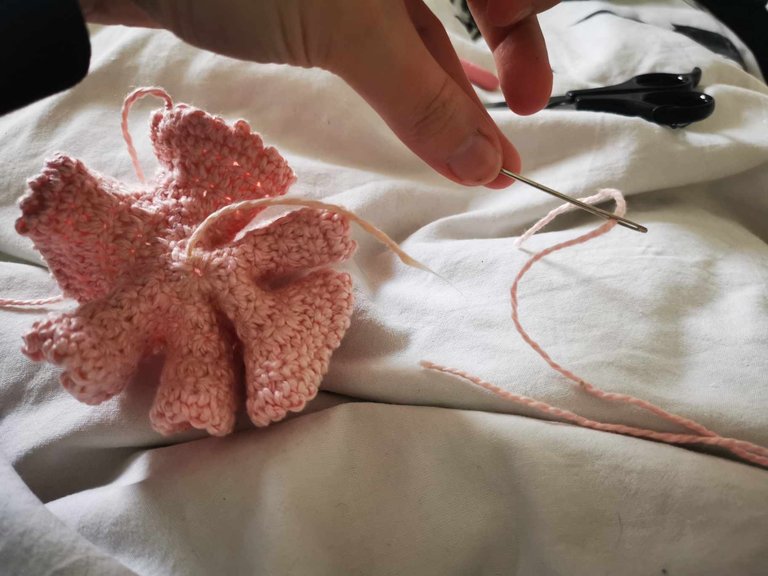
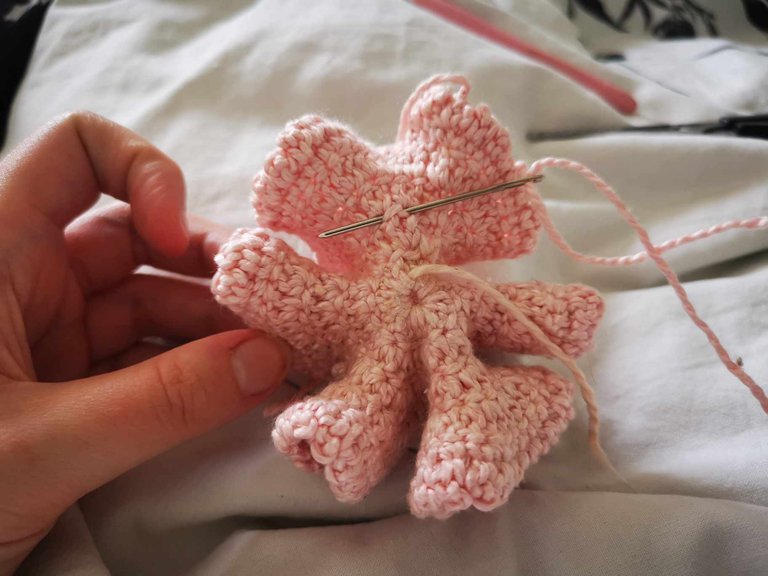
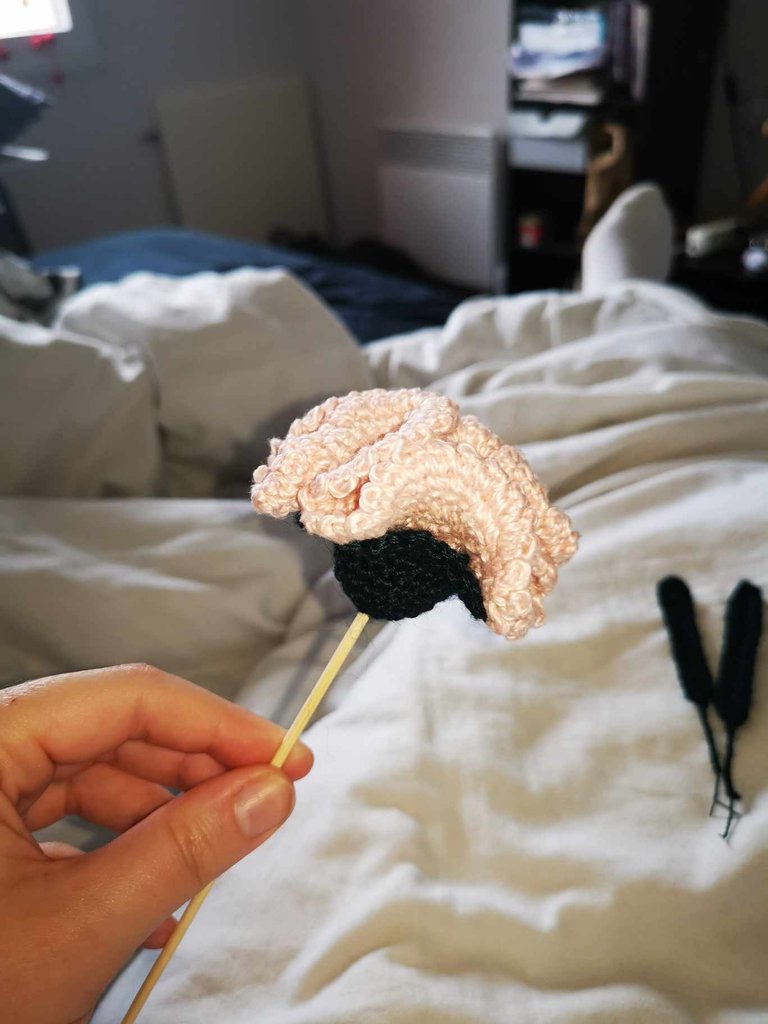
To finish the flower, take a piece of thread in the same color as the flower and sew a stitch at the second row on the back of the flower. This tightens the bottom of the flower and creates the shape of the carnation flower.
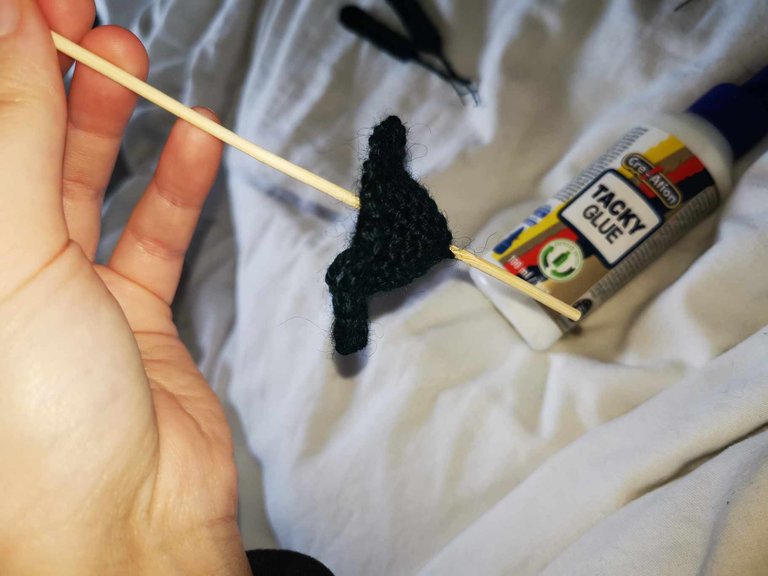
The Receptacle
For the receptacle, use green yarn and a 2.5mm crochet hook.
To begin, make a magic ring and work 7 single crochets inside it. After that, you can close the ring and make a slip stitch in the first stitch of the row.
Next, make 1 chain stitch, then 2 single crochets in the first stitch, and then 2 single crochets in each stitch throughout the row. At the end of the row, make a slip stitch in the first stitch of the row.
For the next row, make 1 chain stitch, then 1 single crochet in each stitch. And close with a slip stitch at the end of the row.

For the next 4 rows, simply make 1 single crochet in each stitch and close with a slip stitch.
And for the last row, make 1 single crochet, cast on 3 chains, then make 1 single crochet in the next stitch, and so on:
1 single crochet, chain 3,
1 single crochet in the next stitch, chain 3,
1 single crochet in the next stitch, chain 3,
…
And this continues until you reach the end of the row, where you make a slip stitch in the first stitch to close the loop. You can then make a chain stitch and cut the thread.
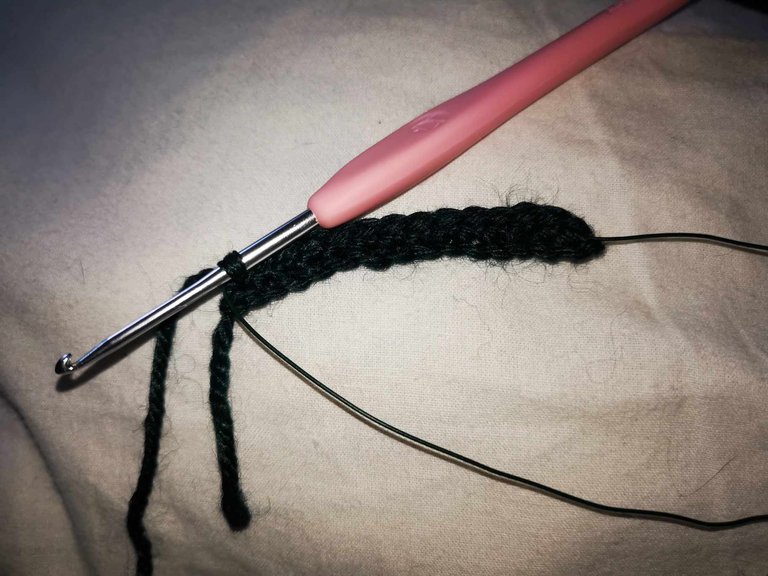
Leaf x2
For the leaf, take a 15 cm piece of wire and fold it in half. You also need to take the green yarn and start with a slip knot.
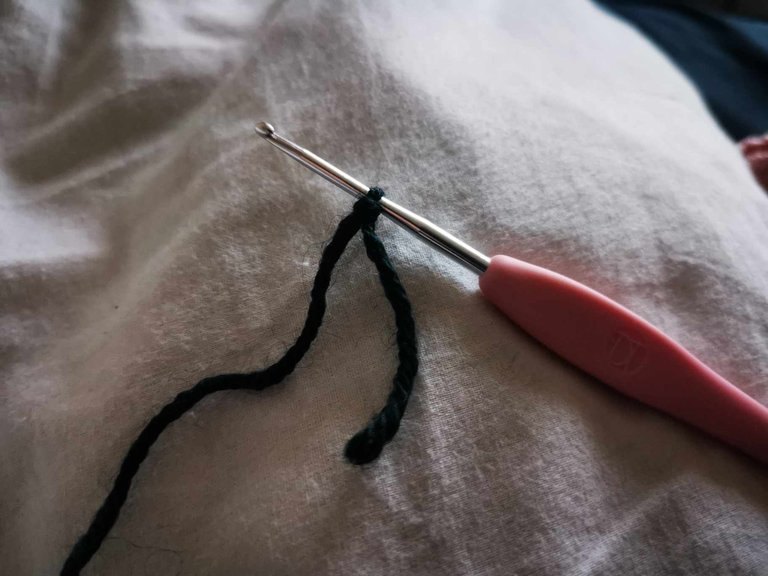
Next, cast on 15 chain stitches.
Then insert the wire into the second stitch under the hook. You then need to work single crochets throughout the row, including the wire.
When you reach the end, you need to make 3 single crochets to be able to work on the other side of the chain. On this side, you also need to make 1 single crochet in each stitch until you reach the end of the row.
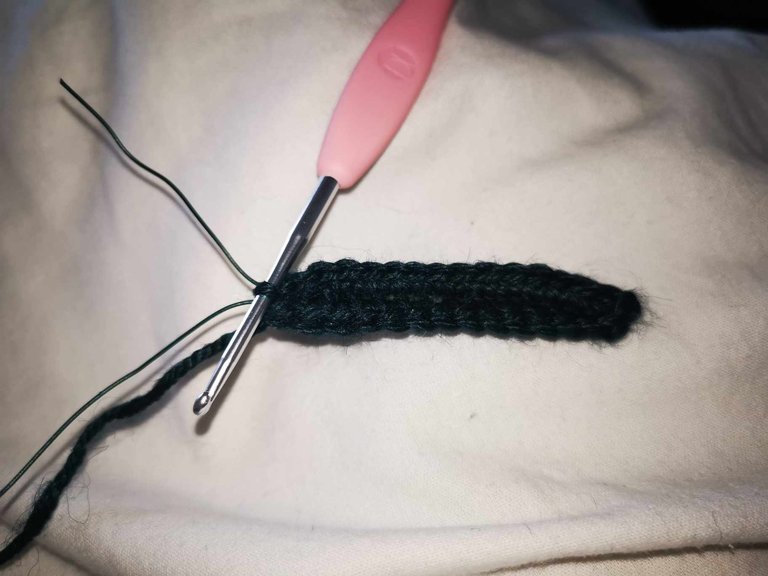

To close the row and the leaf, simply slip stitch into the first stitch of the previous row, then chain one, and cut the thread.
You need to make two identical leaves.
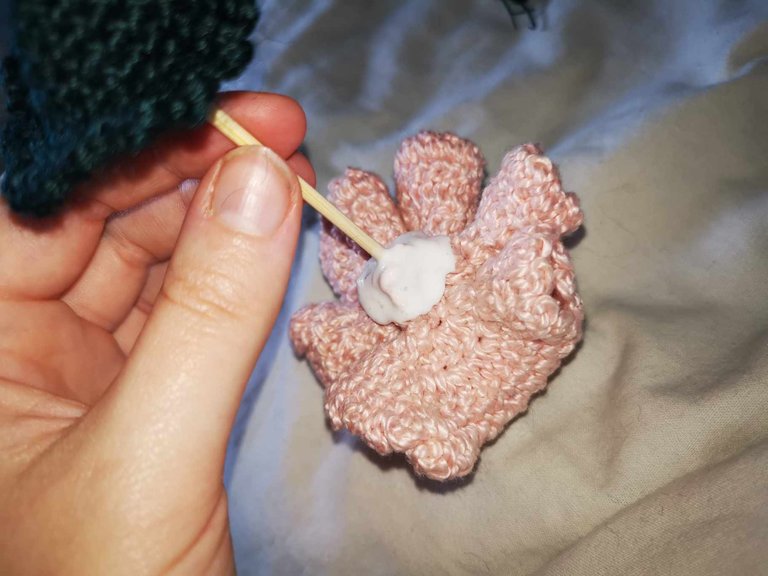
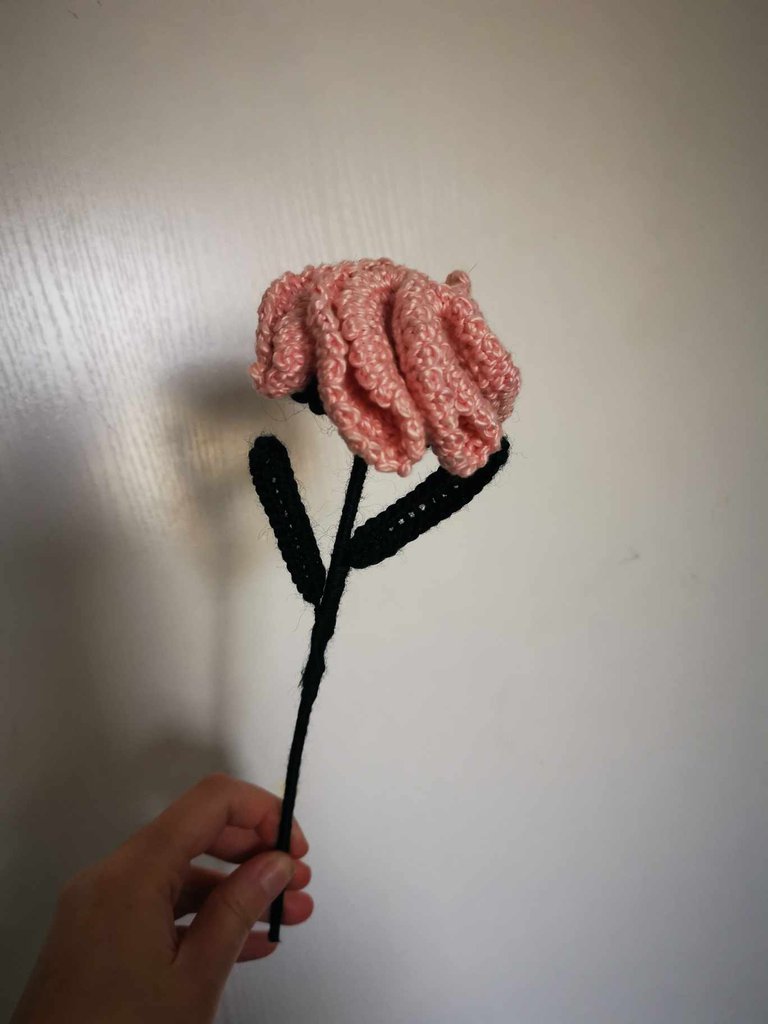
Assembly
To assemble the carnation, you need the flower, the receptacle, the leaves, a skewer, glue, and the green yarn.
Place the flower on top of the skewer, then place the receptacle under the flower and apply a generous amount of glue.
Next, wrap the green yarn around the skewer and arrange the leaves as desired. The green yarn should cover the entire skewer.
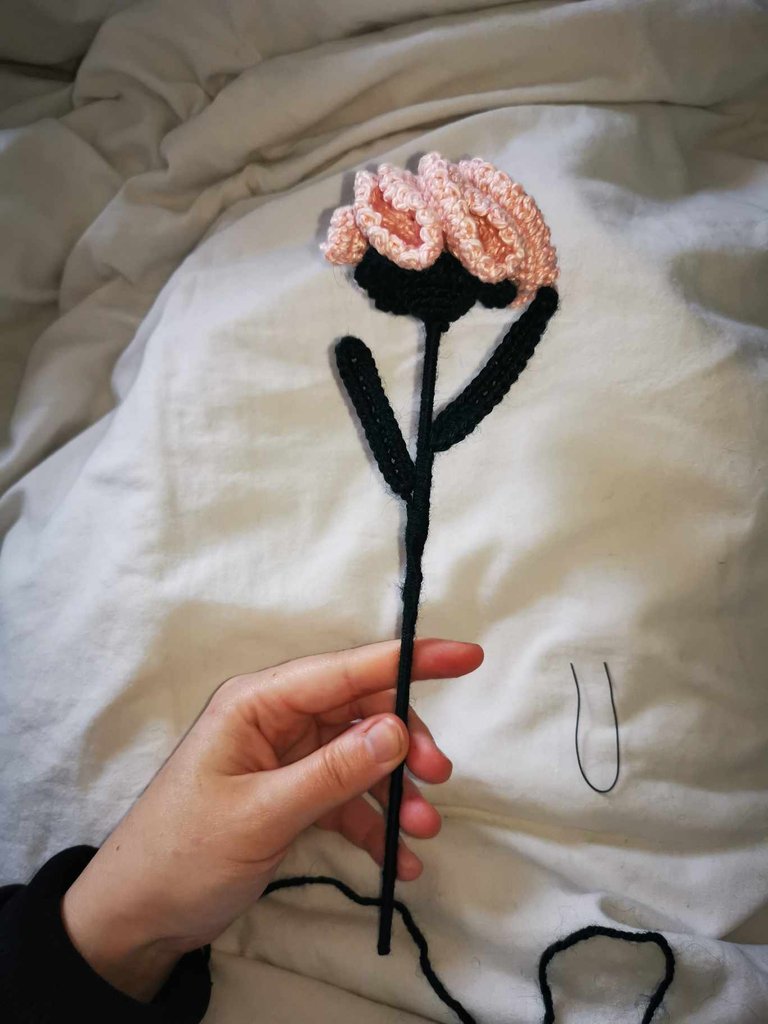

And there you have it, the carnation flower is ready! 🌸
What do you think of this flower? I love it! I can't wait to make more 😁
It can be made in lots of different colors and is quite simple to make. Some rows are a bit long, but I find it enjoyable to crochet.
I hope you enjoyed this little tutorial! 😊
See you soon,
Johanna
PS: I used Google Translate to translate the English part.

Hello les amis et les crochet lovers ! J’espère que vous allez tous très bien en ce début de semaine. ☀️
La semaine dernière, j’ai crocheté une nouvelle fleur : un œillet. 🌸
Je pensais que c’était une fleur compliquée à réaliser, parce que de l’extérieur, elle paraît un peu complexe. Mais en réalité, pas du tout.
C’est vraiment accessible aux débutants. Il faut simplement savoir faire un cercle magique, des brides, des mailles en l’air et des mailles serrées.
C’est assez rapide à faire, la fleur en elle-même prend environ 45 minutes.
Voici le tutoriel que j’ai suivi : Vidéo Youtube. Il est en français.
Mais je vais essayer de partager au mieux les étapes à suivre pour que vous puissiez le suivre en anglais et que vous puissiez vous aussi réaliser de jolis œillets pour votre bouquet ! 💐
Le matériel
- 1 pelote de fil pour la fleur ;
- 1 pelote de fil vert pour la tige, la feuille et le réceptacle ;
- 1 crochet 2,5 mm ;
- 1 aiguille à laine ;
- De la colle ;
- Un pique à brochette pour la tige ;
- Du fil de fer pour les feuilles ;
- Des ciseaux.
Les étapes
La fleur
Pour commencer la fleur, il faut faire un cercle magique :
Ensuite, il faut monter 3 mailles en l’air, qui comptent comme une première bride.
Puis, il faut ajouter 15 brides dans le cercle.
Une fois que les 15 brides sont faites, il faut fermer le cercle magique en tirant sur le fil qui dépasse. Et fermer le rond en faisant une maille coulée dans la 3ème maille en l’air formant la première bride.
Pour le deuxième rang, il faut commencer par 3 mailles en l’air.
Puis fait une bride dans la même maille que les 3 mailles en l’air.
Ensuite, il faut faire 2 brides dans chaque maille.
Arrivé au bout du rang, il faut fermer le rond avec une maille coulée dans la 3 ème maille en l’air qui forme la première bride.
Pour le troisième rang, rien de bien compliqué, il faut refaire exactement la même chose :
3 mailles en l’air et 1 bride dans la même maille ;
2 brides dans chaque maille du rang précédent ;
1 maille coulée dans la 3ème maille en l’air qui forme la première bride.
Et pour le quatrième rang, il faut refaire la même chose :
3 mailles en l’air et 1 bride dans la même maille ;
2 brides dans chaque maille du rang précédent ;
1 maille coulée dans la 3ème maille en l’air qui forme la première bride.
Pour le cinquième rang, il faut commencer par une maille en l’air, puis 1 maille serrée dans la même maille.
Il faut ensuite monter 3 mailles en l’air pour faire un picot. Après avoir monté 3 mailles en l’air, il faut faire une maille coulée dans le V correspondant à la maille serrée.
Ensuite, il faut faire une maille serrée dans la maille suivante, monter 3 mailles en l’air, faire une maille coulée dans le V de la maille serrée et ainsi de suite.
En fait, vous devez répéter le même geste jusqu’à la fin du rang :
1 maille serrée ;
3 mailles en l’air ;
1 maille coulée dans le V de la maille serrée ;
1 maille serrée ;
3 mailles en l’air ;
1 maille coulée dans le V de la maille serrée ;
etc
Une fois que vous arrivez à la fin du rang, il faut fermer avec une maille coulée dans la première maille du rang. Il est temps de fermer le projet et de couper le fil.
Pour terminer la fleur, il faut prendre un morceau de fil de la couleur de la fleur et faire une couture au niveau du deuxième rang sur l’arrière de la fleur. Cela permet de resserrer le bas de la fleur et de créer la forme de l'œillet.
Le réceptacle
Pour le réceptacle, il faut prendre le fil vert et un crochet 2,5mm.
Pour commencer, il faut faire un cercle magique et faire 7 mailles serrées à l’intérieur. Après cela, on peut fermer le cercle et faire une maille coulée dans la première maille du rang.
Ensuite, il faut faire 1 maille en l’air, puis 2 mailles serrées dans la première maille et ensuite, 2 mailles serrées dans chaque maille tout le long du rang. À la fin du rang, il faut faire une maille coulée dans la première maille du rang.
Pour le rang suivant, il faut faire une maille en l’air, puis faire 1 maille serrée dans chaque maille. Et fermer par une maille coulée à la fin du rang.
Pour les 4 rangs suivants, il faut simplement faire 1 maille serrée dans chaque maille et fermer par une maille coulée.
Et pour le dernier rang, il faut faire 1 maille serrée, monter 3 mailles en l’air, puis faire une maille serrée dans la maille suivante et ainsi de suite :
1 maille serrée, 3 mailles en l’air,
1 maille serrée dans la maille suivante, 3 mailles en l’air,
1 maille serrée dans la maille suivant, 3 mailles en l’air,
…
Et cela jusqu’à atteindre la fin du rang, où il faut faire une maille coulée dans la première maille pour fermer. On peut ensuite faire une maille en l’air et couper le fil.
La feuille x2
Pour la feuille, il faut prendre un morceau de 15 cm de fil de fer et le plier en deux. Il faut également prendre le fil vert et commencer par un noeud coulant.
Ensuite, il faut monter 15 mailles en l’air.
Puis insérer le fil de fer dans la deuxième maille sous le crochet. Il faut ensuite crocheter des mailles serrées tout le long du rang, en englobant le fil de fer.
Arrivé au bout, il faut faire 3 mailles serrées pour pouvoir crocheter de l’autre côté de la chaînette. De ce côté, il faut également faire 1 maille serrée dans chaque maille jusqu’à arrivé au bout du rang.
Pour fermer le rang et la feuille, il faut simplement faire une maille coulée dans la première maille du rang précédent, puis faire une maille en l’air et couper le fil.
Il faut faire 2 feuilles identiques.
L’assemblage
Pour assembler l'œillet, il faut prendre la fleur, le réceptacle, les feuilles, un pic à brochette, de la colle et le fil vert.
Il faut placer la fleur au sommet du pic à brochette, puis placer le réceptacle sous la fleur et mettre une bonne dose de colle.
Ensuite, il faut enrouler le fil vert autour du pique à brochette, et placer les feuilles un peu comme on le souhaite. Le fil vert doit recouvrir l’entièreté du pique à brochette.
Et voilà, l'œillet est prêt ! 🌸
Que pensez-vous de cette fleur ? Moi, j’adore ! J’ai hâte d’en faire d’autres 😁
On peut la faire de plein de couleurs différentes et elle est assez simple à réaliser. Quelques rangs sont un peu longs, mais c’est agréable à crocheter, je trouve.
J’espère que ce petit tutoriel vous a plu ! 😊
À bientôt,
Johanna
PS : J’ai utilisé Google Traduction pour traduire la partie en anglais.
It looks very beautiful
Thank you so much 🙏
!ALIVE
Your post has been manually reviewed for curation by the Principality of Bastion.
Check the Trail of posts we voted
Principality of Bastion - Our Leit Motiv? Let's Grow Together.
Principality's site | Minava NFT Market | Discord | Our Twitch Channel
You may TRAIL this account if you like the curation we do, or join our discord to know more about what we do.

!BBH
It is so beautiful, lovely, and charming. It shows your creativity and talent. Love it. Thank you for sharing this.
selected by @rezoanulvibes
Thank you very much for all your compliments 🙏