💙⭐Bolsita reutilizable con un diseño de estrellas hechas con brillantina//Reusable bag with a glitter star design💙⭐[Esp~Eng]

in NeedleWorkMondayyesterday (edited)

Picsart_24-09-21_12-51-00-918.jpg

Picsart_24-09-21_12-55-59-686 (1).jpg

¡Feliz y bendecida tarde mis amores!un placer saludarles 😘 y es para mí un agrado estar con ustedes acá compartiendo más y más ideas,se vienen muchas ideas que tengo en mente y más tutoriales ,si te gustan mucho mis tutoriales pues agradezco tanto que pues sea así y que te sirva a ti de inspiración para hacer cualquier cosita sea reciclada sea de costura o de cualquier cosa que siempre hago 🤗gracias a ustedes por comentar siempre mis trabajitos y estar al tanto de ellos.

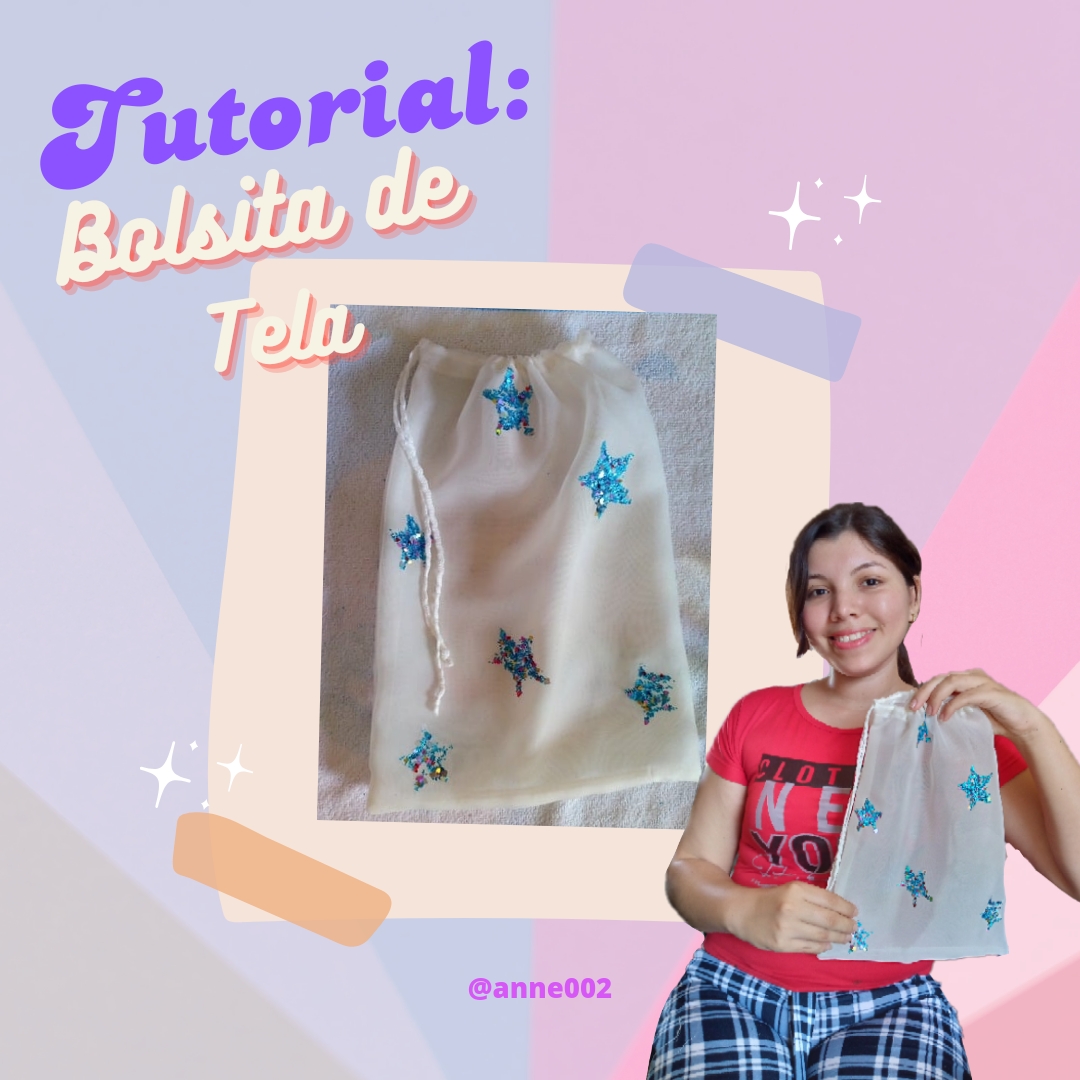
Happy and blessed afternoon my loves! It is a pleasure to greet you 😘 and it is a pleasure for me to be with you here sharing more and more ideas, many ideas that I have in mind and more tutorials are coming, if you really like my tutorials then I am so grateful that it is so and that it serves as inspiration for you to do anything, be it recycled, sewing or anything that I always do 🤗 thank you for always commenting on my work and keeping up with it.

Hoy vengo a enseñarles como podéis hacer estás bolsitas muy sencillas con telas que quizás tal vez no encuentres que hacer con ellas ya que solo nos sirven o para hacer vestidos o cortinas ,y siempre sobran estos retazos pero hoy los vas a poder usar para hacer estás fáciles y sencillas bolsitas reutilizables en esta ocasion usare un cordon para ajustarlas en la parte de arriba y asi las cositas que vayas a insertar en ellas no se te salgan si quieres ver como se hacen te invito a que observes el proceso a continuación.

Today I come to show you how you can make these very simple bags with fabrics that perhaps you may not find what to do with them since they only serve us to make dresses or curtains, and there are always these scraps left over but today you will be able to use them to make these easy and simple reusable bags. On this occasion I will use a cord to adjust them at the top so that the things that you are going to insert in them do not come out. If you want to see how they are made, I invite you to observe the process below.


IMG_20240921_094517_331 (1).jpg

Picsart_24-09-21_12-55-59-686 (1).jpg

💙Materiales que usé:💙

Materials i used:

Picsart_24-09-21_12-55-59-686 (1).jpg

Tela de saten o chifón o cualquier otro trozo de tela,tijeras,estaremos usando escarcha o brillantina en polvo tambien puedes usar en gel, silicón frio o de manualidades,usaremos un cordon ,hilo y alfileres, lápiz y un trozo de cartón.

Satin or chiffon fabric or any other piece of fabric, scissors, we will be using glitter powder or glitter, you can also use gel, cold silicone or craft silicone, we will use a cord, thread and pins, pencil and a piece of cardboard.

Picsart_24-09-21_12-55-59-686 (1).jpg

💙Pasos a seguir:💙

Steps to follow:

Picsart_24-09-21_12-55-59-686 (1).jpg

Paso 01

Para empezar a trabajar vamos a estar cortando en la tela un rectángulo de 20 cm de ancho x 40 cm de largo.

Step 01

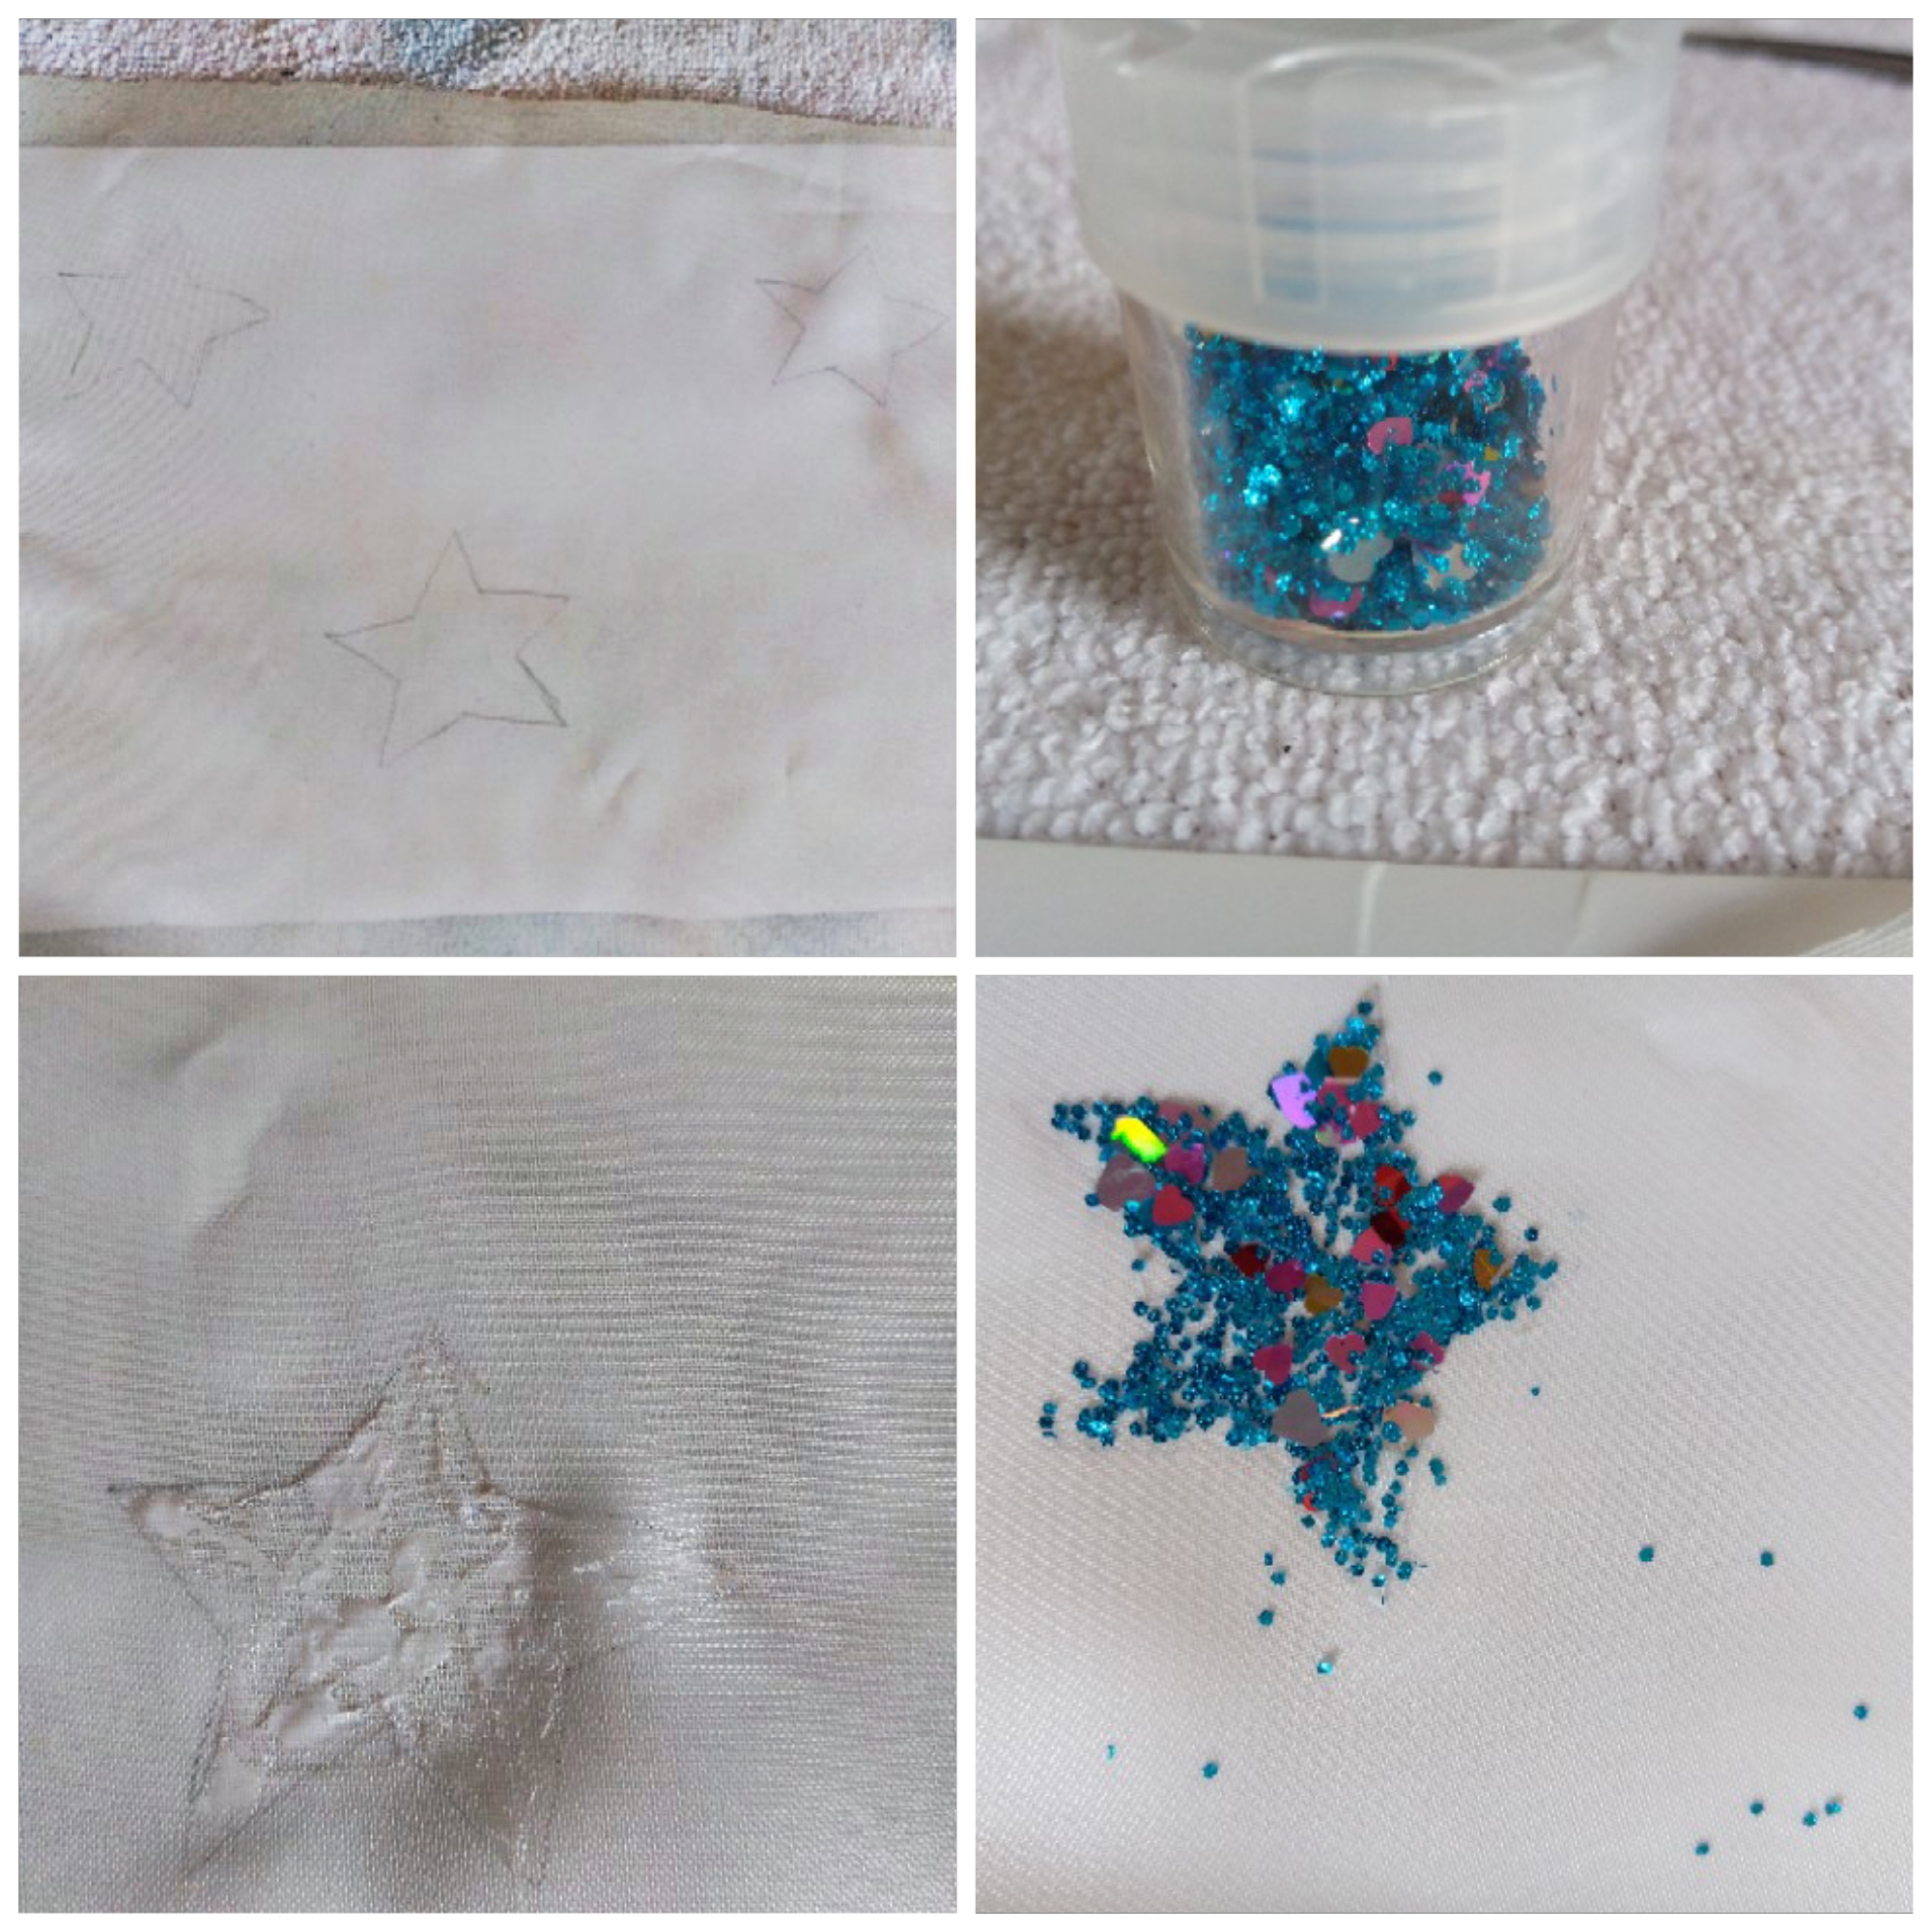
To start working we will be cutting a rectangle of 20 cm wide x 40 cm long in the fabric.

IMG_20240921_094543_237 (2).jpg


Paso 02

Antes de pasar a coser la tela lo que haré será decorar la tela con algunas estrellas que estaremos rellenando con brillantina y silicón para ello hice la forma con ayuda de mi lápiz y por supuesto el cartón lo usaremos para colocarlo bajo la tela y la tela no se pegue a la superficie o la mesa, entonces dibujo varias estrellitas separadas en la tela y con brillantina en esta ocasión tenía azul voy a echar por todo adentro de la estrella que he dibujado mi silicón lo riego y después agrego brillantina para rellenar la estrella y dejo secar por varios minutos.

Step 02

Before moving on to sewing the fabric, what I'm going to do is decorate the fabric with some stars that we'll be filling with glitter and silicone. For this, I made the shape with the help of my pencil and of course we'll use the cardboard to place it under the fabric so that the fabric doesn't stick to the surface or the table, then I draw several separate little stars on the fabric and with glitter, this time I had blue, I'm going to pour my silicone all over the inside of the star that I've drawn and water it, then I add glitter to fill the star and let it dry for several minutes.

Picsart_24-09-21_13-07-40-145.jpg


Paso 03

Una vez estén secas mis estrellas en la tela retiro la tela del cartón poco a poco y entonces voy a doblar la tela por el lado inferior y entonces allí voy a estar cosiendo primero un dobladillo por la parte de arriba por donde insertaremos el cordón hacemos en cada extremo también pequeños dobleces para que la tela no se nos suelte.

Step 03

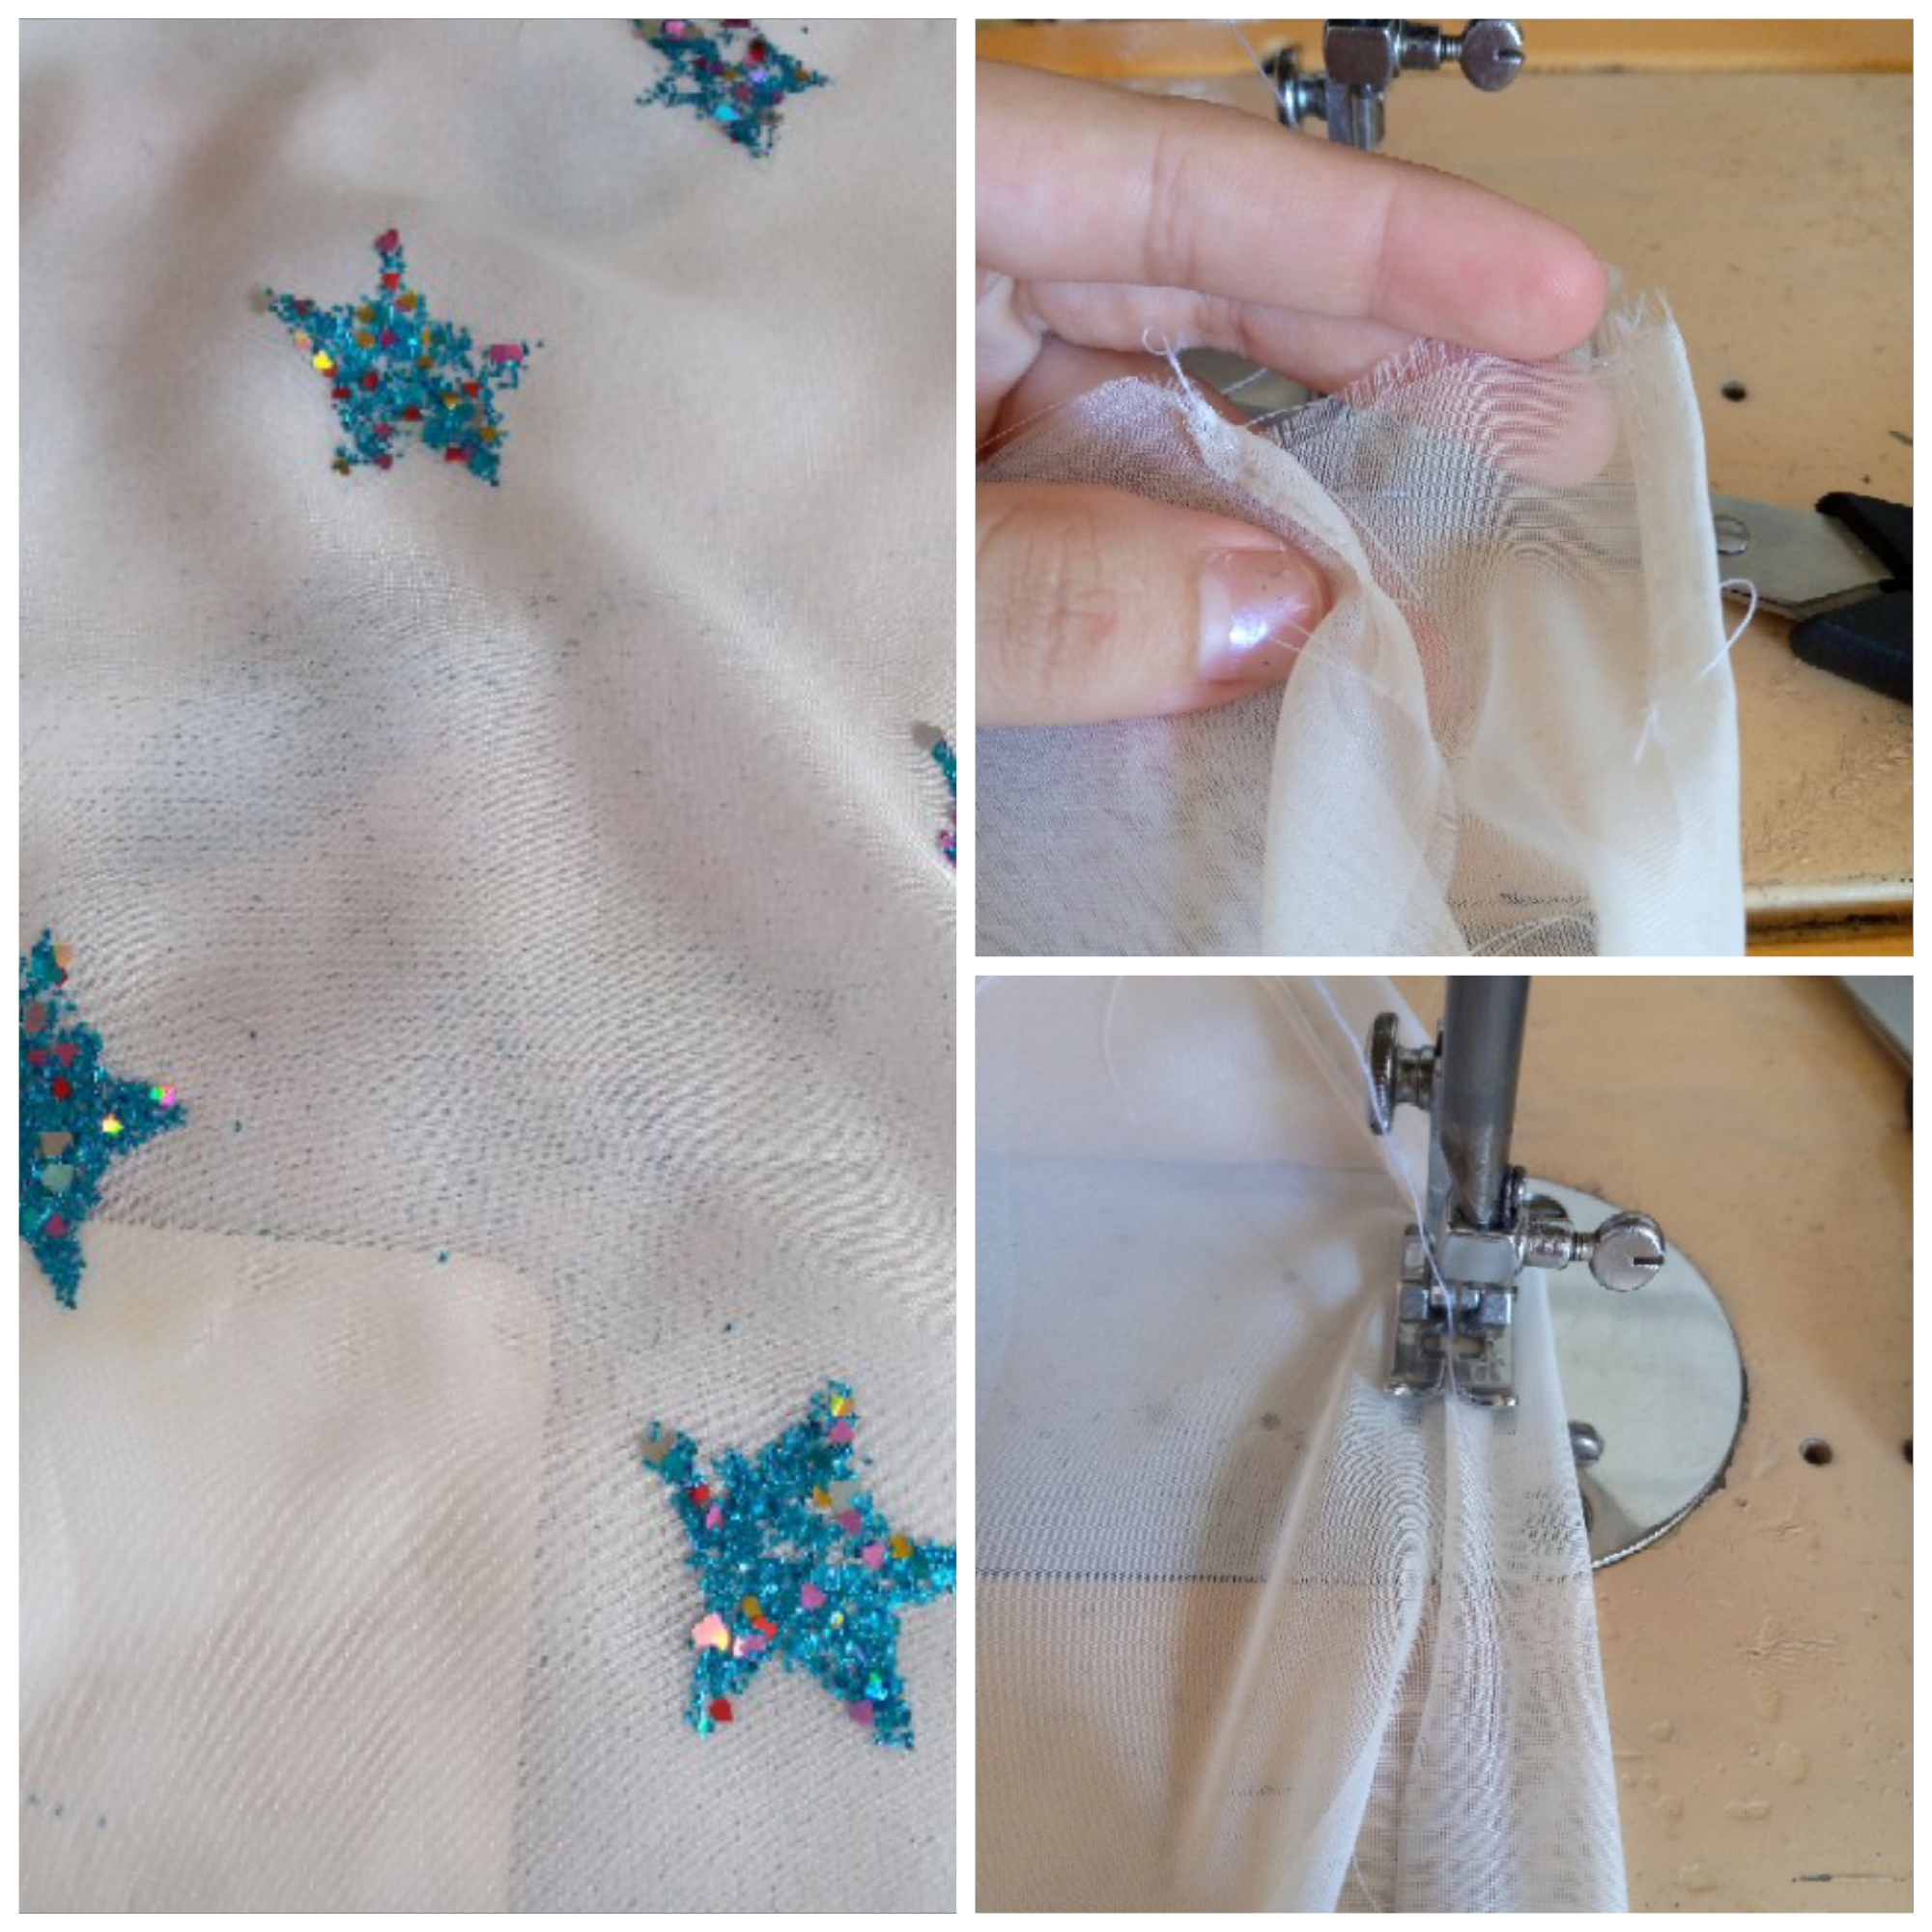
Once my stars on the fabric are dry, I remove the fabric from the cardboard little by little and then I am going to fold the fabric on the bottom side and then I am going to first sew a hem on the top where we will insert the cord. We also make small folds at each end so that the fabric does not come loose.

Picsart_24-09-21_13-08-59-958.jpg


Paso 04

Como último paso de mi proceso entonces con los alfileres sostenemos la tela y cosemos por el borde con costura recta y remato con zig zag ,paso a insertar el cordon por el dobladillo que hemos hecho anteriormente y listo así nos ha quedado la bolsita.

Step 04

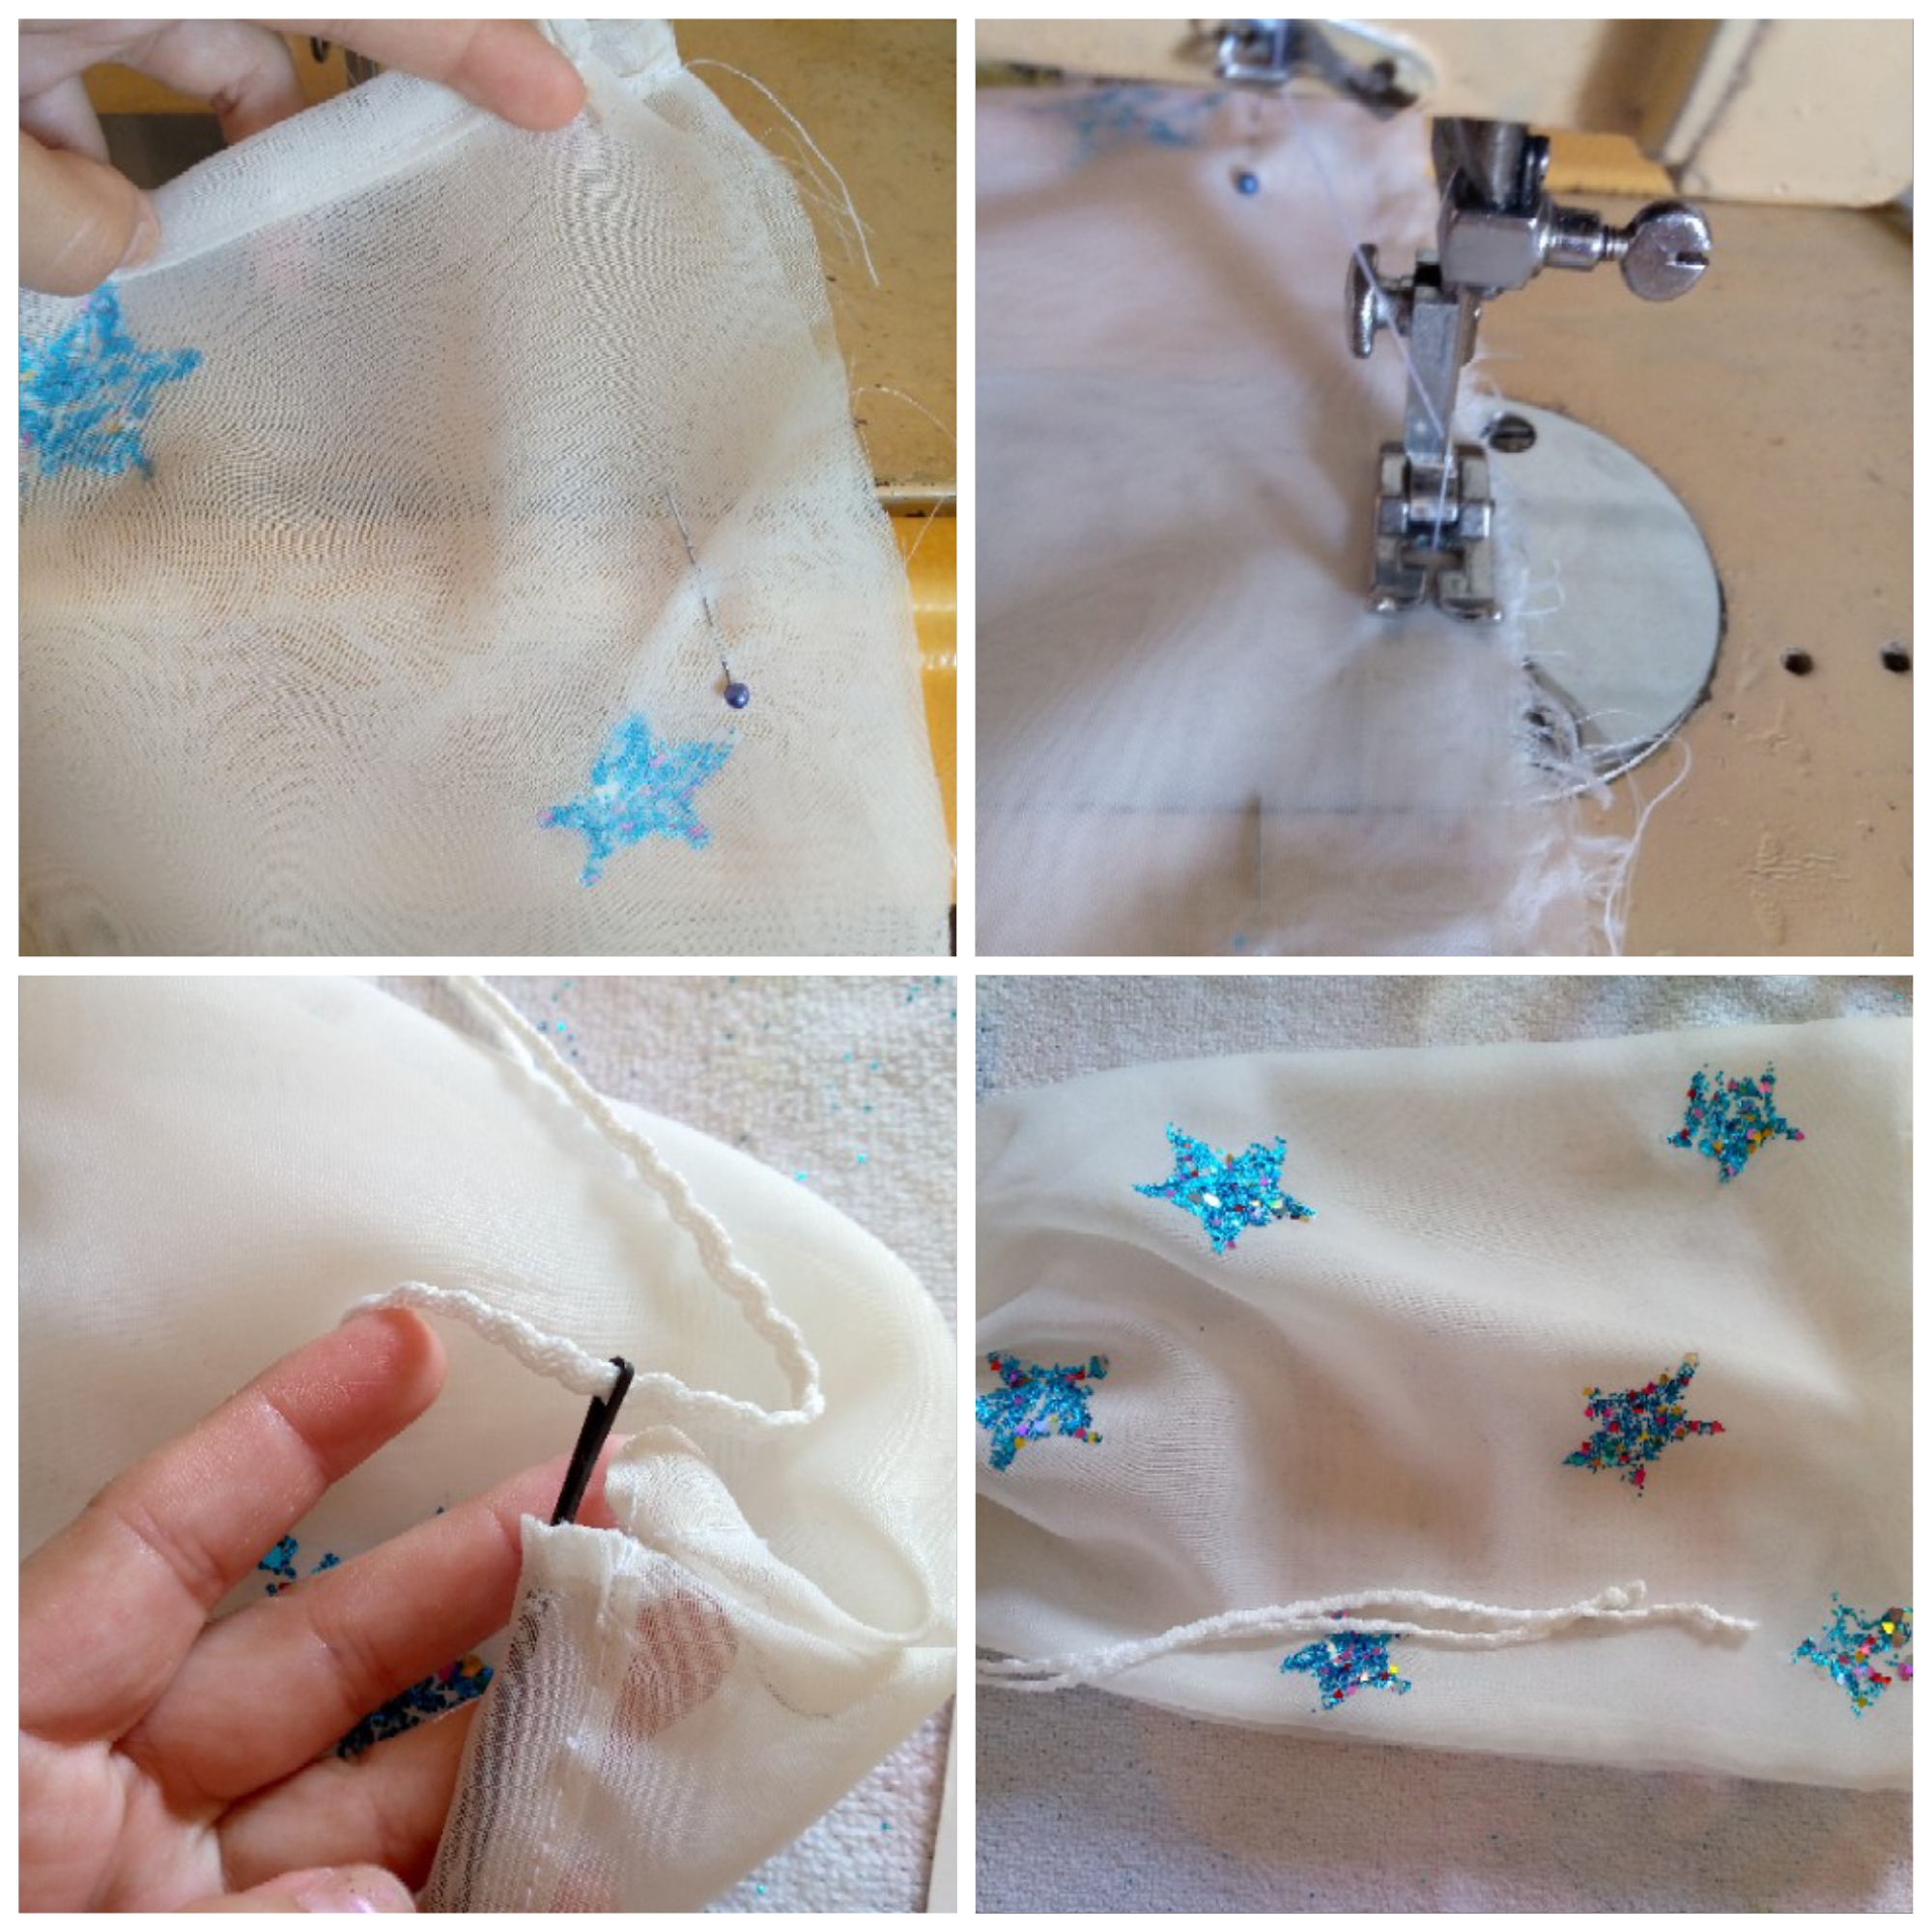
As the last step of my process, we hold the fabric with the pins and sew along the edge with a straight stitch and finish with a zigzag. I insert the cord through the hem that we made previously and that's it, the bag is ready.

Picsart_24-09-21_13-10-25-972.jpg


Picsart_24-09-21_12-55-59-686 (1).jpg

💙Resultado:💙

Result:

Picsart_24-09-21_12-55-59-686 (1).jpg

⭐💙He usado esta bolsita para guardar mis toallas sanitarias y algunos pañitos para el rostro ya que como la tela es casi transparente puedo ver lo que hay en el fondo de ella ,me ha gustado mucho la verdad se podría usar para siempre llevarla en algún bolso ya que en alguna oportunidad se nos presenta utilizar una bolsita asi y no tenemos,así que ya está esta idea te puede servir para eso,si te ha gustado házmelo saber en los comentarios y despido de ustedes deseándoles una bella y linda tarde,los quiero mucho ,saludos ,nos vemos en otro próximo blog.

⭐💙I have used this little bag to store my sanitary pads and some face cloths since the fabric is almost transparent I can see what is at the bottom of it, I really liked it, the truth is that it could be used to always carry it in a bag since on some occasion we have to use a bag like this and we don't have one, so there is this idea that can be useful for that, if you liked it let me know in the comments and I say goodbye to you wishing you a beautiful and nice afternoon, I love you very much, greetings, see you in another next blog.

IMG_20240921_110110_002.jpg

Picsart_24-09-21_12-55-59-686 (1).jpg

🦋✨Todas las imágenes de esta publicación son de mi autoria ,📱tomadas con mi celular TecnoSpark8C |📸Fotos editadas en PicsArt y Canva. Texto traducido en el traductor de Google.

🦋✨ All the images in this publication are my author ,📱taken with my TecnoSpark8C cell phone |📸Photos edited in PicsArt and Canva. Text translated in Google Translate.


Picsart_24-08-15_13-46-37-839.jpg


Sort:  

The star details on the fabric is an attractive detail. I like it, thanks for sharing the making process with us

Thanks friend 🥰

It is beautiful and elegant. What you did that, that's great. Love it. Keep up the good work! Thanks!

Linda tarde a mi también me encanta 😍🤗 gracias por el apoyo ,muy agradecida