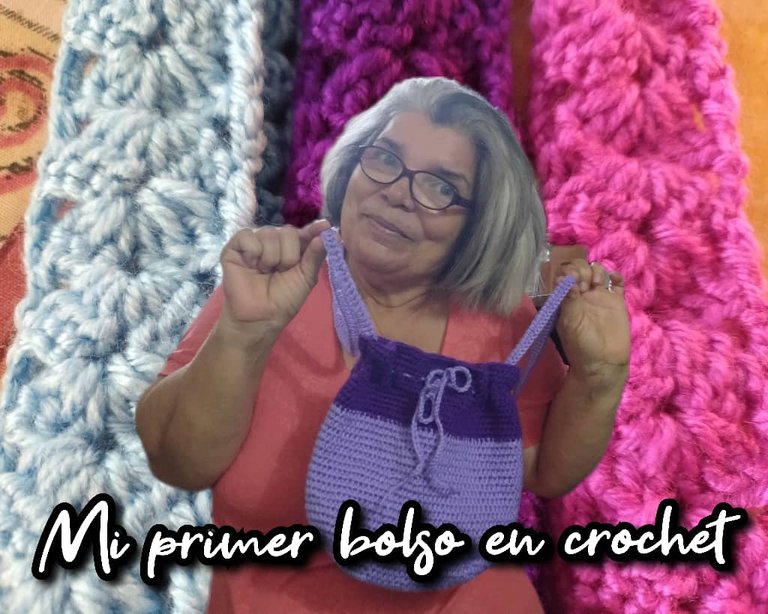
¡Hola, amantes de las artes de la aguja!
Después de hacer la funda de la tablet que les mostré en mi publicación anterior, me puse a trabajar en un bolso que es un regalo que voy a hacer. Hasta ahora ha sido el proyecto más largo que he realizado, creo que con cada proyecto ha ido subiendo poco a poco la complejidad, lo que me ha permitido
ir mejorando de manera progresiva.
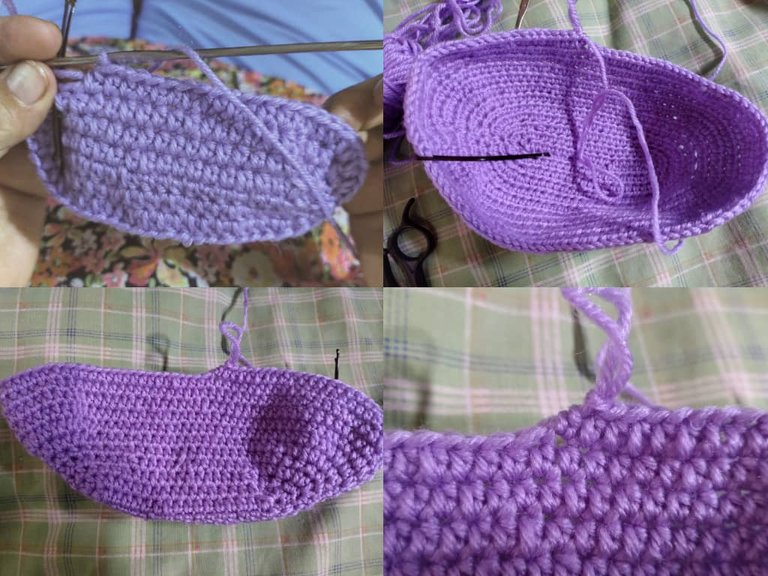

Guiada por un tutorial de youtube y seleccionando los colores favoritos de la destinataria de este proyecto, comencé. Pero el hilo que yo estaba usando era más delgado que el del video, eso significaba que las dimensiones del bolso serían más pequeñas, así que improvisé ampliando el patrón añadiendo unos cuantos puntos más en la base y realizando aumentos.

Si ven distintas tonalidades en las fotos es porque la iluminación ambiental afecta mucho los colores y muchas de las fotos las tomé de noche, que era el horario en el que estaba más desocupada para trabajar en este proyecto.

En el video no me explicaba como hacer la transición de color de manera que quedaran la línea precisa, después que lo había hecho encontré un reel en Facebook en el que explicaban justamente como hacerlo. Aunque no se ve mal y puede pasar desapercibido si me gustaría perfeccionar ese detalle.

El ancho de lo que será el asa o correa depende del gusto de cada quien, igual el largo. Yo lo hice bastante largo para usarlo tipo bandolero de forma cruzada.

Listo el bolso y la correa, también tejí una cadeneta simple para la parte de arriba que sirve de decoración y para cerrar el bolso.


El truco para colocarla es medir el bolso como muestro en las fotos, marcar el centro e ir contando los puntos para ir pasando la cadeneta con una aguja lanera. La idea es que se vea recto y equidistante para que el acabado sea más profesional.
Finalmente, cosí el asa al bolso tratando de que quedará firme y me tomé varias fotos para presumirlo orgullosa.

Siento que con este bolso aprendí muchísimo, jamás pensé que me quedaría tan bonito ni que lo haría tan rápido. Estoy muy feliz de haberlo logrado y ahora tengo lista de pedidos para realizar.
Aún sigo aprendiendo y esforzándome por mejorar, sé que hay muchos pequeños detallitos que pudieron quedar mejor, pero también sé que con práctica y constancia mis creaciones serán cada vez más bonitas.
Espero que les gustara este pequeño viaje a través de mi experiencia con este bolso y que se animen a intentar cosas nuevas.

Hello, needle arts lovers!
After making the tablet case that I showed you in my previous post, I got to work on a bag that is a gift that I am going to give. So far it has been the longest project I have done, I think that with each project the complexity has increased little by little, which has allowed me
improve progressively.
Guided by a YouTube tutorial and selecting the favorite colors of the recipient of this project, I started. But the yarn I was using was thinner than the one in the video, that meant the dimensions of the bag would be smaller, so I improvised by expanding the pattern by adding a few more stitches on the base and increasing.
If you see different tones in the photos it is because the ambient lighting greatly affects the colors and many of the photos were taken at night, which was the time when I was most free to work on this project.
The video did not explain how to make the color transition so that the precise line was left, after I had done it I found a reel on Facebook in which they explained exactly how to do it. Although it doesn't look bad and can go unnoticed if I would like to perfect that detail.
The width of the handle or strap depends on each person's taste, as does the length. I made it long enough to wear it crossbody style.
The bag and strap were ready, I also wove a simple chain for the top part that serves as decoration and to close the bag.
The trick to place it is to measure the bag as I show in the photos, mark the center and count the stitches to pass the chain with a wool needle. The idea is that it looks straight and equidistant so that the finish is more professional.
Finally, I sewed the handle to the bag trying to make it firm and I took several photos to show it off proudly.
I feel like I learned a lot with this bag, I never thought it would look so pretty or that I would make it so quickly. I am very happy to have achieved it and now I have a list of orders to place.
I'm still learning and striving to improve, I know that there are many small details that could have been better, but I also know that with practice and perseverance my creations will become more and more beautiful.
I hope you liked this little journey through my experience with this bag and that you are encouraged to try new things.

Todas las fotos son de mi propiedad, tomadas con teléfono Motorola Edge 30 Neo.
All photos are my property taken with Motorola Edge 30 Neo phone.
Gracias por el apoyo!
It's beautiful I love the color combination and I can see that you have styled it in different ways showing how multifunctional it can be.
Well done dear
Thank you, I'm really happy with the result 😊
It’s amazing how we learn new things every blessed day while we make projects
I’m glad you also learned new things
I love the colours and the final look
It’s pretty
Yes, I really enjoy my crochet projects. Thanks for your comment
You’re welcome
Esta bolsita está muy linda, la combinación de colores es perfecta. Los bolsos tejidos son realmente lindos y es muy entretenido tejerlos.
Otra cosa que puedes hacer para agrandar un patrón cuando el hilo es muy delgado es trabajar con hebra doble, además eso le da mucha más firmeza al tejido.
Saludos.
Gracias por tus lindas palabras y por la acogida en la comunidad. Voy a probar de usar la hebra doble la próxima vez, muchas gracias por el consejo.
Para ser el primer bolso que usted hace, el resultado fue muy prolijo. El púrpura es un hermoso color. Buen trabajo @dulce.crucita
Gracias por elogio y el apoyo. De verdad me esforcé mucho, quería que quedara con muy buenos acabados. Ya estoy tejiendo otro, estoy aprovechando los retazos de hilos para hacerlo muy colorido.
Este es un excelente regalo, te ha quedado muy linda en esos dos tonos de morado. Felicidades y gracias por compartir tu gran trabajo. Saludos.
Gracias, elegí los colores favoritos de la destinataria del regalo y lo hice con mucho amor
What a cute totebag! I love the color combination, light and dark lavender.
Thanks for your comment! ❤️
Hola amiga, amé tu presentación, es un post exquisito de ver. te felicito por tu primer bolso en crochet, quedò hermoso.
Gracias! Desde que aprendí a hacer los gif me encanta ponerle esos detalles animados a las publicaciones. 😊