¡Muy buenos días a todos los amigos y amigas que nos acompañan en este nuevo día! En esta ocasión les voy a compartir unas artesanías para la cocina, los cuales están inspirados en cestas de golosinas, cuyas tonalidades y estructura en distintos modelos forman la contextura parecida a unos bizcochos junto con algunas galletas.
Good morning to all the friends who join us on this new day! On this occasion I am going to share some crafts for the kitchen, which are inspired by candy baskets, whose tones and structure in different models form the texture similar to biscuits along with some cookies.
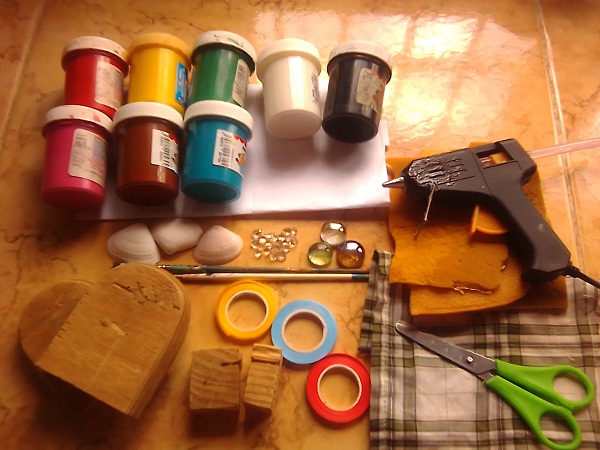
Materiales:
- Pinturas al frio, marrón, amarillo, verde, blanco, negro, rosa, rojo y azul.
- Hojas de papel.
- Caracolas.
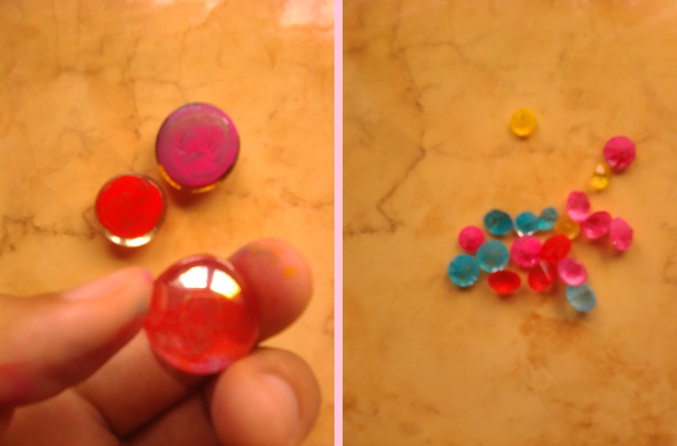
- Diamantitos.
- Piedras acrílicas.
- Pinceles.
- Trozos de esponja.
- Cintas de color, amarillo, azul y rojo.
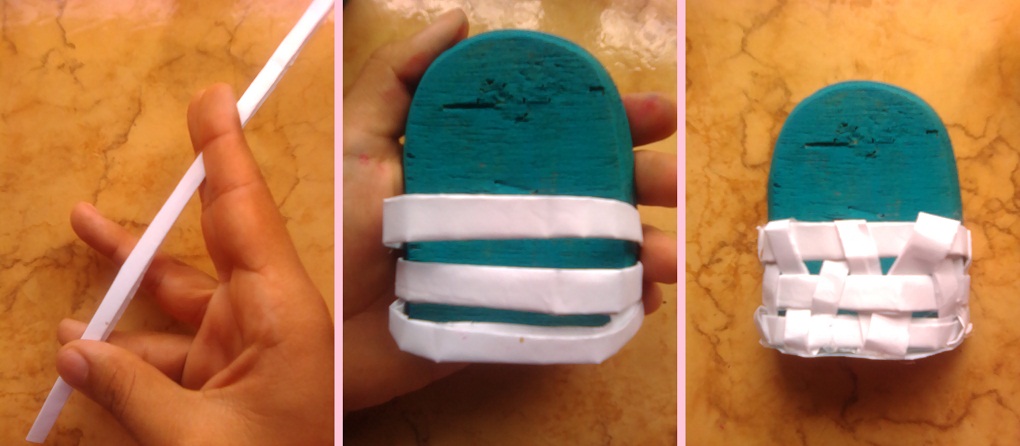
- Recortes de madera.
- Tijera.
- Tela verde a cuadros.
- Pistola de silicón.
Materials:
- Cold paints, brown, yellow, green, white, black, pink, red and blue.
- Sheets.
- Snails.
- Diamonds.
- Acrylic stones.
- Brushes.
- Pieces of sponge.
- Color ribbons, yellow, blue and red.
- Wood cutouts.
- Scissors.
- Checkered green fabric.
- Silicone gun.
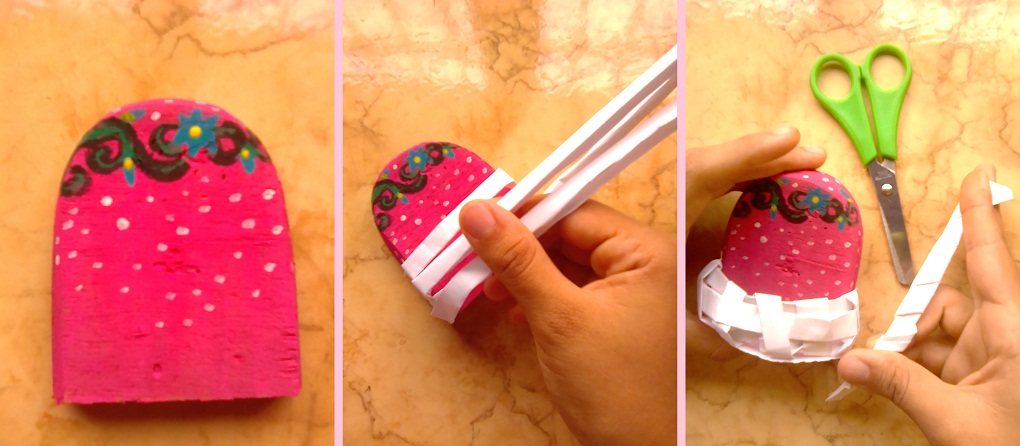
Tomamos la tela verde y recortamos un trozo pequeño cuadrado, agarramos las hojas de papel, las doblamos en flecos y luego las recortamos hasta obtener una cantidad generosa de hileras, suficientes para hacer las cestas.
We take the green fabric and cut out a small square piece, take the sheets of paper, fold them into fringes and then trim them until we have a generous number of rows, enough to make the baskets.

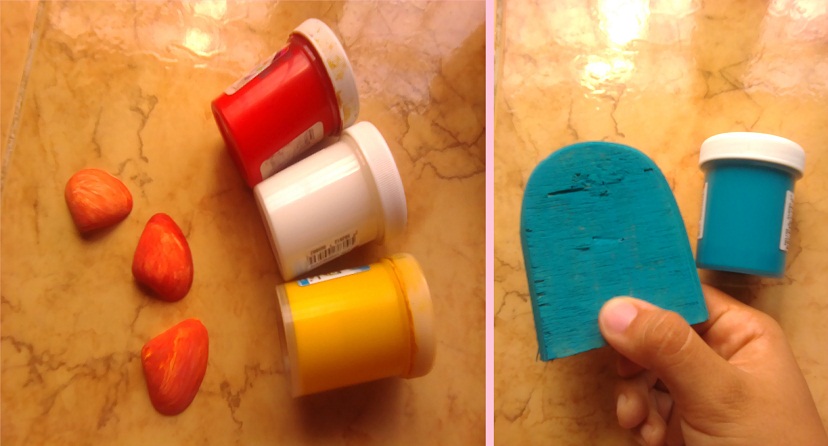
Utilizamos la pintura roja, blanca y amarilla para un tono naranja claro en las conchas, mientras se secan, pintamos uno de los recortes de madera en azul.
We used the red, white and yellow paint for a light orange hue on the shells, while they dry we painted one of the wooden cutouts blue.
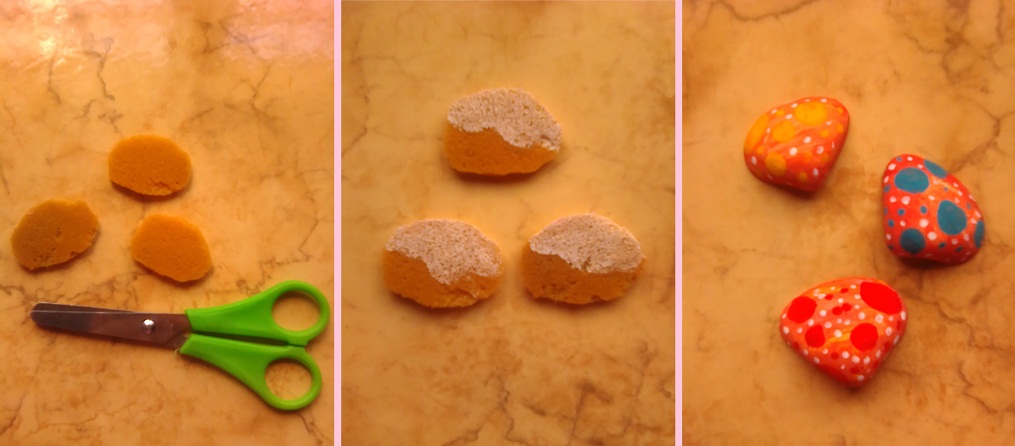
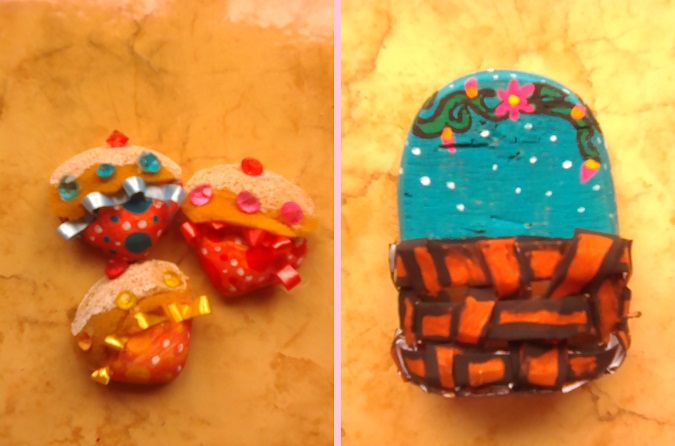
Recortamos tres figuras redondas de tamaño pequeño que formaran la parte superior de los bizcochos, la parte superior de ellos irán en un tono blanco como “glaseado”. En cada una de las caracolas pintamos marcas amarillas, azules y rojas acompañadas con un poco de blanco.
We cut out three small round figures that will form the top of the biscuits, the top of them will be in a white tone as "frosting". On each of the shells we paint yellow, blue and red marks accompanied with a little white.
Pintamos la parte posterior de las piedras en rosa y rojo, al igual que los brillantes, solo que estos tendrán mas colores como azul y amarillo.
We painted the back of the stones in pink and red, just like the rhinestones, only these will have more colors like blue and yellow.
Doblamos un poco más las hileras para así obtener un poco mas de grosor y resistencia para el desarrollo de las cestas, tomamos tres hileras las adherimos a los lados del recorte y empezamos a entrelazar mas hileras, arriba y abajo, hasta ir formando la textura tejida de la cesta, después le adherimos una base con el mismo papel.
We bend the rows a little more to obtain a little more thickness and resistance for the development of the baskets, we take three rows, we adhere them to the sides of the cutout and we begin to intertwine more rows, above and below, until we form the woven texture. of the basket, then we adhere a base with the same paper.
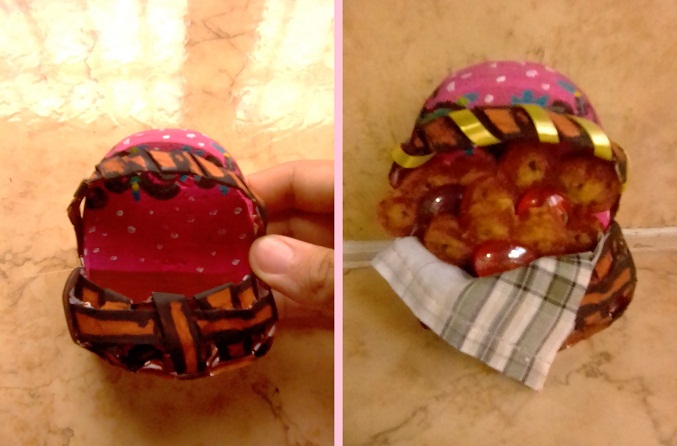
Adherimos las cintas de colores azul, roja y amarilla arruchada a los bordes de las conchas, fijamos las esponjas a las caracolas y las detallamos pegándoles los diamantes como chispas de colores, de esta manera terminamos con los pastelillos, pintamos la cesta en marrón, delineada en negro y en la parte superior del recorte pintamos un arco de flores en rosa, amarillo y rojo con puntitos blanco.
We adhere the blue, red and yellow colored ribbons curled to the edges of the shells, we fix the sponges to the shells and we detail them by gluing the diamonds as colored sparks, in this way we finish with the cupcakes, we paint the basket in brown, outlined in black and in the upper part of the cutout we painted an arch of flowers in pink, yellow and red with white dots.
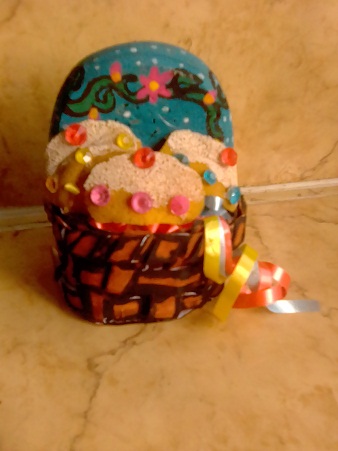
Pegamos los pastelillos a la cesta y para el toque final agregamos unas cintas de varios colores a un lado de la cesta y atrás de ella fijamos un recorte pequeño de madera, para que se pueda mantener en pie.
We glued the cupcakes to the basket and for the final touch we added some colored ribbons to one side of the basket and behind it we fixed a small wooden cutout, so that it can stand up.
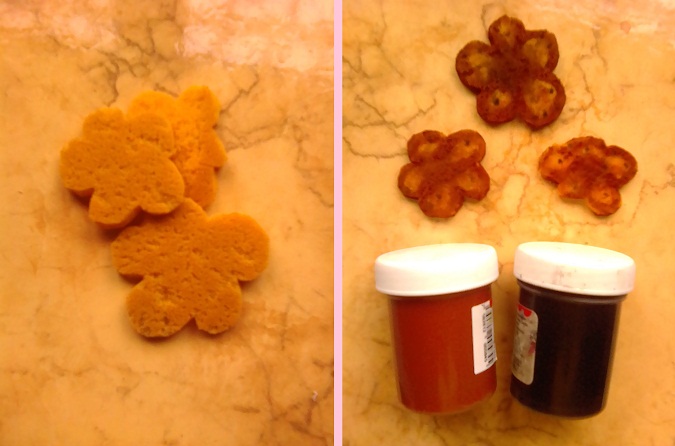
Ahora vamos a comenzar con el segundo modelo, cuyo procedimiento es similar al primer modelo, solo que más rápido, para ello cortamos en la esponja la forma de flores, estas tendrán gamas en marrón y manchitas negras, parecidas a las galletas tostadas.
Now we are going to start with the second model, whose procedure is similar to the first model, only faster, for this we cut the shape of flowers in the sponge, these will have brown ranges and black spots, similar to toasted cookies.
Pintamos el otro recorte en rosa con enredadera verde, flores azules amarillas y puntitos blancos, esta vez el tejido será distinto al primero, ya que para este las hileras estarán tejidas unas sobre otras hasta que tome una forma en zigzag, esta cesta tendrá una manilla, así que también se usara la misma técnica quebrada en el.
We paint the other cutout in pink with green vines, blue yellow flowers and white dots, this time the fabric will be different from the first, since for this the rows will be woven one on top of the other until it takes a zigzag shape, this basket will have a handle , so the same broken technique will also be used on it.
Pintamos en los mismos tonos la cesta, pegamos la manilla arriba de la cesta con una cinta amarilla entrelazada. Fijamos la tela como pañuelo de cocina y en el introducimos las galletas con el centro de piedras acrílicas como jalea.
We paint the basket in the same tones, we glue the handle on top of the basket with an intertwined yellow ribbon. We fix the fabric as a kitchen handkerchief and in it we introduce the cookies with the center of acrylic stones as jelly.
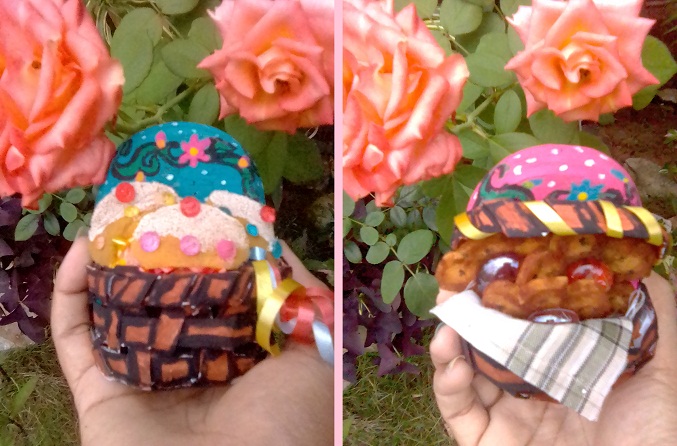
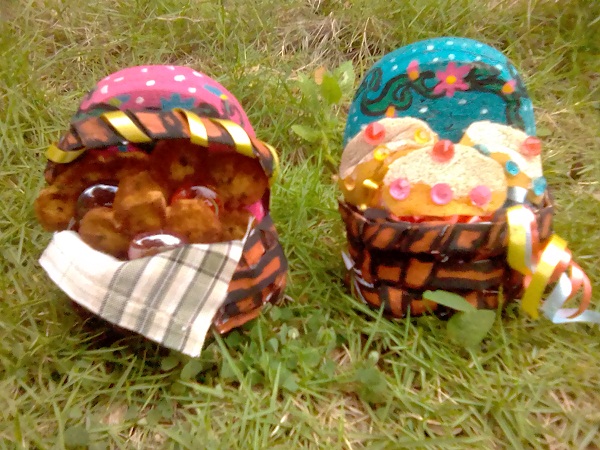
Y este es su resultado tras culminar, espero que les haya gustado esta bonita manualidad 😉
And this is your result after finishing, I hope you liked this beautiful craft 😉
A llegado la hora de despedirnos por el día de hoy, los invito a que nos sigan acompañando en mas de estas fantásticas y próximas publicaciones, ¡Que tengan un feliz día! ¡Nos vemos pronto!
The time has come to say goodbye for today, I invite you to continue accompanying us in more of these fantastic and upcoming publications, Have a happy day! See you soon!

💜 Las fotografías 📷 son de nuestra autoria y fueron tomadas con un teléfono inteligente (ZTE Blade L130) y editadas en Paint y Paint Tool SAI por @albakriz.
💜 The photographs 📷 are of our authorship and were taken with a smartphone (ZTE Blade L130) and edited in Paint and Paint Tool SAI by @albakriz.
💜 Traducción: traductor de Google.
💜 Translation: translate Google.
Congratulations @albakriz! You have completed the following achievement on the Hive blockchain and have been rewarded with new badge(s):
Your next target is to reach 900 upvotes.
You can view your badges on your board and compare yourself to others in the Ranking
If you no longer want to receive notifications, reply to this comment with the word
STOPTo support your work, I also upvoted your post!
Check out the last post from @hivebuzz:
Support the HiveBuzz project. Vote for our proposal!
Congratulations, your post has been upvoted by @dsc-r2cornell, which is a curating account for @R2cornell's Discord Community. We can also be found on our hive community & peakd as well as on my Discord Server
Felicitaciones, su publication ha sido votado por @dsc-r2cornell. También puedo ser encontrado en nuestra comunidad de colmena y Peakd así como en mi servidor de discordia
¡Muchas gracias @dsc-r2cornell! me alegra que le haya gustado ¡saludos! 💮
Thank you for sharing this amazing post on HIVE!
Your content got selected by our fellow curator @rezoanulvibes & you just received a little thank you via an upvote from our non-profit curation initiative!
You will be featured in one of our recurring curation compilations and on our pinterest boards! Both are aiming to offer you a stage to widen your audience within and outside of the DIY scene of hive.
Join the official DIYHub community on HIVE and show us more of your amazing work and feel free to connect with us and other DIYers via our discord server: https://discord.gg/mY5uCfQ !
If you want to support our goal to motivate other DIY/art/music/homesteading/... creators just delegate to us and earn 100% of your curation rewards!
Stay creative & hive on!