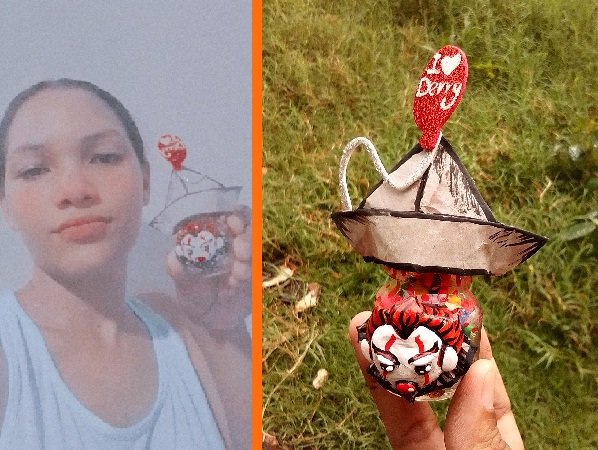
¡Buenos días queridos amigos de peakd! En este día les traigo un novedoso dulcero inspirado en un pequeño Penny Wise, elaborado con una botellita cuya tapa es un barquito de papel y un globo de foamy el cual nos recuerda a esta escalofriante película.
Good morning dear peakd friends! On this day I bring you a new candy box inspired by a small Penny Wise, made with a little bottle whose lid is a little paper boat and a foam balloon which reminds us of this chilling movie.
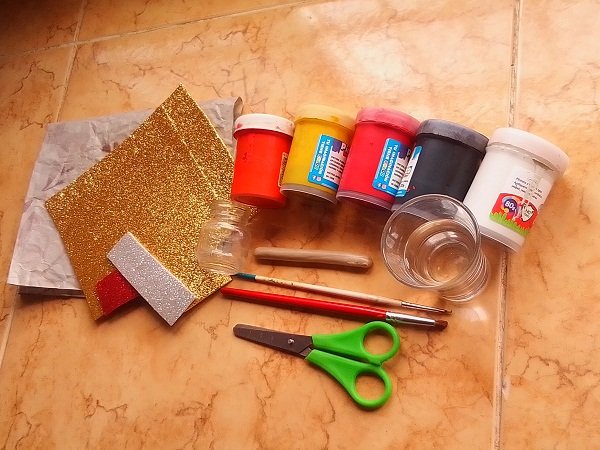
Materiales:
- Papel de seda en color gris.
- Foami escarchado en color dorado, rojo y plateado.
- Frasco pequeño.
- Pinturas al frío en color rojo, amarillo, naranja, negro y blanco.
- Masa flexible.
- Pinceles.
- Tijera.
- Barniz.
Materials:
- Gray tissue paper.
- Frosted foam in gold, red and silver.
- Small jar.
- Cold paints in red, yellow, orange, black and white.
- Flexible dough.
- Brushes.
- Scissors.
- Varnish.
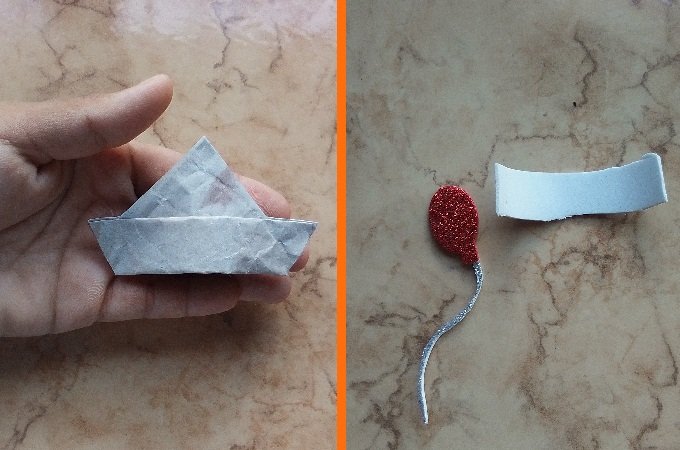
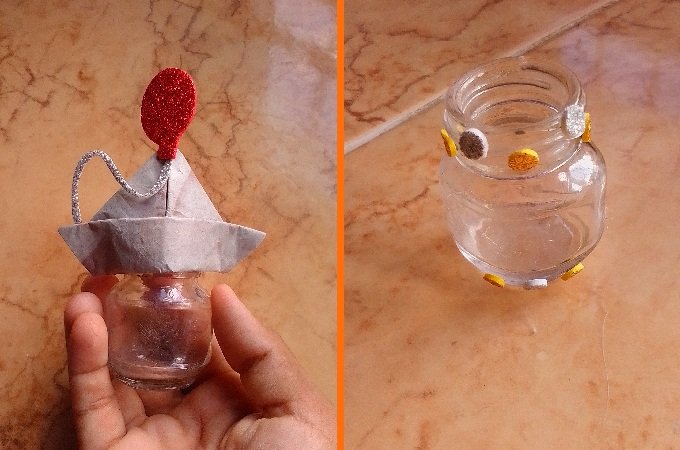
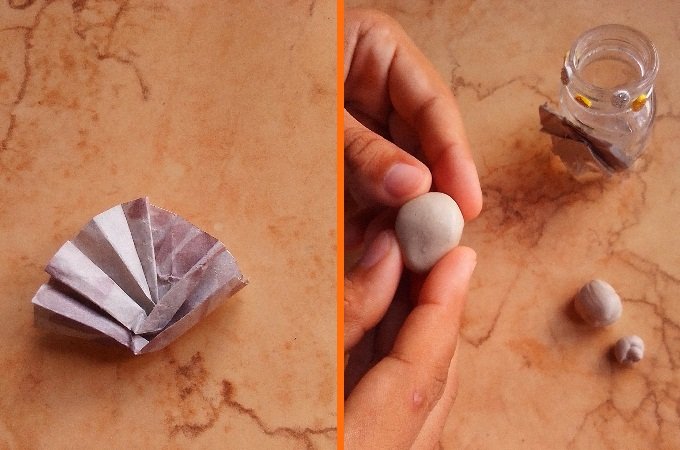
Para dar inicio a esta obra recortamos en el papel de seda un cuadro, lo doblamos y crearemos un pequeño barquito de papel y dentro de este insertaremos una tira en foamy plateado y le daremos la forma de un cilindro que será la tapa del frasco, también recortaremos la figura de un globo en foamy rojo con una tira de foamy plateado y lo colocaremos en el barquito como decoración.
To start this work, we cut out a picture from the tissue paper, we fold it and we will create a small paper boat and inside it we will insert a strip of silver foam and we will give it the shape of a cylinder that will be the lid of the jar, too. We will cut out the figure of a balloon in red foam with a strip of silver foam and place it on the boat as decoration.
Ya culminado el paso anterior procederemos a recortar varios círculos pequeños en foamy dorado y plateado para luego adheriros alrededor del frasco.
Once the previous step is completed, we will proceed to cut out several small circles in gold and silver foam and then adhere them around the jar.
Nuevamente recortaremos un trozo de papel de seda, lo doblamos en forma de “abanico” y lo pegamos en la parte frontal del frasco, este será el cuerpo de nuestro payaso, ahora amasamos la masa flexible para darle la forma de una cabeza.
Again we will cut out a piece of tissue paper, fold it into a “fan” shape and glue it to the front of the jar, this will be the body of our clown, now we knead the flexible dough to give it the shape of a head.
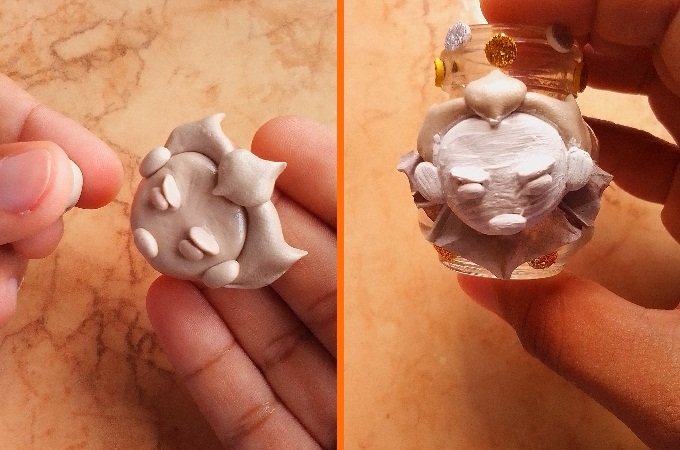
Continuamos amasando y dándole forma a otras piezas tales como el cabello, los ojos, la nariz y las orejas para luego colocarlas en sus respectivos lugares; una vez terminada la cabeza de nuestro payaso la colocaremos en el frasco y procedemos a agregarle pintura blanca.
We continue kneading and shaping other pieces such as the hair, eyes, nose and ears and then placing them in their respective places; Once our clown's head is finished, we will place it in the jar and proceed to add white paint.
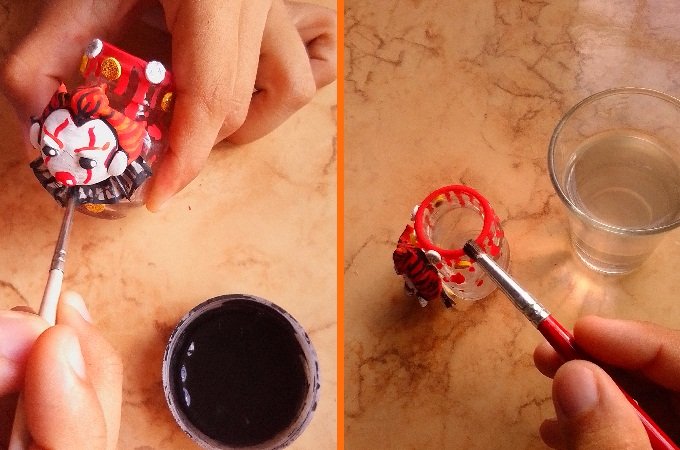
Con el resto de las pinturas agregamos el resto de los detalles del rostro, así mismo le pintaremos en color rojo unas marcas terroríficas a la parte superior del frasco, dejamos secar por un rato y luego agregamos algunas pinceladas de barniz a cada pieza para darle más durabilidad.
With the rest of the paints we add the rest of the details of the face, we will also paint some terrifying marks in red on the upper part of the jar, we let it dry for a while and then we add a few strokes of varnish to each piece to give it more durability.
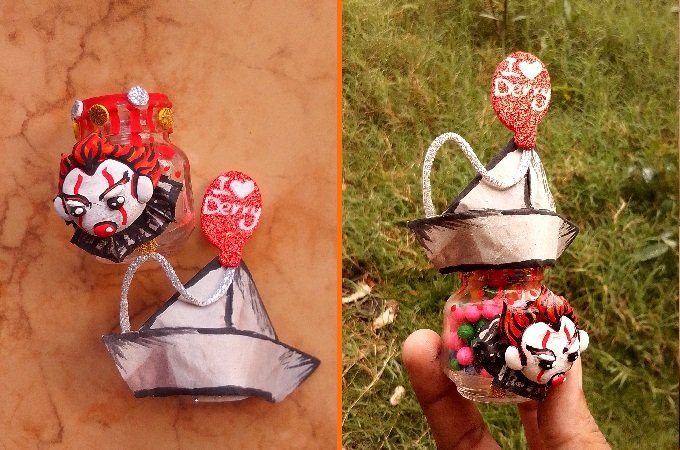
Finalmente detallamos el barquito y el globo que lleva este en color negro y blanco, ahora podemos usar este original y aterrador dulcero con temática de IT.
Finally we detail the little boat and the balloon that it carries in black and white, now we can use this original and terrifying IT-themed candy box.
Así hemos llegado al final por el día de hoy, los invito a que nos acompañen próximamente a más de estas ingeniosas ideas, ¡Nos vemos pronto!
So we have reached the end for today, I invite you to join us for more of these ingenious ideas soon, See you soon!
Las fotografías 📷 son de nuestra autoria y fueron tomadas con un teléfono inteligente (ZTE Blade L130) y editadas en Paint y Paint Tool SAI por @albakriz.
The photographs 📷 are of our authorship and were taken with a smartphone (ZTE Blade L130) and edited in Paint and Paint Tool SAI by @albakriz.
Traducción: traductor de Google.
Translation: translate Google.
Hola @albakriz, que estupenda idea para decorar y reciclar los envases que regularmente tenemos en casa, está genial para obsequiar en los cumpleaños , gracias por compartir.
Saludos!
This post has been manually curated by @steemflow from Indiaunited community. Join us on our Discord Server.
Do you know that you can earn a passive income by delegating to @indiaunited. We share more than 100 % of the curation rewards with the delegators in the form of IUC tokens. HP delegators and IUC token holders also get upto 20% additional vote weight.
Here are some handy links for delegations: 100HP, 250HP, 500HP, 1000HP.
100% of the rewards from this comment goes to the curator for their manual curation efforts. Please encourage the curator @steemflow by upvoting this comment and support the community by voting the posts made by @indiaunited.
Wow me encanta!
Pretty cool! The way you made this, that's great. Keep up the good work!
Ay que linda idea amiga, gracias por compartirlo, bendiciones.
Muy ingenioso tu dulcero, y lo mejor que es hecho con reciclaje, te felicito