
¿Alguna vez has hecho algún birrete? ¿Te gustaría aprender a elaborar uno con materiales fáciles de conseguir?
Have you ever made a birrete and would you like to learn how to make one with easily available materials?
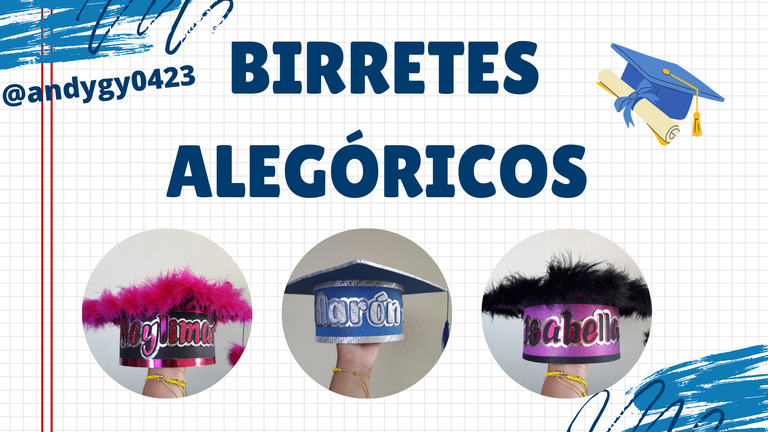
Los birretes son un símbolo de logro, de metas alcanzadas, que desde la antigüedad se han utilizado en actos solemnes para representar mayor nivel. Es de costumbre que en cada graduación, sea de primaria, secundaria o universidad, se utice esta indumentaria, y desde hace unos cuantos años, la gente ha optado por elaborar birretes alegóricos (muy decorados y personalizados según el gusto de cada quien) para sacarse fotos y conservarlos como recuerdo.
The birrtes are a symbol of achievement, of goals reached, that since ancient times have been used in solemn acts to represent a higher level. It is customary that in every graduation, be it primary, secondary or university, people wear this garment, and since a few years ago, people have chosen to make allegorical birretes (highly decorated and personalized according to each person's taste) to take pictures and keep them as a souvenir.
El mes pasado me encargaron hacer tres birretes alegóricos para niños que superaron el sexto grado, y dado que aquí en Cumaná - Edo. Sucre, los precios de éstos se han elevado mucho por la demanda, hoy les quiero compartir el paso a paso para que en cualquier oportunidad ustedes mismos puedan hacer sus propios birretes y no les salgan tan costosos.
Last month I was commissioned to make three allegorical birretes for children who passed the sixth grade, and since here in Cumaná - Sucre State, the prices of these have risen a lot due to the demand, today I want to share with you the step by step so that you can make your own birretes and they will not be so expensive.
El primer birrete que hice fue para uno de mis primos, y fueron pocos los materiales que utilicé, ya que en su escuela le especificaron los colores que debía usar, y que no debía ser tan llamativo, mas bien serio.
The first birrete I made was for one of my cousins, and I used very few materials, since his school specified the colors to be used, and that it should not be too flashy, but rather serious.
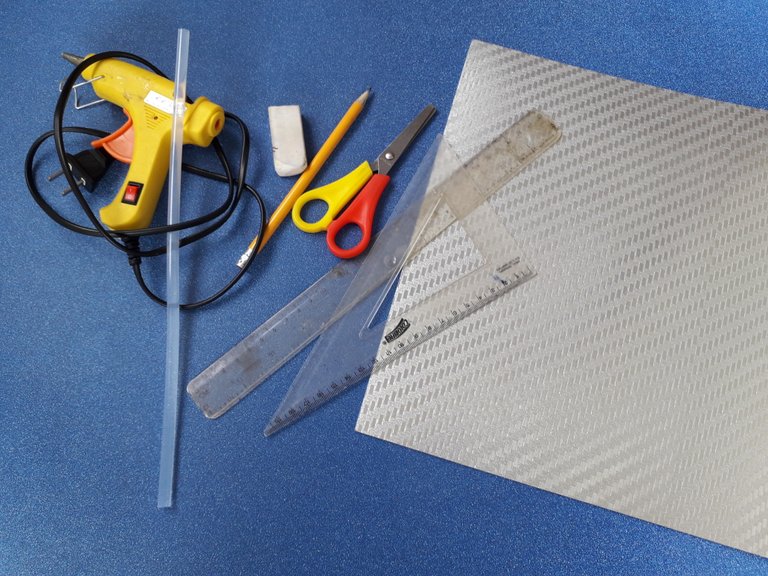
Aquí les dejo los materiales utilizados, que se pueden conseguir fácilmente en una papelería:
Here are the materials used, which are readily available at a stationery store:
Materiales / Materials
| Materiales | herramientas |
|---|---|
| Cartulinas brillantes | tijeras |
| foami estampado | cutter |
| barras de cilicón | pistola de cilicón caliente |
| hilo chino | regla milimetrada |
| lápiz y goma |
| Materials | Tools |
|---|---|
| glossy cardboards | scissors |
| printed foami | cutter |
| hot glue sticks | hot glue gun |
| chinese thread | milimeter ruler |
| pencil and eraser |
Pasos / Steps
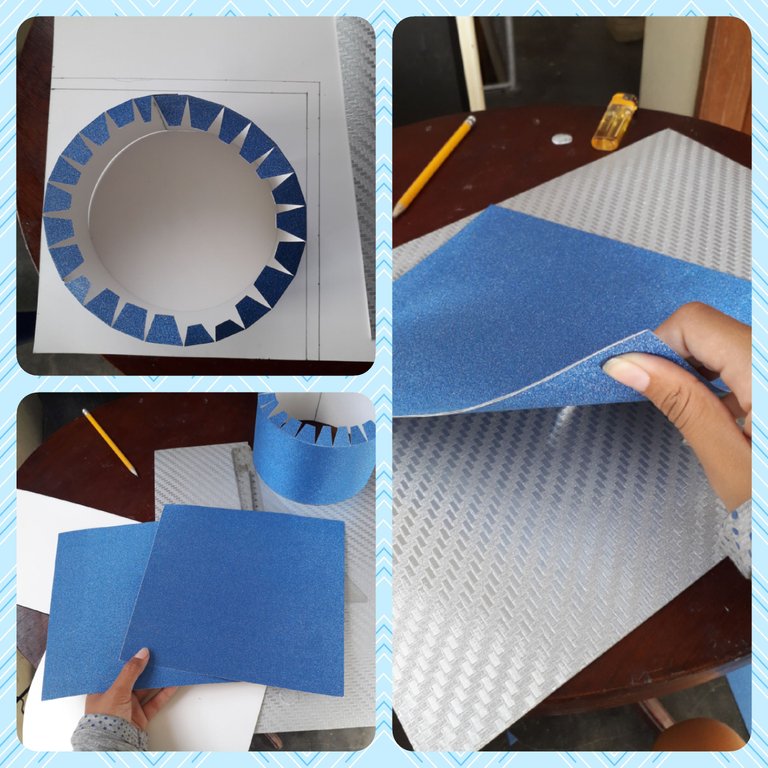
1.- Lo primero que se hace es medir la circunferencia de la cabeza del niño a quien se le va a hacer el birrete, y con esas medidas, marcar en la cartulita base un rectángulo que sea de ancho dos centímetros mayor que la medida, y que mida 11cm de alto. Marcar, además, esos 2cm añadidos de más y 2cm menos de alto, es decir, marcar en el noveno centímetro hacia arriba. Cortar toda la figura y doblar por la marca de arriba, tal como en la imagen.
1.- The first thing to do is to measure the circumference of the head of the child to whom the biretta is to be made, and with these measurements, mark on the cardboard base a rectangle that is two centimeters wider than the measurement, and that measures 11cm high. Mark, in addition, those 2cm more and 2cm less in height, that is to say, mark in the ninth centimeter upwards. Cut the whole figure and fold along the top mark, as shown in the picture.
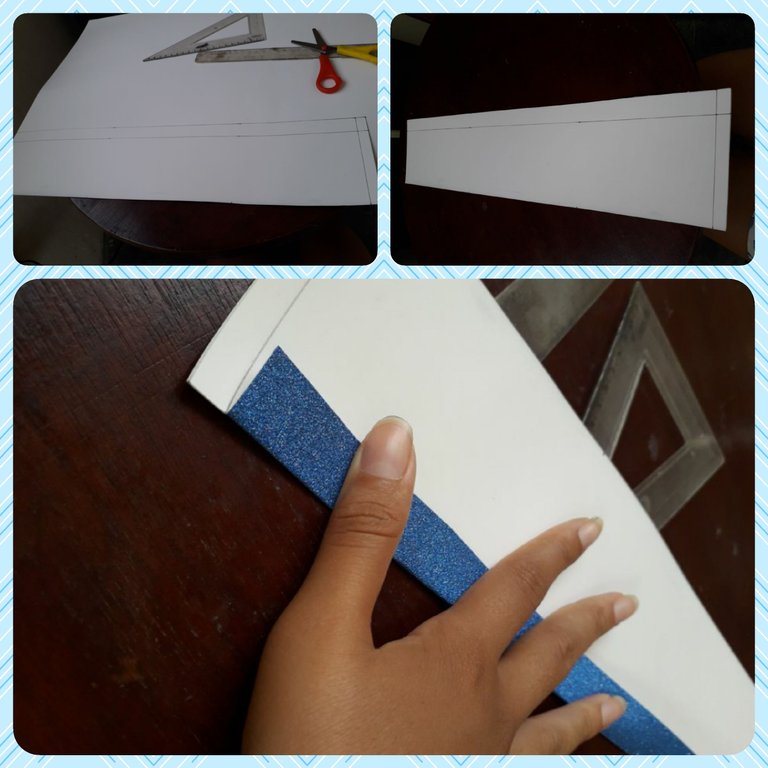
2.- Por la marca doblada, cortar pequeños triángulos en la cartulina, de modo que queden sólo pestañas en esa zona. Esto permitirá que la cartulina pueda doblarse sin dificultades, y que además se pueda pegar a la placa de arriba (que es el siguiente paso). Doblar y pegar la cartulina con cilicón caliente para unir los extremos, pegando hasta los 2cm marcados, dejando el lado estampado de la cartulina hacia afuera.
2.- Along the folded mark, cut small triangles in the cardboard, so that only tabs are left in that area. This will allow the cardboard to be folded without difficulty, and also to be glued to the top plate (which is the next step). Fold and glue the cardboard with hot glue to join the ends, gluing up to the marked 2cm, leaving the stamped side of the cardboard facing out.
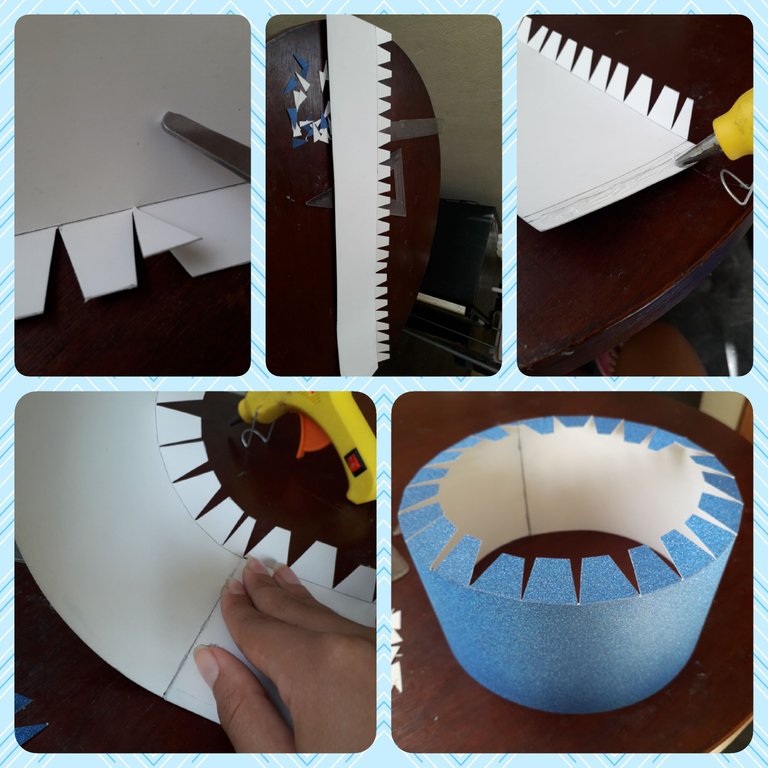
3.- Utilizando como referencia la pieza que se acaba de armar, marcar en la cartulina dos cuadardos. Yo los hice de 23x23 cm. Pegarlos de tal modo que quede la parte estampada por el lado de afuera.
3.- Using the piece that has just been assembled as a reference, mark two squares on the cardboard. I made them 23x23 cm. Glue them in such a way that the stamped part is on the outside.
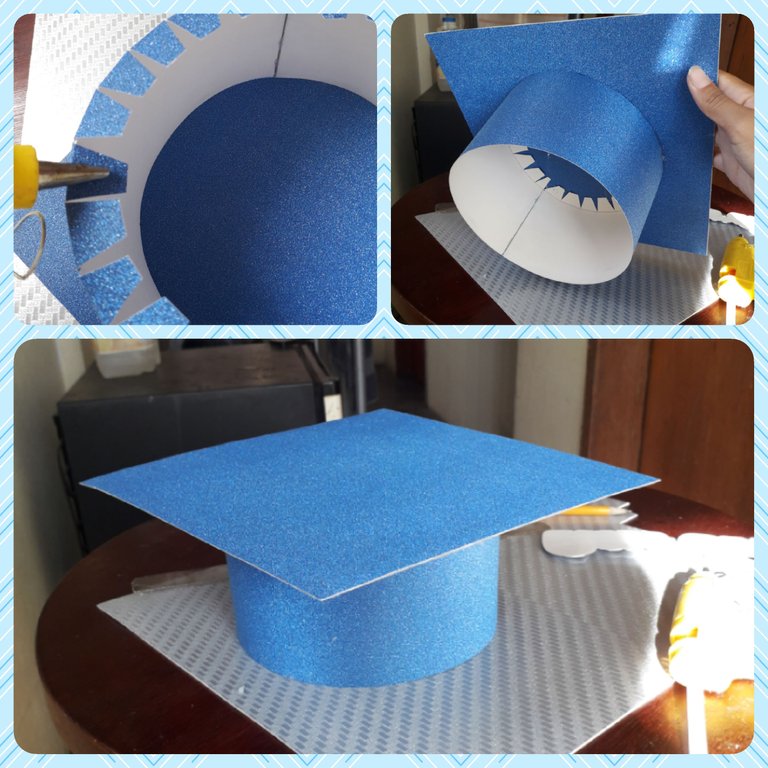
4.- Colocar el cilicóncaliente en las pestañas de la parte inferior del birrete, y pegarlas cuidadosamente de la parte superior, es decir, del cuadrado de cartulina, asugurándonos de que haya quedado centrado y que la parte superior quede como un diamante, como se ve en la imagen.
4.- Place the hot glue on the tabs at the bottom of the cap, and carefully glue them to the top, that is, the square of cardboard, making sure that it is centered and that the top is like a diamond, as shown in the image.
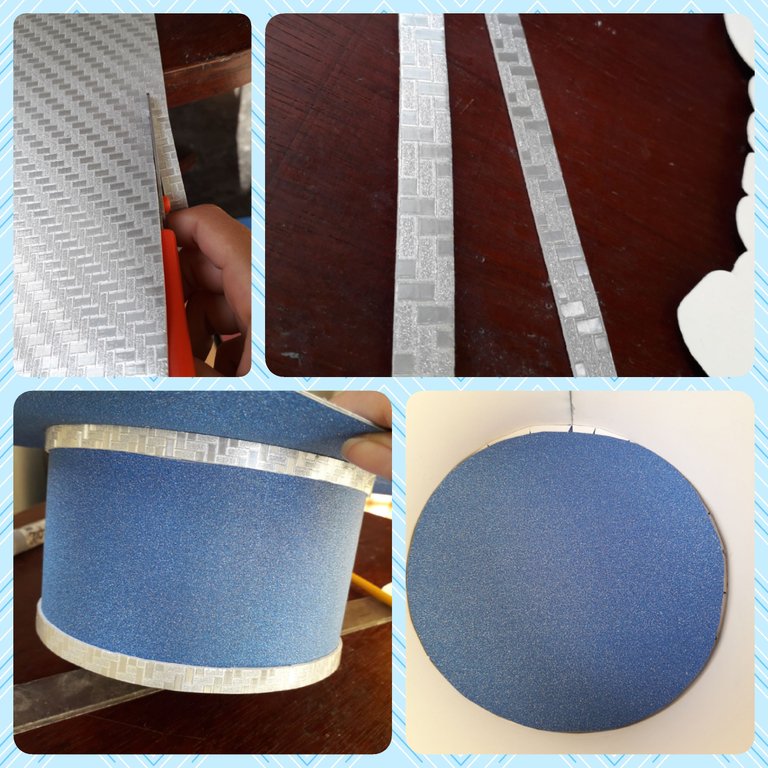
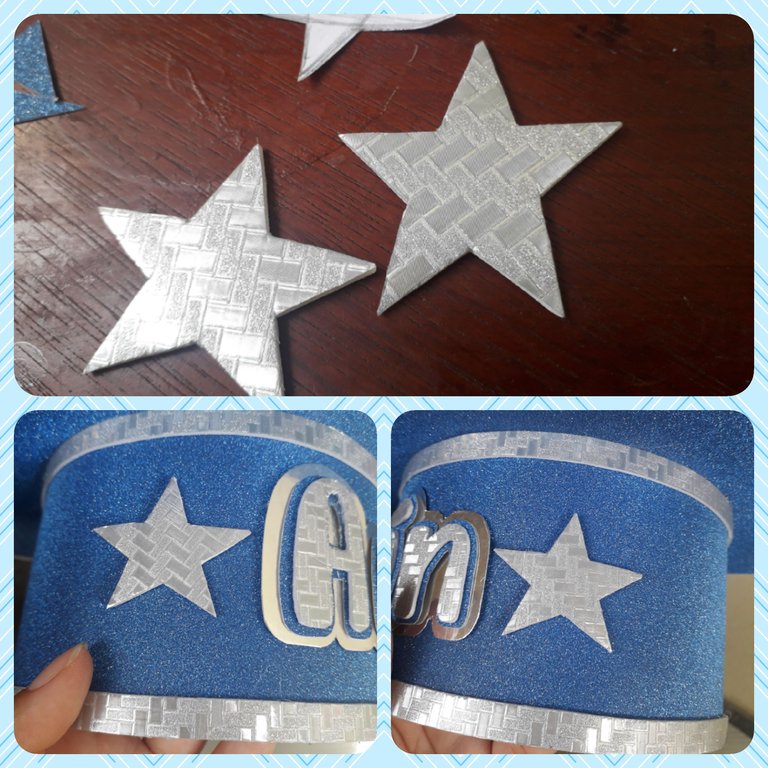
5.- Para empezar a decorar el birrete, cortar tiras largas de foami estampado de 1cm de grosor aproximadamente, y pegarlas en los bordes del birrete, menos en el borde del cuadrado. También, cortar un círculo y pegarlo adentro del birrete, para ocultar las pestañas de cartulina y que el birrete se vea mucho más pulcro.
5.- To start decorating the birrete, cut long strips of patterned foami about 1 cm thick, and glue them around the edges of the birrete, except for the edge of the square. Also, cut a circle and glue it inside the birrete, to hide the cardboard tabs and make the birrete look much neater.
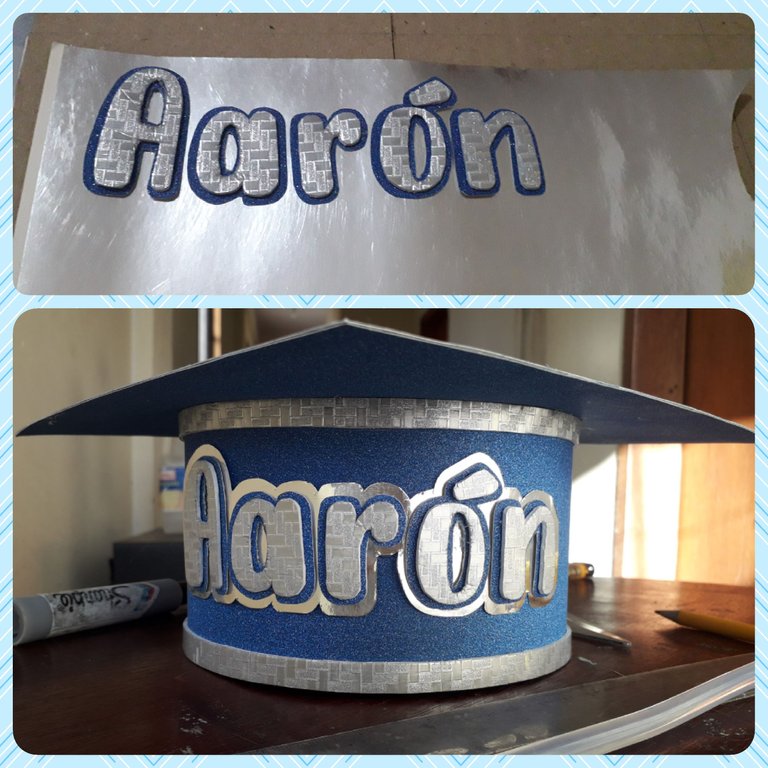
6.- Hacer las letras del nombre con el mismo foami estampado, y pegarlas en cartulina para hacerlas más llamativas, luego pegarlas en todo el frente del birrete, asegurándonos de que queden bien centradas.
6.- Make the letters of the name with the same printed foami, and glue them on cardboard to make them more eye-catching, then glue them all over the front of the birrete, making sure they are well centered.
7.- (Opcional) Hacer figuras para decorar y pegar en cada extremo del nombre, en este caso, yo hice estrellas de cinco puntas.
7.- Optional) Make shapes to decorate and glue on each end of the name, in this case, I made five-pointed stars.
8.- Cortar tiras muy finas de foami estampado para cubrir todo el borde del cuadrado superior del birrete, para que este no se vea desprolijo.
8.- Cut very thin strips of patterned foami to cover the entire edge of the top square of the birrete, so that it does not look messy.
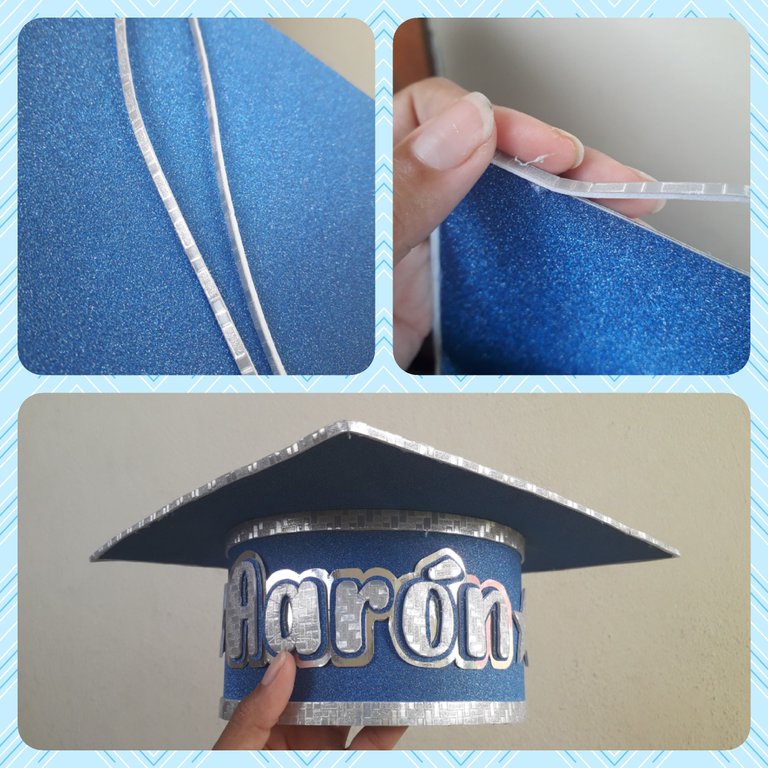
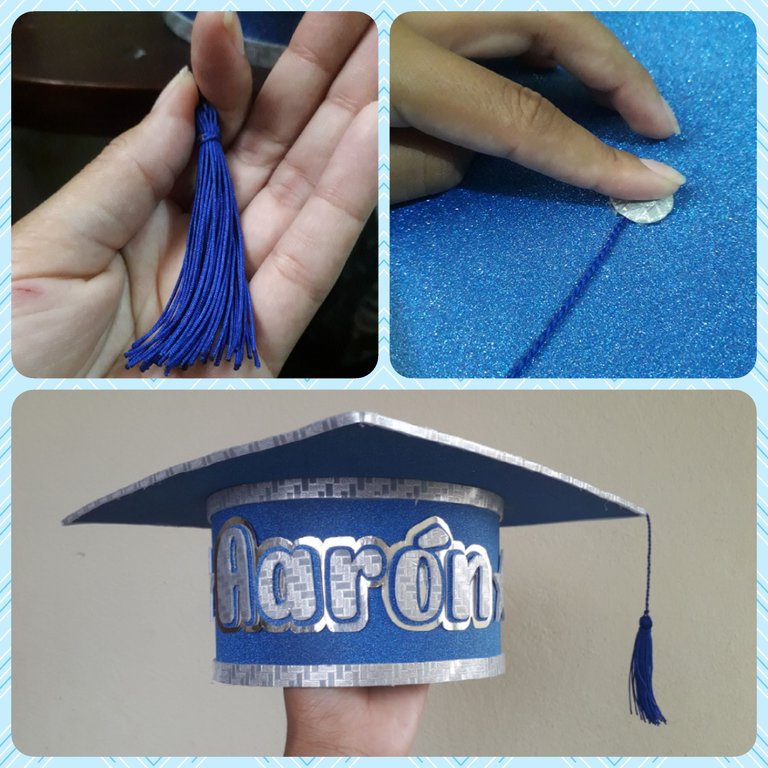
9.- Como toque final, hacer la borla del birrete con hilo chino. Yo prefiero este hilo porque no se daña fácilmente y queda mucho mejor el acabado, pero se pueden utilizar otros materiales. Pegar la borla en todo el centro del cuadro, dejándola caer hacia un lado del birrete, y cubrir la parte que se ha pegado con un círculo de foami, para que se vea como el botón que se coloca ahí.
9.- As a final touch, make the tassel of the cap with Chinese thread. I prefer this thread because it is not easily damaged and the finish is much better, but other materials can be used. Glue the tassel all around the center of the frame, letting it fall to one side of the birrete, and cover the part that has been glued with a circle of foami, so that it looks like the button that is placed there.
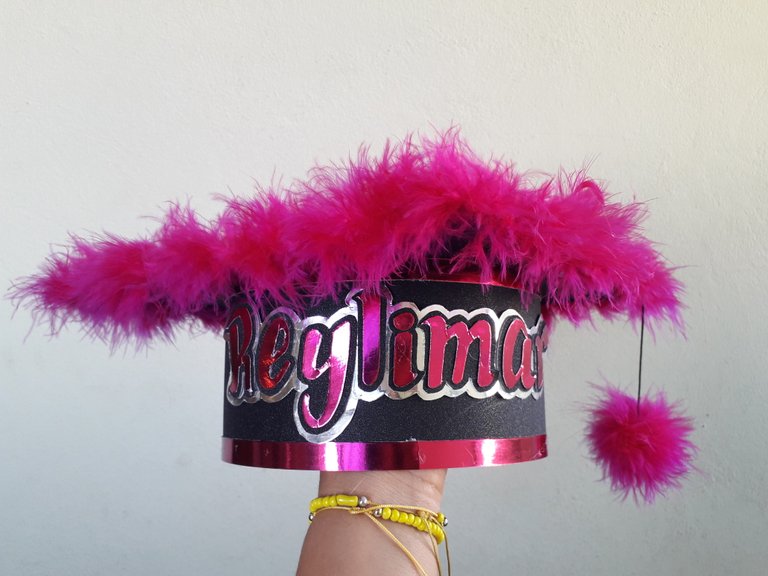
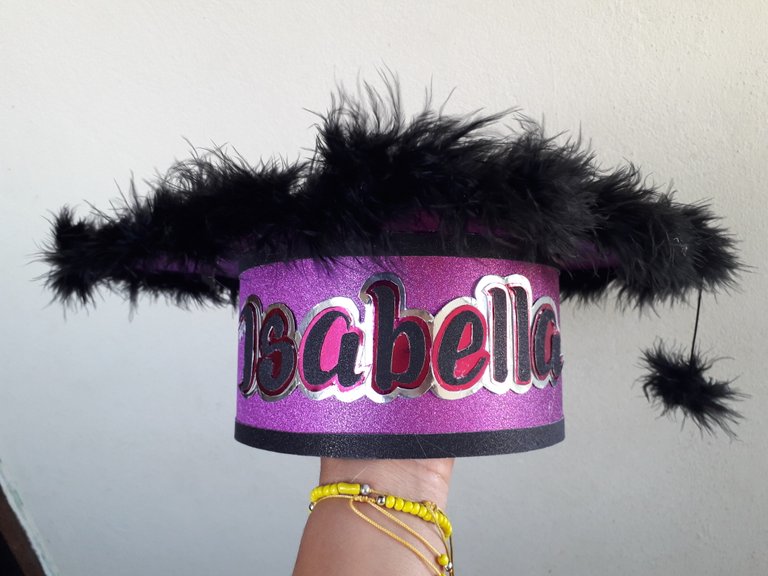
De esta manera queda terminado el birrete. También comparto con ustedes las fotos de los otros birretes que hice, para que puedan ver que también se utilizan materiales adicionales, como el marabú, en este caso. También se le pueden poner lentejuelas, escarchas, mariposas, y un sinfín de decoracioces, pero por supuesto, te irá aumentando el costo con cada material extra.
This way the birrete is finished. I also share with you the photos of the other birretes I made, so you can see that additional materials are also used, such as marabou, in this case. You can also put sequins, fringes, butterflies, and endless decorations, but of course, the cost will increase with each extra material.
Espero que les haya gustado este post, gracias por leerme.
I hope you liked this post, thanks for reading.
23/08/23
Todas las imágenes son de mi propiedad, sacadas con mi teléfono Samsung Galaxy j6.
All images are my own, taken with my Samsung Galaxy j6 phone.
Protada y separadores hechos por mí, con Canva.
Cover and dividers have been made by me, with Canva.
Traducción hecha con DeepL traductor.
Translation done by DeepL translator.

Me encantaron todos los birretes amiga😊, los niños se ven muy lindos con ellos, estoy de acuerdo contigo, los birretes son símbolo de logro, de la meta cumplida de un estudiante; Bendiciones✨
Qué bueno que te hayan gustado bendiciones para ti también 🤗
Birettes truly are a sign of achievement and this one you made for your niece looks really good.
Yes 😊
Thanks 🤗
Le quedan hermosos sus birretes amiga, además que los niños y chicos mas grandes les da mucho orgullo llevar su birrete a la moda y personalizado en el día de su acto, la felicito es una gran idea, gracias por compartir, saludos 🖖
Así es, les encanta. Me alegra que le haya gustado mi trabajo, saludos 🤗