

If Spanish isn't your first language, scroll down for the English version or click here
Bienvenidos a otra publicación de los Miércoles de la Carpintería. El día de hoy retomamos el proceso de este instrumento. La última vez que lo vimos, esa tapa armónica tenía forma y algunos refuerzos. Ahora vamos a completar esta pieza.
La Voz de la Madera
Toda pieza de madera tiene cualidades sonoras. Si son buenas o malas, va a depender de la especie, tipo de grano, edad, proceso de secado, elasticidad y muchos factores más. Claro, la mejor madera siempre será aquella que sepiese adquirir de aserraderos especializados y algunos lugares remotos.
Mientras eso no esté en nuestras posibilidades, tenemos que hacer lo mejor con lo que tengamos a disposición.

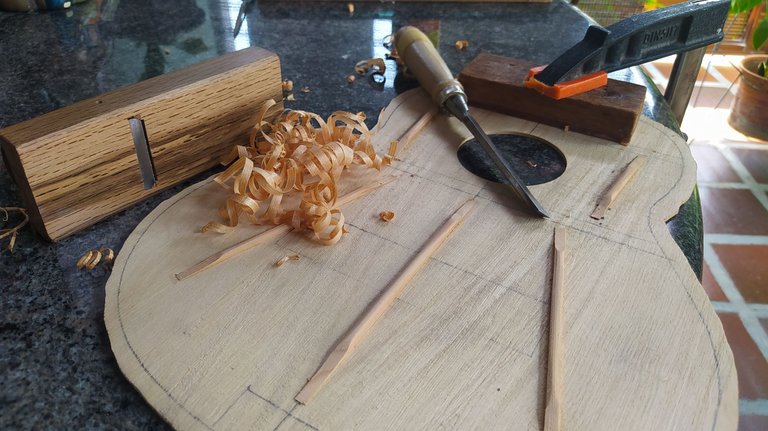
La última vez que vimos esta tapa armónica, ya habíamos colocados los refuerzos del abanico. Ahora es tiempo de rebajarlos para ajustar la respuesta de la tapa a las frecuencias graves y agudas. Por aquí, solo puedo mostrarles que rebajé un poco las varas del abanico. El proceso real es todo un trabajo de ir usando un formón y tomar pausas para levantar la tapa, llevarla al cerca del oído y hacerla sonar con un dedo para ir ajustando su respuesta.
Como una regla general, entre más peso tengan esos refuerzos, más rígida será la tapa. Esto favorece una respuesta a los agudos, pero reduce el tiempo de vibración (sustain) de la pieza. Si los refuerzos son más livianos, la tapa vibrará por más tiempo y mejorará su respuesta a la frecuencias graves.
Esto solo es con respecto al abanico. La otra razón de tener estás varas ahí es evitar que la tapa se doble por la tensión de las cuerdas. Por esa razón de ponen los refuerzos. Además, la junta de las maderas debe tener un poco de apoyo o estas se podrían despegar.
Estos son ajustes preliminares. Los ajustes finales se hacen con el lijado. Ahí podemos terminar de calibrar el sonido de la tapa. Todavía falta bastante para llegar a ese punto.
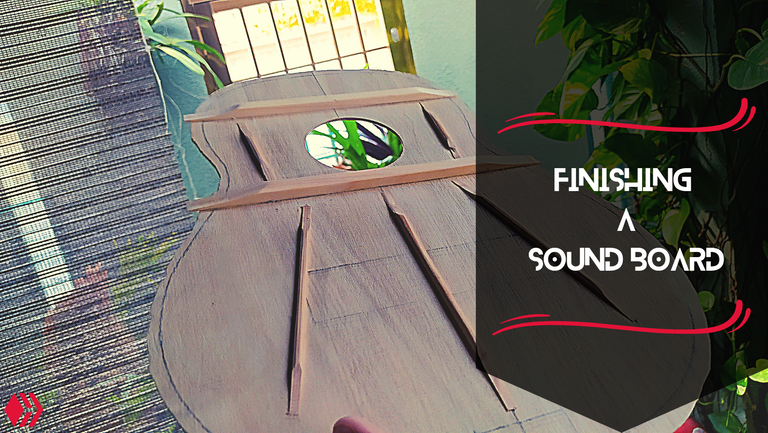
Bancos
Los últimos refuerzos sobre la tapa son los bancos. Estas son piezas de madera que van en sentido horizontal y limitan el área de vibración de la misma. La razón principal de colocarlos es meramente estructural.
Una segunda razón es evitar que las maderas se doblen como un rollo. Hay que recordar que por el corte que tienen las piezas de la tapa, estas tienden a doblarse de la misma manera que lo haría una hoja de papel después de haber sido enrollada.


Después de pegarlos y darle suficiente tiempo en reposo para manipular las piezas, podemos darle forma a los bancos y recortarlos. Al terminar con esta tarea, tenemos lista la tapa para comenzar a ensamblar el instrumento.


Sin embargo eso tendrá que esperar hasta la próxima ocasión.
Gracias por leer. ¡Nos vemos en los comentarios!
Finishing a Sound Board
Welcome back to another entry of Woodworking Wednesday. Today, we follow up the process of this instrument. Last time we saw it, the sound board had its shape and some of its reinforcements. Now, it time to complete it.
Voicing the Top
All wood is tonewood. Whether its sound is good or not depends on lots of factors suchs as species, age, grain, dying process, elasticity and a whole lot more. Of course, the best quality is only available on certified places or remote forests.
Since this isn't something that could fit my budget, we'll have to make due with what's available!
The last time we saw this sound board, we had put the struts in place. Now, it's time to get them trimmed. This will serve to adjust the response of the top. I can only show you the results. Doing this particular job is a task of patience, trail and error. As we take off from the struts, we need to take a moment to listen to the sound the board makes when tapped with a finger. And thus is something we need to do several times to assure we are getting to the response we want.
As a rule of thumb, heavier reinforcements mean a stiffer sound board. This will give it a lot of treble but will reduce its sustain. Lighter reinforcements give the top more room for vibration and a better bass response.
However, there's another reason to have these struts in place. We need to give the whole piece some resistance to the tension of the strings. Also, we need to strengthen the place where the two pieces of wood that make the sound board meet, lest we want them to come apart.
These are some preliminary adjustments. The last tuning we can do is only possible when we sand the whole instrument. We are way off from that at this moment.
Bars
The last reinforcements to place on the sound board are the bars. This are strips of wood that go in horizontally. They are places to limit the active area of the board. The only reason we need them is for structural integrity.
A complementary reason is to avoid the pieces of wood from curling. For the nature of the cut on th wood, it tends to curl. So we need something in place to avoid it.
Once we have glued these bars and given them enough time before doing anything, we can carve them up. After finishing this task, we have a sound board ready to start the assembly process.
However, that will have to wait until the next entry!
Thanks for reading! See you in the comment section!
Fotos/Photos 📷: taken by me (Redmi Note 8)
Portada/Thumbnail 🖼️: by me, created with Canva.
Edición/Editing 🎬: by me, made Adobe Photoshop Lightroom.
Follow me on Instagram for enquires and commission.
If you'd like to help the workshop grow, you can make a donation here. You can find me at discord as bertrayo#1763
The rewards earned on this comment will go directly to the people( @bertrayo ) sharing the post on Twitter as long as they are registered with @poshtoken. Sign up at https://hiveposh.com.
Sin duda esto es todo un trabajo, te felicito por la dedicación y el esmero con el que lo haces, lo mejor de esto es ver el resultado final, éxitos, saludos.
Muchas gracias. ✨👌🏻
Me parece oler a madera, me encanta. Que genial trabajo Andrés!✨
Ahí vamos. Poco a poco.
Y las alergias? Buenos días!
Siempre activas 🤣
🤣🤣🤣🤣 bueno te hacen compañia
Ya lo creo. 🤣🤣
🤣🤣🤣🤣
Qué bonita quedó. Como ya te había dicho me encantan los colores que se ven en la madera, pero sobre todo el de los ricitos que quedan por ahí a los costados, se ven tan bonitos 😍
Aunque sinceramente, no son mis ricitos favoritos 👀😘
La madera tiene unos colores geniales. Cuando esté listo el instrumento se va a ver mucho mejor.
Ja, ja, ja, ja. Los rizos favoritos son otros. 👀♥️
La calibración del sonido ¿la haces puramente probando y usando tu oído? La verdad la creación de este tipo de instrumentos para mi siempre fue una incógnita, así que gracias por compartirlo y tomarte el tiempo de explicar para que sirve cada tarea que haces y el tiempo que te lleva.
Eso se hace a oído. Bueno, no hay otra manera porque no tengo todos los aparatos para hacer la calibración con un algún aspecto para medir los parámetros.