
Hello everyone! It's the first time I post in this community and I feel excited about it. Today I want to share with you this technique to make flowers with tissue paper, which can be used for decoration or any occasion as a gift. This time I was guided by a dear friend who is dedicated to making decorations for events and I wanted to try to make some of them. I admit I am a novice in the matter but here I show you the process so you can make them by yourselves and certify that they really look great. So let's get started.
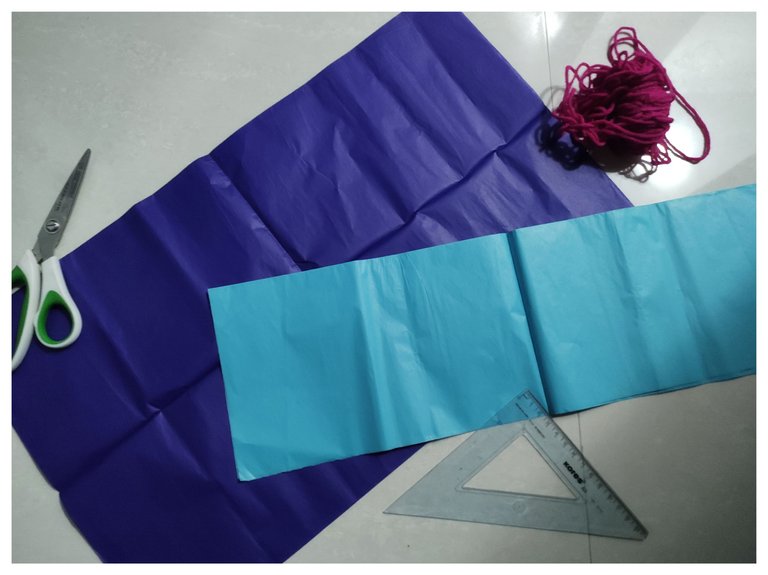
To make the flowers we are going to need:
💙 Tissue paper.
💙 Siccors
💙 Wire, Stamen or Wick (any will do).
💙Ruler
¡Hola a todos! Es primera vez que publico por esta comunidad y me siento entusiasmada por ello. El día de hoy quiero compartir con ustedes está técnica para hacer flores con papel de seda, que pueden servir para decoración o cualquier ocasión cómo obsequio. En esta oportunidad me guíe con una querida amiga que se dedica a realizar decoraciones para eventos y quise intentar realizar algunas de ellas. Me admito novata en el asunto pero aquí les muestro el proceso para que puedan realizarlas por ustedes mismas y certificar que realmente quedan muy bien. Así que comencemos con ello.
Para realizar las flores vamos a necesitar:💙 Papel de seda💙 Tijera💙 Alambre, Estambre o Pabilo (cualquiera sirve)💙 Regla
Process:
💙The first step will be to measure our tissue paper. This depending on the size you want the flower, if it is big or small, you choose the centimeters. A conventional size, medium, is 12x15. I chose a width of 10cm to 14cm. Once the size is marked, we are going to fold the paper over itself several times so that they are all the same size.
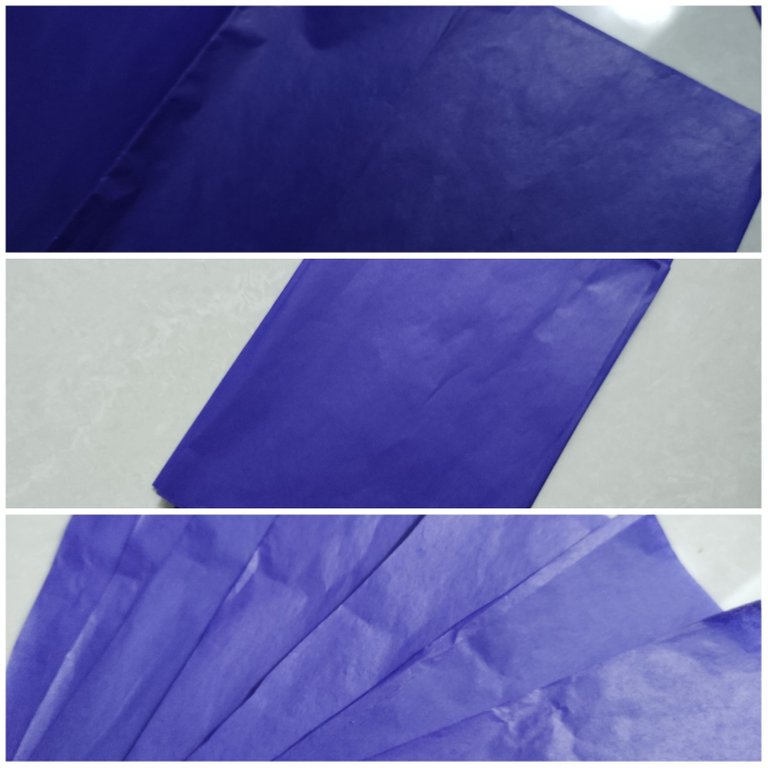
Once the appropriate size is obtained, we will get a rectangle. As we need each sheet to be separated, we will cut along the edges where they are joined to obtain individual pieces of paper. They would look as shown in the image. Several rectangles separately.
Proceso:
💙El primer paso será medir nuestro papel de seda. Este dependiendo del tamaño que quieras la flor, si es grande o pequeña, eliges los centímetros. Un tamaño convencional, mediano, es de 12x15. Yo elegí por un ancho de 10cm a 14cm. Una vez marcado el tamaño, vamos a doblar varias veces el papel sobre si mismo para que todos queden del mismo tamaño.
Una vez obtenido el tamaño apropiado, vamos a obtener un rectángulo. Cómo necesitamos que cada hojita este separada, vamos a cortar por los bordes donde se encuentran unidos para poder obtener piezas individuales de papel. Quedarían de la forma en la que se ve la imagen. Varios rectángulos por separado.
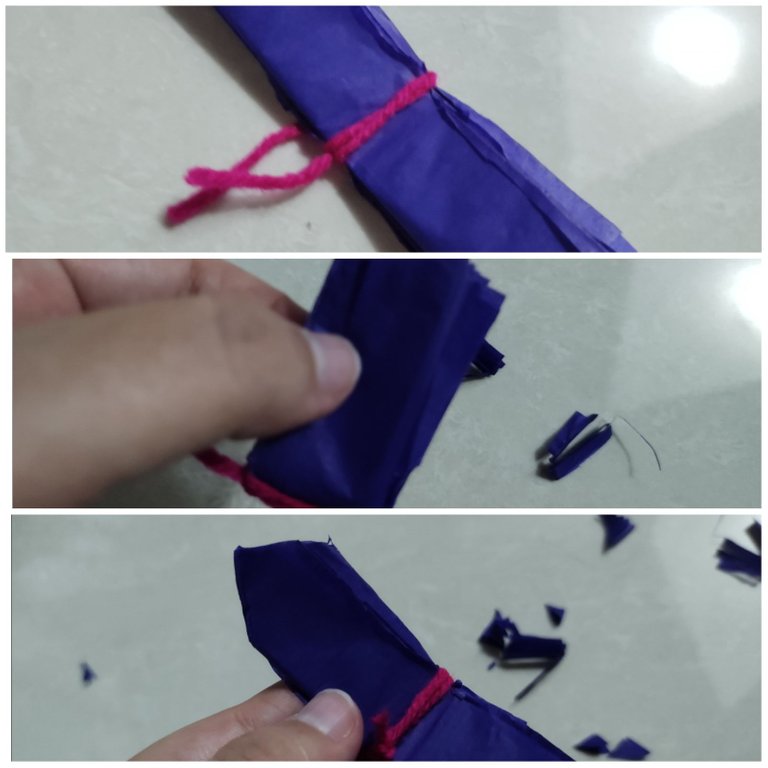
💙Then, we are going to select only 6 pieces for a flower. The ones we have cut in the previous step. They are enough for our flower to be abundant and to make it easier to work when removing each petal. Now, we are going to join the six pieces, one below the other and start folding in a fan shape. The rectangle should be positioned vertically, that is, the base should be 10cm and folded. It is as shown in the image.
💙Luego, vamos a seleccionar solamente 6 piezas para una flor. Las que hemos cortado en el paso anterior. Son suficientes para que nuestra flor quede abundante y se facilite el trabajo a la hora de sacar cada pétalo. Ahora, vamos a unir las seis piezas, una abajo de la otra y empezaremos a plegar en forma de abanico. El rectángulo debe estar posicionado de forma vertical, es decir, que quede de base los 10cm y plegamos. Queda de la forma en que se aprecia en la imagen.

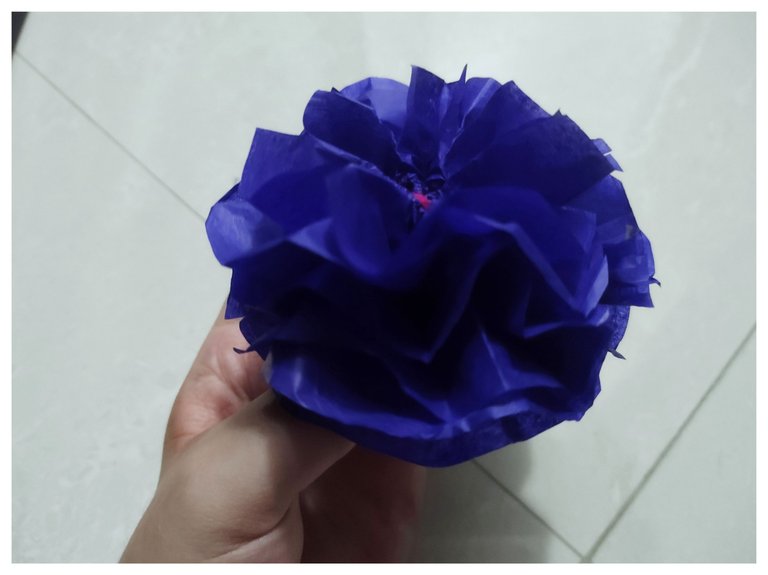
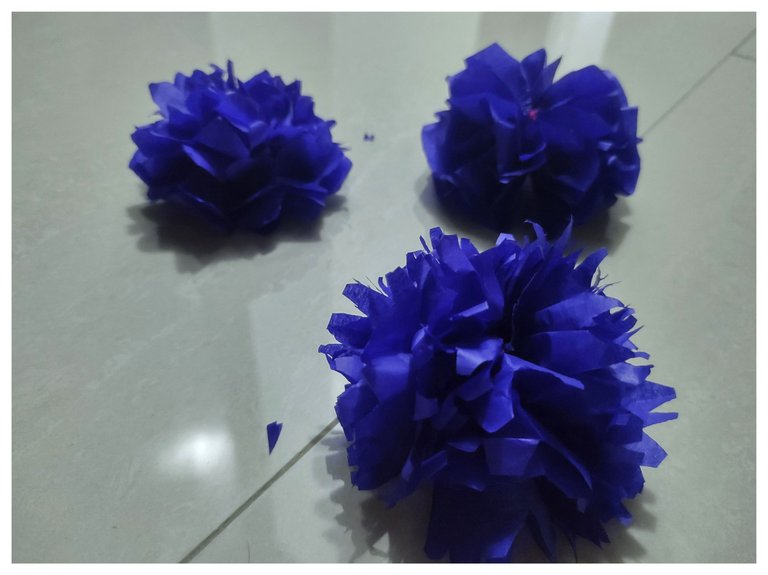
💙Once folded our paper, we will cut a piece of our wire, wick or wire to tie in the middle of our paper. Tighten it well to prevent it from unraveling. The paper should have two ends, two fans. Now, optionally, we will cut the ends with the design we want. I made three models of flowers, one of them I cut in a point, the other one I cut once it was finished and the last one I made several triangles. It all depends on which flower you would like to get. I leave the image for a better appreciation.
💙Una vez plegado nuestro papel, vamos a cortar un pedazo de nuestro estambre, pabilo o alambre para amarrar en el medio de nuestro papel. Apretamos bien para evitar que se desate. Nos debe quedar el papel con dos extremos, dos abanicos. Ahora, de forma opcional vamos a cortar los extremos con el diseño que querramos. Yo realice tres modelos de flores, en una pique en punta, la otra la pique una vez que estuvo terminada y a la última le hice varios triángulos. Todo depende de que flor te gustaría obtener. Dejo la imagen para que se aprecie mejor.
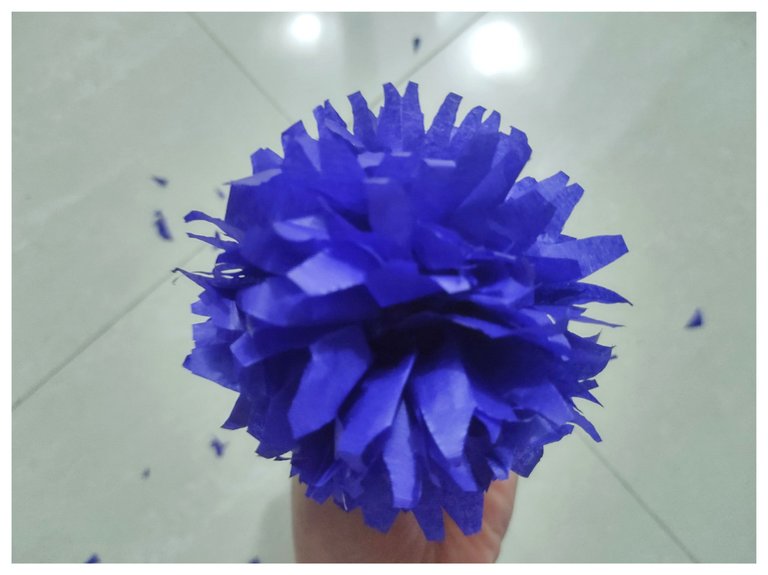
💙The most important part is this, the unfolding of each layer of paper to get a flower. You must do it first by a "wing" and start from the center, with the first layer of paper. You will do this clockwise, that is, unfold in order, from right to left. Never do it randomly because they can easily break. There are six layers, as we move forward the flower will become thicker in the center and loose at the ends. Take all the time you want for this as it takes patience and practice.
💙La parte más importante es está, el desplegar cada capa de papel para obtener una flor. Debes hacerlo primero por una "ala" y comenzar por el centro, con la primera capa de papel. Esto lo harás en el sentido del reloj, es decir, desplegamos en orden, de derecha a izquierda. Nunca hacerlo al azar porque se pueden romper fácilmente. Son seis capas, conforme vamos avanzando la flor se hará más gruesa en el centro y holgada a los extremos. Tomate todo el tiempo que quieras para esto ya que requiere de paciencia y práctica.
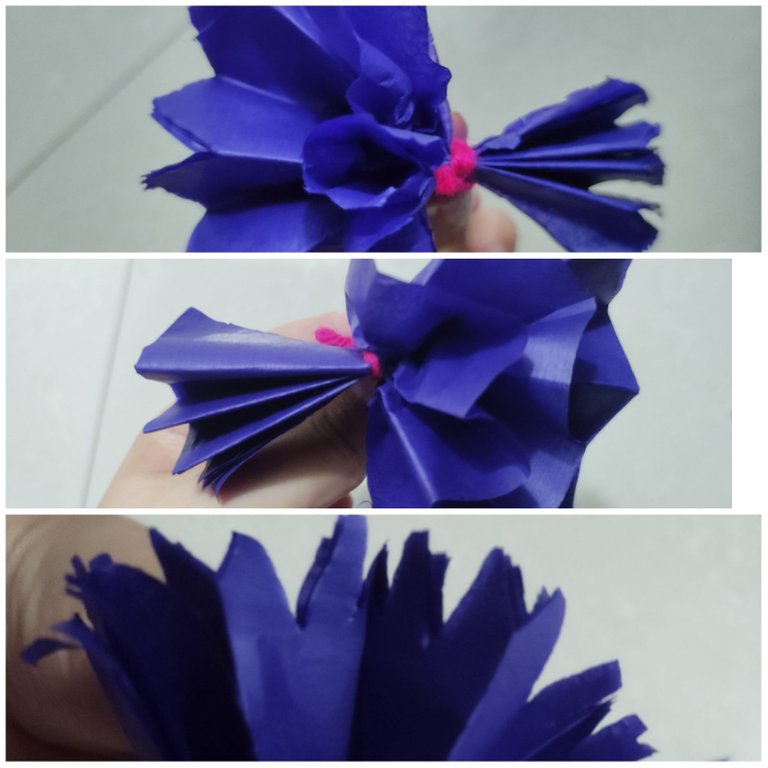
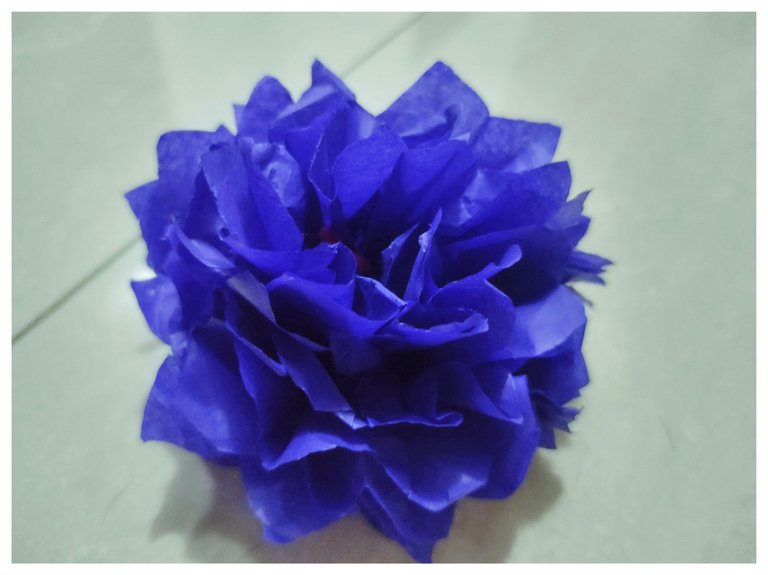
💙When we finish one side, we will proceed with the other repeating the same process of unfolding the layers. Finally, in this way we will obtain our flower. I recommend that after finishing, the petals are arranged a little to make it look more aesthetic and the flower does not seem to be divided into two parts and remains homogeneous. I share with you the results.
💙Al terminar un lado, procederemos con el otro repitiendo el mismo proceso de despliegue de las capas. Finalmente, de esta forma obtendremos nuestra flor. Recomendando que luego de terminada, se acomoden un poco los pétalos para que se vea más estética y la flor no parezca estar dividida en dos partes y quedé homogénea. Les comparto los resultado.
This is how we obtain these beautiful flowers. The finish will depend on how much we practice, as it may be that more first flowers do not come out so well but that's the good thing about this work, that the flowers are quite asymmetrical and if there are some petals that seem to be disordered, it is not serious. They look much better if they are accompanied by several flowers and different patterns. I have added a different personality to each one. I hope you liked my work, it's the first time I made them and although I was a little lost at the beginning, I was happy to see them ready. Don't get carried away if at the beginning the same thing happens to you, it's just a matter of continuing until the end and see how good they look. Thank you very much for stopping by. A big hug.
Es así como de esta forma obtenemos estás bellas flores. El acabado dependerá de cuánto practiquemos, ya que pueda que más primeras flores no salgan tan bien pero eso es lo bueno de este trabajo, que las flores son bastante asimétricas y si hay algunos pétalos que parecen estar desordenados, no es grave. Lucen mucho mejor si se acompañan de varias flores y diferentes modelos. Yo le he añadido a cada una una personalidad diferente. No me queda más que decir que, espero que les haya gustado mi trabajo, es la primera vez que las realizó y aunque al inicio estaba un poco perdida, me hizo feliz verlas listas. No sé dejen llevar si al principio les sucede lo mismo, cuestión de seguir hasta el final y ver qué si quedan muy bien. Muchas gracias por pasar. Fuerte abrazo.


Hola, por ser por primera vez las flores te quedaron lindas, saludos.
¡Gracias, Coromoto! Por tu apreciación y comentario, abrazos 🙏💙
Me encantan las flores y encantadas con estas que compartes , te quedaron super lo intentaré, gracias por compartir 🌹
¡Hola, cariño! Me alegra que te hayan gustado, intentalo están súper lindas, más si haces un juego con bastantes flores. Te ando un abrazo, gracias por pasar por aquí.
Están hermosas, el color es muy llamativo. Excelente Post, sigue haciendo manualidades te quedan bonitas.
Saludos y un abrazo 🤗🤗
¡Hola, bonita! Muchas gracias por la observación. Ese color me encantó en cuanto lo ví jejeje así que supe que era el indicado para estas flores. Recibo tu abrazo, saludos y cariños también para ti.
se ven muy bonitas y sencillas de hacer, me parecen geniales para hacer unas con mi hijo y se divierta realizando manualidades.
Gracias por compartirlas,
Exitos
¡Gracias, cariño! Sí, son sencillas pero eso sí lleva un poco de práctica 😆 yo casi me rindo con la primera porque no salían las capas pero uno después me agarra el truco. Excelente para compartir con tu pequeño, lo disfrutará mucho 🙏💙 un abrazote
Me encantan estas flores, he intentado hacerlas un par de veces, mi mami las hacía, ella me enseñó, pero el papel es super delicado y no se lleva bien conmigo, ¡Jajajaj! Quizá no le tengo paciencia, pero igual me encanta pues quedan hermosas. Para ser tu primera vez han quedado logradas, a mi se me rompen de la nada. Gracias por compartir con nosotros.
¡Saludos por aquí! Es así, a mi me pasó lo mismo. El papel de seda o el crepé son super delicados y sacar cada capa es cuestión de práctica y paciencia. Casi destruí por completo la primera pero se redimió a último momento jajaja muchas gracias por apoyar mi trabajo, un abrazo.
La verdad nosotros somos más malos con las manualidades, siempre que vemos algo así de verdad lo admiramos mucho, amiga tienes tantas facetas en serio, te quedo lindo y sobre todo creativo 🌹💙
¡Saludos muchachos! Muchas gracias jejeje fue una prueba de fuego porque es primera vez que las hacía. Me alegra que les haya gustado, un super abrazo.
Congratulations, your post has been upvoted by @dsc-r2cornell, which is the curating account for @R2cornell's Discord Community.
Enhorabuena, su "post" ha sido "up-voted" por @dsc-r2cornell, que es la "cuenta curating" de la Comunidad de la Discordia de @R2cornell.
Thank you for sharing this amazing post on HIVE!
Your content got selected by our fellow curator @rezoanulvibes & you just received a little thank you via an upvote from our non-profit curation initiative!
You will be featured in one of our recurring curation compilations and on our pinterest boards! Both are aiming to offer you a stage to widen your audience within and outside of the DIY scene of hive.
Join the official DIYHub community on HIVE and show us more of your amazing work and feel free to connect with us and other DIYers via our discord server: https://discord.gg/mY5uCfQ !
If you want to support our goal to motivate other DIY/art/music/homesteading/... creators just delegate to us and earn 100% of your curation rewards!
Stay creative & hive on!