Hola a todos... 🐱🐾💕
Hola mis queridos Hivers, y a todas esas bellas personas que hacen comunidad en esta gran familia como lo es #HiveDiy, deseándoles un día de infinitas bendiciones, les presento mi trabajo del día, realizado como en todas las ocasiones con gran amor y cariño.
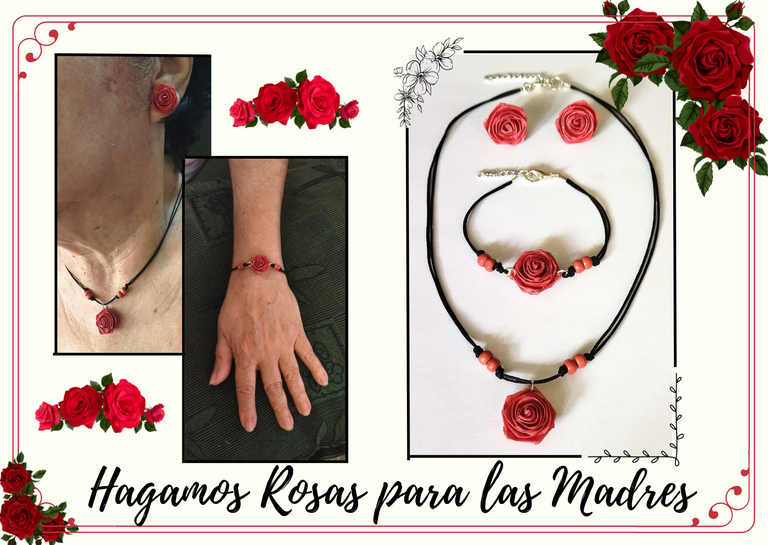
Está por llegar "El Día de las Madres 💕", y es por ello que para hoy les traigo algo muy sencillo y rápido de realizar, y al mismo tiempo es un detalle muy hermoso que cualquier madre le gustaría lucir, unas bellas rositas, en un juego de zarcillos, collar y pulsera con la técnica de quilling art.
Por acá les dejo el paso a paso, esperando que mi trabajo sea de su agrado.

Hello everyone... 🐱🐾💕
Hello my dear Hivers, and to all those beautiful people who make community in this great family as it is #HiveDiy, wishing you a day of infinite blessings, I present my work of the day, made as on all occasions with great love and affection.
It is coming "Mother's Day 💕", and that is why today I bring you something very simple and quick to make, and at the same time is a very beautiful detail that any mother would like to wear, a beautiful roses, in a set of earrings, necklace and bracelet with quilling art technique.
Here I leave you the step by step, hoping that my work is to your liking.

Comencemos:😃
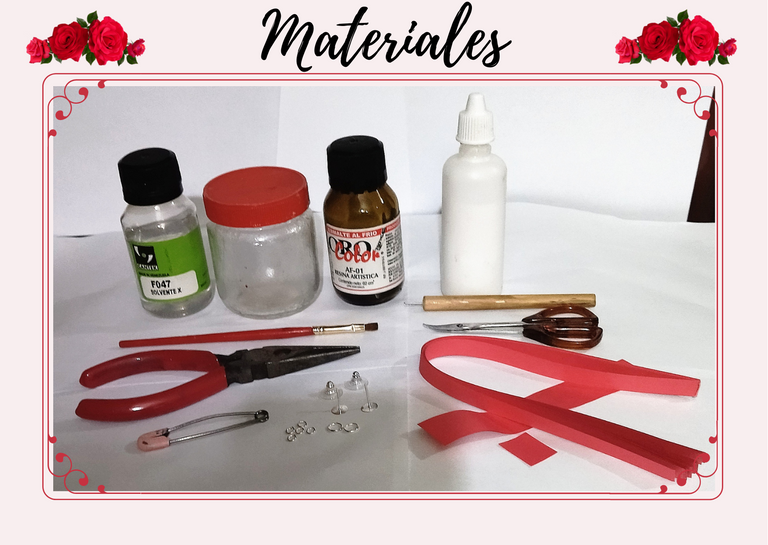
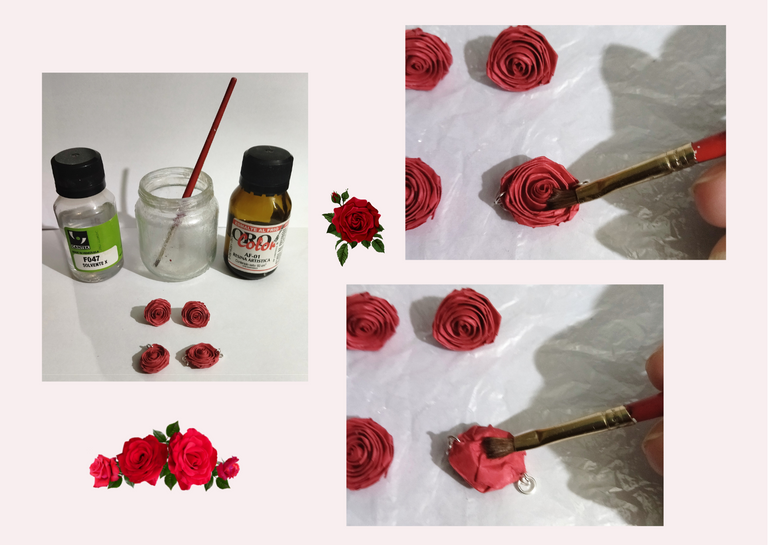
Materiales:📏✏️✂️
• Cintas de quilling de 9mm de ancho, rojas, (o del color de tu preferencia).
• Aguja para quilling.
• Pega blanca.
• Tijera.
• Alfiler o aguja punta gruesa.
• Base para zarcillos fijas (grandes), tapas para zarcillos antialérgicas.
• Argollas pequeñas y medianas de bisutería.
• Alicate punta fina.
• Solvente X.
• Resina Artística.
• Frasco de vidrio.
• Pincel.
Let's get started:😃
Materials:📏✏️✂️.
- 9mm wide quilling ribbons, red, (or color of your choice).
- Quilling needle.
- White glue.
- Scissors.
- Pin or thick needle.
- Base for fixed tendrils (large), covers for antiallergic tendrils.
- Small and medium size costume jewelry earrings.
- Fine nose pliers.
- Solvent X.
- Artistic resin.
- Glass flask.
- Brush.
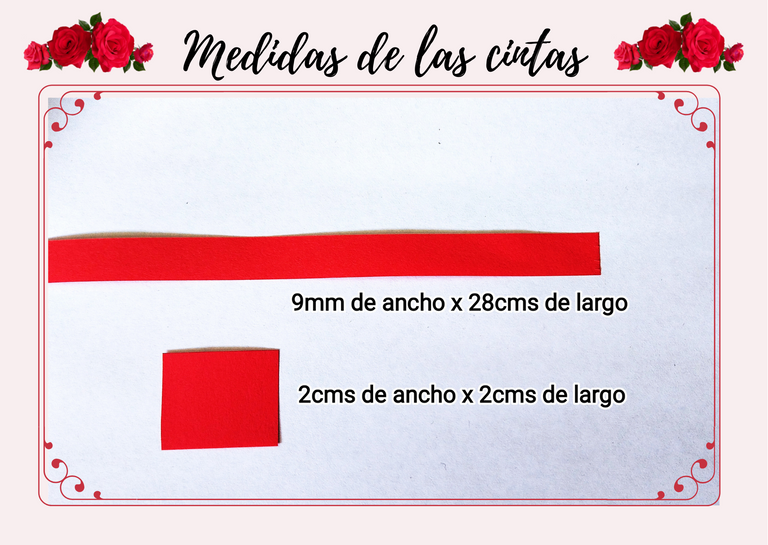
Medidas de las cintas:🌈
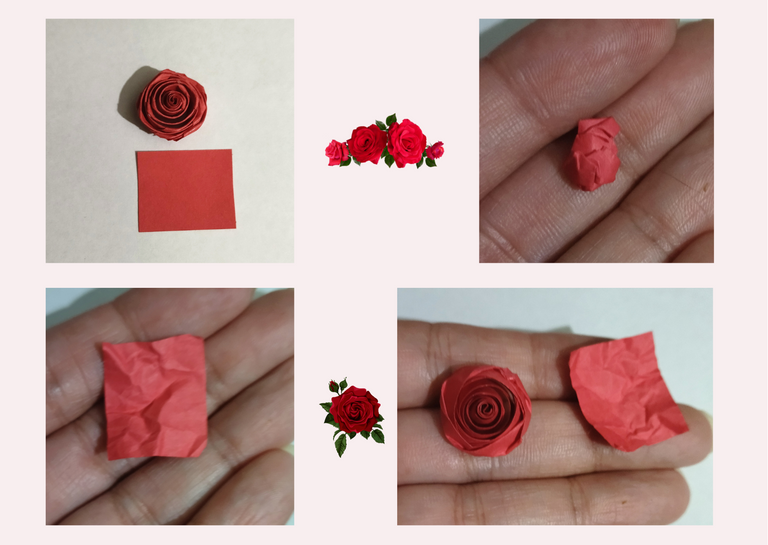
• Para comenzar vamos a necesitar cintas de quilling de 9mm de ancho por 28cms de largo, y un trozo de quilling de 2cms de ancho x 2cms de largo. Como realizare un par de zarcillos, un collar y una pulsera, hare cuatro piezas, por ello necesitaremos 4 cintas y cuatro trozos de quilling de las mediadas antes mencionadas.
Ribbon measurements: 🌈
- To begin with we will need quilling ribbons 9mm wide by 28cms long, and a piece of quilling 2cms wide x 2cms long. As I will make a pair of earrings, a necklace and a bracelet, I will make four pieces, so we will need 4 ribbons and four pieces of quilling of the aforementioned measurements.
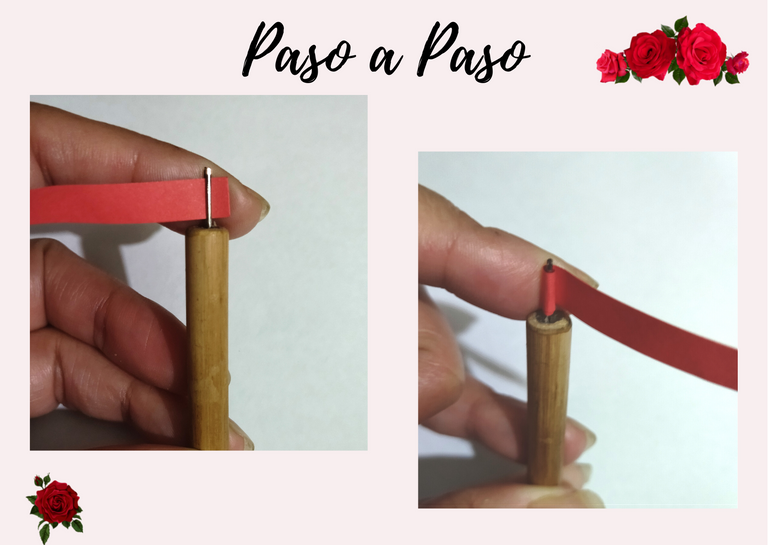
Paso a paso:💖
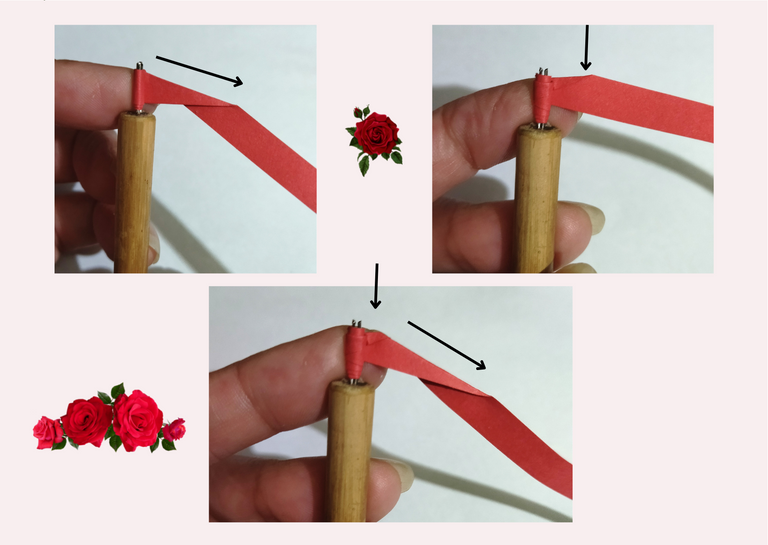
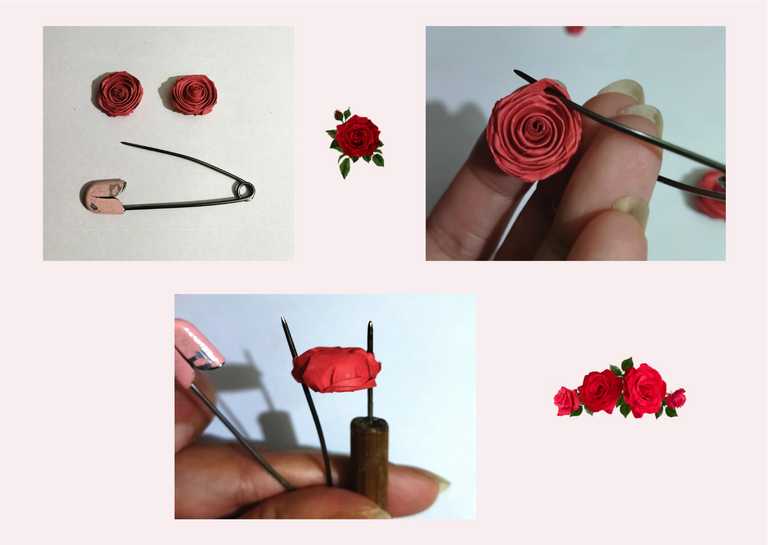
• Tomamos la aguja para quilling e introducimos la punta de nuestra cinta en la ranura de la aguja, comenzamos dando de tres a 4 vueltas para darle firmeza a la cinta y comenzar con lo que es el capullo de nuestra rosa.
Step by step:💖
- We take the quilling needle and insert the tip of our ribbon into the needle slot, we start by giving three to 4 turns to give firmness to the ribbon and start with what is the bud of our rose.
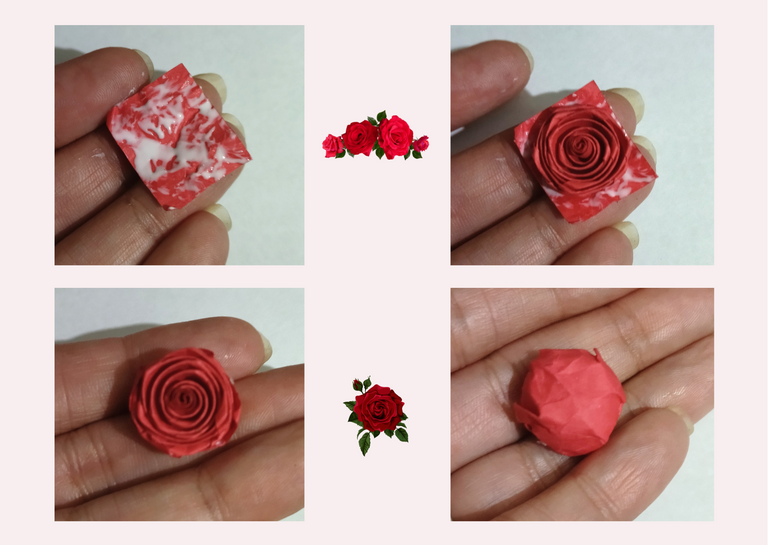
• Al terminar con las vueltas vamos a realizar un dobles en diagonal hacia la parte derecha, seguiremos enrollando nuestra cinta y antes de llegar al final del dobles, volvemos a doblar en diagonal hacia la derecha, de esta misma manera vamos a continuar enrollando y doblando la cinta en diagonal antes de finalizar cada dobles, hasta llegar al final de la cinta, (los dobles son los que nos van a dar los picos que serán los pétalos de nuestra rosa).
- At the end of the turns we will make a double diagonally to the right side, we will continue winding our ribbon and before reaching the end of the double, we will fold again diagonally to the right, in the same way we will continue winding and folding the ribbon diagonally before finishing each double, until we reach the end of the ribbon, (the doubles are the ones that will give us the peaks that will be the petals of our rose).
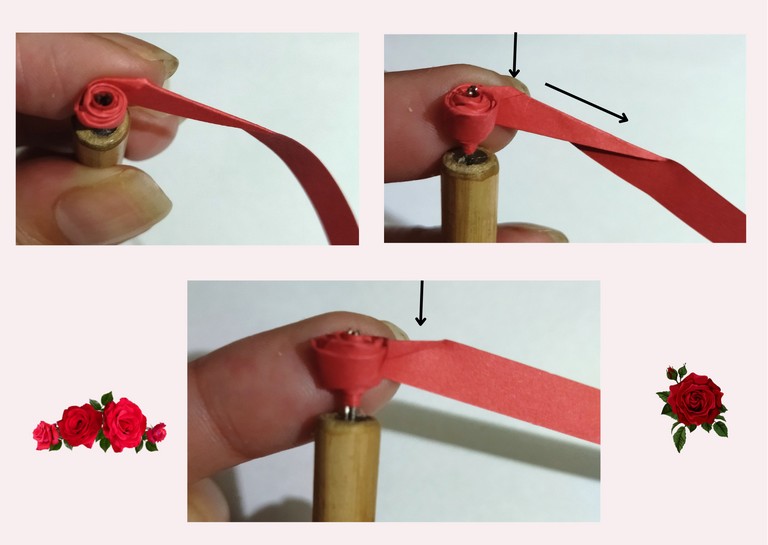
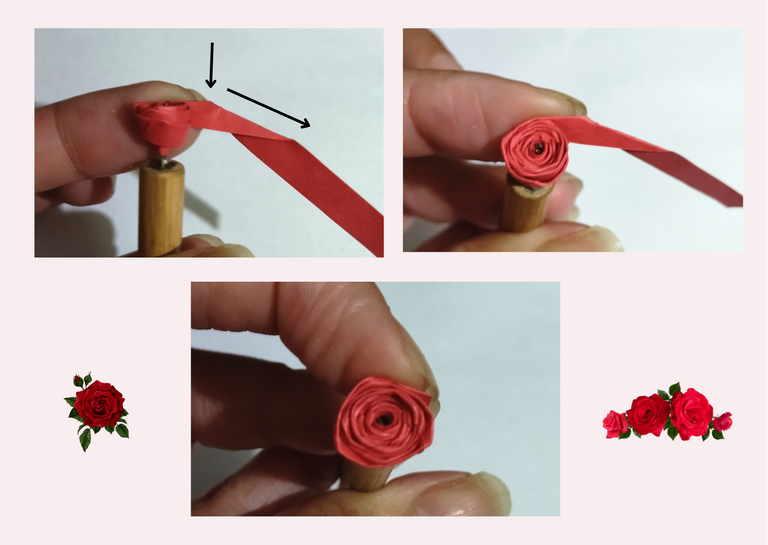
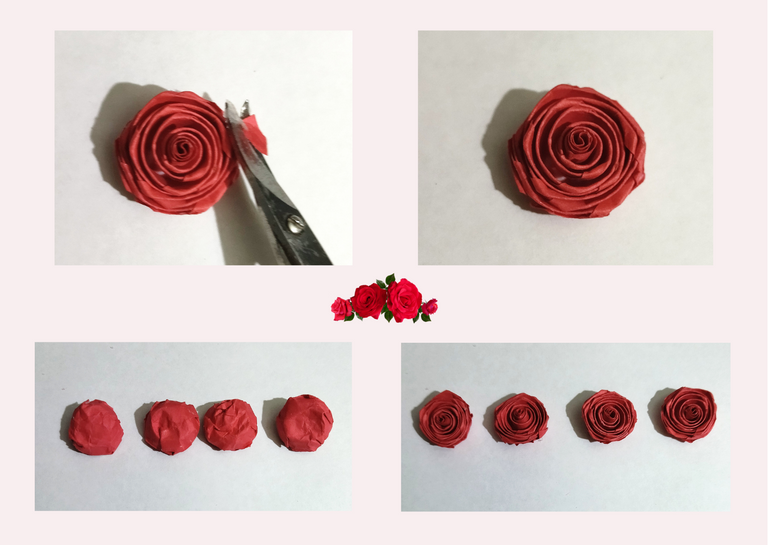
• Al culminar sacamos con sumo cuidado de la aguja para no estropear el trabajo realizado, y procedemos a soltar un poco la pieza para que nuestra rosa tome forma.
• Una vez que la rosa tome el tamaño y forma que más nos guste, procedemos a sellarla, colocamos un punto de pega en el extremo que nos queda al final de la cinta y pegamos. Yo la hice algo abierta para que luzca en los zarcillos y como dije del collar y pulsera, pero si es de nuestro gusto la podemos hacer un poco más cerrada.
- When we finish, we carefully remove the needle so as not to spoil the work done, and we proceed to loosen the piece a little so that our rose takes shape.
- Once the rose takes the size and shape that we like, we proceed to seal it, we place a point of glue at the end that remains at the end of the ribbon and glue. I made it a little bit open so that it looks on the tendrils and as I said of the necklace and bracelet, but if we like it we can make it a little bit more closed.
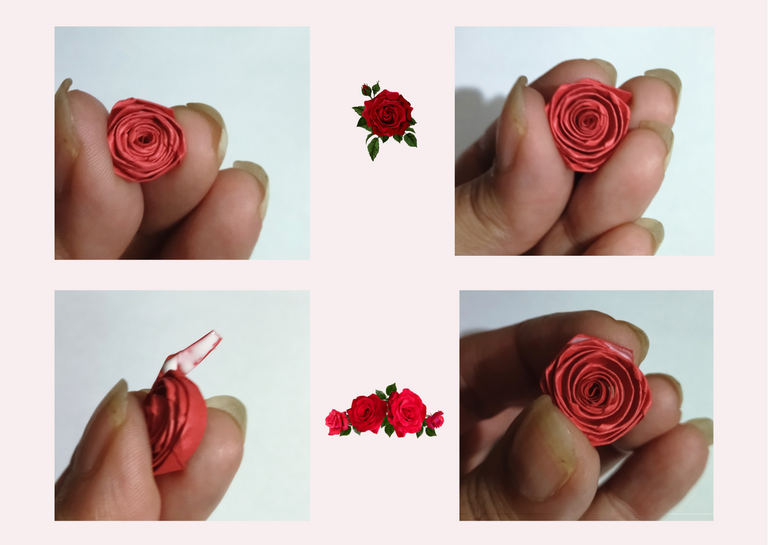
• Como dije anteriormente necesitaremos cuatro piezas para el conjunto que deseo realizar, es por esto que debemos hacer las 4 rosas de un mismo tamaño y que queden lo más similar posibles.
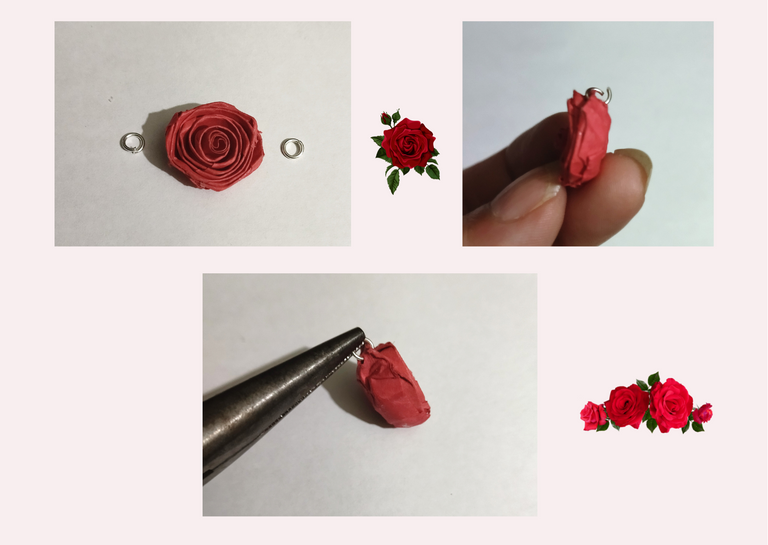
• Ahora que tenemos listas las 4 rosas que vamos a usar, procedamos a tapar las imperfecciones que quedan por la parte trasera, tomamos el trozo de quilling de 2cms de largo x 2cms de ancho, en mi caso me gusta arrugar el trozo de papel para que quede más moldeable, después de arrugarlo lo vuelvo a abrir, le añado pega y lo coloco en la parte de atrás de la rosa, dejamos secar y si queda algún sobrante lo cortamos con la tijera.
- As I said before we will need four pieces for the set I want to make, that is why we must make the 4 roses of the same size and that they are as similar as possible.
- Now that we have ready the 4 roses that we are going to use, let's proceed to cover the imperfections that remain on the back, we take the piece of quilling 2cms long x 2cms wide, in my case I like to crumple the piece of paper to make it more moldable, after crumpling it I open it again, add glue and place it on the back of the rose, let it dry and if there is any excess we cut it with the scissors.
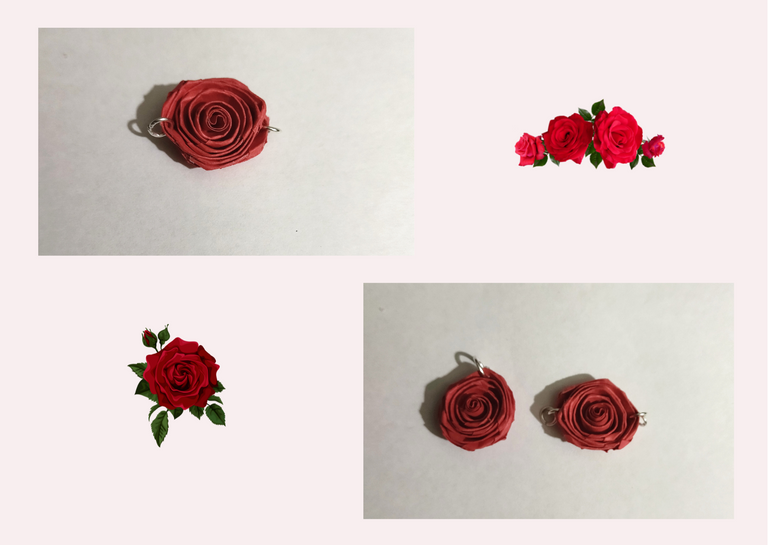
• Ya tenemos las rosas sin imperfecciones, vamos a tomar 2 piezas, para armar los zarcillos, tomamos las bases para zarcillos grandes, le colocamos pega y procedemos a colocarla en la parte trasera de ambas rosas, dejamos secar.
- Now we have the roses without imperfections, we are going to take 2 pieces to assemble the tendrils, we take the bases for large tendrils, we put glue and proceed to place it on the back of both roses, let it dry.
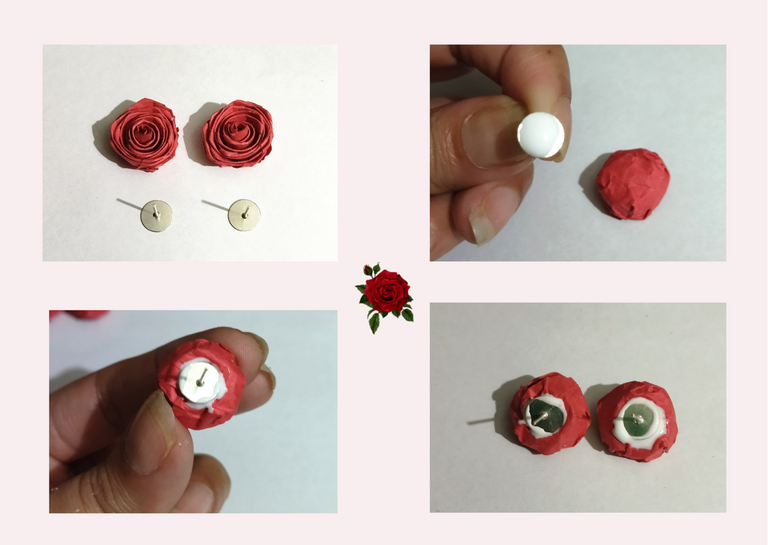
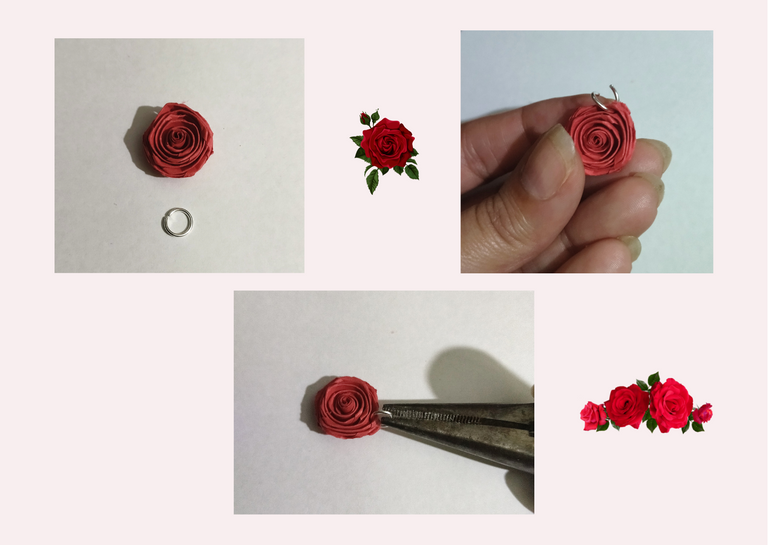
• Nos quedan dos piezas una para el collar y otra para la pulsera, para esto debemos abrirles agujeros a las rosas para poder colocarles las argollas. Tomamos un alfiler o aguja que tenga la punta gruesa, a una de las piezas le vamos a abrir un agujero en uno de los pétalos, tomamos la aguja y procedemos a realizar la perforación.
• A la otra pieza le vamos a realizar dos perforaciones, una de cada lado.
We have two pieces left, one for the necklace and the other for the bracelet, for this we must open holes in the roses to be able to place the rings. We take a pin or needle with a thick tip, to one of the pieces we are going to open a hole in one of the petals, we take the needle and proceed to make the perforation.
We are going to make two holes in the other piece, one on each side.
• Ahora vamos a colocar las argollas a las piezas, a la que tiene un solo agujero le colocaremos una argolla de bisutera mediana, col la ayuda del alicate punta fina, abrimos la argolla, colocamos luego cerramos. Esta será la pieza de nuestro collar.
- Now we are going to place the rings to the pieces, to the one that has only one hole we will place a medium bisutera ring, with the help of the fine tip pliers, we open the ring, place it and then close it. This will be the piece of our necklace.
• Ahora tomemos la pieza restante y colocaremos una argolla pequeña de bisutería en cada lado. Esta será la pieza de nuestra pulsera.
- Now let's take the remaining piece and place a small costume jewelry ring on each side. This will be the piece of our bracelet.
• Ahora vamos a colocarle su protección liquida (plastificado), a nuestras piezas, tomamos nuestro frasco de vidrio ponemos una parte de resina artística, otra de solvente x y revolvemos con el pincel, aplicamos a nuestras rosas por su parte delantera y trasera, dejamos secar, repetimos el procedimiento y dejamos secar de un día para otro.
- Now we are going to place its liquid protection (plasticized), to our pieces, we take our glass bottle put a part of artistic resin, another part of solvent x and stir with the brush, we apply to our roses by its front and back, we let dry, we repeat the procedure and let dry from one day to another.
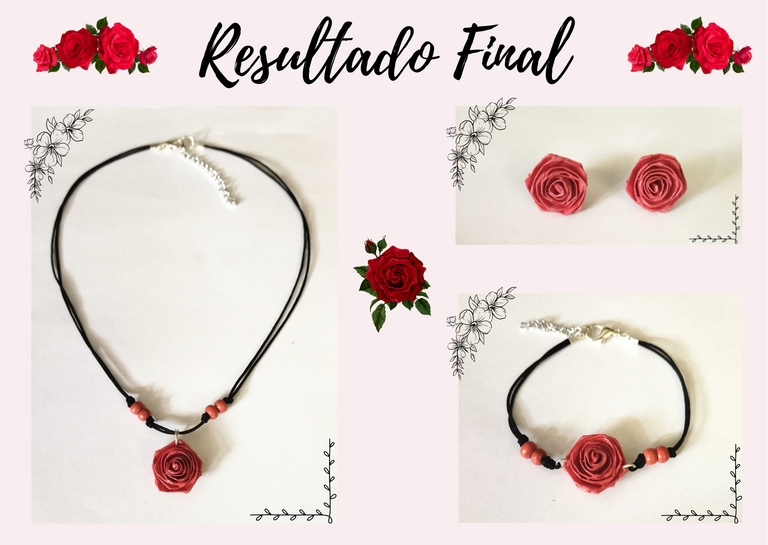
• Ya tenemos nuestras piezas listas y secas, decidí para el collar y pulsera, utilizar hilo chino realizándoles unos nudos simples, agregando para dar un detalle unas perlitas de madera de color rojo, cerré con su tapa nudos, coloqué su argolla, su trancadero pico de loro, y un pedacito de cadena para hacerlos ajustables.
De esta manera ya está listo uno de los regalos de mi mama, su conjunto de zarcillos, collar y pulsera de rositas. 🌹💕
- Now we have our pieces ready and dry, I decided to use Chinese thread for the necklace and bracelet, making some simple knots, adding some red wooden beads to give a detail, I closed the knots with a knot cover, placed the ring, the parrot's beak locking ring and a little piece of chain to make them adjustable.
This way one of my mom's gifts is ready, her set of earrings, necklace and bracelet of roses. 🌹💕
Resultado Final:💕
Final Result:💕
Tips 💡
• Estas bonitas rosas podemos realizarlas del color y tamaño de tu preferencia, en mi caso utilice cintas de 9mm de ancho, pero para la parte de bisutería puedes realizarlas también con cintas de 6mm de ancho y de esta manera te saldrá una rosita mucho más pequeña, puedes jugar también con el ancho de la rosa, la puedes hacer abierta o tipo botón.
• Para hacer detalles a tus trabajos puedes hacer las rosas miniaturas con cintas de 3mm de ancho.
• Para hacer tus conjuntos puedes hacer las rosas de variados tamaños añadiendo argollas a los lados, colocando una al lado de la otra para hacer un collar o pulsera con varias rosas, para realizar estos trabajos en diferentes estilos solo debes dejar volar tu imaginación.
• Siempre puedes colocar a tus dijes el collar y pulsera de tu preferencia, bien sea una que tengas hecha en casa o hacerla tu como más lo desees y de los colores que más te gusten.
Tips 💡
These beautiful roses can be made in the color and size of your preference, in my case I used 9mm wide ribbons, but for the costume jewelry part you can also make them with 6mm wide ribbons and this way you will get a much smaller rose, you can also play with the width of the rose, you can make it open or button type.
To make details to your works you can make miniature roses with 3mm wide ribbons.
To make your sets you can make roses of various sizes by adding rings on the sides, placing one next to the other to make a necklace or bracelet with several roses, to make these works in different styles you just have to let your imagination fly.
You can always attach to your charms the necklace and bracelet of your choice, either one that you have made at home or you can make it as you wish and in the colors you like the most.

¿Que les pareció, les gustó?
Espero que sí, que les haya gustado mi explicación, procedimiento y fotos, los hice con mucho cariño por y para ustedes.
"Deja salir esa musa que te inspira, y deja volar tu imaginación".
Gracias a todos, nos vemos en la próxima. 🐾🐱💕
What did you think, did you like it?
I hope you did, I hope you liked my explanation, procedure and photos, I made them with love for you.
"Let out that muse that inspires you, and let your imagination fly".
Thank you all, see you next time. 🐾🐱💕
All photos used in this post are of my authorship and have been taken on my personal cell phone a Redmi 9T and edited in Canva Dividers and banner made by me in Paint Tool Sai Translated with the help of DeepL


Amiga cuanta preciosura, que creatividad y cuanta paciencia💕💕
Gracias preciosa @alizmarpaola . Me alegra que te haya gustado. Si hay que tener bastante paciencia para realizar este trabajo, pero el resultado es muy placentero. Besos...💖
Felicidades amiga, te quedó muy hermoso. Saludos 🖐
Gracias amiga @kathelopez77 . Me alegra tanto que te guste. Gracias por pasar. Bendiciones...🌈
🖐😊
Con todo un verdadero jardín me he conseguido al ver toda esta belleza que han realizado tus manos y tu creatividad.. Te quedó fabuloso. Querida amiga!
✨ Guaooo que galán @fixie, Que hermoso comentario mi bello amigo 💖. Me alegra tanto que te haya gustado mi trabajo. Mil gracias por ser tan atento siempre, y pasar a visitarme. Besos y mil bendiciones. Que tengas bello día. 🌈🌹🐦💕
No podía perdermelo por nada del mundo
@fixie 💖
♥️🤗
Muy lindas amigas
Gracias cariño @paovaler03 Saluditos.🌹
Que precioso el juego de accesorios amiga parece de porcelana👍. Como siempre tus trabajos son de calidad. Bendiciones
Gracias amiga @zullyarte, me encanta que te haya gustado. Gracias por tu bello comentario. Abrazos y bendiciones. 💕
Amiga dayadam wow, felicidades! Que lindo 😍😍 yo amo las rosas y estás quedaron súper. 😍😍
Gracias mi corazón @mayi04. Me alegra muchísimo que te hayan gustado. Gracias por tu hermoso comentario. Saluditos🌹🥰❤️
Thank you for sharing this amazing post on HIVE!
Your content got selected by our fellow curator @hafizullah & you just received a little thank you via an upvote from our non-profit curation initiative!
You will be featured in one of our recurring curation compilations and on our pinterest boards! Both are aiming to offer you a stage to widen your audience within and outside of the DIY scene of hive.
Join the official DIYHub community on HIVE and show us more of your amazing work and feel free to connect with us and other DIYers via our discord server: https://discord.gg/mY5uCfQ !
If you want to support our goal to motivate other DIY/art/music/homesteading/... creators just delegate to us and earn 100% of your curation rewards!
Stay creative & hive on!
Thank you very much for your support @diyhub. Blessings✨
Hola amiga, un regalo perfecto, te quedó precioso.
Gracias Bella @lilianap15 🥰
Te quedaron fenomenales. Es todo un lindo arte.
Para las madres es un hermoso regalo.
Gracias por esta técnica y por los tips.
Gracias mi corazón @leidimarc por tu bello comentario🥰
Hermosos y gran técnica 😍
!discovery 35
Gracias corazón @mili2801 🌹
This post was shared and voted inside the discord by the curators team of discovery-it
Join our community! hive-193212
Discovery-it is also a Witness, vote for us here
Delegate to us for passive income. Check our 80% fee-back Program
Gracias por el apoyo @discovery-it 🥰
Congratulations @dayadam! You have completed the following achievement on the Hive blockchain and have been rewarded with new badge(s):
Your next target is to reach 4000 upvotes.
Your next target is to reach 700 replies.
You can view your badges on your board and compare yourself to others in the Ranking
If you no longer want to receive notifications, reply to this comment with the word
STOPCheck out the last post from @hivebuzz:
Support the HiveBuzz project. Vote for our proposal!
🥰
Your content has been voted as a part of Encouragement program. Keep up the good work!
Use Ecency daily to boost your growth on platform!
Support Ecency
Vote for new Proposal
Delegate HP and earn more
Thank you for your support @ecency. Blessings✨
The rewards earned on this comment will go directly to the person sharing the post on Twitter as long as they are registered with @poshtoken. Sign up at https://hiveposh.com.
🌹🥰
Gracias por compartir, excelente tu explicación y el juego de accesorios te quedó super hermoso, muy delicado.
Gracias amiga @yusma21. Me encanta que te haya gustado. Saludos y bendiciones 🌹