Hello everyone... ✨
Hello to my dear Hivers and the dear community of artists #HiveDIY, as always very pleased and excited to be here again, showing you my work made with love and especially for you.
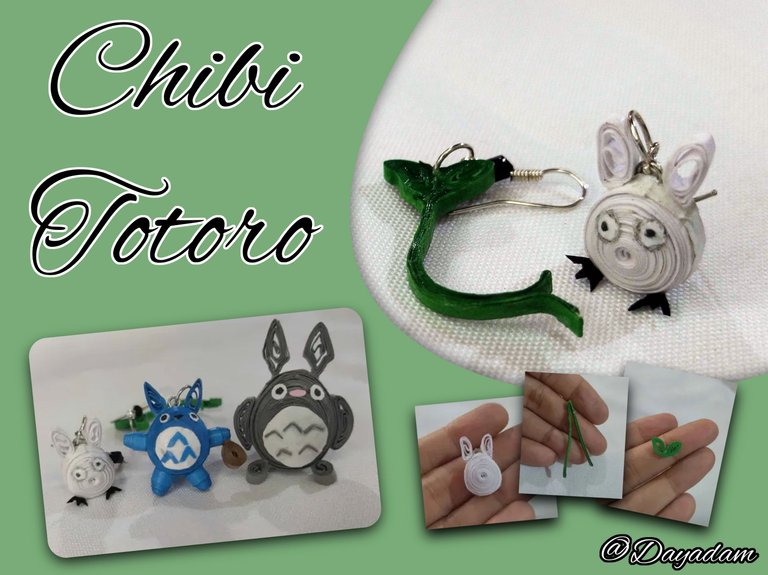
A few days ago I carried out under the Kawai theme a small "Totoro decorative 3D" in the quilling technique, and in another post a pendant for necklace that follows, "The Chu Totoro or blue Totoro", I mentioned that I wanted to finish the collection and finally I did creating the third and final called "Totoro Chibi" plus a "Leaf” that always carry them and characterizes them, I decided to finish creating a pair of dangling tendrils to complete the accessories.
If you want to see the first and second Totoro that I materialized here I leave you the link, I will be happy to read your appreciations:
Decorative 3D Totoro: https://peakd.com/hive-130560/@dayadam/totoro-in-3d-quilling-technique-engesp-h26
Chu Totoro or Totoro blue pendant for 3D necklace: https://peakd.com/hive-189504/@dayadam/chu-totoro-in-3d-necklace
I hope you like the work, join me in this creative process.
Let's get started:😃

Hola a Todos... ✨
Hola a mis queridos Hivers y a la querida comunidad de artistas #HiveDIY, como siempre muy complacida y emocionada de encontrarme por acá nuevamente, mostrándole mi trabajo hecho con mucho amor y especialmente para ustedes.
Hace unos días lleve a cabo bajo la temática Kawai un pequeño "Totoro decorativo en 3D" en la tecnica de quilling, y en otro post un dije para collar del que le sigue, "El Chu Totoro o Totoro azul", mencione que deseaba terminar la colección y finalmente lo hice creando el tercero y ultimo llamado "Totoro Chibi" mas una "Hojita" que siempre llevan ellos y los caracteriza, decidí para terminar crear un par de zarcillos colgantes para completar los accesorios.
Si desean ver el primero y segundo Totoro que materialice por acá les dejo el link, con gusto leeré sus apreciaciones:
Totoro decorativo en 3D https://peakd.com/hive-130560/@dayadam/totoro-in-3d-quilling-technique-engesp-h26
Chu Totoro o Totoro azul dije para collar en 3D: https://peakd.com/hive-189504/@dayadam/chu-totoro-in-3d-necklace
Espero sea de su agrado el trabajo, acompáñenme en este proceso creativo.
Comencemos:😃


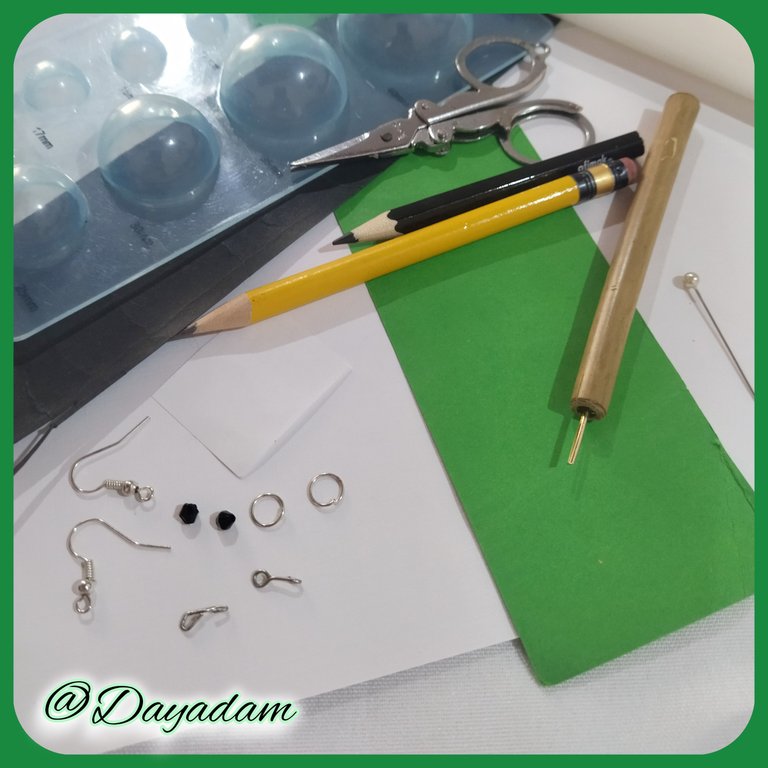
• Cintas de quilling.
• Aguja para quilling.
• Hoja blanca.
• Lápiz de color negro.
• Plantilla para moldear círculos.
• Pega blanca extra fuerte (de carpintería).
• Bases colgantes para zarcillos (anzuelos).
• Cristales checos negros.
• Argolla de bisutería mediana.
• Pincel.
• Pinza punta fina.
• Alicate punta fina.
- Quilling ribbons.
- Quilling needle.
- White sheet.
- Black pencil.
- Template to mold circles.
- Extra strong white glue (carpentry glue).
- Hanging bases for tendrils (hooks).
- Black Czech crystals.
- Medium-sized costume jewelry ring.
- Brush.
- Fine tip tweezers.
- Fine nose pliers.

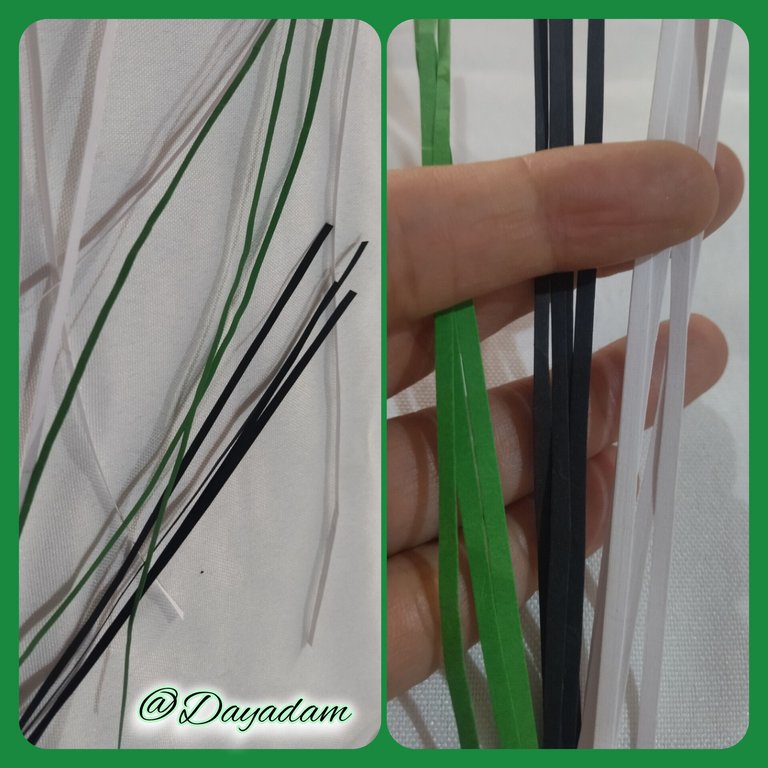
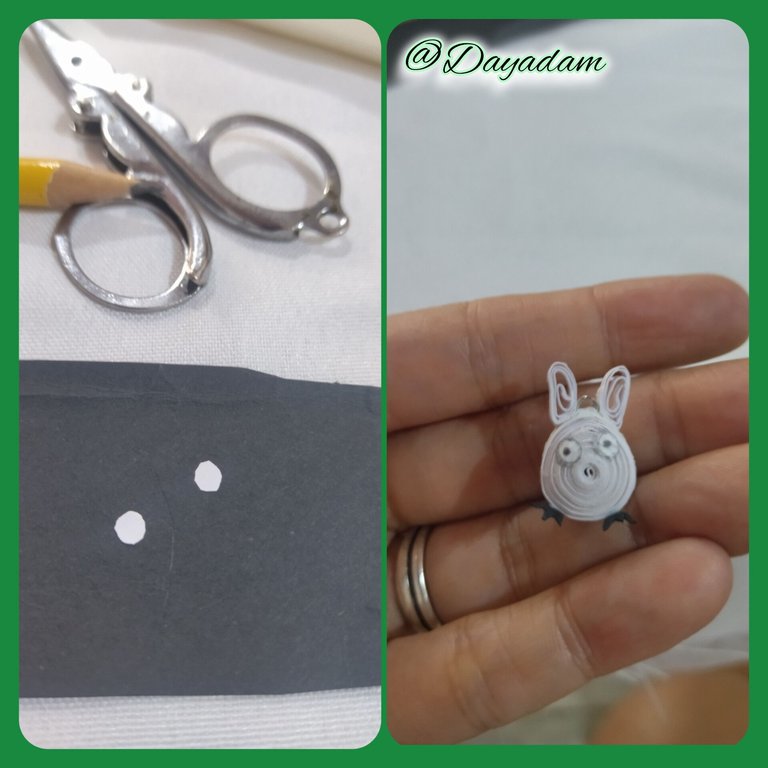
Basically the process of making this Totoro Chibi, is similar to the previous ones in the body part, his ears, tail, eyes and little legs are different, carry out the whole set with recycled cardboard from which I cut the quilling strips by myself with a scissors.
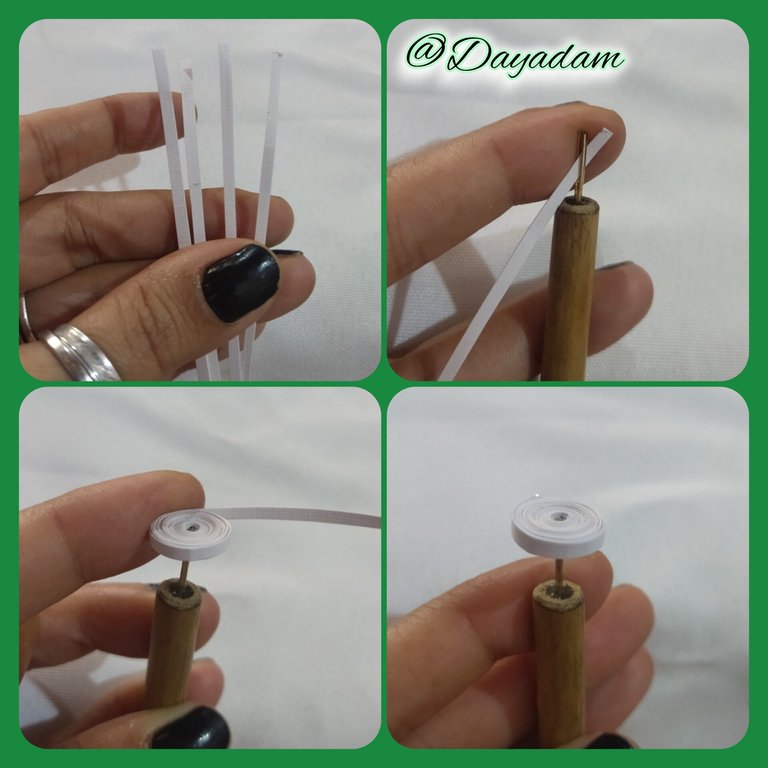
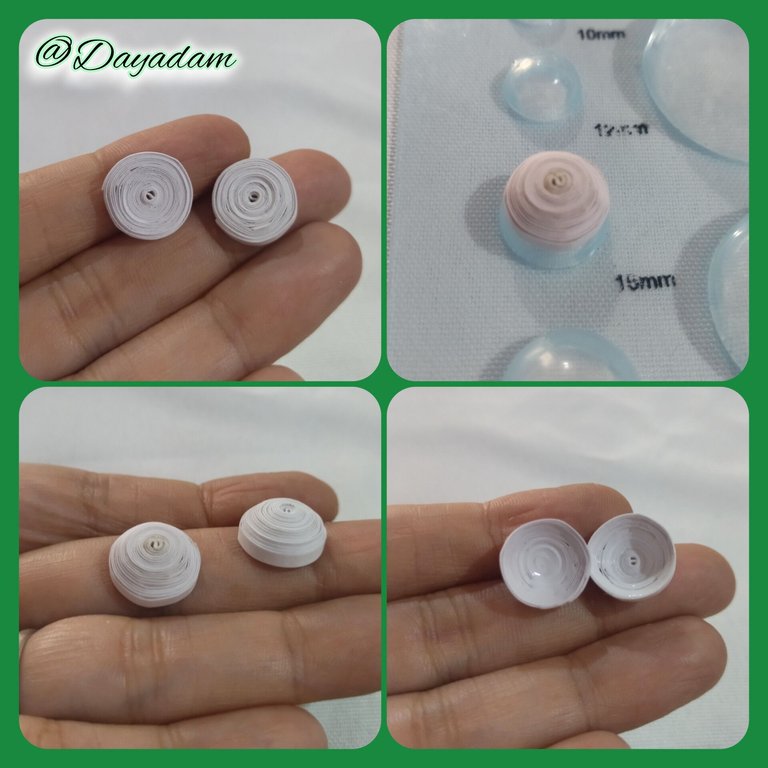
- We start by taking 3mm wide white quilling tape, with the quilling needle we are going to roll until we reach the end of the tape, take it out of the needle and seal it with extra strong white glue. We are going to obtain a closed circle, like this we will need 2 equal ones.
- We will mold the closed circles in a template to mold circles, in the measure number 15mm, we will do this with both circles, we take out of the mold and apply extra strong white glue on the inside, to prevent the pieces from moving or deforming, we will let them dry very well.
- Once the circles are dry, I proceeded to mold them with my fingers to give them a more elongated shape.
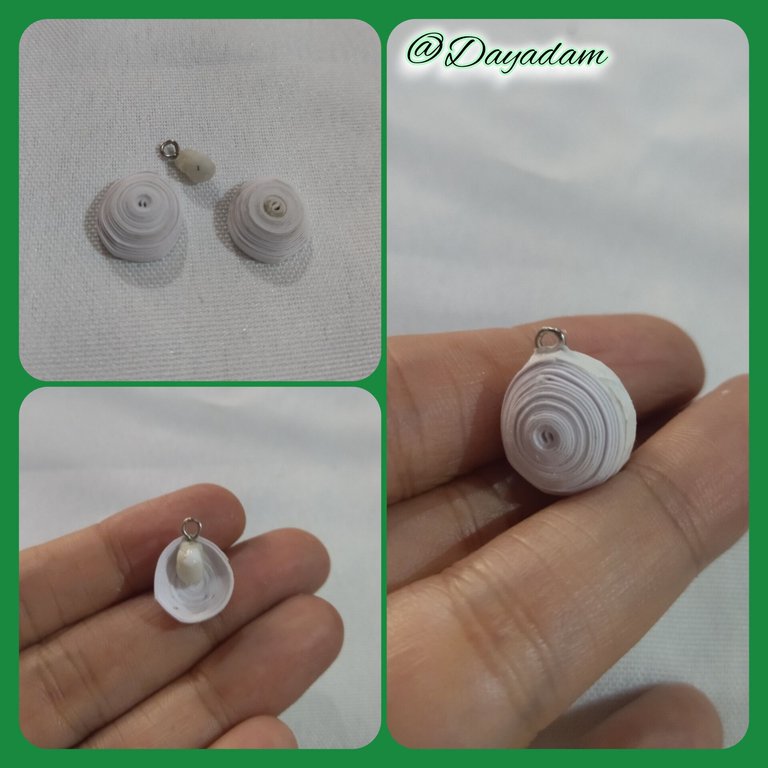
- Take a costume jewelry pin and a piece of flexible dough, which I placed in the center of the pin, then introduced into one of the previously molded pieces, and proceeded to close it with the other piece applying glue and a piece of tape around it.

Básicamente el proceso de elaboración de este Totoro Chibi, es parecido a los anteriores en la parte del cuerpo, sus orejas, cola, ojos y patitas son diferentes, lleve a cabo todo el conjunto con cartulina de reciclaje de las cuales corte las tiras de quilling por mi misma con una tijera.
• Comenzamos tomando cinta para quilling de color blanca de 3mm de ancho, con la aguja para quilling vamos a enrollar hasta llegar al final de la cinta, sacamos de la aguja y sellamos con pega blanca extra fuerte. Vamos a obtener un círculo cerrado, como este necesitaremos 2 iguales.
• Moldearemos los círculos cerrados en una plantilla para moldear círculos, en la medida numero 15mm, esto lo haremos con ambos círculos, sacamos del molde y aplicaremos pega blanca extra fuerte en la parte interna, para evitar que se muevan o deformen las piezas, dejaremos secar muy bien.
• Secos los círculos procedí a moldearlos con los dedos para darle una forma mas alargada.
• Tome un alfiler de bisutería y un trozo de masa flexible, el cual coloque en el centro del alfiler, luego introduje en una de las piezas moldeadas con anterioridad, y procedí a cerrarla con la otra pieza aplicando pega y un trozo de cinta a su alrededor.
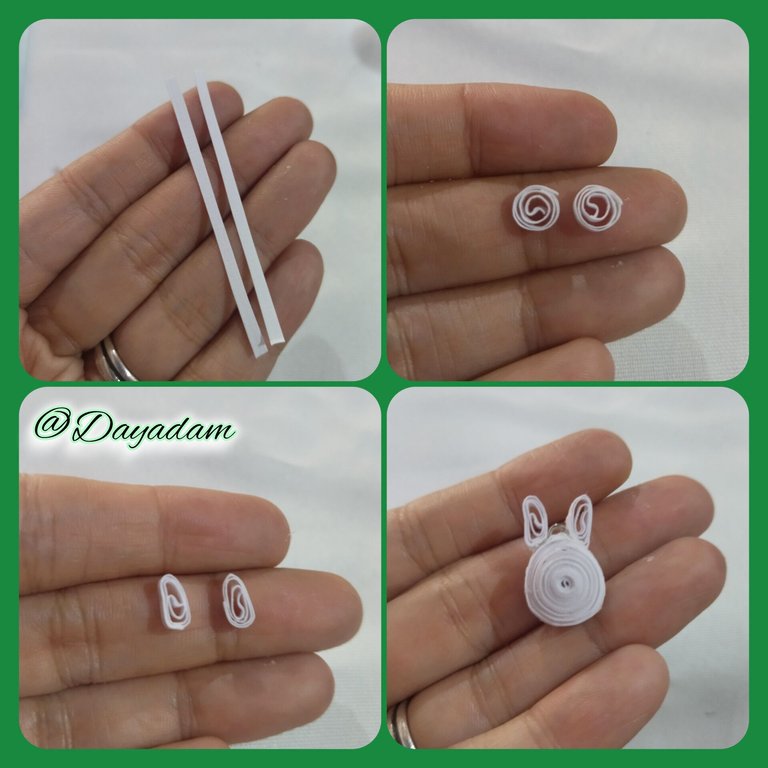
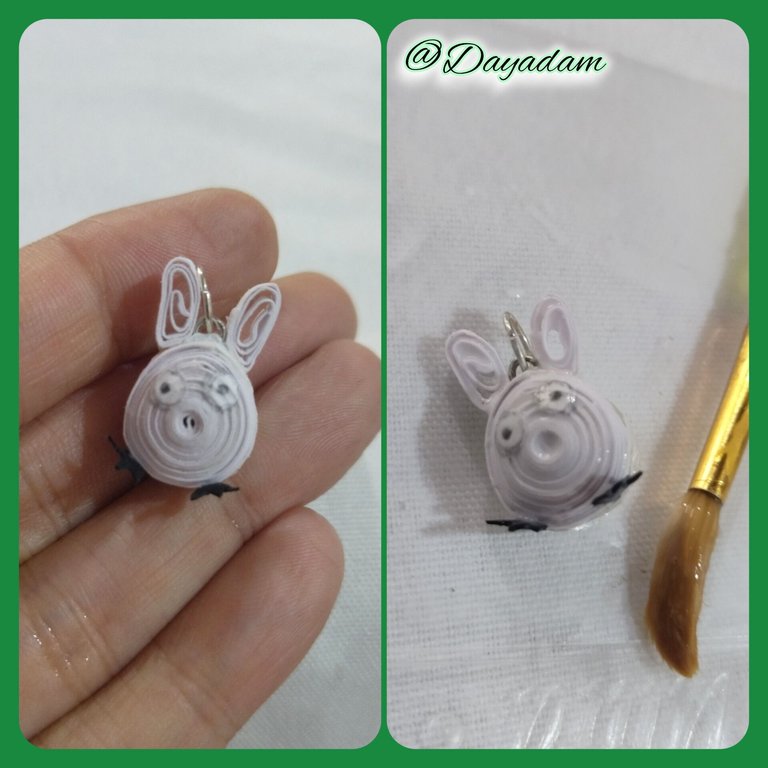
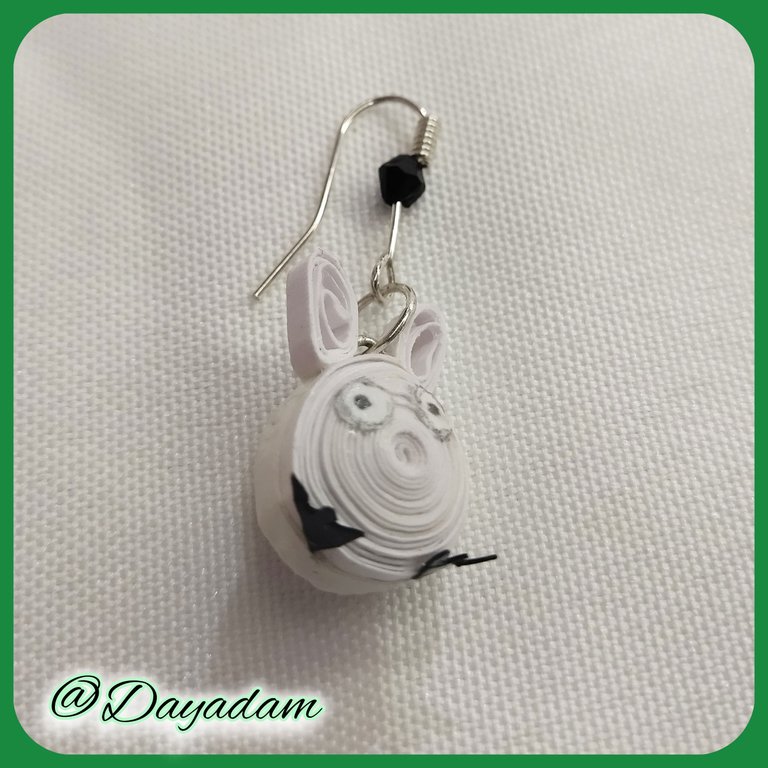
- To make the ears, take 3mm wide white quilling tape and use it to make two open circles, mold them with the top rounded and the bottom flat, glue them on top of the previous piece on the sides of the ring of the jewelry pin that you are going to place.
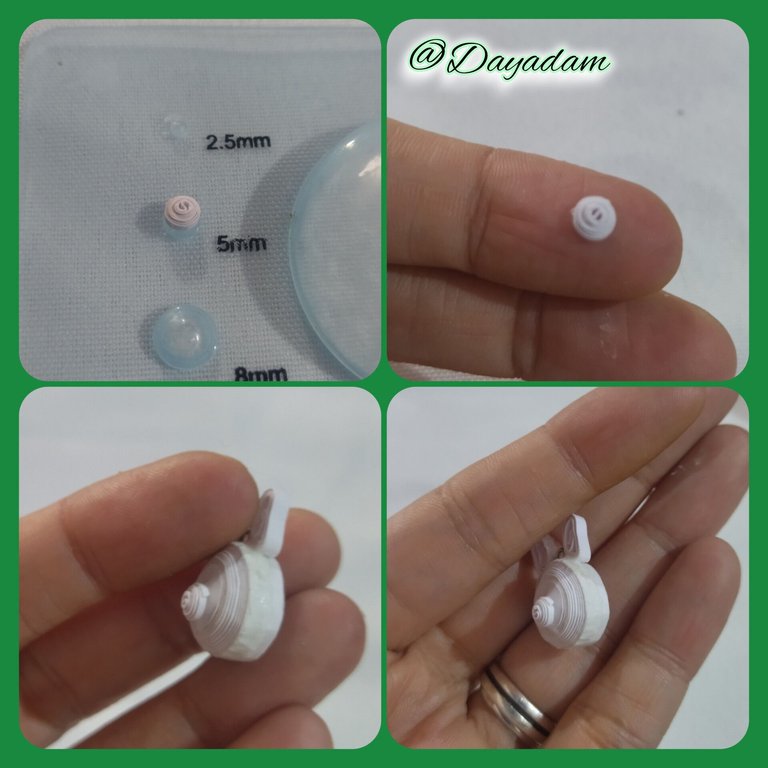
- Make a small white closed circle with 3mm wide ribbon, mold in the template in the number 5mm to give it a rounded shape with 3D effect, glue on the back of the body.
- For the legs cut out a small piece of black cardboard in the shape of spikes, glue under the body.
- Paint the eyes with a pencil on a white sheet of paper and glue them to the face.
- Finally, place a medium-sized costume jewelry ring on the top and apply several coats of extra strong white glue to give shine, plasticity and protection to the tendril.
• Para realizar las orejas tome cinta para quilling de color blanca de 3mm de ancho con la cual realice dos círculos abiertos, los cuales moldee con la parte de arriba redondeada y la parte de abajo plana, pegue arriba de la pieza anterior a los lados de la argolla del alfiler de bisutería que coloque.
• Realice un pequeño circulo cerrado color blanco con cinta de 3mm de ancho, moldee en la plantilla en el numero 5mm para darle una forma redondeada con efecto 3D, pegue en la parte de atrás del cuerpo.
• Para las patitas recorte un pedacito de cartulina negra con forma de picos, pegue debajo del cuerpo.
• Los ojos los pinte con un lápiz en una hoja blanca. pegue de la cara.
• Por ultimo coloque una argolla mediana de bisutería en la parte de arriba y aplique de una vez para que se fuera secando, varias capas de pega blanca extra fuerte para darle brillo, plasticidad y protección al zarcillo.

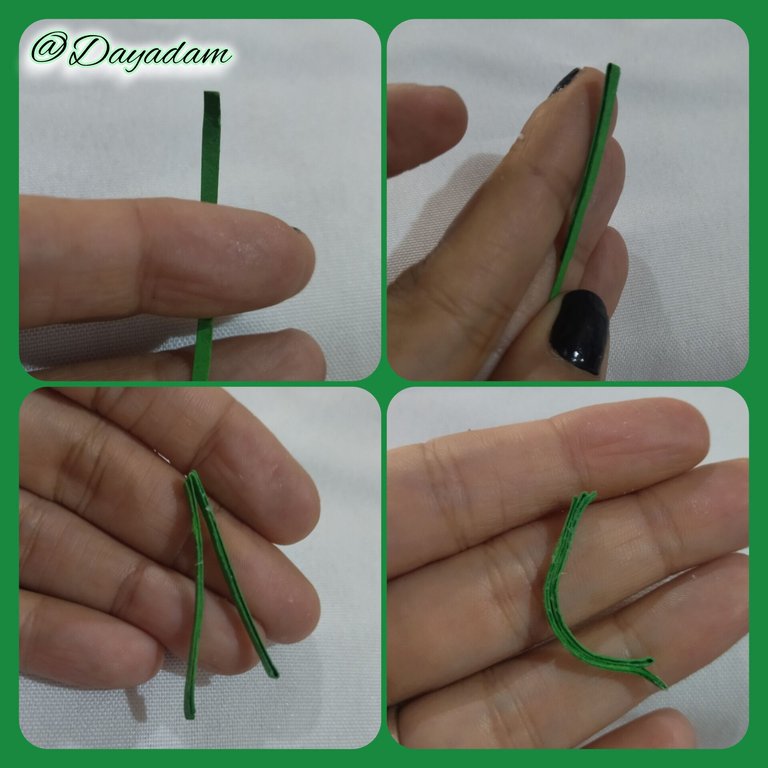
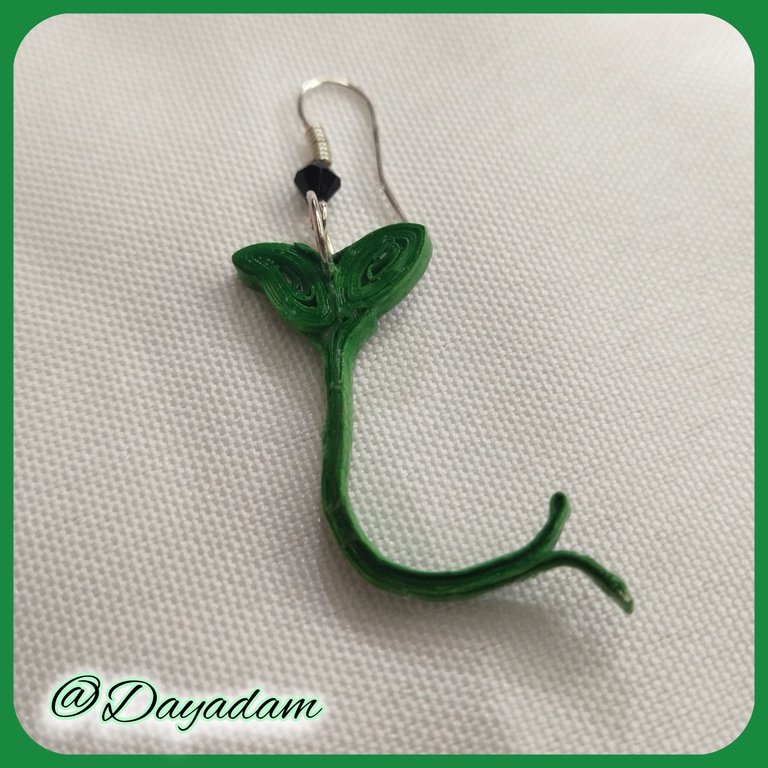
- To make the other tendrils of leaves the process is very simple, I started making the stem with green ribbon 3mm wide, I took a strip and proceeded to fold it sticking between ribbons with glue until the desired thickness, then molded a little inclined.
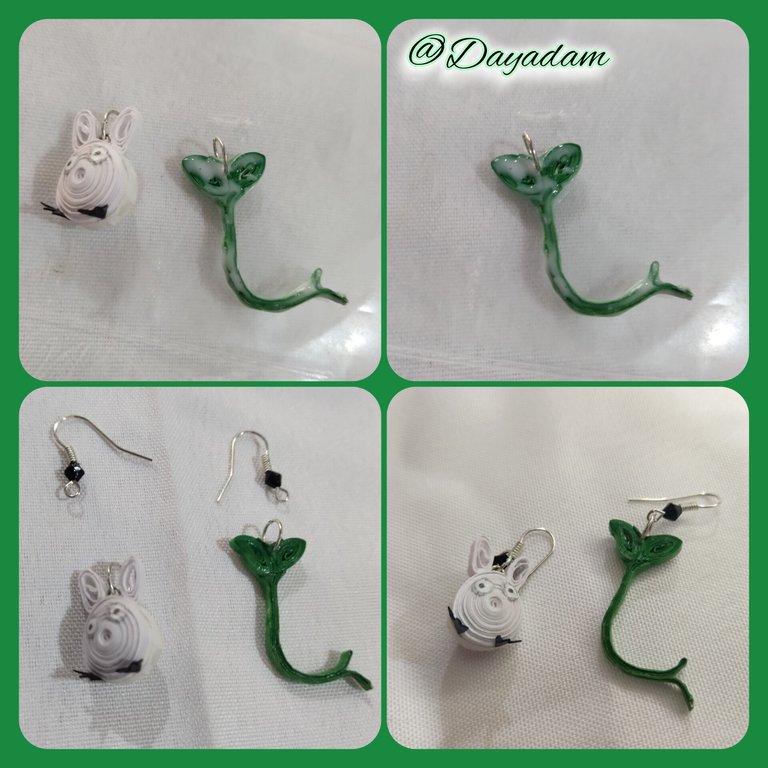
- For the leaves, with the help of the quilling needle, make 2 open circles, one larger than the other, then mold them in the shape of leaves with spikes on both sides and glue them together.
- To finish with the tendril, glue from the stem that I made previously and introduce a medium size ring of costume jewelry, apply several layers of glue to the piece, letting it dry between one layer and another.
- Finally, having the 2 dry tendrils, place their respective bases for hanging tendrils (hooks), to which I placed a black Czech glass to give it more showiness.
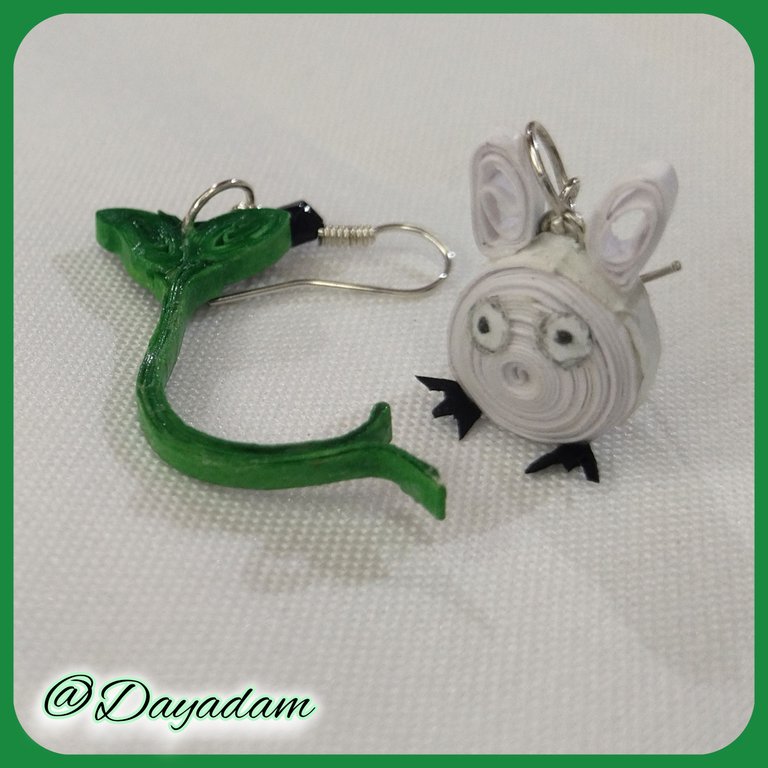
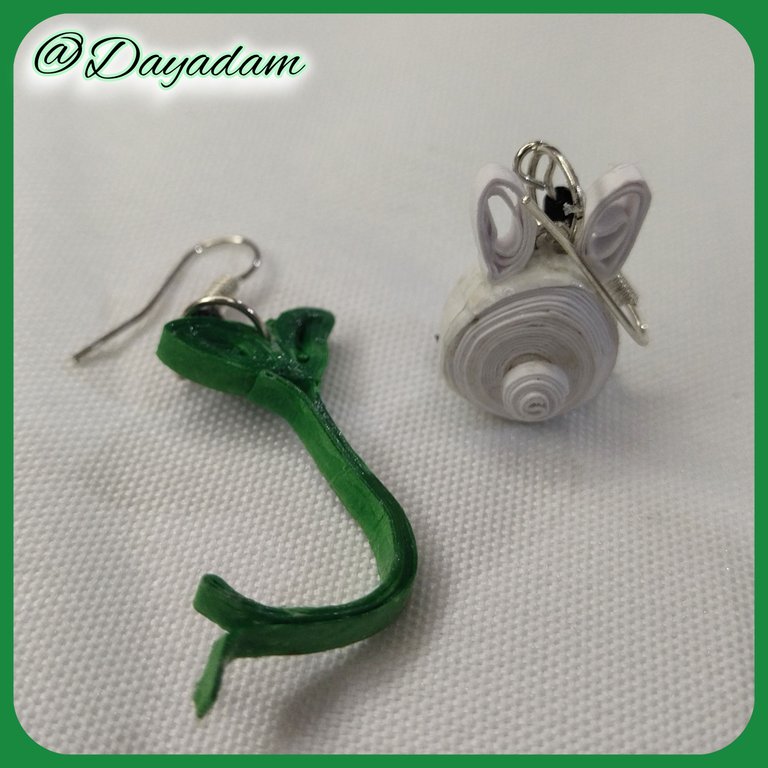
This way we have this pair of hanging tendrils of Totoro Chibi in 3D and its representative leaf in the quilling technique..
• Para realizar el otro zarcillos de hojas el proceso es muy sencillo, comencé realizando el tallo con cinta verde de 3mm de ancho, tome una tira y procedí a doblarla pegando entre cintas con pega hasta conseguir el grosor deseado, luego moldee un poco inclinada.
• Para las hojas realice con la ayuda de la aguja para quilling 2 círculos abiertos uno mas grande que el otro, luego moldee en forma de hojas con picos en ambos lados y pegue entre si.
• Para finalizar con el zarcillo, pegue del tallo que realice previamente e introduje una argolla mediana de bisutería, aplique a la pieza varias capas de pegue dejando secar entre una capa y otra.
• Por ultimo teniendo los 2 zarcillos secos, coloque sus respectivas bases para zarcillos colgantes (anzuelos), a los cuales coloque un cristal checo negro para darle mayor vistosidad.
De esta manera tenemos este par de zarcillos colgantes de Totoro Chibi en 3D y de su hoja representativa en la técnica de quilling,


What did you think, did you like it?
I hope you did, I hope you liked my explanation, procedure and photos, I made them with love for you.
"Let out that muse that inspires you, and let your imagination fly".
Thank you all, see you next time...
¿Que les pareció, les gustó?
Espero que sí, que les haya gustado mi explicación, procedimiento y fotos, los hice con mucho cariño por y para ustedes.
"Deja salir esa musa que te inspira, y deja volar tu imaginación".
Gracias a todos, nos vemos en la próxima.
Todas las fotos usadas en este post son de mi autoría y han sido sacadas en mi celular personal un Redmi 9T y editadas en Canva y en Inshot Banner y separador hecho por mí en Canva Traducido con la ayuda de DeepL

Posted Using InLeo Alpha
Yei finalmente esta toda la familia Totoro completa y reunida, los tres estan bellisimos 😍 me alegra no habermelos perdido ninguno, una genialidad como te quedaron ❤️
Gracias hermosa 💕 por haberle hecho seguimiento a esta colección que hice con tanto cariño, se aprecia muchísimo tus palabras y tu presencia pero más que te hayan gustado.
Un abrazote inmenso a una de las autoras más creativas, y especiales que hay en Hive 😘
Me parece encantador que hayas logrado terminar los tres. Me pareció encantador ver el primer Totoro y es muy lindo que hayas hecho los tres. Las fotos finales se ven geniales.
!discovery 45
Gracias por tu apoyo, y sobre todo por tu bonita apreciación.
Una de las cosas que más le puse empeño fue en esas fotos finales y la portada para que el post resultará como dices genial.
Abrazos @gaboamc2393 💙
This post was shared and voted inside the discord by the curators team of discovery-it
Join our Community and follow our Curation Trail
Discovery-it is also a Witness, vote for us here
Delegate to us for passive income. Check our 80% fee-back Program
Thanks for the support @discovery-it ✨
👏 Keep Up the good work on Hive ♦️ 👏
❤️ @gaboamc2393 suggested sagarkothari88 to upvote your post ❤️
Thanks for the support @hivecurators ✨
Wooo que lindisimo, me encantaron mucho, y mas porque son de totoro
!HUESO
Click on this banner, to be directed to the Virtual World Discord and learn more about the curation project.
!LUV
Gracias @bot-bdbhueso @misticogama
Muchísimas gracias cariño, que bueno que te haya gustado mi colección de Totoros. Saluditos ✨
Son lindisimos, espero ver mas de otros personajes
Te quedó bello amiga, que talento
Gracias hermosa 😘
Mil gracias por el apoyo. 💕
Congratulations @dayadam! You have completed the following achievement on the Hive blockchain And have been rewarded with New badge(s)
Your next target is to reach 14000 replies.
You can view your badges on your board and compare yourself to others in the Ranking
If you no longer want to receive notifications, reply to this comment with the word
STOPGracias @hivebuzz 💖
¡Eso es genial @dayadam! ¡Estamos encantados con tu participación en Hive! ¡Adelante con este nuevo objetivo!
Saludos, que lindo los zarcillo, te felicito, muy buen trabajo, muy prolijo.
Me pareció muy hermoso tu trabajo querida, cuanta dedicación y amor transmiten cada uno de ellos, te felicito, feliz día
Great as always🤩
Me encantó ver todos los pasos de este proyecto tan tierno y nostálgico para muchos 🤭☺️🌟 la colección está preciosa✨
Saludos querida dayadam🌻 has logrado un hermoso arte a traves de esta técnica 👏🏻
This is highly creative @dayadam, being able to produce such an amazing craft shows that you are a great artist. Well done, it was nice encountering your post today
Una belleza, la combinación de Totoro y tu técnica, no puede fallar. Excelente
De verdad que admiro tu trabajo!
Esa familia quedó bellísima, viendo esas piezas me dan ganas de realizar algo parecido a ver que tal me sale.
Gracias por compartirlo.
Un trabajo maravilloso amiga, ha quedado muy bella la colección, muestra de la calidad y el amor que le imprimes a tu trabajo. Felicitaciones y saludos.