Hola, hola mis queridos amigos creativos de @Hivediy reciban un saludo cariñoso 🤗
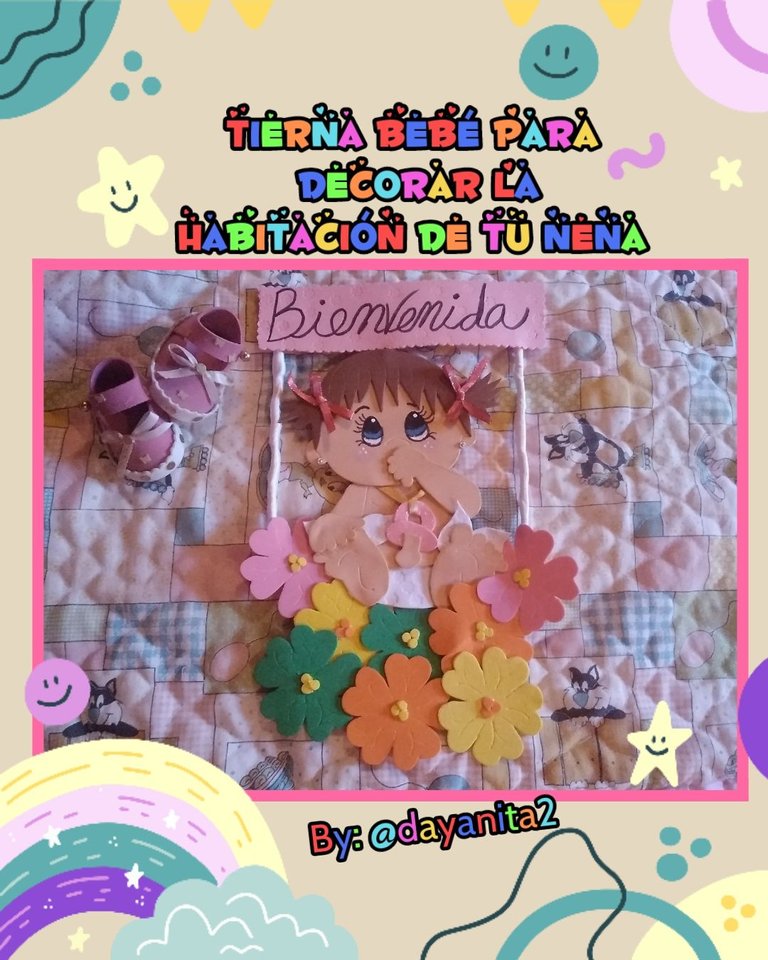
Hoy por acá complacida de mostrarle un proyecto muy tierno, hermoso que realice, me encanta realizar este tipo de manualidades porque es dirigida a la llegada de un nuevo ser a este mundo, es un linda bebita que realice para la niña de mi primo que hace poco nació y pronto iré a conocerla, y que se me ocurre realizarle este pequeño detalle para que la coloquen en su habitación, sentí tanta ternura al realizarla porque mi mayor deseo es ser madre y crear este tipo de detalles para decorar la habitación de mi bebé, pero los tiempos de Dios son perfectos y se que pronto se me concederá este lindo sueño.
Y bien amigos me gustaría que me acompañaran a este sencillo paso a paso y que se conecten con este tierno proyecto, y ahora si es hora de crear🤗.
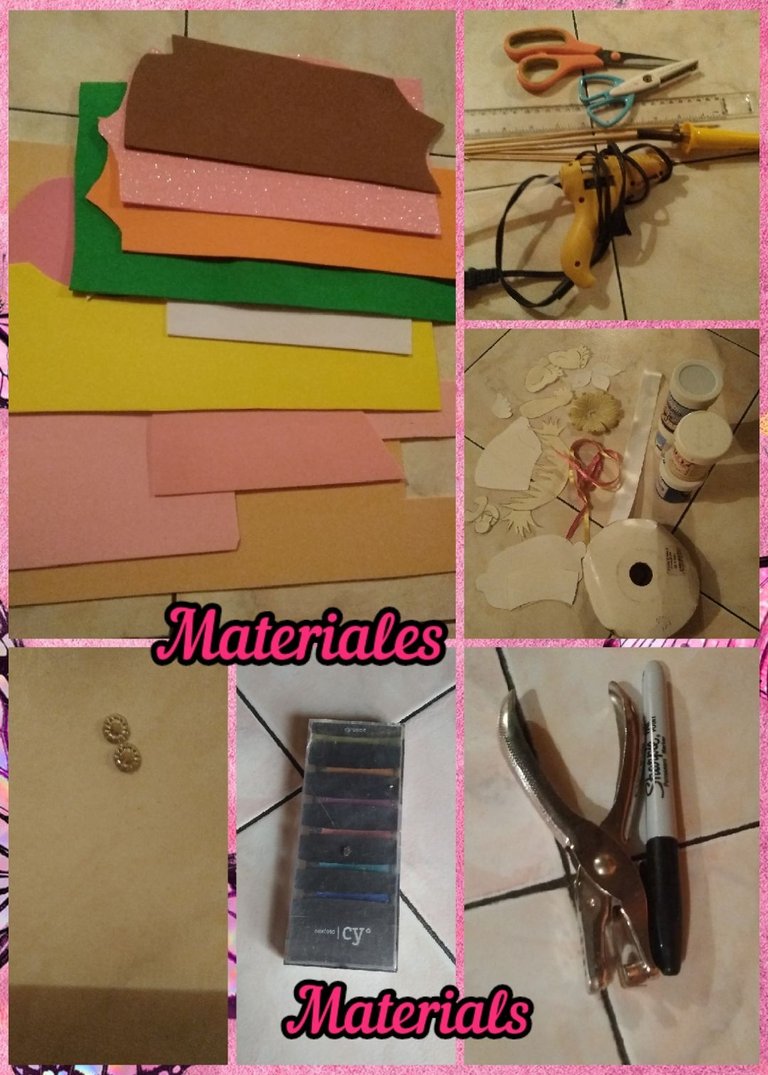
Materiales:
👶 Foami o goma eva color: piel, rosado, amarillo, blanco, verde, naranja, marrón, rosado escarchado.
👶 Tijera recta y en zic zac, regla, pincel fino, palito de altura, cautíl,pistola de silicón.
👶 Patrones, cinta de raso delgada fucsia, dorada y blanca gruesa,sombras, marcador fino negro,abrehuecos, 2 florecitas plateadas.
👶 Pinturas al frío: piel, negro, blanco, azul rey.
Hello, hello my dear creative friends from @Hivediy, receive a loving greeting 🤗
Today here I am pleased to show you a very tender, beautiful project that I made, I love making this type of crafts because it is aimed at the arrival of a new being to this world, it is a beautiful baby that I made for my cousin's girl who makes She was recently born and soon I will go to meet her, and what occurred to me to make this small detail for her to place in her room, I felt so much tenderness when I made it because my greatest desire is to be a mother and create this type of details to decorate my baby's room , but God's timing is perfect and I know that this beautiful dream will soon be granted to me.
And well friends, I would like you to accompany me in this simple step by step and connect with this tender project, and now it is time to create🤗.
Materials:
👶 Foami or eva rubber color: skin, pink, yellow, white, green, orange, brown, frosty pink.
👶 Straight and zic zac scissors, ruler, fine brush, height stick, cautil, silicone gun.
👶 Patterns, thin fuchsia, gold and thick white satin ribbon, shadows, fine black marker, hole opener, 2 silver flowers.
👶 Cold paints: skin, black, white, royal blue.
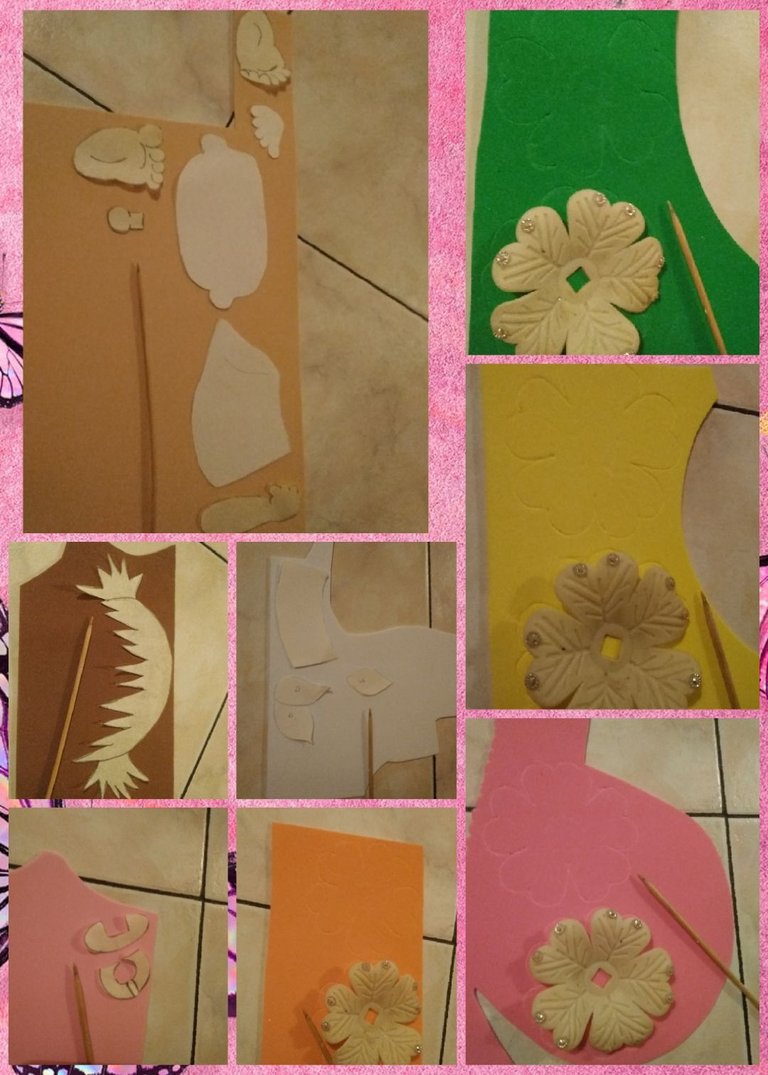
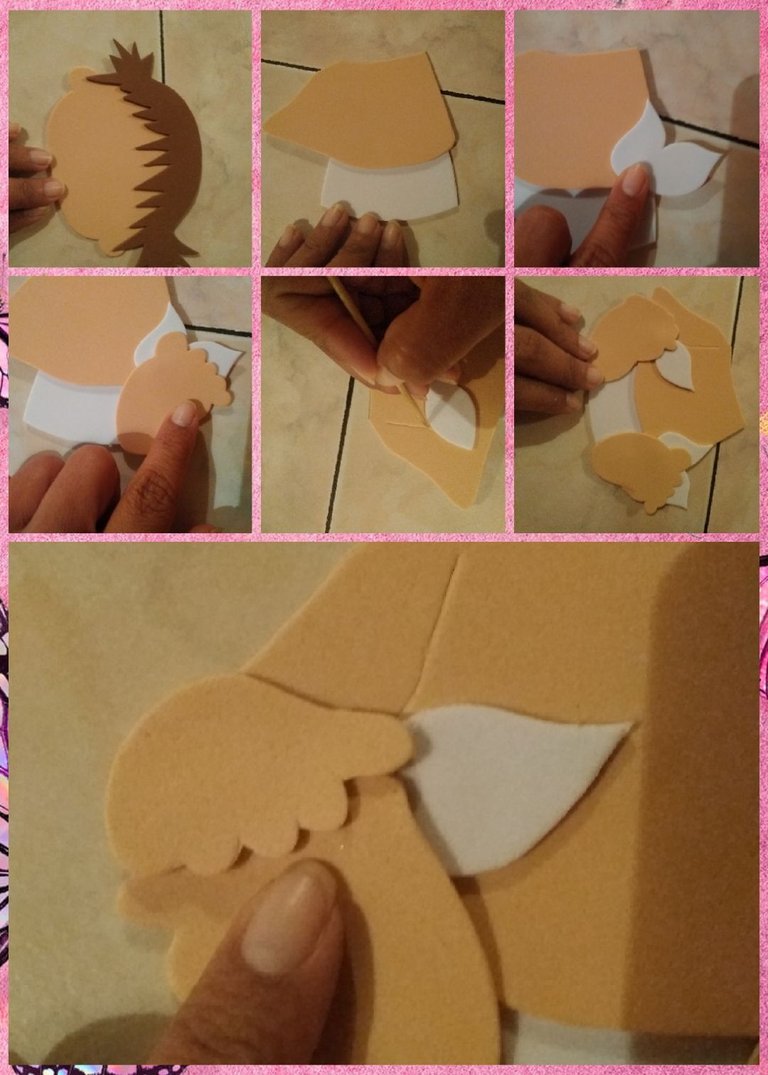
Iniciaremos pasando al foami o goma eva cada uno de los patrones haciendo uso del palito de altura:
👶El cuerpo de la bebé en el color piel, el cabello en el marrón, el chupón en el rosado escarchado, el pañal en el blanco.
🌸 2 flores de cada color: verde, amarillo, rosado y verde.
We will begin by passing each of the patterns to the foam or EVA foam using the height stick:
👶The baby's body in skin color, hair in brown, pacifier in frosty pink, diaper in white.
🌸 2 flowers of each color: green, yellow, pink and green.
✂️ Hora de recortar
Tomaremos la tijera y recortaremos cada uno de los patrones tratando de hacerlo con precisión evitando picotear el foami o goma eva ya que de un buen recortado depende que nuestro proyecto nos quede impecable.
✂️ Time to trim
We will take the scissors and cut out each of the patterns, trying to do it with precision, avoiding pecking at the foam or EVA rubber since a good cut depends on our project being impeccable.
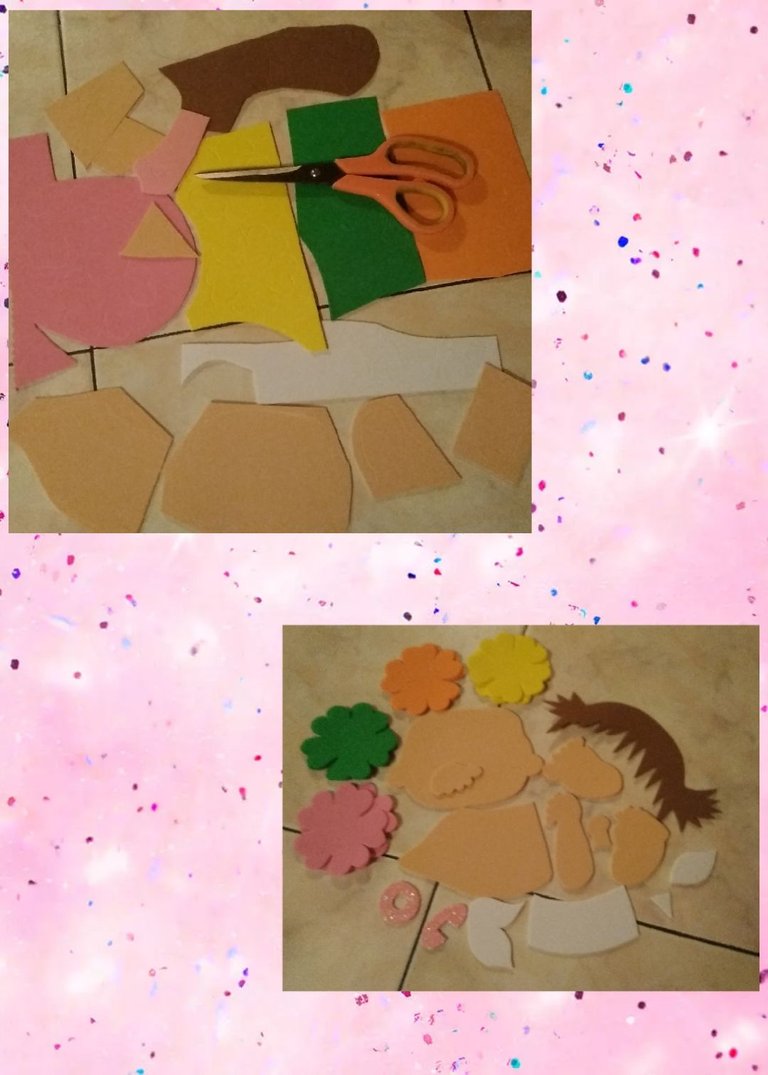
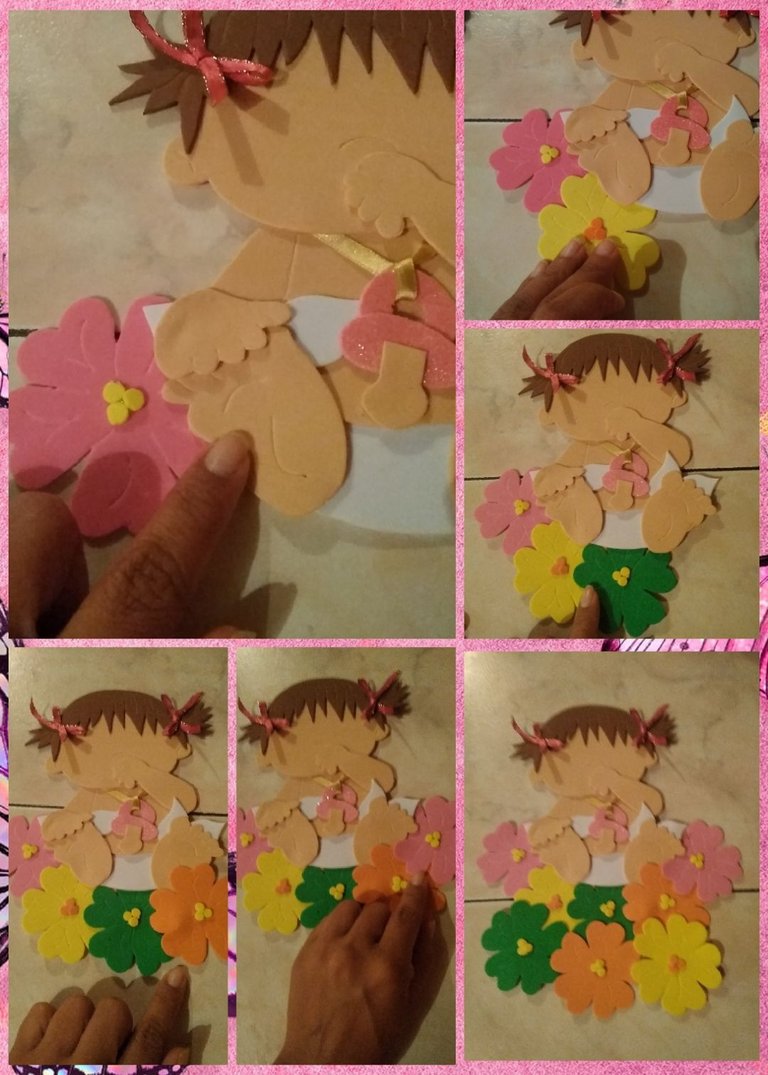
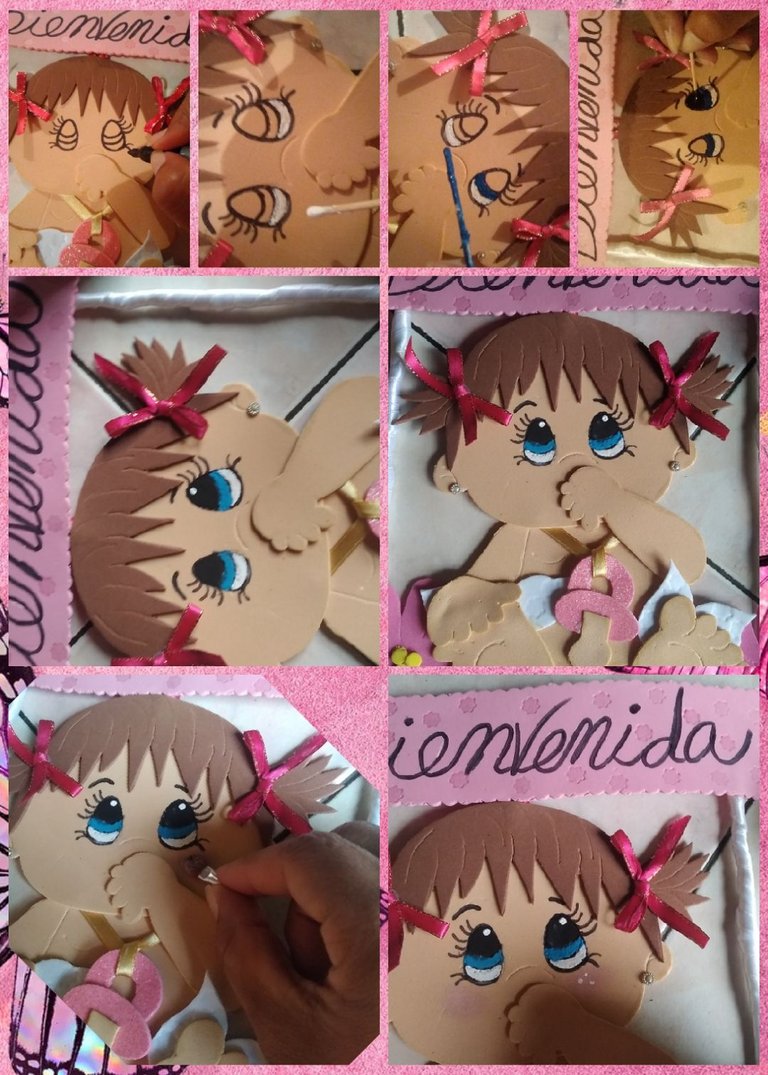
Comenzaremos a armar la bebé, primero que nada tomaremos la cara y con silicón pegaremos encima de esta el cabello, la barriga se pegara encima del pañal y las puntas del pañal que son dobles se pegaran del lado derecho entre el pañal y la barriga fijate en la imágen, el piecito derecho se pega encima del pañal. Del lado izquierdo de la barriga con el palito de altura aprovecharemos de dibujar una línea que será el brazo y justo donde termina dicha línea se pegara la otra punta del pañal para luego pegar encima del mismo el otro piecito encima de este se pegara la manito para que simule que se esta agarrando su pies, por último pegaras la otra punta del pañal detrás de la manito.
We will begin to assemble the baby, first of all we will take the face and with silicone we will glue the hair on top of it, the belly will stick on top of the diaper and the ends of the diaper, which are double, will stick on the right side between the diaper and the belly, look at In the image, the right foot is stuck on top of the diaper. On the left side of the belly with the height stick we will take advantage of drawing a line that will be the arm and just where said line ends we will stick the other end of the diaper and then stick the other little foot on top of it, on top of it the little hand will stick to Let him pretend that he is holding his feet, finally you will glue the other end of the diaper behind his hand.
Continuamos tomando las piezas del chupón, la chupa de mismo se pegara encima de la parte circular y el agarradero se pega detrás de la pieza que tenemos armada, ahora la cinta dorada se le hará un nudito en el agarradero del chupón y se dejara dos puntas largas que se pegaran al cuerpo que armamos en el paso anterior, coloca un punto de silicón en los hombros allí pega ambas cintas de lado y lado dejando que el chupón cuelgue en el cuerpo de la bebé, seguidamente fijaras la cabeza para luego pegar el brazito, la manito la ubicaras justo a la altura de su boquita asemejando que se la esta llevando la misma a su boca.
We continue taking the pieces of the pacifier, the pacifier's pacifier will be glued on top of the circular part and the handle will be glued behind the piece that we have assembled, now the gold ribbon will be tied into a knot on the handle of the pacifier and two points will be left long ones that will stick to the body that we assembled in the previous step, place a silicone dot on the shoulders, there stick both ribbons on both sides, letting the pacifier hang on the baby's body, then you will fix the head and then glue the little arm , you will place your hand right at the height of his little mouth, making it seem like he is taking it to his mouth.
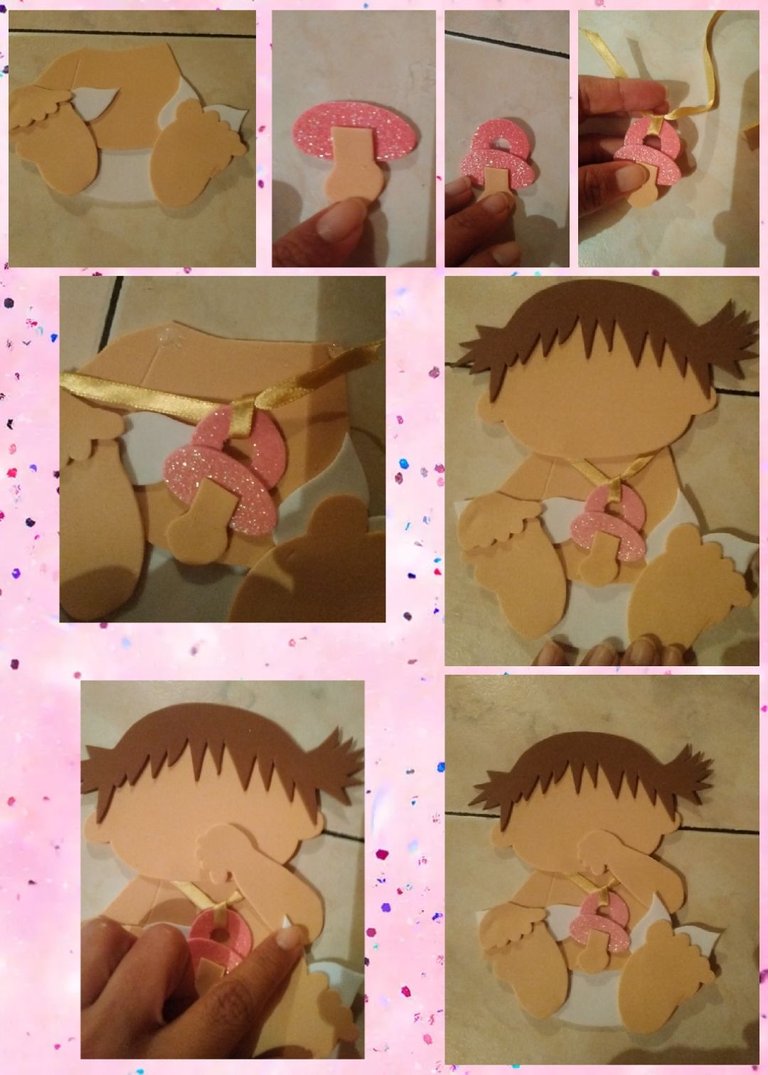
Con la cinta fucsia delgada haras 2 pequeños lazitos para pegar en el cabello de la bebé de cada lado, así lucirá unos lindos moños.
Toma el palito de altura y dibuja las líneas del surco de las orejas, la nariz, las líneas del cabello,de los piecitos y sus deditos.
With the thin fuchsia ribbon you will make 2 small bows to stick in the baby's hair on each side, so she will have cute bows.
Take the stick and draw the lines of the furrow of the ears, the nose, the lines of the hair, the little feet and the little fingers.
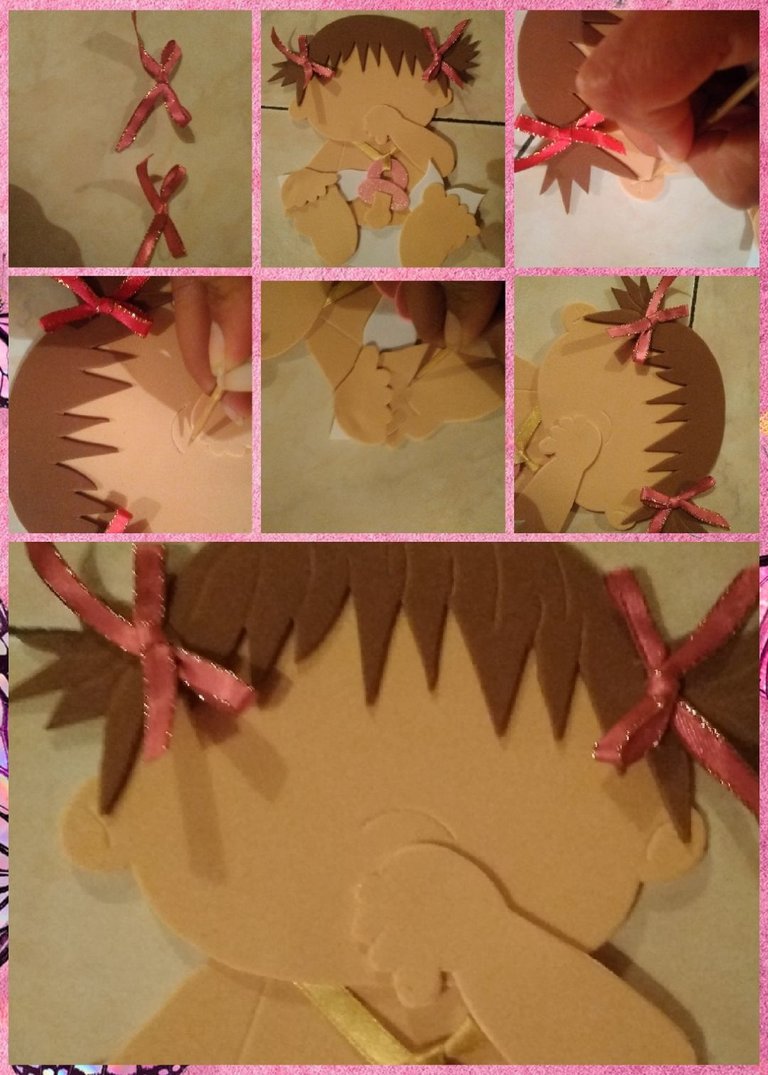
Con el palito de altura le haremos las líneas a las flores para que resalten aún más.
With the height stick we will make the lines for the flowers so that they stand out even more.
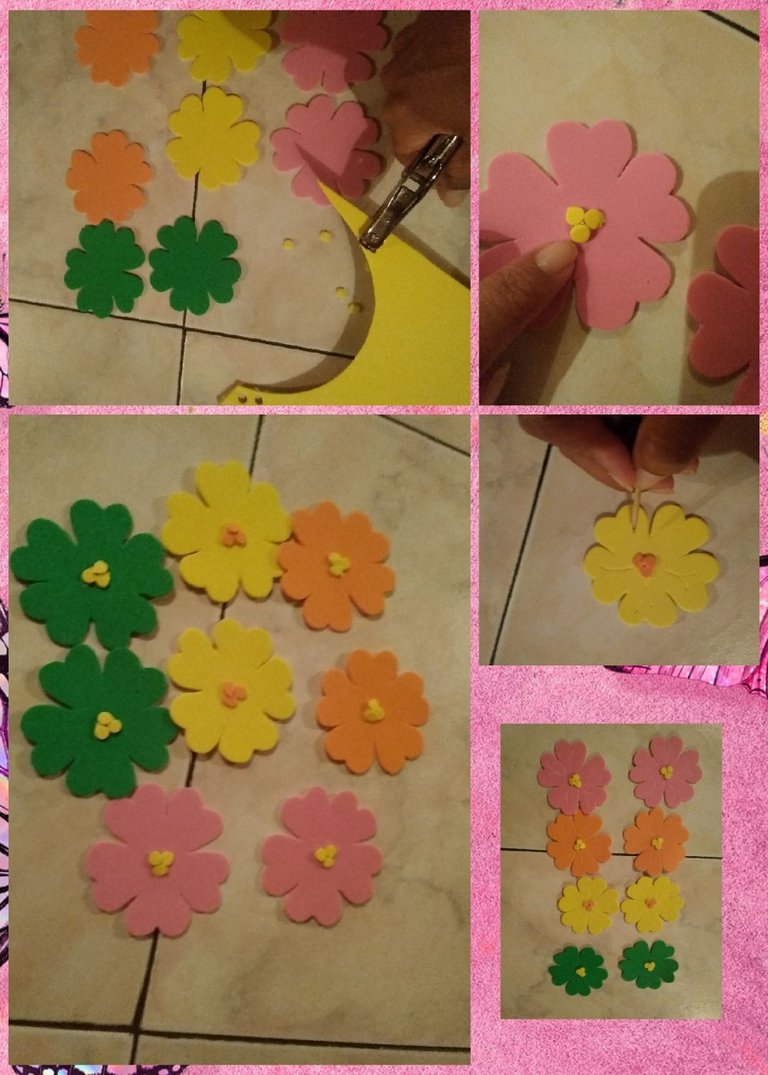
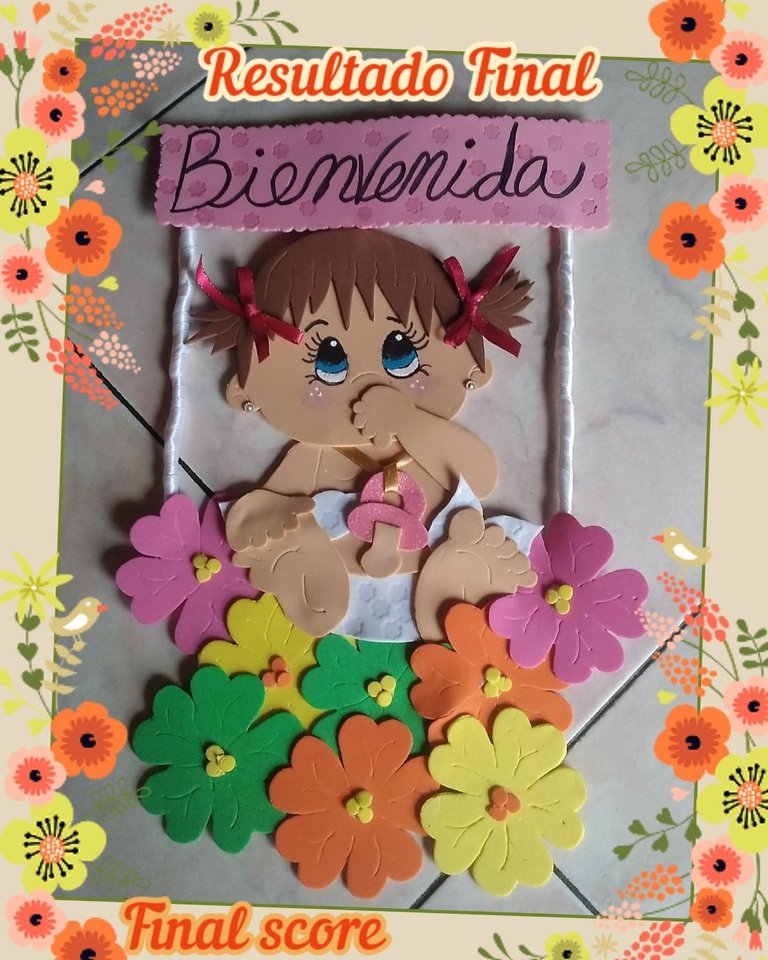
🌸 Las flores las comenzaremos a pegar con silicón debajo de los pies de la bebé en el lado izquierdo comenzando por: una rosada, amarilla, verde, naranja cerrando con una rosada , el resto de las flores se pegaran debajo de estas la verde debajo de la amarilla seguiremos con la naranja y por último la amarilla.
🌸 We will begin to glue the flowers with silicone under the baby's feet on the left side starting with: a pink, yellow, green, orange one closing with a pink one, the rest of the flowers will be glued below these the green one below the yellow we will continue with the orange and finally the yellow.
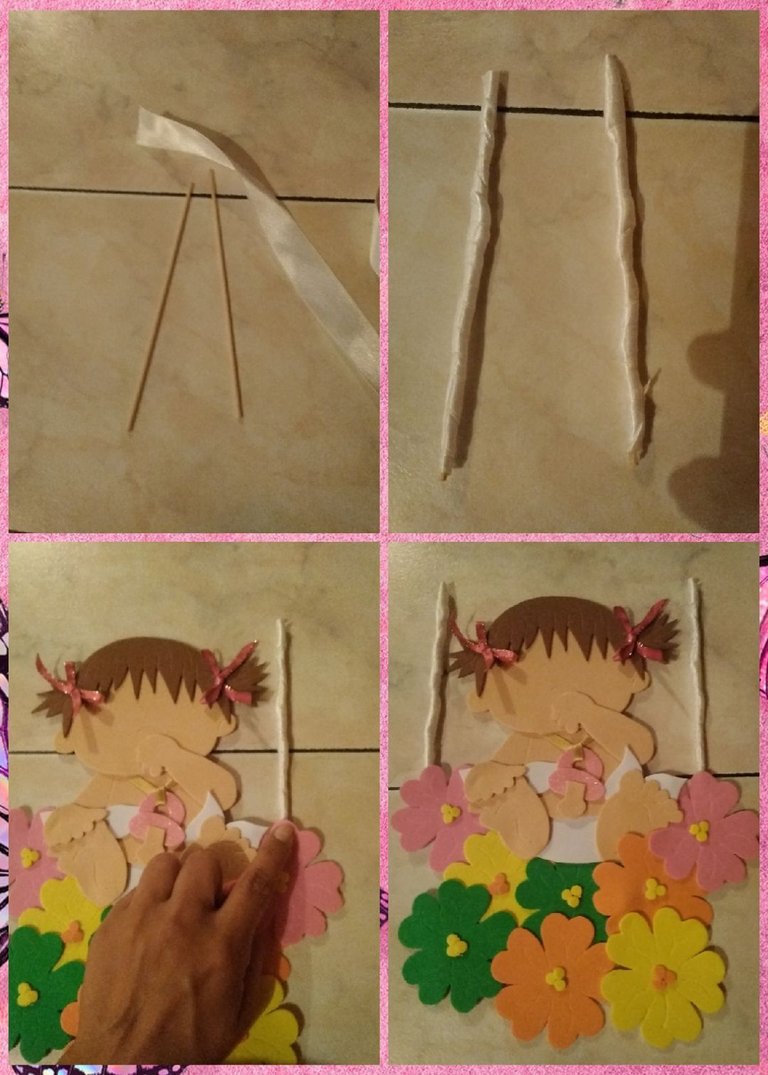
Los dos palitos de altura los forraremos usando la cinta gruesa blanca y con silicón, después de tenerlos forrados se pegaran de lado y lado justo donde esta las flores rosadas.
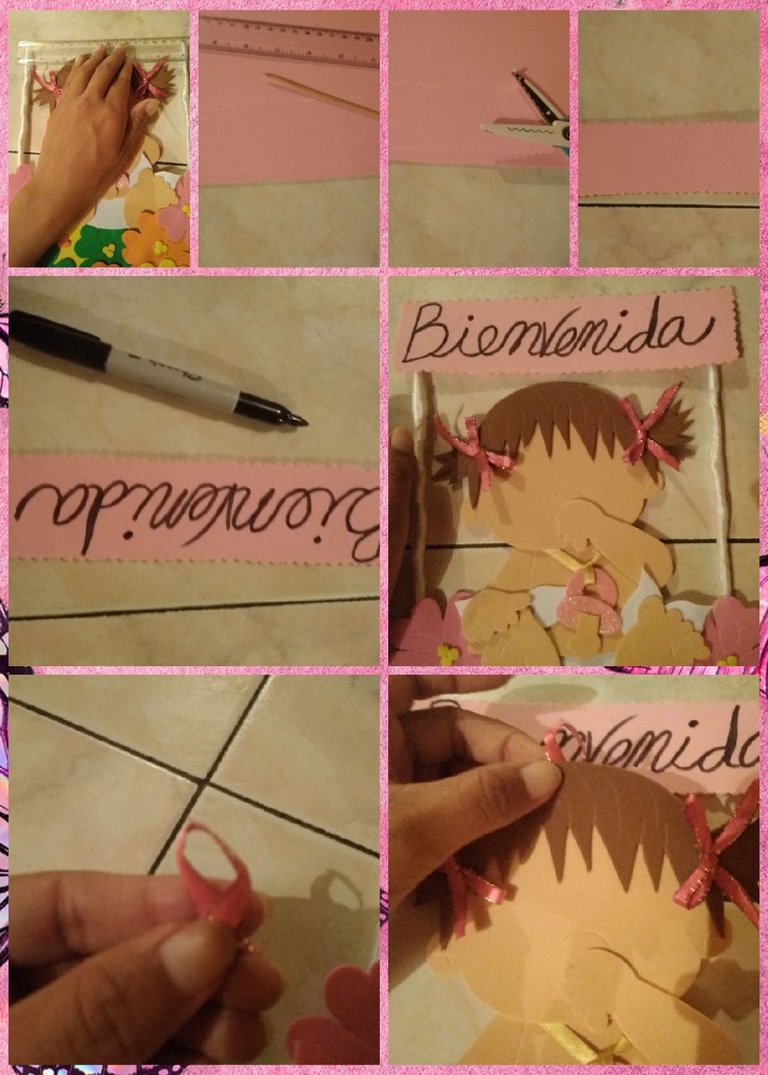
Ahora que tenemos los 2 palitos pegados con la regla mediremos la distancia que es de 11cm para luego en el foami o goma eva pasaremos esta medida por 5cm de alto este será un rectángulo y se convertirá en nuestro letrero. Ahora con la tijera corte zic zac recortamos el rectángulo y escribiremos con el marcador negro fino con una linda letra la palabra Bienvenida para luego pegarlo encima de los palitos.
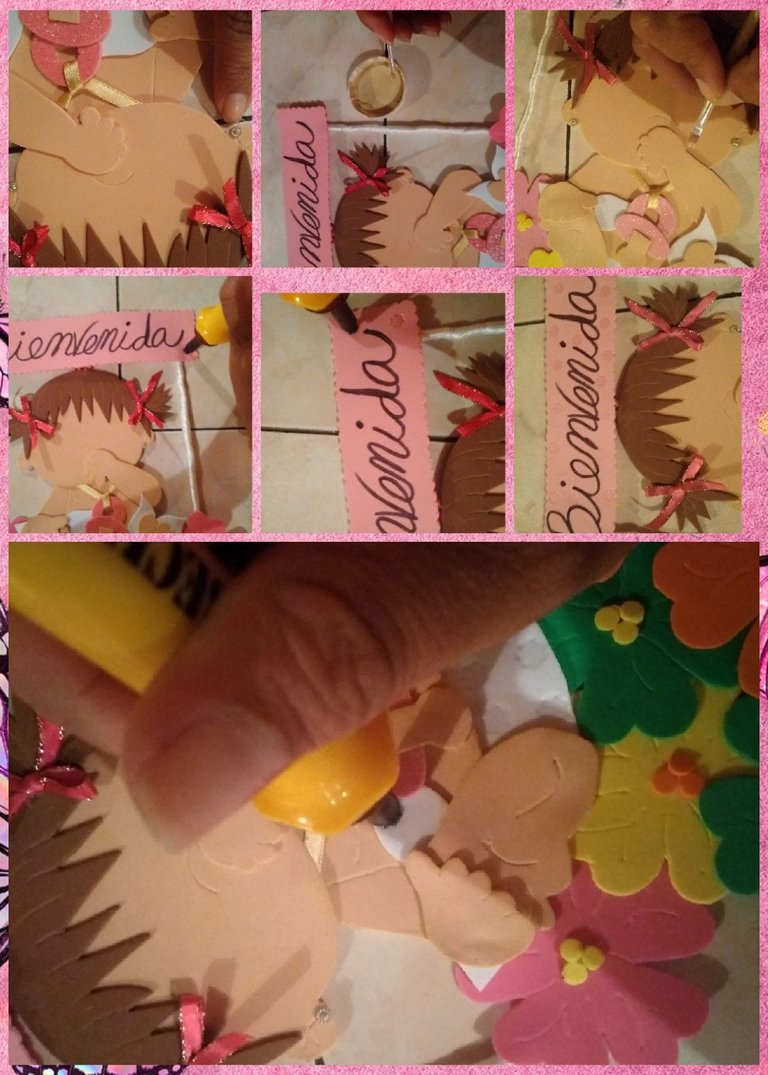
El guindadero de nuestro adorno se lo pondremos con la misma cinta fucsia, pegando con silicón una punta encima de la otra y este se pegara justo en la cabeza de la bebé.
We will line the two tall sticks using thick white tape and silicone, after having them lined they will stick from side to side right where the pink flowers are.
Now that we have the 2 sticks glued together with the ruler, we will measure the distance, which is 11cm and then in the foam or EVA we will pass this measurement by 5cm high, this will be a rectangle and will become our sign. Now with the zic zac cut scissors we cut out the rectangle and we will write the word Welcome with the fine black marker with a nice letter and then glue it on top of the sticks.
We will put the bow of our ornament with the same fuchsia ribbon, gluing one end on top of the other with silicone and it will stick right on the baby's head.
Las 2 florecitas plateadas la pegaras en cada orejita esto serán los zarcillos y la hará lucir aún más linda.
Con la pintura al frío piel y el pincel fino difuminaras el cuerpo de la bebé y luego tomaras el cautíl con la punta en forma de estrella y de forma aleatoria decoraras el letrero también el pañal.
You will glue the 2 little silver flowers on each ear, these will be the tendrils and will make her look even prettier.
With the cold skin paint and the fine brush you will blur the baby's body and then you will take the cautil with the star-shaped tip and randomly decorate the sign as well as the diaper.
Nuestro último paso es pintar los ojos para ello con el marcador negro fino dibujaremos unos lindos ojos, las pestañas y las cejas. Con la pintura al frío blanca y el palito de altura pintaremos la primera franja de los ojos, la siguiente franja azul, y la que sigue será negra, dejamos secar para luego dar luz a la mirada con un puntito blanco en cada ojo.
Para que sus mejillas se vean rozagantes en cada lado colocaras sombra con el aplicador de la misma, luego con la pintura al frío y el palito de altura le dibujaras 3 puntitos encima de la sombra para que parezcan las pequitas de la bebita.
Y de esta manera concluimos esta tierna y hermosa bebé, lista para decorar la ambientación de esta hermosa nena llamada Aisha y darle la Bienvenida a la nueva integrante de la familia, estoy segura que a mi primo y su esposa le gustara yo quede complacida con el resultado aquí se los dejo por si se les presenta la ocasión como en mi caso es un lindo detalle para obsequiar.
Our last step is to paint the eyes. With the fine black marker we will draw cute eyes, eyelashes and eyebrows. With the white cold paint and the height stick we will paint the first stripe of the eyes, the next stripe blue, and the one that follows will be black, we let it dry and then brighten the look with a white dot in each eye.
To make her cheeks look pink on each side, you will place shadow with the same applicator, then with the cold paint and the height stick you will draw 3 dots on top of the shadow so that they look like the baby's freckles.
And in this way we conclude this tender and beautiful baby, ready to decorate the setting of this beautiful girl named Aisha and give Welcome to the new member of the family, I am sure that my cousin and her My wife will like it and I will be pleased with the result. Here I leave them in case the occasion arises, as in my case it is a nice detail to give as a gift.
Y bien amigos hasta aquí mi aporte del día espero les sea útil, gracias por pasar y leer cada una de mis publicaciones, a ustedes mis grandiosos lectores les envío un abrazo cargado de energías positivas ✨ 🤗.
Las fotos fueron tomadas y editadas con mi celular
use la aplicación "Foto Collage"
La traducción la realice con el traductor de google
Hasta un Próximo Encuentro!!!
🤗😘
Well, friends, this is it for my contribution of the day, I hope it is useful to you, thank you for stopping by and reading each of my publications, to you, my great readers, I send you a hug full of positive energy ✨ 🤗.
The photos were taken and edited with my cell phone.
use "Photo Collage" app
I did the translation with Google Translate
Until a Next Meeting!!!
🤗😘

Que bonito que te ha quedado, me ha gustado mucho y verdaderamente es ideal para colgarlo en toda la puerta de la habitación de la bebé. Y tranquila, ya te llegará el momento en dónde puedas hacerla para tu propio bebé.
Gracias 🤗 @aarolita
amén que así sea 🙏, un abrazo 🤗
That is a really cute outcome. I'm sure any girl would love to have one like that. Well done!
Thank you very much, I appreciate your comment @erikah
Greetings🤗