¡Hola, gente creativa de Hive!💖
Hello, creative people of Hive!💖
Hace años solía pensar que no tenía ningún talento, que jamás aprendería a dibujar por más que lo deseara; y ahora, en la actualidad, te traigo un tutorial de como pintar con acuarelas, mostrando mi más reciente dibujo😌 Por esto, te puedo decir completamente segura que la práctica sí hace al maestro, y sé que aún me falta muchísimo por aprender, pero estoy orgullosa del avance que he hecho.
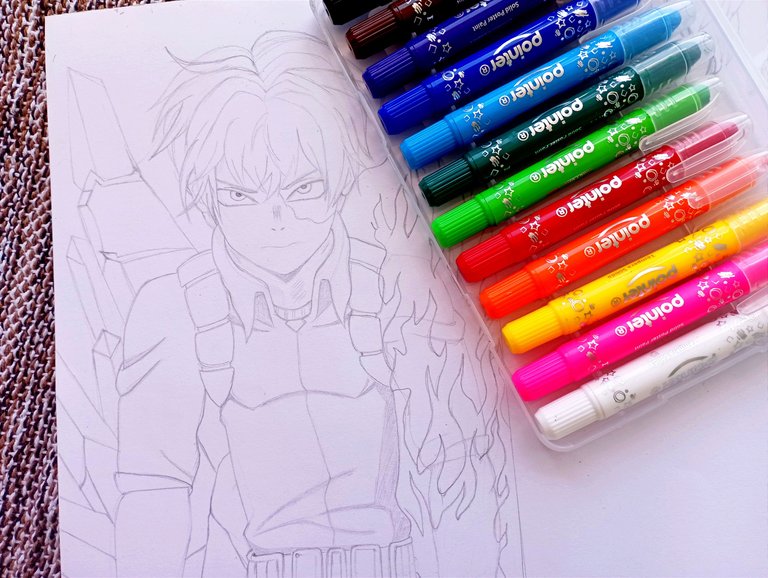
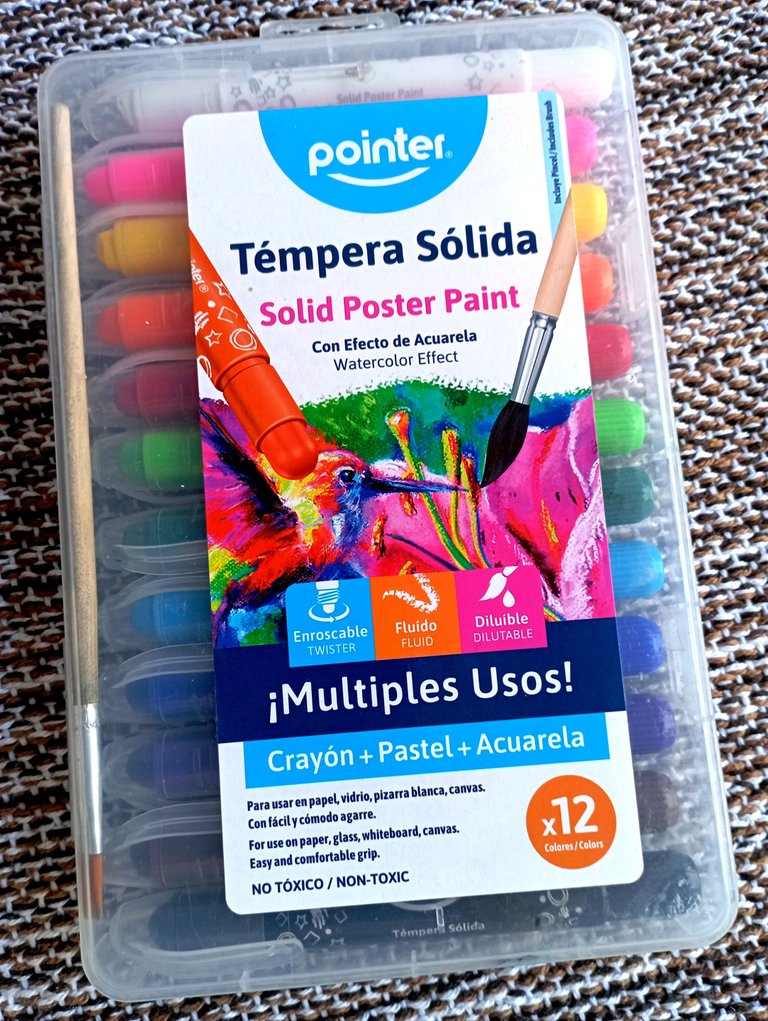
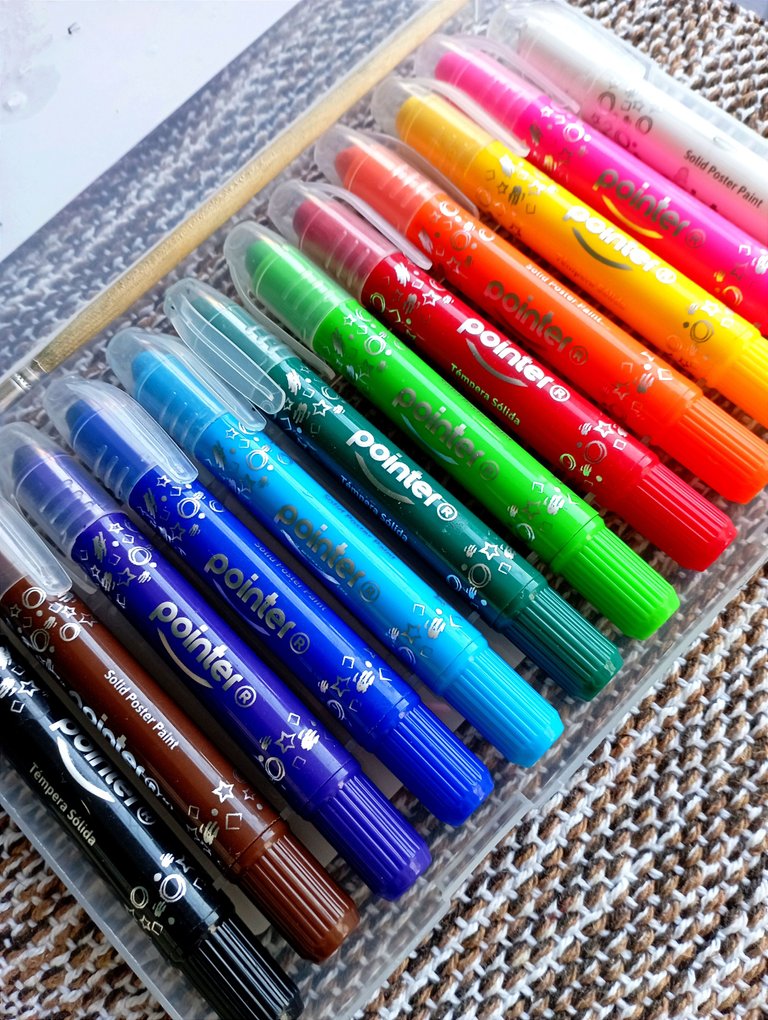
De manera que me alegra hacer esta publicación, e invitarte a practicar en tus dones artísticos✨ Estos crayones de la marca Pointer ya los había visto anteriormente, me llamaban la atención, pero como no sabía pintar con acuarelas, no había querido comprarlos; sin embargo, en mi última compra de útiles escolares los volví a encontrar, y esta vez sí les di una oportunidad. Spoiler: Son muy buenos para tu primera experiencia con acuarelas😌 ¡Así que comencemos con el tutorial!
Years ago I used to think that I had no talent, that I would never learn to draw no matter how much I wanted to; and now, today, I bring you a tutorial on how to paint with watercolors, showing my most recent drawing😌 For this, I can tell you completely sure that practice does make perfect, and I know that I still have a lot to learn, but I'm proud of the progress I've made.
So I'm happy to make this post, and invite you to practice in your artistic gifts✨ These Pointer brand crayons I had seen them before, they caught my attention, but since I didn't know how to paint with watercolors, I hadn't wanted to buy them; however, in my last school supplies shopping I found them again, and this time I did give them a try. Spoiler: They are great for your first experience with watercolors😌 So let's get started with the tutorial!

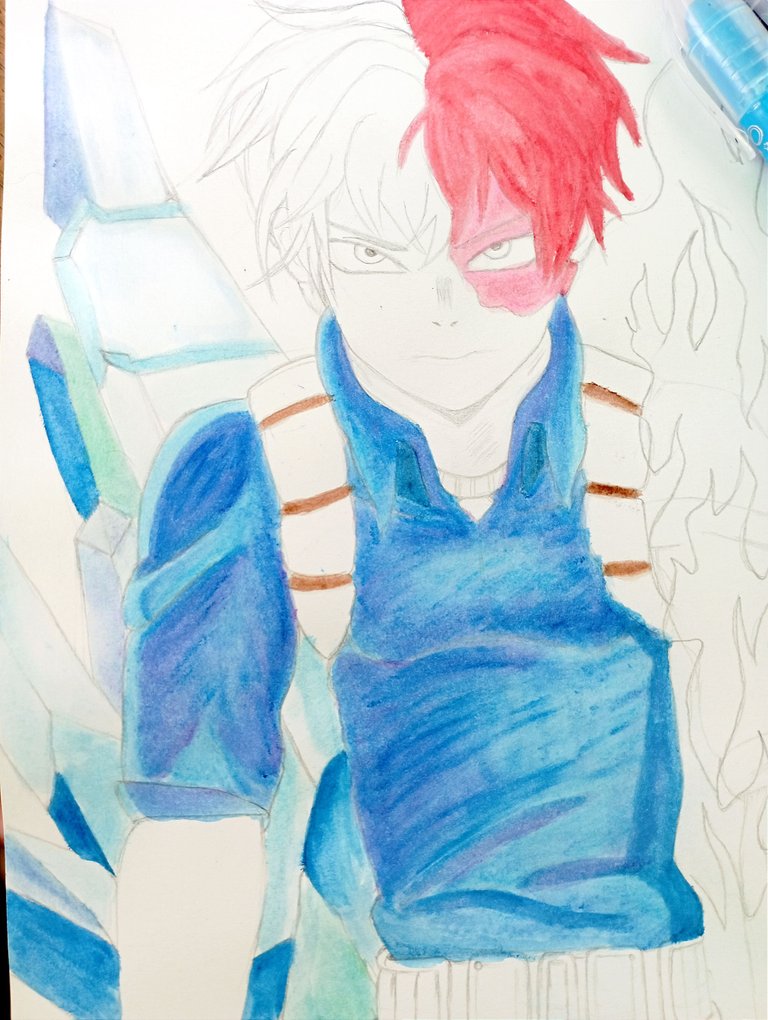
Para comenzar, primero debo presentarte al protagonista de este dibujo. Shoto Todoroki es uno de los personajes principales del anime My Hero Academia, en un mundo de héroes Shoto tiene el poder de “mitad frío, mitad caliente”, y justo como aparece en el dibujo, el lado derecho de su cuerpo controla el hielo, mientras que el lado izquierdo controla el fuego❄🔥
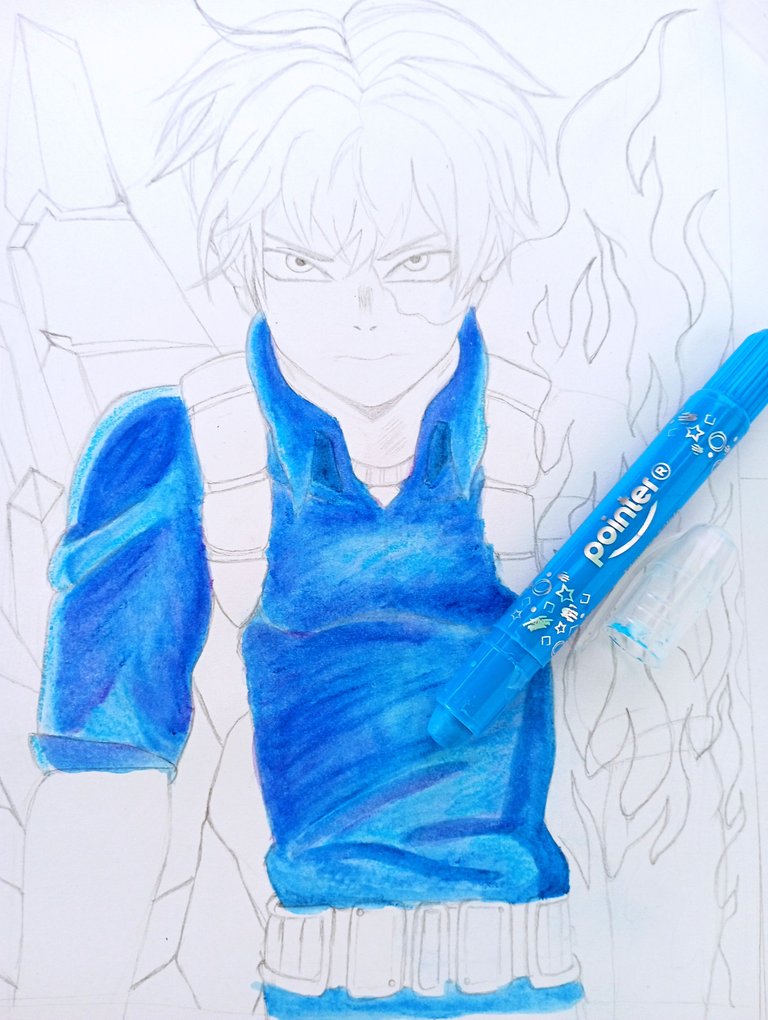
Ahora, volviendo al tutorial, estos crayones son muy parecidos a los típicos crayones de cera que usan los niños, solo que tienen un secreto: cuando pasas por encima un pincel húmedo se convierte en acuarelas. ¡Y los estoy amando!😍
To begin with, I must first introduce you to the main character of this drawing. Shoto Todoroki is one of the main characters of the anime My Hero Academia, in a world of heroes Shoto has the power of "half cold, half hot", and just as he appears in the drawing, the right side of his body controls ice, while the left side controls fire❄🔥.
Now, back to the tutorial, these crayons are very similar to the typical wax crayons kids use, only they have a secret: when you run a wet brush over them they turn into watercolors. And I'm loving them!😍
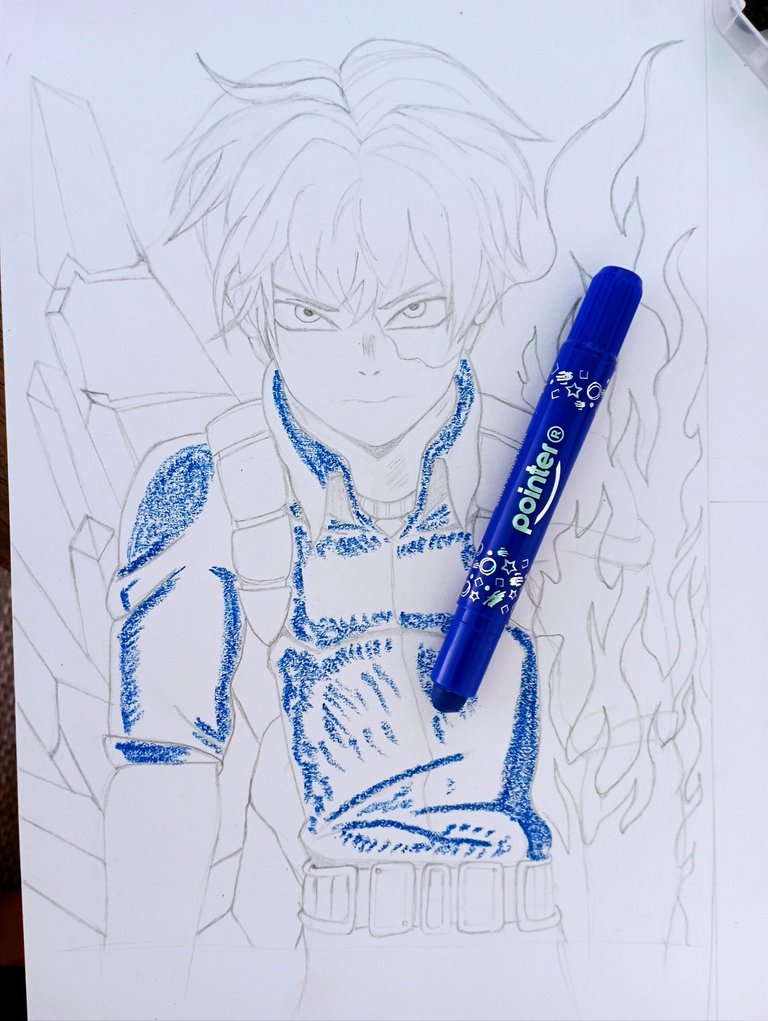
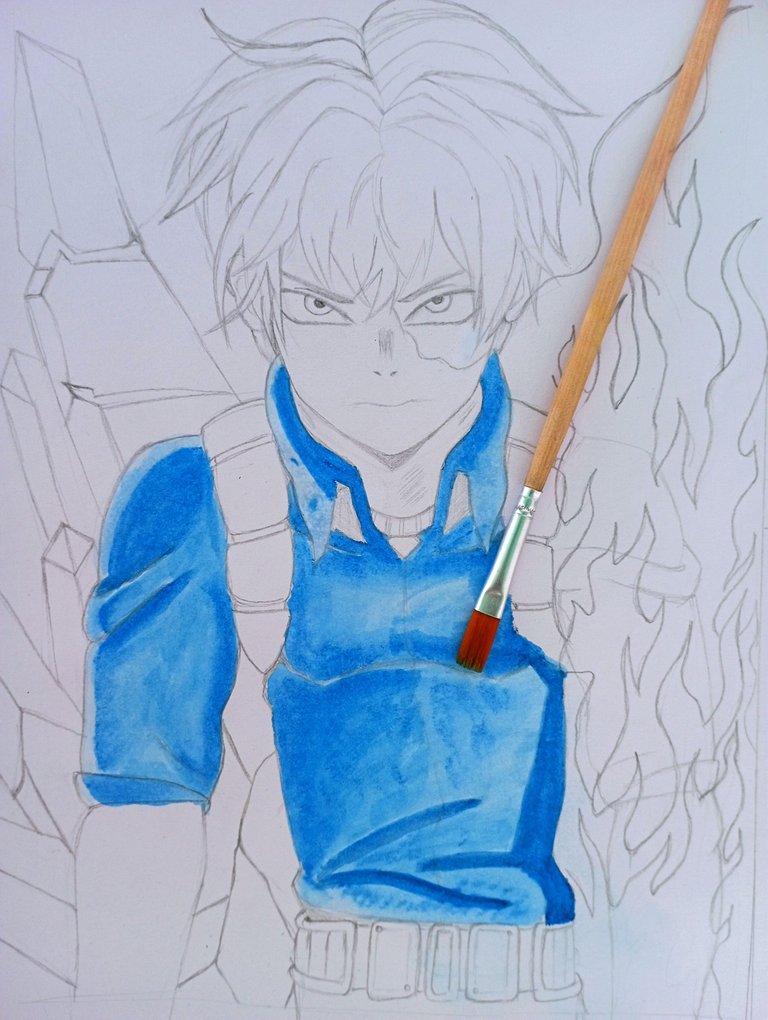
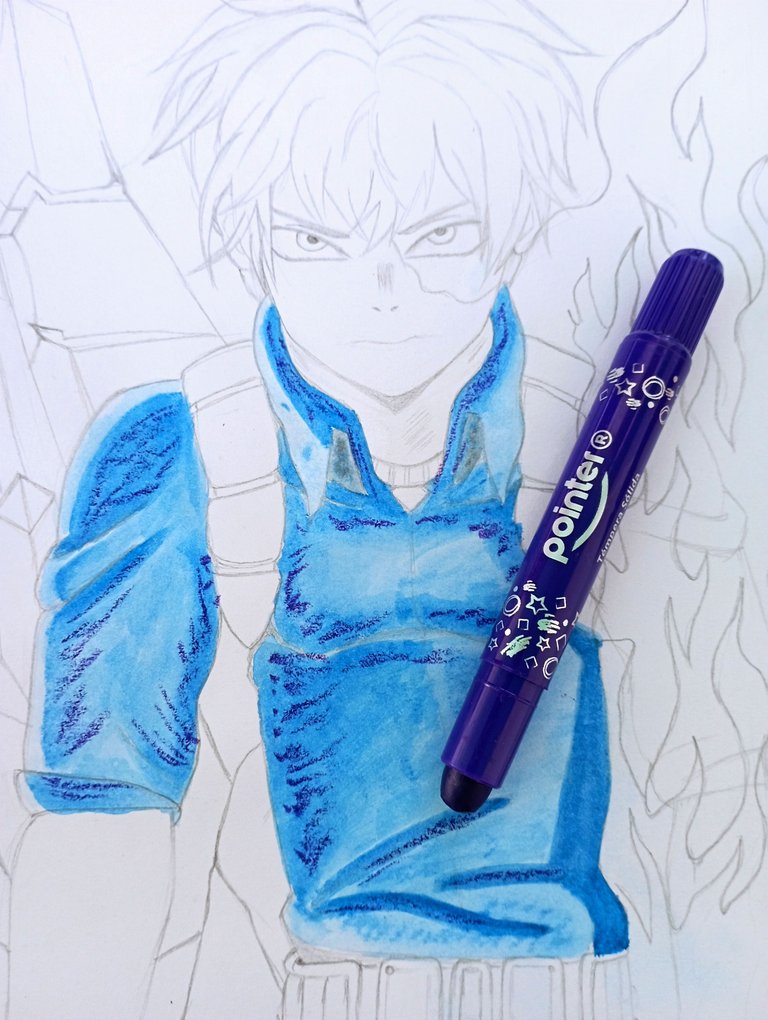
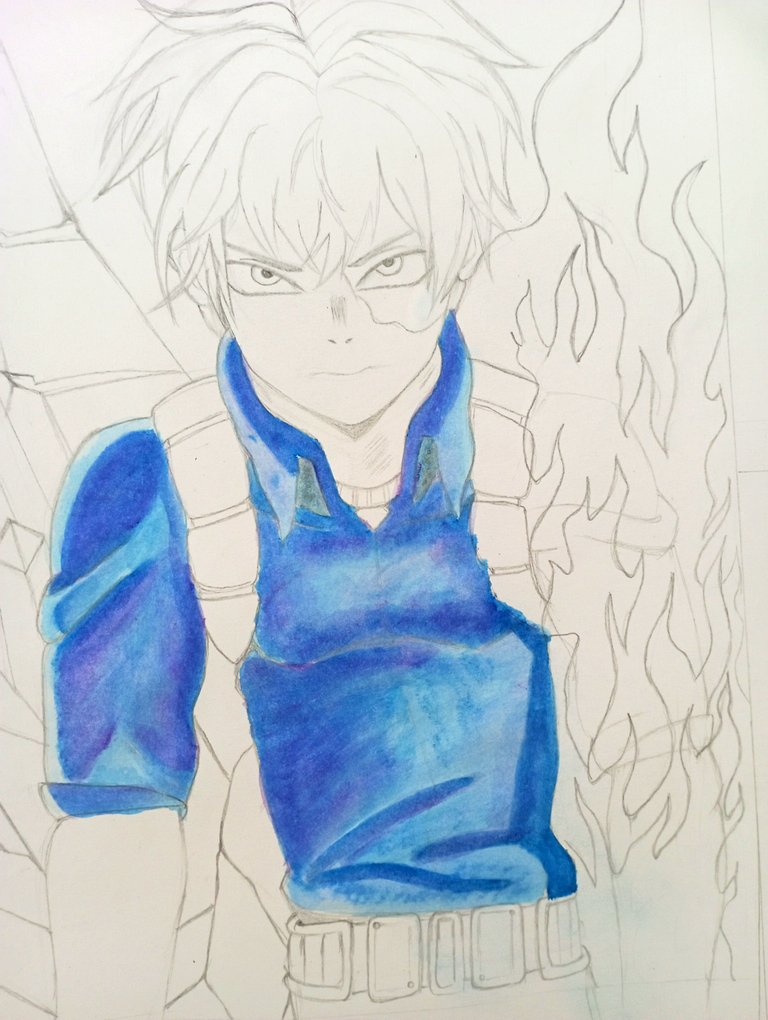
🎨PASO 1. La camisa || STEP 1. The shirt🎨
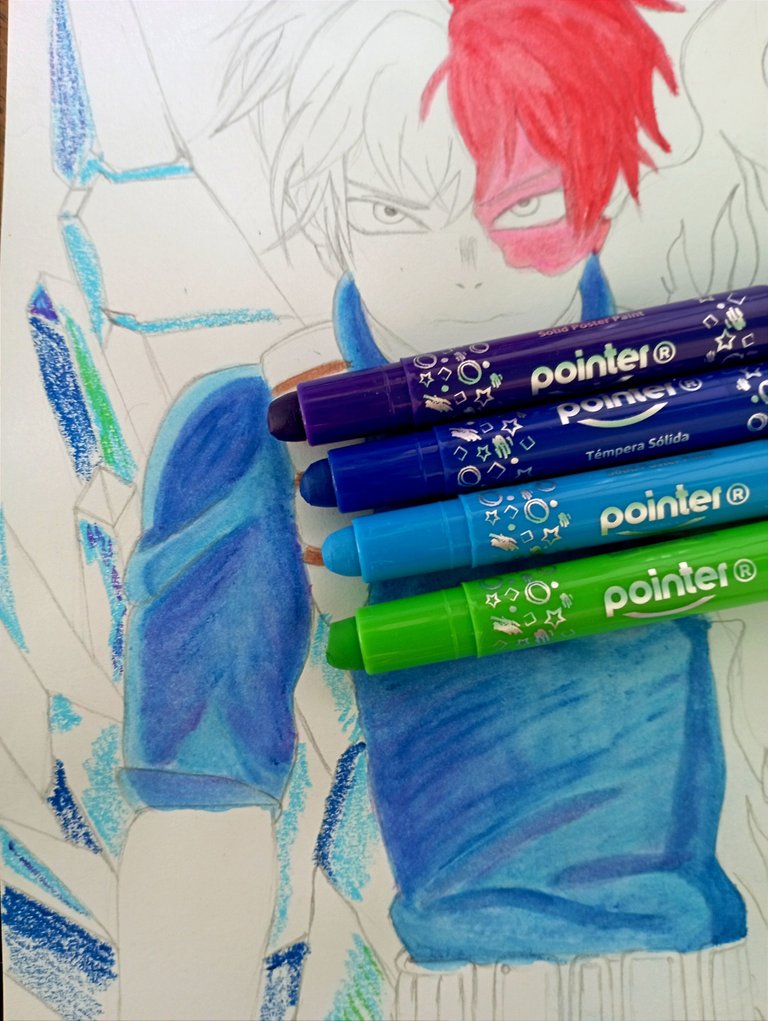
Lo primero que debes hacer es colorear. Yo comencé con la camisa de Todoroki, concentré el color donde quería que estuviera más oscuro, es decir, en las partes donde le daría profundidad al dibujo. Luego con el pincel húmedo comencé a esparcir el color y te darás cuenta de que luce como un degradado, por eso si quieres toda la zona del mismo color puedes colorear todo, pero si necesitas dar profundidad te recomiendo la manera en que lo hice.
Como quería mayor profundidad, pensé en utilizar el crayón morado, y fue una buena opción. Para finalizar, en las partes que quedaron más claras, apliqué el azul claro, y terminé de difuminar todos los colores.
The first thing to do is to color. I started with Todoroki's shirt, I concentrated the color where I wanted it to be darker, that is, in the parts where I would give depth to the drawing. Then with the wet brush I started to spread the color and you will notice that it looks like a gradient, so if you want the whole area of the same color you can color everything, but if you need to give depth I recommend the way I did it.
As I wanted more depth, I thought of using the purple crayon, and it was a good choice. To finish, in the parts that were lighter, I applied the light blue, and finished blending all the colors.
 |  |
|---|
 |  |  |
|---|
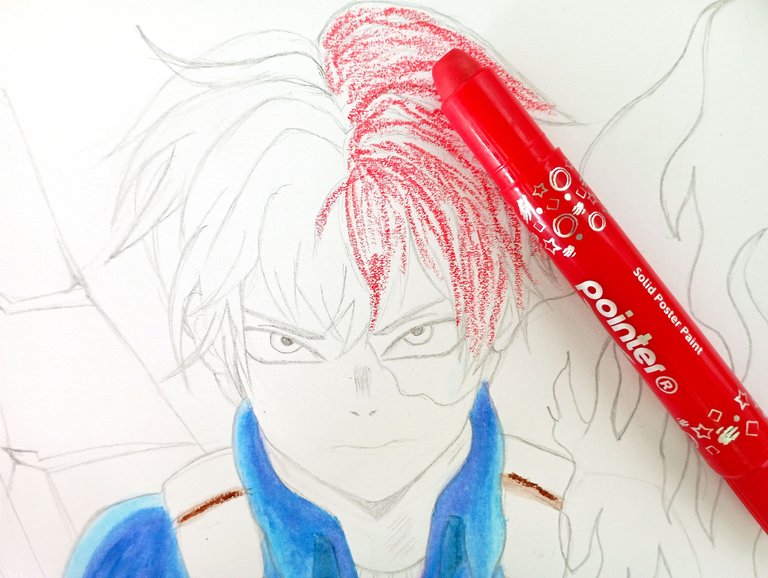
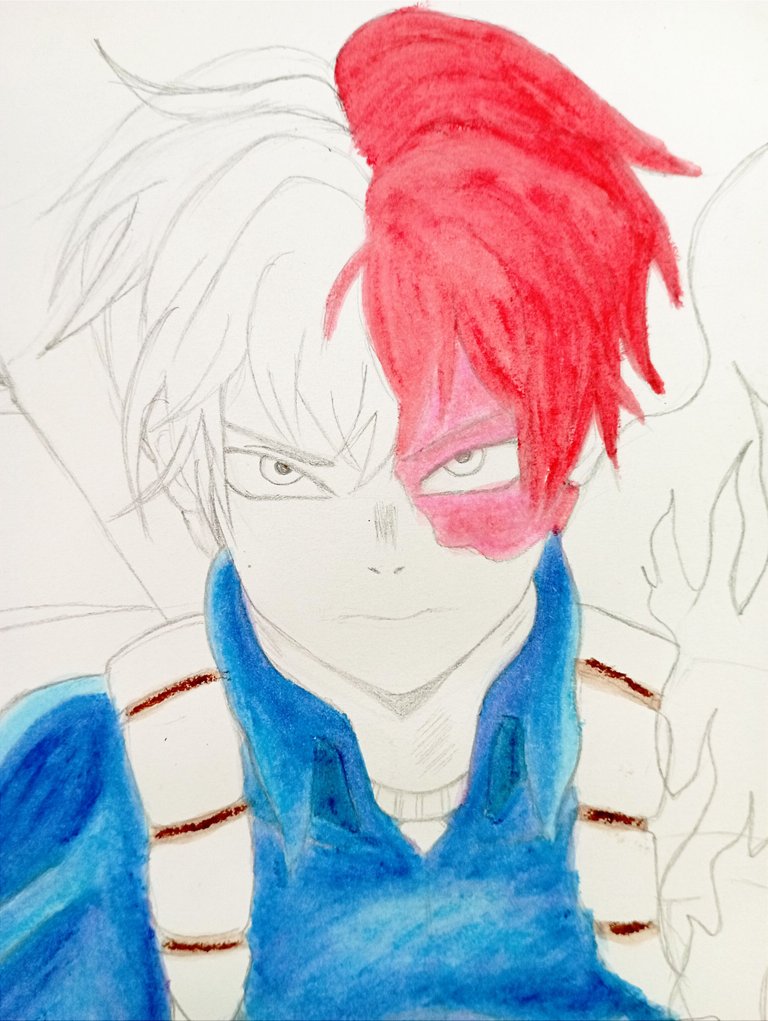
Amo el cabello de Todoroki, mitad blanco y mitad rojo, siguiendo la naturaleza de sus poderes. A diferencia de la camisa, aquí si coloree todo de la misma manera, más adelante le haría los detalles. Además, algo que caracteriza al personaje es que posee una quemadura en el lado izquierdo de su rostro, por lo cual, combiné el color rojo con el rosado, para darle más realismo.
I love Todoroki's hair, half white and half red, following the nature of his powers. Unlike the shirt, here I colored everything the same way, later I would do the details. Also, something that characterizes the character is that he has a burn on the left side of his face, so I combined the red color with pink, to give it more realism.
 |  |
|---|
🎨PASO 3. El hielo || STEP 3. Ice 🎨
En esta parte ya estaba emocionada de los resultados, así que me sentí segura de combinar varios colores para el hielo (y no solo colorearlo de azul claro), combiné azul oscuro y claro, morado y un poco de verde. Se supone que son columnas de hielo, por lo cual no todo podía ser del mismo color.
Los colores de estos crayones se mezclan muy bien cuando pasas el pincel, por lo tanto, puedes usar varios sin ningún problema, ya sea para hacer degradados u otra cosa.
At this part I was already excited about the results, so I felt confident to combine several colors for the ice (and not just color it light blue), I combined dark and light blue, purple and a bit of green. These are supposed to be ice columns, so they couldn't all be the same color.
The colors of these crayons blend very well when you pass the brush, so you can use several without any problem, either to make gradients or something else.
 |  |
|---|
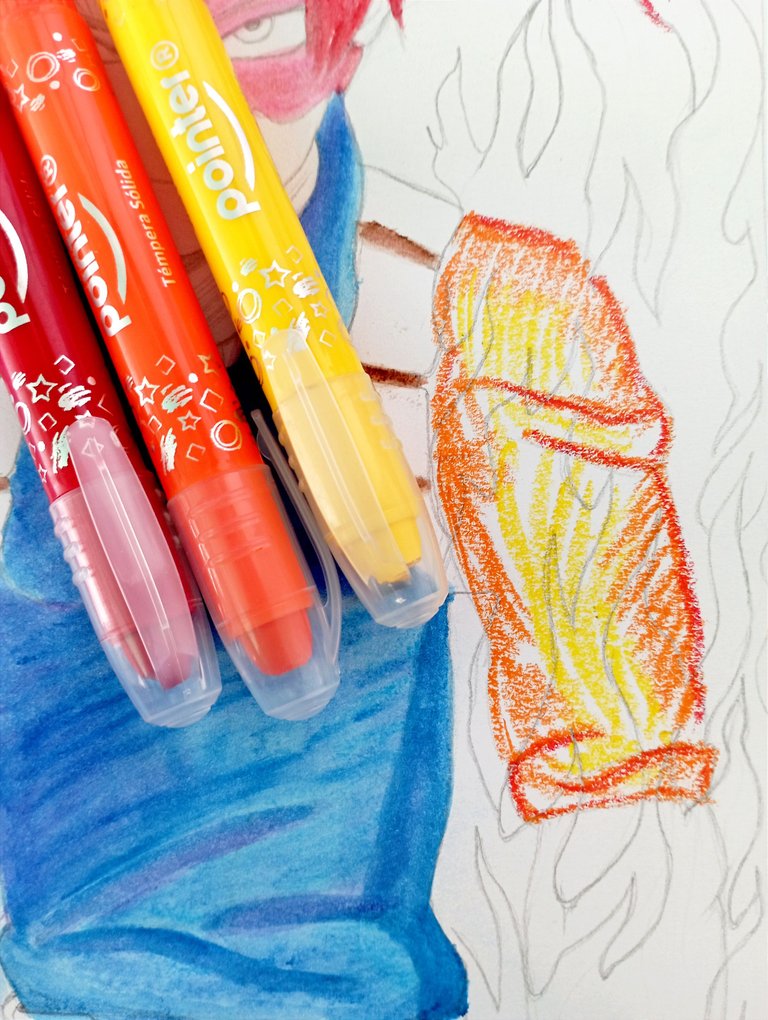
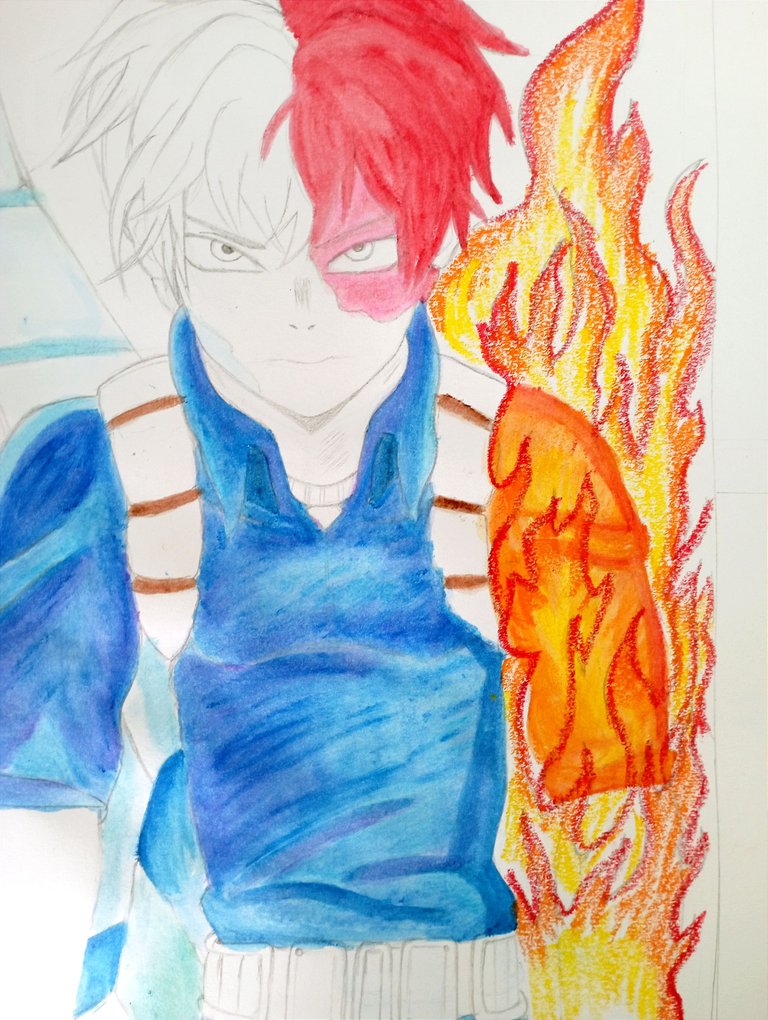
Esta parte la dejé de última porque sabía que sería la más complicada. Con el crayón naranja, rojo y amarillo, primero coloreé la manga de la camisa, porque a pesar de que las llamas la iban a cubrir, no quería que perdiera la forma.
Luego utilicé los mismos colores para el fuego, utilizando el rojo en la parte superior de las llamas, siguiendo del color naranja, y de último, en la parte más baja, el color amarillo. Mezclarlos fue muy fácil, entre más húmedo esté el pincel, más suave será el color, entre más seco esté el pincel, el color será más intenso. Por eso, a diferencia del hielo donde quería un color suave, aquí traté de que el pincel estuviera solo lo suficientemente húmedo, para que todos los colores quedaran intensos.
I left this part last because I knew it would be the most complicated. With the orange, red and yellow crayon, I first colored the sleeve of the shirt, because even though the flames were going to cover it, I didn't want it to lose its shape.
Then I used the same colors for the fire, using red at the top of the flames, followed by orange, and finally, at the bottom, yellow. Mixing them was very easy, the wetter the brush, the softer the color, the drier the brush, the more intense the color. So, unlike the ice where I wanted a soft color, here I tried to keep the brush just wet enough, so that all the colors would be intense.
 |  |
|---|
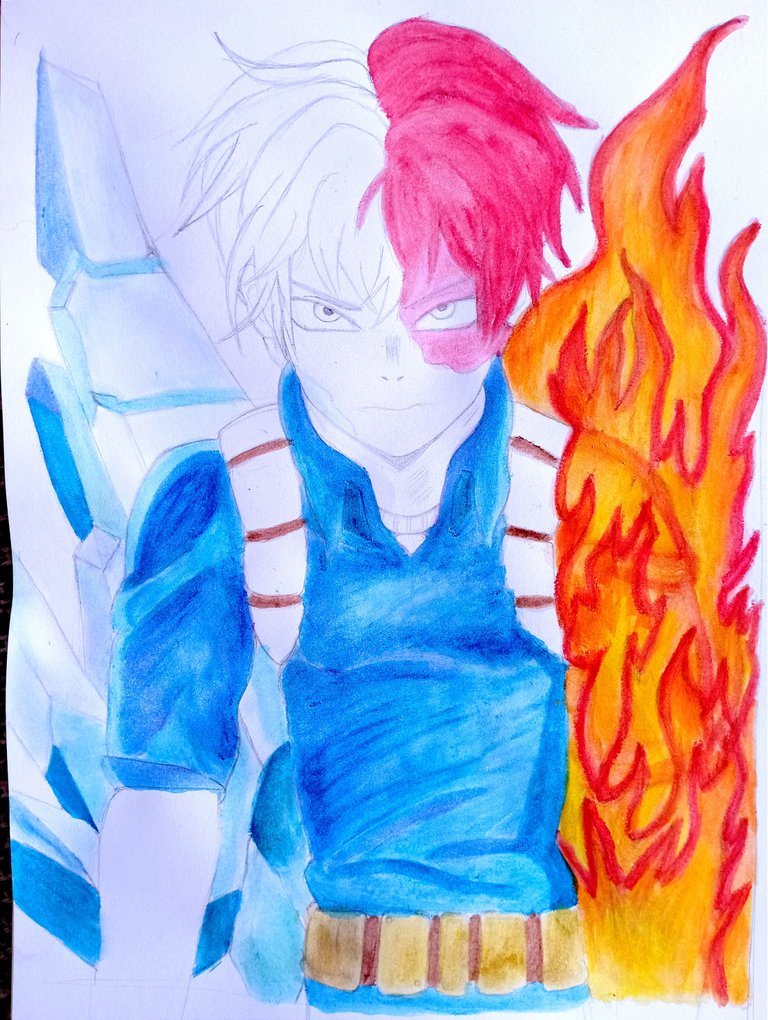
Para finalizar el dibujo usé un lapicero a gel para hacer el lineart, debe ser al final porque si lo hacemos al principio la tinta se va a mezclar con la acuarela. La piel y la parte blanca del cabello fueron las únicas áreas que pinté con colores normales, además, le agregué un detalle en la barbilla para destacar que su piel también puede congelarse. También le agregué más detalles al traje con los colores.
To finish the drawing I used a gel pen to make the lineart, it must be at the end because if we do it at the beginning the ink will mix with the watercolor. The skin and the white part of the hair were the only areas that I painted with normal colors, besides, I added a detail in the chin to emphasize that his skin can also freeze. I also added more details to the suit with the colors.

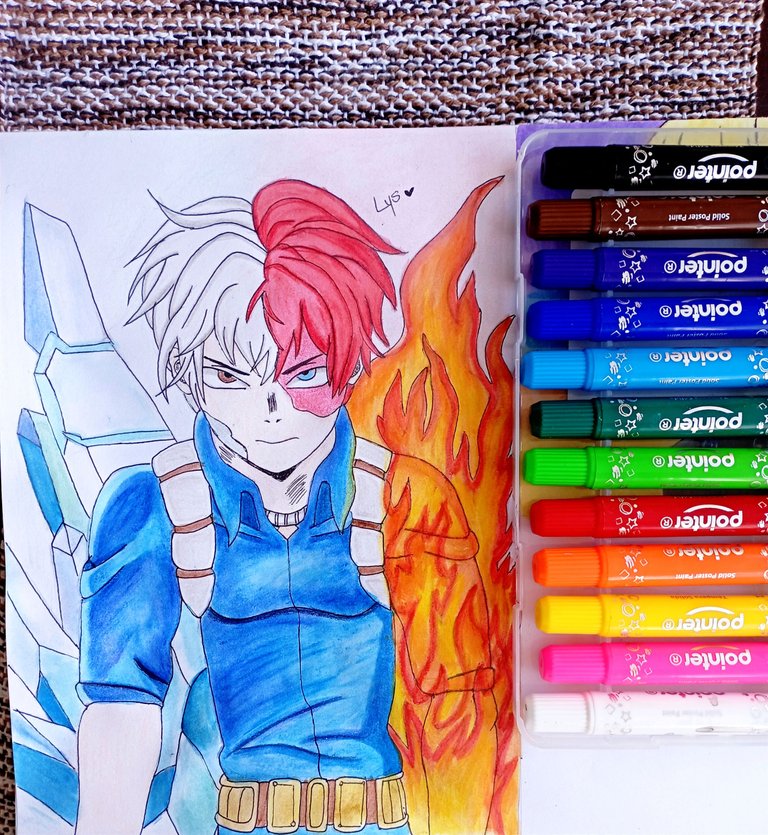
En mi opinión, estos crayones con efecto acuarela son perfectos para tener un primer acercamiento con esta técnica (como yo lo estoy haciendo), así cuando tengas verdaderas acuarelas no estarás tan perdido. Son fáciles de usar, solo tienes que dejar volar tu creatividad💫
Lo único que no me gusta es que son de punta redonda, así que es un poco complicado hacer los detalles, queda en ti hacerlos con el pincel. Pero, la punta es enroscable, para que la vayas sacando a medida que se acabe. Además, también se pueden utilizar en pizarras blancas y en vidrios, por si te quieres dejar un mensaje en el espejo😉
¡Y eso fue todo!✨ Muchísimas gracias por leer, y realmente espero que te ayude un poco. Si ves estos crayones, o algunos parecidos, dales una oportunidad, pueden sorprenderte💖 ¡Hasta luego!
In my opinion, these watercolor effect crayons are perfect to have a first approach with this technique (like I am doing), so when you have real watercolors you won't be so lost. They are easy to use, you just have to let your creativity fly💫.
The only thing I don't like is that they are round tip, so it's a bit complicated to make the details, it's up to you to make them with the brush. But, the tip is screwable, so you can take it out as it runs out. They can also be used on whiteboards and glass, in case you want to leave a message on the mirror😉.
And that was it!✨ Thank you so much for reading, and I really hope it helps you a little. If you see these crayons, or some similar ones, give them a try, they might surprise you💖 See you later!
 |  |
|---|
Banner hecho en Canva || Banner made in Canva
Traducido por DeepL
Nice detailed post. Both the drawing process and the drawing itself looks very nice.
Hello💖 Thank you so much for the support!
Liz! Gracias por compartir con nosotros tu técnica, tu publicación es orden, color y belleza, la amé profundamente.
Gracias a ti por tomarte el tiempo de leer mi publicación 💖✨
Congratulations @eldiariodelys! You have completed the following achievement on the Hive blockchain And have been rewarded with New badge(s)
Your next target is to reach 4750 upvotes.
You can view your badges on your board and compare yourself to others in the Ranking
If you no longer want to receive notifications, reply to this comment with the word
STOPCheck out our last posts:
Support the HiveBuzz project. Vote for our proposal!
Hola bella, gracias por el tutorial, he visto varias veces esta marca pero no tenia ni idea si era buena o no. Te ha quedado super bien el dibujo me gusto ver como el dibujo iba tomando forma. Saludos que pases un lindo día😊
Sinceramente las cosas que he comprado de Pointer han resultado muy buenas, es mi marca favorita de papelería 🥺💖
Gracias por tu lindo comentario, que también tengas un excelente día ✨