Buenas noches mis queridos amigos, cómo están?
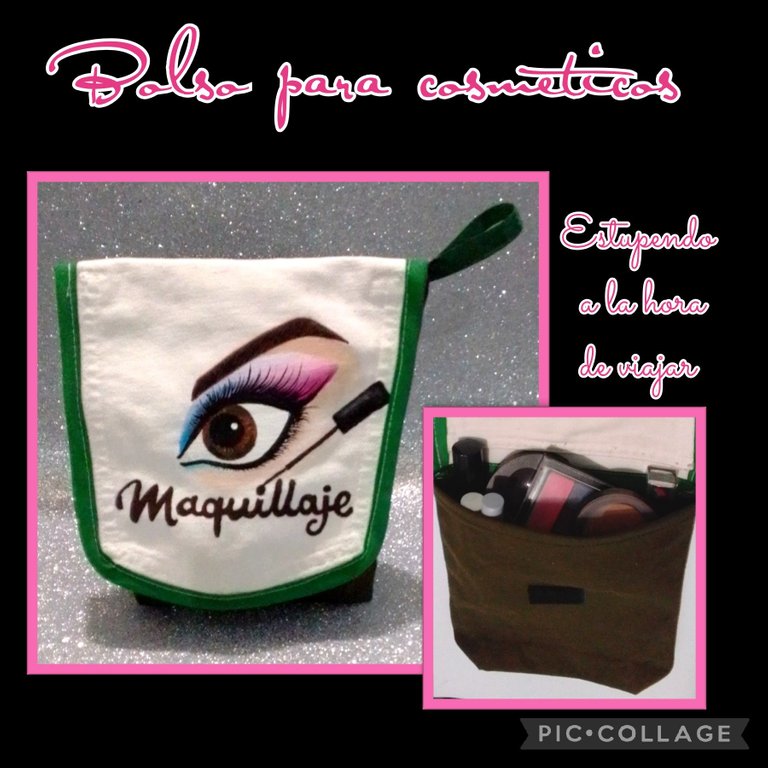
Hoy les compartiré este paso a paso en donde puse mi mente a crear un lindo Bolso para cosméticos, les cuento que no tenía nada en mente, pero busqué entre mis retazos de tela y conseguí dos pantalones dañados,(reciclando) de uno tomé un bolsillo y del otro un rectángulo que recorté de una pierna y bueno aquí está mi creación jajajaja... Espero les guste
Entonces te invito a que me acompañes y veas como se hace.
Materiales a usar:
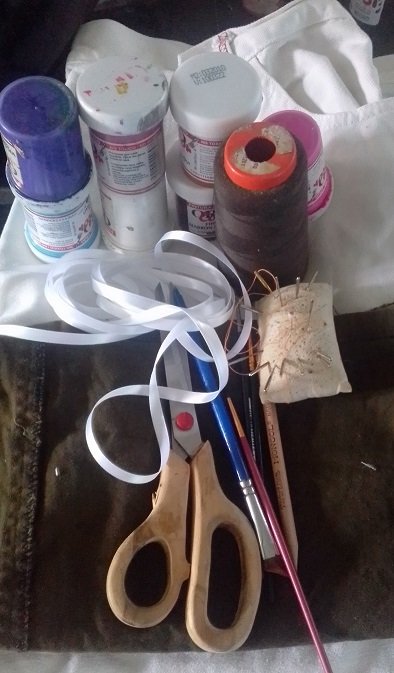
| Retazos de tela de jeans | Hilos y alfileres |
|---|---|
| Sesgo verde | Pinturas y pinceles |
| Tijera | Lápiz |
| Cierre mágico | Dibujo o impresión Opcional |
| Maquina de coser |
Seguimos con el Procedimiento:
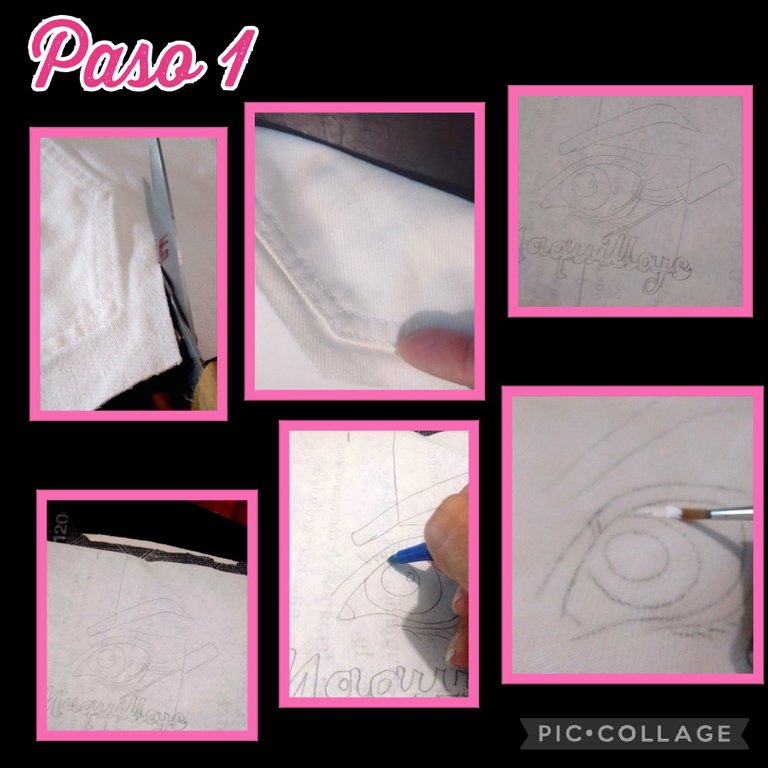
- Recorta un bolsillo trasero de un jeans dejando 1 cm aproximadamente de ancho.
- Calca o imprime el dibujo de tu preferencia y transfiere a la tela utilizando un papel carbón y un bolígrafo sin tinta para que se marque mejor, si no tienes, usa un lápiz.
- Después de transferir comienza a pintar el ojo.

- Después de rellenar el ojo en blanco, comienza a maquillar el ojo pero con pintura comienza de afuera hacia adentro usando los tonos que quieras yo coloqué primero un rosa claro y difuminé con morado y azul, tratando de hacerlo sin dejar secar la pintura, así se unen bien los colores.
- Luego delínea con pintura negra todo el borde del ojo con un pincel delgado y rellena el iris y deja secar para trazar pequeñas líneas en blanco, coloca el punto de luz y pinta las pestañas.
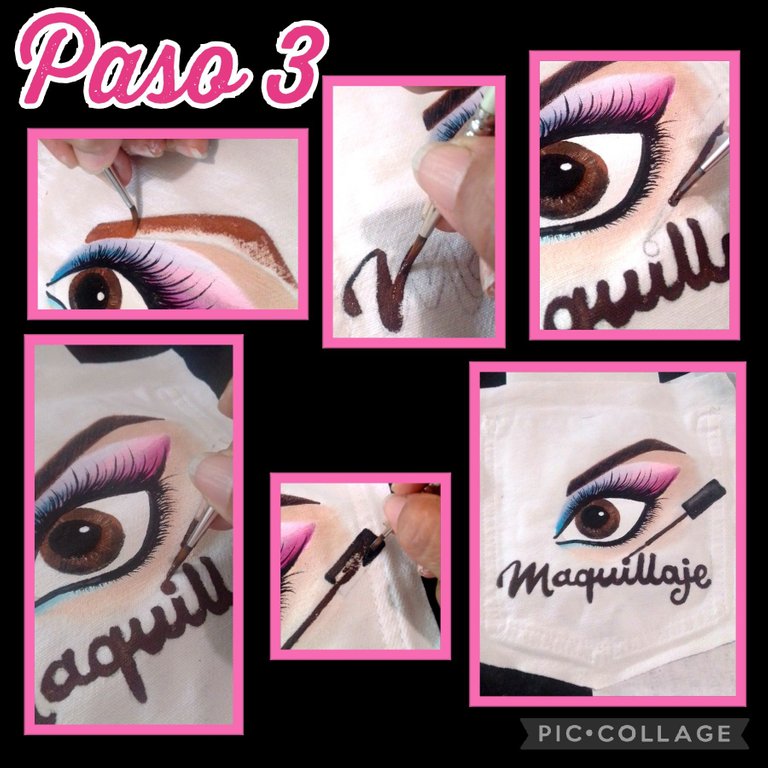
- Rellena la ceja con color marrón claro como base y luego utiliza marrón más oscuro y por último haz líneas en negro semejando los pelitos.
- Ahora rellena las letras con pintura marrón, igualmente rellena el aplicador del delineador y ya estará listo... Solo deja secar bien.
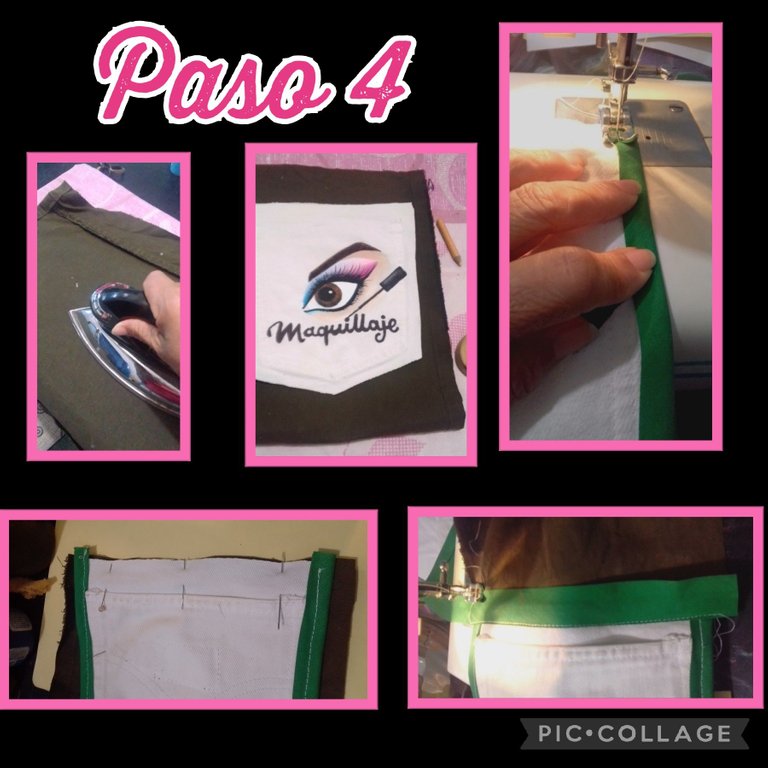
- Plancha la pierna del pantalón.
- Ahora mide la parte más ancha del bolsillo y recorta un rectángulo aumentando a esa medida 1cm a cada lado para las costuras.
- Para el largo del rectángulo aumenta de aproximadamente 10cms que serán para la base de la bolsa y el dobles en la parte superior del bolso.
- Ahora cose pegando el sesgo por todo el contorno del bolsillo.
- Fija con alfileres uniendo el bolsillo con el rectángulo.
- Después cose un pedazo de sesgo para tapar la unión de las telas cuidando de no cerrar el bolsillo.
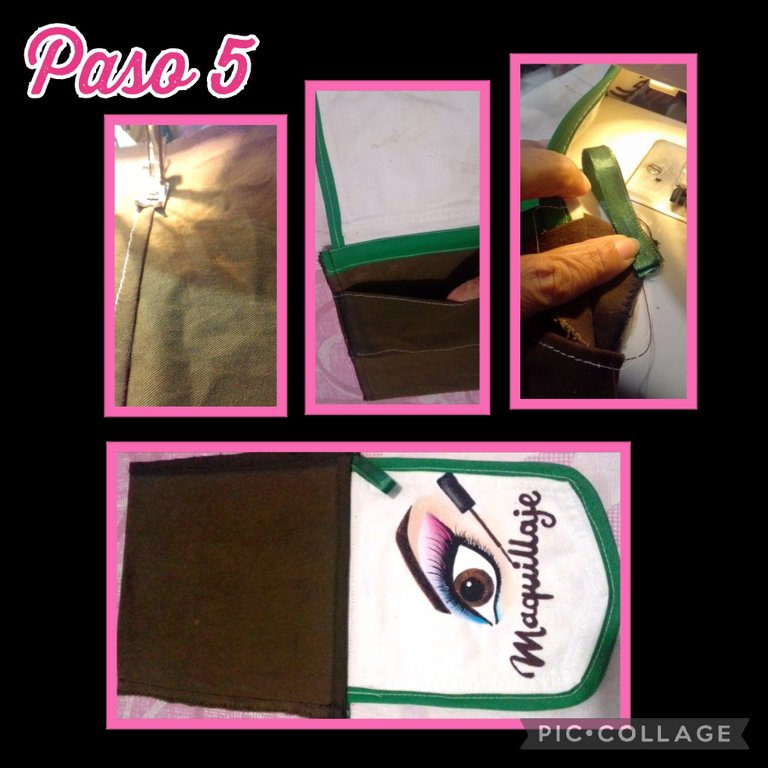
- Aparte haz un (bolsillo) recortando un rectángulo pequeño y pega a la parte de adentro, luego cose los laterales y antes de cerrar uno de los extremos arriba coloca un pedazo de cinta y cose rematando bien. luego pasa zig zag por todo el contorno del bolso.
Ya vamos bien adelantados verdad?
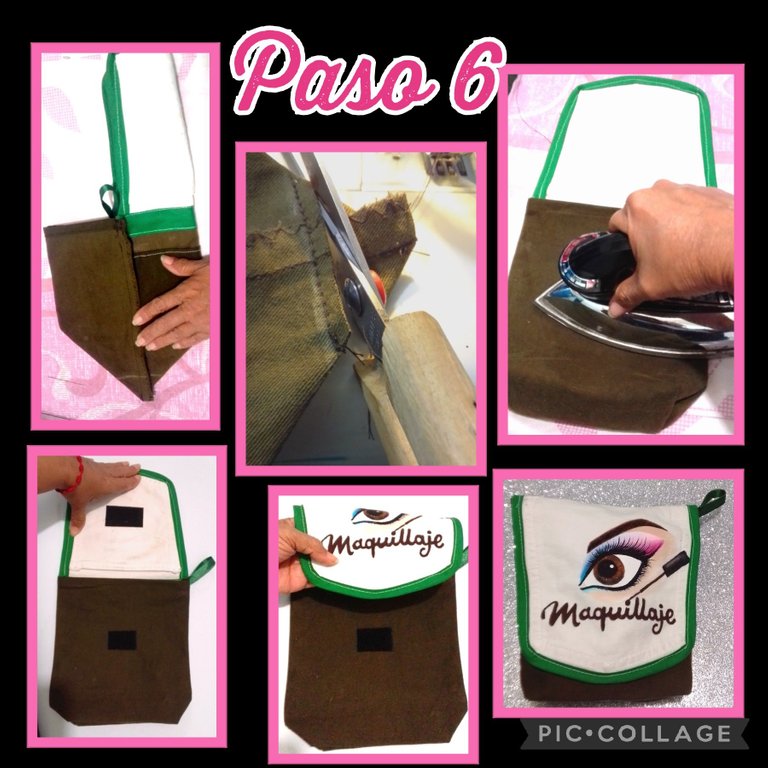
- Ahora dobla el bolso por toda la mitad, te quedarán 1 triángulo a cada lado, trazo una línea recta y pasa una costura, luego recorta lo sobrante y remata con zig zag.
- Voltea y plancha para alisar todas las costuras, recorta, pega o cose dos pedacitos de cierre mágico y ya terminamos.

- Mira que el bolsillo te queda como la parte frontal y a la vez por dentro como bolsillo, me pareció muy buena esta idea jajaja.
De verdad me encantó este bolso!

Fuente del dibujo:
https://www.google.com/search?q=dibujos+de+makeup&tbm=isch&ved=2ahUKEwibzfHNo-L0AhUShOAKHZyoAbgQ2-cCegQIABAA&oq=dibujos+de+&
Y llegó la hora de despedirme, no sin antes mencionar que mi publicación la traduje con DeepL, usé etiquetas HTML y las fotos son capturadas por mi teléfono Blu G5 y editadas con Pic Collage.
Espero sea de su agrado mi paso a paso y agradezco mucho tu visita, apoyo y como siempre, si te gustó me encantará ver tu comentario.
Saludos, bendiciones y suerte para todos.
Se les quiere.
English
Good evening my dear friends, how are you?
Today I will share with you this step by step where I put my mind to create a cute Cosmetic Bag, I tell you that I had nothing in mind, but I searched among my scraps of fabric and I got two damaged pants,(recycling) from one I took a pocket and from the other a rectangle that I cut from one leg and well here is my creation hahahahaha.... I hope you like it
Then I invite you to join me and see how it's done.
Materials to use:
| Pieces of jeans fabric | Threads and pins |
|---|---|
| Green bias | Paints and brushes |
| Scissors | Pencil |
| Magic zipper | Drawing or printing Optional |
| Sewing machine |
We continue with the Procedure:
- Cut out a back pocket from a pair of jeans, leaving about 1 cm wide.
- Trace or print the drawing of your choice and transfer it to the fabric using a carbon paper and a pen without ink so that it marks better, if you don't have it, use a pencil.
- After transferring start painting the eye.
- After filling in the eye in white, start to make up the eye but with paint start from the outside to the inside using the tones you want I placed first a light pink and blended with purple and blue, trying to do it without letting the paint dry, so the colors are well united.
- Then outline with black paint all the edge of the eye with a thin brush and fill in the iris and let dry to draw small lines in white, place the point of light and paint the eyelashes.
- Fill in the eyebrow with light brown as a base color and then use darker brown and finally make black lines resembling the hairs.
- Now fill in the letters with brown paint, also fill in the eyeliner applicator and you're done.... Just let it dry well.
- Iron the pant leg.
- Now measure the widest part of the pocket and cut out a rectangle by adding 1cm on each side for the seams.
- For the length of the rectangle increase by approximately 10cms which will be for the base of the bag and the doubles at the top of the bag.
- Now sew the bias binding all the way around the pocket.
- Pin the pocket to the rectangle.
- Then sew a piece of bias binding to cover the joining of the fabrics taking care not to close the pocket.
- Then make a pocket by cutting out a small rectangle and glue it to the inside, then sew the sides and before closing one of the ends place a piece of ribbon on top and sew it well. Then zig zag all around the bag.
We are already well ahead, aren't we?
- Now fold the bag in half, you will have 1 triangle on each side, draw a straight line and sew a seam, then trim the excess and finish with zig zag.
- Turn over and iron to smooth out all the seams, trim, glue or sew two pieces of magic zipper and you are done.
- Look how the pocket looks like the front part and at the same time like a pocket on the inside, I thought this idea was very good hahaha.
I really loved this bag!
Source of the drawing:
https://www.google.com/search?q=dibujos+of+makeup&tbm=isch&ved=2ahUKEwibzfHNo-L0AhUShOAKHZyoAbgQ2-cCegQIABAA&oq=drawings+of+&&
And it's time to say goodbye, but not before mentioning that I translated my post with DeepL, I used HTML tags and the photos are captured by my Blu G5 phone and edited with Pic Collage.
I hope you like my step by step and thank you very much for your visit, support and as always, if you liked it I will love to see your comment.
Greetings, blessings and good luck to all of you.
You are loved.
Espectacular le agregaras ese detalle de pintura, que te ha quedado perfecto, felicidades. Gracias por participar en el concurso.
Buenas noches, muchas gracias @equipodelta
Genial me gustó mucho tu portacosméticos te a quedado muy bien.
@lexim muchas gracias.
Saludos.
que bonito quedp ese ojo!