

Greetings artistic community, artisans and other visitors, I hope everyone is in good health and others, my best vibes at this time for all.
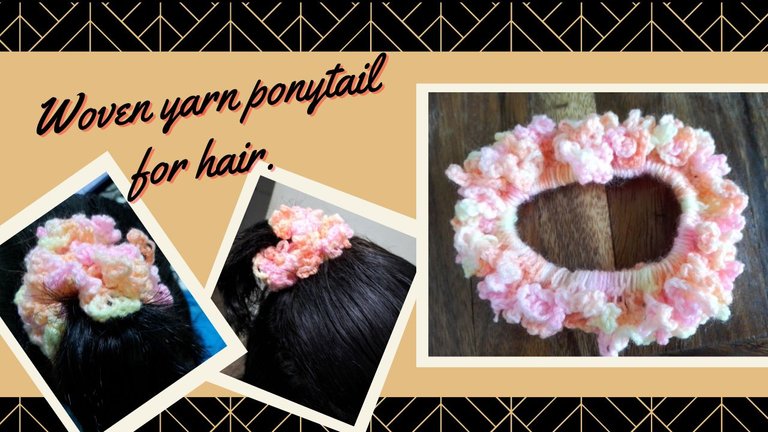
Remember those cute little yarn or wool bows from the 90's? They are back.
These hair buns (known like this in my city) or ponytails, were very fashionable in the 90's, my mother wove many for me because at that time I had my hair to my waist, long and straight, beautiful, so I was always decorating it. Although this may be another topic, now that I wear short pixie style hair, I'm letting it grow a little but I can't stand it anymore, too much heat and it's heavy. As an anecdote I just told you that I wore hair extensions, I bought hair and I went to the hairdresser to weave me some hairpins, I did not take into account in my ignorance that it would be too stressful and painful, an attempt to recover my long natural hair was frustrated because the headache that gave me the weight and the pressure of the hairpins began to raise my blood pressure, I went to the doctor and he told me that I can not wear those things anymore. Well, I can't grow my hair either because menopause suffocates me with the heat, hahaha! That's wearing and accepting menopause in style.
Friends, this was my inspiration to create this hair accessory, my mother taught me to weave them, I had several friends who did it as a business, they sold them and I have noticed that in my town they are appearing again along with ribbons and bows but of other materials. Today I show you this idea to undertake, it is economical and easy to make that you can take advantage or just to give away as in my case, which will be a gift from some relatives who enjoy beautiful long and straight hair. I was looking for them as a rosemary stick to take pictures showing my product but they were not around at that time, only this model with short hair but it is just as beautiful.
Joy, let's create!

Saludos comunidad artística, artesana y demás visitantes espero todos se encuentren muy bien de salud y demás, mis mejores vibras en estos momentos para con todos.
¿Recuerdas esas bellas moñeras o colitas de estambre o lana de los años 90's? Están de vuelta.
Estas moñeras (conocidas así en mi ciudad) o colitas para el cabello, estaban muy de moda en los años 90's, mi madre tejía muchas para mí pues yo en esa época tenía mi cabello por la cintura, largo y lacio, precioso, por lo cual siempre estaba adornándolo. Aunque este quizá sea otro tema, ahora que uso cabello corto estilo pixie, estoy dejándomelo crecer un poco pero ya no lo soporto, demasiado calor y pesa. Como anécdota recién les cuento que me puse extensiones, compré cabello y me fui a la peluquería para que me tejieran unas clinejas, no tomé en cuenta en mi ignorancia que sería demasiado estresante y doloroso, un intento de recuperar mi larga cabellera natural se vio frustrada pues el dolor de cabeza que me propinó el peso y lo presada de las clinejas que comenzó a subirme la presión arterial, fui al médico y me dijo que no puedo ponerme esas cosas ya. Bueno, como que tampoco puedo dejarme crecer el cabello pues la menopausia me sofoca con el calor, ¡Jajaja! Eso es llevar y aceptar la menopausia con estilo.
Amigas y amigos, esta fue mi inspiración para crear este accesorio para el cabello, mi madre me enseñó a tejerlas, tenía varias amigas que lo hacían como emprendimientos, las vendían y he notado que en mi localidad están apareciendo de nuevo junto a cintillos y lazos pero de otros materiales. hoy te muestro esta idea para emprender, es económica y fácil de hacer que puedes sacarle provecho o solo para regalar como en mi caso, que serán obsequio de algunos familiares que gozan de hermosa cabellera larga y lacia. A las que estuve buscando como palito de romero para tomarles fotos mostrando mi producto pero no estaban cerca en ese momentos, solo este modelo con el cabello corto pero que queda igual de hermoso.
¡Alegría, vamos a crear!

| |
|---|---|
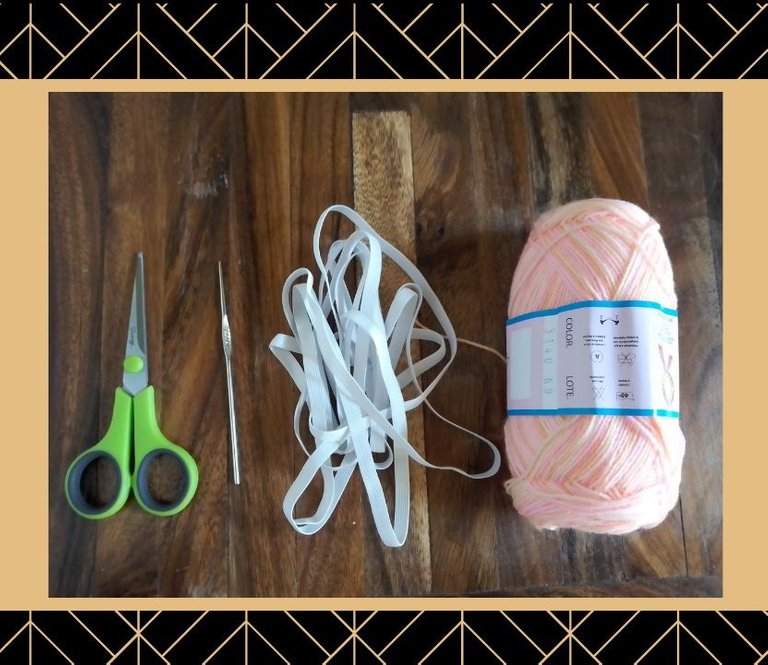
| - Yarn, Wire. | - Estambre. |
| - Scissors. | - Tijera. |
| - Knitting needle. | - Aguja de tejer. |
| - Rubber or elastic. | - Goma o elástico |

Step 1️⃣
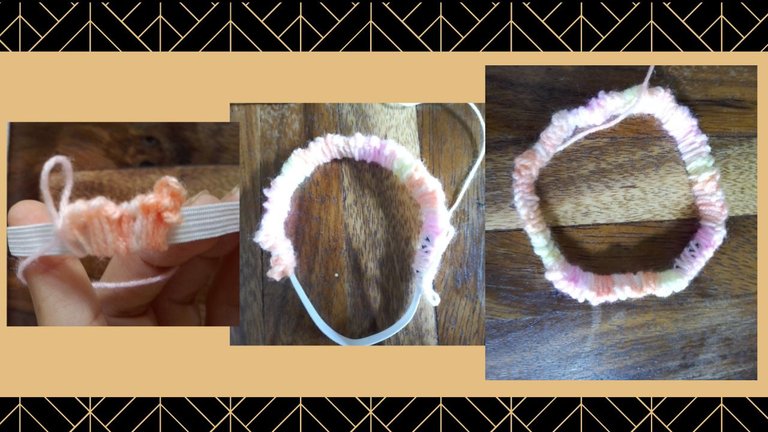
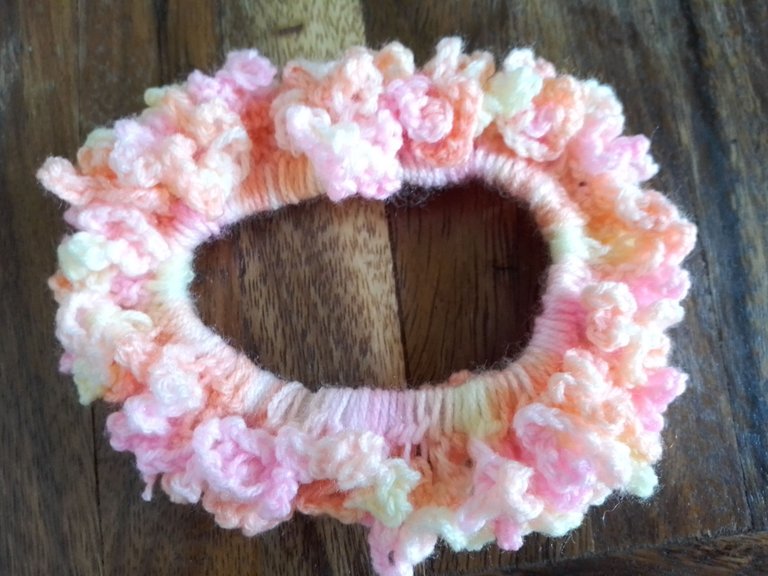
Choose the color of wool or yarn that you like, I chose this one that has shades.
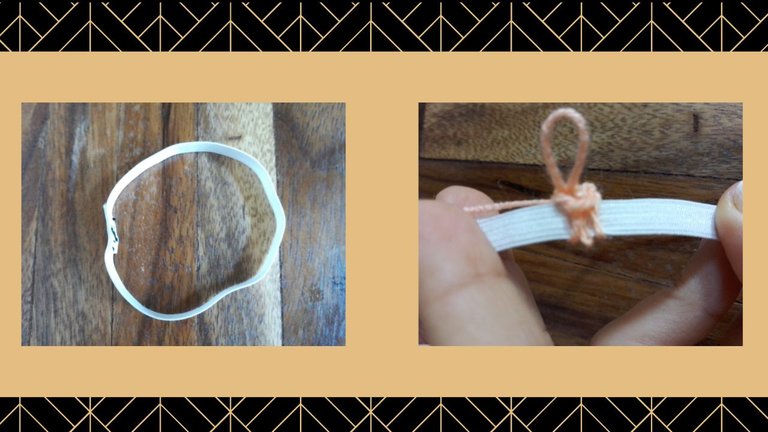
Cut approximately 15 centimeters of gum and join both ends, so that it is well fastened you can give a few stitches by hand with sewing thread and needle, if you have a sewing machine it will be neater.
Now start stitching with the yarn. In this case it was easier for me to make a knot with the yarn in the rubber band.
As you will see in the step-by-step, the stitch to knit this little tail is very simple, it is chains, stockinette stitch and medium high stitch but leaving them far apart from each other and very loose.
As in the gif that I present to you, it is all about bordering the whole comma, it consists of giving a stitch inside and outside, use the gif as a help.
Paso 1️⃣
Elije el color de lana o estambre que sea de tu agrado, yo elegí esta que tiene matices.
Corta aproximadamente 15 centímetros de goma y une ambas puntas, para que quede bien sujeta puedes dar unas puntadas a mano con hilo de coser y aguja, si tienes máquina de coser quedará más prolija.
Ahora comienza a dar las puntadas con el estambre. En este caso se me hizo más fácil hacer un nudo con el estambre en la goma.
Como verás en el paso a paso, el punto para tejer esta colita es muy sencillo se trata de cadenas, punto media vareta y punto medio alto pero dejándolos muy separados de cada uno y muy sueltos.
Como en el gif que te presento, se trata de bordear toda la coma, consiste dando una puntada adentro y fuera, usa el gif como ayuda.
Step 2️⃣
Knit with a loose stitch that allows the gum to stretch.
As you knit, pull the stitch together, when you cover all the gum, you will have finished the first part.
Paso 2️⃣
Teje con el punto flojo que permita el estiramiento de la goma.
mientras vas tejiendo ve arruchando el has logrado, cuando cubras toda la goma, habrás terminado la primera parte.
Step 3️⃣
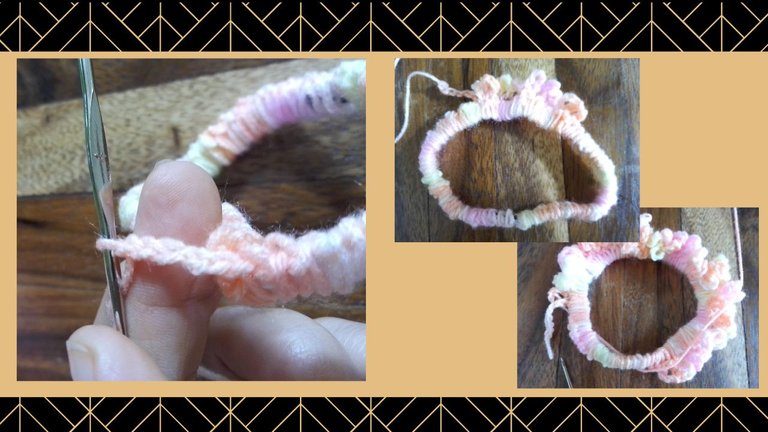
For the next step it is necessary to weave chains of 5 then you join them together leaving two to three stitches of distance approximately one from the other, this is so that they are very loose and look like a little rice.
Repeat this step as many times as you need to create the second layer.
Paso 3️⃣
Para el próximo paso es necesario tejer cadenas de 5 luego la unes de forma muy junta dejando dos a tres puntos de distancia aproximadamente una de la otra, esto es ara que queden muy sueltas y se vean como un arrocito.
Este paso lo vas a repetir las veces que necesites para crear la segunda capa.
Step 4️⃣
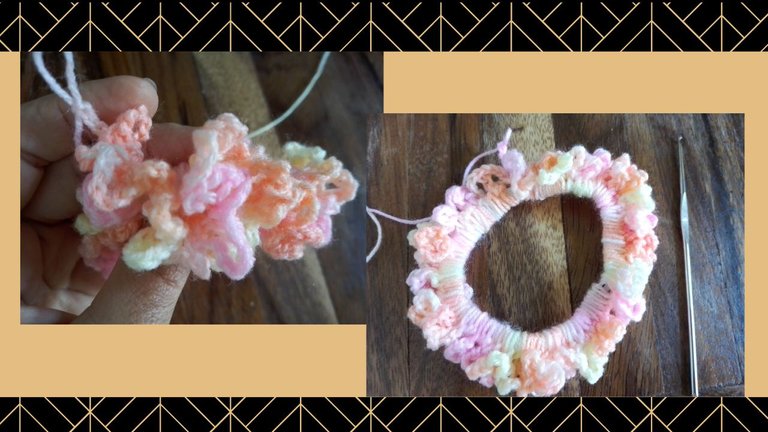
Once you have covered the entire edge, repeat the previous step to weave the third and last layer, in the same way, chains of 5 and join with the lower part leaving spaces of 2 to three chains so that they are very loose.
After you have covered all the rubber again, it's time to tie the knot. My mother taught me a very simple one that does not come loose and is not noticeable.
You just make a chain and pull the stitch in the opposite way, it tightens and stays knotted. It won't come loose.
We have concluded, I hope you like this idea of entrepreneurship and I will make a few of various colors. It is a practice that relaxes me a lot and distracts my mind.
Paso 4️⃣
Una vez cubras todo el borde, repite el paso anterior para tejer la tercera y última capa, de la misma forma, cadenas de 5 y vas uniendo con la parte inferior dejando espacios de 2 a tres cadenas para que queden muy sueltas.
Luego de haber cubierto toda la goma nuevamente, es hora de dar el nudo. Mi madre me enseñó uno muy sencillo que no se suelta y no se nota.
Tan solo haces una cadena y halas el punto de forma contraria, este se aprieta y queda anudado. No se soltará.
hemos concluido, espero te guste esta idea de emprendimiento y te animes. yo haré unas cuantas de varios colores. Es una practica que demás me relaja bastante y distrae la mente.
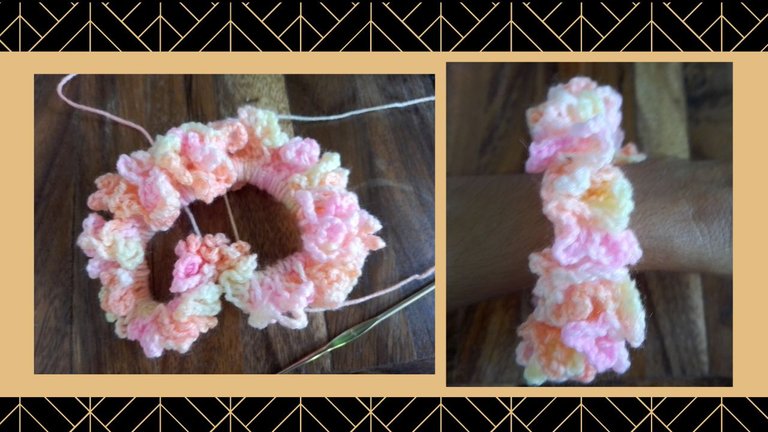
I remember very well when we used to wear them as an accessory on the wrists of our arms, it was common that when we took our hair out for a moment we would leave them there so that they could take shape again. They looked great and were the center of attention. We all wanted one and wanted to have a collection.
Recuerdo mucho cundo las usábamos como accesorio en las muñecas de los brazos, era común que al retirarnos un momento del cabello nos las dejábamos allí para que agarraran forma nuevamente. Se veían estupendas y capturaban el centro de todas las miradas. Todas queríamos una y tener una colección.
¿Qué te pareció?
Credits / Créditos

Hacks, DIY, Crafts, handmade arts Community
![]() 👉
👉 ![]() 👉
👉 ![]() 👉
👉  👉
👉 ![]()
The rewards earned on this comment will go directly to the people( @equipodelta ) sharing the post on Twitter as long as they are registered with @poshtoken. Sign up at https://hiveposh.com.
Hola, este escrito me hizo recordar a dos mujeres importantes en mi vida, mi abuela y mi madre que ya no están conmigo, pero que les encantaban tejer. Hacían de todo, desde colas, sombreros, cintillos, blusas entre otras cosas. Viendo tu post me animaste a tejer, luego les muestro lo que logré hacer. Saludos y felicidades, eres una mujer con muchos talentos. 👋👍🤗
Esos recuerdos son los que busco en mis publicaciones, esas conexiones con nuestros recuerdos y nuestros grandes maestros que siempre serán nuestros padres y abuelos.
Me encantaría ver tus creaciones y ese paso a paso para aprender a recrearlas, gracias por compartir conmigo su experiencia.
excelente, bastante talento, quedo muy hermoso.
No creo que lo intente, ya que dudo de mi capacidad para que quede tan bonito, te felicito y gracias por compartirlo.
Saludos
Muchas gracias Pedro, si quizá no lo intentes pero lo valoras mucho y eso también es importante como las cosas que no se hacer, pero me encantaría aprender, un abrazo.
Te ha quedado super precioso. Yo no sé tejer de esa forma pero si que me gustan y como comentas, las he visto bastante últimamente. Me han encantado los tonos que has elegido 💕
Con respecto a lo del cabello, te entiendo. Yo también tenía muy largo el cabello y empecé a sentir molestias. Era incómodo de peinar, las personas a veces lo jalaban al atorarse con ellos, el peso es mucho. Optar por un corte más cómodo creo que es la mejor opción.
Me encantó tu trabajo, te mando un abrazo.
Hola Carmina, gracias por visitarme, me contenta sean de tu agrado y que también estén apareciendo por allá.
Sabes que? Tienes razón, yo ya ni necesito peinarme, es más cómodo y menos esclavizante tenerlo corto, creo que iré nuevamente a la peluquería pero esta vez a reafirmar mi corte Pixie, al que llamo curiosamente "mamá Kardashian"
Jajaja me encanta ¡Esa es la actitud! Pronto optare también por el cabello bien corto 💙🙏
Que cuchitura, si tuviera mis hijas pequeñas seguro q me pondría a aprender a tejerlas. Que bueno que se pongan de moda nuevamente, me gustaría hacerlas pero nunca en mi vida he tejido, solo coser, y siento q es difícil. Admiro mucho a las personas q tienen el entendimiento, la creatividad y la concentración, siento q se necesita todo eso...
Felicitaciones y gracias por la idea. Un abrazo 🤗🤗
Hola amiga, gracias por visitarme. Dios no me dio hijas pero si muchas sobrinas, jajaj! estoy segura que tendrás alguna. Yo también admiro esas personas que tejen maravillas, me falta mucho por aprender y quiero tejer pañitos... ( Me estoy volviendo algo viejita)
La combinación de colores está perfecto, muy lindo ✨✨✨
Gracias Sylregne, me alegra sea de tu agrado
Que idea tan hermosa my Dear nunca se me hubiese ocurrido buen trabajo 🧡
HOla Chopi estaban muy de moda y es fenomenal verlas de nuevo. A tejer!
Buenos recuerdos bella, a mí me costaba mucho tejer jejeje siempre me quedaba como torcidas jeje😁 que bueno que todavía recuerdes como hacer las colitas 👍 excelente 🤗🤗👏👏
Es lo mejor de esto, traer bellos recuerdos a sus mentes, jajaja! extrañamente no me quedó torcida, pues me pasaba también.
Que recuerdos me trajo esto, no solo las use bastante, sino que las hacía para vender y ayudarme a pagar los estudios. Te quedó increíble 😍😊😊😍
Hola amiga, fuiste una de las que emprendió con ellas, maravilloso, eres la prueba fiel que se puede y guao! pagabas tus estudios con ello, es admirable. Un abrazo.
Hola amiga esta muy bonita la colita, me hiciste recordar cuando era muchacha que hacía esas colitas tejidas. Un fuerte abrazo 🤗
Hola amiga, espero ver algo tuyo tejido por ahí, sería magnifico.
This post has been manually curated by @steemflow from Indiaunited community. Join us on our Discord Server.
Do you know that you can earn a passive income by delegating to @indiaunited. We share 100 % of the curation rewards with the delegators.
Here are some handy links for delegations: 100HP, 250HP, 500HP, 1000HP.
Read our latest announcement post to get more information.
Please contribute to the community by upvoting this comment and posts made by @indiaunited.
Thanks you community
Congratulations, your post has been upvoted by @dsc-r2cornell, which is the curating account for @R2cornell's Discord Community.
Enhorabuena, su "post" ha sido "up-voted" por @dsc-r2cornell, que es la "cuenta curating" de la Comunidad de la Discordia de @R2cornell.
Thank you for sharing this amazing post on HIVE!
Your content got selected by our fellow curator @rezoanulvibes & you just received a little thank you via an upvote from our non-profit curation initiative!
You will be featured in one of our recurring curation compilations and on our pinterest boards! Both are aiming to offer you a stage to widen your audience within and outside of the DIY scene of hive.
Join the official DIYHub community on HIVE and show us more of your amazing work and feel free to connect with us and other DIYers via our discord server: https://discord.gg/mY5uCfQ !
If you want to support our goal to motivate other DIY/art/music/homesteading/... creators just delegate to us and earn 100% of your curation rewards!
Stay creative & hive on!
Thanks you community
WOW.. SIII YO LAS RECUERDO JEJEJE ERAN LO MEJOR.! que lindo trabajo has hecho, felicidades.°!