Greetings to all, creative people of the Hive DIY community. This time I would like to share with you my participation in the community's "😍 Decorated letters 😍" contest, moderated this time by the great @equipodelta.
You can read more of the contest by following this link:.
https://peakd.com/hive-130560/@hive-130560/new-contest-decorated-letters-winners-of-the-previous-contest
In the contest we are invited to exploit our creativity to create decorated letters. We were put no limits on the materials to be used, neither on the theme nor on the style, something great because it allows experimentation, something that can result in the creation of really interesting things.
In my case, this is what happened. I decided to mix letter decorating with my plasticine molding skills and make a decoration that, in my opinion was very interesting. I present to you, then, my letter decorated with plasticine.
Saludos a todos, gente creativa de la comunidad Hive DIY. En esta ocasión me gustaría compartir con ustedes mi participación en el concurso "😍 Decorated letters 😍" de la comunidad, moderado esta vez por la grandiosa @equipodelta.
Pueden leer más del concurso siguiendo este enlace:
https://peakd.com/hive-130560/@hive-130560/new-contest-decorated-letters-winners-of-the-previous-contest
En el concurso se nos invita a explotar nuestra creatividad para crear letras decoradas. No se nos puso límites en cuanto a los materiales a utilizar, tampoco a la temática ni al estilo, algo grandioso porque permite la experimentación, algo que puede resultar en la creación de cosas realmente interesantes.
En mi caso, esto fue lo que sucedió. Decidí mezclar el decorado de letras con mis habilidades en el moldeado de plastilina y hacer una decoración que, en mi opinión quedó muy interesante. Les presento pues, mi letra decorada con plastilina.
English
To be honest, it's not the first time I do letter decorating. When I was studying in high school I did a lot of models and crafts in general, so I got used to do this kind of work.
I almost always used anime as the base material and then the other materials came in, like paints, paper and yes, plasticine too.
For this work, the materials used were the following:.
*Anime (or polystyrene).
*Paints.
*Plasticine.
*Cardboard.
*Glue.
*Tools: needles, scissors, pins, wire.
Español
Siendo honesto, no es la primera vez que hago decorado de letras. Cuando estudiaba en bachillerato hacía muchas maquetas y manualidades en general, así que me acostumbré a hacer este tipo de trabajos.
Casi siempre usaba el anime como material base y luego entraban los otros materiales, como pinturas, papel y sí, plastilina también.
Para este trabajo, los materiales utilizados fueron los siguientes:
*Anime (o poliestireno).
*Pinturas.
*Plastilina.
*Cartulina.
*Pegamento.
*Herramientas: agujas, tijera, pincéles, alambre.
When I decided to participate in the contest, one letter came to my mind, the L letter. It is the letter with which my mother's name begins, but being a letter with such a simple shape, it did not match what I was planning to do at first, so I decided on the G of Gabo, a letter with a slightly more complex shape...
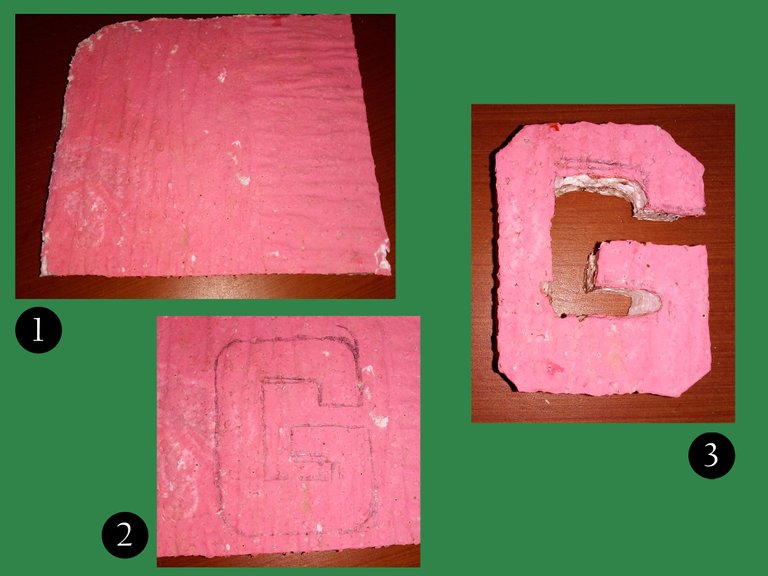
With this in mind, I started to work. I cut a piece of anime I had lying around (1), drew the shape of the letter G (2) and then cut it with a hot needle (3).
Note: Be careful with the hot needle, it heats up very fast and you can get burned, I tell you from experience....
Cuando decidí participar en el concurso, se me vino una letra a la mente, la L. Es la letra con la que comienza el nombre de mi madre, pero al ser una letra con una forma tan simple no daba juego con lo que, en un comienzo, planeaba hacer, así que me decidí por la G de Gabo, una letra con una forma un poco más compleja...
Con esto en mente, comencé a trabajar. Corté un trozo de anime que tenía por allí guardado (1), le dibujé la forma de la letra G (2) y luego lo corté con una aguja caliente (3).
Nota: Tengan cuidado con la aguja caliente, se calienta muy rápido y se pueden quemar, se los digo por experiencia...
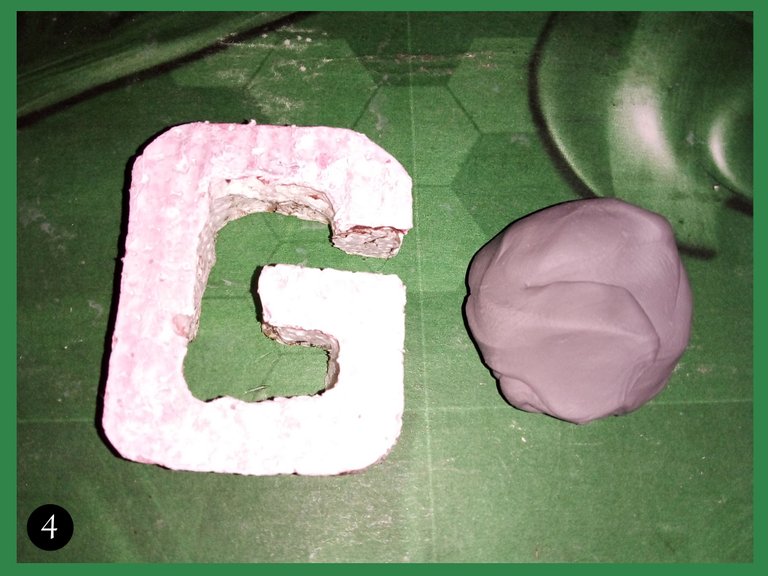
The idea was to turn this simple anime letter into something similar to a letter made of rock, with which I could make a diorama that in my mind was already drawn, so the first thing I had to do for this was to cover the letter with plasticine, in this case gray plasticine.
La idea era la de convertir esta simple letra de anime en algo similar a una letra hecha de roca, con la que pudiera hacer un diorama que en mi mente ya estaba dibujado, así que lo primero que debía hacer para esto era cubrir la letra con plastilina, en este caso plastilina gris.
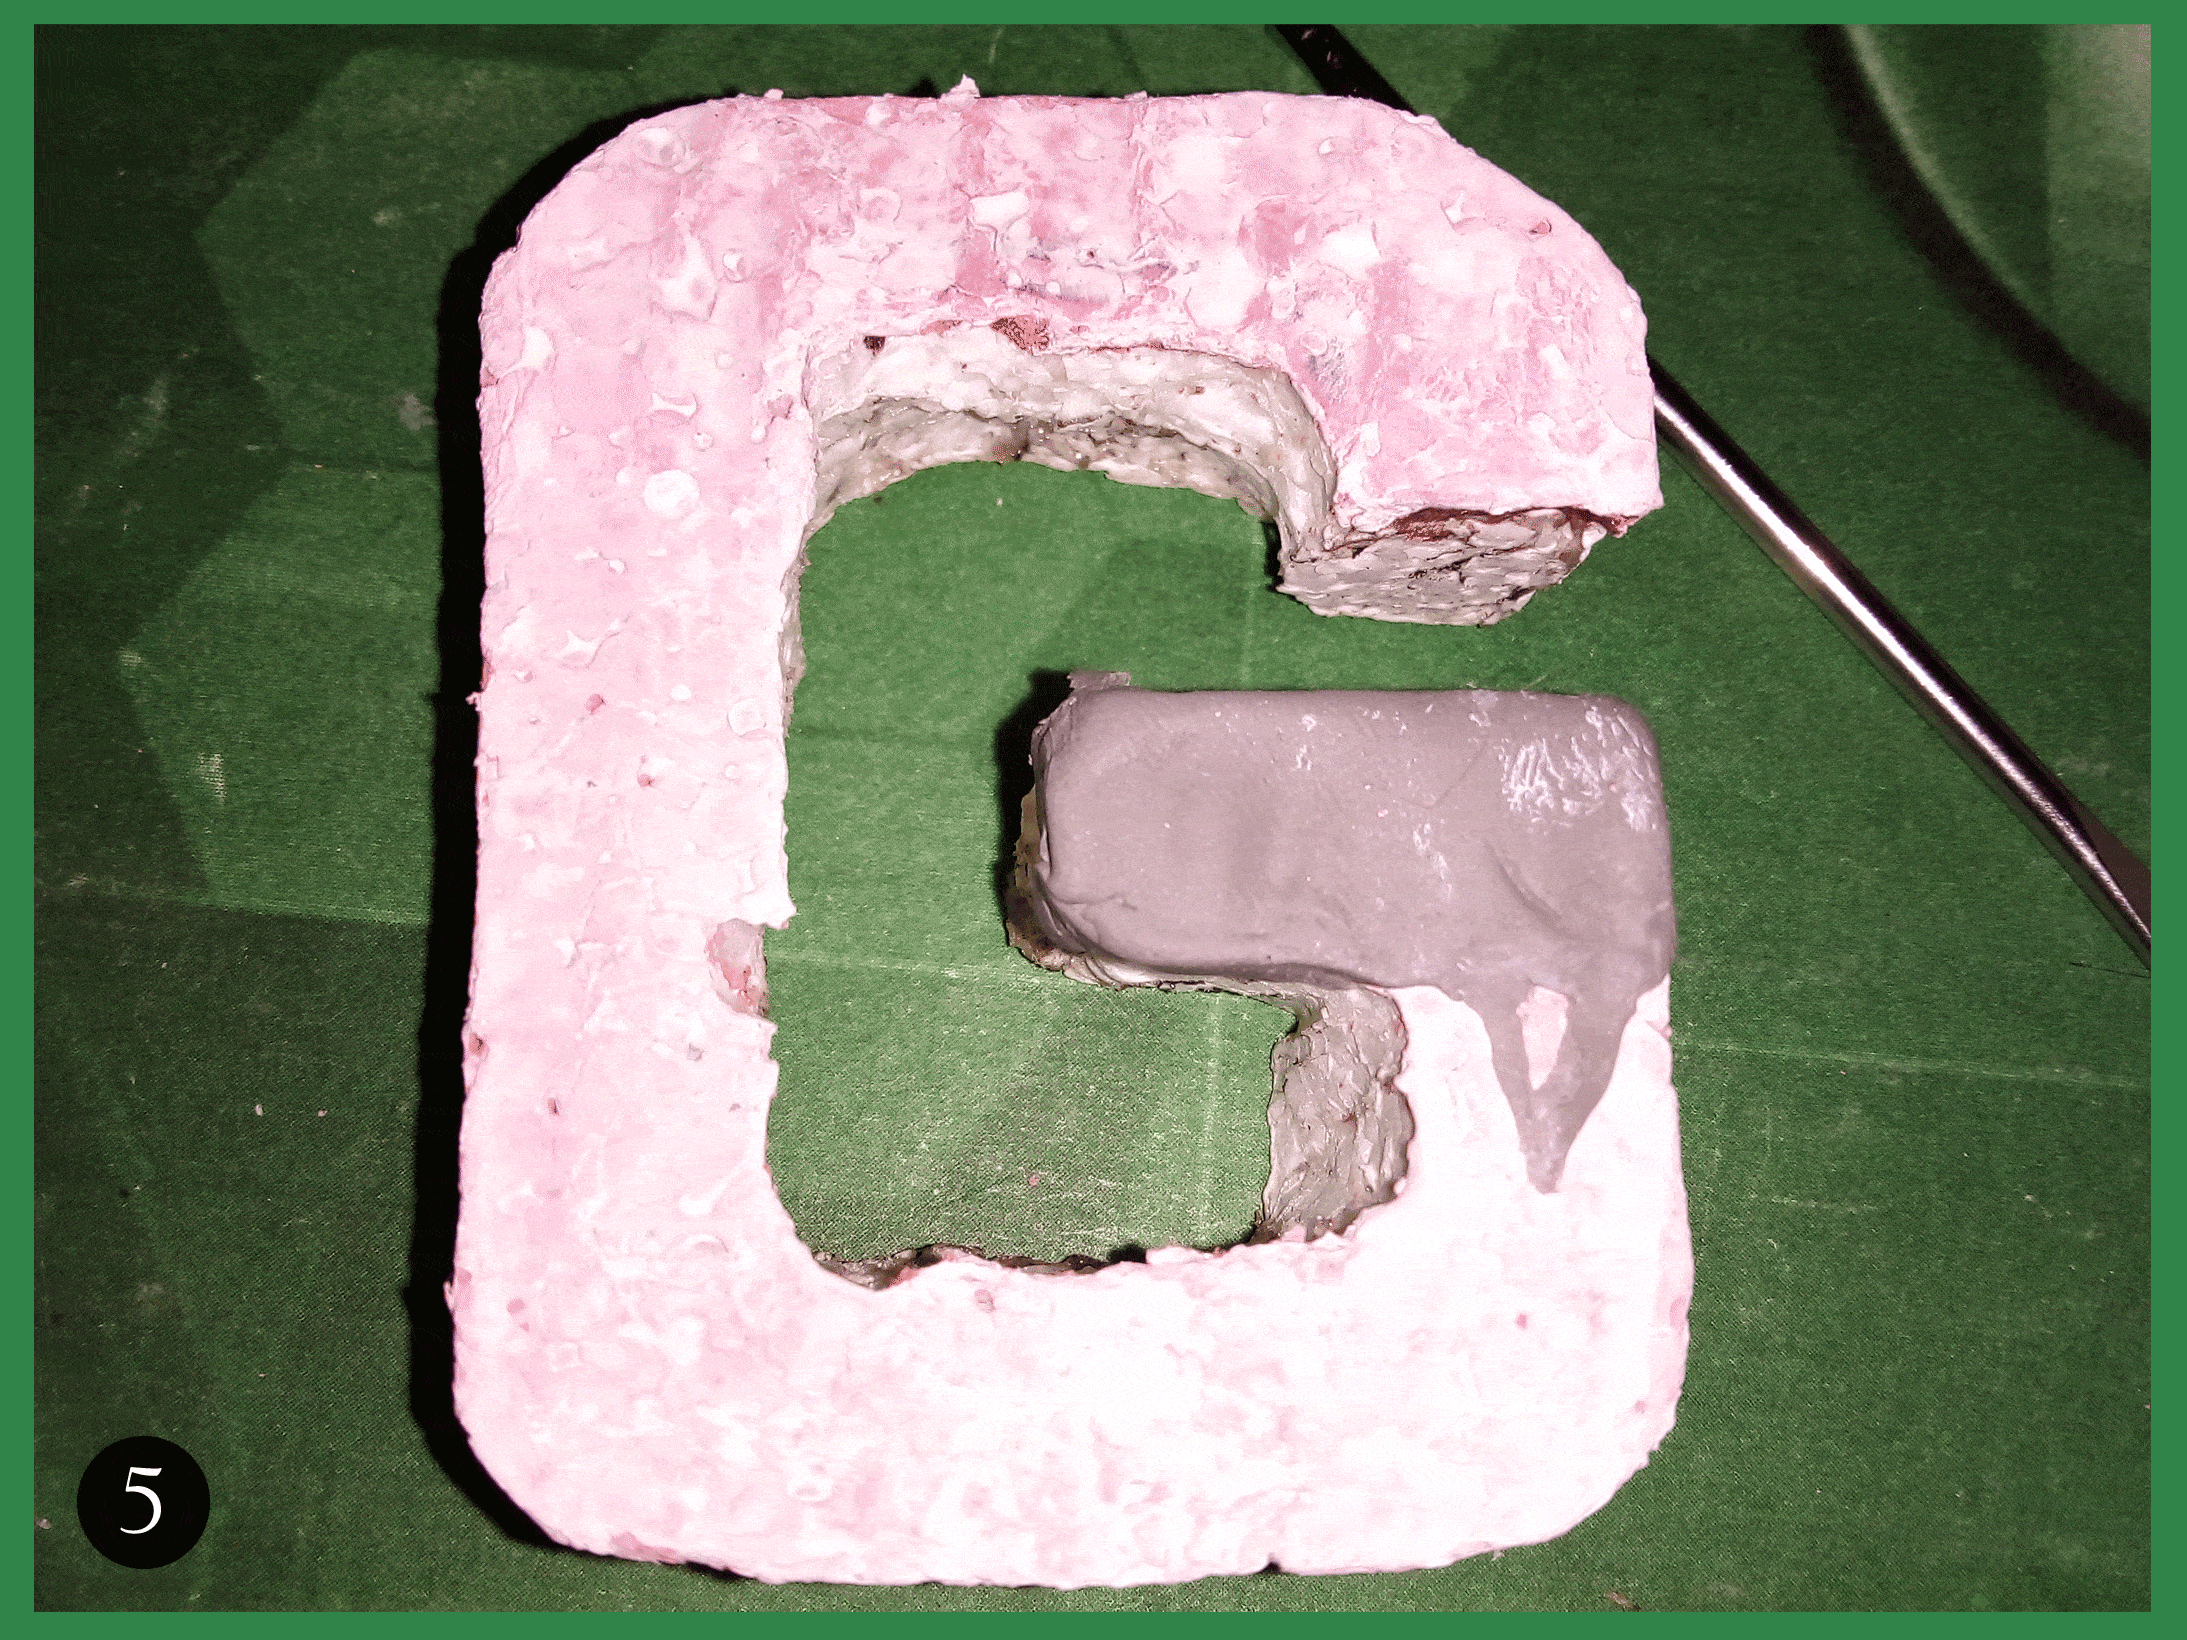
In this way I began to cover the letter layer by layer, making thin plasticine sheets and stretching it over the surface of the letter until it was completely covered, both on the outer and inner sides.
De esta manera comencé a cubrir la letra capa por capa, haciendo lásminas delgadas de plastilina y estirandola sobre la superficie de la letra hasta cubrirla por completo, tanto en las caras exteriores como en las caras interiores.
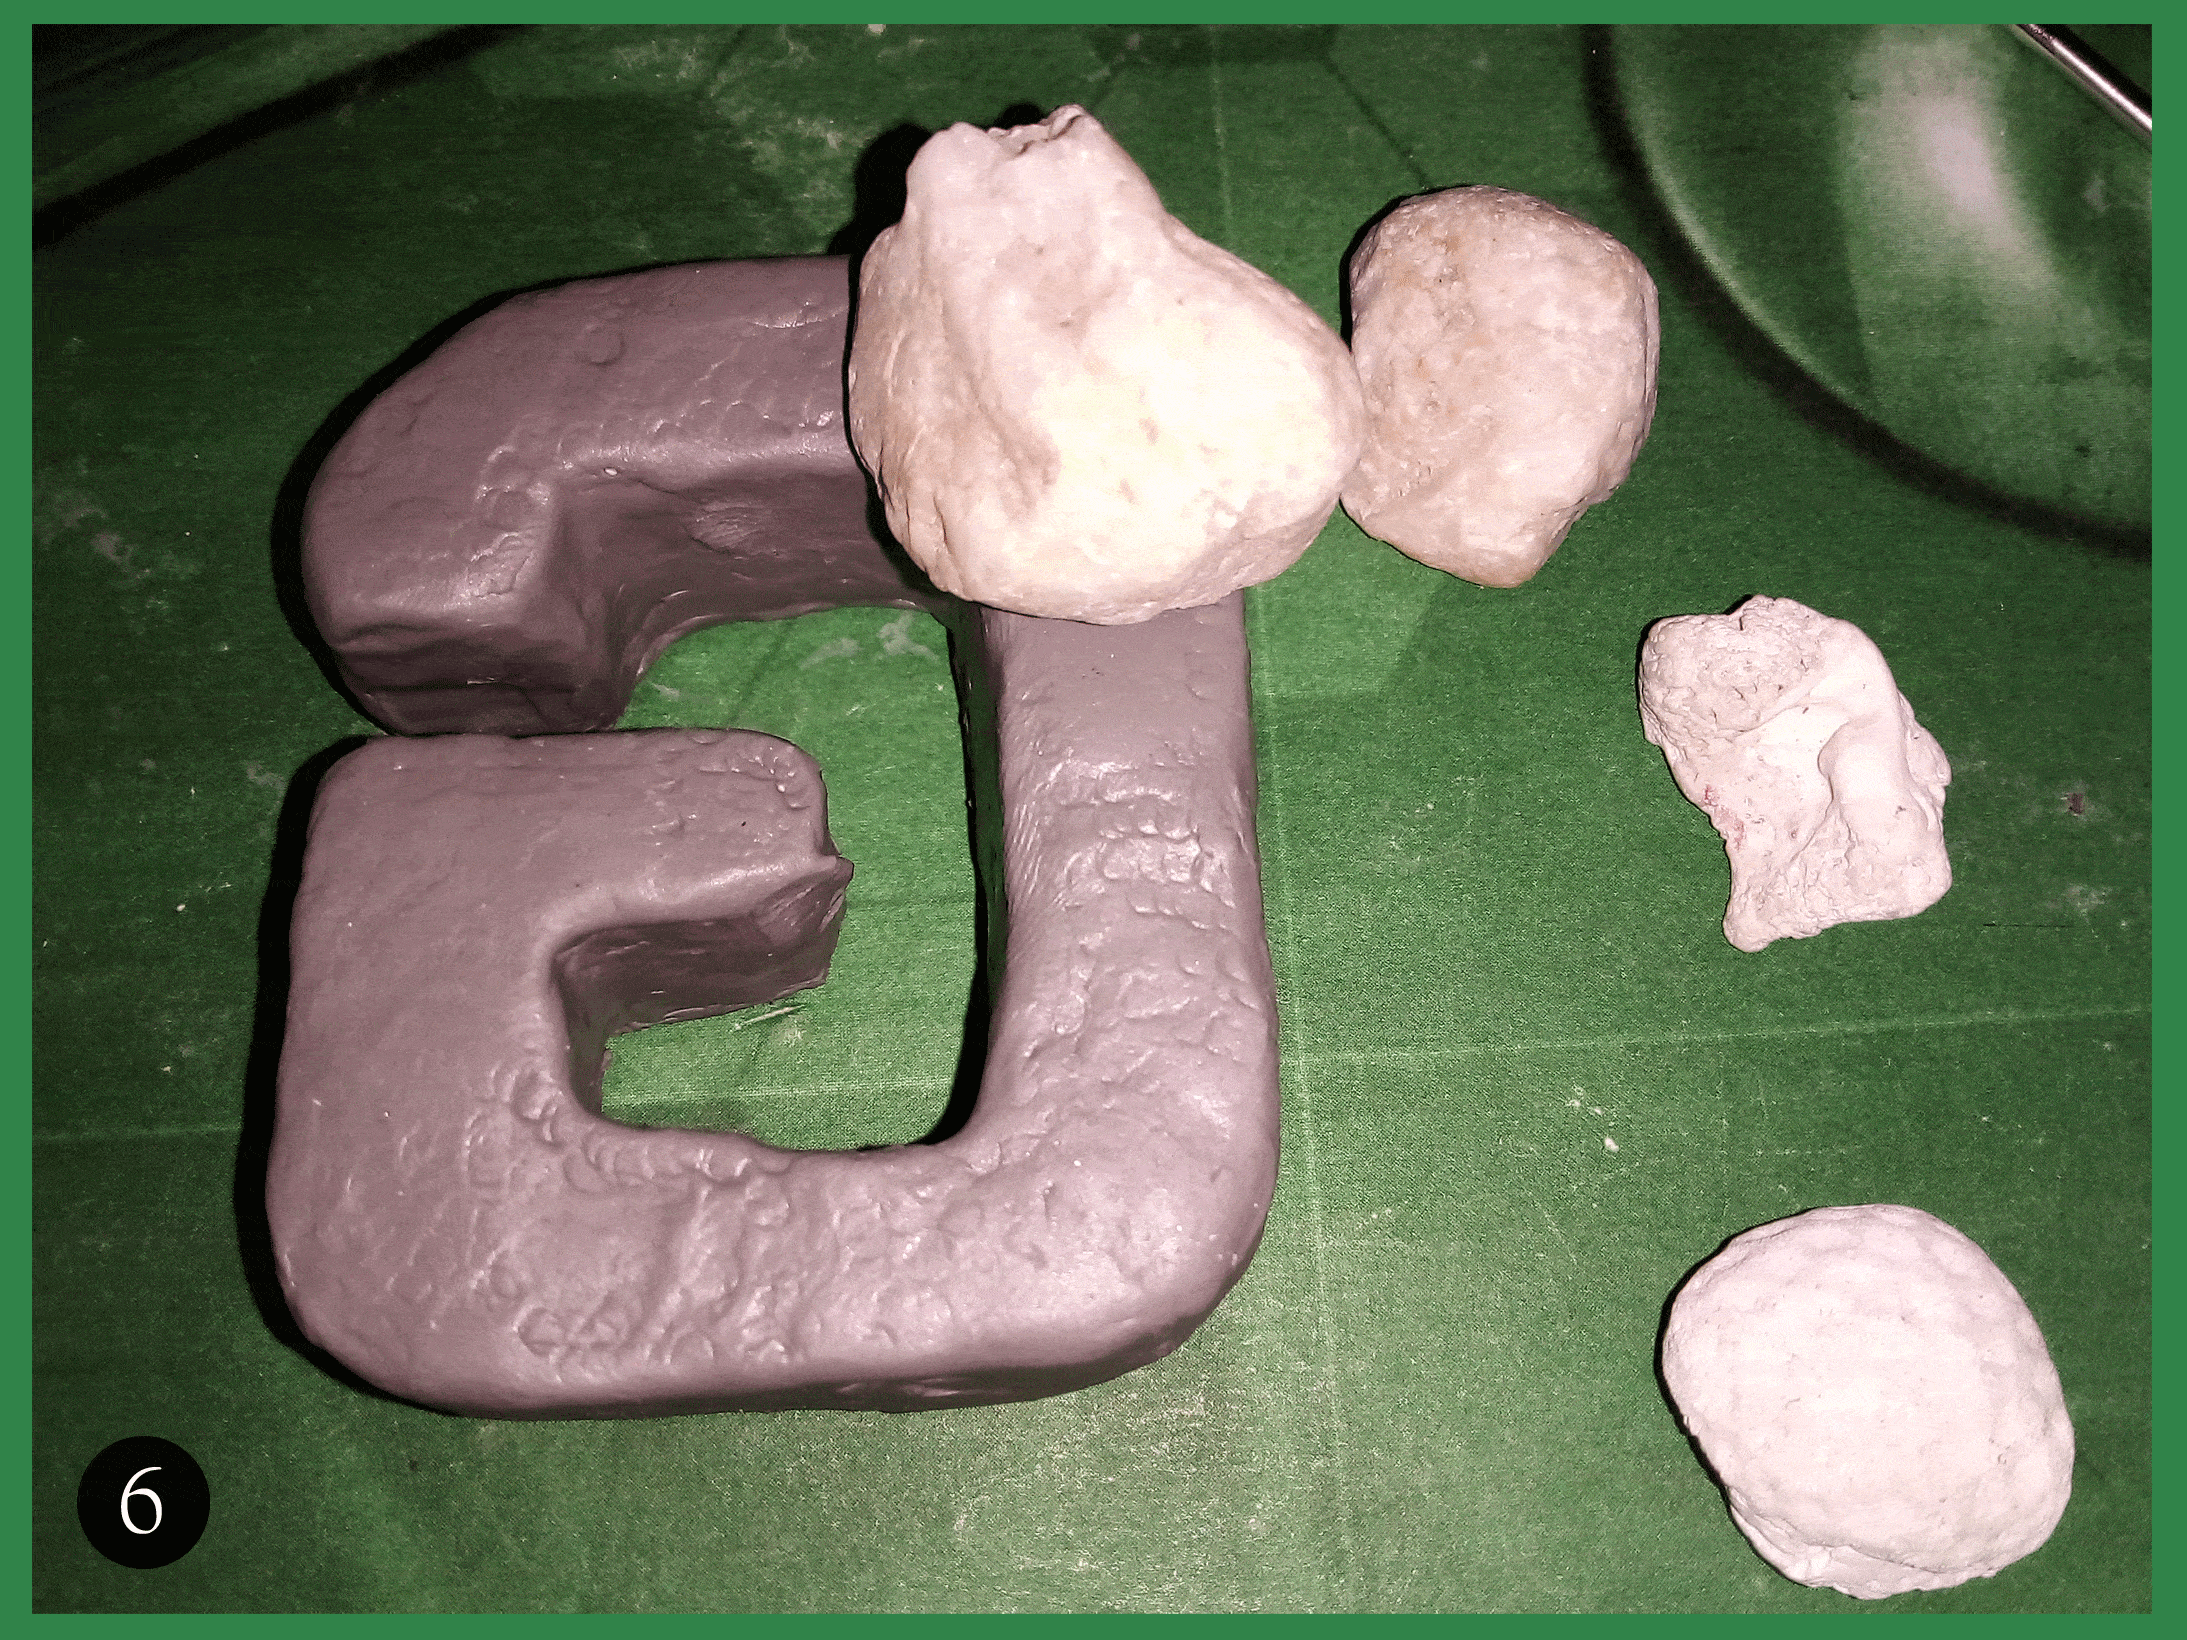
Now, there are ways to create rock-like textures, but the easiest way, in my experience, is to use other rocks.
Plasticine is a moldable material, so it can be textured by simply applying pressure with the pattern we want to engrave in the plasticine.
In my case I used several rocks to gently hit the plasticine surface of my letter, achieving to engrave on it the texture of these rocks.
Ahora bien, hay maneras de crear texturas similares a las de una roca, pero la manera más sencilla, en mi experiencia, es usando otras rocas.
La plastilina es un material moldeable, así que se puede texturizar simplemente aplicando presión con el patrón que queremos grabar en la plastilina.
En mi caso yo usé varias rocas para golpear suavemente la superficie de plastilina de mi letra, logrando grabar sobre esta la textura de estas rocas.
Once we have given texture to our letter, we have to start with the other aspects that will serve to decorate this G-shaped "rock".
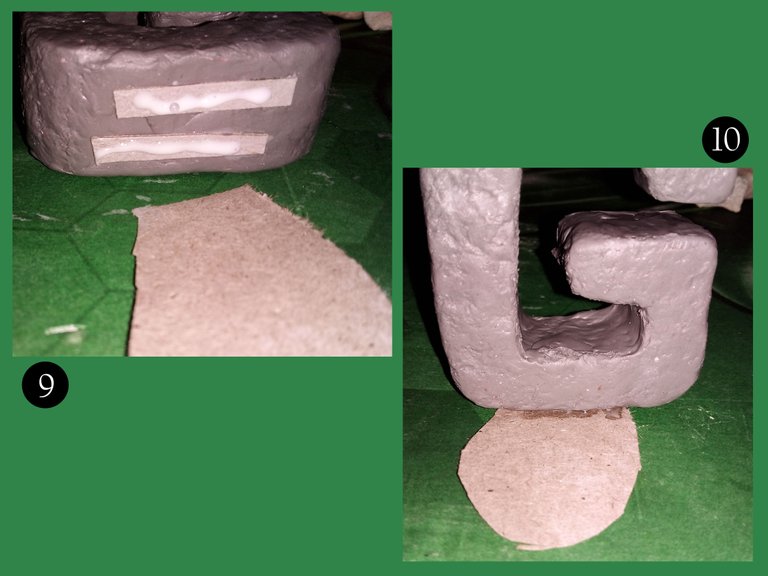
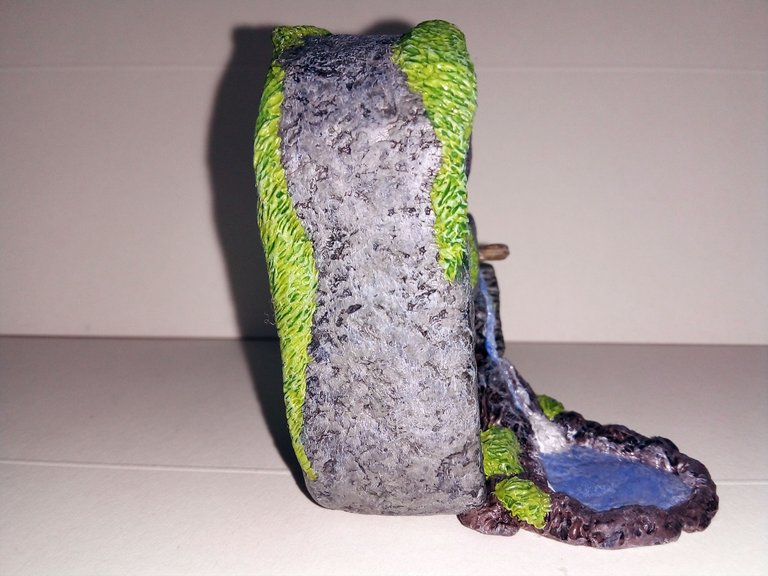
One of those aspects is a small waterfall that falls into a small pond at the base of the letter. To do this, first cut out a small piece of cardboard in the shape of a balloon and glue it to the base of the letter.
When I did this, I noticed that it was uneven, so I had to cut two strips of cardboard (7) and glue them to the base of the letter (8).
Una vez que le hemos dado textura a nuestra letra, hay que comenzar con los otros aspectos que serviran para decorar esta "roca" con forma de G.
Uno de esos aspectos es una pequeña cascada que cae hacia un pequeño estanque en la base de la letra. Para hacer esto primero hay que recortar un pequeño trozo de cartulina con forma de globo y pegarlo en la base de la letra.
Al hacerlo, noté que quedaba desnivelada, así que tuve que tuve que cortar dos tiras de cartulina (7) y pegarlas en la base de la letra (8),

Now we add glue to the two strips of cardboard (9) and glue the balloon-shaped piece of cardboard on them (10).
Ahora sí agregamos pegamento a las dos tiritas de cartulina (9) y pegamos sobre estas el trozo de cartulina con forma de globo (10).
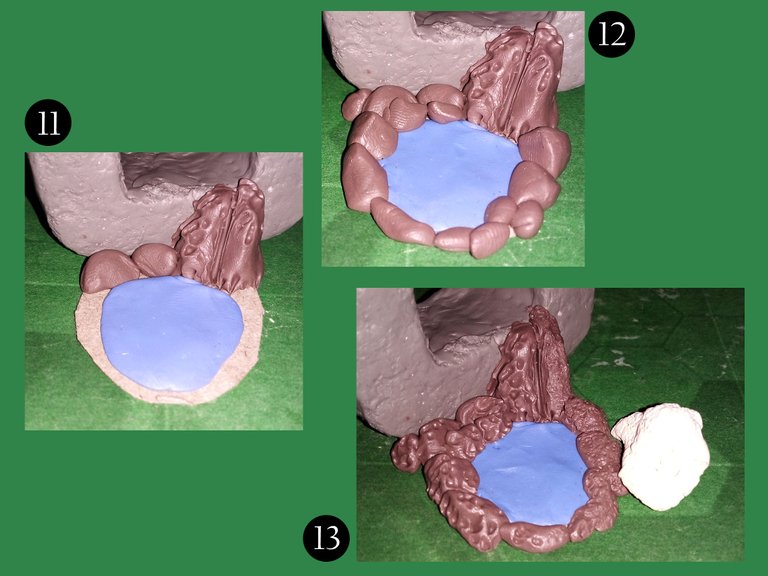
The next thing to do is to start adding plasticine on the piece of cardboard. First a blue plasticine disk, which will be the water, then the rocks (11). We have to place two long rocks that will be the rocks where the water will fall, then smaller rocks around the blue disk (12).
As we did with the surface of the letter, we will give these small rocks a rock texture using the small rocks we used before (13).
Lo siguiente es comenzar a agregar plastilina sobre el trozo de cartón. Primero un disco de plastilian azul, que será el agua, luego las rocas (11). Hay que colocar dos rocas alargadas que serán las rocas por donde caerá el agua, luego rocas más pequeñas alrededor del disco azul (12).
Tal como hicimos con la superficie de la letra, a estas pequeñas rocas le daremos textura de roca usando las pequeñas piedras que usamos anteriormente (13).
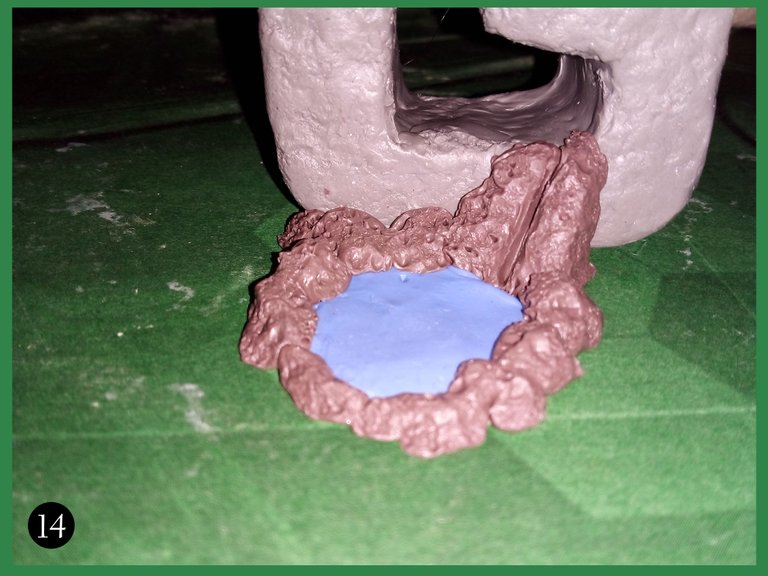
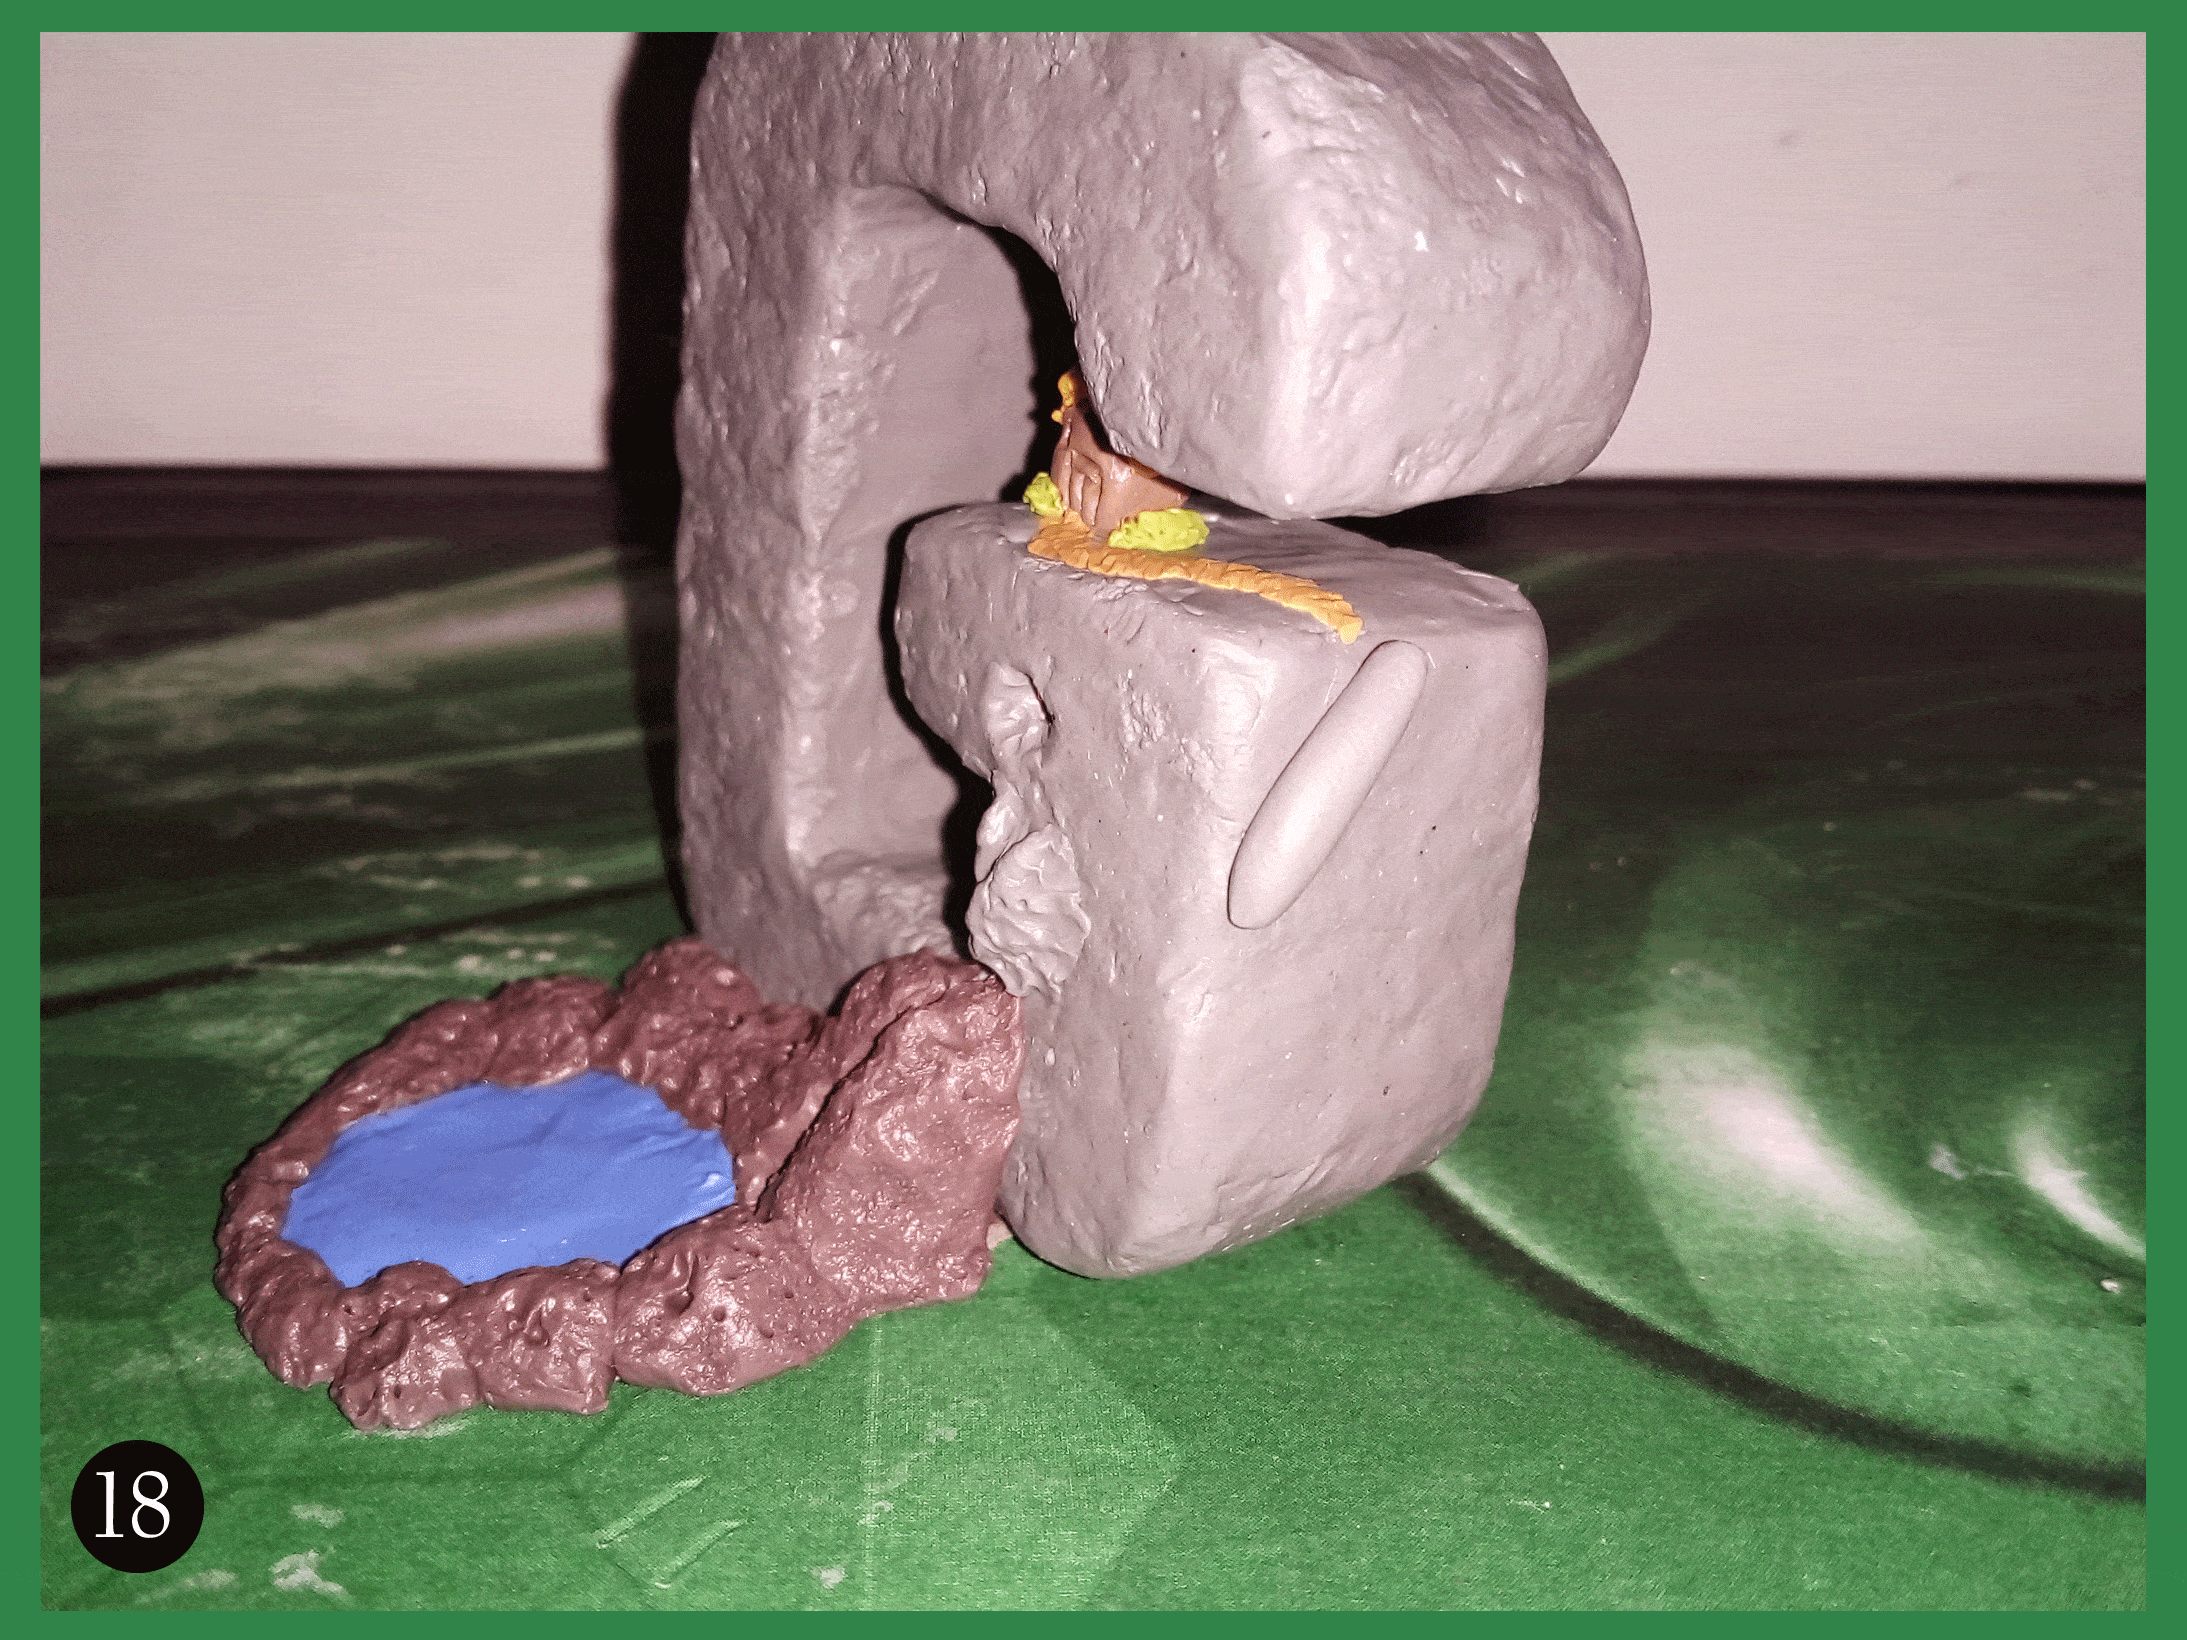
Below is a picture of how this pond is coming along so far:
A continuación una fotografía de cómo va quedando este estanque hasta el momento:
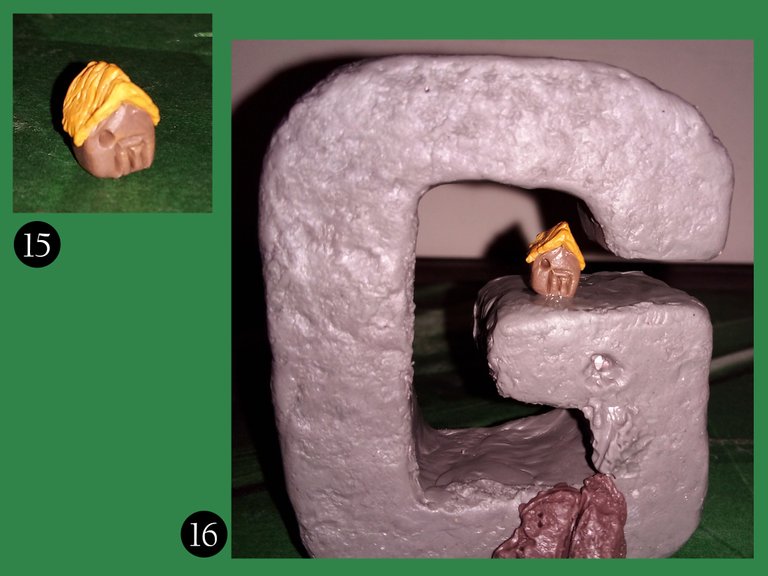
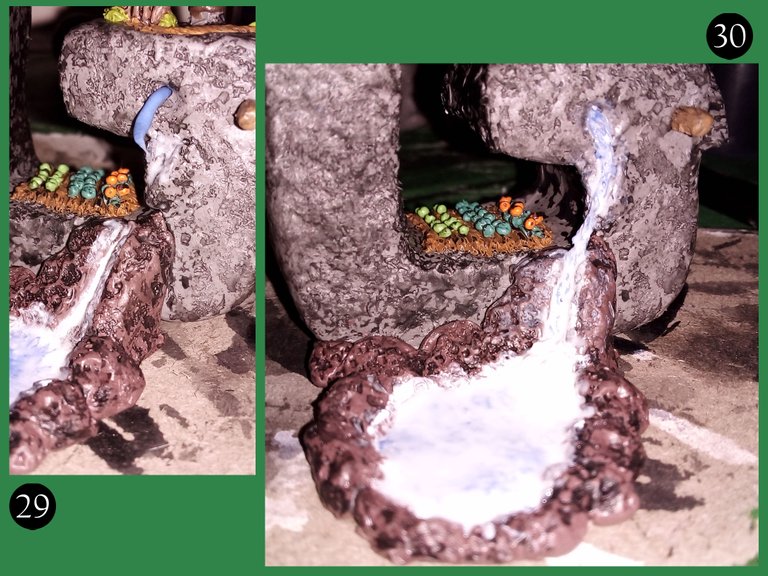
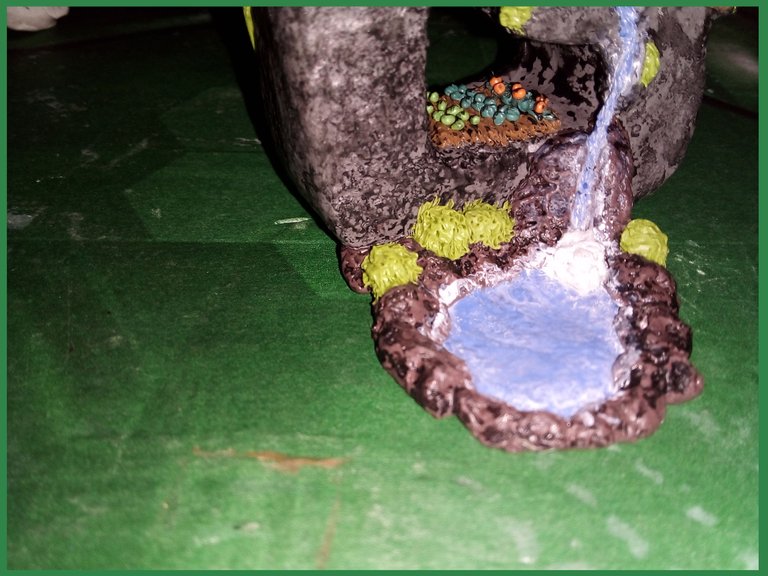
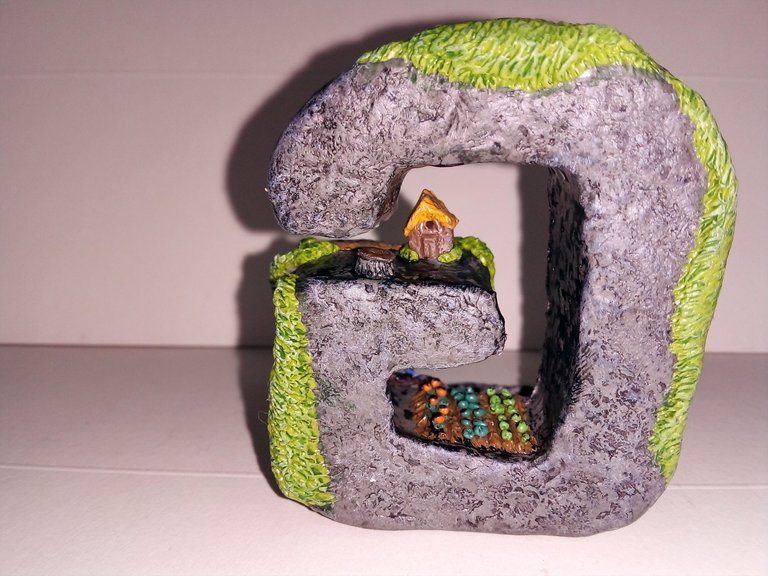
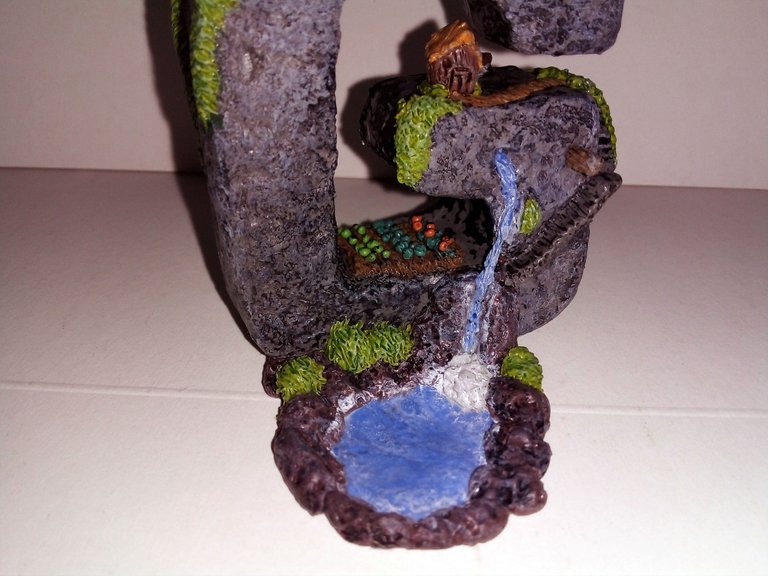
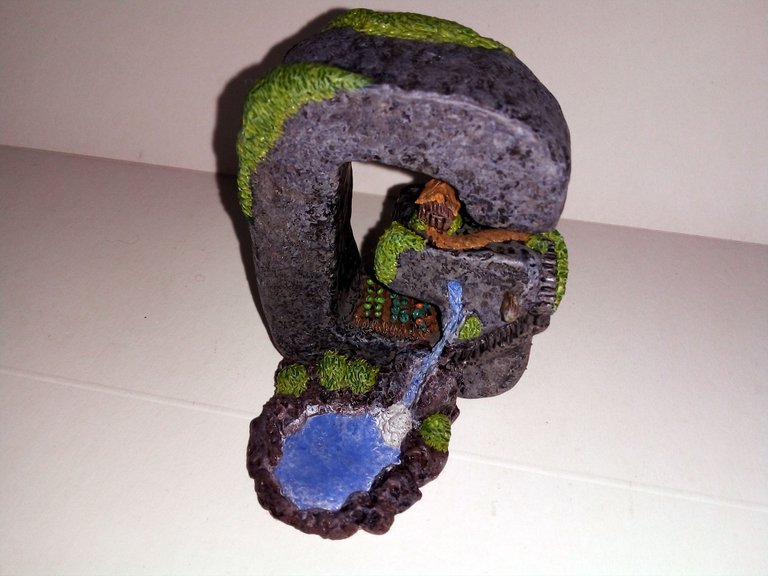
In addition to the pond, I wanted to make a kind of house with a garden, a path and even a small garden, so the first thing I did was the little house, a very small one (15), then I placed it in the place that I arranged for it (16).
If you look closely, a little above the high rocks of the pond there is a hole and further down a "rock" ledge, because that is where the water will fall into the pond (16).
Además del estanque, quería hacer una especie de vivienda con jardin, un camino y hasta un pequeño sembradío, así que lo primero que hice fue la casita, una muy pequeñita (15), luego la coloqué en el lugar que dispuse para esta (16).
Si se fijan bien, un poco más arriba de las rocas altas del estanque hay un agujero y más abajo una saliente de "roca", pues por allí es donde caerá el agua hacia el estanque (16).
With the house in place, I began to make the jardon, which is nothing more than small pieces of green plasticine around the house. These I pressed them several times with the sharp point of the needle to make them look like a bush.
Then I made the path with a thin strip of orange play dough, made a few lines with the needle and then flattened it a bit.
Con la casa en su lugar, comencé a hacer el jardón, que no es más que unos pequeños trozos de plastilina verde alrededor de la casa. Estos los presioné varias veces con la punta filosa de la aguja para hacerlos parecer un arbusto.
Luego hice el camino con una tira delgada de plastilina naranja, le hice unas cuantas líneas con la aguja y luego la aplasté un poco.
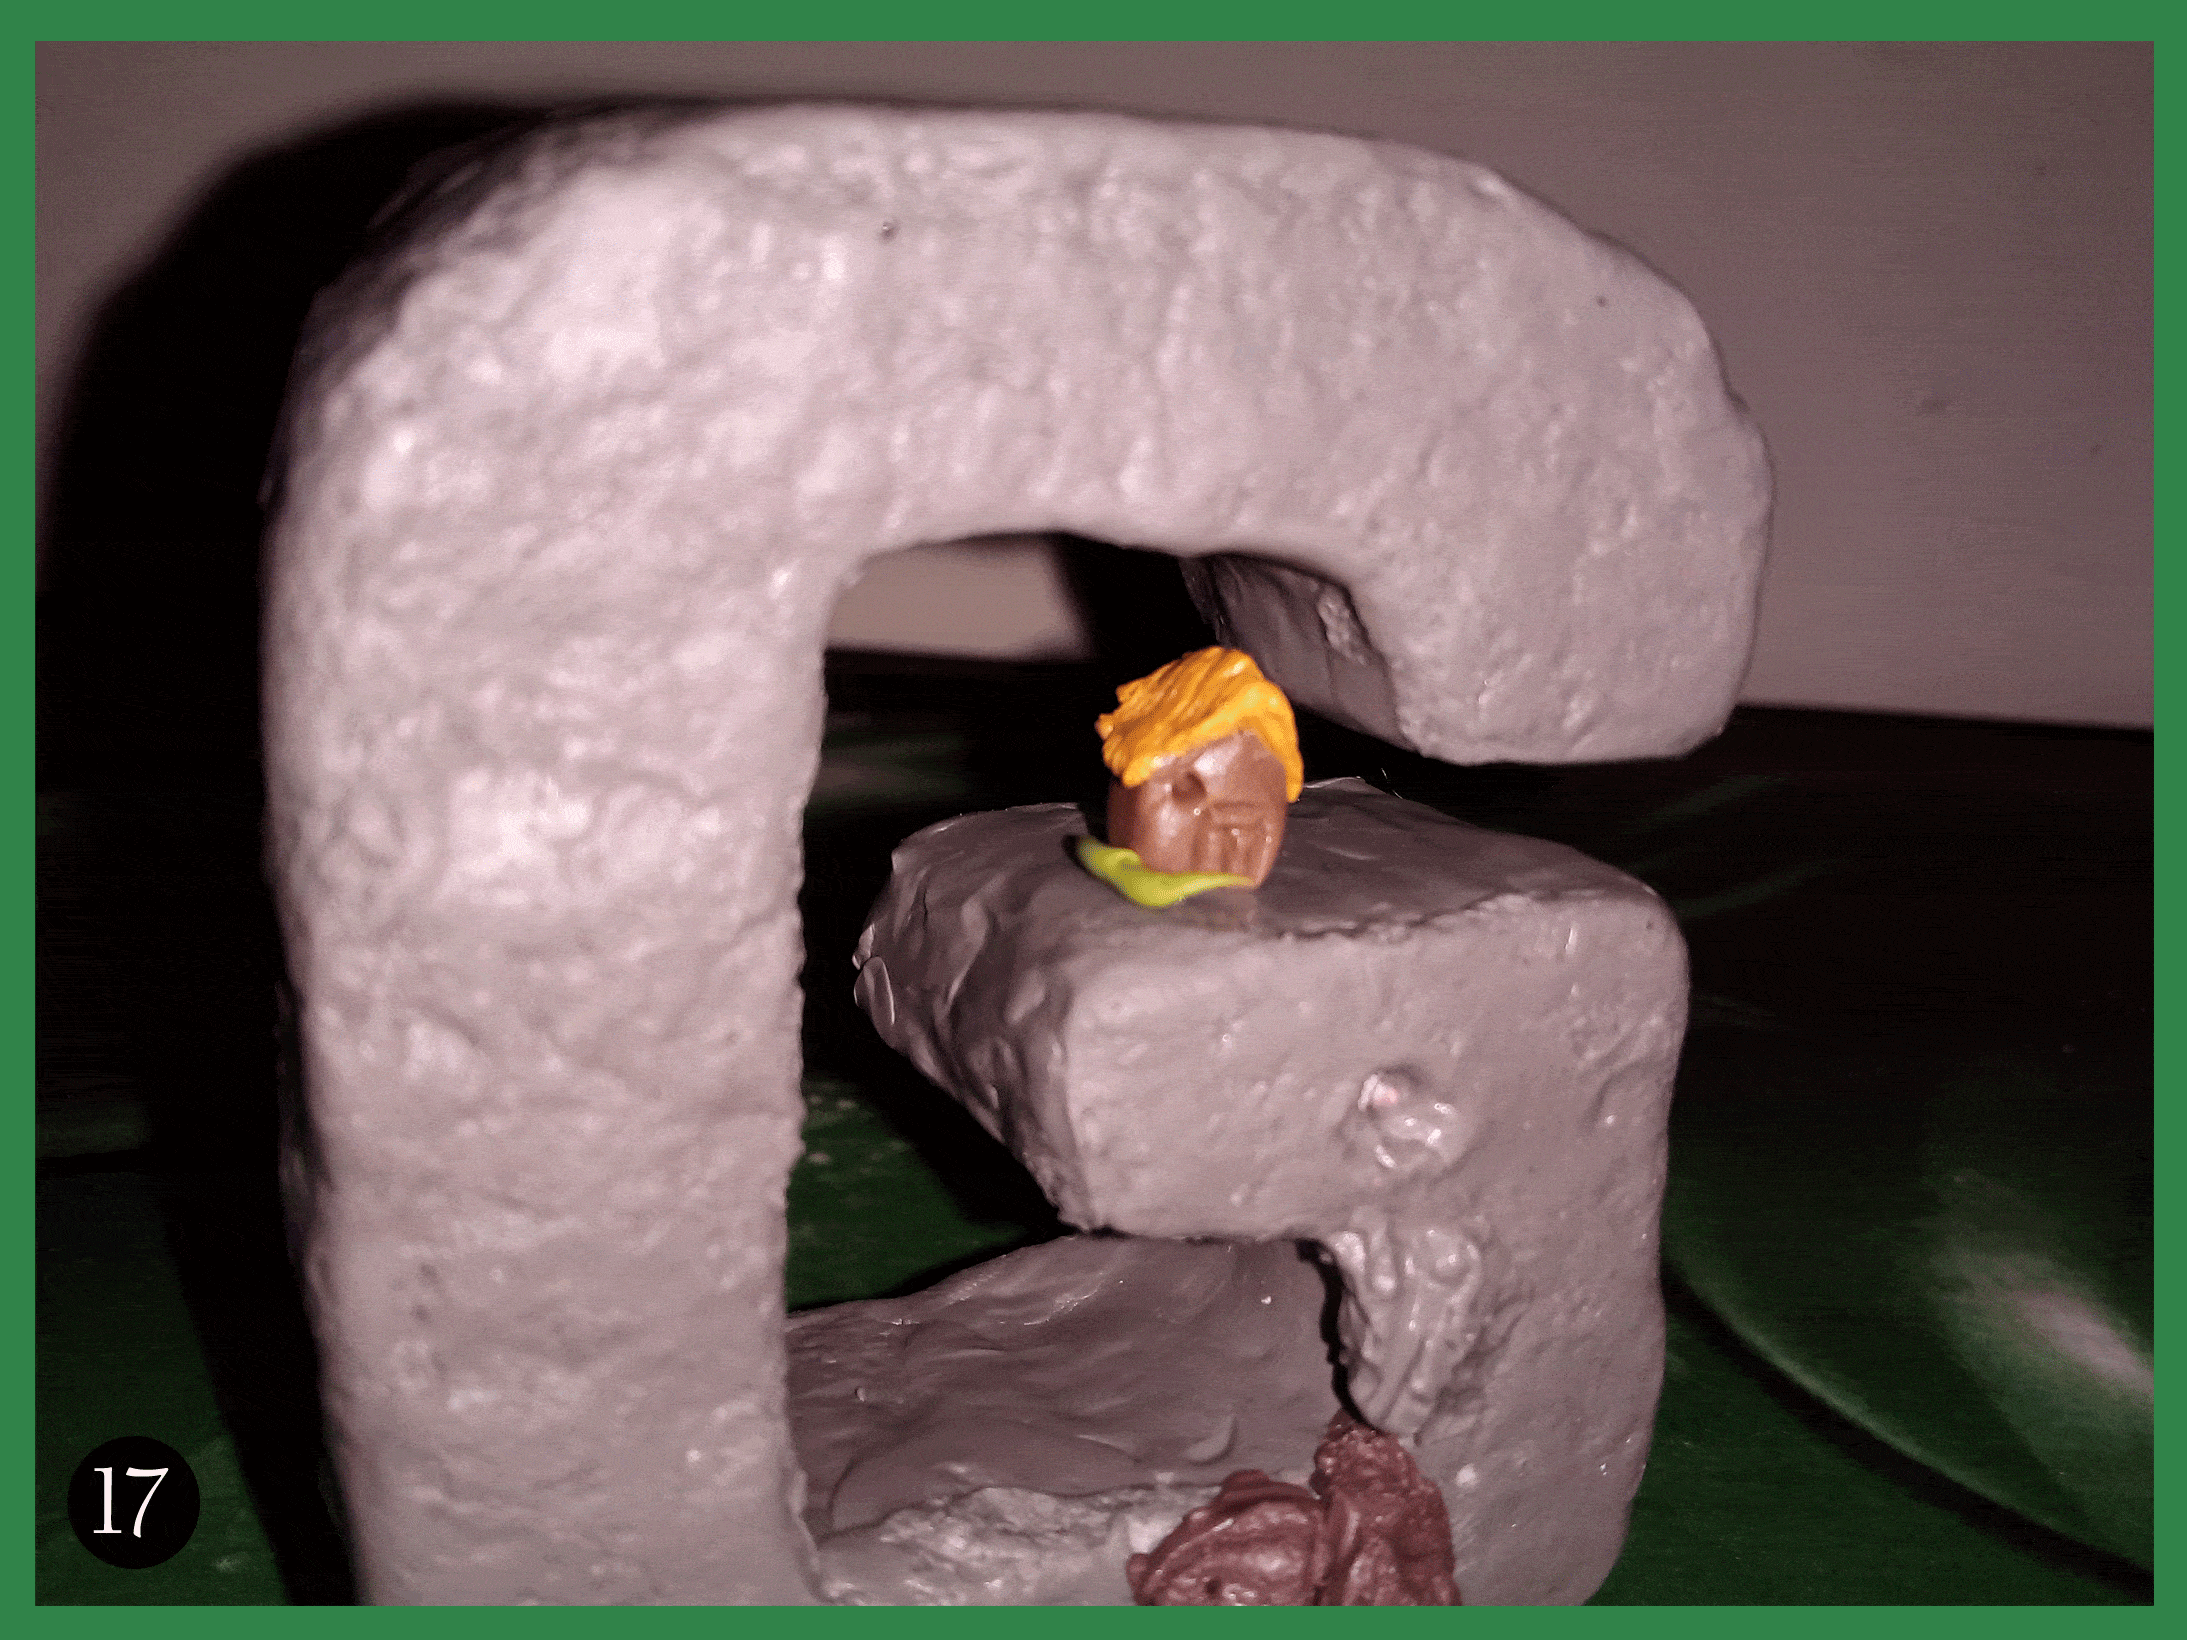
I also made a small ladder on one side, so that whoever lives in the small house can climb down to solid ground. In the image below you can see the process of molding the ladder.
También le hice una pequeña escaleta a un costado, para que el que sea que vive en la pequeña casa pueda bajar a tierra firme. En la imagen a continuación puede ver el proceso de moldeado de la escalera.
There on one side of the hole where the waterfall water will come out, I nailed a thin piece of wire with some plasticine on the tip (19), this would simulate a log embedded in the wood. I simply placed it, it serves no purpose or anything.
For the plantation I planned to place in this diorama, I cut a square piece of plasticine (20) and glued it on the lower part of the letter G, there would be the plantation, near the water (21).
Ahí a un lado del agujero por donde saldrá el agua de la cascada, clavé un delgado trozo de alambre con un poco de plastilina en la punta (19), esto simularía un tronco incrustado en la madera. Simplemente lo coloqué, no cumple ningún propósito ni nada.
Para el sembradío que planeaba colocar en este diorama, corté un trozo cuadrado de plastilina (20) y lo pegué sobre la parte baja de la letra G, allí quedaría el sembradío, cerca del agua (21).
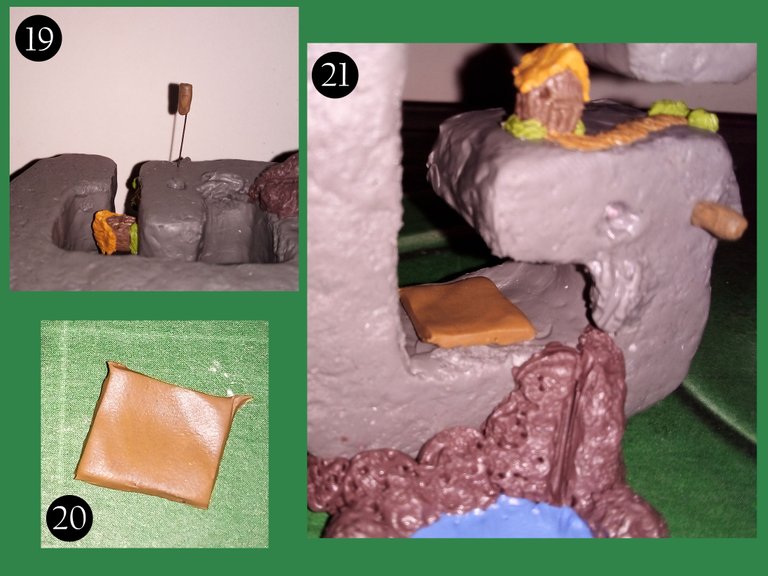
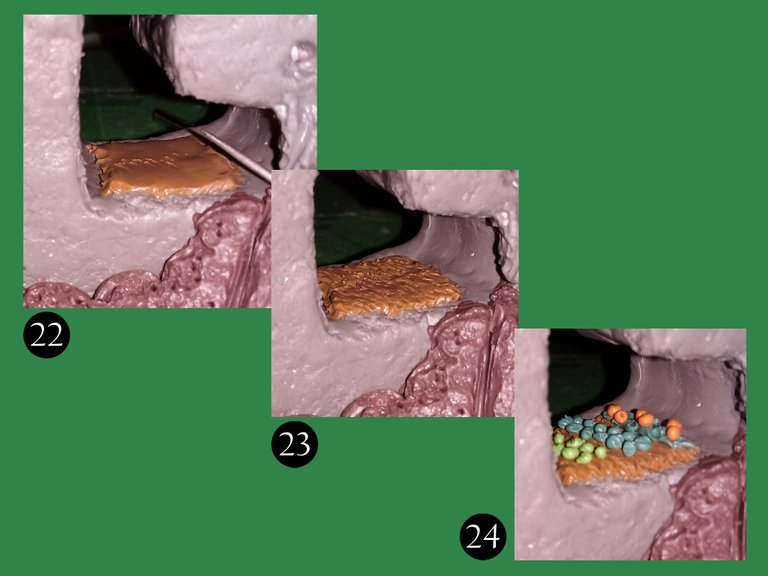
Once the glue was dry, I began to shape the plasticine square where I would make the plantation (22). I used the needle to make furrows and numerous lines so that it would look as much like a field as possible (23), then I placed several colored spheres that would become the fruits to be harvested (24).
Una vez seco el pegamento, comencé a darle forma al cuadro de plastilina donde haría el sembradío (22). Usé la aguja para hacer surcos y numerosas líneas para que se pareciera lo más posible a un terreno (23), después coloqué varias esferas de colores que vendrían a ser los frutos a cosechar (24).
As an additional detail, at the back of the house I placed a subway water well.
Como un detallito adicional, en la parte trasera de la casa coloqué un pozo de agua subterránea.
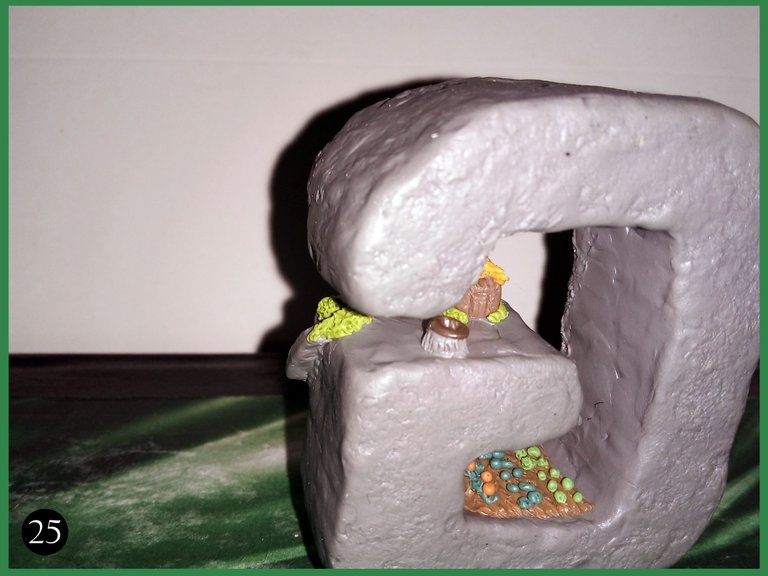
This is how the base shape of our decorated letter was left, now the most important thing is missing, the details...
De esta manera quedó la forma base de nuestra letra decorada, ahora falta lo más importante, los detalles...
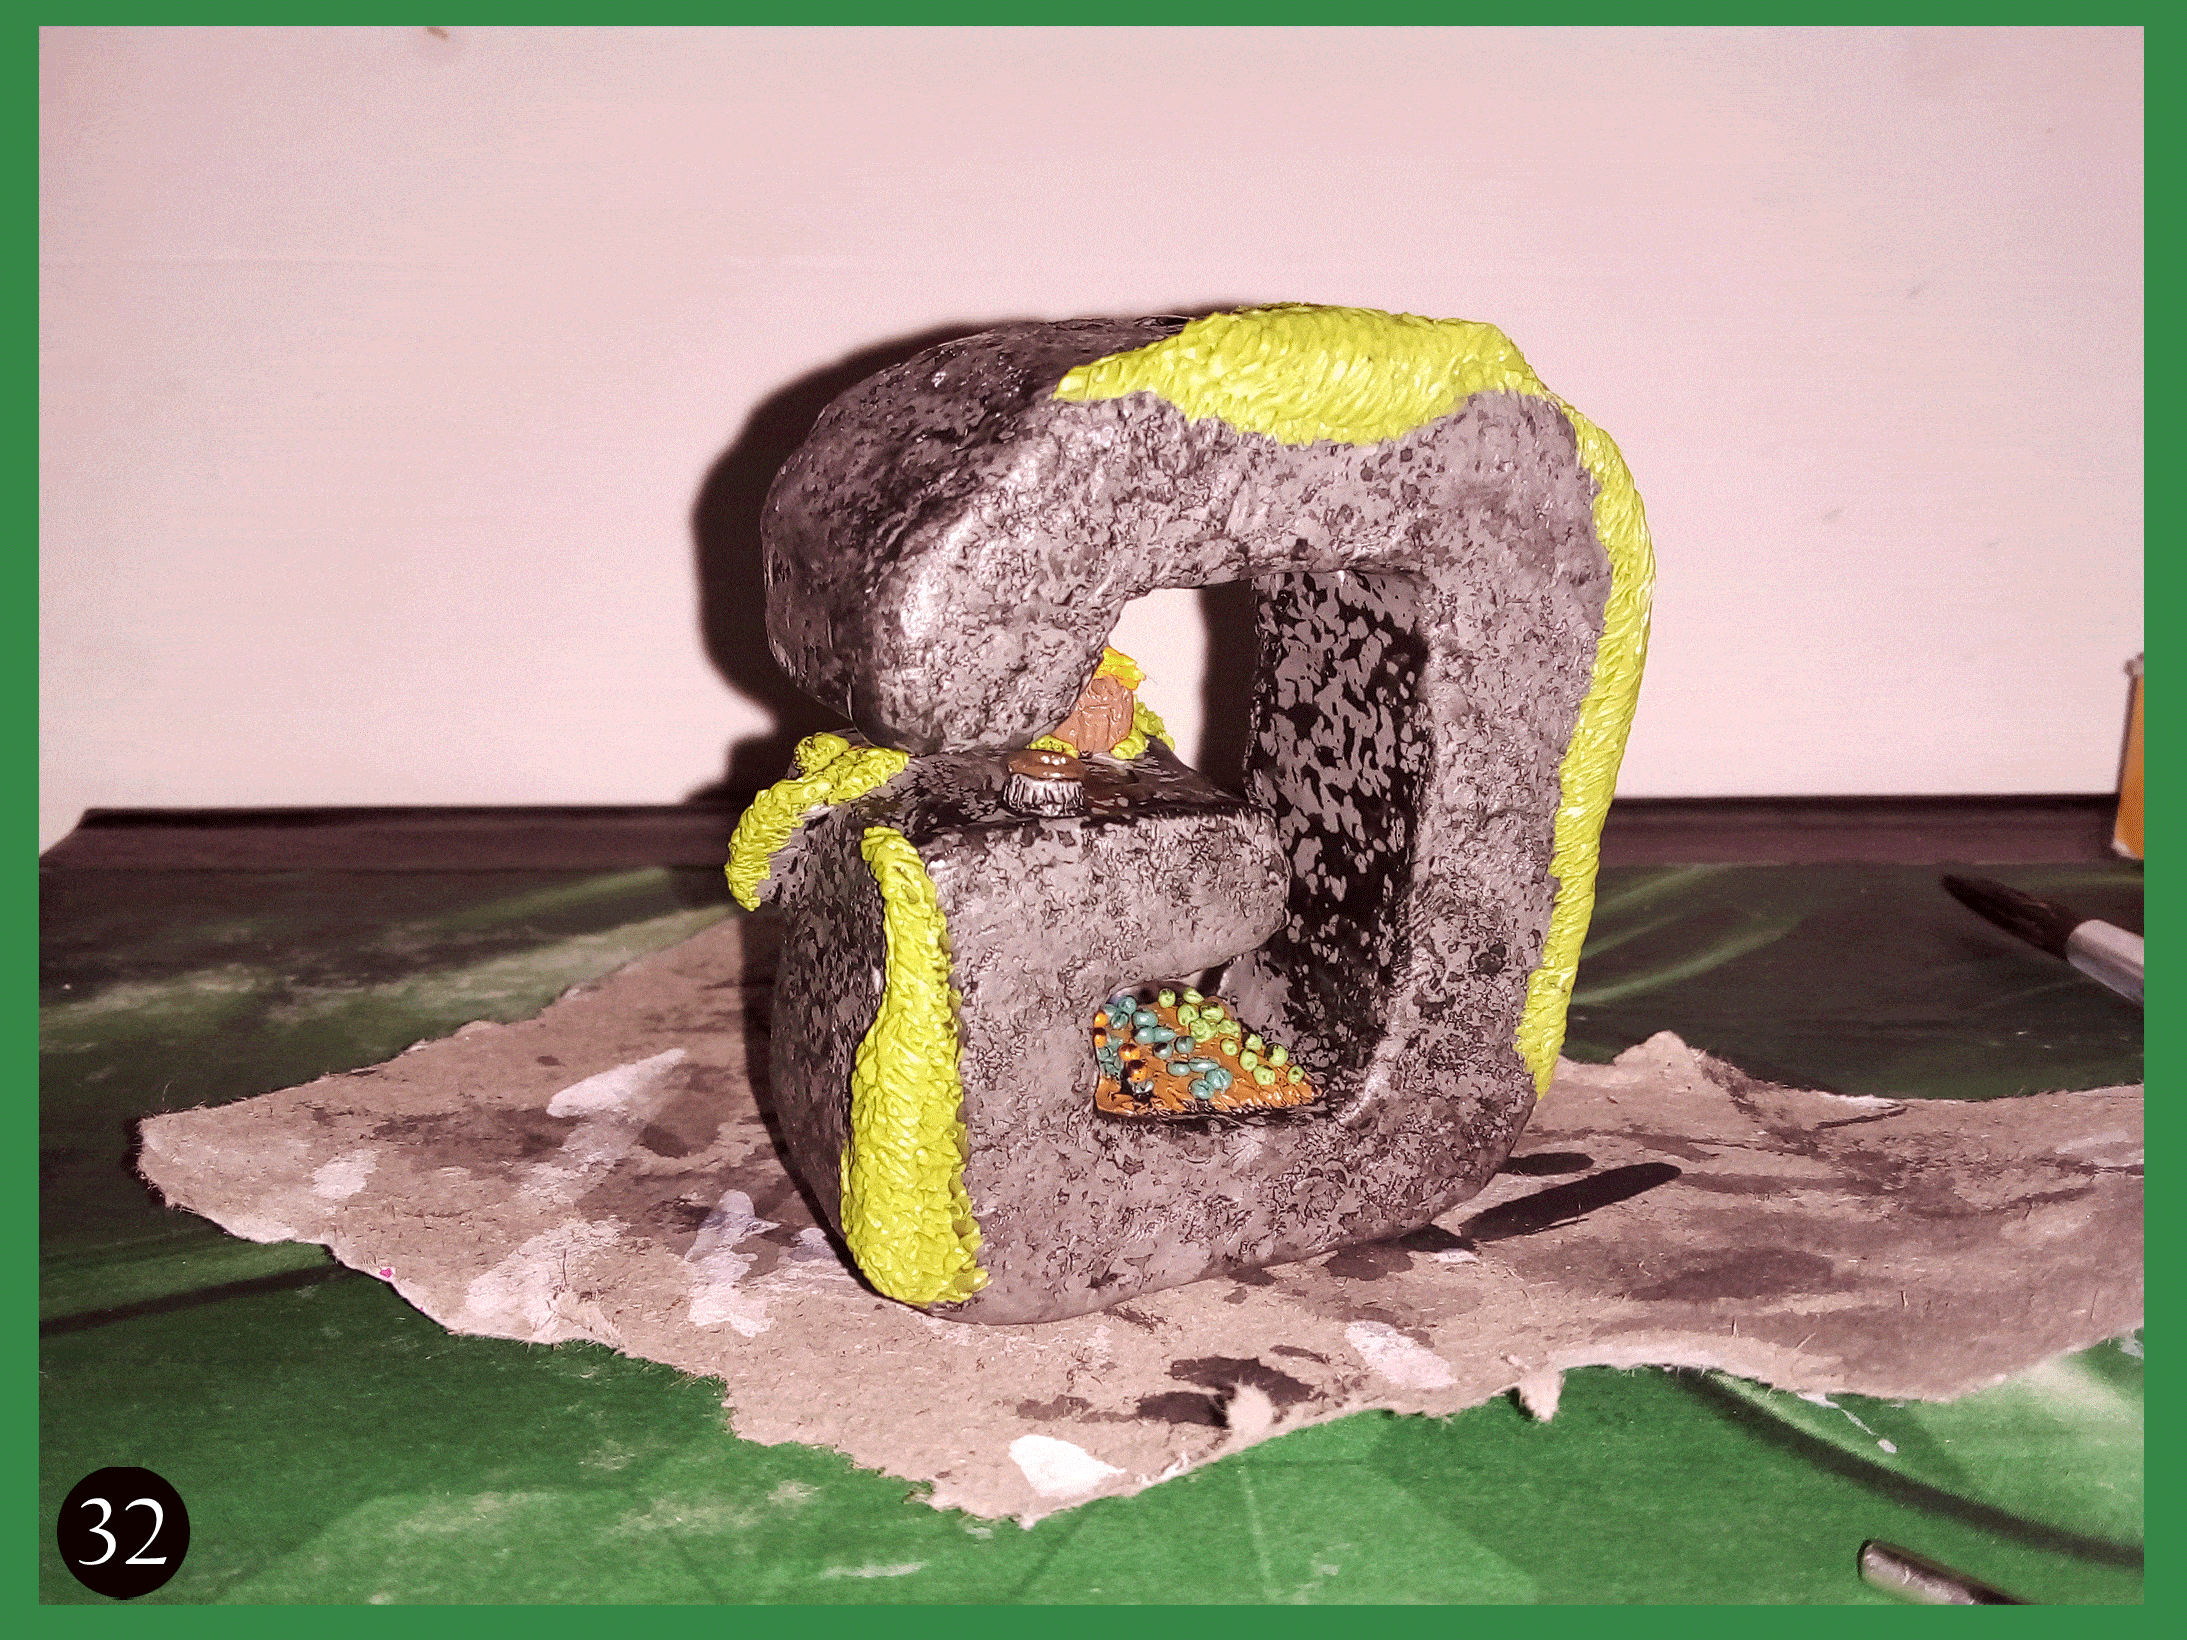
One of the advantages of painting on plasticine is that it is oily, so water-based paints do not completely cover the surface of the plasticine when diluted even a little.
This is not a disadvantage, on the contrary, it is an advantage. Remember that the letter has the texture of rocks? Well, the diluted paint will not completely cover the surface of the plasticine, but it will drip through the cracks it has thanks to the texture we molded with the rocks.
In my case, I covered the entire surface of the letter with black paint diluted with water, after a couple of minutes I removed the excess with a piece of cloth, then with a dry paintbrush I spread the paint that still remained on the plasticine, as if I were sweeping.
Una de las ventajas de pintar sobre plastilina, es que esta es aceitosa, así que las pinturas a base de agua no cubren completamente la superficie de la plastilina cuando son diluidas, aunque sea un poco.
Esto no es una desventaja, al contrario, es una ventaja. ¿Recuerdan que la letra tiene la textura de las rocas? Pues bien, la pintura diluida no cubrirá por complto la superficie de la plastilina, sino que se escurrirá por las grietas que tiene gracias a la textura que moldeamos con las rocas.
En mi caso, yo cubrí toda la superficie de la letra con pintura negra diluida con agua, luego de un par de minutos quité los excesos con un trozo de tela, luego con un pincél seco destribuí la pintura que aún quedaba sobre la plastilina, como si estuviese barriendo.
Going back to the pond, I made a mixture of glue and white paint and added it on top of the blue plasticine (27). With the help of a fine brush, I began to distribute all this mixture around the edge of what will be the pond and the places where the water will fall (28).
In the image, you can see how the surface of the rock looked like once the diluted black paint penetrated the texture of the plasticine.
Volviendo al estanque, hice una mezcla de pegamento con pintura blanca y lo agregué sobre la plastilina azul (27). Con ayuda de un pincel fino, comencé a distribuir toda esta mezcla por el borde de lo que será el estanque y por los lugares por donde caerá el agua (28).
En la imagen, pueden ver cómo quedó la superficie de la roca una vez que la pintura negra diluida penetró en la textura que tenía la plastilina.
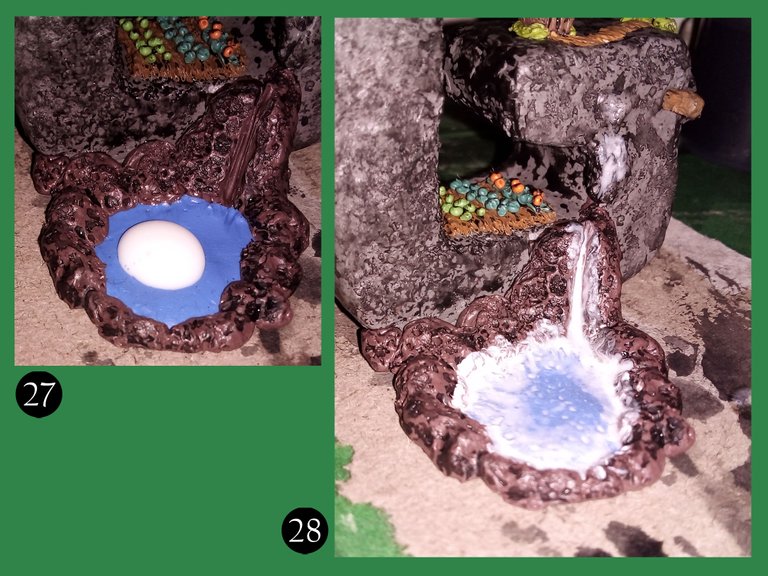
But this is not all, we must make the waterfall and for this we must make a thin strip of plasticine and place it in the hole that is on the surface of the letter, then we stretch it and, with the help of the needle, we make some lines on the thin strip of blue plasticine taking care not to break it (29).
Once this is done, place the plasticine strip along the rocks of the waterfall and at the base, place a small sphere of white plasticine to simulate foam. With the needle you have to pierce multiple times this white sphere until it loses its shape, as I said, to make it look like foam. After all this we cover the blue plasticine with a little more of the mixture of paint and glue (30).
Pero lo anterior no lo es todo, hay que hacer la cascad y para ello hay que hacer una delgada tira de plastilina y colocarla en el agujero que está en la superficie de la letra, luego la estiramos y, con ayuda de la aguja, se le hacen algunas líneas a la delgada tira de plastilina azul cuidando de no romperla (29).
Una vez hecho lo anterior, colocamos la tira de plastilina a lo largo de las rocas de la cascada y ya en la base, se debe colocar una pequeña esfera de plastilina blanca para simular espuma. Con la aguja hay que agujerear multiples veces esta esfera blanca hasta que pierda la forma, como dije, para que parezca espuma. Después de todo esto cubrimos la plastilina azul con un poco más de la mezcla de pintura con pegamento (30).
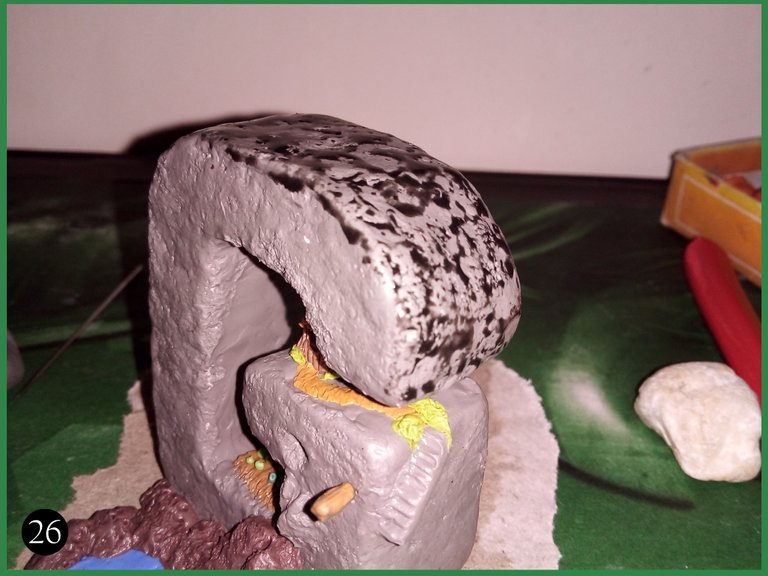
While the paint and glue of the waterfall is drying, I placed numerous pieces of plasticine without a definite shape on various parts of the letter, in order to make something similar to a vegetation that is covering the rocky surface of the letter.
Mientras la pintura y el pegamento de la cascada se secan, coloqué numerosos trozos de plastilina sin forma definida a en varias partes de la letra, esto con el fin de hacer algo similar a una vegetación que esté cubriendo la superficie rocosa de la letra.
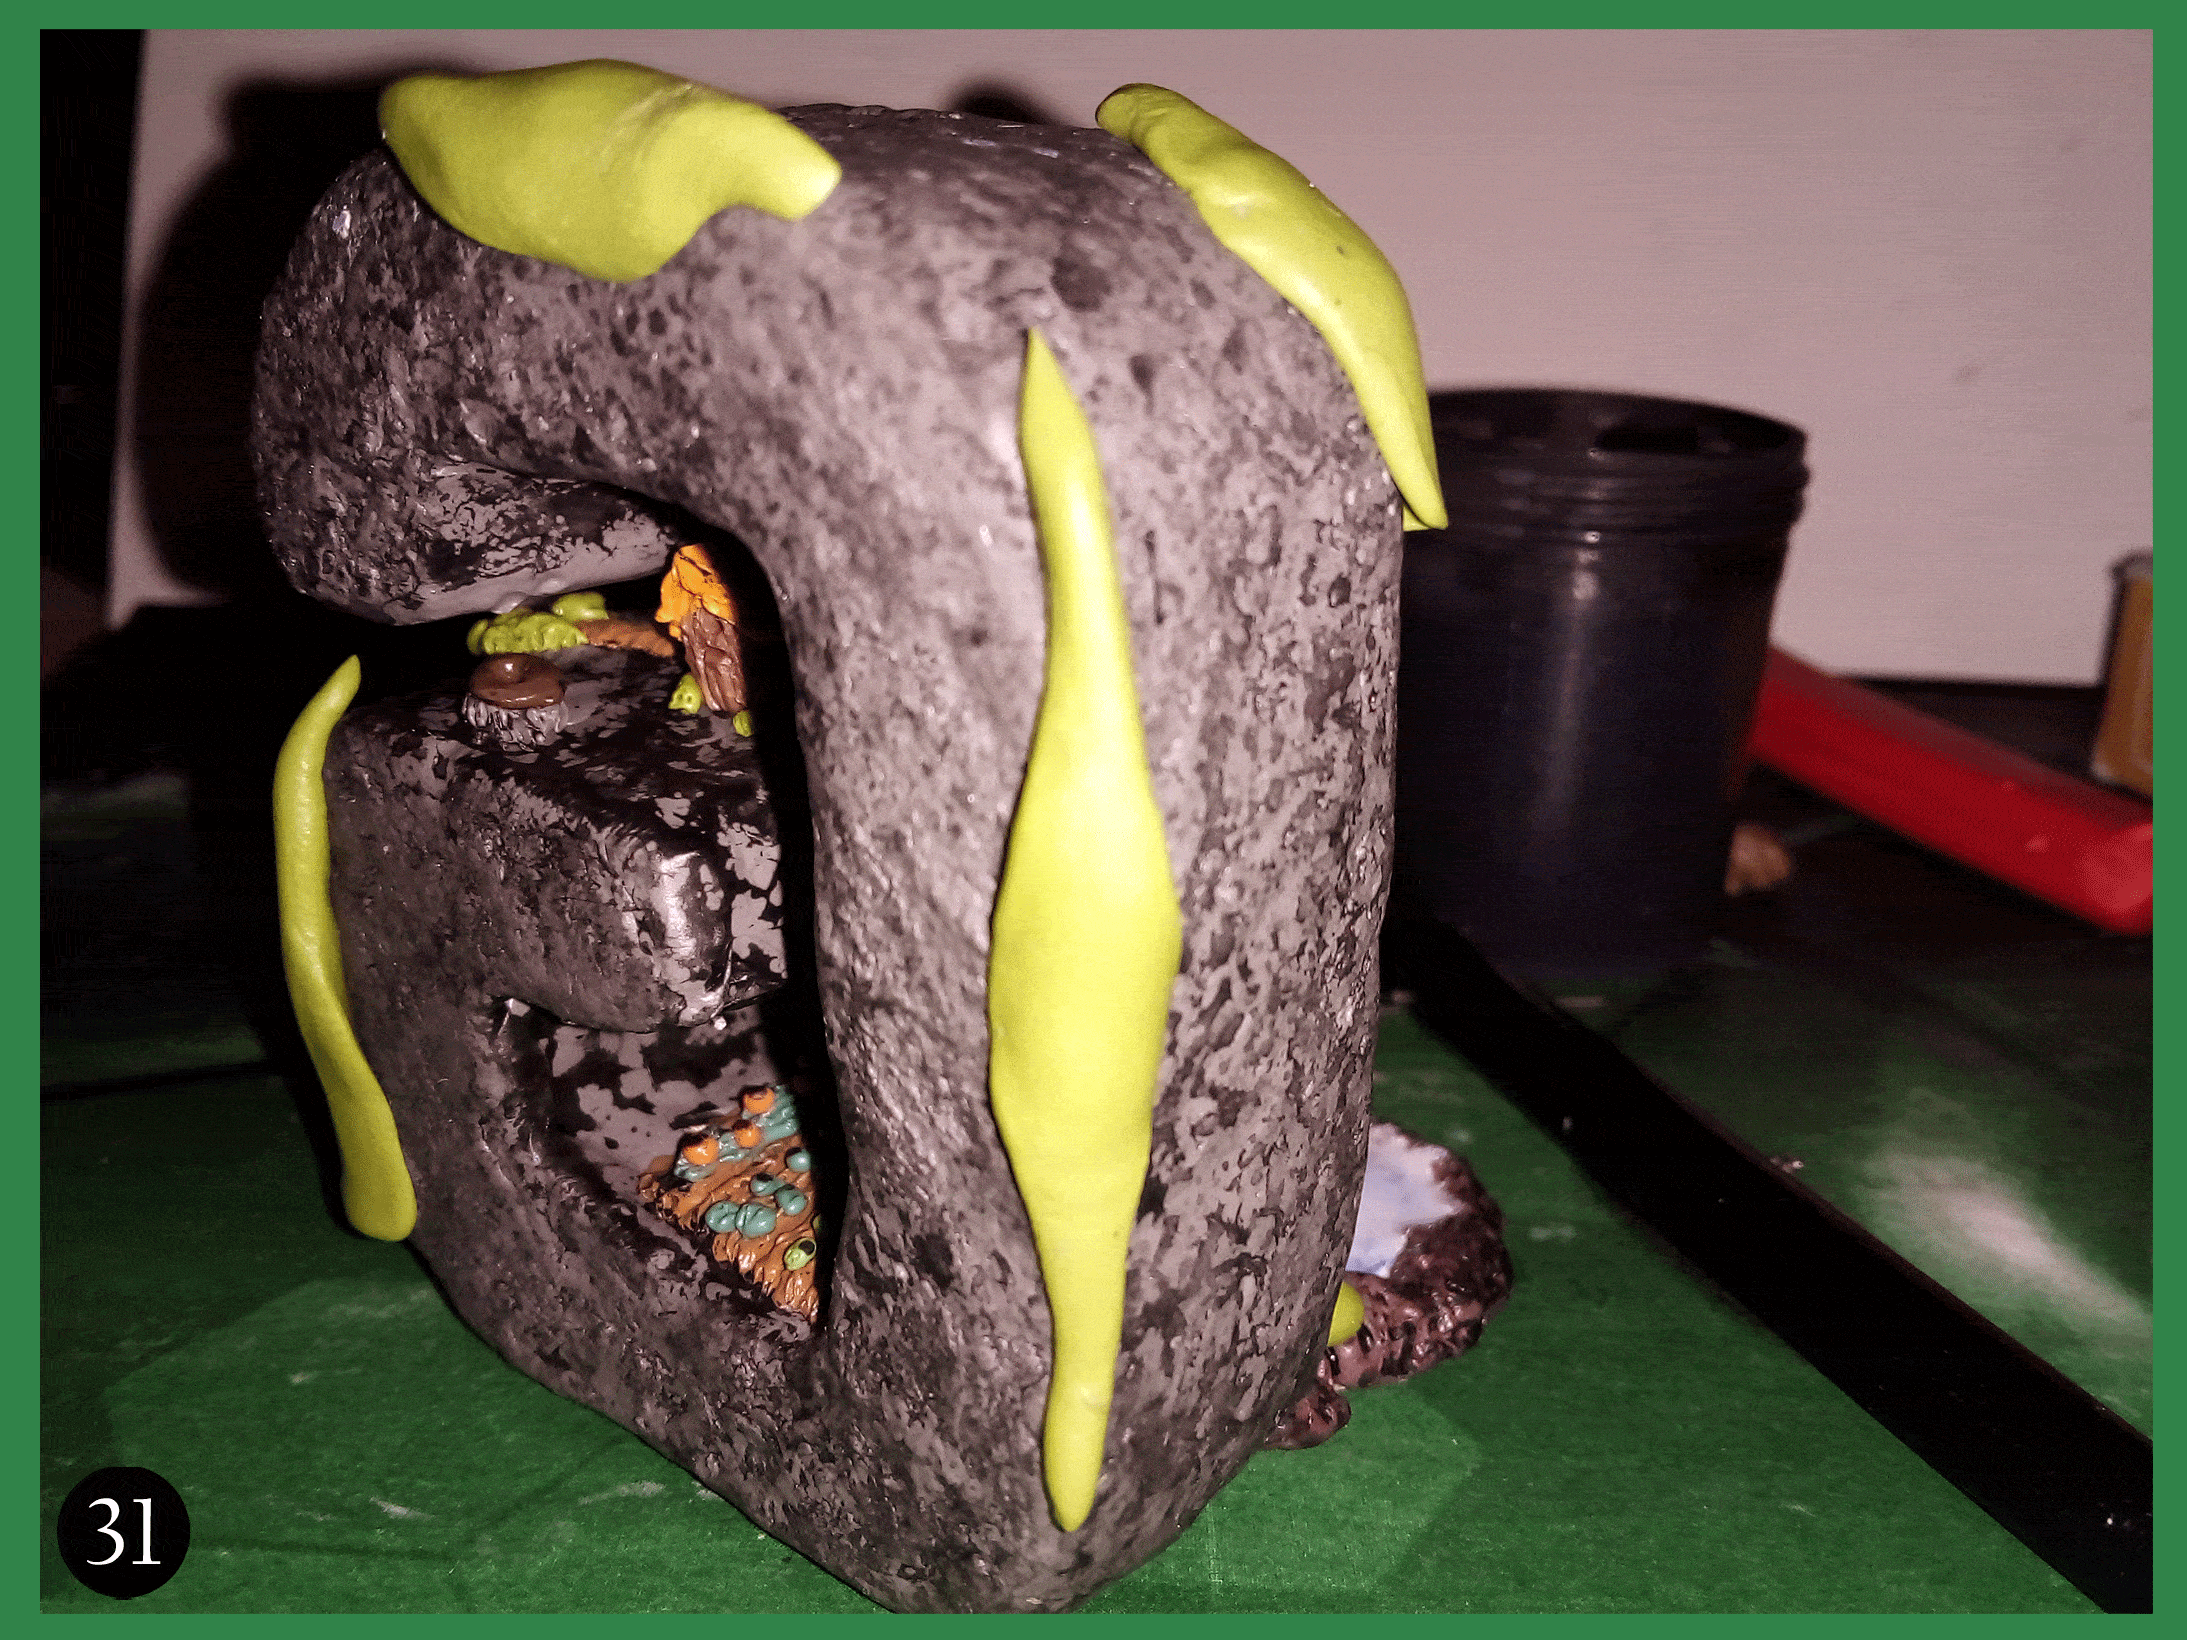
With the needle I began to make thin and numerous lines on these pieces of green plasticine, to simulate vegetation. I made the lines with defined patterns, so that they follow the same direction, as shown in the image below:
Con la aguja comencé a hacer delgadas y numerosas líneas sobre estos trozos de plastilina verde, para simular vegetación. Hice las líneas con patrones definidos, de modo que sigan una misma dirección, tal como se observa en la imagen a continuación:
After being dry, you can see how the waterfall of this decoration looks like, with the water falling into the pond, the foam and a relief on the water that makes the waves of the water look like.
Tras estar seca, pueden ver cómo quedó la cascada de esta decoración, con el agua cayendo hacia el estanque, la espuma y un relieve sobre el agua que hace parezca las ondas del agua.
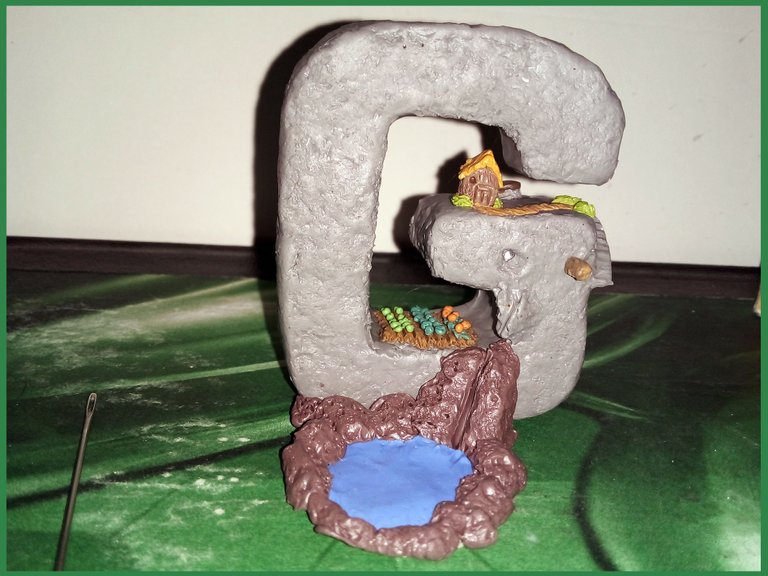
Finally the decorated letter is ready, but something else is missing that I forgot to put and it is very important, another staircase...
Finalmente está lista la letra decorada, pero hace falta algo más que olvidé colocar y es muy importante, otra escalera...
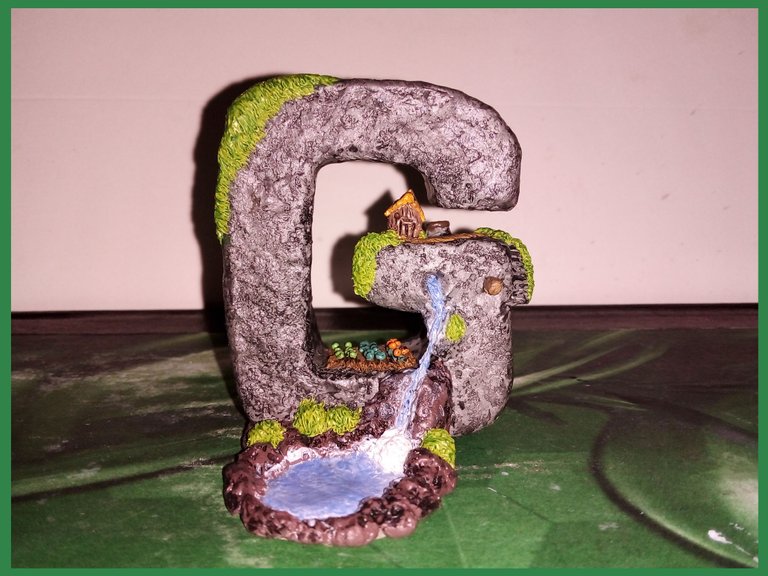
If you compare the image below with the image above, you can see that in the one above I didn't make a staircase connecting the upper part, where the little house is, with the lower part, where the pond and the vegetable garden are. I forgot to do it, but there it is:
Si comparan la imagen a continuación con la imagen de arriba, podrán ver que en la de arriba no hacía escalera que conectase la parte superior, donde está la casita, con la parte inferior, donde está el estanque y el sembradío. Olvidé hacerla, pero ahí está:

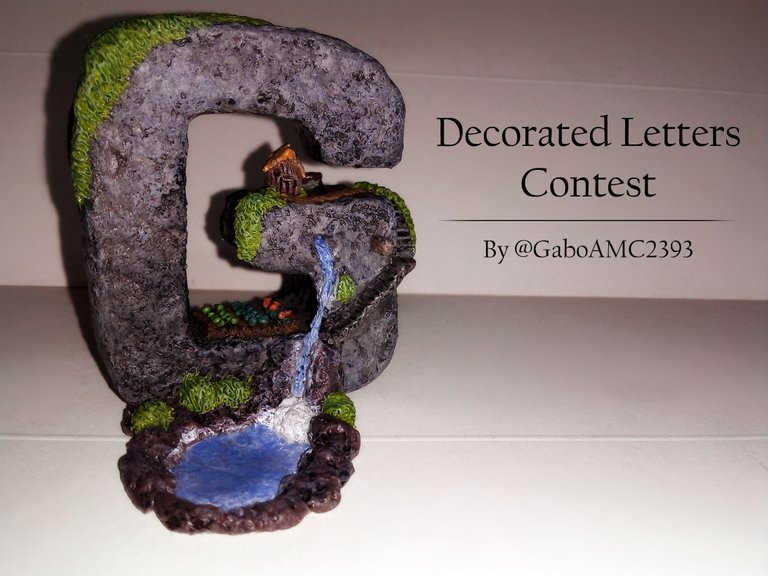
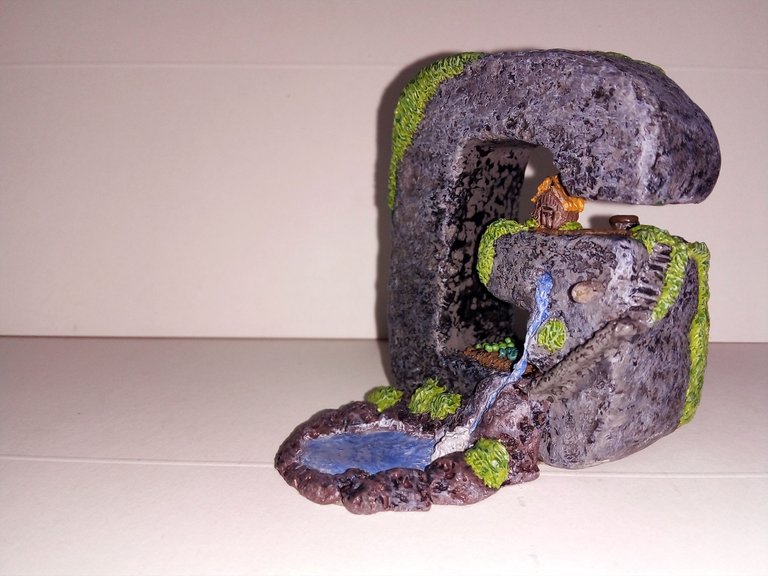
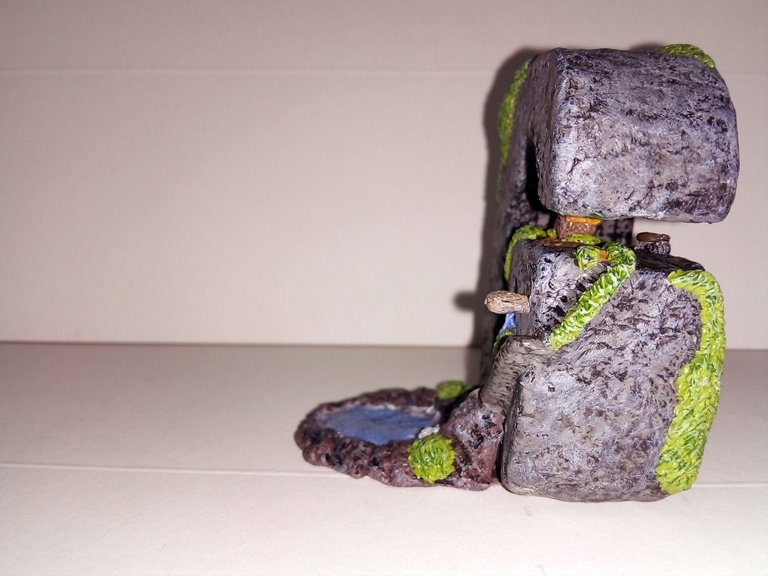
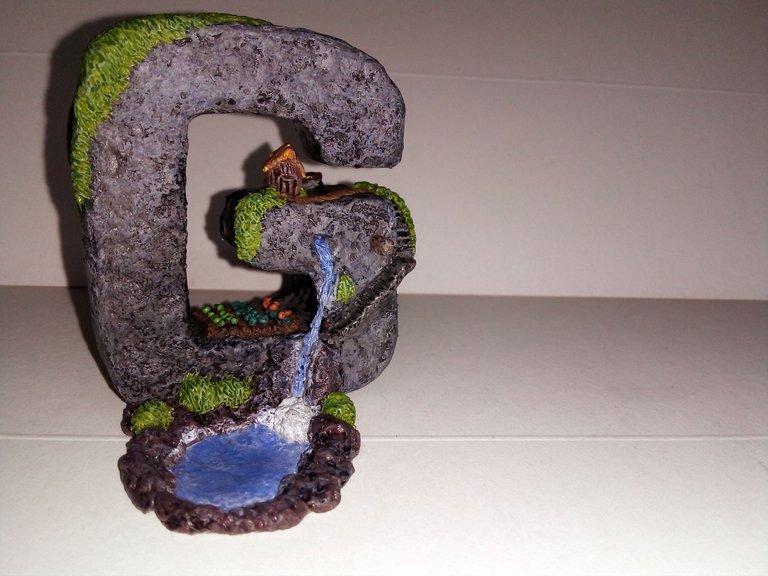
And with that last detail, this letter decorated with plasticine was finished, making a sort of diorama of a house built on a rock in the shape of a G, with a water fountain and a field for food.
Here are some pictures of the finished work:
Y con ese último detalle, ya quedó terminada esta letra decorada con plastilina, haciendo una suerte de diorama de una casa construirda sobre una roca con forma de G, con una fuente de agua y un sembradío para alimento.
A continuación les dejo una serie de fotografías del trabajo terminado:
Well friends, for me it has been quite an adventure to have done this experiment in which I decorated a letter with plasticine. What in the beginning was just a dull letter, ended up becoming something very nice, at least from my point of view.
The contest is great and it's not over yet, so I invite @josueprime, @sarix and @kellyrsa to participate. Come on, if you can...
And you guys, what did you think? I hope you enjoyed this post as much as I enjoyed doing it. As for me, I just invite you to leave your opinions below in the comments, as always I'll be happy to read them. With nothing more to add, I'll say goodbye then....
See you next time!
Bien amigos, para mi ha sido toda una aventura haber hecho este experimento en el que decoré una letra con plastilina. Lo que es un comienzo era solo una letra sin brillo, terminó convirtiéndose en algo muy bonito, al menos desde mi punto de vista.
El concurso es genial y aún no termina, así que invito a participar a @josueprime, @sarix y @kellyrsa. Vamos, que si pueden...
Y a ustedes, ¿qué les pareció? Espero que hayan disfrutado de este post tanto como yo disfruté haciéndolo. Por mi parte solo me queda invitarlos a dejar sus opiniones abajo en los comentarios, como siempre estaré encantado de leerlos. Sin más que agregar, me despido entonces...¡Hasta la próxima!
Traducido con DeepL
Challenge to Gabo: Batman Sculpture
My first legendary card
Life finds a way


Brutal hermano , literal creaste un ecosistema completo 🙀. Saludos
Hola! Si la idea era la de crear una suerte de habitad y creo que quedó bien jeje... gracias por comentar, saludos cordiales.
Sabes que? a veces lo dejas tan anonadado e impresionado con tu trabajo que solo puesto resumir en una sola palabra:
MAESTRO!!!
Gracias por participar querido Gabo, tu G ha quedado sensacional, todos la amamos.
Hola! Me haces sentir muy contento con comentarios así. No me considero un maestro, aún me falta mucho, pero trato de hacer lo mejor que pueda y me alegra que les guste.
felicidades gabo, te que genial, saludos
Gracias david, atento siempre a tus comentarios, lo aprecio.
Buenas noches, excelente trabajo,
Buenas noches, muchas gracias por detenerse a leer y comentar.
¡Una cosa de otro mundo amigo!
Cómo siempre destacando en sus creaciones.
🤗🤗🤗
Congratulations @gaboamc2393! You received a personal badge!
Wait until the end of Power Up Day to find out the size of your Power-Bee.
May the Hive Power be with you!
You can view your badges on your board and compare yourself to others in the Ranking
Check out the last post from @hivebuzz:
Support the HiveBuzz project. Vote for our proposal!
Gabo, acabo de ver que ganaste el concurso y corrí hasta aquí para tu obra de arte. Tanto que esperé verla y no me di cuenta cuando la publicaste porque hasta ahora me di cuenta de que no te seguía. Muchas felicitaciones y mi admiración, tienes un gran talento en tus manos para crear. ¡Felicitaciones!