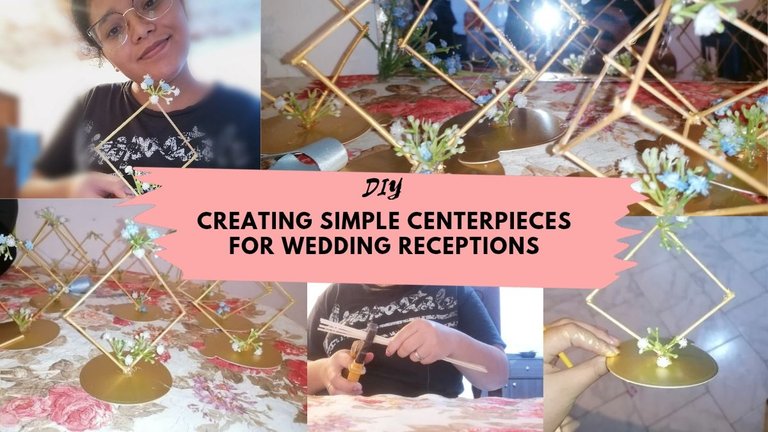
Cómo le compartí en mi publicación anterior, estos días han estado llenos de muchas cosas por hacer porque una amiga va a casarse, de hecho, hace una hora se casó por civil, pero mañana es el día en que le haremos una fiesta tipo recepción, un poco sencilla pero bonita para celebrar este momento tan especial para ella. Obviamente queremos que la ocasión sea especial, pero también que todo se vea súper bonito, solo que por falta de presupuesto no pudimos hacerlo como queríamos y tuvimos que resolver por nuestra propia cuenta.
Es por esta razón que decidimos que haríamos los centros de mesa, buscando un par de ideas por Pinterest y uniéndolas todas para crear un recuerdito ideal, que no solamente fuera sencillo sino que también se viera bonito y presentable para la ocasión. Es por eso que hoy quiero compartirles todo el proceso para crear estos lindos centros de mesa y mostrarles que con un poco de Ingenio, algo de ayuda de Pinterest y con muchas ganas de crear, se puede lograr hacer algo bonito y especial.
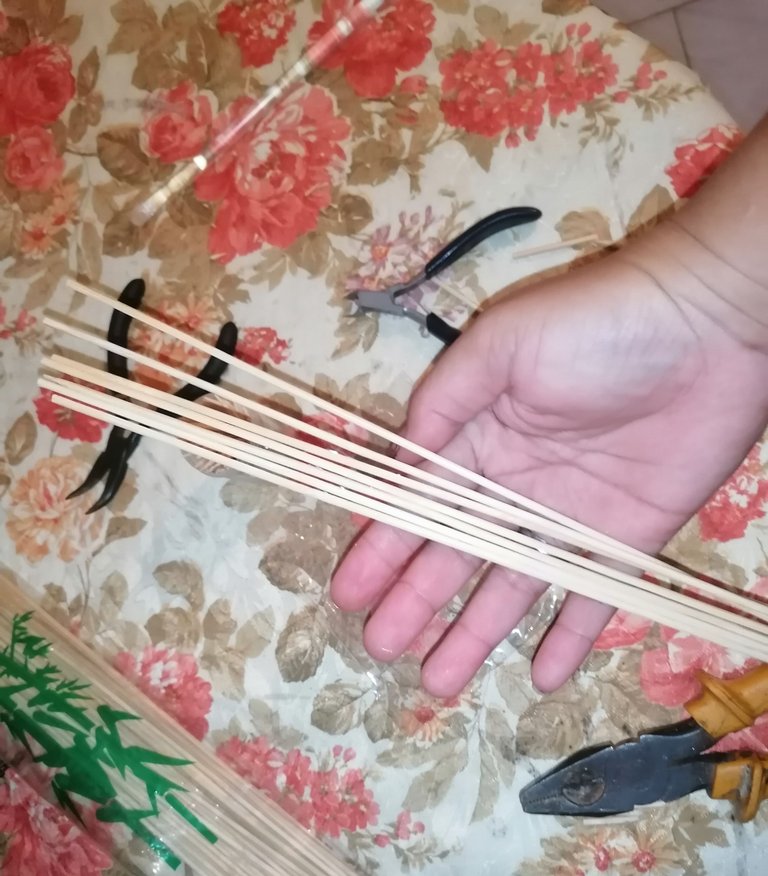
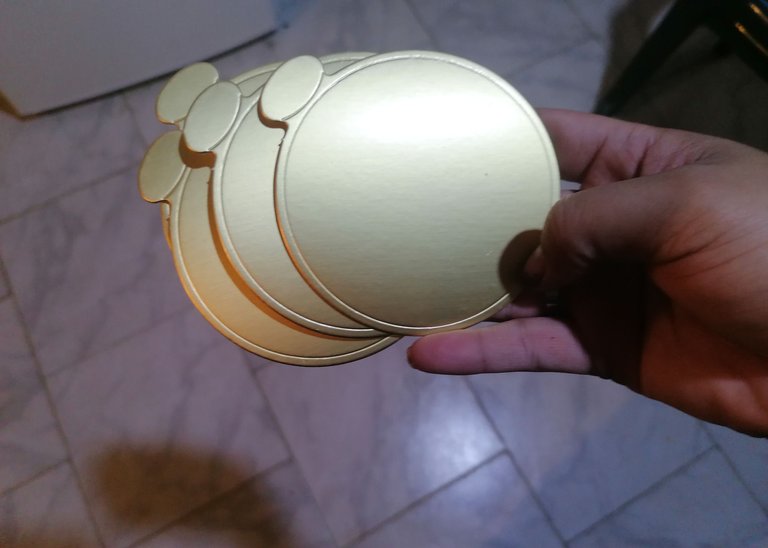
Les cuento que para realizar este recuerdito no necesitamos demasiados materiales, solo necesitamos varios palitos de bamboo para brochetas, los mismos que se utilizan para hacer pinchos, o cualquier palito de madera que tengas disponible en casa, incluso podría hacerse con paletas y no hay ningún problema. Lo importante es que seamos creativos. También necesitamos silicón en barra una pequeña base redonda, que si tiene un color llamativo o brillante es mucho mejor, también necesitamos algunas florecitas que podamos combinar juntas y que tengan los colores que eligieron los novios.
English version
As I mentioned in my previous post, these days have been very busy because a friend of mine is getting married. In fact, she had her civil wedding an hour ago, but tomorrow we're throwing her a reception, a simple but beautiful party to celebrate this special moment in her life. Obviously, we want the occasion to be special, but we also want everything to look super pretty. However, due to a lack of budget, we couldn't do it the way we wanted, so we had to figure it out on our own.
That's why we decided to make the centerpieces ourselves, looking for a couple of ideas on Pinterest and combining them all to create the perfect souvenir, which would not only be simple but also look pretty and presentable for the occasion. That's why today I want to share with you the whole process of creating these beautiful centerpieces and show you that with a little ingenuity, some help from Pinterest, and a lot of desire to create, you can make something beautiful and special.
I'll tell you that we didn't need too many materials to make this souvenir, just several bamboo skewers, the same ones used to make kebabs, or any wooden sticks you have available at home. You could even make them with popsicle sticks, no problem. The important thing is to be creative. We also need silicone in a bar, a small round base (preferably in a bright or shiny color), and some small flowers that we can combine together and that match the colors chosen by the bride and groom.

Para comenzar quiero decirles que si tienen pistola de silicón es mucho más rápido y sencillo el proceso, pero si se les dañó unos minutos antes de comenzar a hacer los recuerdito, como fue en nuestro caso, no se preocupen siempre hay formas de resolver. Nosotros usamos la vieja confiable, que fue la llama de una de las hornillas de la cocina. Es más práctica esta idea que utilizar una vela porque la vela carbona el silicon y este se ve negro al utilizarlo, pero la cocina por alguna razón no.
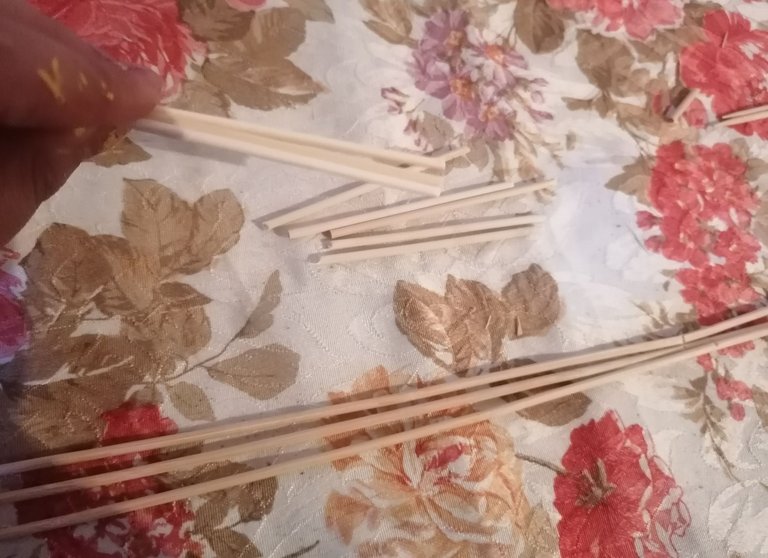
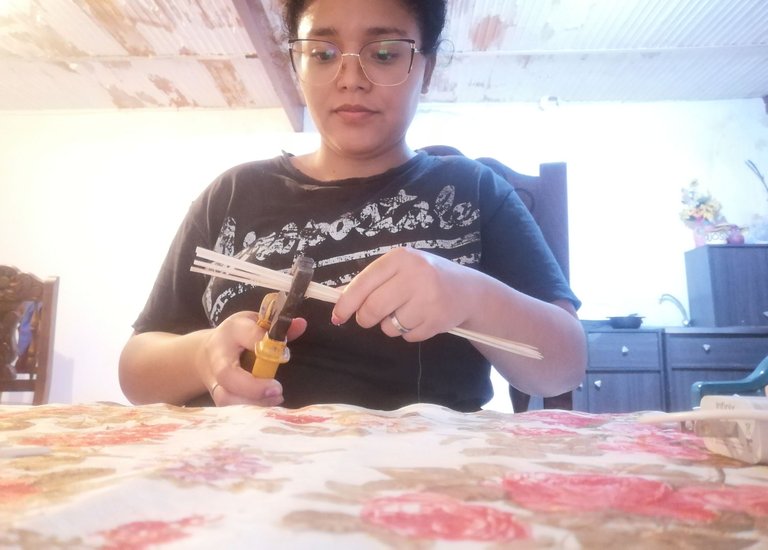
Para comenzar lo primero que hice fue cortarle las partes puntiagudas o afiladas a los palitos, y como no ibamos a hacer recuerditos tan grandes también pasé a picar en tres partes iguales cada uno de los palitos de pincho, la mayoría de los recuerditos solo tienen cuatro de los palitos, así que fui sacándo la cuenta en base a eso. Para picarlos utilicé un alicate fue la herramienta que mejor me funcionó para hacerlo, porque deja los cortes limpios y la madera no se abre.
Luego de hacer los cortes procedimos a pegar cada palito uno a uno. Como para pegar utilizamos la cocina y no una pistola de silicón fue un poco más tardado y un poco más difícil de colocar solo un puntito de silicón en un sitio específico. Sin embargo, lo que mejor no funcionó a nosotros fue colocar los palitos sobre la mesa y no en el aire, íbamos poniendo el silicón en cada punta y lo acostábamos y dejábamos allí hasta que se secara.
English version
First, I want to tell you that if you have a silicone gun, the process is much faster and easier, but if it broke a few minutes before you started making the souvenirs, as was the case with us, don't worry, there are always ways to solve the problem. We used the old reliable method, which was the flame from one of the burners on the stove. This idea is more practical than using a candle because the candle carbonizes the silicone and it looks black when you use it, but for some reason, the stove doesn't.
To start, the first thing I did was cut off the pointed or sharp parts of the sticks, and since we weren't going to make such big souvenirs, I also cut each of the skewers into three equal parts. Most souvenirs only have four sticks, so I did the math based on that. I used pliers to cut them, as this was the tool that worked best for me because it leaves clean cuts and the wood doesn't split.
After making the cuts, we proceeded to glue each stick one by one. Since we used the stove to glue them and not a silicone gun, it took a little longer and was a little more difficult to place just a dot of silicone in a specific spot. However, what didn't work best for us was placing the sticks on the table instead of in the air. We put the silicone on each tip, laid them down, and left them there until they dried.
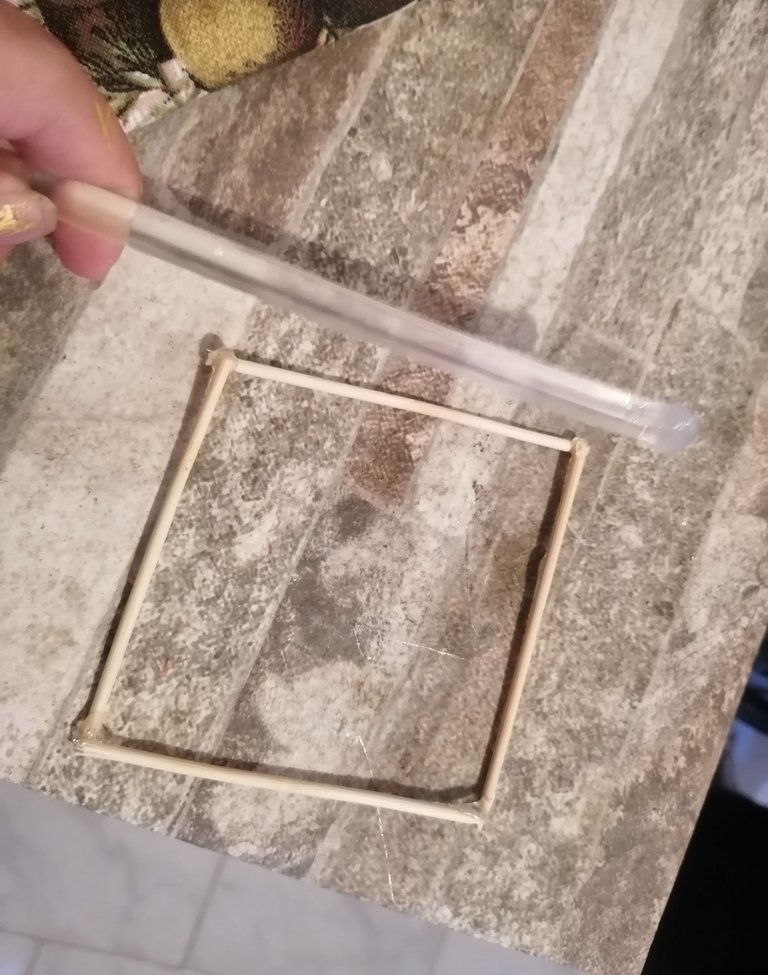
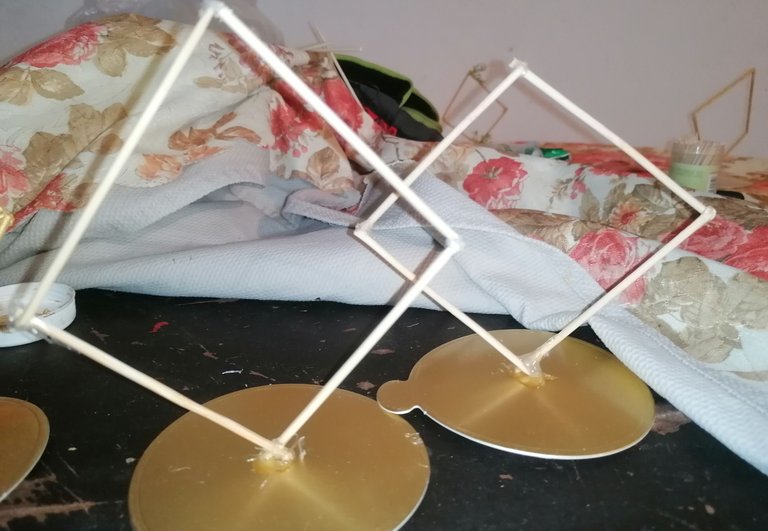
Ibamos a hacerlos todos en forma de cubo y por eso hay varios que tienen esta forma, pero como se nos hizo muy complicado y tardado decidimos hacerlo así. Sin embargo, para hacerlos en forma de cubo con una pistola de silicón se puede hacer mucho más fácil, simplemente se hacen dos cuadrados y luego se unen con un palito en cada esquina del mismo tamaño. Honestamente quedan súper bonitos así, solo que requieren un poquito más de paciencia y trabajo.
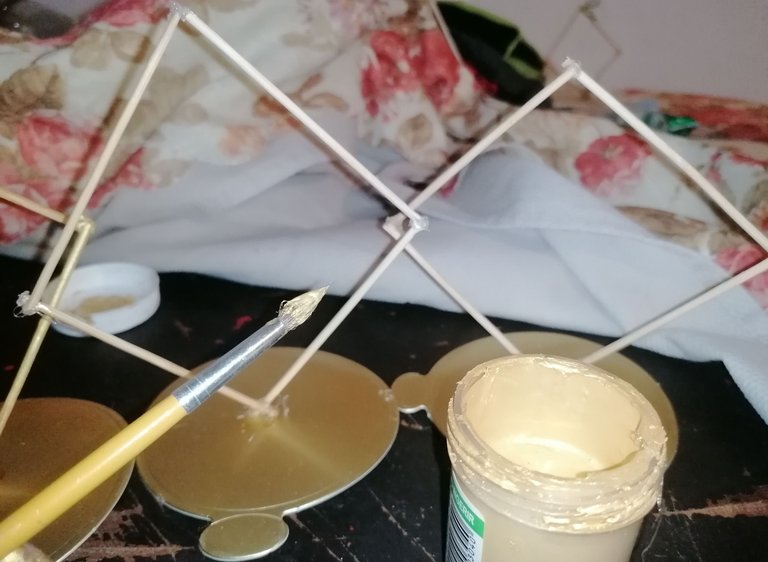
Después de armar y pegar pasamos a quitarle todos esos hilitos de silicón que quedan alrededor, los hicimos todos de una vez antes de pasar al siguiente, esto para poder retirarnos de la cocina y continuar con lo demás. El siguiente paso que dimos fue el de pegar los cuadrados de manera que quedaran en forma de rombo. Para esto simplemente tomamos una de las esquinas de el cuadrado y lo pegamos hacia abajo en nuestra base dorada, al principio creíamos que no iba a funcionar porque se iba hacia los lados, pero solamente hay que tener paciencia y esperar a que el silicón se seque muy bien.
El otro paso que dimos fue el de pintar todos los palitos, yo tenía en casa una pintura al frío dorada y pensamos que combinaría bastante bien con la base, así que esa fue la que utilizamos. En este punto me di cuenta de que hubiese sido una mejor idea pintarlos antes de pegarlos a la base, por lo que les recomiendo que lo hagan ustedes, así podrán tener un poquito más de libertad para pintar todas las partes sin necesidad de ser demasiado cuidadoso para no pintar la base.
English version
We were going to make them all cube-shaped, which is why several of them have this shape, but as it proved very complicated and time-consuming, we decided to do it this way. However, making them cube-shaped with a silicone gun is much easier. You simply make two squares and then join them with a stick of the same size at each corner. Honestly, they look really nice this way, but they require a little more patience and work.
After assembling and gluing, we removed all the silicone threads that remained around the edges. We did them all at once before moving on to the next one, so we could leave the kitchen and continue with the rest. The next step was to glue the squares so that they formed a diamond shape. To do this, we simply took one of the corners of the square and glued it down onto our gold base. At first, we thought it wasn't going to work because it kept sliding to the sides, but you just have to be patient and wait for the silicone to dry thoroughly.
The next step was to paint all the sticks. I had some gold cold paint at home, and we thought it would go well with the base, so that's what we used. At this point, I realized that it would have been a better idea to paint them before gluing them to the base, so I recommend that you do that, so you can have a little more freedom to paint all the parts without having to be too careful not to paint the base.
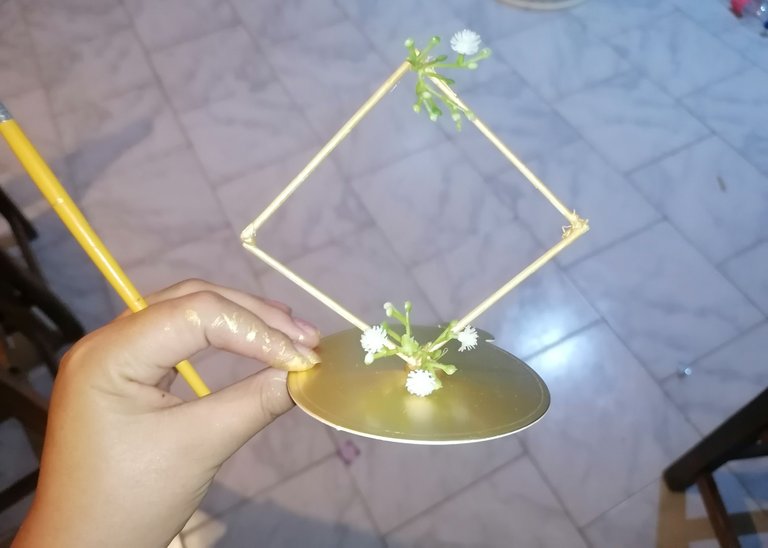
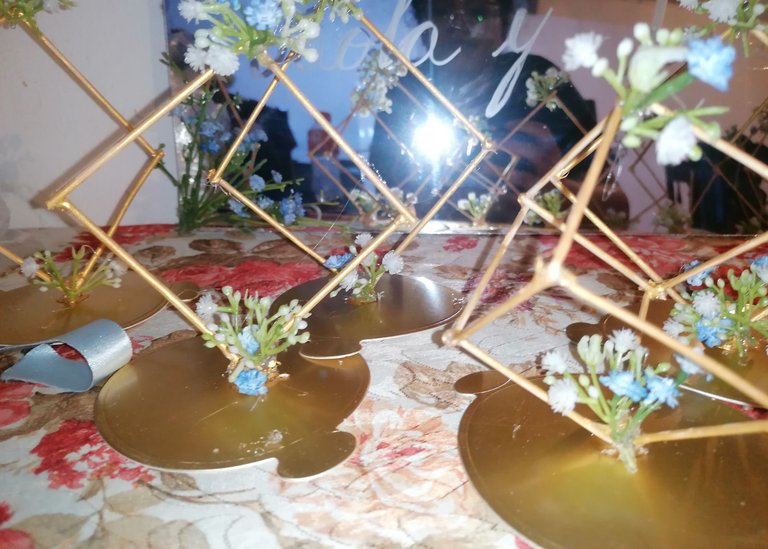
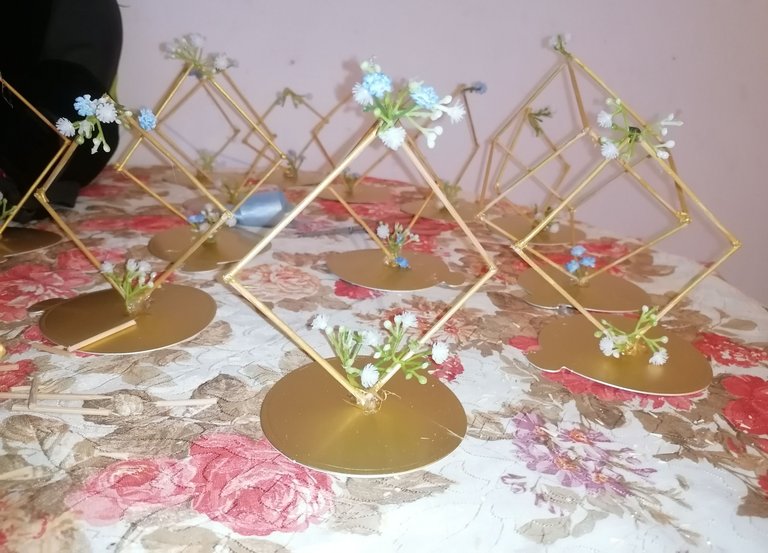
Después de que la pintura finalmente se secó, pasamos al siguiente paso que fue agregar las flores. No queríamos que el recuerditos se viera demasiado cargado sino sencillo pero bonito, así que solo agregamos una pequeña cantidad de florecitas y tratamos de combinarlas bien porque teníamos blancas y azules ya que esos son los tonos que se van a utilizar en los adornos y la decoración de la fiesta de recepción.
Con muchísimo cuidado seguimos utilizando silicón y poniendo solo un puntito en las partes donde íbamos a agregar las florecitas, esta fue la parte más sencilla y sin embargo, requirió concentración y cuidado para que no se llenará todo de silicon y no se dañara la pintura ni nada. Y eso fue todo, quedó bastante lindo y sencillo pero con un toque elegante que seguro le dará a la decoración un bonito plus. A veces no sabemos cómo hacer algo que quede bien y que sea apto para un momento tan importante, sin embargo, siempre podemos conseguir buenas ideas que nos ayuden a dejar salir nuestra creatividad. Espero que esta idea les guste y que pueda servirles.
English version
After the paint finally dried, we moved on to the next step, which was adding the flowers. We didn't want the souvenirs to look too busy, but rather simple yet pretty, so we only added a small amount of flowers and tried to combine them well because we had white and blue ones, as those are the colors that will be used in the decorations for the reception party.
We continued to use silicone very carefully, putting just a tiny dot on the parts where we were going to add the flowers. This was the easiest part, but it required concentration and care so that everything wouldn't get covered in silicone and the paint wouldn't get damaged. And that was it! It turned out quite pretty and simple, but with an elegant touch that will surely give the decoration a nice bonus. Sometimes we don't know how to make something that looks good and is suitable for such an important moment, but we can always find good ideas that help us unleash our creativity. I hope you like this idea and that it is useful to you.

-Contenido completamente de mi autoria e inspiración.
-Texto original en español, traducido en DeepL.
-Fotografías personales, tomadas con mi teléfono Huawei p30 Lite.
-Banners diseñados en Canva Pro.
-Content entirely of my authorship and inspiration.
-Original text in Spanish, translated at DeepL.
-Personal photographs, taken with my Huawei p30 Lite Phone.
-Banners designed in Canva Pro.
Has sido votado por
PROYECTO ENLACE
'Conectando Ideas y Comunidades'
PROYECTO ENLACE es un proyecto de curación de habla hispana enfocado en recompensar contenido de calidad y apoyar autores en su proceso de crecimiento en HIVE.
Creemos y apostamos por el futuro de esta gran plataforma, y estamos muy emocionados de poder hacerla crecer junto a esta comunidad. Así que te invitamos a publicar en nuestra COMUNIDAD y estar atento a todas las actividades que tenemos preparadas y que estaremos publicando en breve.
¿QUIERES AUTOMATIZAR TUS GANANCIAS DE CURACIÓN? SE PARTE DEL PROYECTO ENLACE APOYANDO A NUESTRO TRAIL EN HIVE.VOTE INGRESA AQUÍ PARA CONOCER LOS DETALLES.
¿QUIERES INVERTIR ENLACE? DESCUBRE COMO HACERLO Y GENERAR INGRESOS DE FORMA SEMANAL MEDIANTE TU DELEGACIÓN DE HP AQUÍ TE EXPLICAMOS COMO.
Te invitamos a participar en nuestro servidor de Discord: https://discord.gg/3S9y7BbWfS
Atentamente
EQUIPO ENLACE 2025
te quedaron lindos y super elegantes, me encantó el resultado y el proceso es bastante sencillo, muchas gracias por compartir!
Congratulations @jemima1996! You have completed the following achievement on the Hive blockchain And have been rewarded with New badge(s)
Your next target is to reach 3000 replies.
You can view your badges on your board and compare yourself to others in the Ranking
If you no longer want to receive notifications, reply to this comment with the word
STOPCheck out our last posts:
Que linda ocasión para celebrar. Deseo mucha felicidad, provisión, salud y paz para los novios.
Los adornos te quedaron lindos. Que disfruten de tan memorable evento.