Hola buenas tardes hermosos y apreciados amigos , espero que se encuentren bien, les quiero compartir una hermosa restauración de un viejo cintillo a uno renovado inspirado en una dinosaurio bebé , ya qué es para una sobrina bebé, el proceso es sumamente sencillo les invito a aprender junto conmigo en este nuevo tutorial.
Hello good afternoon beautiful and dear friends, I hope you are well, I want to share a beautiful restoration of an old headband to a renovated one inspired by a baby dinosaur, because it is for a baby niece, the process is very simple I invite you to learn along with me in this new tutorial.
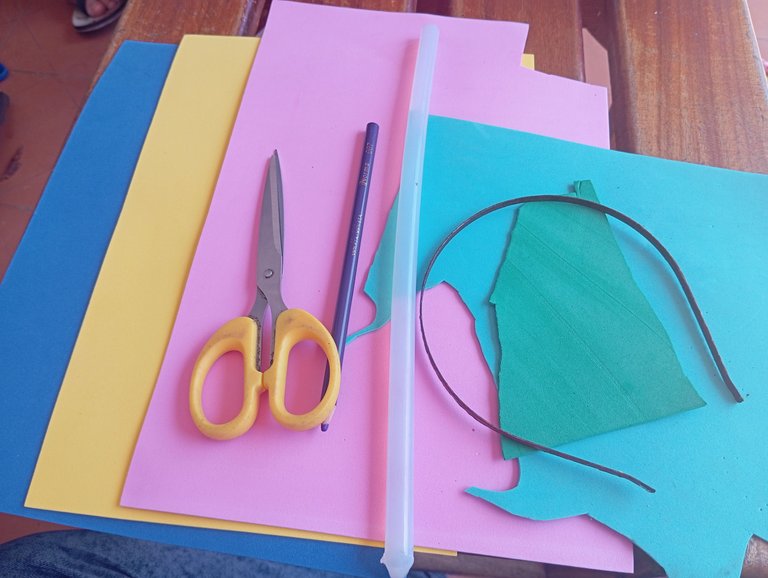
Materiales qué utilicé para la restauración de mi cintillo:
-Foamis
-Cintillo
-Tijera
-Silicon
-Lapiz y papel
Materials I used for the restoration of my headband:
-Foamis
-Headband
-Scissors
-Silicon
-Paper and paper
A continuación los pasos a seguir:
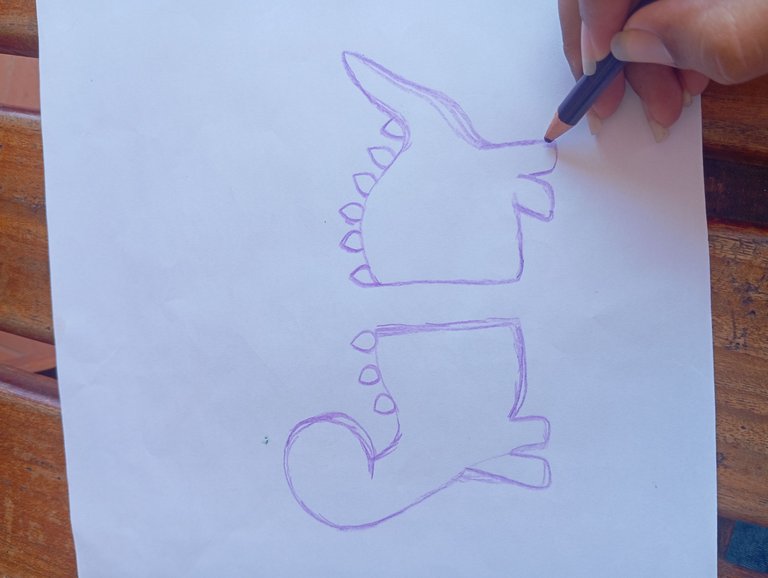
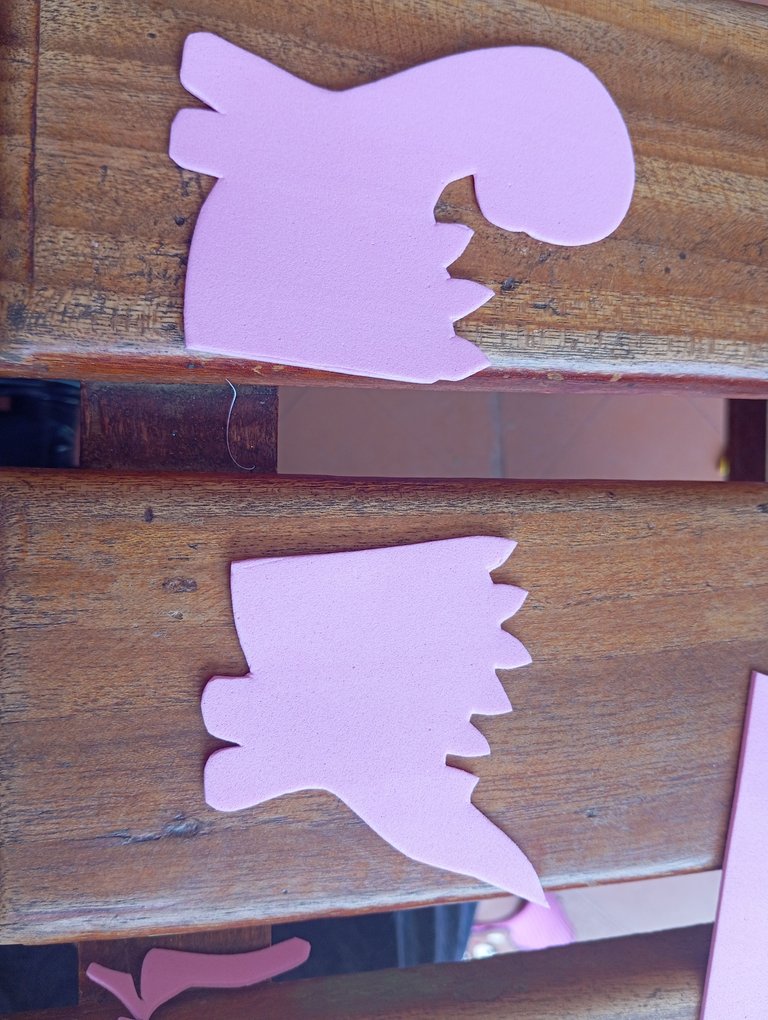
Paso número 1: En nuestro primer paso iniciaremos realizando un patrón con la temática con la cuál vamos a trabajar , dibujé una dinosaurio bebé dividida en dos partes , es decir , su cabeza y patas delanteras, por último el restante de su cuerpo,patas traseras y cola
Here are the steps to follow:
Step number 1: In our first step we will start making a pattern with the theme with which we are going to work, I drew a baby dinosaur divided into two parts, ie, its head and front legs, finally the rest of his body, hind legs and tail.
Paso número 2: seguidamente vamos a continuar marcando en este siguiente paso nuestro patrón en el foamis de nuestra preferencia, en este caso utilicé,color rosa ,un tono pastelero delicado y hermoso para una niña , lo marqué con la ayuda de un palito de altura para que no se ensucie el foamis con lápiz
Step number 2: then we will continue marking in this next step our pattern on the foamis of our preference, in this case I used, pink, a delicate and beautiful pastel tone for a girl, I marked it with the help of a stick height so as not to dirty the foamis with pencil.
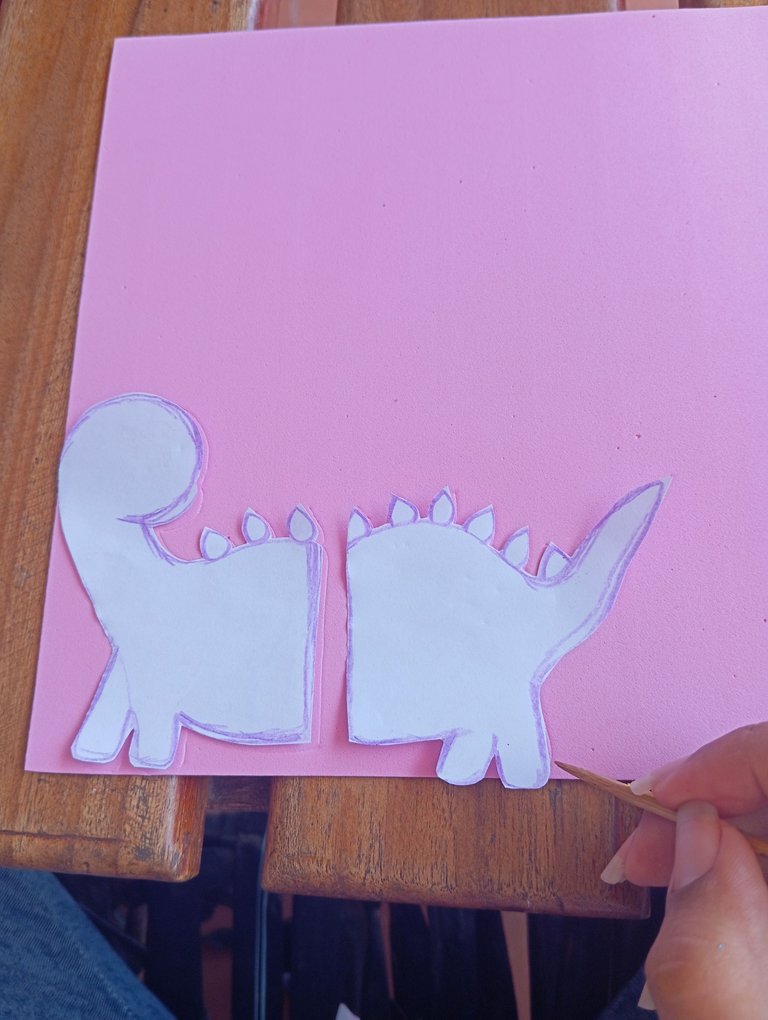
Paso número 3: una vez que marcamos nuestro diseño en el paso anterior, vamos a continuar en este tercer paso recortándolo con la ayuda de una tijera
Step number 3: once we marked our design in the previous step, we will continue in this third step by cutting it out with the help of a scissors.
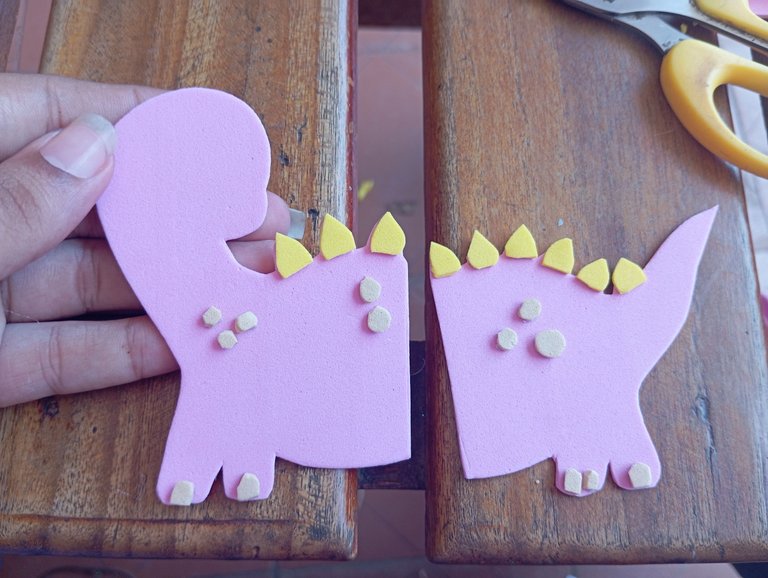
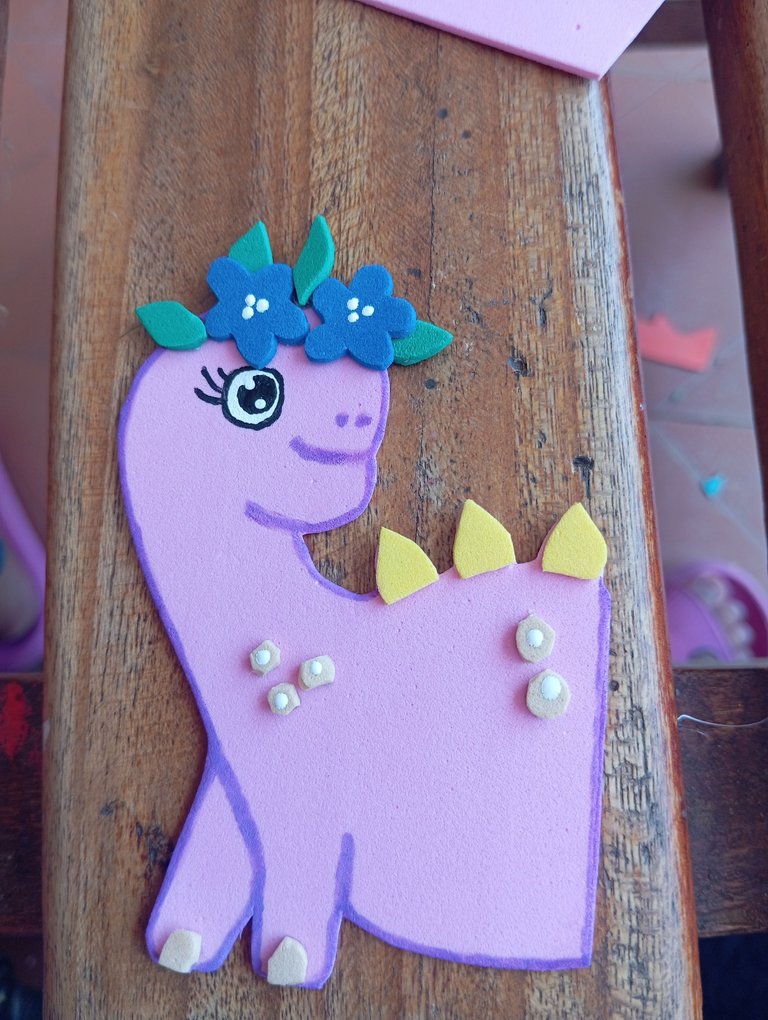
Paso número 4: en nuestro cuarto paso vamos a proceder pegando las especies de paletas que estás especies en su mayoría llevan en el lomo , estás las pegué color amarillo , sus pezuñas y lunares a los costados color piel amigos
Step number 4: in our fourth step we will proceed by gluing the species of paddles that these species mostly carry on the back, I glued them in yellow color, their hooves and polka dots on the sides skin color friends.
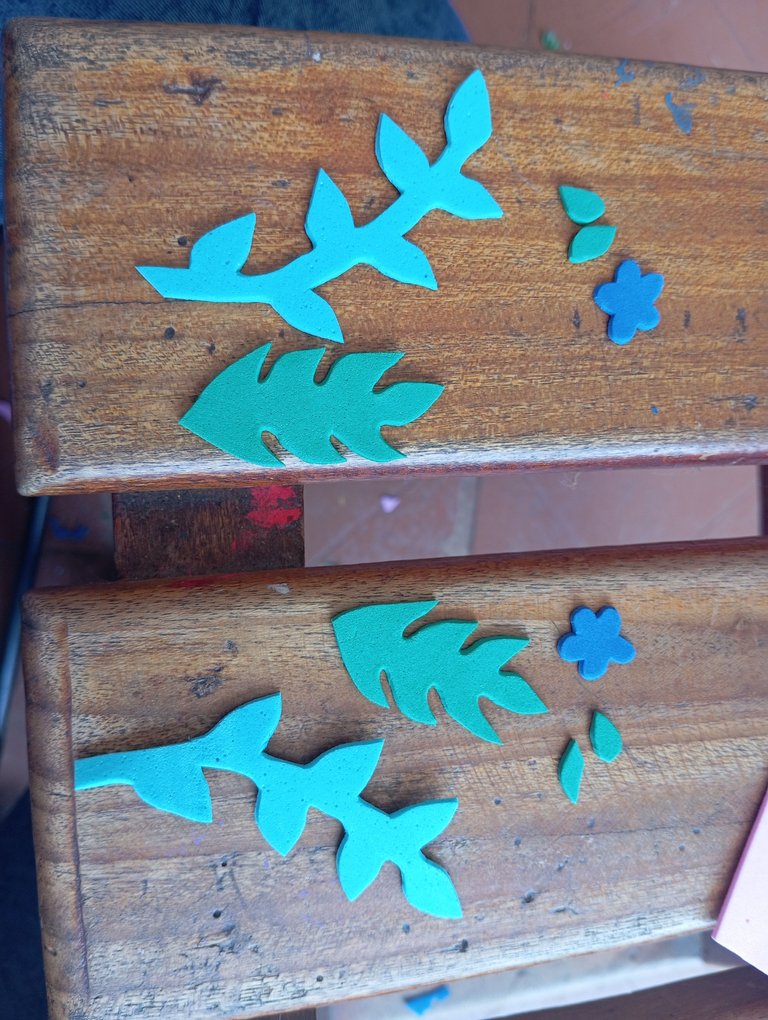
Paso número 5: para adornar el alrededor, continúe recortando dos pequeñas flores azules ,unas ramas verde oscuro y verde aguamarina
Step number 5: to decorate the surrounding area, continue cutting out two small blue flowers, some dark green and aquamarine green branches.
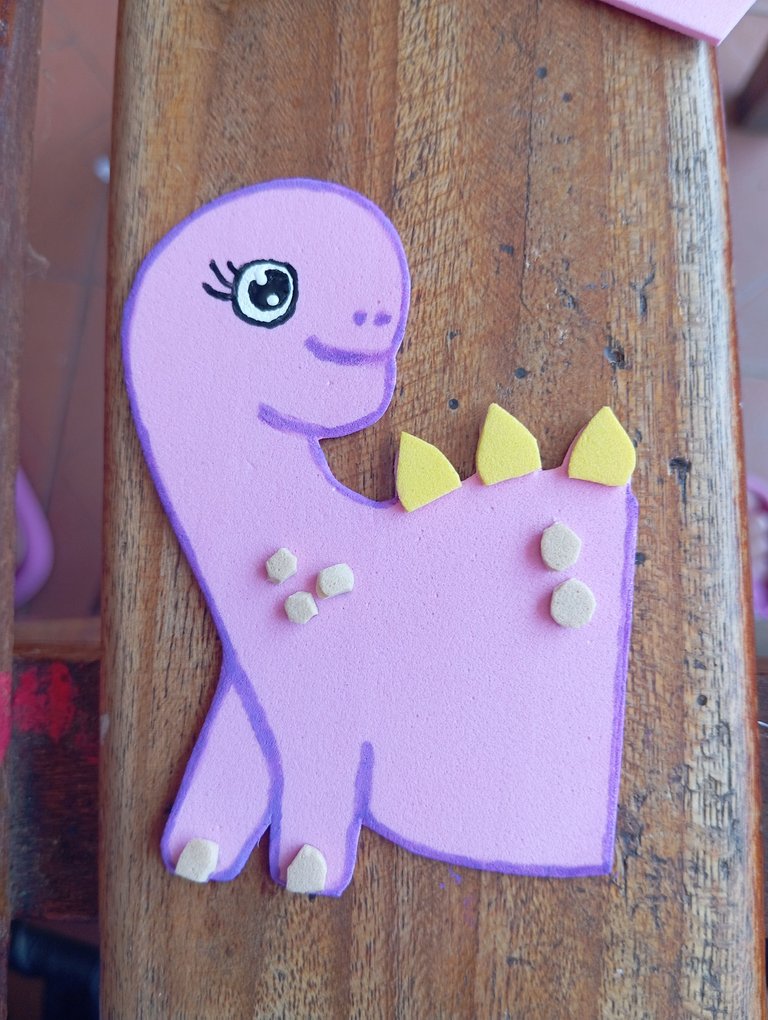
Paso número 6: luego continúe en nuestro sexto paso retocando los bordes con lápiz morado , así mismo dibujando su rostro alegre , en la parte de arriba de su cabeza pegué unas minis flores y hojas adornando e identificando que es una hembra dinosauria
Step number 6: then continue in our sixth step retouching the edges with purple pencil, likewise drawing his cheerful face, on top of his head I glued some mini flowers and leaves decorating and identifying that it is a female dinosaur.
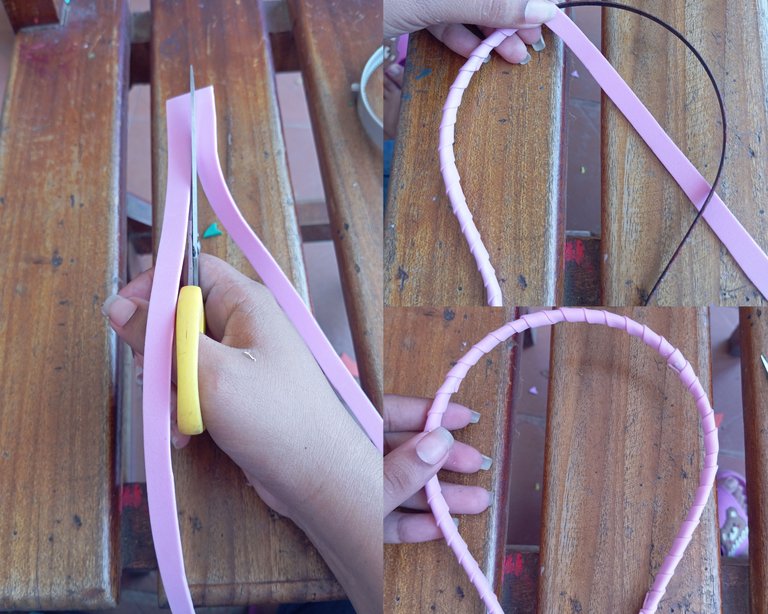
Paso número 7:a continuación en nuestro séptimo paso vamos a proceder recortando unas tiras de foamis , comenzaremos pegando de una esquina desde abajo hacia la otra punta , debemos enrollar hasta llegar al final del cintillo y cubrir la parte vieja amigos
Step number 7: then in our seventh step we will proceed by cutting out some foam strips, we will start gluing from one corner from the bottom to the other end, we must roll until we reach the end of the headband and cover the old part friends.
Paso número 8 ,paso final : en nuestro siguiente paso tomaremos las piezas y pegaremos , hasta formar nuestro diseño , iniciaremos pegando mitad de dinosaurio en un lado y la otra mitad en la misma dirección de la primera parte que pegamos , por último tomaremos las ramas y la pegamos a los lados para finalizar nuestro cintillo
Step number 8, final step: in our next step we will take the pieces and glue them together to form our design, we will start by gluing half of the dinosaur on one side and the other half in the same direction of the first part we glued, finally we will take the branches and glue them to the sides to finish our headband.
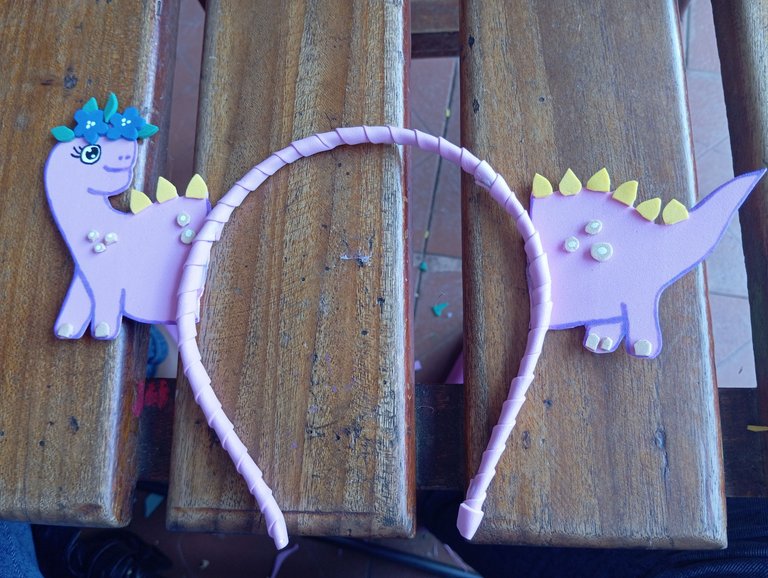
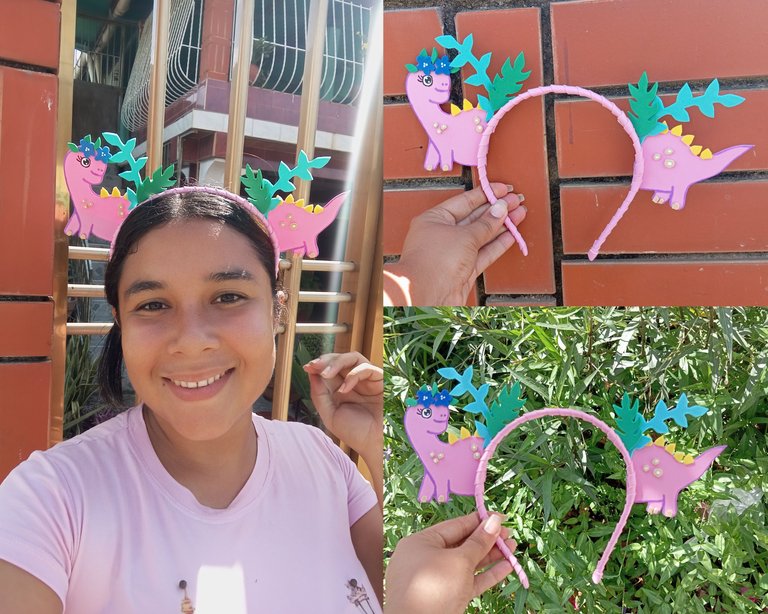
Resultado final: de esta manera realicé la restauración de mi viejo cintillo en una dinosaurio bebé , ideal para nuestras pequeñas, renovando y reciclado .
Créditos; las fotos las tomé con mi redmi 12 y traduje los textos con el traductor deepl,feliz tarde amigos
Final result: this is how I restored my old headband into a baby dinosaur, ideal for our little ones, renewing and recycling.
Credits; I took the photos with my redmi 12 and translated the texts with the deepl translator, happy afternoon friends.

Has sido curado por @visualblock / You've been curated by @visualblock
Bienvenidas delegaciones / Delegations welcome
Trail de Curación / Curation Trail
Vota por nuestro Testigo aliado - @hispapro / Vote for our allied Witness - @hispapro
Más información sobre el testigo aquí / More information about the witness here
Esta super tierno con esos brillitos en los ojos. Muy lindo, de seguro tu sobrina se enamora. Bendiciones
Gracias amiga linda
you did great with the color choice. looks cute for the little ones :)
Te quedo super creativo, gracias por compartir.😃
Gracias amiga