A few months ago, on an outing that we did at the university, they taught us how to make this flower and as you know "the beauty of learning is sharing" so today I want to share with you the step by step to make this beautiful flower that we can use as a box to decorate any area we want or simply stylize our favorite space. Also, although it seemed super complex to me when I saw it, actually making it is quite simple and we don't need to be an expert illustrator to have a good result, so if you like it I hope you're encouraged, all we need is a ruler and a lot of attention👌
Hace unos meses en un salida que hicimos en la uni nos enseñaron a realizar esta flor y como saben "lo bonito de aprender es compartir" por ende hoy quiero compartir con ustedes el paso a paso para elaborar esta hermosa flor que podemos usar como recuadro para decorar cualquier área que deseemos o simplemente estilizar nuestro espacio favorito. Además a pesar de que me pareció super compleja cuando la vi, realmente hacerla es bastante sencillo y no necesitamos de ser dibujante expertos para tener un buen resultado, por lo que si les gusta espero que se animen solo necesitamos de una regla y mucha atención👌
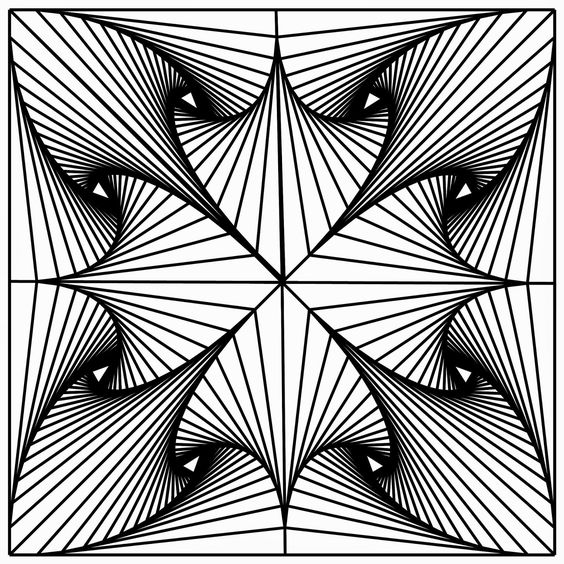
Guide image | Imágen guía
Materials | Materiales
📌Pencil✏️
📌Colored pencils🖍️
📌Drawing Paper
📌Rule
📌Lápiz✏️
📌Lápices de colores🖍️
📌Papel de dibujo📄
📌Regla📐📏
Proceso de creación | Creation process
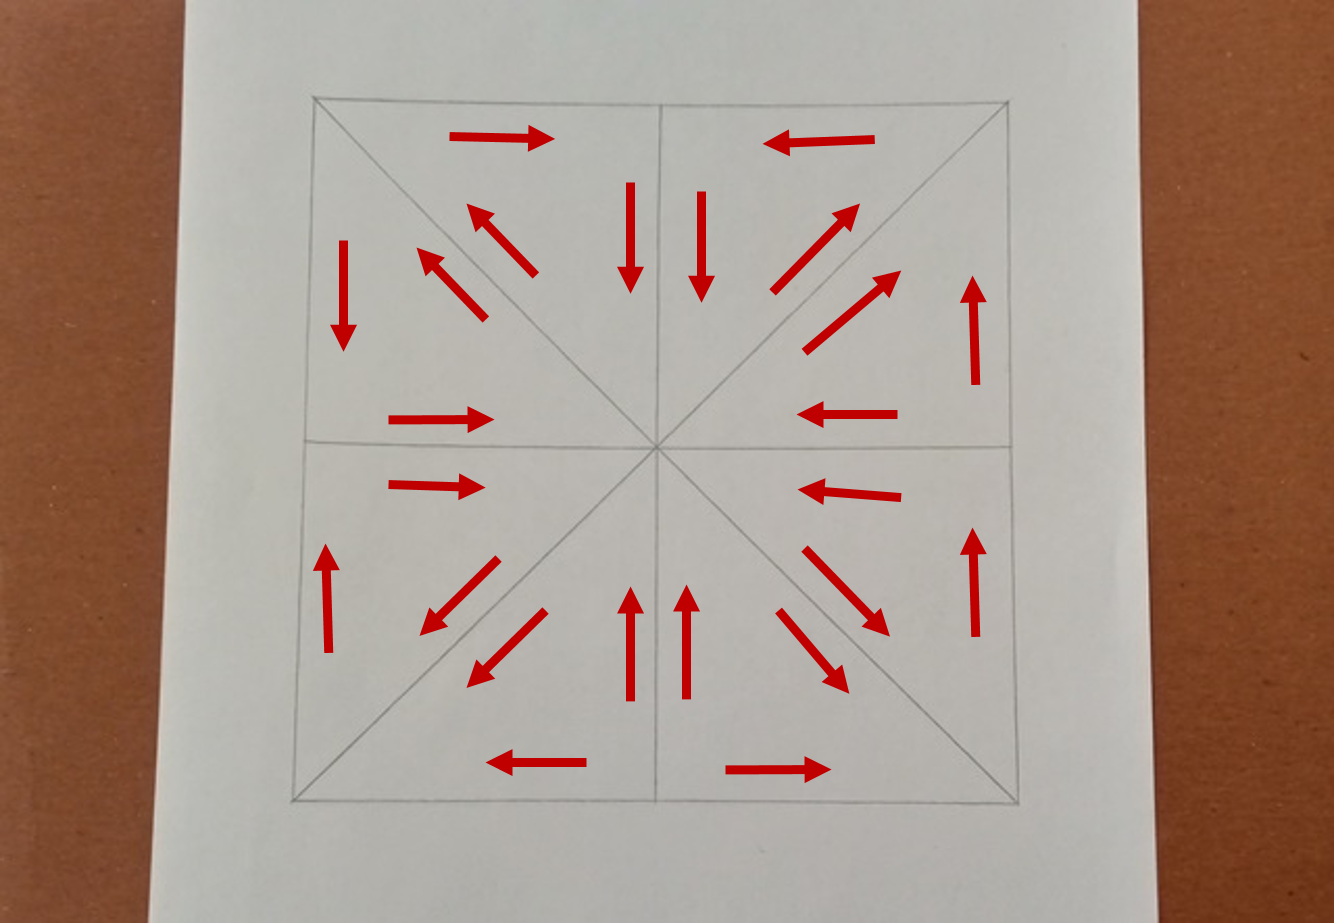
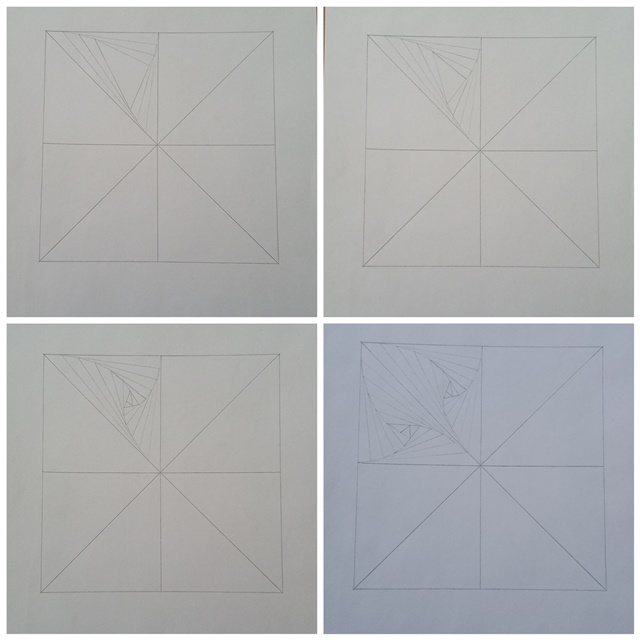
💜In this drawing it is essential that we use a ruler or square. To begin, draw a square, we can make it any size we want, the only important thing is that all its sides measure the same; I then divided the painting into four parts and drew the diagonal lines. As you can see in the image, the arrows there represent the direction in which we will draw each line. We don't have to draw them, just be guided by them, since they will help us not get lost.
💜En este dibujo es fundamental que utilicemos una regla u escuadra. Para empezar trace un cuadrado, podemos hacerlo del tamaño que queramos, lo único importante es que todos sus lados midan lo mismo; seguidamente dividí el cuadro en cuatro partes y trace las líneas diagonales. Como pueden ver en la imagen, las flechas que se encuentran allí representan el sentido en el que iremos trazando cada línea. No tenemos que dibujarlas solo guiarnos de ellas, ya que nos ayudaran a no perdernos.
💜Next; Draw the first straight line, like all the other lines that I will draw, they are diagonal. To maintain harmony, it is advisable that all the lines be even. Since it is a simple figure, we can begin to trace it with a pencil, a pen or a marker depending on what we feel more confident with; Since this is the second time I've done it, I prefer to use a pencil.
💜A continuación; trace la primera recta, esta como todas las demás líneas que trazaré son diagonales, también para mantener la armonía conviene que todos los trazos sean parejos. Al ser una figura sencilla, podemos comenzar a trazarla con un lápiz, un bolígrafo o un marcador dependiendo de con que nos sintamos más confiados; como es la segunda vez que lo hago prefiero utilizar un lápiz.
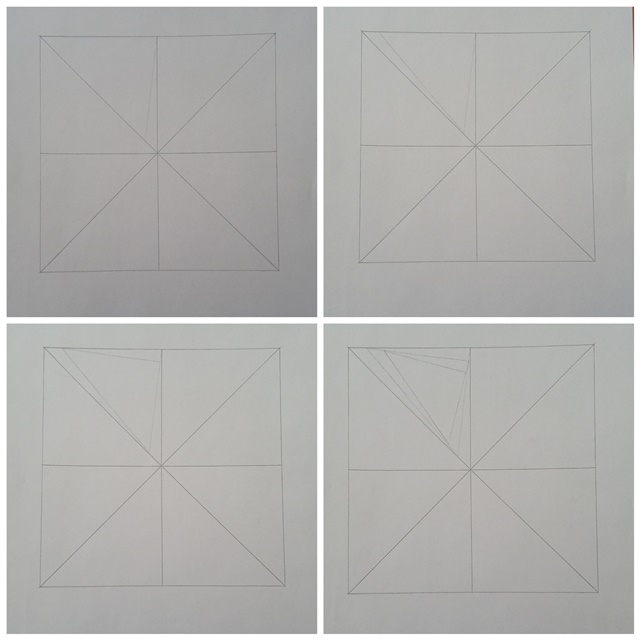
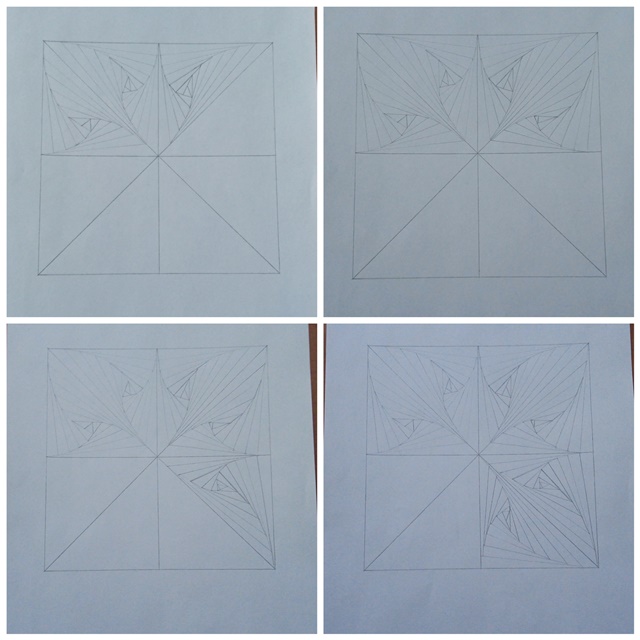
💜As we can see, each segment has the shape of a triangle, what we will do is fill each of the segments with more triangles, it may happen that we get confused and forget the direction in which one of the lines goes; But for this we only have to be guided by the arrows that we mentioned at the beginning and maintain attention.
💜Como podemos observar cada segmento tiene forma de triángulo, lo que haremos es rellenar cada uno de los segmentos con más triángulos, puede pasar que nos confundamos y olvidemos el sentido en que va una de las rectas; pero para esto solo debemos guiarnos de las flechas que mencionamos en un principio y mantener la atención.
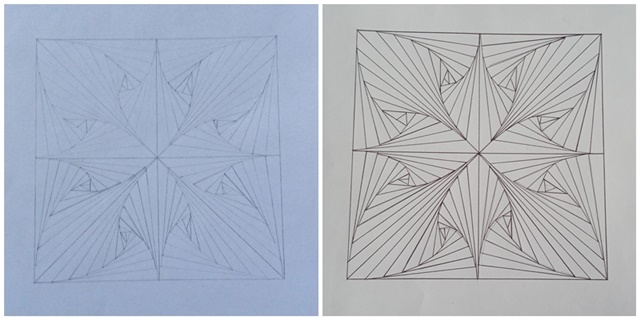
💜Here we can see how it gradually takes the shape of a flower and once finished we have the first part of the tutorial ready. Without a doubt, this is a quite interesting visual effect since even though we only draw straight lines, a curve is created from them, giving shape to the petals. After finishing the flower, outline the entire drawing with black pen, this part is optional.
💜Aquí podemos ver cómo va tomando poco a poco forma de flor y una vez terminada tenemos la primera parte del tutorial listo. Sin duda este un efecto visual bastante interesante ya que a pesar de que solo trazamos rectas se crea una curva a partir de ellas dándole forma a los pétalos. Después de terminar la flor, delinee todo el dibujo con bolígrafo negro esta parte es opcional.
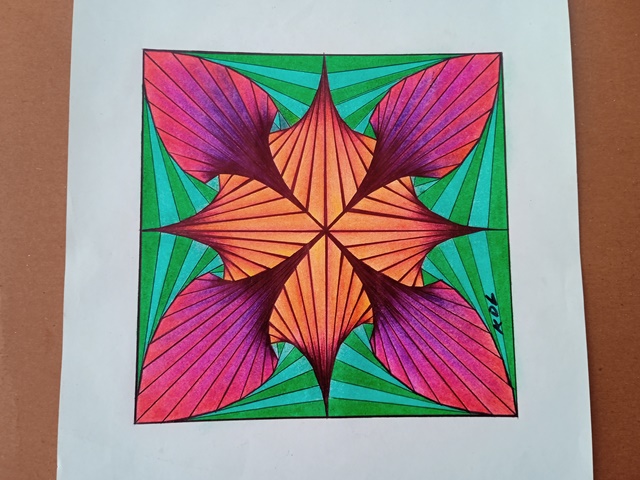
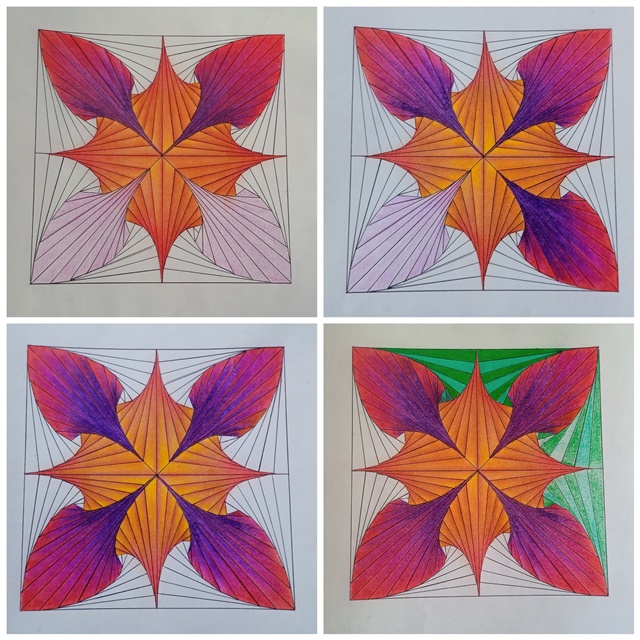
💜At first I had planned to just use the pencil and that's it, but I changed plans and decided to add color instead, for that reason I outlined the entire flower with a pen. In itself it is a figure that stands out without having to add many details but since I love to color everything that is what I am going to do. First I started to apply color to the central figure, I chose to use warm colors like yellow and red, the combination gave this beautiful orange that we see in the photo, the truth is I am not a lover of orange but I like to use it from time to time.
💜Al principio tenía planeado solamente utilizar el lápiz y ya pero cambie de planes y decidí mejor agregarle color, por esa razón delinee toda la flor con bolígrafo. Ya de por si es una figura que resalta sin tener que agregarle muchos detalles pero como me encanta colorear todo eso es lo que voy a hacer. Primero empecé a aplicar color en la figura central, opte por usar colores cálidos como el amarillo y el rojo, la combinación dio este naranja bonito que vemos en la foto, la verdad no soy amante del naranja pero me gusta usarlo de vez en cuando.
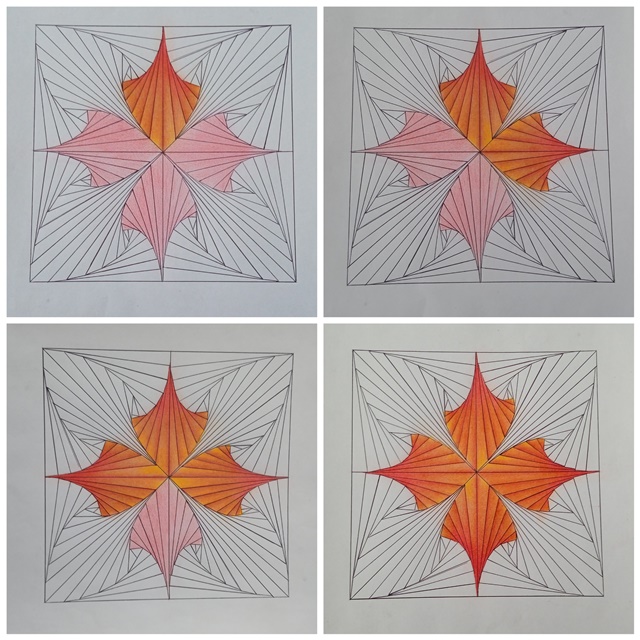
💜After finishing painting the center, move on to drawing the petals of the flower. Here I dared to use other colors, I mostly use cold pigments since they are my favorites but here as you can see in this drawing I chose complementary colors. The warm colors of the center contrast with the cold ones of the other petals, this helps to give it a little more dynamism and I found it more creative than drawing the entire flower in just one color. Although in the original drawing the flower is only the one in the center and the rest are the leaves that surround it, I also preferred to paint them in other colors.
💜Luego de terminar de pintar el centro, pase a dibujar los pétalos de la flor. Aquí me atreví a usar otros colores, mayormente utilizo pigmentos fríos ya que son mis favoritos pero aquí como pueden ver en este dibujo escogí colores complementarios los colores cálidos del centro contrastan con los fríos de los demás pétalos, esto ayuda a darle un poco más de dinamismo y me pareció más creativo que dibujar toda la flor solamente de un solo color. Aunque en el dibujo original la flor solamente es la del centro y lo demás son las hojas que la rodean yo igualmente preferí pintarlas de otros colores.
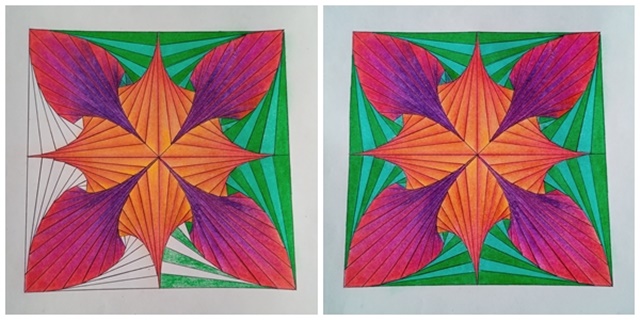
Finished work | Obra terminada

💗 Espero que hayan disfrutado del paso a paso! Les agradezco por quedarse y ver mi post. Recuerda que cualquier consejo o critica constructiva siempre es bienvenida😊💗
Thank you for your visit. See you next time!😘👋
!Gracias por tu visita. Nos vemos en la proxima!😘👋
📌The images were taken by me with a Redmi 10 and edited in Picsart📲💜 . The translation was thanks to Google translate🔍✌️
📌 Las imágenes fueron tomadas por mí con un Redmi 10 y editadas en Picsart📲💜. La traducción fue gracias al traductor de Google🔍✌️
¡Feliz inicio de semana!. Que trabajo tan hermoso, me encanta que no solo describes paso a paso lo que debemos hacer, sino que cuentas tu real experiencia y nos trasmites la pasión que tuviste al crear tu arte. Me parece que la mejor decisión fue haber comenzado a colorear, solo con lápiz no habría tenido el mismo efecto (en mi opinión). Te felicito...
Holaa amigo! muchas gracias, me alegra que te haya gustado es para mi un placer compartir todo o que amo hacer❤️ definitivamente opino lo mismo solo con el lápiz se hubiese visto muy simple y tampoco es mi estilo yo soy más de usar colores🌈
Gracias por tu comentario que tengas un feliz día😊!!
Wow, este diseño está espectacular! Es muy artístico y tiene mucho movimiento, da esa impresión cinética en la vista, además los colores están muy bien escogidos. Te felicito por este trabajo genial.
Que hermoso trabajo ❤️
Que bonito dibujo Karen 🤗✨💖, tiene su proceso y su técnica realizar esa hermosa flor🌺♥️
Congratulations @karenlagonell! You have completed the following achievement on the Hive blockchain And have been rewarded with New badge(s)
Your next target is to reach 6000 upvotes.
You can view your badges on your board and compare yourself to others in the Ranking
If you no longer want to receive notifications, reply to this comment with the word
STOPCheck out our last posts: