Hello artist friends! Happy start of the month!💗🌞 | Hola amigxs artistas! Feliz inicio de mes!💗🌞
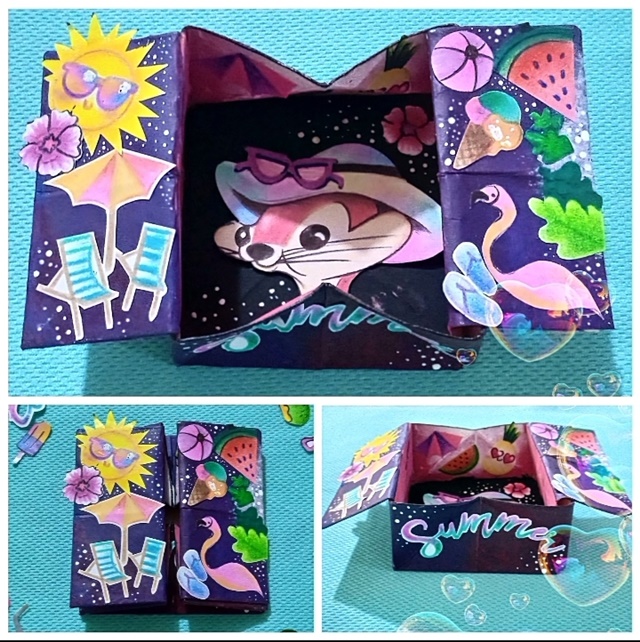
I hope you are good. I am very happy to return to hive! I missed the platform so much and being able to see and share creations🤗💕. It's been a few months since I posted in the community. To sum it up, it has been quite a busy year since I started university; However, I'm already on vacation and it's my time to catch up with hive... This time I'll make a card-box, it's two in one since we can use it in both ways; it's a perfect detail to give it to someone and fill them with sweets or just write a nice message 💌✨. I hope you like it!😉
Espero que se encuentren muy bien. Yo estoy muy alegre de volver a hive! Extrañaba mucho la plataforma y poder ver y compartir creaciones🤗💕. Hace unos meses que no posteo en la comunidad. Para resumirles ha sido un año un tanto ajetreado ya que comencé la universidad; sin embargo ya estoy de vacaciones y es mi momento para ponerme al día con hive... En esta ocasión hare una tarjeta- cajita, es dos en una ya que podemos usarla de las dos maneras; es un detalle perfecto para regalárselo a una persona y llenarla de dulces o simplemente escribirle un mensaje bonito💌✨. Espero les guste!😉
For today I have decided that my craft is simply about two things that I really like: making origami and drawing... I tend to complicate my life a lot by analyzing even the smallest things, I am a perfectionist and this makes me obsessed with every little thing. detail; However, I got tired and said to myself: "Ok, today I'm just going to improvise while doing something fun" and here we are. This craft is inspired by this, there are no other two words that relax and cheer me up as much as summer and vacation🙂🙂
Para hoy he decidido que mi manualidad se trate sencillamente de dos cosas que me gustan mucho: hacer origamis y dibujos...Suelo complicarme mucho la existencia sobre analizando hasta las más mínimas cosas, soy muy perfeccionista y esto hace que me obsesione por cada pequeño detalle; sin embargo me canse y me dije: "Ok, hoy simplemente voy a improvisar mientras hago algo divertido" y pues aquí estamos. Esta manualidad está inspirada en esto, no hay otras dos palabras que me relajen y alegren tanto como verano y vacaciones🙂🙂
Guide images | Imágenes guías
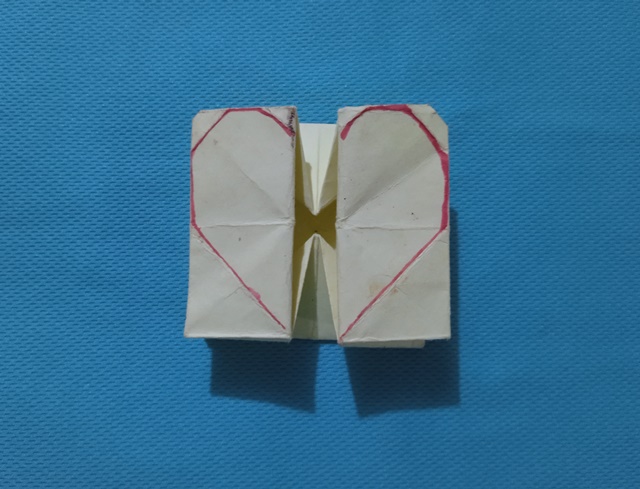
Para hacer la cajita me guíe de este detalle que le regalaron a mi mamá; me pareció interesante y decidí desarmarla y volver a armarla para ver cómo se hacía.
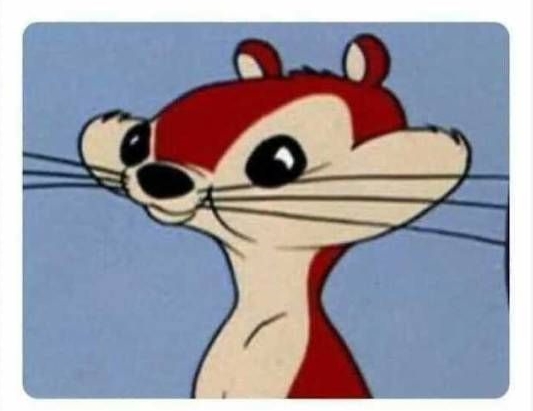
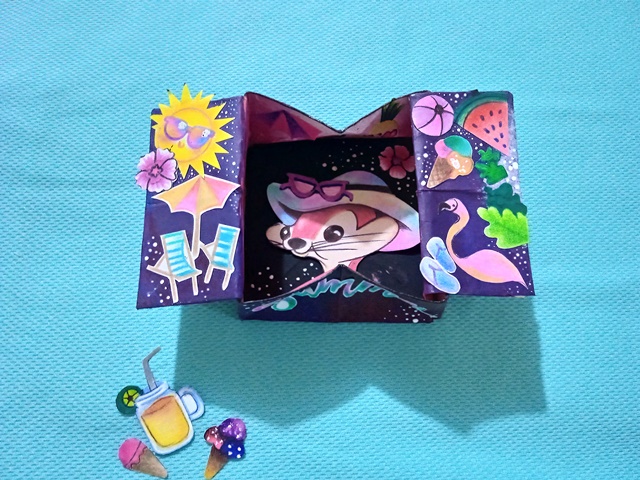
Igualmente dibuje a esta caricatura quise agregarla a la caja para que cada vez que la abra pueda ver esta imagen en el fondo, me hace mucha gracia😆
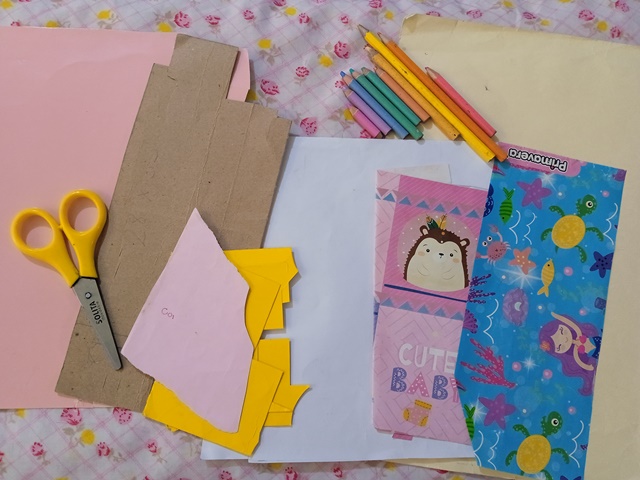
Materials | Materiales
♻️ En esta oportunidad, utilice materiales reciclados y aproveche retazos de cartulina y papel que me sobraron de otras manualidades ♻️
🍒Cardstock
🍒Rule
🍒Scissors
🍒Pencil
🍒Colored pencils
🍒Glue
🍒Paintings
🍒Brush
🍒Details to decorate
🍒Cartulina
🍒Regla
🍒Tijera
🍒Lápiz
🍒Lápices de colores
🍒Pegamento
🍒Pinturas
🍒Pincel
🍒Detalles para decorar
Creation process | Proceso de creación
🍉To make this card I used a manila folder, it was torn and I thought I would use it for this project, these folders are usually disposable since it is quite a fragile material, but I usually collect them to make crafts. The first thing I did was cut out a square with the cardboard. From this first step we can start decorating, painting details or whatever we want, I prefer to wait until the end. Then score the cardstock in half and mark the diagonal lines. In this same position, take the tips of two extremes and bring them to the center as we can see in the third photo.
🍉Para hacer esta tarjeta utilice una carpeta manila, estaba rota y pensé en usarla para este proyecto, estas carpetas suelen ser desechables ya que es un material bastante frágil, pero yo suelo recolectarlas para hacer manualidades. Lo primero que hice fue recortar un cuadro con la cartulina. Desde este primer paso podemos comenzar a decorar, pintarle detalles o lo que queramos, yo prefiero esperar hasta el final. Luego marque por la mitad la cartulina y marque las líneas diagonales. En esta misma posición tome las puntas de dos extremos y las lleve hasta el centro como podemos ver en la tercera foto
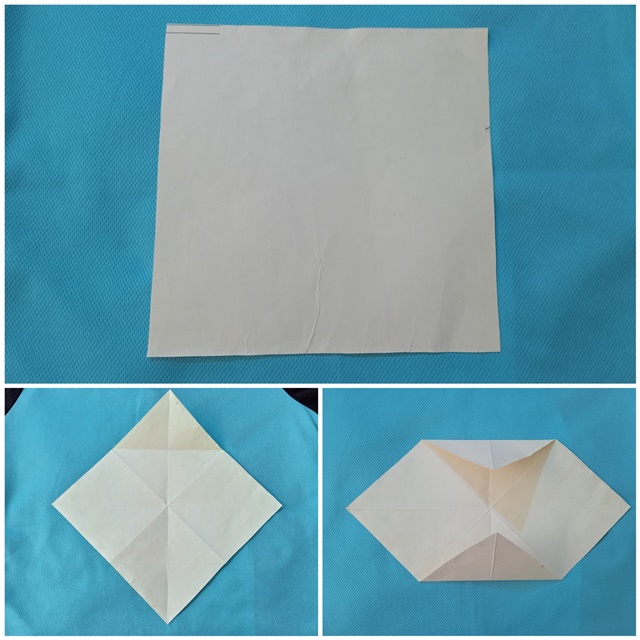
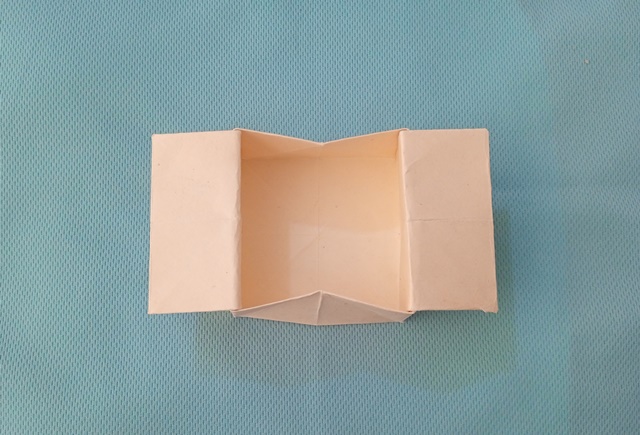
🍉Then take those same tips to the edge of the cardboard. I turned the piece over; again take the tips of the two ends and bring them to the center and then fold them outwards, forming a little square. In this case, I believe that images are worth more than words; everything starts to make sense when you elaborate it. I remember that when I learned how to make origami I was very frustrated, however later when I started practicing and the pieces started to come out it turned out to be quite a relaxing activity.
🍉Seguidamente lleve esas mismas puntas hacia el borde de la cartulina. Le di vuelta a la pieza; nuevamente tome las puntas de los dos extremos y las lleve hasta el centro y luego las doble hacia afuera, formando un cuadradito. En este caso, creo que las imágenes valen más que las palabras; todo empieza a cobrar sentido cuando lo elaboras. Recuerdo que cuando aprendí a hacer origami me frustraba mucho, sin embargo luego cuando empecé a practicar y las piezas empezaron a salir resulto ser una actividad bastante relajante.
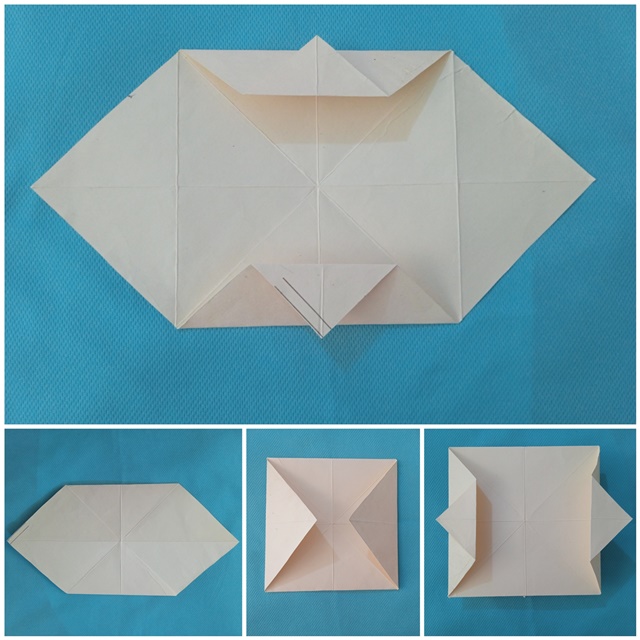
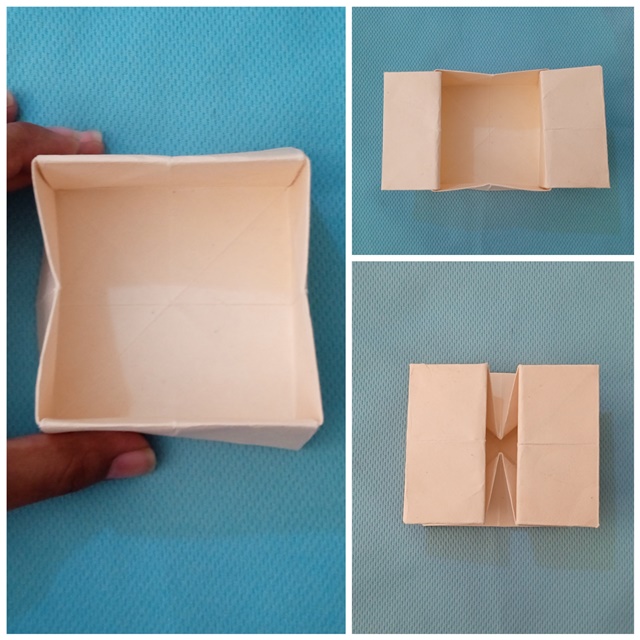
🍉Once we have the square, take the upper edge of it and fold it towards the center, then I did the same with the lower edge, mark this part well and unfold the folds I made. Later I repeated this same step with the other two edges of the square.
🍉Una vez que tenemos el cuadradito, tome el borde superior de este y lo doble hacia el centro, seguidamente hice lo mismo con el borde inferior, marque bien esta parte y desplegué los dobleces que hice. Posteriormente repetí este mismo paso con los otros dos bordes del cuadrado.
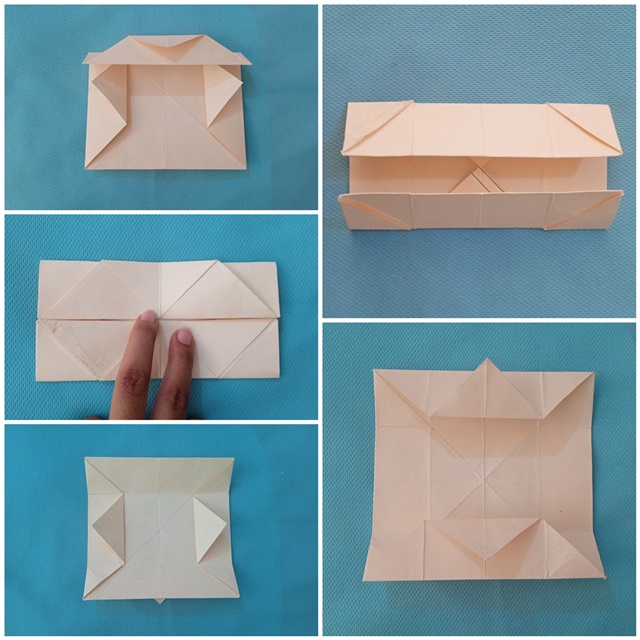
🍉As we can see in the images when unfolding the piece, some squares are marked; These folds are very important since with them we can shape our box. The next thing I did was fold back the first segment from the top. And then I started to shape the piece.
🍉Como podemos observar en las imágenes al desdoblar la pieza quedan marcados unos cuadritos; estos dobleces son muy importantes ya que con ellos podremos darle forma a nuestra caja. Lo siguiente que hice fue plegar hacia atrás el primer segmento de la parte superior. Y luego empecé a darle forma a la pieza.
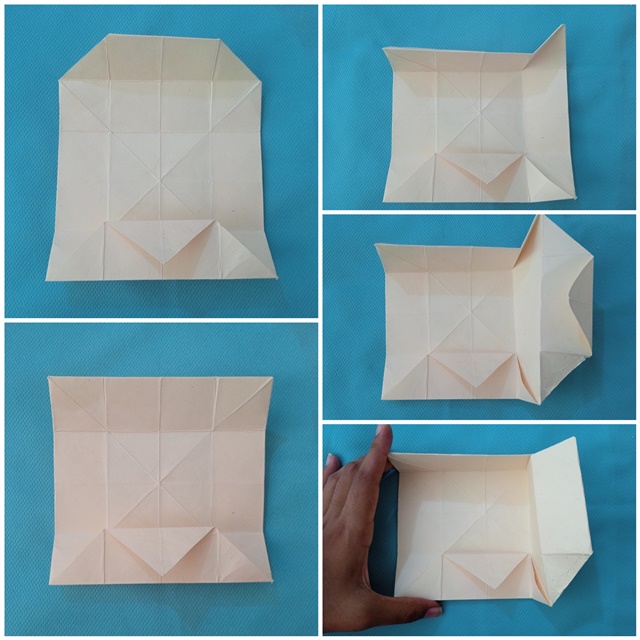
🍉Here we already have our Card-Box formed; whatever they want to call it. It is not necessary to use glue, but I used it to reinforce some parts. Love the result; now it is a blank canvas, in which we can display all our tastes. As you can see, if we unfold the flaps to the back, it only looks like a box, it all depends on what we want to do, it's enough to give free rein to our imagination.
🍉Aquí ya tenemos formada nuestra Tarjeta-Cajita; como deseen llamarle. No es necesario usar pegamento, pero yo lo use para reforzar algunas partes. Ame el resultado; ahora es un lienzo en blanco, en el podemos desplegar todos nuestro gustos. Como pueden ver si desplegamos las solapas hacia atrás queda como una caja solamente, todo depende de lo que queramos hacer, solo basta con darle rienda suelta a nuestra imaginación.
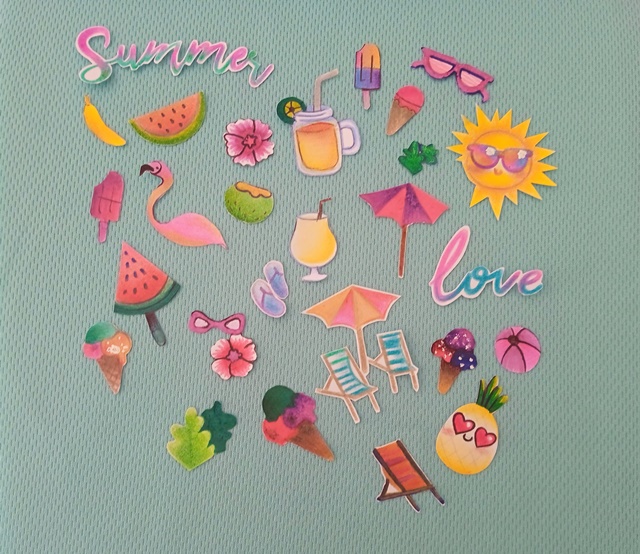
🍉Follow one of my favorite steps in life and that is to decorate; It's the best part because we can do it however we want, without following any specific steps. As you can see below I chose to draw pictures and paste them; above all because it relaxes me a lot to cut out images, figures; I understand that for many it can be somewhat picky but this at the same time helps a lot to cultivate patience and calm. The theme that I chose was summer, vacations; I really like that word a lot😄. Right now I'm on my vacation and what better time to get inspired by that. Once I cut out all the drawing, select the ones that I would paste in the box and save the ones that remain for future projects.
🍉Sigue uno de mis pasos favoritos en la vida y es decorar; es la mejor parte porque podemos hacerla como nos dé la gana, sin seguir ningún paso en específico. Como pueden ver a continuación yo escogí hacer dibujos y pegarlos; sobre todo porque me relaja mucho recortar imágenes, figuras; entiendo que para muchos puede ser algo quisquilloso pero esto a la vez ayuda mucho a cultivar la paciencia y la calma. La temática que yo escogí fue verano, vacaciones; de verdad que esa palabra me gusta mucho😄. Ahora mismo estoy en mis vacaciones y que mejor momento para inspirarme en eso. Una vez que recorte todo el dibujo seleccione los que pegaría en la caja y guarde los que me quedaron para futuros proyectos.

Utilice colores referentes a esta época del año, colores cálidos, energéticos que representan el verano🌞🏝️
🍉Then I made a drastic decision and painted the box about three times, first I painted it green with yellow and I didn't like the result, then I painted it blue and I didn't like it either, in the end I decided to be faithful to my style and I painted it purple and in the center use a guava pink; I did not plan to do this, at first I did not include the paints in the materials but I liked the result and finally I added some small spots with white paint. To obtain the purple mix the paints Blue Rey+Magenta and for the pink mix Magenta+Light Yellow🖌️🎨
🍉Luego tome una decisión drástica y pinte la caja unas tres veces, primero la pinte de verde con amarillo y no me gusto el resultado, luego la pinte de azul y tampoco me gusto, a la final decidí serle fiel a mi estilo y la pinte de morado y en el centro utilice un rosado guayaba; no tenía planeado hacer esto, al principio no incluí las pinturas en los materiales pero me gusto el resultado y por último agregue unas pequeñas manchas con pintura blanca. Para obtener el morado mezcle las pinturas Azul Rey+Magenta y para el rosado mezcle Magenta+Amarillo claro🖌️🎨
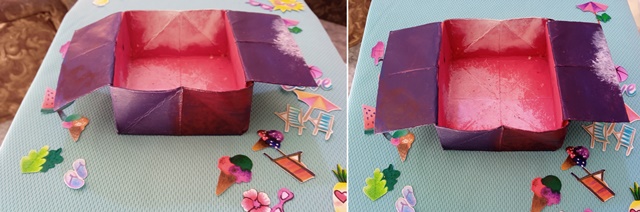
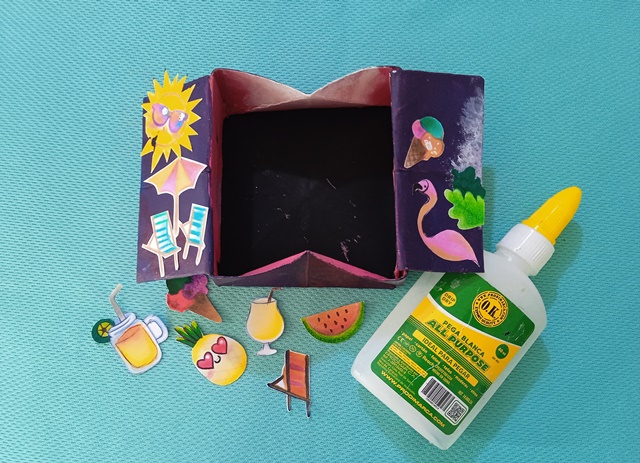
🍉In the end, I painted the floor of the box black since the image that I wanted to place there, not highlighted on the pink background, turned out to be very good; after this I got ready to paste the drawings that I had made on the whole box-card and that's it! Easy and fast✨
🍉A la final pinte el piso de la caja de color negro ya que la imagen que quería colocar ahí no resaltada sobre el fondo rosa, resulto quedar muy bien; después de esto me dispuse a pegar los dibujos que había hecho sobre toda la caja-tarjetita y listo! Fácil y rapido✨
Finished work | Obra terminada
💗Espero que hayan disfrutado del paso a paso! Les agradezco por quedarse y ver mi post. Recuerda que cualquier consejo o critica constructiva siempre es bienvenida💗
Thank you for your visit🤗. See you next time!👋
!Gracias por tu visita🤗. Nos vemos en la proxima! 👋
The images were taken by me with a Redmi 10 and edited in Picsart 📲. The translation was thanks to 👉Google translate
Las imágenes fueron tomadas por mí con un Redmi 10 y editadas en Picsart 📲. La traducción fue gracias al 👉traductor de Google
https://leofinance.io/threads/dayadam/re-dayadam-2zfmnawmm
The rewards earned on this comment will go directly to the people ( dayadam ) sharing the post on LeoThreads,LikeTu,dBuzz.
Muy bonita esta cajita. Es bueno dejarse llevar por la creatividad sin buscar el perfeccionismo. Será porque para mí las manualidades representan relax que trato de no sentirme presionada por nada.
El resultado es fantástico. Me encantó que hayas pintado la caja, todas las figuras se ven preciosas decorando la cajita. Gracias por compartir.
Muchaas graciaas!!!🤗❤️ si definitivamente la clave esta en no pensar tanto en los detalles y simplemente disfrutar el proceso❤️
Ainsssss esta cajita te quedo hermosa, esta súper cuchi y llena de detalles, te felicito. Gran manera de volver a hive. Que tengas un maravilloso día lleno de éxitos y bendiciones @karenlagonell ✨
!DIY
Holiss! @dayadam! Muuchas Graciass ;3 aprecio mucho tu comentario, me disverti mucho haciento esta cajita, me alegra que te halla gustado. Te mando un abrazo💗💗💗
You can query your personal balance by
!DIYSTATSOK friend! Thanks, I will do it :3
Es muy cuchi esta cajita 😍 y mas con esa ardillita, amaba esa caricatura porque me daba mucha ternura su diseño y sigue siendolo jejeje ademas los detallitos playeros le dieron un toque especial, me gusta mucho la playa aunque no voy nunca jajaja
Muy linda manualidad, me encanto 😍
Te entiendo amiga yo casi nunca voy a la playa 😆, por eso la dibuje, algun día volveremos a ir jsjsjsj, me alegra que te halla gustado el paso a paso; lo hice con mucho cariño💗. Que tengas un feliz día @elbuhito!💗💗
jajajaj amo esa ardillita, me traiste a mi infancia que bello!, Me encantó tu caja es super original, la decoración y el color es estupenda, me recuerda el scrapbook que ando haciendo. Tu paso a paso es estupendo.
Holaa ;3 !! jijiji me alegra muchísimo que te halla gustado el detalle de la ardillita la dibuje justamente para eso y poder sacarles una sonrisa con el recuerdo. Muchas graciaas; aprecio mucho tu comentario. Te mando un abrazo💗💗💗