( ENG)
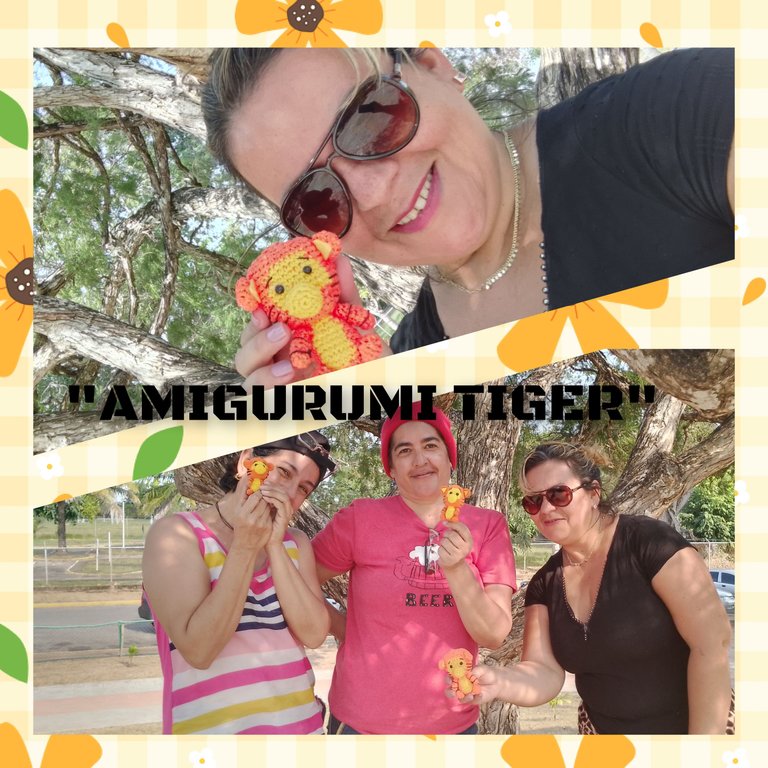
Very good day dear friends, creators of @hivediy, today I come to share with you, very happy and satisfied, a great experience. I had always had the concern, within @hive of the wonders, woven, and transformed into adorable animals, from cartoons, if I had always had that concern, then imagine discovering it and applying it. Well, I tell you that for a long time, I made some beautiful friends on the platform, and destiny brought us together, and after some meetings with @creacioneslelys and @linita, the idea arose of doing mini workshops, these dictated and directed by us. Each one would be dedicated to a specific manual technique. So I invite you to learn how I did it, I hope you enjoy it.
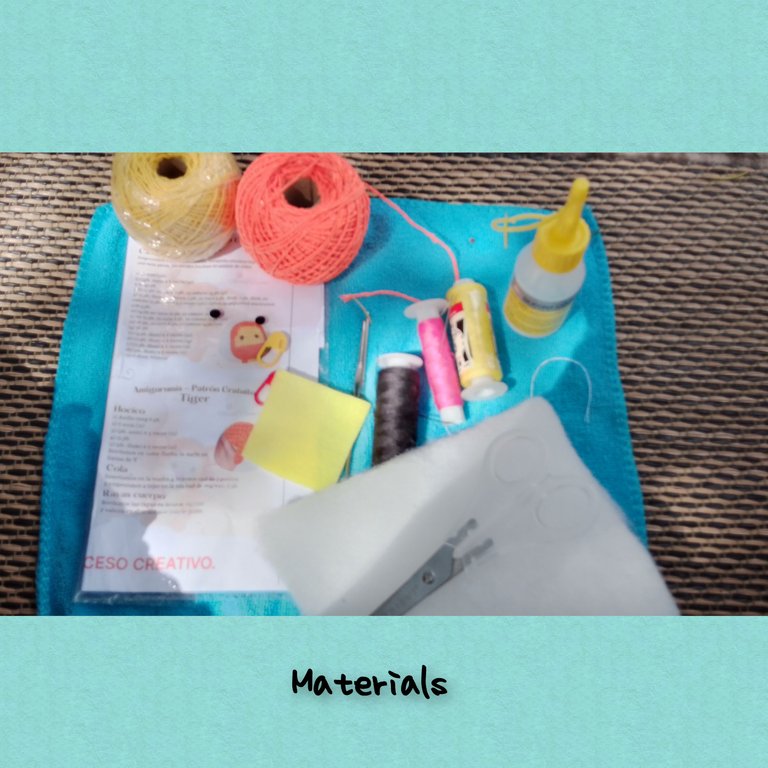
Materials: After a few days, the list of materials was published by @creacioneslelys, so it gave enough time for collection.
. Colored knitting threads (yellow and orange)
. Knitting needle.
. Yellow felt cutout.
. Wool needle.
. Wadding or filling.
. Knitting pattern (courtesy of the facilitator)
. Scissors.
. Glue.
. Printed manual.
. Small eyes.
Steps:
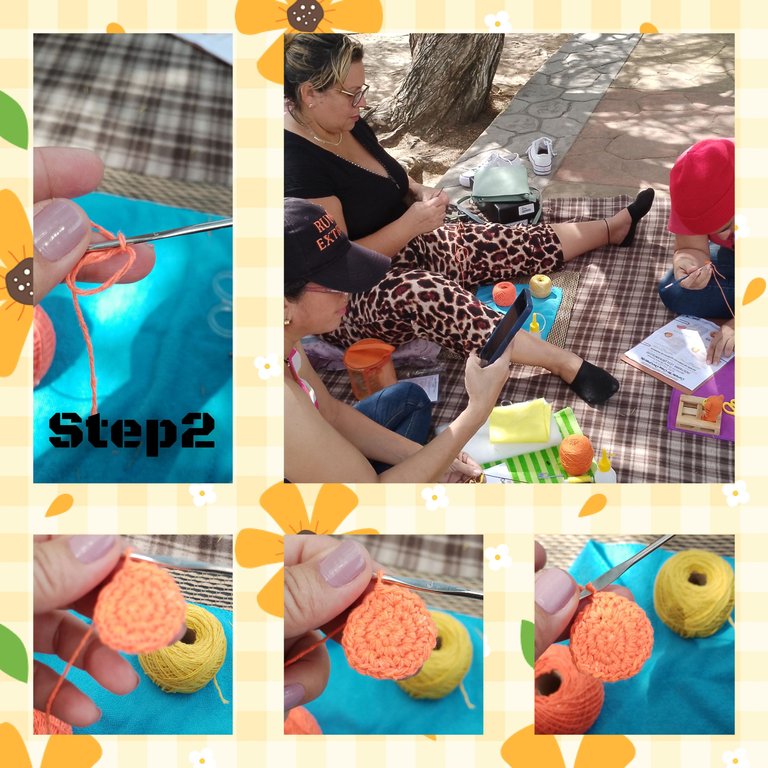
1.) after the person in charge of the mini workshop, explain, in advance, what the development of the workshop will be, mention the points that we will use, the technique among others. Guide you closely, the pattern in the manual, how the stitches are applied and clarify some doubts, show us the model already woven by her. We prepared to position ourselves in the most comfortable way we could, we chose under a tree, because of the coolness and the shade with which it covers us, so we laid out a tarp, which the instructor arranged and that was it, the next thing was, go after the purpose.

2.) start, as the guide says, with a magic ring, inside the six, low stitches and I close the ring, with slipped stitches. For the next round, there will be six increases, it was not easy for me to knit in a spiral, so the person in charge suggests lifting chains, to start and continue the following rounds and avoid getting lost between them and if that were the case, be easier to locate myself, for an apprentice I think, this way is very valuable, since the markers also escaped me. So it continued.
3.) for round n4, I begin the experience of changing the color of the thread, to give a different color to Tiger's tummy, and so on, always guiding me on my rounds and their development in the manual. It was a little difficult for me to drag both threads in each of the turns, but I adapted very quickly to how to insert the thread, in the turns and in each of the moments in which this had to happen. All very tasty with a super cool climate and very good conversations.
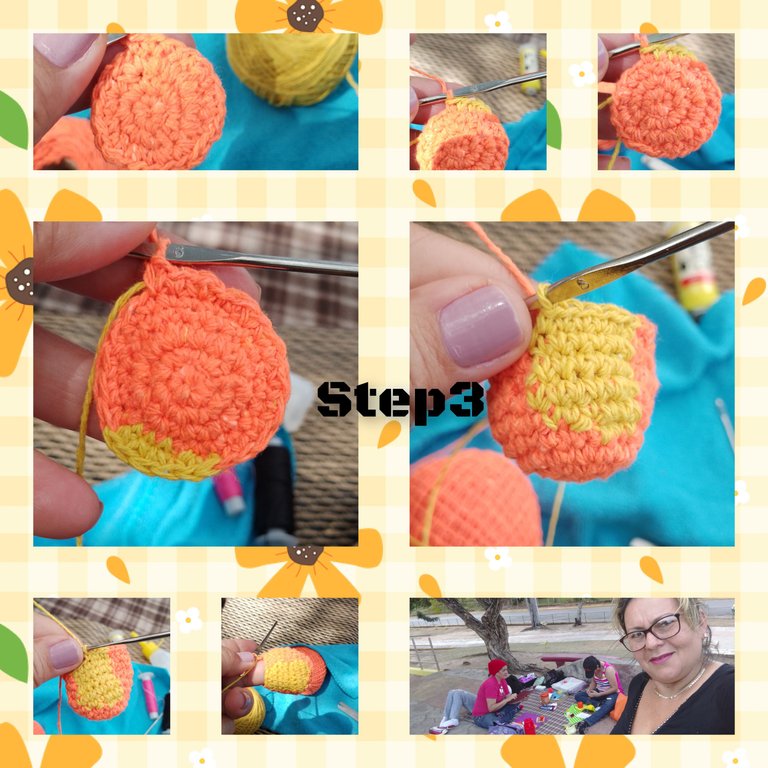
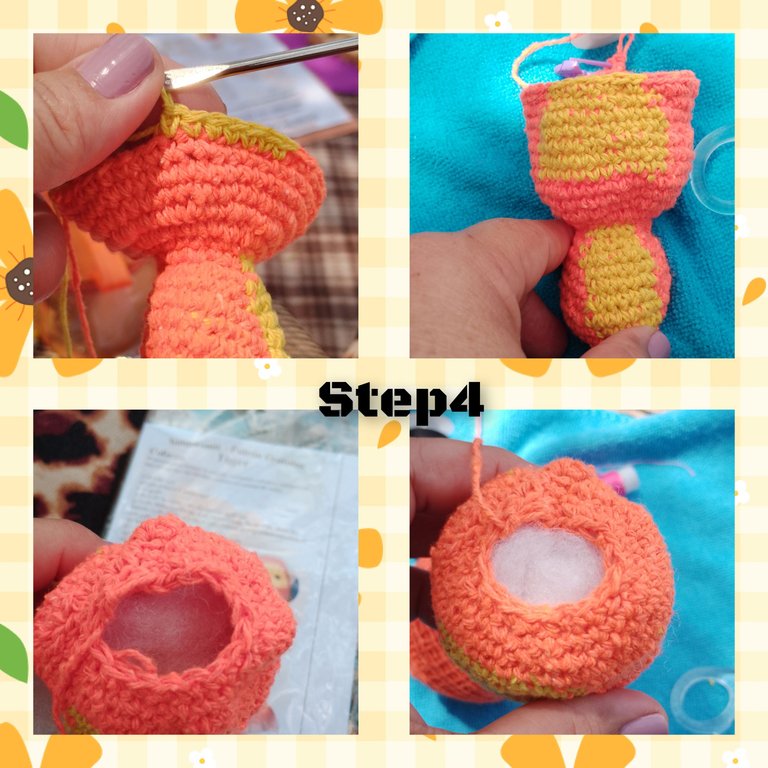
4.) I continued knitting, and when I got to the head, it was really calming, being able to knit with a single color, when I removed the hammer color, I felt great relief. And I thought, it is necessary to practice, when I get home, I will put this into practice again, I told the attendees. Ready, continue filling the woven piece, which included the body and head of the tiger. So I filled as much as I could with the battingand with the wool needle I will see at the top of the head.
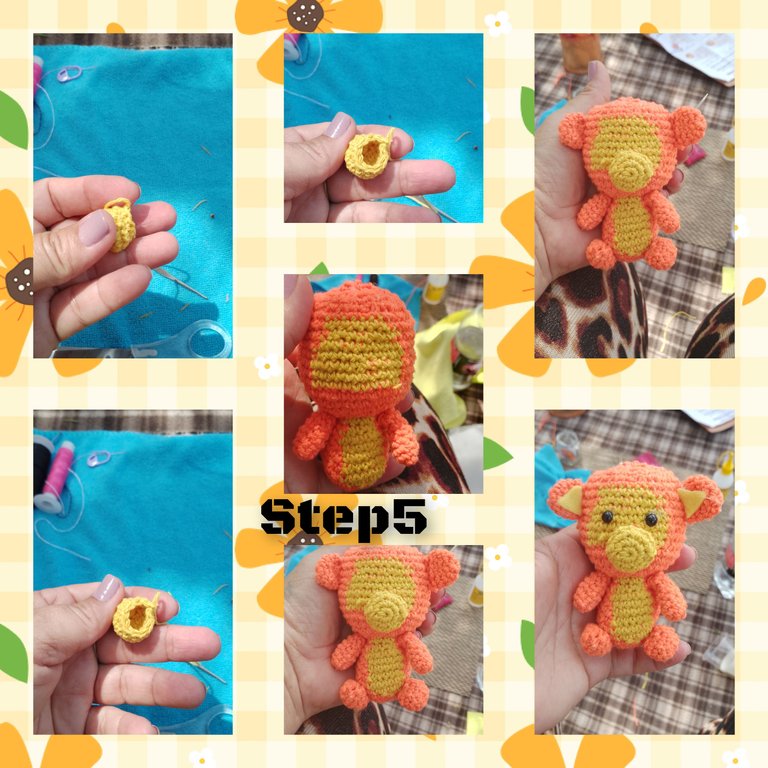
5.) in the next step, I knit the bear, I filled and closed, as well as the little arms, ears and legs, then I knit and filled each of the pieces, I began to glue on the body, with the wool needle, maintaining the distance between the pieces, in the same way, I sew a small triangle of yellow felt, in the middle of the ears, and glue the eyes.
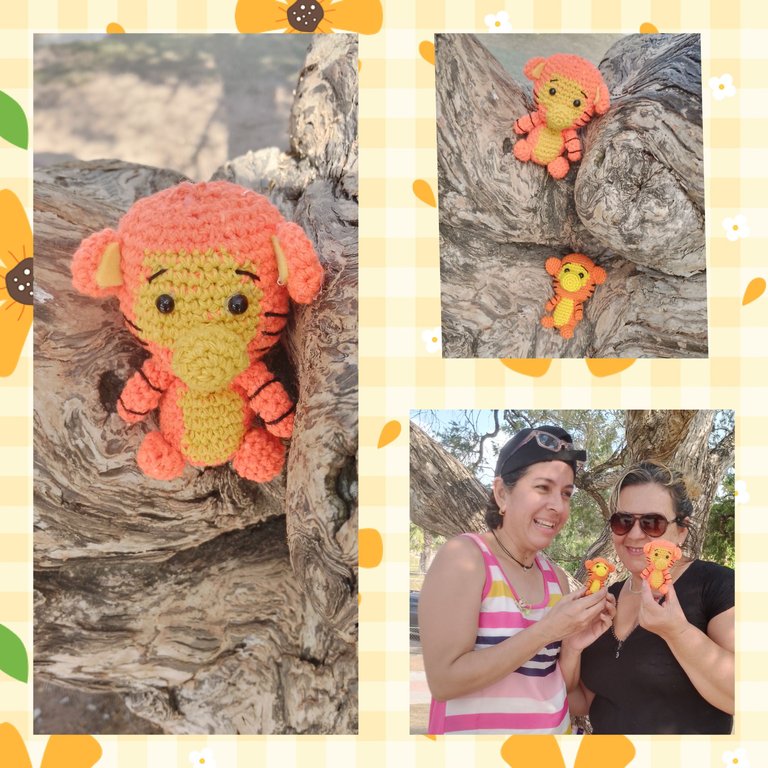
6.) Now all that remains is to embroider, with black thread, the tiger stripes, and wait until we are all ready for the final photo.
 .
.
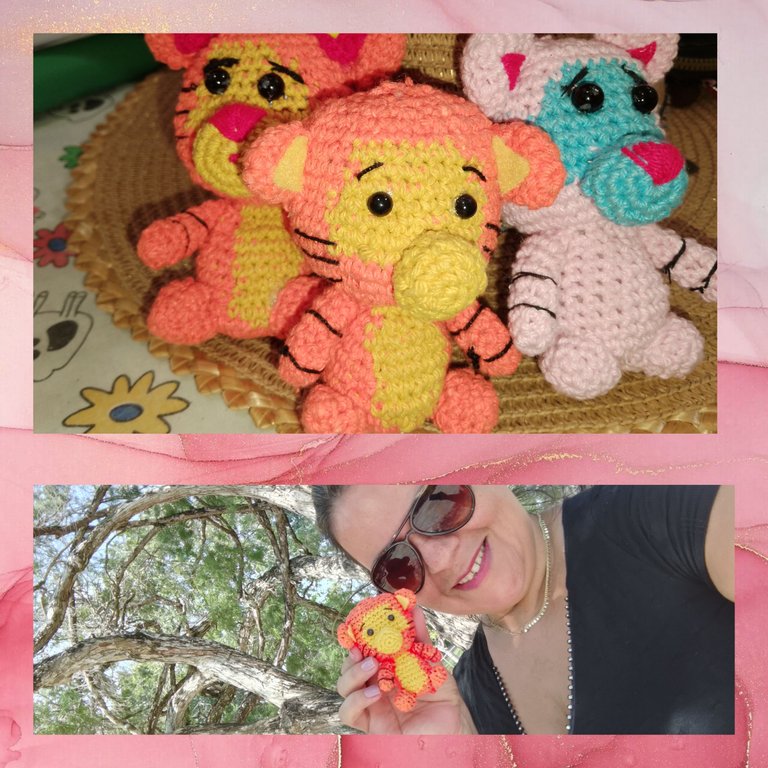
I was excited, pleased and very grateful for the facilitator @creacioneslelys for that great demonstration and effort to teach, this technique, which had caught my attention for a long time, but which I had not put into practice. And well, still infected, I continue making my amigurumis at home, to achieve that skill while practicing it, and looking for other patterns to knit in the future.
. All photos were taken with my smartphone, and shared with the participants, in a natural and free environment (Los Guaritos park, Maturin, Monagas State).
. Use incollage I
. used language translator
. Thank you for reading me, I hope to see you soon.
(ESP)
Muy buen día queridos amigas, creadores de @hivediy, hoy vengo a compartirles, muy contenta y satisfecha, una gran experiencia. Siempre había tenido la inquietud, dentro de @hive de las maravillas, tejidas,y transformadas en adorable animalitos, de los dibujos animados,si siempre había tenido esa inquietud, pues imaginen descubrirla y aplicarla. Pues les cuento que desde hace mucho, hice unas bonitas amistades en la plataforma, y el destino nos unió, y luego de algunos encuentros con @creacioneslelys y @linita, surge la idea, de hacer mini talleres, estos dictados y dirigidos por nosotras. Cada una, se dedicaría a una técnica manual, específica. Así que les invito, a conocer, como lo hice, espero lo disfruten.
Materiales:
Luego de unos días, nos fue publicado,por @creacioneslelys, la lista de los materiales, así que dió suficiente tiempo para la recolección.
. Hilos para tejer de colores ( amarillo y anaranjado)
. Aguja para tejer.
. Recorte de fieltro amarillo.
. Aguja lanera.
. Guata o relleno.
. Patrón para el tejido ( cortesía de la facilitadora)
. Tijeras.
. Pegamento.
. Manual impreso.
. Ojos pequeños.
Pasos:
1.) luego de la, encargada de el mini taller, explicar, previamente, lo que será el desarrollo de el taller, mencionar los puntos que usaremos, la técnica entre otros. Orientar a cerca, el patro en el manual, como se aplican los puntos y aclaras algunas dudas, mostrarnos el modelo ya tejido por ella. Nos dispusimos, a colocarnos de la forma más cómoda que podamos, escogimos debajo de un árbol, por lo fresco y la sombra con la que este nos arropa, así que tendimos una lona, que la instructora dispuso y listo, lo siguiente fue, ir tras el propósito.
2.) inicie, tal como dice la guía, con un anillo mágico, dentro de el seis, puntos bajo y cierro el anillo, con puntos deslizado. Para las siguiente vuelta, serán seis aumento, no fue fácil para mí tejer en espiral, así que, la encargada, sugiere hacer levantamiento de cadenas, para iniciar y seguir las siguientes vueltas y evitar perderme entre ellas y si se diera el caso, ser más fácil ubicarme, para una aprendiz creo, es muy valiosa esta manera, ya que además los marcadores de me escapaban. Así continuo.
3.) para la vuelta n4, comienzo la experiencia de cambiar de color de hilo, para dar, un color diferente a l pancita de tiger, y así continuo, siempre guiando me de mis vueltas y su desarrollo en el manual. Me costó un poco arrastras ambos hilos en cada una de las vueltas, pero, me adapte muy rápido a el como insertar el hilo, en las vueltas y en cada uno de los momentos en que esto debía ocurrir. Todo muy sabroso con un clima súper fresco y una muy buenas conversaciones.
4.) continuo el tejido, y al llegar a la cabeza, fue realmente, una tranquilidad, poder tejer con un solo color, cundo retire el color martillo, sentí un gran alivió. Y pensé, es necesario practicar, al llegar a casa, pondré en práctica nuevamente esto, comenté a las asistentes. Listo continúe rellenando la pieza tejida, que comprendía el cuerpo y cabeza de tigre. Así que rellene lo más que pude con la guata y con la aguja lanera veré en la parte superior de la cabeza.
5.) en el siguiente paso, tejo el osico, rellene y cerré, así mismo los bracitos, orejas y patitas, luego te tejer y rellenar cada un de las piezas, comencé a pegar en el cuerpo, con la aguja lanera, manteniendo la distancia entre las piezas, de igual manera, coso un pequeño triángulo de fieltro amarillo, en medio de las orejas, y pego los ojitos.
6.) ahora solo queda, bordar, con hilo de color negro, las rayas de el tigre, y esperar todas estemos lista para la foto final.
.
Yo emocionada, complacida y muy agradecida por la facilitadora @creacioneslelys por ese gran demostración y empeño por enseñar, está técnica, que desde hace mucho me había llamado la atención, pero que no había puesto en práctica. Y bueno aún contagiada, sigo haciendo mis amigurumis en casa, para lograr esa habilidad mientras lo práctico, y buscando otros patrones par tejer en el futuro.
. Todas las fotos, fueron tomadas con mí teléfono inteligente, y compartidos con las participantes, en un ambiente natural y libre (parque Los Guaritos, Maturin, Estado Monagas).
. Use incollage
Usé traductor lenguaje.
Gracias por haberme leído, espero sea hasta un pronto oportunidad.
Que hermoso te felicito, es grato tejer entre amigos no solo te diviertes y aprendes sino que también tejen lazos de fraternidad y hermandad, feliz tarde
Hola @gladymar1973 realmente tal cual lo describe usted. Gracias
FWLIZ NOCHE
Hola amiga @katiuskamata la verdad es que sí andas bastante entusiasmada, ya se te pegó la fiebre del tejido de los Amigurumis. Vas muy bien. Los Tiger se ven muy lindos. Con la práctica todo irá mejorando. Muchas gracias por acompañarnos y ponerle empeño y dedicación a este arte. 🫂
Si amiga, mira que ya me conoces jjjj... Gracias
What a beautiful group!! to sit and share passions, experiences, learning, crafts, wow! I enjoyed not only the craft but to see a beautiful sharing. I love that Lelys is guiding them. Greetings to you all.
@sagarkothari88 vote
Gracias cariño, demasiado bueno...hermosa noche
Que cosa más hermosa.
Admiro la paciencia que tienen las personas que hacen amigurumi.
Felicidades
Greetings friend, very successful workshop, that tiger was beautiful, a big applause for all, as I wish I could have that opportunity, the place looks so cool and relaxing, I am also on the subject of learning the techniques to make amigurumis and what has cost me most is when making the change of color of the threads, is a detail that I still do not know how to do I need my dear @creacioneslelys 😁👍👍👏.
Gracias cariño...muchos éxitos.
Te invitamos conocer y apoyar nuestro Microproyecto: Fondos de ayuda a los Artesanos.
En la siguiente publicación puedes conocer los detalles.
https://peakd.com/hive-130560/@hivediy/microproject-artisans-aid-funds-microproyecto-fondosde-ayuda-a-los-artesanos-espeng

Muy lindo te quedó, nunca he hecho un animalito tejido, espero en algún momento tratar de realizar uno. Gracias por compartirlo.
Saludos.
Que hermoso grupo para compartir conocimientos, te quedaron hermosos todos los que has hecho, se nota que lelys es una excelente maestra, y que dicha poder compartir entre todas 😉🤩