♥️ ♥️ ¡Hola gente! ♥️ ♥️
En este nuevo tutorial, les enseño como realizar un neceser, cosido totalmente a mano.
♥️ ♥️ Hello people! ♥️ ♥️
In this new tutorial, I show you how to make a toilet bag, sewn entirely by hand.
Es fácil, y muy útil , necesario para mantener el orden de nuestro maquillaje, cremitas, perfumes, útil, muy útil. Si necesitas uno o varios, hazlo tu misma, solo necesitas unos jeans viejos. Esta idea de crear un neceser surgió porque ando con un morral y toda está ahí tirado, un total desastre, así que agarre uno de mis jeans viejos, que era mi favorito, los fiesteros, el quitaipón, y lleve a cabo esta manualidad.
¡Empecemos!
It's easy, and very useful, necessary to keep the order of our makeup, creams, perfumes, helpful, very useful. If you need one or several, do it yourself, you only need some old jeans. Creating a toiletry bag came up because I have a backpack and everything is just lying there in a total mess, so I grabbed one of my old jeans, which was my favorite, the party bag, the bag remover, and carried out this craft.
Let's get started!

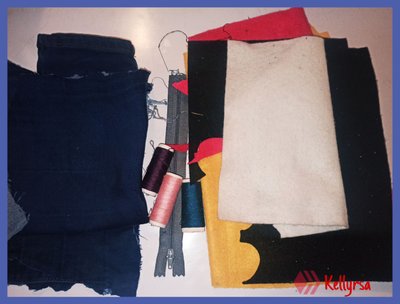
✂️ Jeans
✂️ Fieltro Blanco
✂️ Fieltro piel
✂️ Fieltro negro
✂️ Fieltro rosado
✂️ Hilo
✂️ Aguja
✂️ Cierre
✂️ Jeans
✂️ Felt White
✂️ Felt leather
✂️ Black Felt
✂️ Pink Felt
✂️ Thread
✂️ Needle
✂️ Clasp


✂️ ✂️ Paso 1 :
- En un pedazo de tela jeans trazamos el patrón de la cara. Necesitaremos dos piezas.
✂️ ✂️ Step 1 :
- On a piece of denim fabric we trace the pattern of the face. We will need two pieces.

✂️ ✂️ Paso 2:
- Para el soporte de la cremallera: cortar dos trozos de tela de 6 cm, 18 cm. A los trozos de tela vamos a doblar un extremo a 1 cm, para mantener el dobladillo pasé la plancha caliente. Colocar encima de la cremallera y coser a mano con el hilván (La cremallera mide 15 cm).
No coser a cada extremo del cierre, ya que se va a añadir más tela.
✂️ ✂️ Step 2:
- For the zipper holder: cut two pieces of fabric 6 cm, and 18 cm. For the pieces of fabric, we will fold one end to 1 cm, to keep the hem I passed the hot iron. Place on top of the zipper and sew by hand using the basting stitch (The zipper measures 15 cm).
Do not sew to each end of the zipper, as you will be adding more fabric.
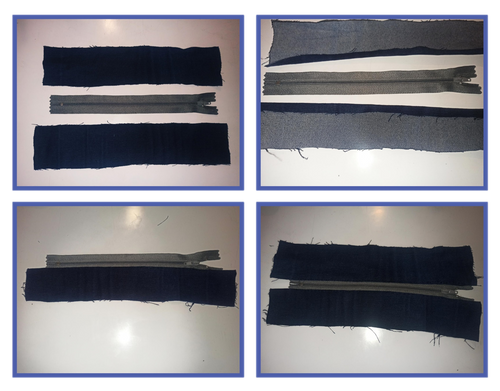
✂️ ✂️ Paso 3
- Marcar el centro del soporte de la cremallera y el centro de uno de los lados, para que queden bien colocados y coser, se hace el mismo procedimiento en el otro lado.
✂️ ✂️ Step 3
Mark the middle of the zipper holder and the middle of one of the sides, so that they are well placed and sewn, the same procedure is done on the other side.


✂️ ✂️ Paso 4:
- Para el fuelle, cortar un trozo de tela de 12 cm por 39 cm, colocar encima de un extremo de la cremallera y coser usando la puntada hilván. Luego continuar cosiendo alrededor de los lados de la bolsa.
✂️ ✂️ Step 4:
- For the gusset, I cut a piece of fabric 12 cm by 39 cm, placed it on top of one end of the zipper, and sew. Then I continue sewing around the sides of the bag.

- Aquí podemos ver cómo he cosido un lado de la cara con el fuelle y he empezado a coser el otro lado.
- Here we can see how I sewed one side of the face together with the gusset and started sewing the other side.

- Al cerrar todo con la puntada hilván, coser usando la puntada sobrehilado a lo largo de los bordes de la tela para evitar que se deshilachen.
- When closing everything with the basting stitch, sew using the overlock stitch along the edges of the fabric to prevent fraying.

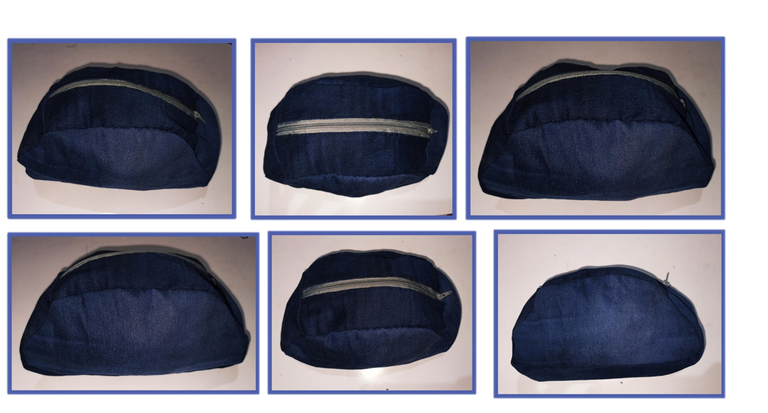
✂️ ✂️ Paso 5:
- Le damos la vuelta y el neceser está listo, todo montado, en forma de media luna.
Yo quería decorarlo en forma de pingüino. Les enseño cómo ...
✂️ ✂️ Step 5:
- We flip it over, and the vanity case is ready, all assembled, in the shape of a half-moon.
I wanted to decorate it in the shape of a penguin. I show you how to ...
✂️ ✂️ Paso 6
- Con tela blanca, yo usé fieltro, trazar el patrón de la cara del pingüino y coser usando la puntada sobrehilada.
✂️ ✂️ Step 6
- With white fabric, I used felt, trace the pattern of the penguin's face and sew using the overlock stitch.

✂️ ✂️ Paso 7
- Trazar los otros patrones en los fieltros correspondiente y pegar con silicona caliente.
✂️ ✂️ Step 7
- Trace the other patterns on the corresponding felts and glue them with hot silicone.

✂️ ✂️ Paso 8
- Para darle un toque más coqueto le he puesto un lacito que está hecho con cinta gross.
✂️ ✂️ Step 8
- To give it a more flirtatious touch I attached a little bow that is made with gross ribbon.

- El neceser está listo. Muy práctico y útil, ha quedado monísimo, anímate a hacerlo, todos necesitamos uno y puedes hacerlo tú mismo.
- The vanity case is ready. Very practical and useful, it has turned out cute, go ahead and make it, we all need one and you can do it yourself.
Puedes dejar tus comentarios, me gustaría saber qué te ha parecido, si tienes alguna pregunta o alguna sugerencia, estaré encantada de leerlos y responder.
You can leave your comments, I would like to know what you thought, if you have any questions or any suggestions, I will be happy to read them and respond.


Fotografías de mi propiedad tomadas con el celular Redmi note 8 pro, editadas en canva
Traducción realizada con la versión gratuita del
traductor DeepL
Todos los diseños fueron creados en canva
Photographs of my property taken with the Redmi note 8 pro cell phone, edited in canva
Translation made with the free version of
translator DeepL
All designs were created in canva

Hermoso resultado sin duda utilizaría está cuchura, coser a mano no es para nada sencillo, así que felicitaciones por este lindo trabajo @kellyrsa
!discovery 35
Hola Mili 🎈🌷😊 muchas gracias. No es tan sencillo , pero me gusta mucho hacer estas cosas manuales, me distrae. Gracias nuevamente ☺️
This post was shared and voted inside the discord by the curators team of discovery-it
Join our community! hive-193212
Discovery-it is also a Witness, vote for us here
Delegate to us for passive income. Check our 80% fee-back Program
The rewards earned on this comment will go directly to the person sharing the post on Twitter as long as they are registered with @poshtoken. Sign up at https://hiveposh.com.
Adorable🐧😍... gracias por compartir tu bello trabajo
🎇🎆🎇🎆🐞🐝🌍🌌🌠☄️🌙✨💫🌟⭐☀️☘️🍃🌿🌱🌾🍄🍁🍂🌼🌻🏵️💮🌸🌲🌳🦋🐝🐞💐🌹🥀🌺🌷🌸💮🏵️🌻🎇🎆🎇🎆
!LADY
Holaa 🎈🎈🍄 gracias a tí. 🐧🐧🍂
View or trade
LOHtokens.@chacald.dcymt, you successfully shared 0.1000 LOH with @kellyrsa and you earned 0.1000 LOH as tips. (1/2 calls)
Use !LADY command to share LOH! More details available in this post.
Thank you for sharing this amazing post on HIVE!
Your content got selected by our fellow curator @rezoanulvibes & you just received a little thank you via an upvote from our non-profit curation initiative!
You will be featured in one of our recurring curation compilations and on our pinterest boards! Both are aiming to offer you a stage to widen your audience within and outside of the DIY scene of hive.
Join the official DIYHub community on HIVE and show us more of your amazing work and feel free to connect with us and other DIYers via our discord server: https://discord.gg/mY5uCfQ !
If you want to support our goal to motivate other DIY/art/music/homesteading/... creators just delegate to us and earn 100% of your curation rewards!
Stay creative & hive on!