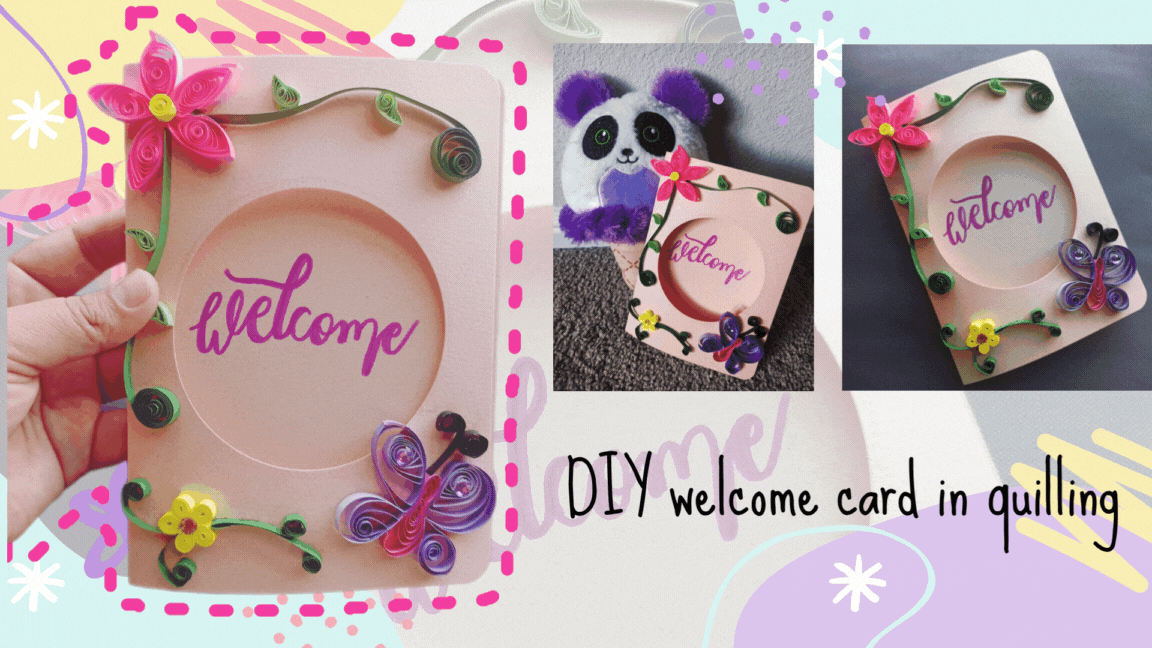
Hace ya mucho tiempo que no hacía una manualidad. Todas mis cosas se quedaron en Venezuela, ni siquiera tenía tijeras, así que en cuanto pude compré varias cositas, tijeras, pegamento, cartulinas, marcadores y otros materiales para seguir aportando contenido a esta plataforma que tanto amo.
Entre las cosas que compré está un kit para hacer manualidades con filigrana de papel o quilling, utilicé esta técnica para hacer una tarjeta que le regalaré a mi hermana para darle la bienvenida, y hoy les mostraré el proceso.
It had been a long time since I had made a craft. All my stuff stayed in Venezuela, I didn't even have scissors, so as soon as I could I bought several little things, scissors, glue, cardboard, markers, and other materials to continue bringing content to this platform that I love so much.
Among the things I bought is a kit to make crafts with paper filigree or quilling, I used this technique to make a card that I will give to my sister to welcome her, and today I will show you the process.

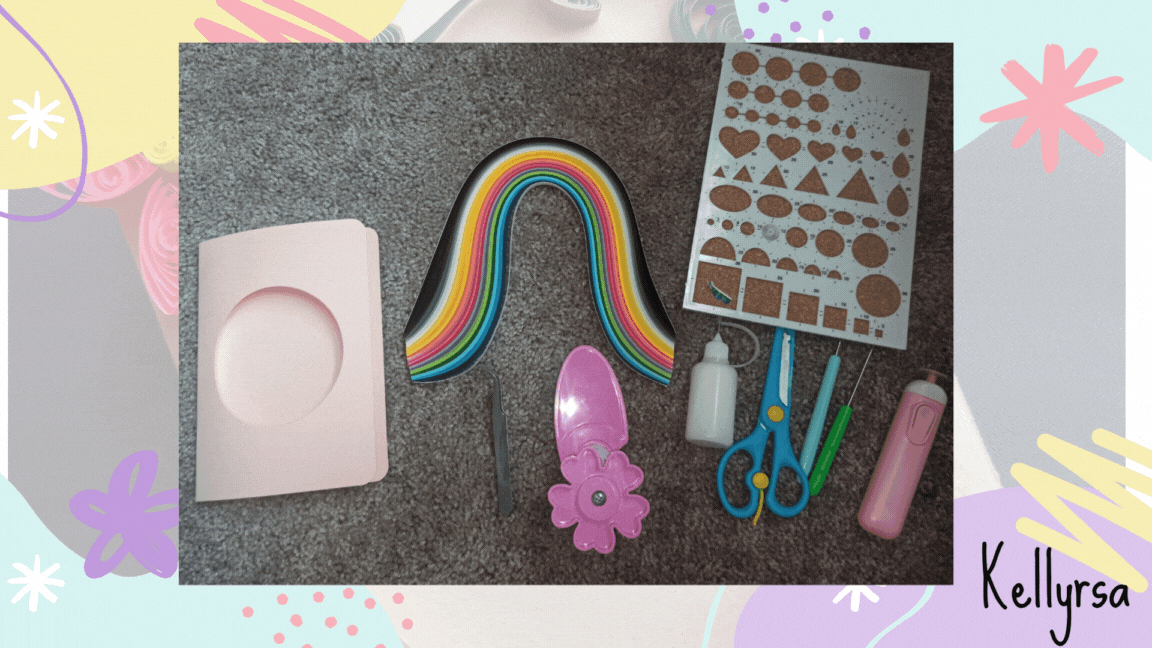
🌸 Cinta para quilling de 5 mm rosado, verde claro y oscuro, morado, lila, amarillo
🌸 Aguja o enrollador para quilling
🌸 Pega
🌸 Cartulina Rosada
🌸 Marcadores
🌸 5 mm quilling tape pink, light and dark green, purple, purple, lilac, yellow
🌸 Quilling needle or quilling winder.
🌸 Glue
🌸 Pink card stock
🌸 Markers

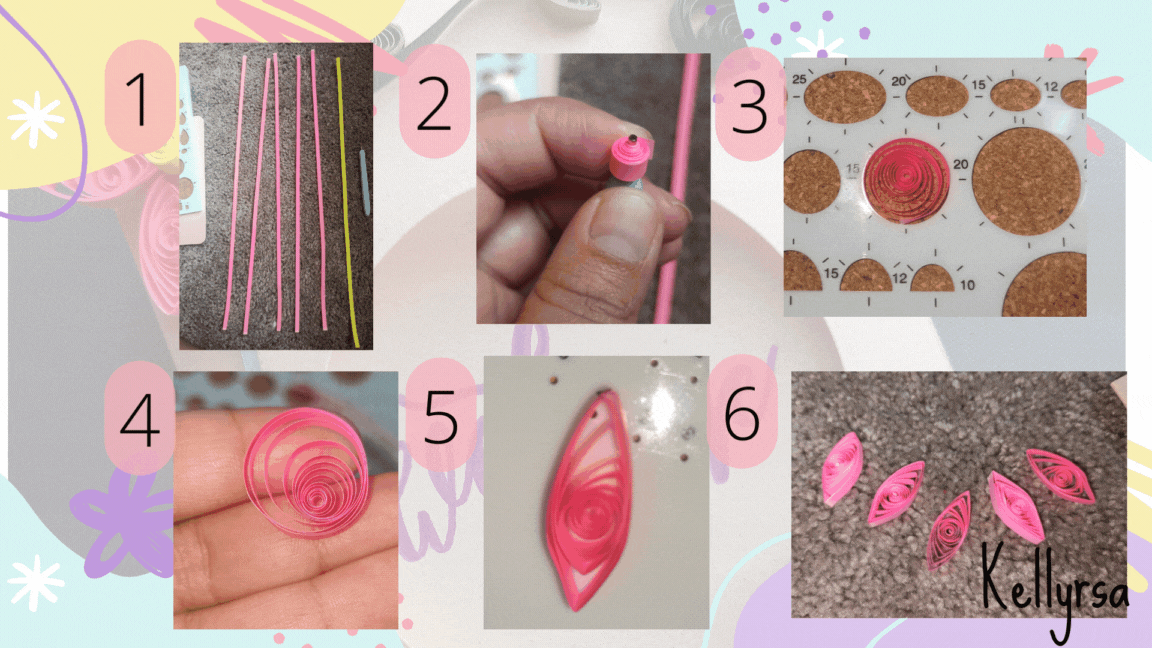
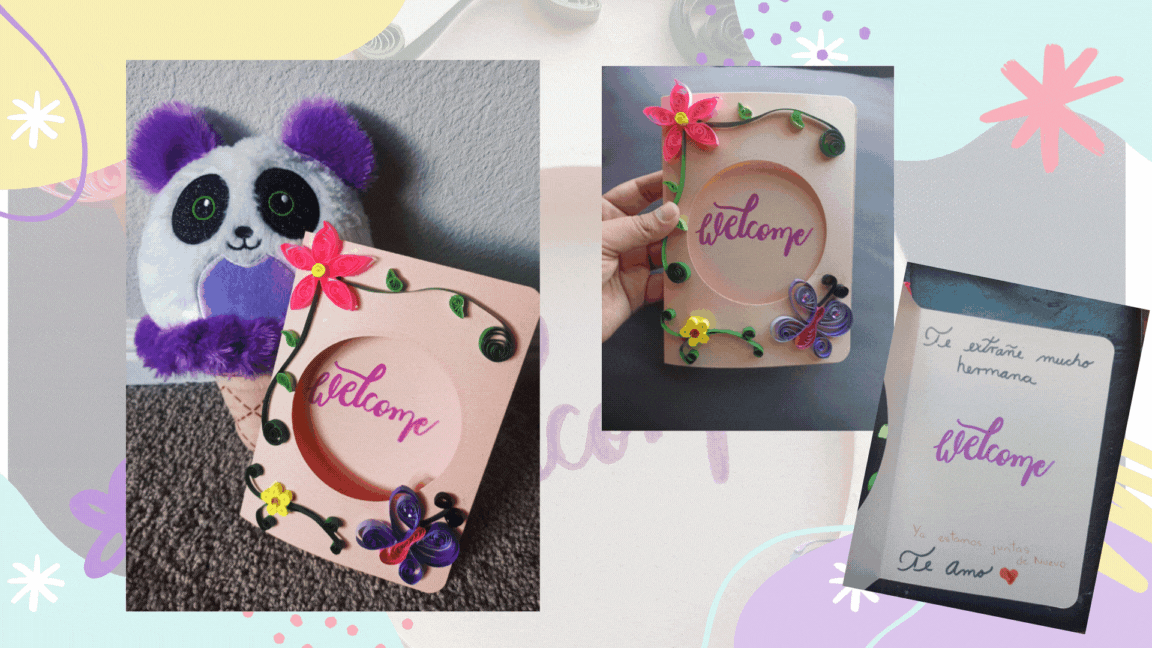
🌸 Flor rosada
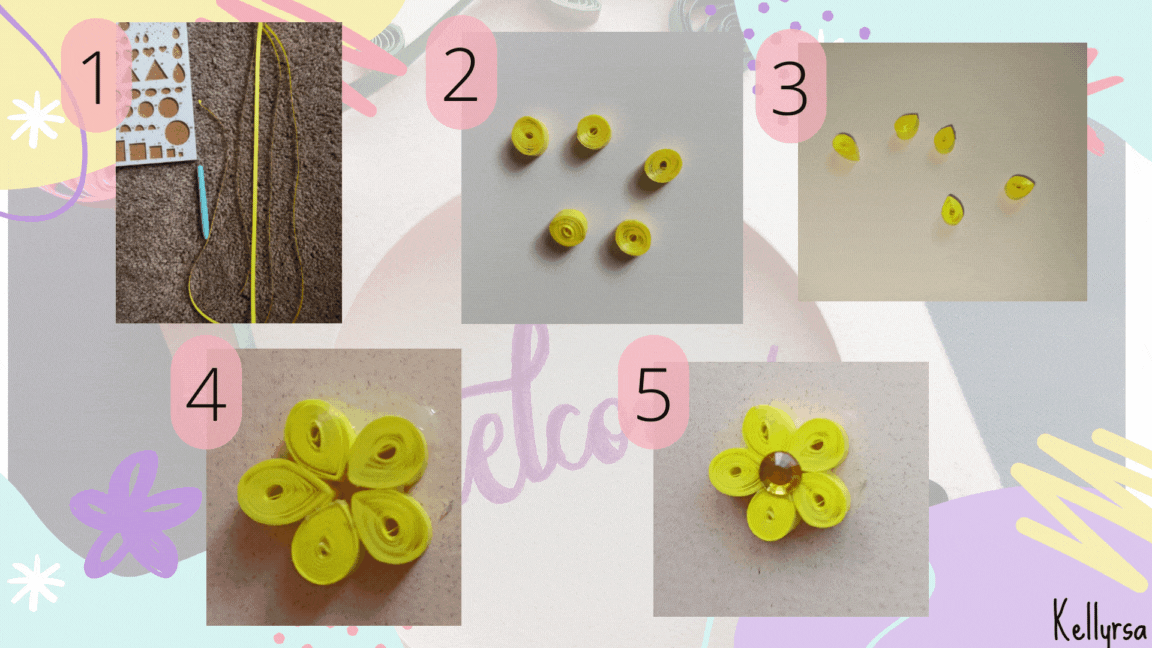
Para la primera flor necesitamos 5 cintas rosas y 1 amarilla, todas de 5 mm de ancho por 39 cm de largo.
Colocamos la cinta en la aguja y enrollamos. Luego la coloco sobre la regla para que el círculo mida 20 mm, pegamos la punta para mantener el círculo. Para dar forma al pétalo presionamos con los dedos en un lado del círculo un extremo hacia arriba y otro hacia abajo y le damos forma de óvalo. Hacemos el mismo procedimiento cinco veces con las cintas rosas.
🌸 Pink flower
For the first flower we need 5 pink and 1 yellow ribbon, all 5 mm wide by 39 cm long.
We place the ribbon on the needle and roll. Then I place it on the ruler so that the circle measures 20 mm, then we glue the tip to keep the circle. To shape the petal we press our fingers on one side of the circle one end up and down and give it the shape of an oval. We do the same procedure five times with the pink ribbons.
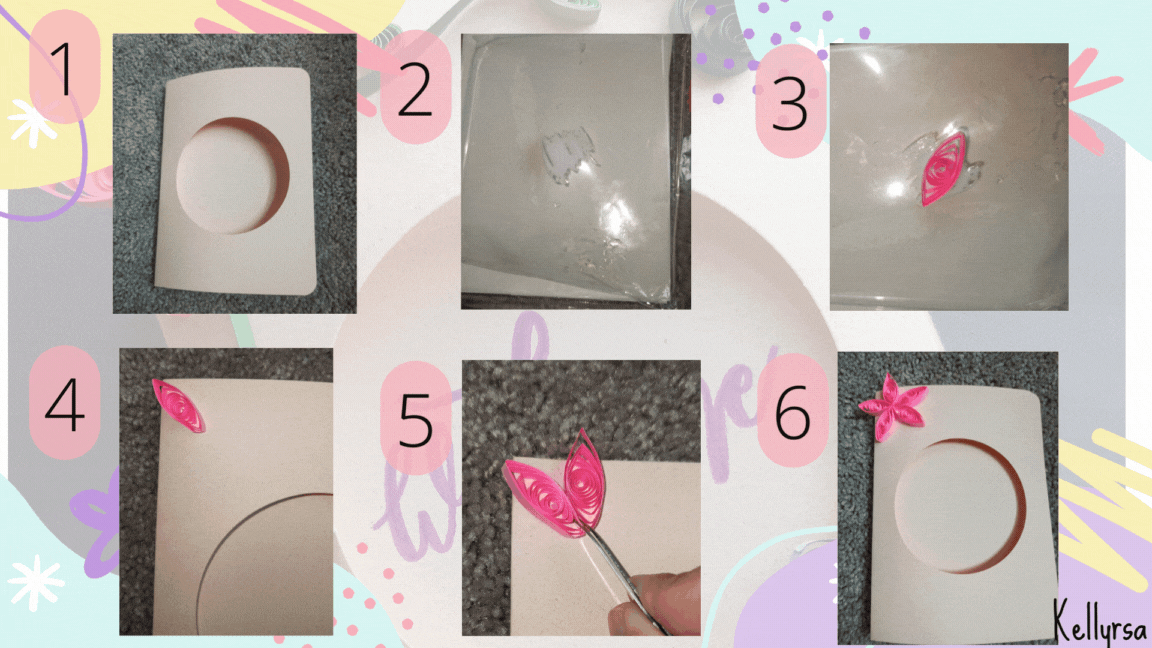
- Sobre la cartulina que vamos a utilizar para la tarjeta vamos a pegar los pétalos para formar la flor. Vamos a poner pegamento en una hoja de acetato o bolsa de plástico para mojar los pétalos y pegarlos en la cartulina para formar la flor.
- On the cardboard that we are going to use for the card we are going to glue the petals to form the flower. We are going to put glue on a sheet of acetate or plastic bag to wet the petals and glue them on the cardboard to form the flower.
- Para el centro de la flor, con una cinta amarilla de 5 mm de ancho por 39 cm de largo, hacemos un círculo cerrado, que no es más que enrollar la cinta con la aguja y dejarla tensa. Lo pegamos en el centro de la flor.
- For the center of the flower, with a yellow ribbon 5 mm wide by 39 cm long, we make a closed circle, which is nothing more than rolling the ribbon with the needle and leaving it tight. We glue it in the center of the flower.

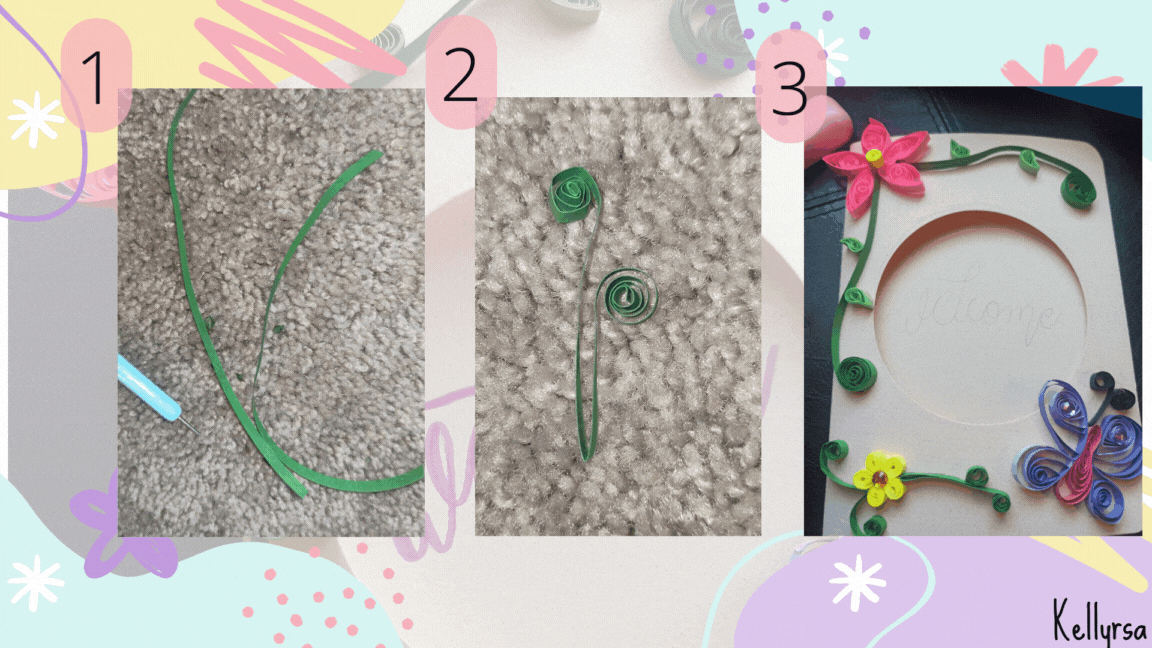
- Con una cinta verde de 5 mm de ancho por 39 cm de largo hice dos ramas. Enrollé la cinta con la aguja hasta la mitad, aflojé un poco el círculo y la pegué sobre el cartón.
- With a green ribbon 5 mm wide by 39 cm long I made two branches. I rolled the ribbon with the needle up to the middle, loosen the circle a little, and glue it on the cardboard.
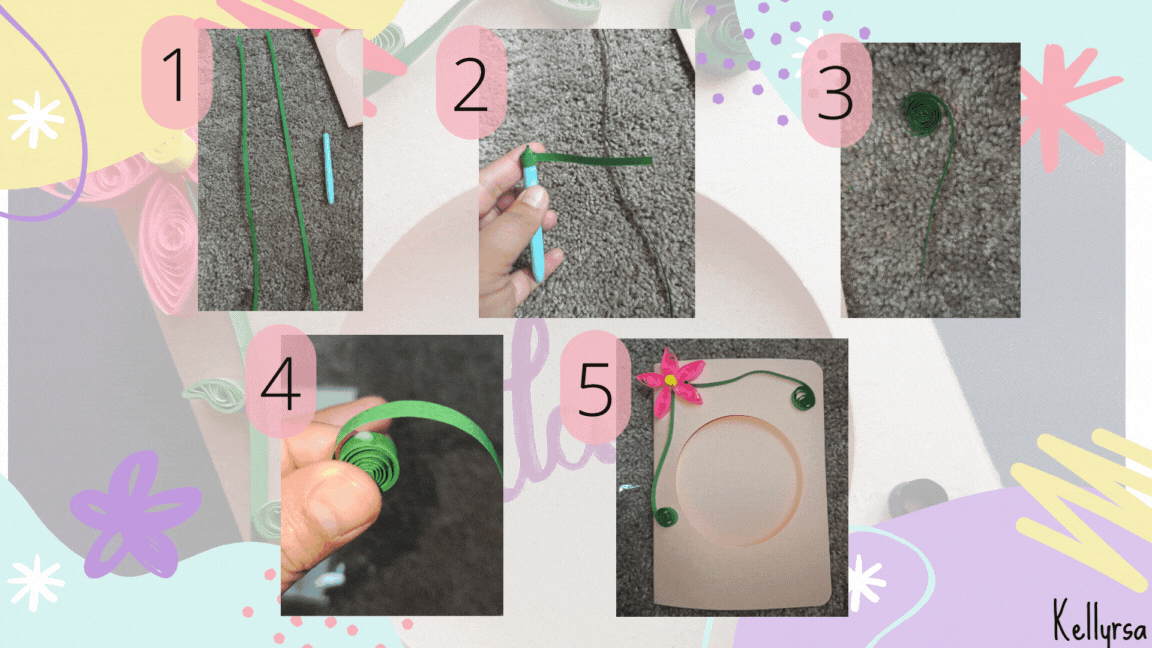
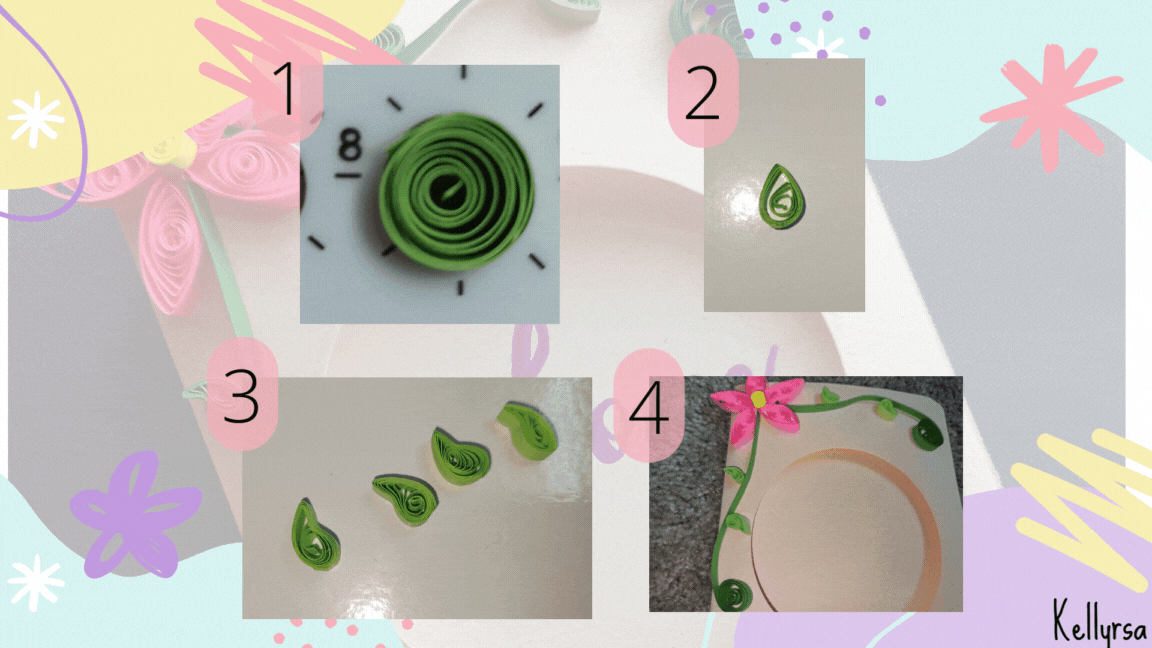
- Para las hojas hacemos un circulo abierto de 10 mm con cinta verde clara de 5 mm de ancho por 20 cm de largo. Presionamos una parte del circulo y torcemos un poco esa punta. Sacamos 4 hojas que pegaremos sobre las ramas.
- For the leaves, we make an open circle of 10 mm with a light green ribbon 5 mm wide by 20 cm long. We press a part of the circle and twist the tip a little. We take out 4 leaves that we will glue on the branches.
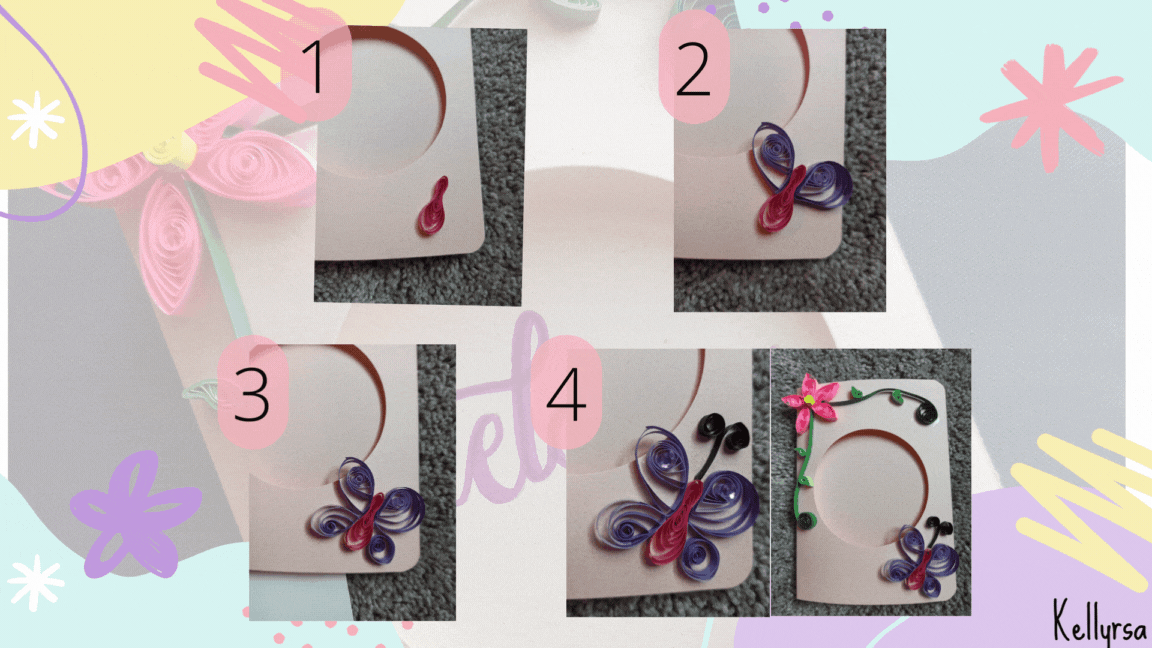
🌸 Mariposa
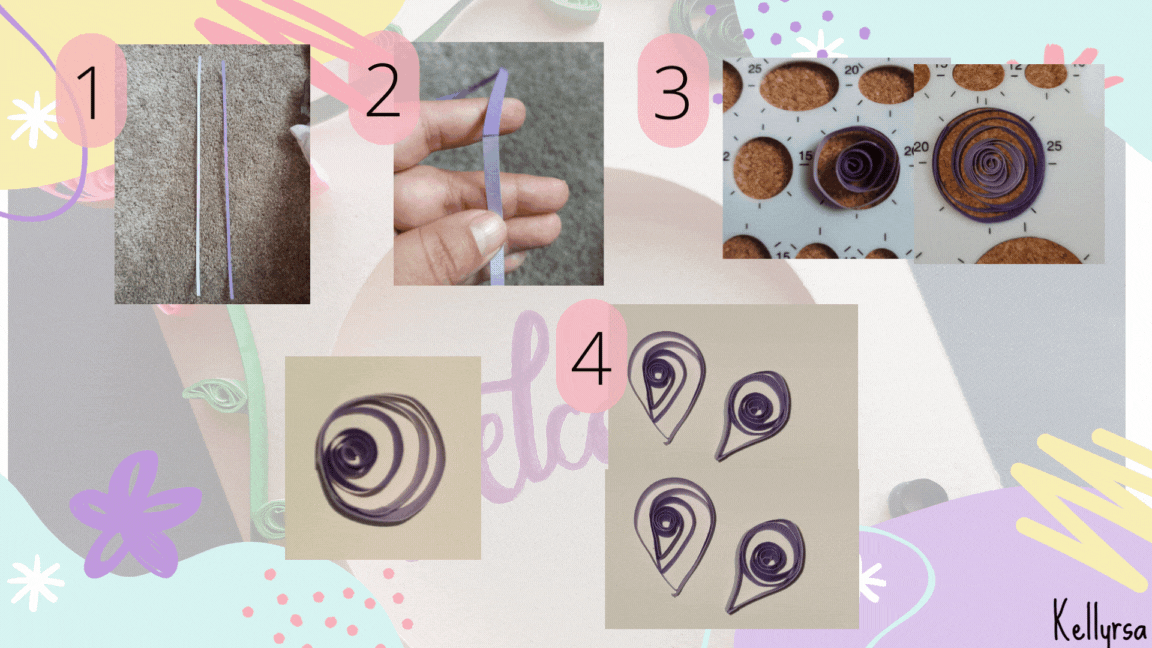
Empezamos con las alas superiores, utilicé una cintas de color morado y una lila de 5 mm de ancho por 20 cm de ancho cada una. Las cintas las uni. Enrollo y hago un círculo abierto de 25 mm, luego con los dedos aplano una punta. Hago dos piezas.
Para las inferiores realizo el mismo proceso, pero el círculo es más pequeño, de 20 mm.
🌸 Butterfly
Let's start with the upper wings, I used a purple and a lilac ribbon of 5 mm wide by 20 cm wide each. I joined the ribbons together. I roll and make an open circle of 25 mm, then with my fingers I flatten one end. I make two pieces.
For the lower ones I do the same process, but the circle is smaller, 20 mm.
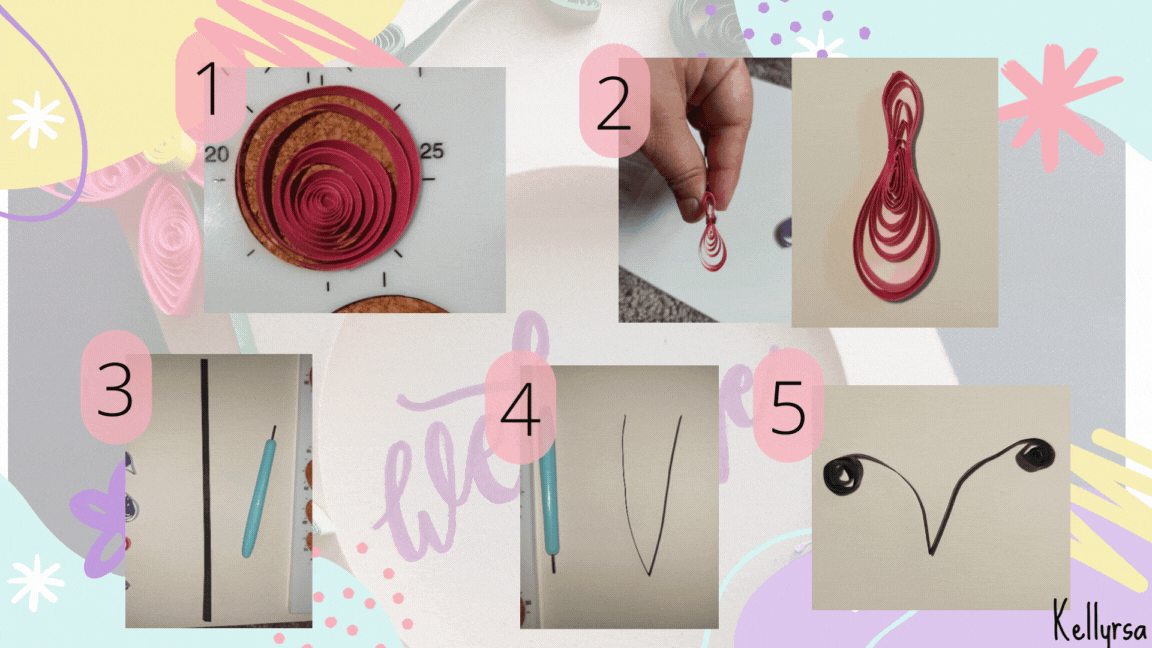
Para el cuerpo de la mariposa, Hago un círculo suelto, a una cuarta parte aplano y pego cada capa de papel para que se mantenga la forma.
Para las antenas hago un espiral en V. Con una cinta negra de 5 mm de ancho por 39 cm de largo, doblo a la mitad y enrollo hacia afuera cada extremo.
For the body of the butterfly, I make a loose circle, flatten and glue each layer of paper to keep the shape.
For the antennae I make a V spiral. With a 5 mm wide by 39 cm long black ribbon, I fold in half and roll out each end.
Vamos pegando las partes de la mariposa sobre la cartulina y armamos la mariposa.
We glue the parts of the butterfly on the cardboard and assemble the butterfly.
🌸 Flor amarilla
- Para la flor amarilla utilizamos 5 cintas de 5 mm de ancho por 39 cm de largo. Las enrollamos y hacemos círculos cerrados. Apretamos un lado del círculo y tendrá forma de gota. Montamos la flor pegándola sobre la cartulina. En el centro he colocado una piedra granate.
🌸 Flor amarilla
- For the yellow flower we use 5 ribbons of 5 mm wide by 39 cm long. We roll up and make closed circles. Squeeze one side of the circle and it will be in the shape of a drop. We assemble the flower by gluing it on the cardboard. In the center I placed a garnet stone.
- Para finalizar con la portada de la tarjeta hice dos espirales con cinta verde de 5 mm de ancho por 39 cm de largo. Enrollamos un lado hacia afuera y otro hacia dentro y pegamos en la cartulina partiendo desde la flor amarilla.
- To finish with the card cover I made two spirals with green ribbon 5 mm wide by 39 cm long. We rolled one side outward and one side inward and glued on the card starting from the yellow flower.
- Dentro de la tarjeta le escribí algo sencillo pero con mucho sentimiento. En el centro escribí la palabra Welcome, que cuando se cierra la tarjeta tambien se puede apreciar el escrito.
- Inside the card I wrote something simple but with a lot of feeling. In the center I wrote the word Welcome, and when you close the card you can also see the writing.
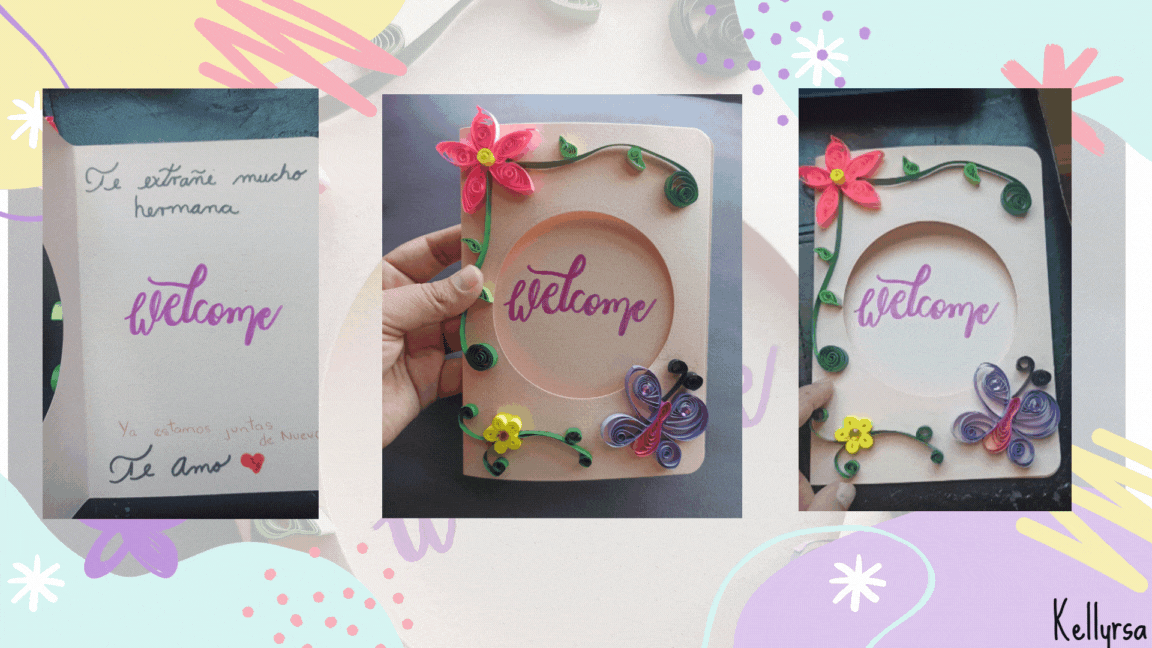
Esto fue todo gente bella, ahora esperando con muchas ansias la llegada de mi hermana. Para entregarle su tarjeta, abrazarla y disfrutar de su compañía.
¡Hasta pronto!
That was all beautiful people, now waiting with great anticipation for the arrival of my sister. To give her your card, hug her and enjoy her company.
See you soon!

Fotografías de mi propiedad tomadas con el celular Redmi note 8 pro, editadas en canva
Traducción realizada con la versión gratuita del
traductor DeepL
Todos los diseños fueron creados en canva
Photographs of my property taken with the Redmi note 8 pro cell phone, edited in canva
Translation made with the free version of
translator DeepL
All designs were created in canva
!discovery 35
This post was shared and voted inside the discord by the curators team of discovery-it
Join our Community and follow our Curation Trail
Discovery-it is also a Witness, vote for us here
Delegate to us for passive income. Check our 80% fee-back Program
Thank you for sharing this post on HIVE!
Your content got selected by our fellow curator desro & you just received a little thank you upvote from us for your great work! Your post will be featured in one of our recurring compilations which are aiming to offer you a stage to widen your audience within the DIY scene of Hive. Stay creative & HIVE ON!
Please vote for our hive witness <3
Quedó realmente hermosa!! 🌺 me gusta mucho esa técnica y cómo la aplicaste en esta tarjeta 😍 estoy segura de que a tu hermana le va a encantar recibirla. Saludos💐
Hola, muchas gracias 😊 Feliz inicio de semana.
Te quedo estupenda @kellyrsa, me encantó muy tienen y la combinación de colores excelente.
Hola Lorennys. Muchas gracias 💐