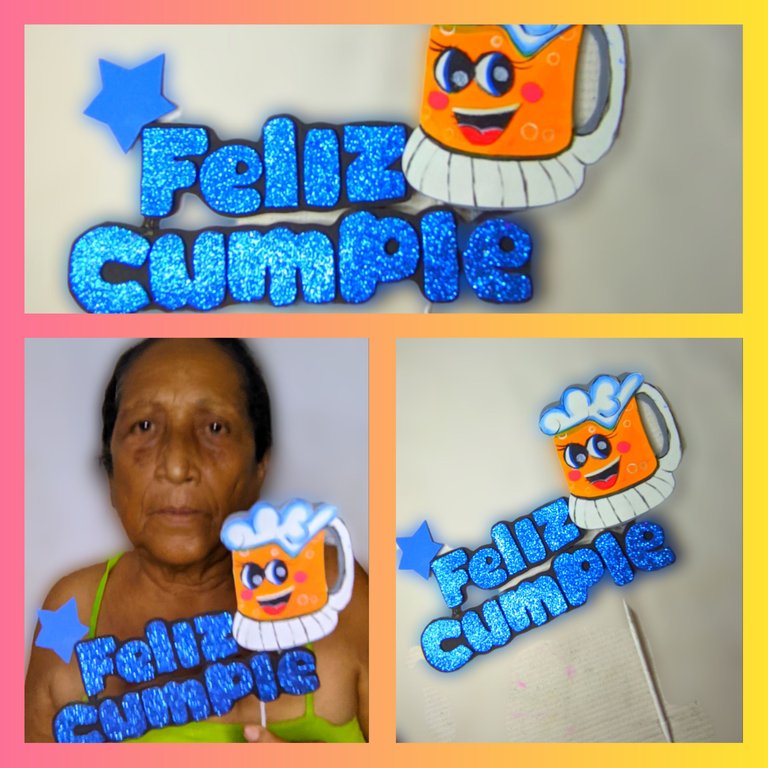
Hola mis hijitos como están espero que se encuentren bien, estuve unos días ausente por motivos de falta de materiales, y no había tenido quien me los comprara, pero hoy pude comprar y aquí les traigo este increíble topper que realice con muchísimo cariño para mi sobrino Lorenzo, quien el día de hoy está de cumpleaños número 25, y no quise dejar pasar la ocasión para regalarle algo de lo que acostumbro a realizar.
Lamentablemente no pude estar en su cumpleaños pero si le regale este pequeño detalle, el cuál quiero mostrarles cómo se elabora, aquí debajo les dejo las fotos de los materiales, también del paso a paso y claro está las fotos de como quedó al final, este topper decorado con esta cerveza coqueta.
🍺 Materiales 🍺
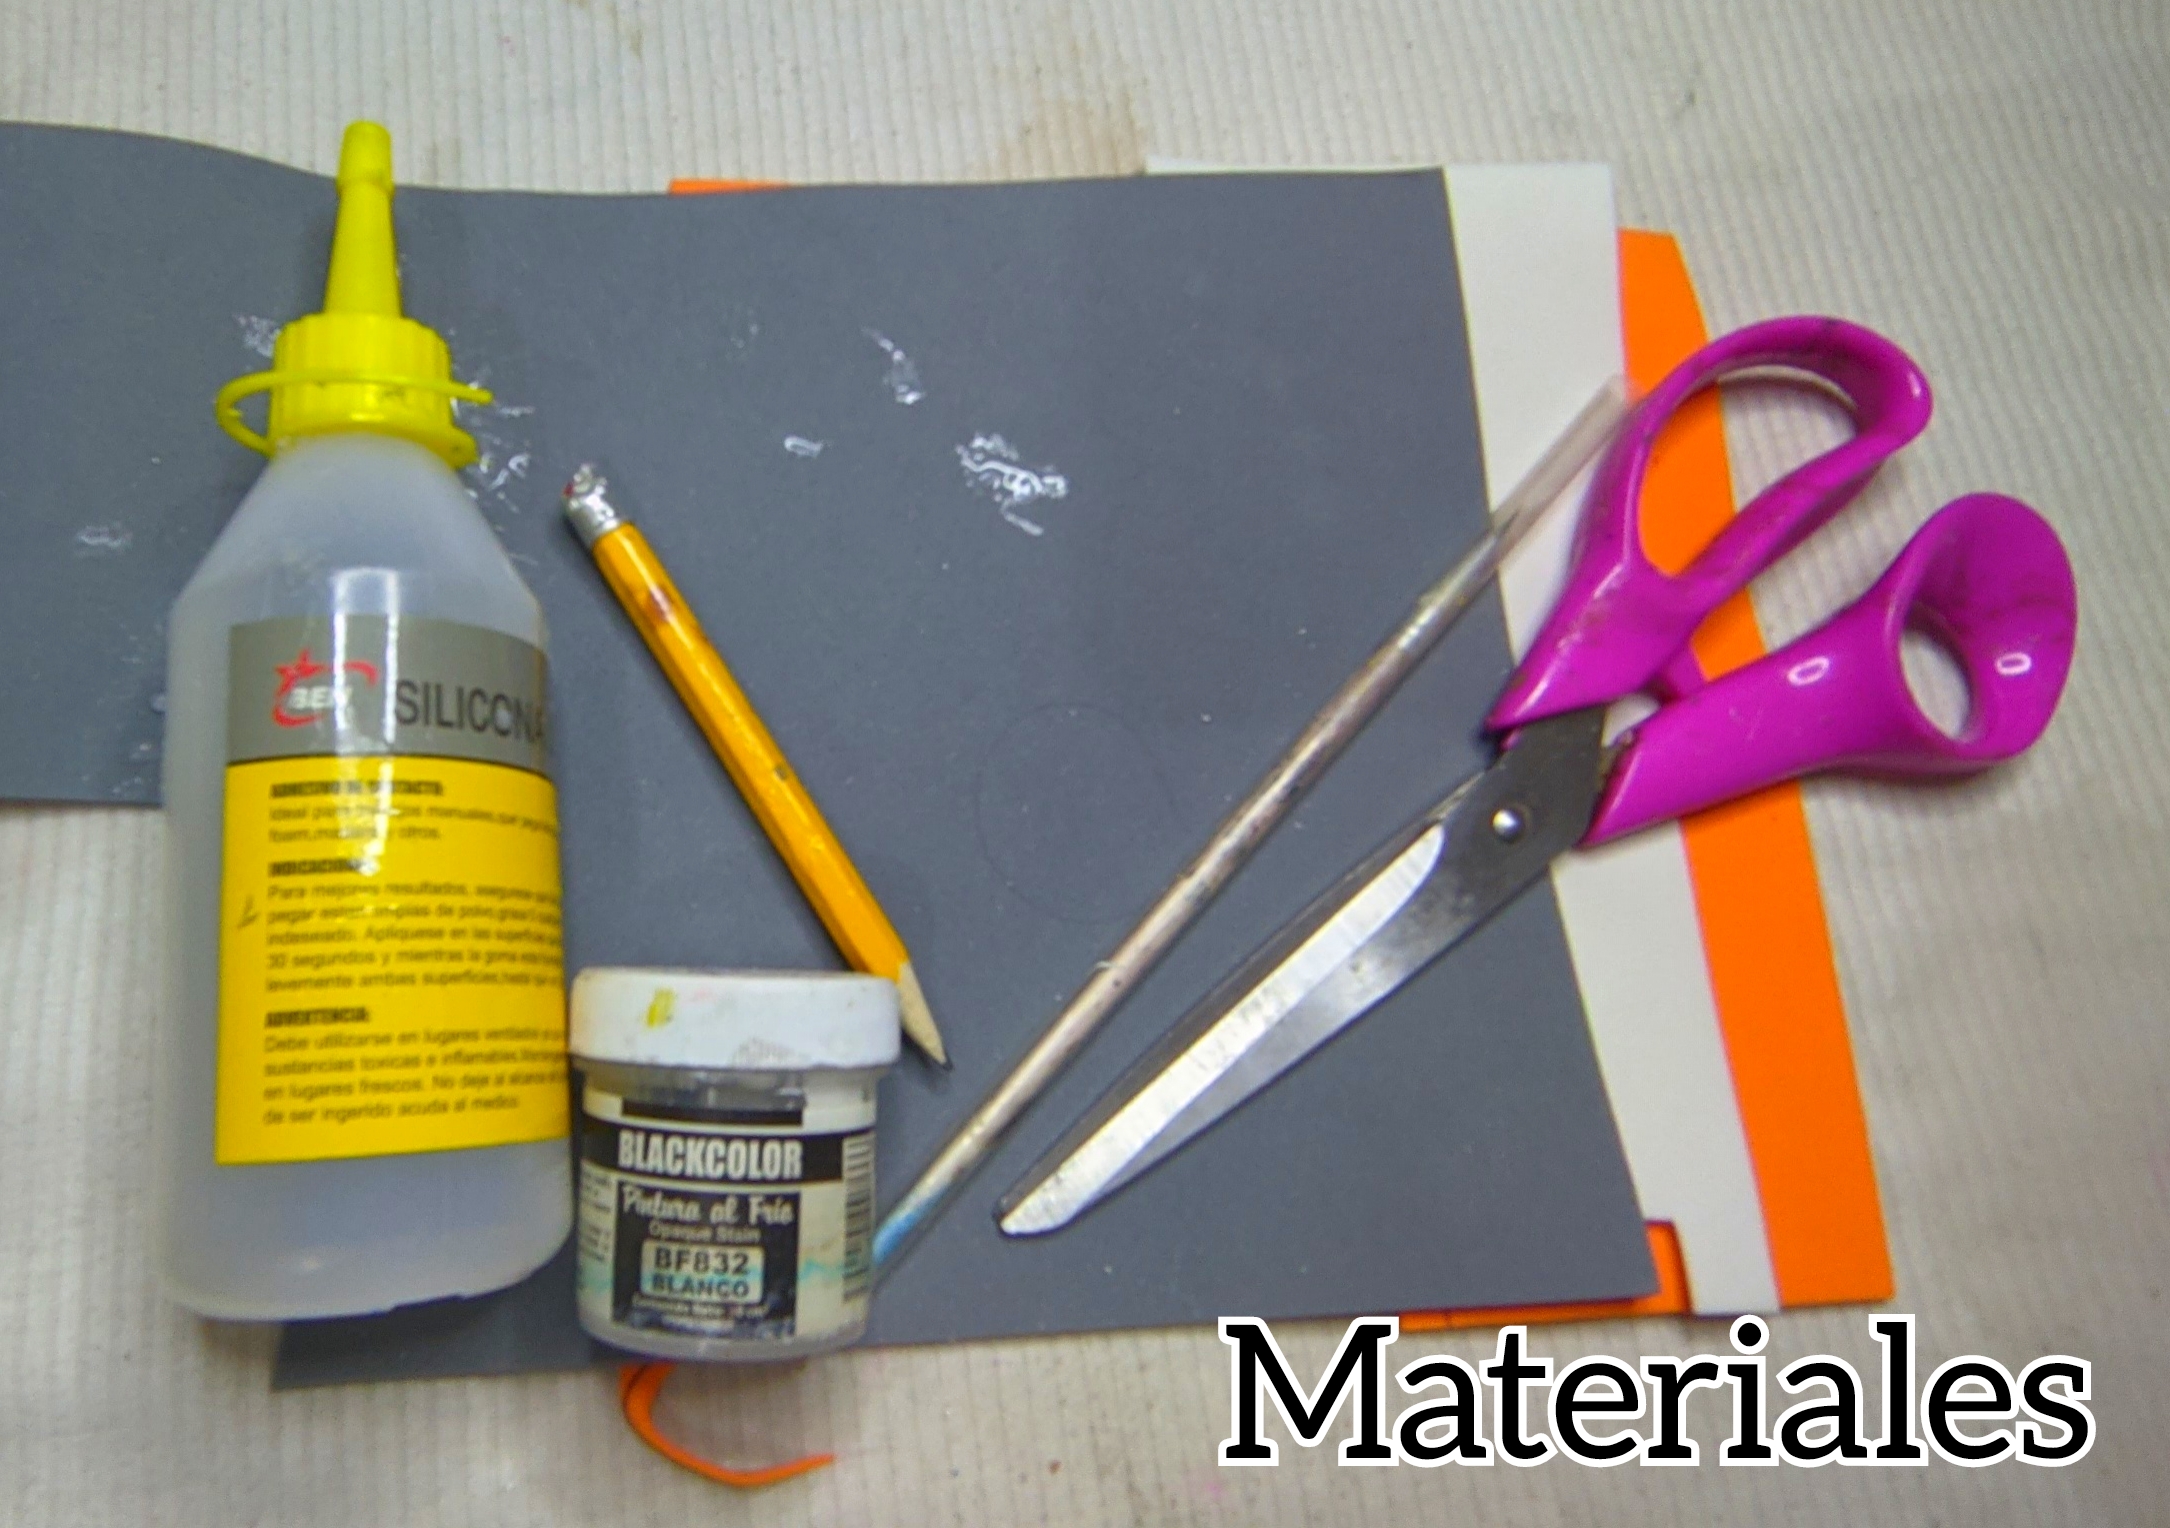
🍺 Foami escarchado azul.
🍺 Foami negro.
🍺 Foami naranja.
🍺 Foami blanco.
🍺 Foami gris.
🍺 Silicón líquido.
🍺 Pintura negra.
🍺 Pintura blanca.
🍺 Pintura azul
🍺 Pintura roja.
🍺 Pintura amarilla.
🍺 Pintura rosada.
🍺 Pincel fino.
🍺 Pincel de sombrear.
🍺 Tijera.
🍺 Palillo de altura.
🍺 Lápiz.
🍺 Paso a paso🍺
🍺Paso 1:
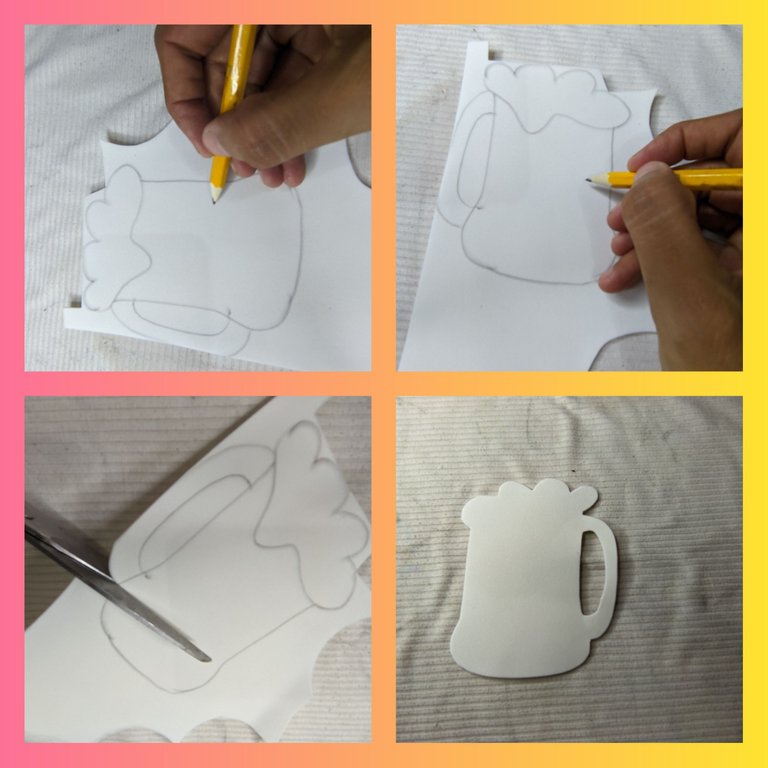
Primero tome el foami blanco y con el lápiz dibuje una jarra de cerveza, luego con la tijera recorté, y separamos la parte de arriba.
🍺 Paso 2:
Ahora marcamos en el foami naranja, el centro de la cerveza, lo que va a ser el líquido, y en el foami gris marcamos la forma completa de la cerveza.
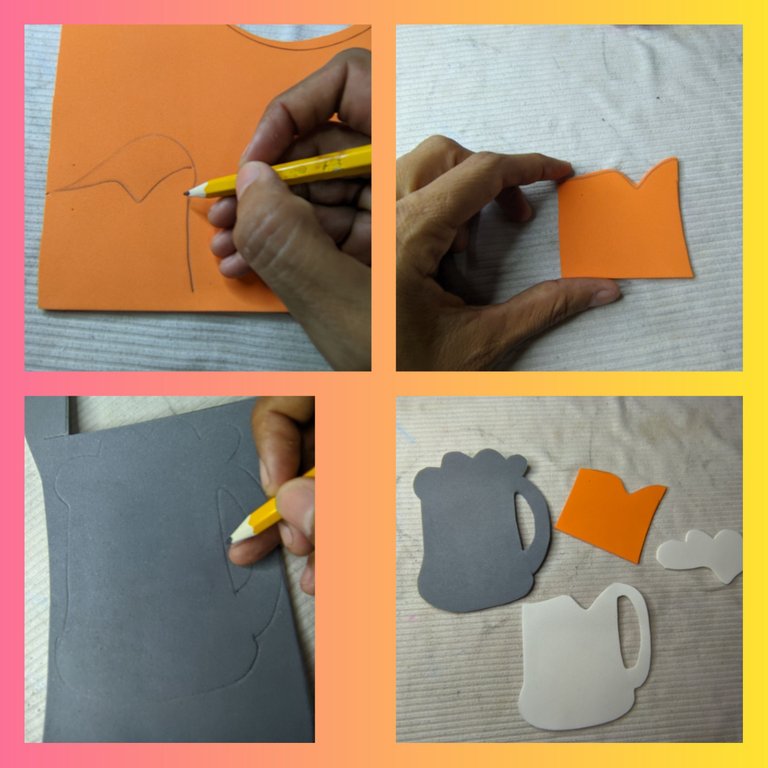
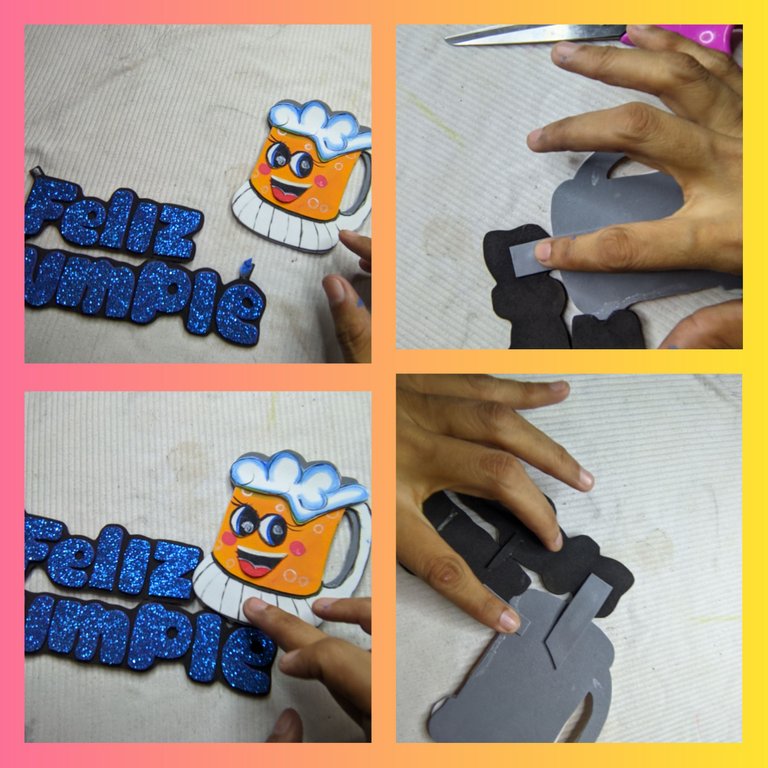
🍺 Paso 3:
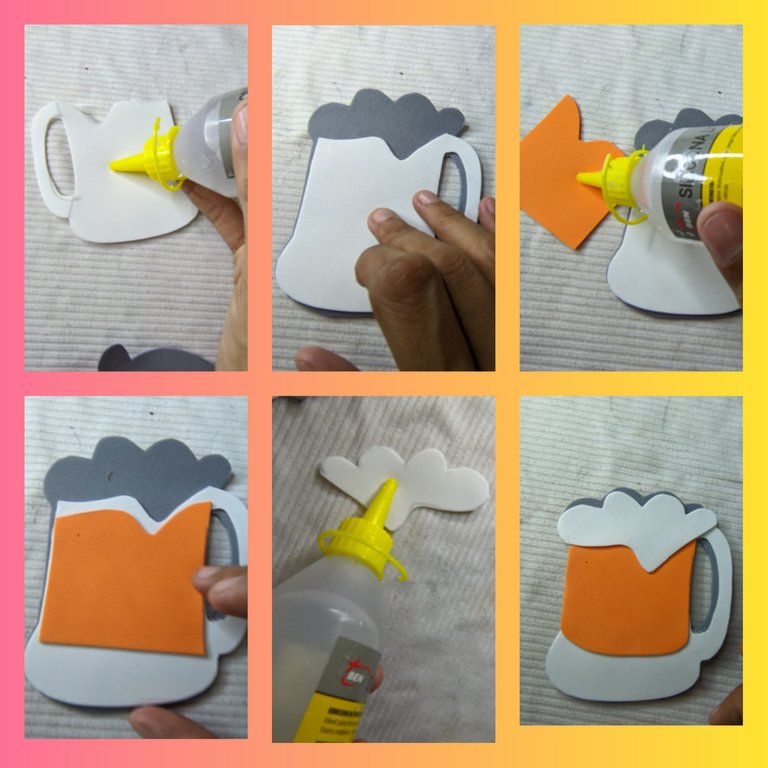
Ahora vamos a ensamblar todas las piezas de la cerveza, para eso la pieza de color gris nos va a servir de fondo para trabajar, luego aplicó silicón líquido en la pieza blanca y pegamos sobre la pieza gris, seguidamente pegamos la parte blanca que forma la espuma de la cerveza.
🍺 Paso 4:
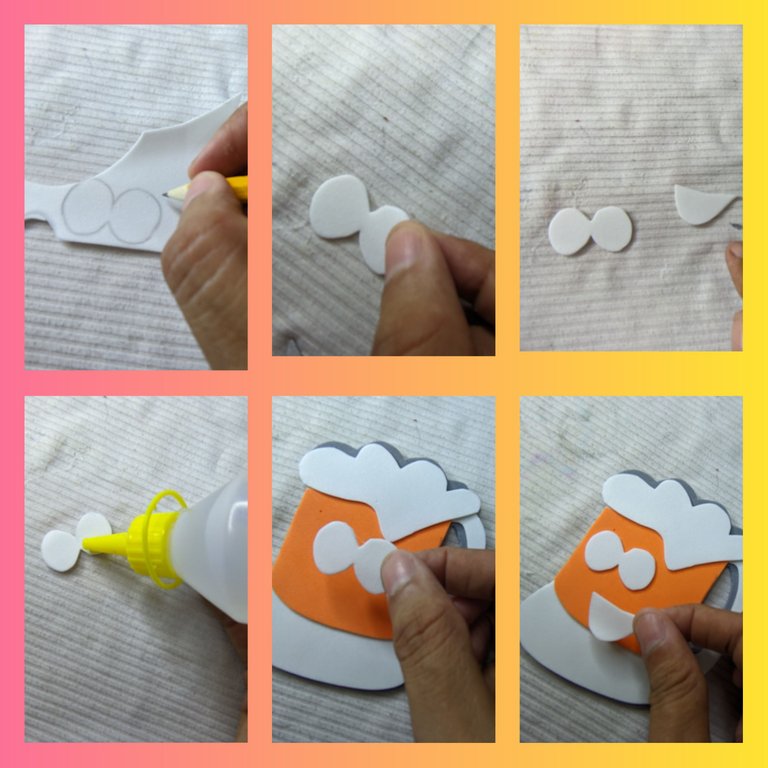
En un retazo del Foami blanco dibujamos los ojos y la boca y luego los recorté con la tijera y les aplicó silicón líquido y pegamos.
🍺 Paso 5:
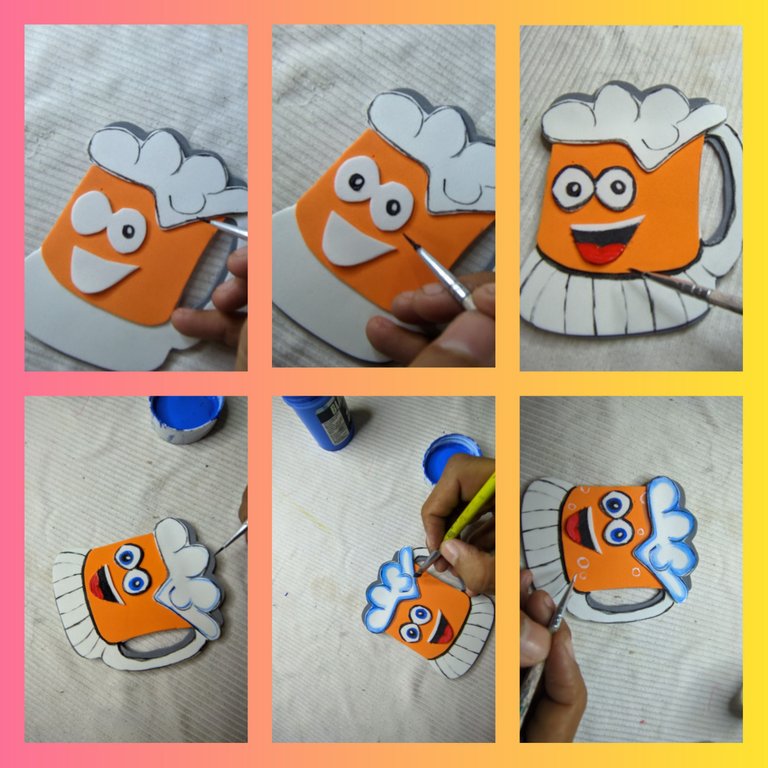
Con la pintura negra y el pincel fino delineamos, también dibujamos los ojos, y otros detalles de la cerveza, luego con la pintura azul le damos algunos detalles a nuestra pieza y luego dibuje algunas burbujas con la pintura blanca.
🍺 Paso 6:
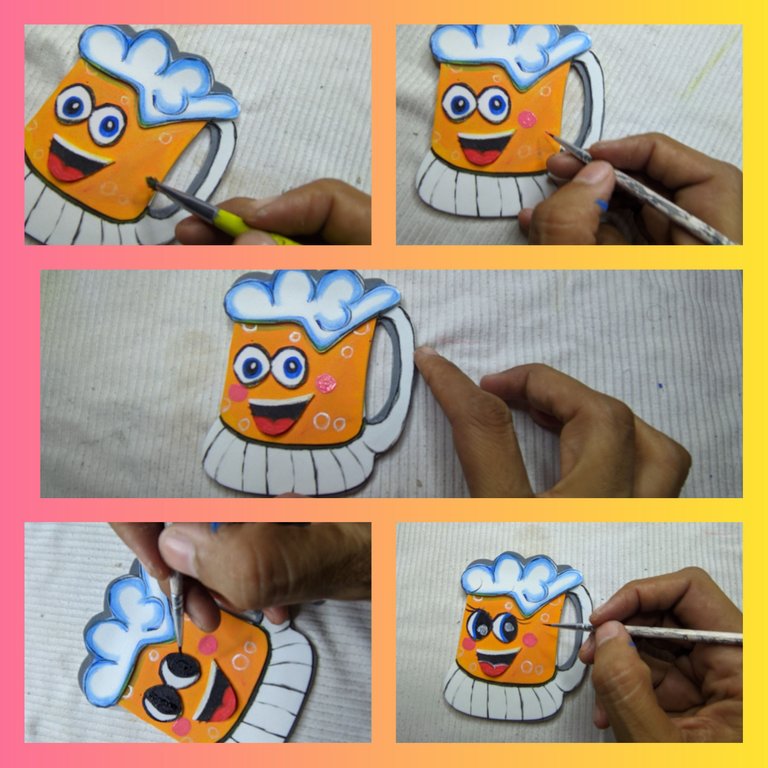
Con la pintura rosada y el pincel dibujamos las mejillas, y aquí lo crean o no le mejores los ojos, ya que no me gusto como había quedado y los pinte de manera diferente.
🍺 Paso 7:
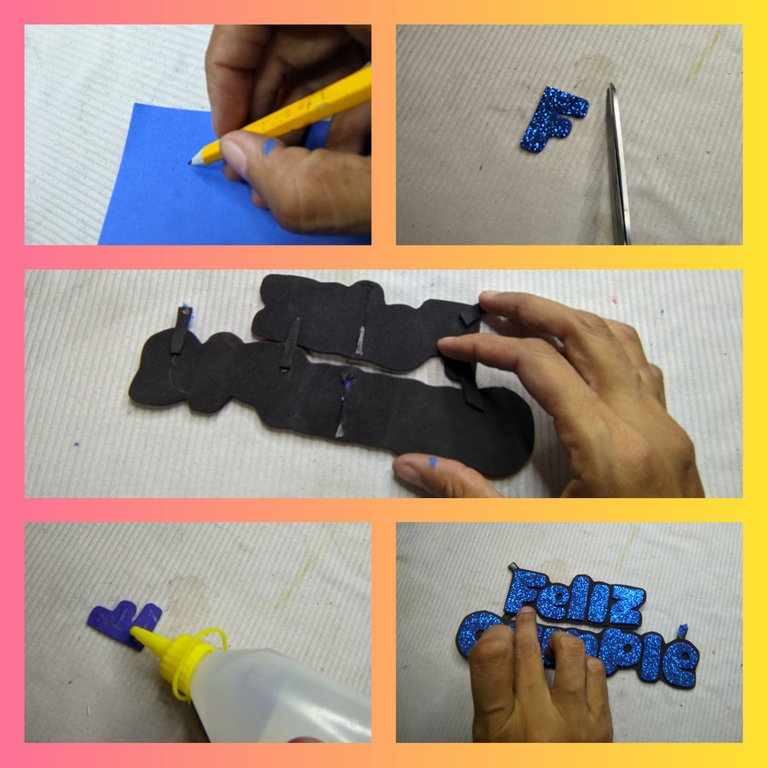
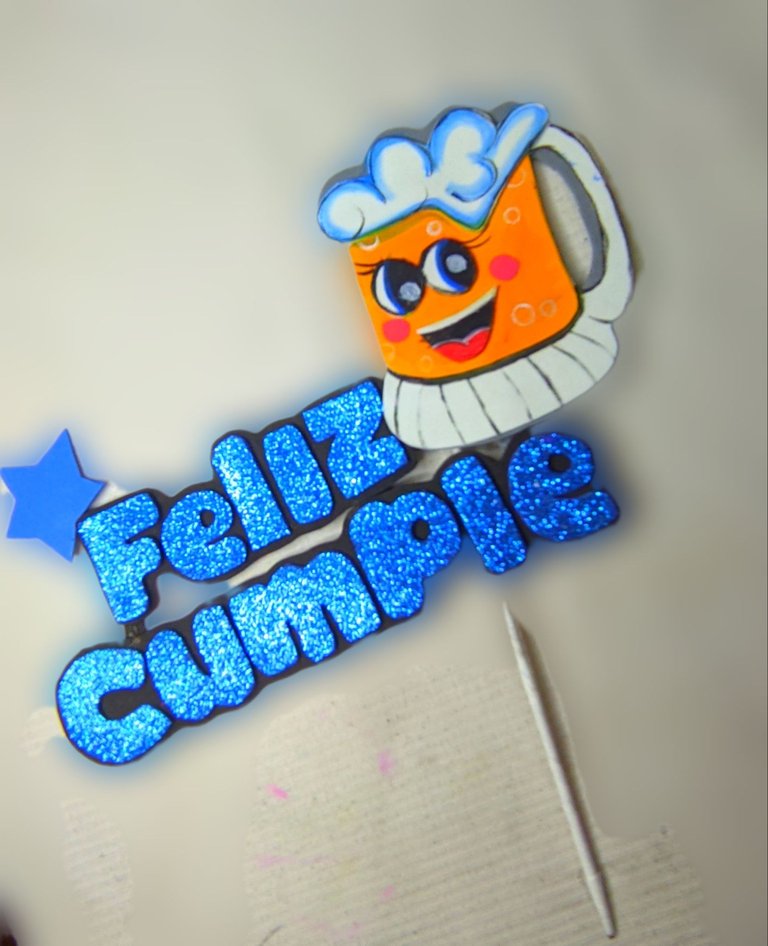
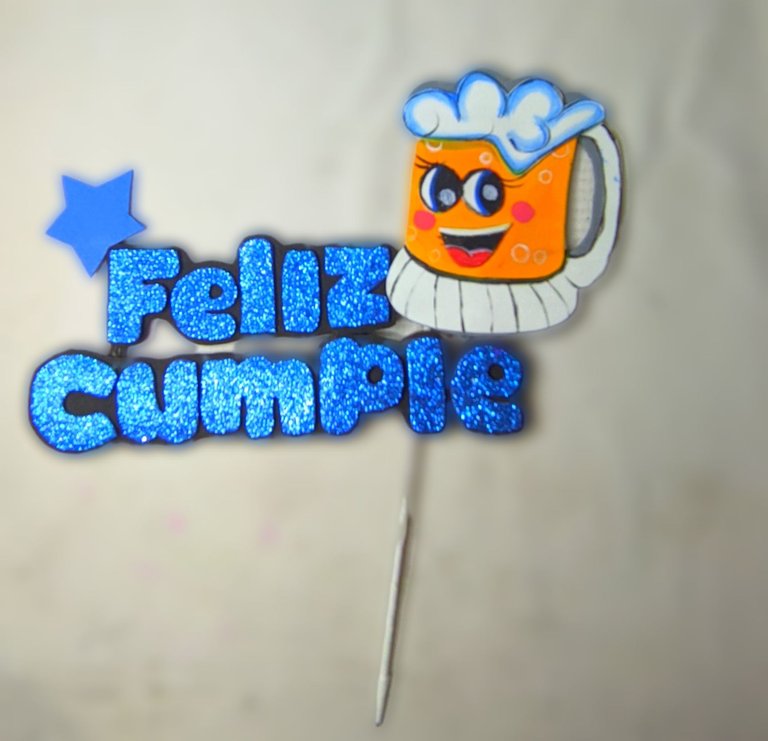
Ahora agarre el foami azul escarchado, y dibujamos unas letras que formen las palabras feliz cumple, y las recortamos, también recorté en el foami negro la base donde colocaré las letras, y con el silicón líquido pegamos.
🍺 Paso 8:
Cuando tenemos las dos piezas listas pegamos la cerveza coqueta de las letras, para que se fijen mejor, recorte dos tiras del Foami gris y las pegué con silicón líquido en la parte trasera.
🍺 Paso 9:
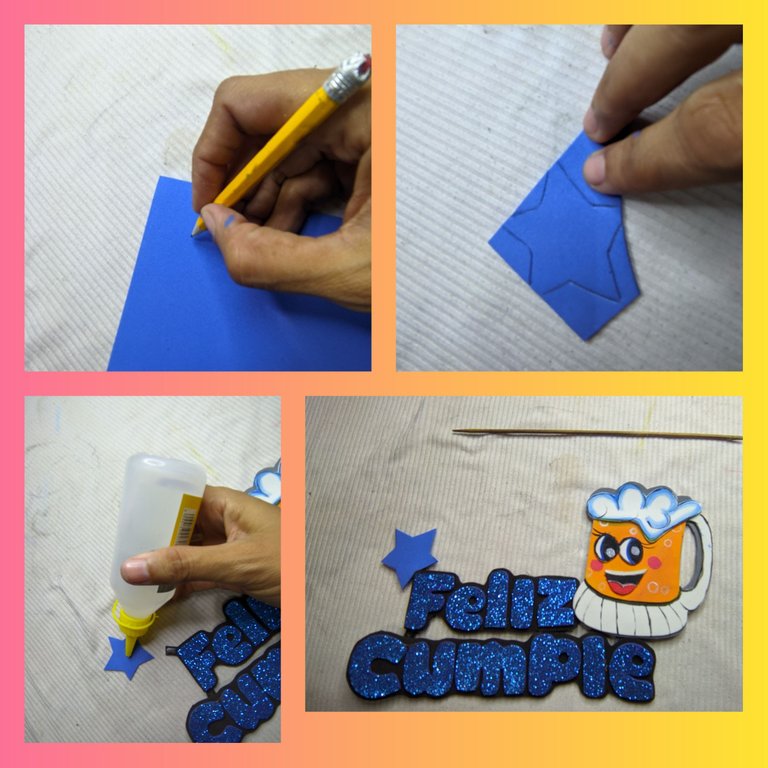
Tome un trocito de foami azul y dibuje una estrella y luego recortó y pegó con el silicón líquido encima de las letras.
🍺 Paso 10:

Cuando ya está totalmente listo la pieza, le aplicamos silicón líquido en la parte de atrás y le pegamos el palito de altura, que previamente forre, y listo hemos terminado.
🍺 Fotos finales.🍺
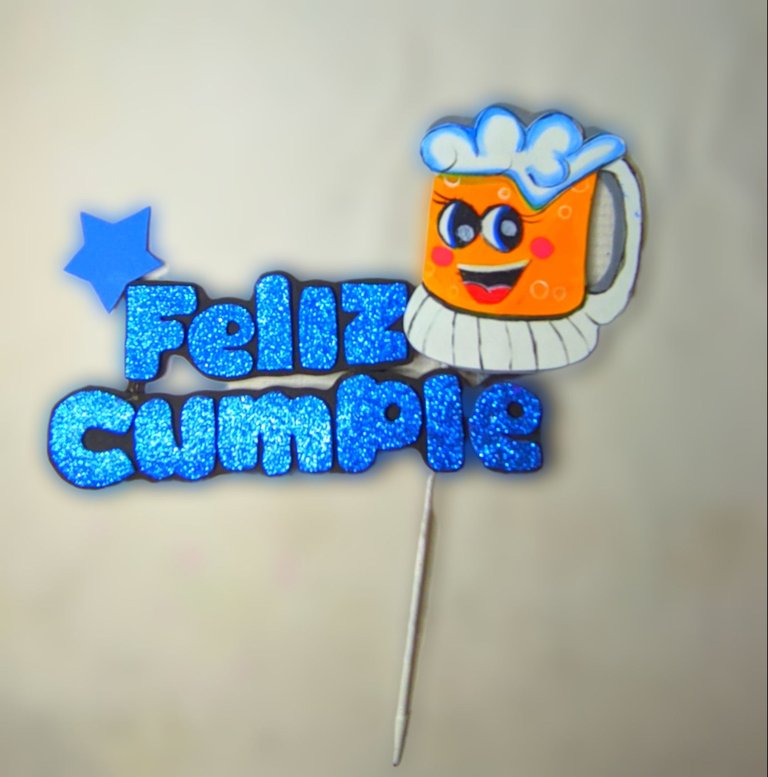
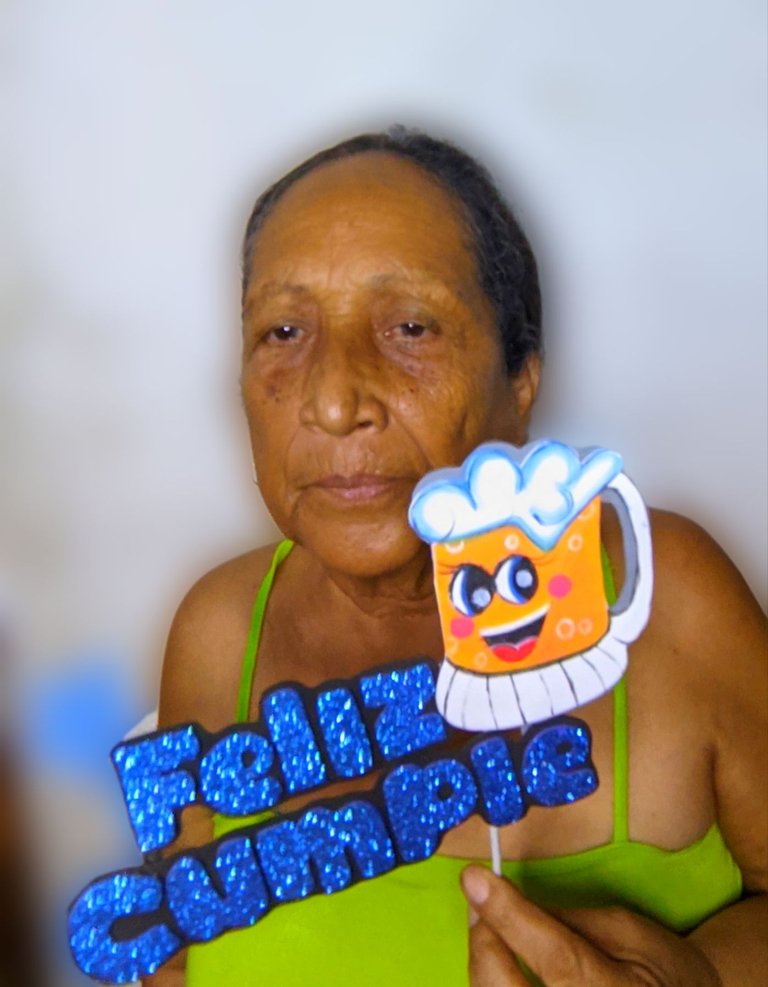
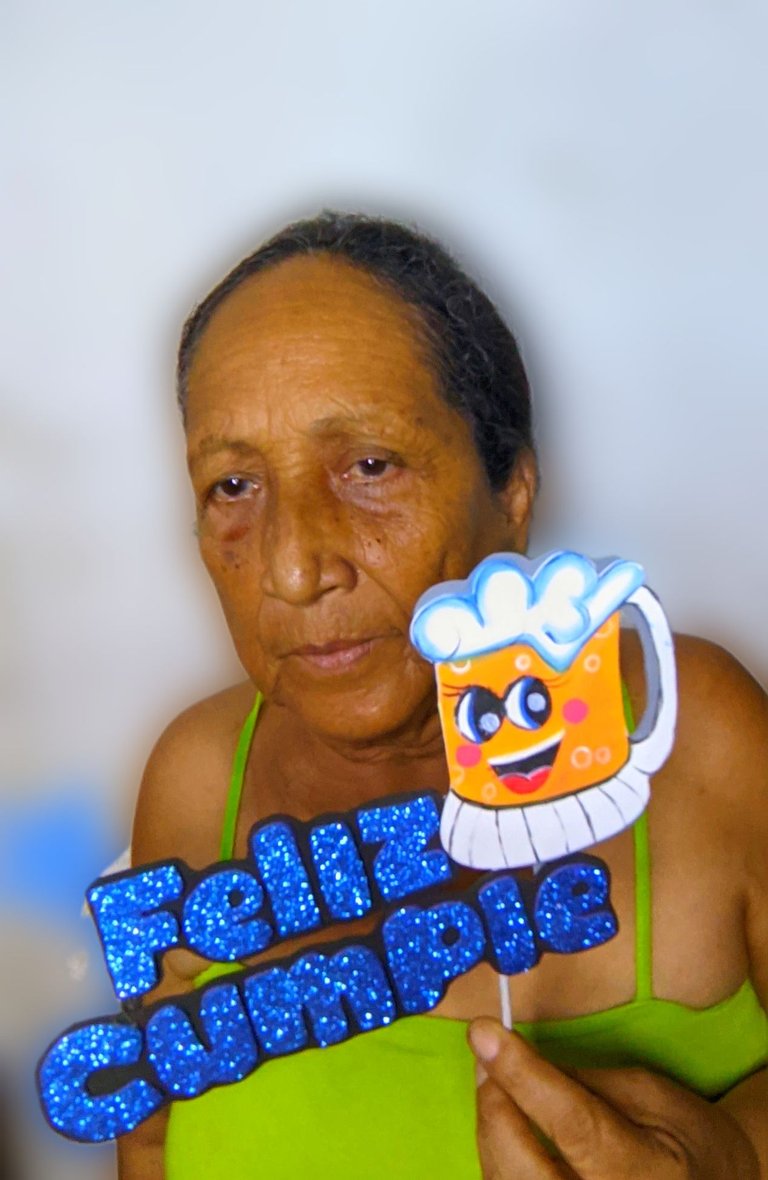
Espero que esté trabajo les haya gustado, a mi sobrino le gustó mucho, cómo pueden darse cuenta es un detalle bonito y fácil de elaborar, para el post use el programa polish y el traductor deepl versión gratis y todas las fotos fueron tomadas con mi teléfono Xiaomi redmi y son mías.
🍺 ENGLISH 🍺
Hello my little children, I hope you are well, I was absent for a few days due to lack of materials, and I had no one to buy them for me, but today I could buy and here I bring you this incredible topper that I made with love for my nephew Lorenzo, who today is my 25th birthday, and I did not want to miss the opportunity to give him something of what I usually make.
Lamentally I could not be at his birthday but I did give him this little gift, which I want to show you how to make it, here below I leave you the photos of the materials, also the step by step and of course the photos of how it was at the end, this topper decorated with this flirty beer.
🍺 Materials 🍺
🍺 Materials 🍺
🍺 Blue frosted foami.
🍺 Black foami.
🍺 Orange foami.
🍺 White foami.
🍺 Grey foami.
🍺 Liquid silicone.
🍺 Black paint.
🍺 White paint.
🍺 Blue paint.
🍺 Red paint.
🍺 Yellow paint.
🍺 Pink paint.
🍺 Fine brush.
🍺 Shading brush.
🍺 Scissors.
🍺 Height stick.
🍺 Pencil.
🍺 Step by step🍺
🍺
🍺Step 1:
First take the white foami and with the pencil draw a beer mug, then with the scissors cut it out, and separate the top part.
🍺 Step 2:
Now we mark on the orange foami, the centre of the beer, what is going to be the liquid, and on the grey foami we mark the whole shape of the beer.
🍺 Step 3:
Now we are going to assemble all the pieces of the beer, for that the grey piece is going to serve us as a background to work with, then I applied liquid silicone on the white piece and we glued on the grey piece, then we glued the white part that forms the foam of the beer.
🍺 Step 4:
On a piece of white Foami we drew the eyes and the mouth and then I cut them out with the scissors and applied liquid silicone and glued them on.
🍺 Step 5:
With the black paint and the fine brush we outline, we also draw the eyes, and other details of the beer, then with the blue paint we give some details to our piece and then draw some bubbles with the white paint.
🍺 Step 6:
With the pink paint and the brush we draw the cheeks, and here believe it or not I improved the eyes, because I didn't like how they looked and I painted them in a different way.
🍺 Step 7:
Now grab the blue frosted foami, and draw some letters that form the words happy birthday, and cut them out, I also cut out the base of the black foami where I will place the letters, and with the liquid silicone we glue them.
🍺 Step 8:
When we have the two pieces ready we glue the flirty beer letters, to make them stick better, I cut out two strips of the grey Foami and glued them with liquid silicone on the back.
🍺 Step 9:
Take a small piece of blue foami and draw a star and then cut it out and glue it with the liquid silicone on top of the letters.
🍺 Step 10:
When the piece is completely ready, we apply liquid silicone on the back and glue the height stick, which we previously lined, and we're done.
🍺 Final photos.🍺
I hope you liked this work, my nephew liked it a lot, as you can see it is a nice detail and easy to elaborate, for the post I used the polish program and the translator deepl free version and all the pictures were taken with my Xiaomi redmi phone and they are mine.
Congratulations @laabuelita! You have completed the following achievement on the Hive blockchain And have been rewarded with New badge(s)
Your next target is to reach 1750 upvotes.
You can view your badges on your board and compare yourself to others in the Ranking
If you no longer want to receive notifications, reply to this comment with the word
STOPTo support your work, I also upvoted your post!
Check out our last posts:
Gracias
¡Eso es perfecto @laabuelita! ¡Eres un verdadero campeón de Hive! ¡Adelante hacia esa nueva meta!
Por cierto, también necesitamos tu ayuda. ¿Podemos pedirle que apoye nuestra propuesta para que nuestro equipo pueda continuar con su trabajo?
Todo lo que necesita hacer es hacer clic en el botón "soporte" en esta página: https://peakd.com/proposals/248.
Gracias!
Has sido curado por @visualblock / You've been curated by @visualblock
Bienvenidas delegaciones / Delegations welcome
Trail de Curación / Curation Trail
Vota por nuestro Testigo aliado - @hispapro / Vote for our allied Witness - @hispapro
Más información sobre el testigo aquí / More information about the witness here
Gracias por todo el apoyo brindado
Que lindo quedó. Quiero hacer mi primer topper me diste una gran idea. Muchas gracias.
Gracias a ti hijita por visitar mi blog y apoyar mi contenido
Hola abuela1 La taza está super feliz, la amé, la esta pasando muy bien, muy alegre, risueña, es así como se debe celebrar un cumpleaños, celebrar la vida, gratitud. Bendiciones para usted.
Gracias por tus buenos deseos, realmente me gustan tus trabajos, todos son impecables y hermosos
@laabuelita
"El progreso se encuentra en el esfuerzo continuo. Tu constancia te llevará muy lejos."
https://inleo.io/threads/view/hive-130560/re-leothreads-29zj2dgsy
Me encantan los toppers y este te ha quedado hermoso. Buen trabajo!
Está genial tu modelo, para esos amigos cerveceros jeje, gracias por compartir <3
Te quedó muy linda amiga, tomaré tu idea para adornar alguna de mis tortas con tan lindo Topper.
Es un diseño muy interesante, una forma agradable de presentar a la cerveza, muchas gracias por compartir su trabajo, un abrazo.
Le quedó muy cuchi ese topper de cervecita, tiene mucho talento mi querida abuelita, le mando un abrazo, saludos.