WELCOME TO MY BLOG
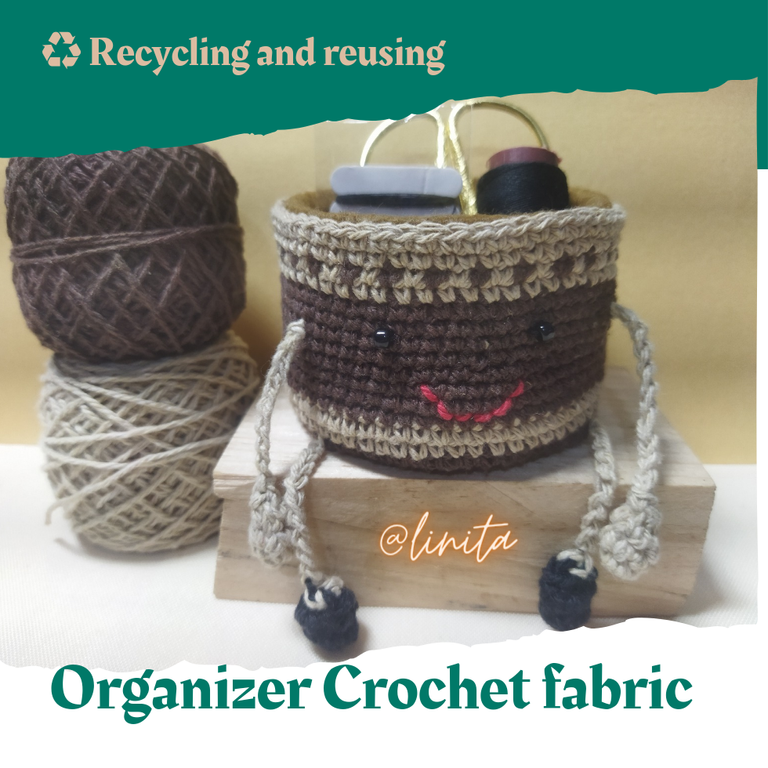
Hellooooo, hellooooooo! Greetings my dear #HiveDiy creatives. One of the processes that I enjoy the most at home is recycling and if we fuse it with the fabric we can obtain spectacular results like the one I bring you below. In my kitchen, I have a space designated to store all the plastic containers, glass and some cans that I consider I can reuse. For this project I took one of the cans to make a mini organizer that I am going to cover with a nice crochet fabric, which in addition to being very useful to avoid misplacing the small objects that I am using in my projects, will also help me to decorate my space. Now, without further ado, let's get started.
BIENVENIDOS A MI BLOG
¡Holaaaa, holaaaaa! Saludos mis estimados creativos de #HiveDiy. Uno de los procesos que más disfruto en casa es el reciclaje y si la fusionamos con el tejido podemos obtener resultados espectaculares como éste que les traigo a continuación. En mi cocina, tengo un espacio destinado para guardar todos los envases de plástico, vidrio y algunas latas que considero que puedo reutilizar. Para este proyecto tomé una de las latas para realizar un mini organizador que voy a forrar con un lindo tejido a crochet, que además de ser de gran utilidad para no traspapelar los objetos pequeños que estoy utilizando en mis proyectos, también me servirá para decorar mi espacio. Ahora, sin más que agregar, comencemos.
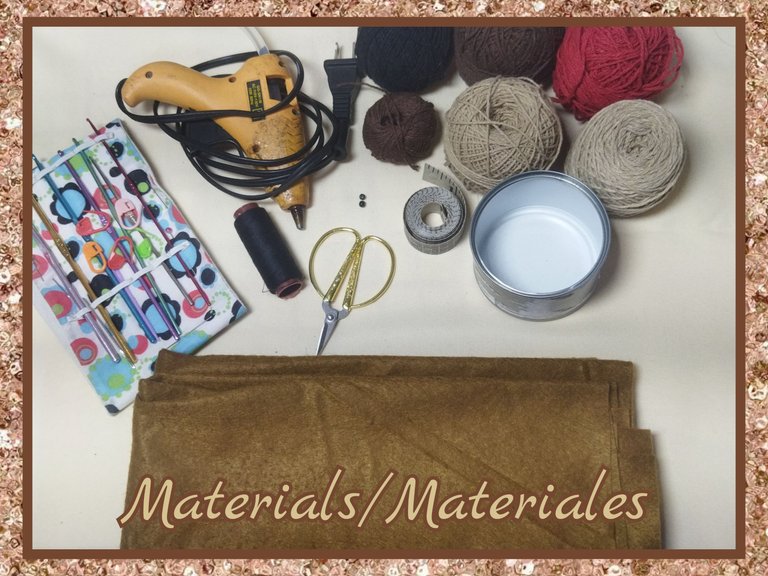
MATERIALS
- Dark brown, dark khaki, light khaki, black and red cotton threads)
- Black sewing thread and sewing needle
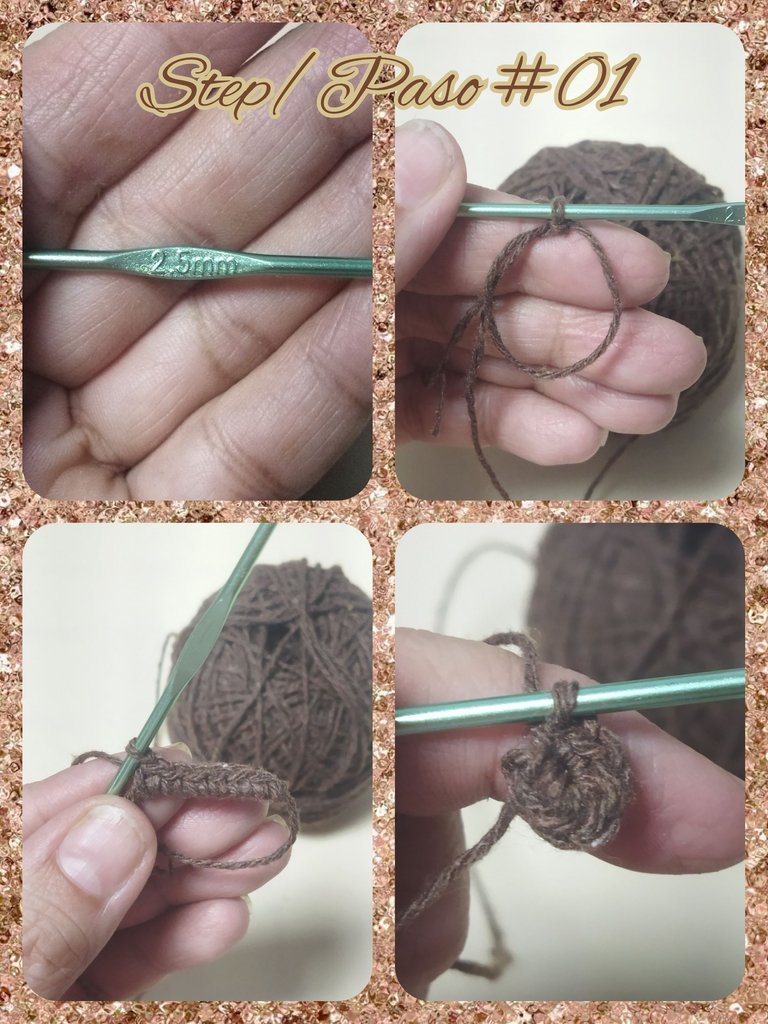
- 2.5 mm crochet hook
- 4 mm mustache (for the eyes)
- Brown felt
- Wool needle
- Scissors
- Measuring tape
- Silicone gun
- Recycled can
- Fabric marker
MATERIALES
- Hilos de algodón marrón oscuro, caqui oscuro, caqui claro,negro y rojo)
- Hilo de coser negro y aguja de coser
- Aguja de crochet de 2,5 mm
- Mostachón de 4 mm (para los ojos)
- Fieltro marrón
- Aguja lanera
- Tijera
- Cinta métrica
- Pistola de silicón
- Lata reciclada
- Marcador de tejido
STEP BY STEP // PASO A PASO
BASKET WEAVING
To make the basket we are going to start with a circle made with single crochets in brown thread made to measure for the can.
LAP 1
- We begin by making a magic ring and 6 single crochets with the dark brown thread.
- We close the ring.
TEJIDO DE LA CESTA
Para realizar la cesta vamos a comenzar con un círculo realizado con puntos bajos en hilo marrón hecho a medida de la lata.
VUELTA 1
- Comenzamos realizando un anillo mágico y 6 puntos bajos con el hilo marrón oscuro.
- Cerramos el anillo.
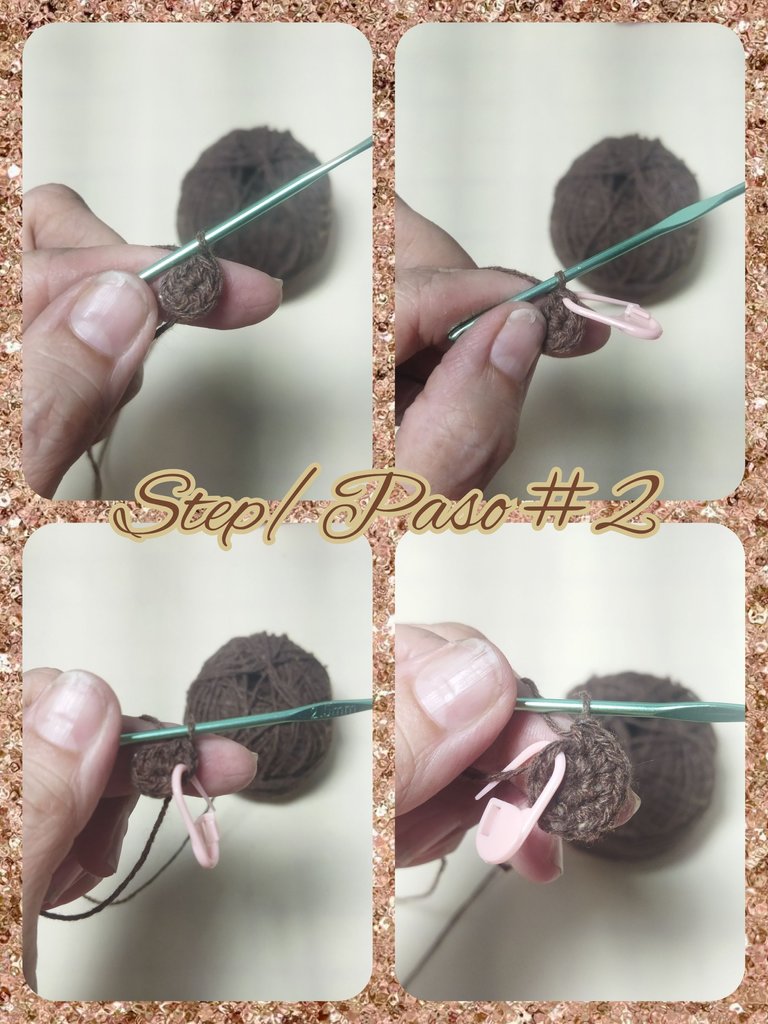
LAP 2
- We make an increase in each single crochet of the previous round for a total of 12 single crochets.
VUELTA 2
- Realizamos un aumento en cada punto bajo de la vuelta anterior para un total de 12 puntos bajos.
LAP 3
We make a single crochet in the first stitch and increase in the next stitch and repeat to obtain 18 single crochets.
VUELTA 3
Realizamos un punto bajo en el primer punto y aumento en el siguiente punto y repetimos para obtener 18 puntos bajos.
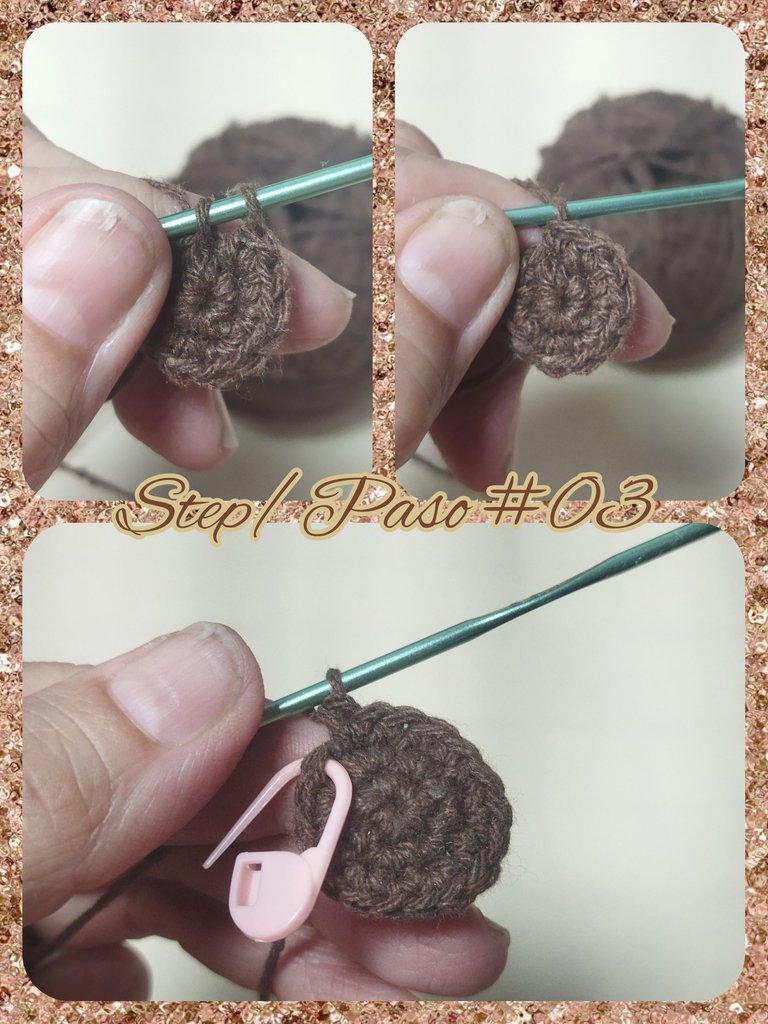
LAP 4
We make two single crochets and increase in the next stitch and repeat to obtain 24 single crochets.
VUELTA 4
Realizamos dos puntos bajos y aumento en el siguiente punto y repetimos para obtener 24 puntos bajos.
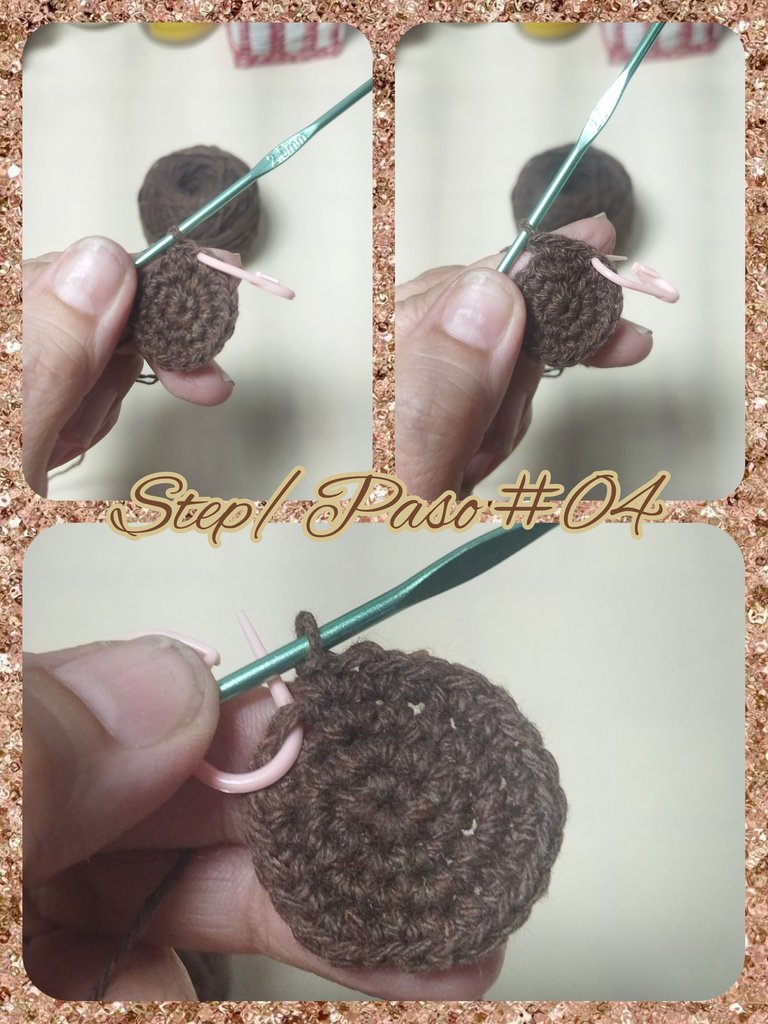
LAP 5
We make three single crochets and increase in the next stitch and repeat to obtain 30 single crochets.
VUELTA 5
Realizamos tres puntos bajos y aumento en el siguiente punto y repetimos para obtener 30 puntos bajos.
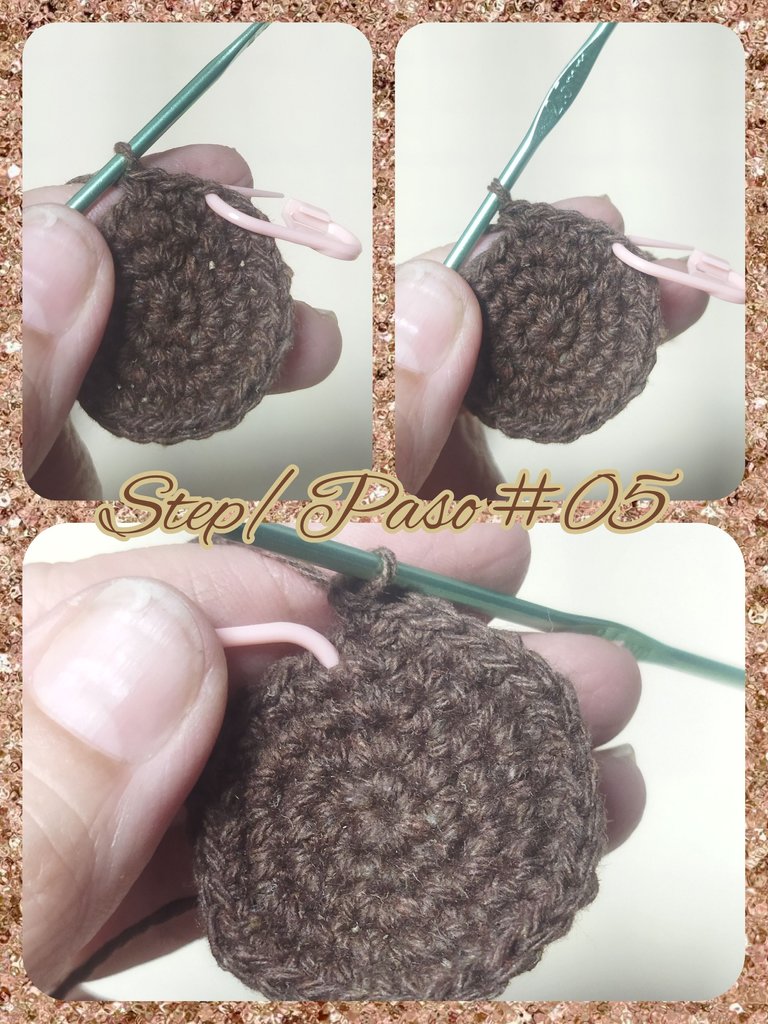
LAP 6
We make four single crochets and increase in the next stitch and repeat to obtain 36 single crochets.
VUELTA 6
Realizamos cuatro puntos bajos y aumento en el siguiente punto y repetimos para obtener 36 puntos bajos.
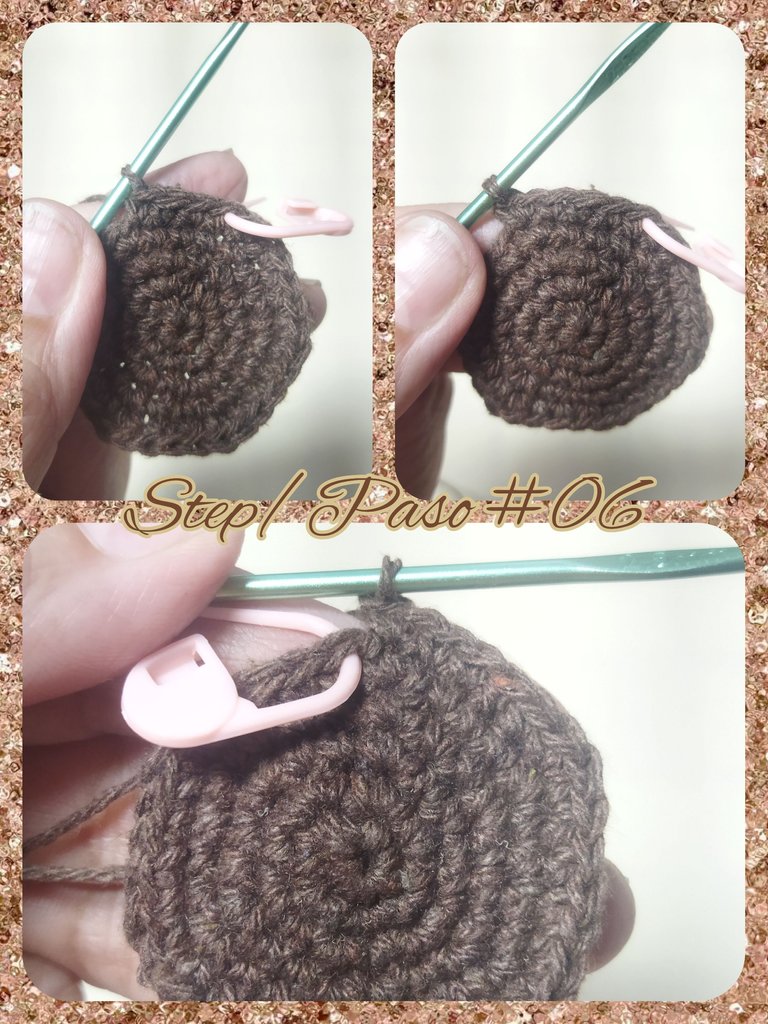
LAP 7
We make five single crochets and increase in the next stitch and repeat to obtain 42 single crochets.
VUELTA 7
Realizamos cinco puntos bajos y aumento en el siguiente punto y repetimos para obtener 42 puntos bajos.

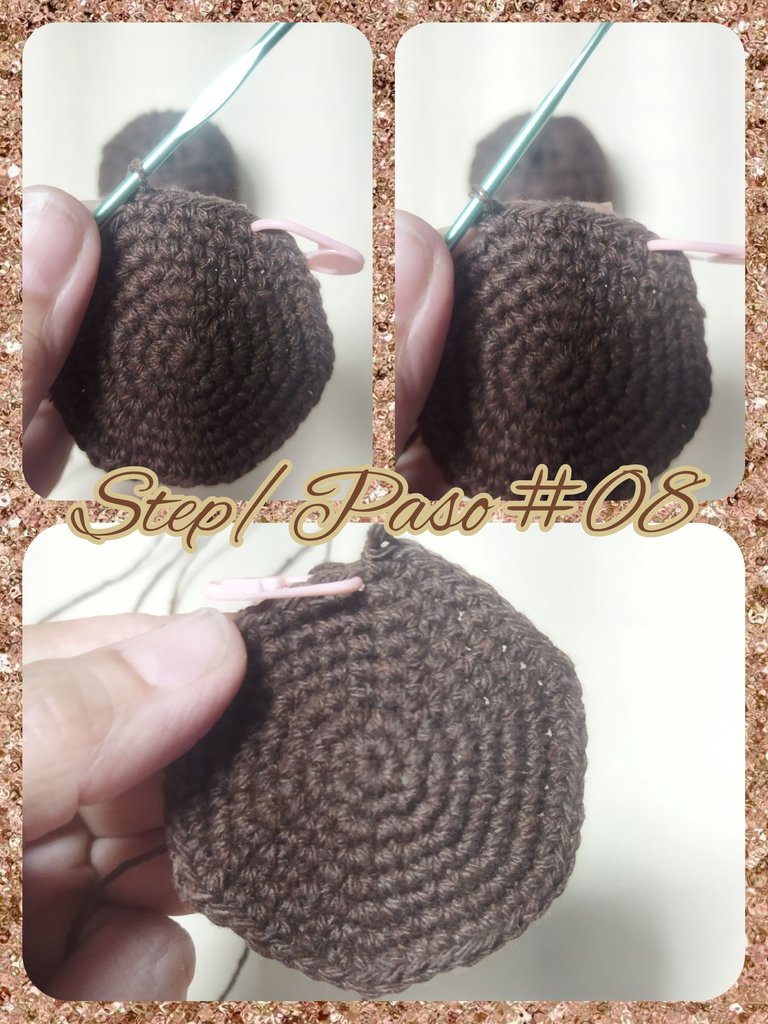
LAP 8
We make six single crochets and increase in the next stitch and repeat to obtain 48 single crochets.
VUELTA 8
Realizamos seis puntos bajos y aumento en el siguiente punto y repetimos para obtener 48 puntos bajos.
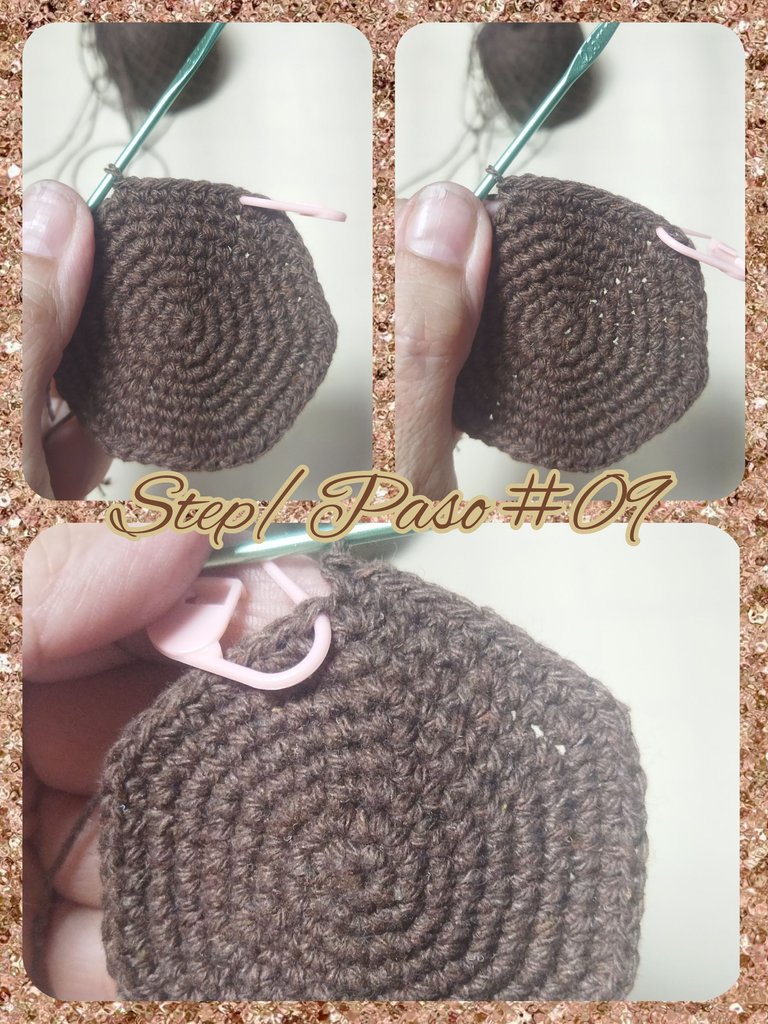
LAP 9
We make seven single crochets and increase in the next stitch and repeat to obtain 54 single crochets.
VUELTA 9
Realizamos siete puntos bajos y aumento en el siguiente punto y repetimos para obtener 54 puntos bajos.
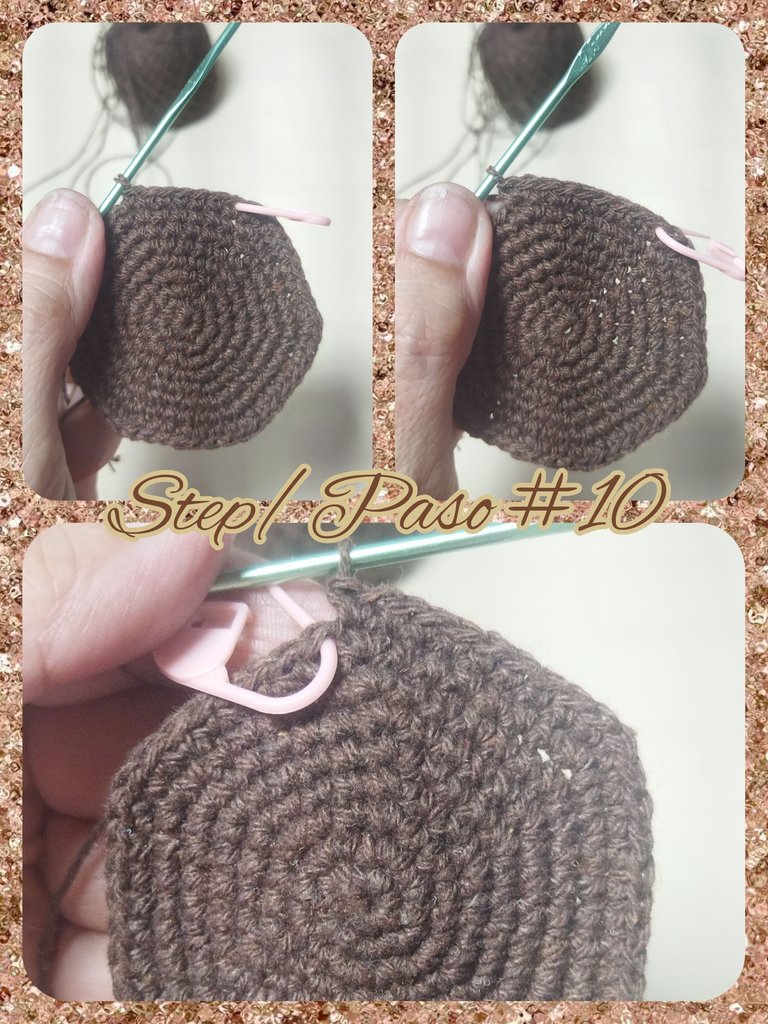
LAP 10
We make eight single crochets and increase in the next stitch and repeat to obtain 60 single crochets.
VUELTA 10
Realizamos ocho puntos bajos y aumento en el siguiente punto y repetimos para obtener 60 puntos bajos.
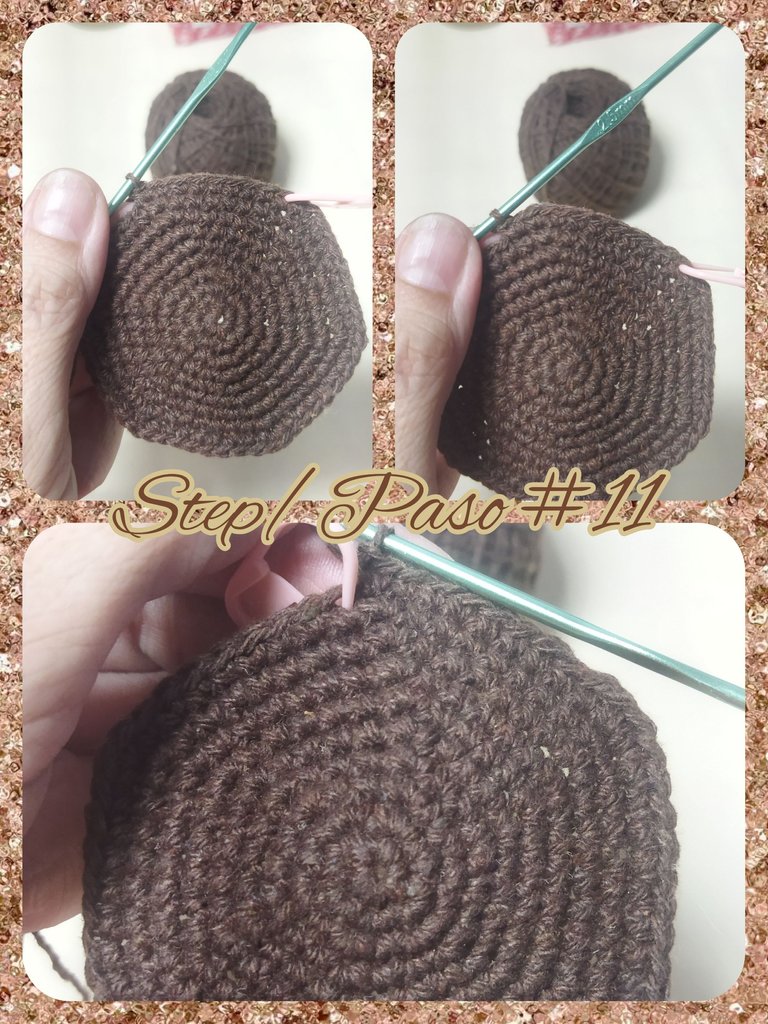
LAP 11
We make nine single crochets and increase in the next stitch and repeat to obtain 66 single crochets.
VUELTA 11
Realizamos nueve puntos bajos y aumento en el siguiente punto y repetimos para obtener 66 puntos bajos.
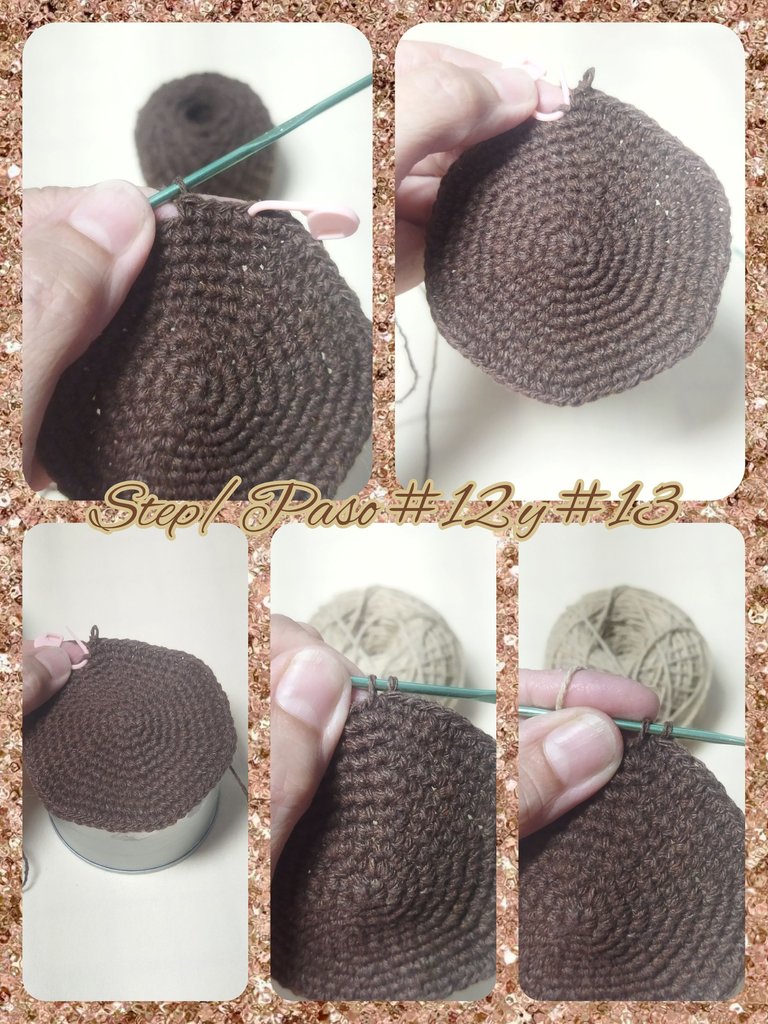
LAP 12 and 13
We make a single crochet in each of the stitches from the previous round to obtain 66 single crochets and we repeat the same process on round 13.
VUELTA 12 y 13
Realizamos un punto bajo en cada uno de los puntos de la vuelta anterior para obtener 66 puntos bajos y repetimos el mismo proceso en la vuelta 13.
LAP 14
In this round we will change the thread, to do this we are going to close the last stitch of the previous round with the thread that we will use, in this case the dark khaki thread.
Once the change is made we are going to knit a single crochet in each stitch of the previous round. For a total of 66 points.
VUELTA 14
En esta vuelta realizaremos cambio de hilo, para ello vamos a cerrar el último punto de la vuelta anterior con el hilo que utilizaremos, en este caso el hilo color caqui oscuro.
Una vez realizado el cambio vamos a tejer un punto bajo en cada punto de la vuelta anterior. Para un total de 66 puntos.

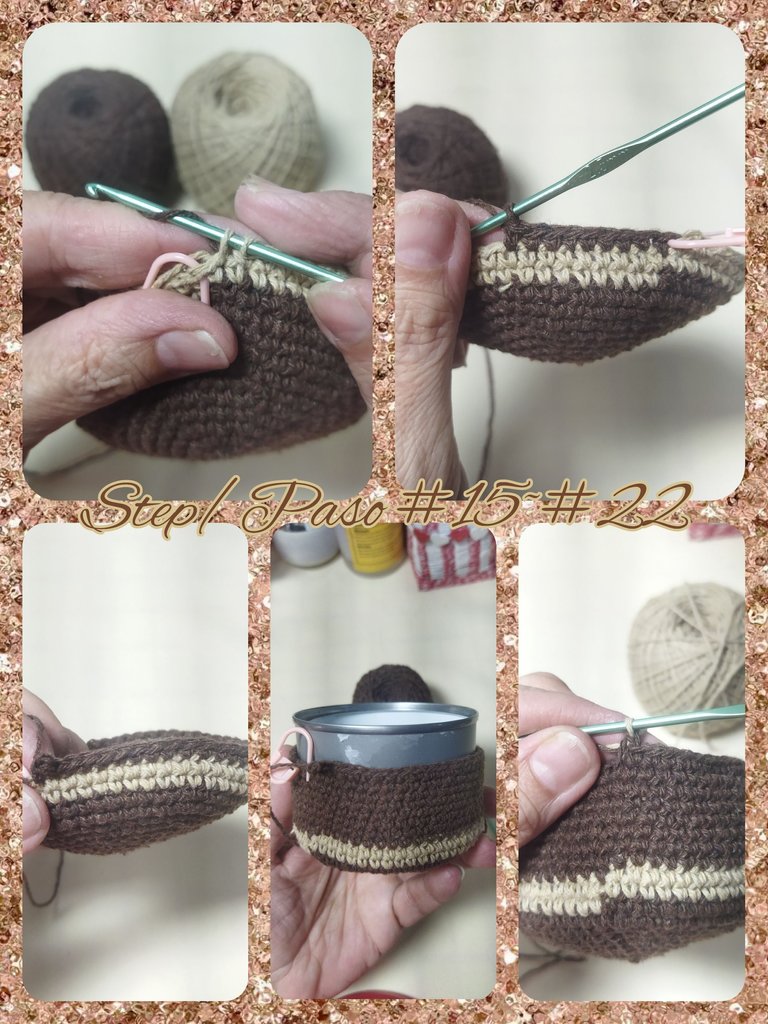
LAP 15 to 23
Again we will change to the dark brown thread, and continue knitting a single crochet in each stitch of the previous round. We make 8 rounds maintaining the same point until we reach approximately 7 cm of fabric, which is the height of our can.
VUELTA 15 a la 23
Nuevamente realizaremos cambio al hilo de color marrón oscuro, y continuamos tejiendo un punto bajo en cada punto de la vuelta anterior. Realizamos 8 vueltas manteniendo el mismo punto hasta alcanzar 7 cm aproximadamente de tejido que es la altura de nuestra lata.
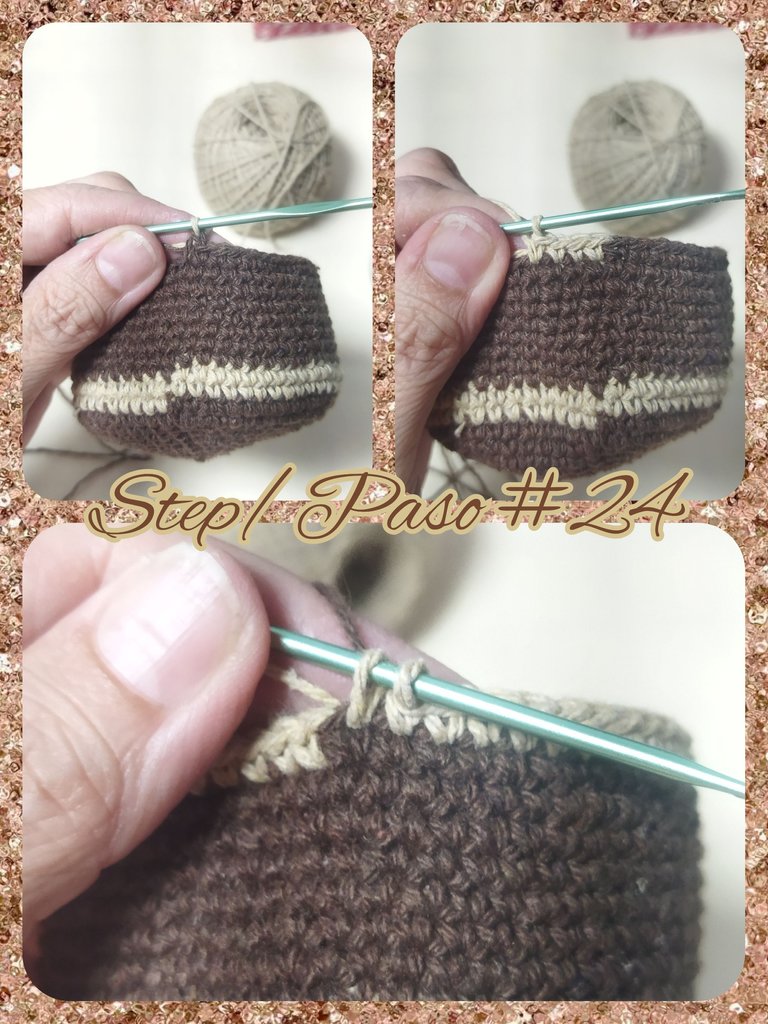
LAP 24
We return to the dark khaki thread, closing the last stitch of the previous round with this thread and we are going to make a round of single crochets.
VUELTA 24
Retomamos el hilo color caqui oscuro, cerrando el último punto de la vuelta anterior con este hilo y vamos a realizar una vuelta de puntos bajos.
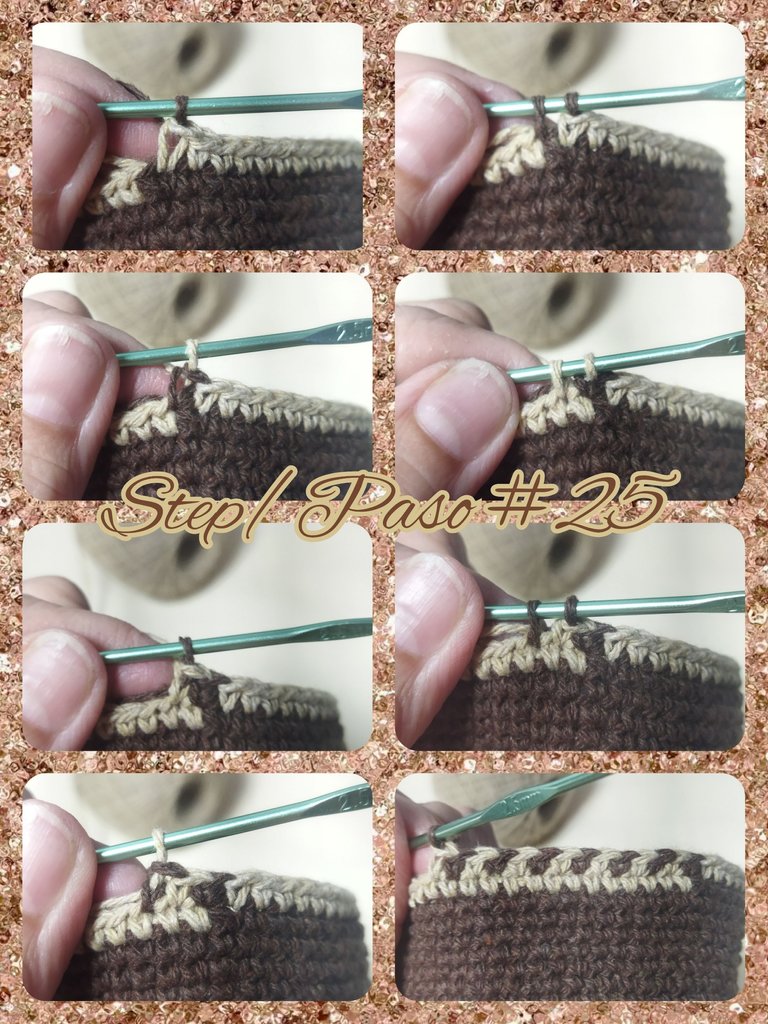
LAP 25
We change to the dark brown thread again, closing the last stitch of the previous round and we are going to make a single crochet but we will close with the khaki thread, we knit another single crochet and close with the brown thread, to form a small line between the fabric. We repeat this process until we finish the round.
VUELTA 25
Cambiamos al hilo marrón oscuro nuevamente cerrando el último punto de la vuelta anterior y vamos a realizar un punto bajo pero cerraremos con el hilo caqui, tejemos otro punto bajo y cerramos con el hilo marrón, para formar un pequeña línea entre el tejido. Este proceso lo repetimos hasta finalizar la vuelta.
LAPS 26 and 27
With these two rounds we finish the basket and we are going to use only the dark khaki thread, which means that we can now cut the brown thread.
We make a single crochet in each stitch of the previous round for both rounds. We close with a slipped stitch and cut the thread leaving a surplus.
VUELTAS 26 y 27
Con estas dos vueltas finalizamos la cesta y vamos a utilizar sólo el hilo caqui oscuro lo que significa que ya podemos cortar el hilo marrón.
Realizamos un punto bajo en cada punto de la vuelta anterior para ambas vueltas. Cerramos on un punto deslizado y cortamos el hilo dejando un sobrante.
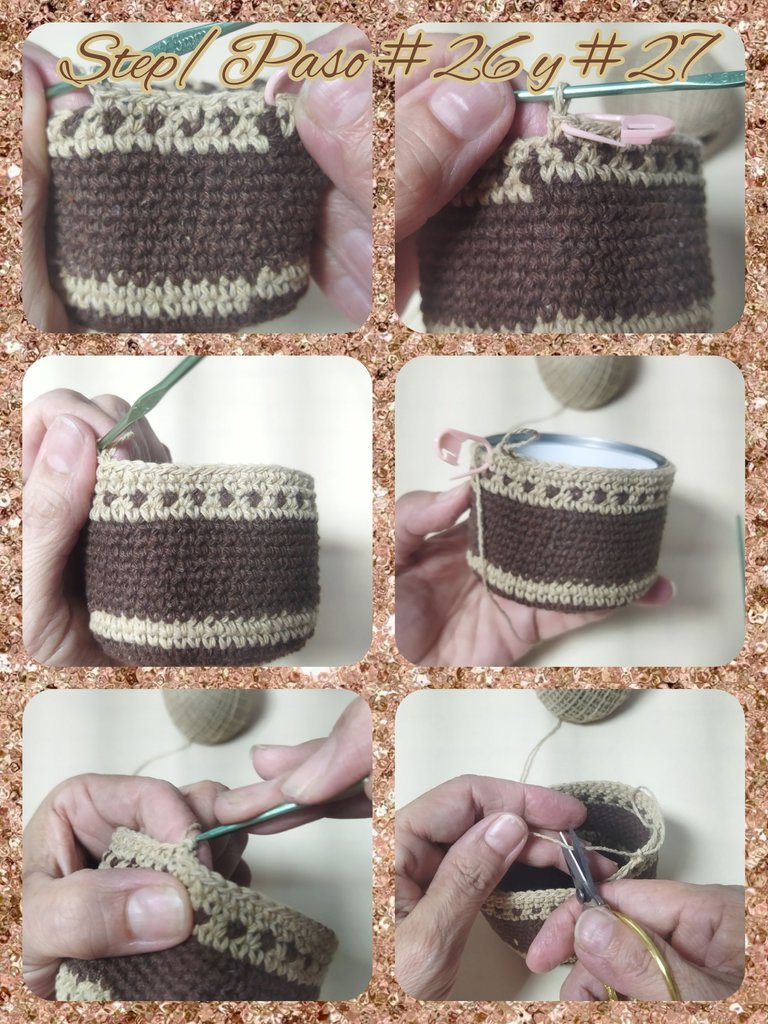
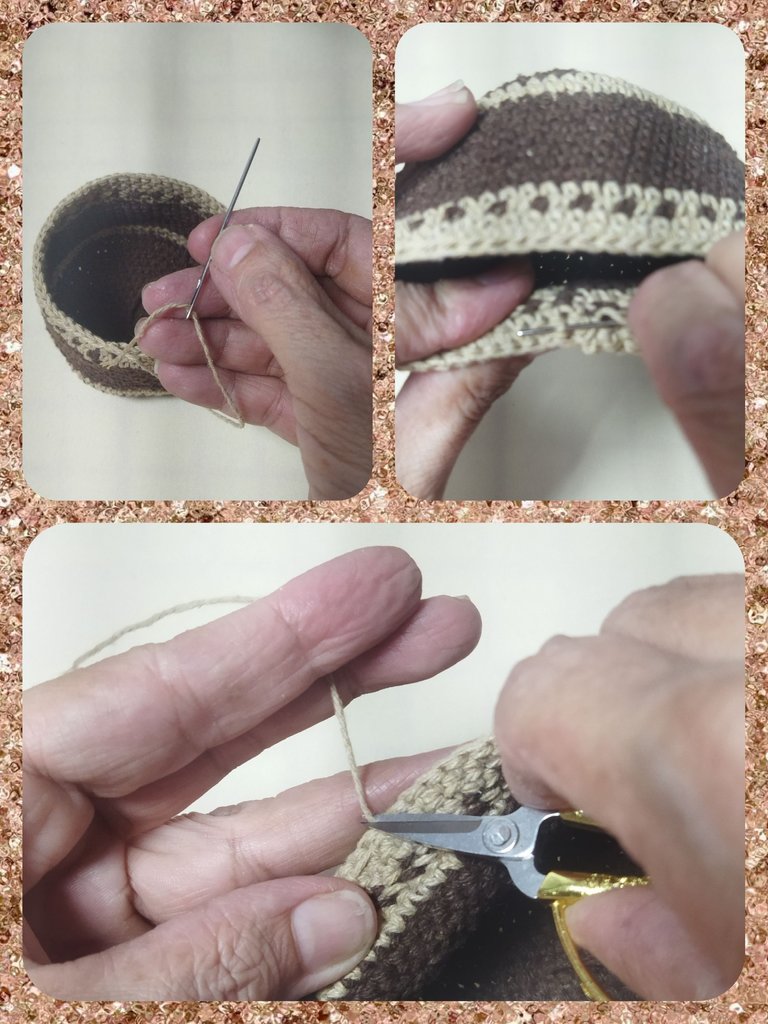
Once the final stitch of the basket is closed, we proceed to hide the excess threads with the wool needle on the inside of the fabric.
Ya cerrado el punto final de la cesta procedemos a esconder los hilos sobrantes con la aguja lanera por la parte interna del tejido.
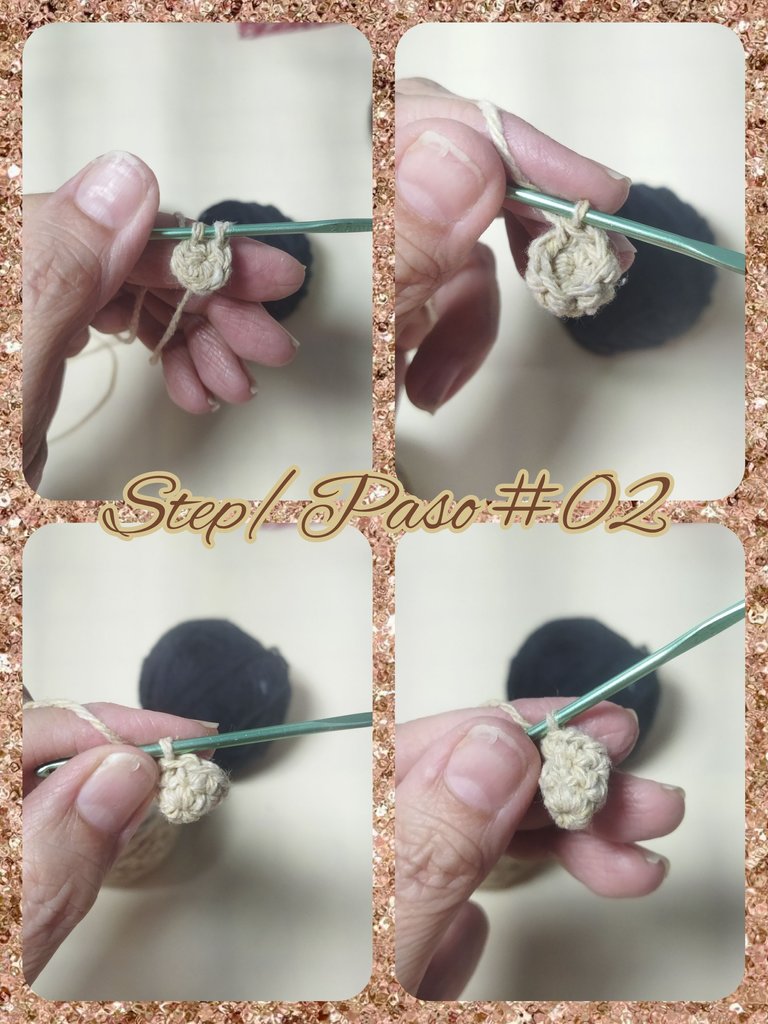
ARMS AND LEGS
To make the arms we are going to use light khaki thread.
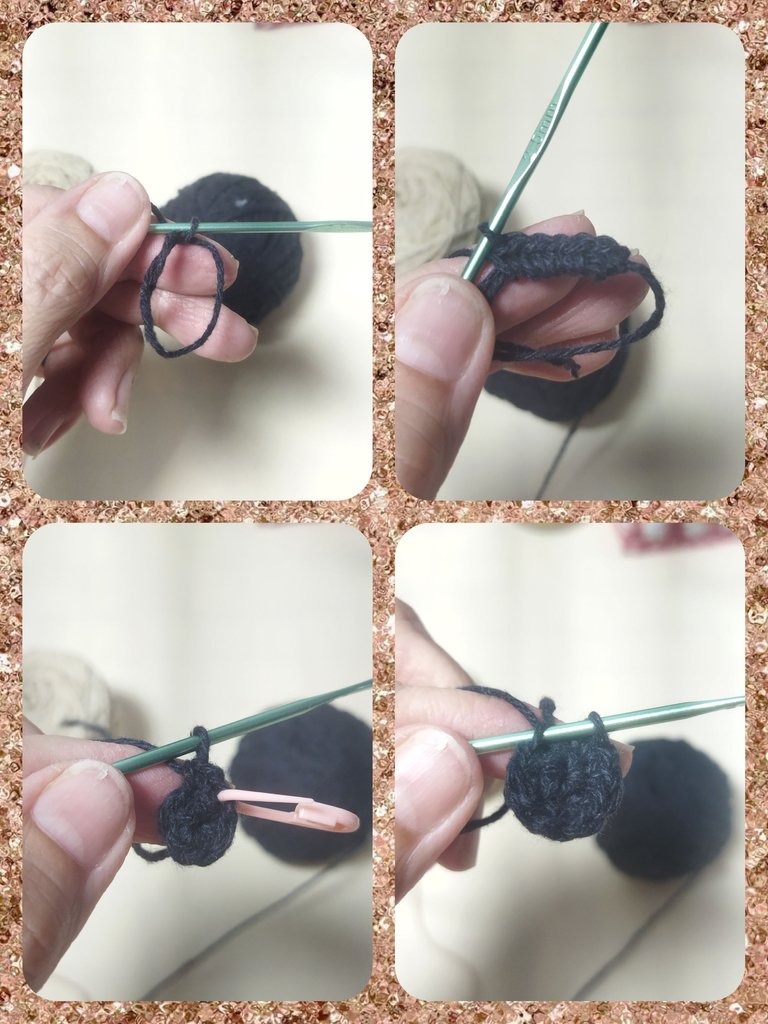
LAP 1
- We begin by making a magic ring and 6 single crochets with the dark brown thread.
- We close the ring.
BRAZOS Y PIERNAS
Para realizar los brazos vamos a utilizar hilo color caqui claro.
VUELTA 1
- Comenzamos realizando un anillo mágico y 6 puntos bajos con el hilo marrón oscuro.
- Cerramos el anillo.

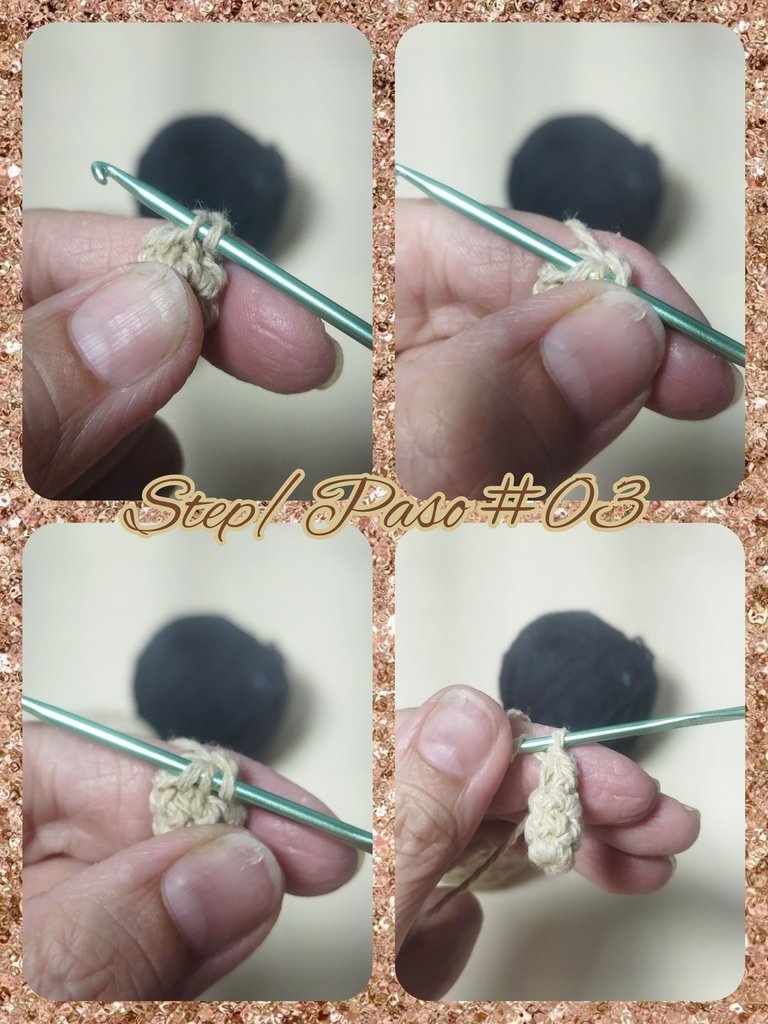
LAP 2
- We knit a single crochet in each point of the previous round.
VUELTA 2
- Tejemos un punto bajo en cada punto de la vuelta anterior.
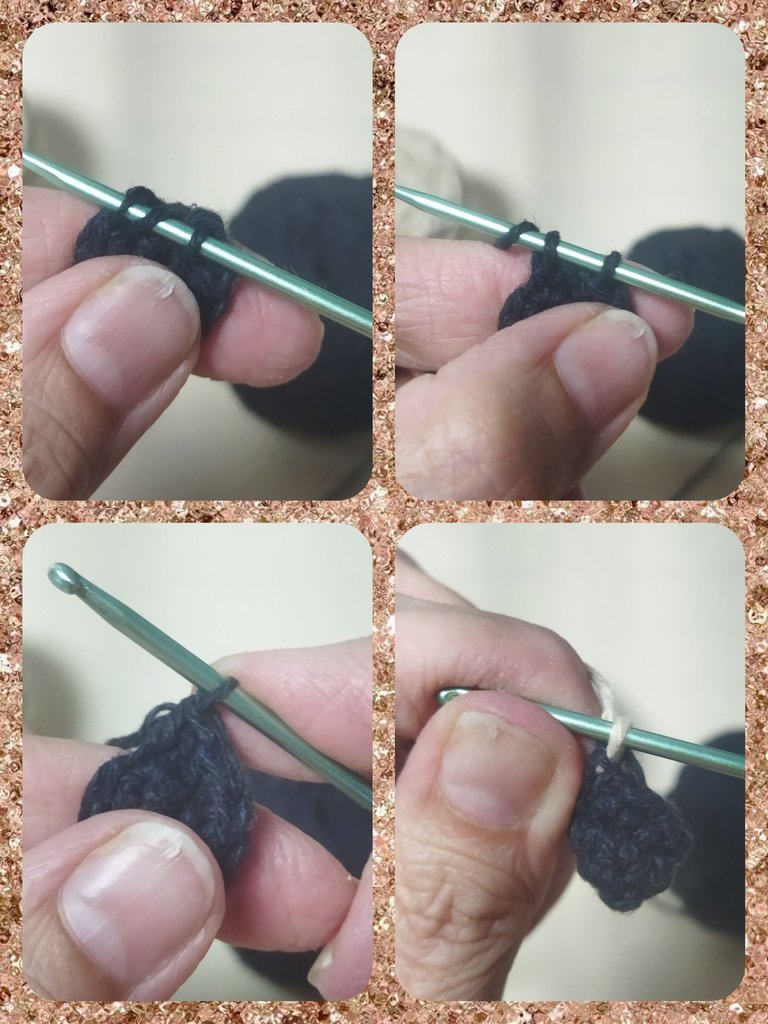
LAP 3
- We make 3 decreases and close the round with a slipped stitch.
VUELTA 3
- Realizamos 3 disminuciones y cerramos la vuelta con un punto deslizado.
LAP 4
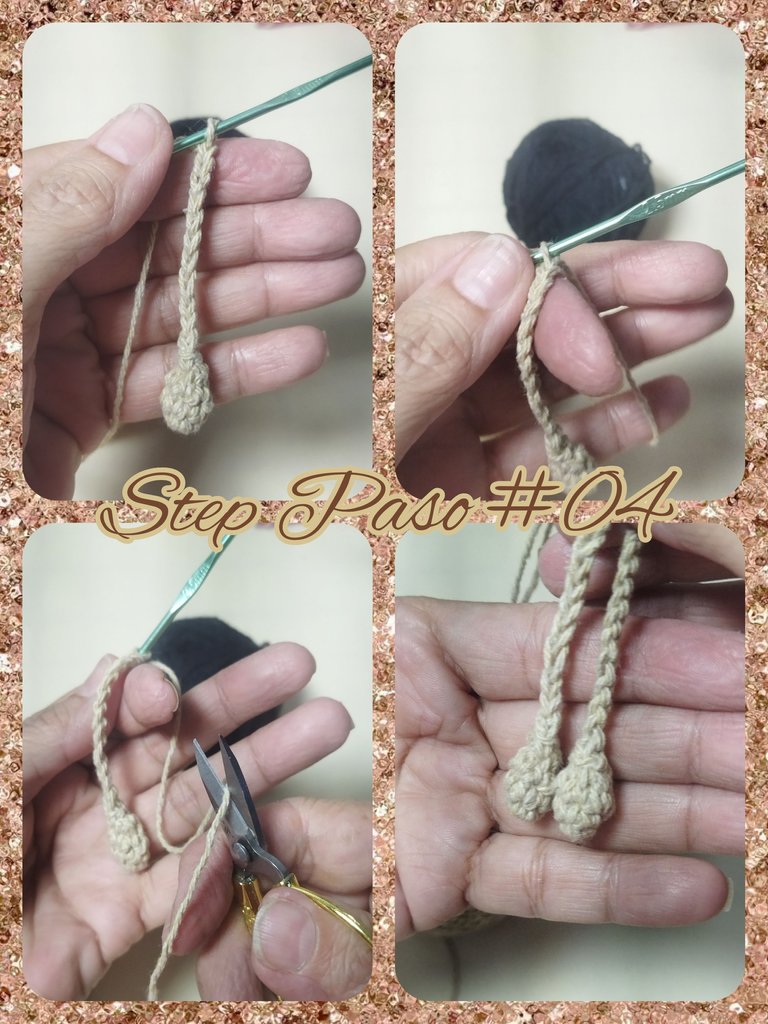
- We make 10 chain stitches, cut the thread and close the stitch. We make another similar piece and we now have the two arms.
VUELTA 4
- Realizamos 10 puntos cadenas, cortamos el hilo y cerramos el punto. Realizamos otra pieza igual y ya tenemos los dos brazos.
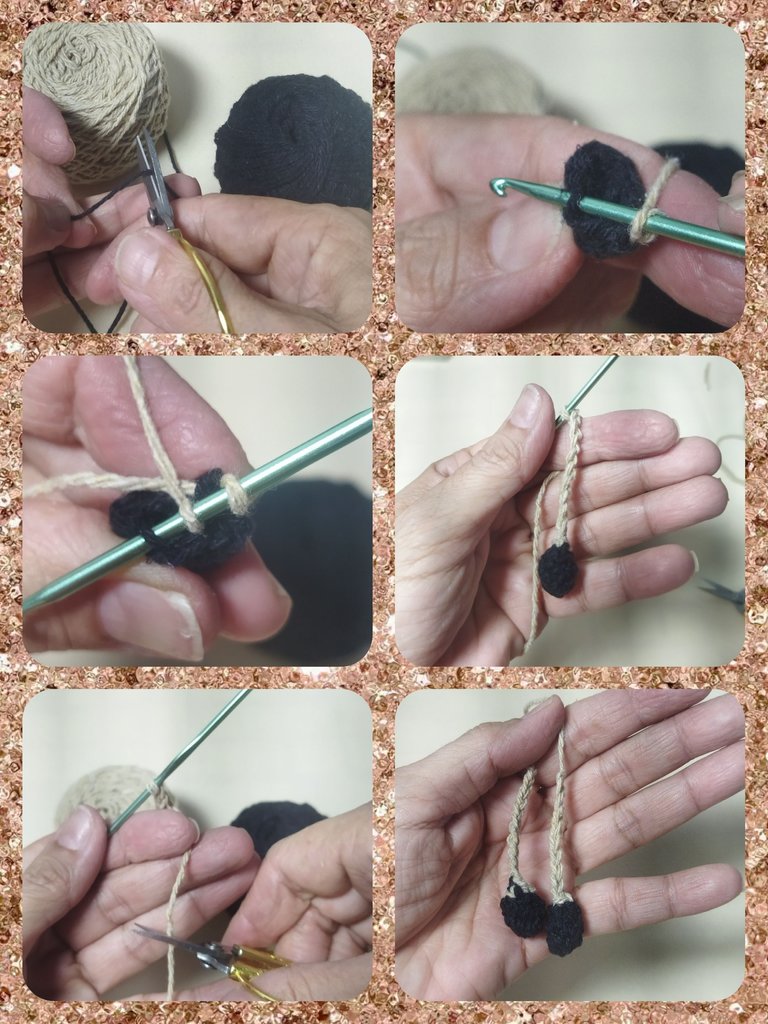
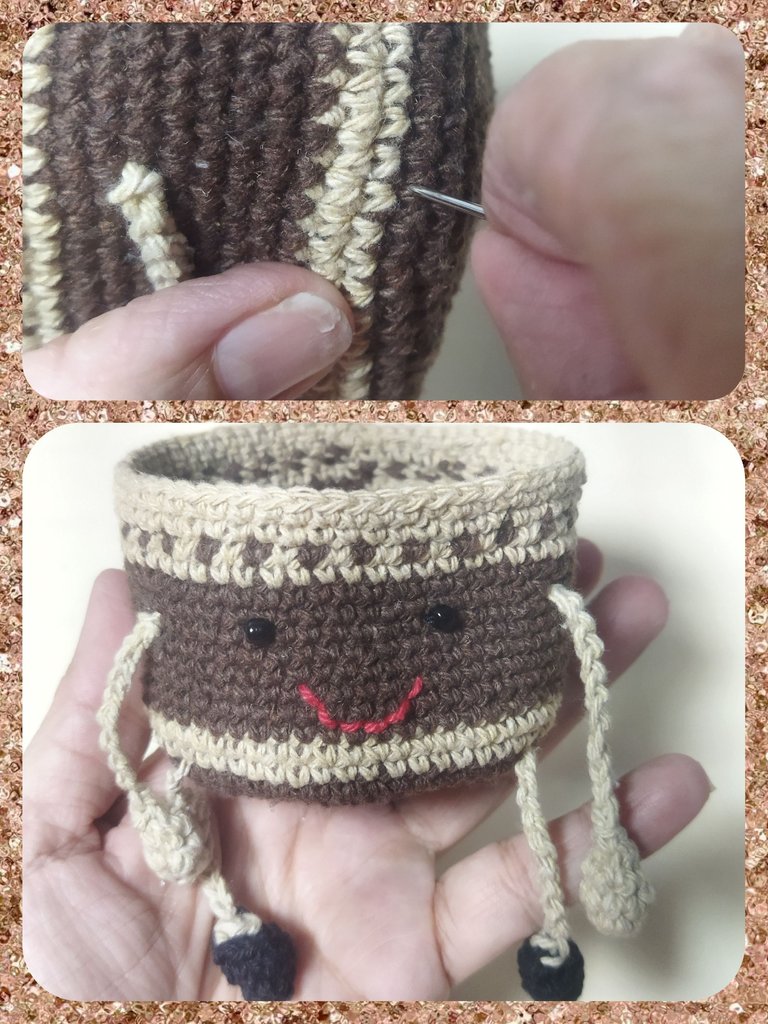
LEGS
To make the pieces we are going to repeat the steps for the arms but we will start with a magic ring and 5 single crochets.
Then we knit two single crochets in each stitch of the previous row for a total of 10 single crochets. We change the thread and close the last stitch with the light khaki thread.
PIERNAS
Para realizar las piezas vamos a repetir los pasos de los brazos pero comenzaremos con un anillo mágico y 5 puntos bajos.
Luego tejemos dos puntos bajos en cada punto de la vuelta anterior para un total de 10 puntos bajos. Hacemos cambio de hilo y cerramos el último punto con el hilo caqui claro.
We close by making 5 decreases and close with a slipped stitch. Then we knit 10 chains, cut the thread and close, leaving a little thread to sew to the basket.
Cerramos realizando 5 disminuciones y cerramos con un punto deslizado. Luego tejemos 10 cadenas, cortamos el hilo y cerramos, dejando un poco de hilo para coserlo a la cesta.
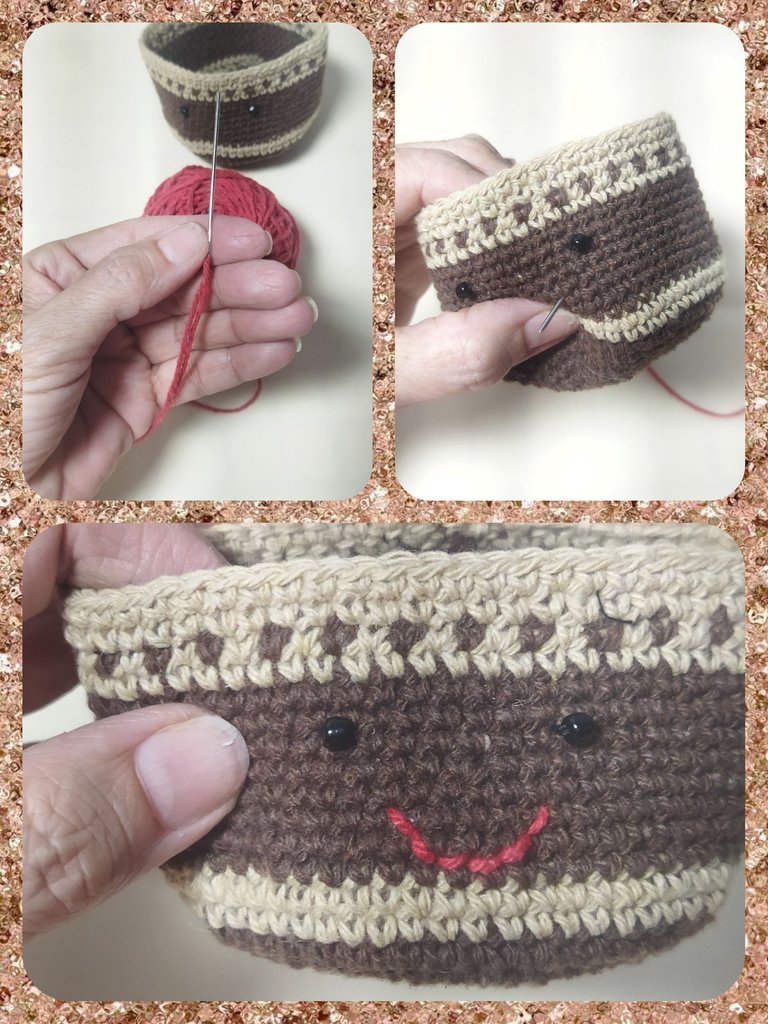
EYES
To make the eyes we are going to use the black sewing thread, the needle and the mustaches.
We calculate the space where we want to put the eyes and sew them, placing them on the same line of the fabric.
OJOS
Para hacer los ojitos vamos a utilizar el hilo de coser negro, la aguja y los mostachones.
Calculamos el espacio donde queremos poner los ojos y los cosemos, ubicándolos en la misma línea del tejido.

MOUTH
For the mouth we are going to use the red cotton thread and the wool needle. We make stitches using the points of the fabric as a separation measure and we make the shape of the mouth.
BOCA
Para la boca vamos a usar el hilo de algodón rojo y la aguja lanera. Realizamos puntadas utilizando los puntos del tejido como medida de separación y hacemos la forma de la boca.
Next we glue the arms that go 7 points of space from the eyes, on each side and we finish the seam on the inside of the basket.
Seguidamente pegamos los brazos que van 7 puntos de espacio a partir de los ojos, a cada lado y hacemos el remate de la costura por la parte interna de la cesta.
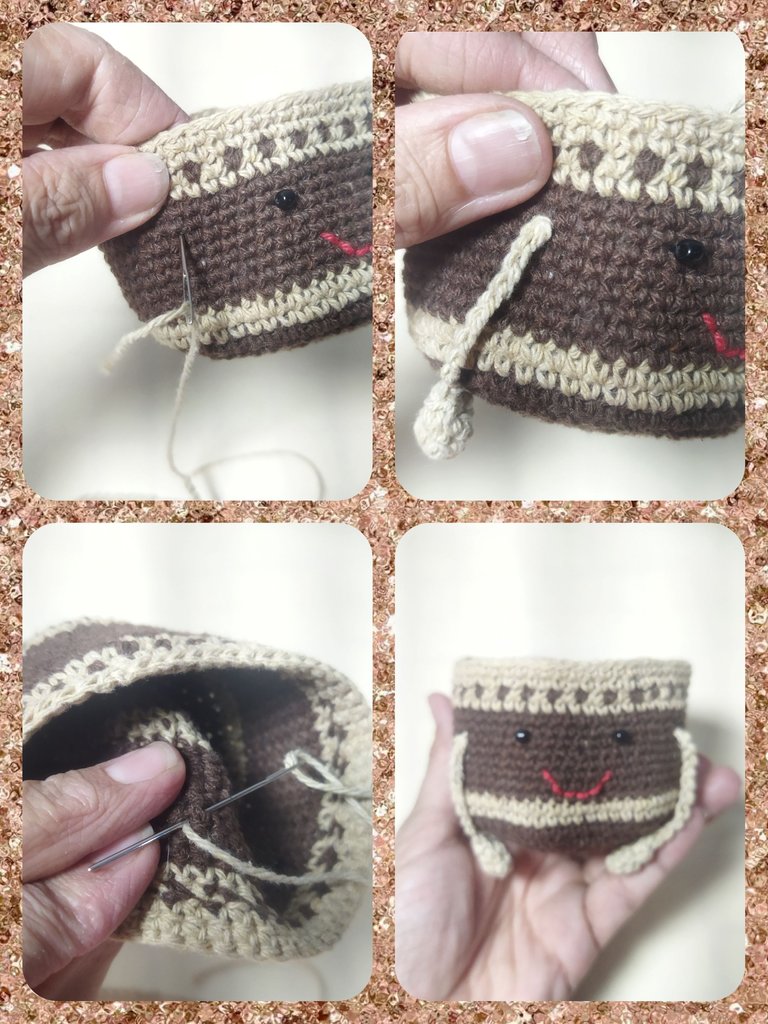
We do the same with the legs, we sew guided by the position of the arms, placing them below the line of the khaki fabric. Thus completing the basket.
De la misma forma hacemos con las piernas, cosemos guiándonos por la posición de los brazos colocándolos por debajo de la línea del tejido caqui. Culminando así la cesta.
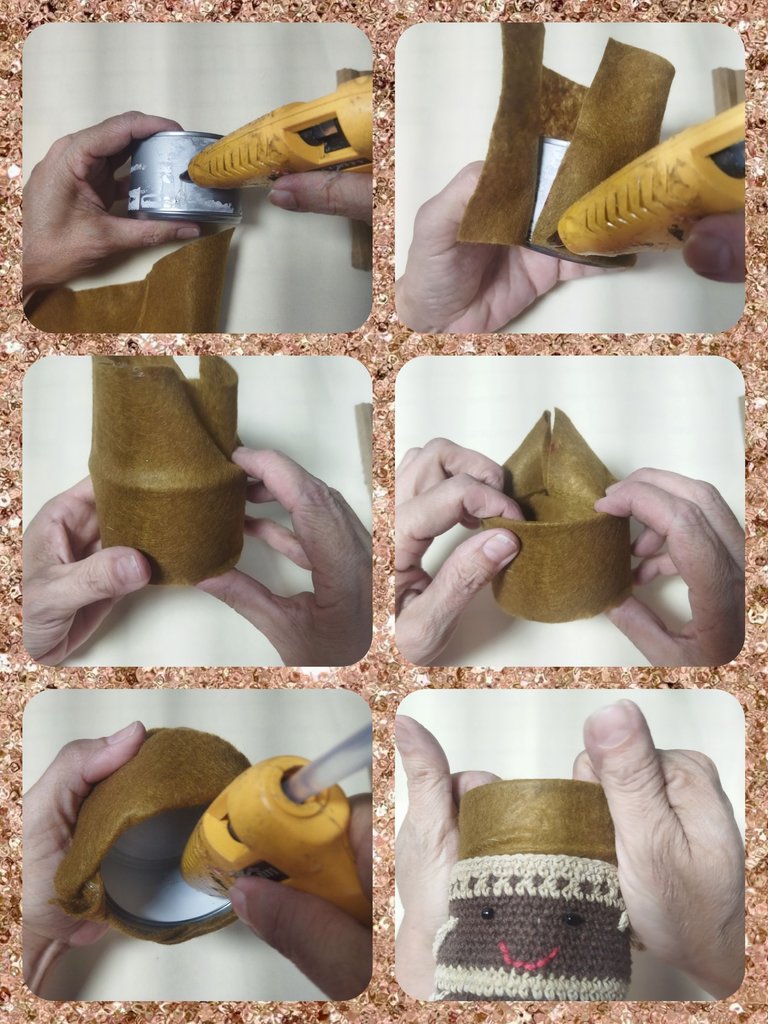
CAN LINER
To line the can we are going to use the brown felt and we will take the measurement of the height and circumference of the can, leaving an additional 3 cm with respect to the height to cover the internal part.
FORRO DE LA LATA
Para forrar la lata vamos a utilizar el fieltro marrón y tomaremos la medida del alto y la circunferencia de la lata, dejan do 3 cms adicional con respecto al alto para cubrir la parte interna.
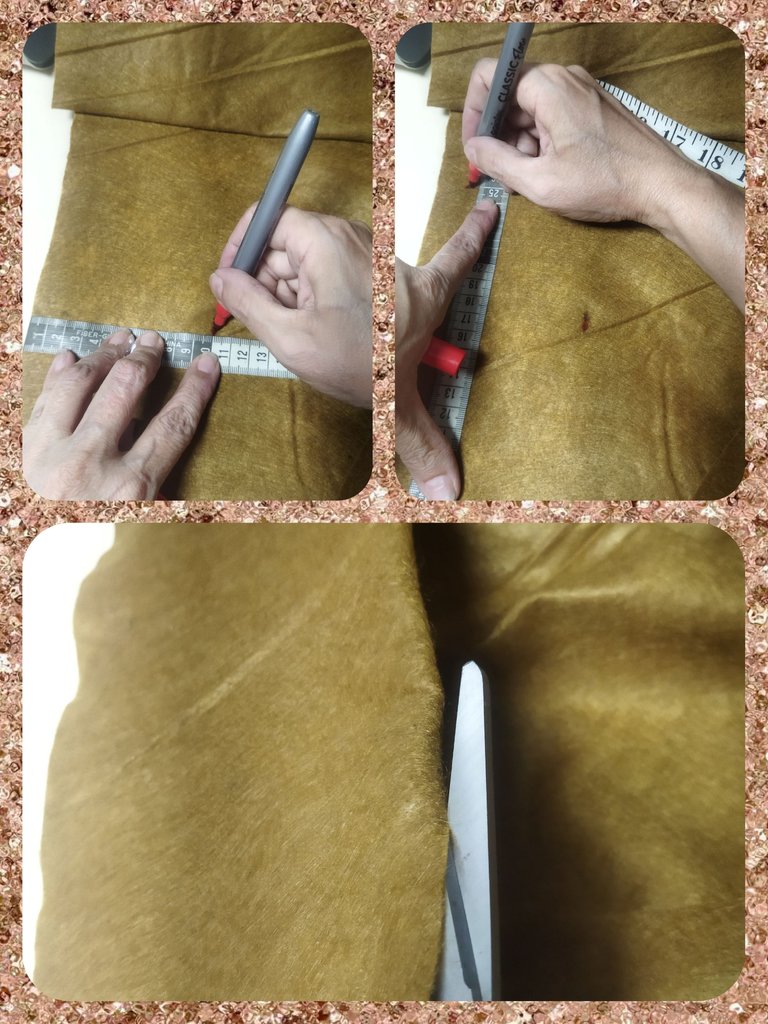
With the silicone gun we glue the felt on the outside and then on the inside. We put it inside the woven basket and that's it.
Con la pistola de silicón pegamos el fieltro por fuera y luego por la parte interna. Introducimos dentro de la cesta tejida y listo.
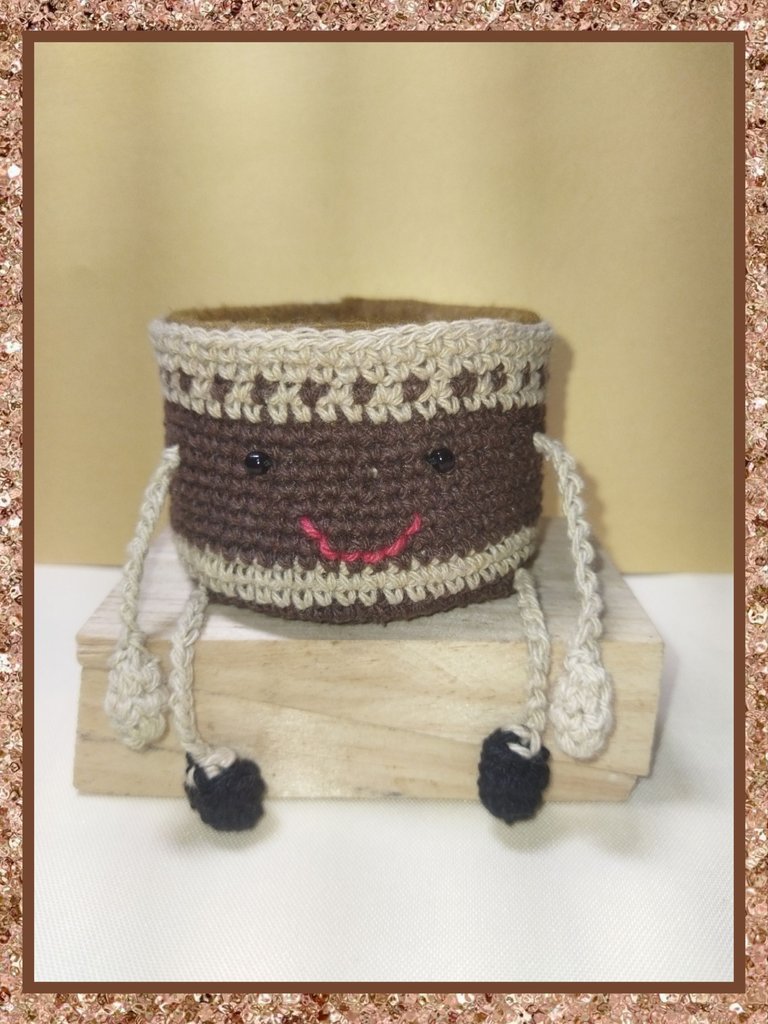
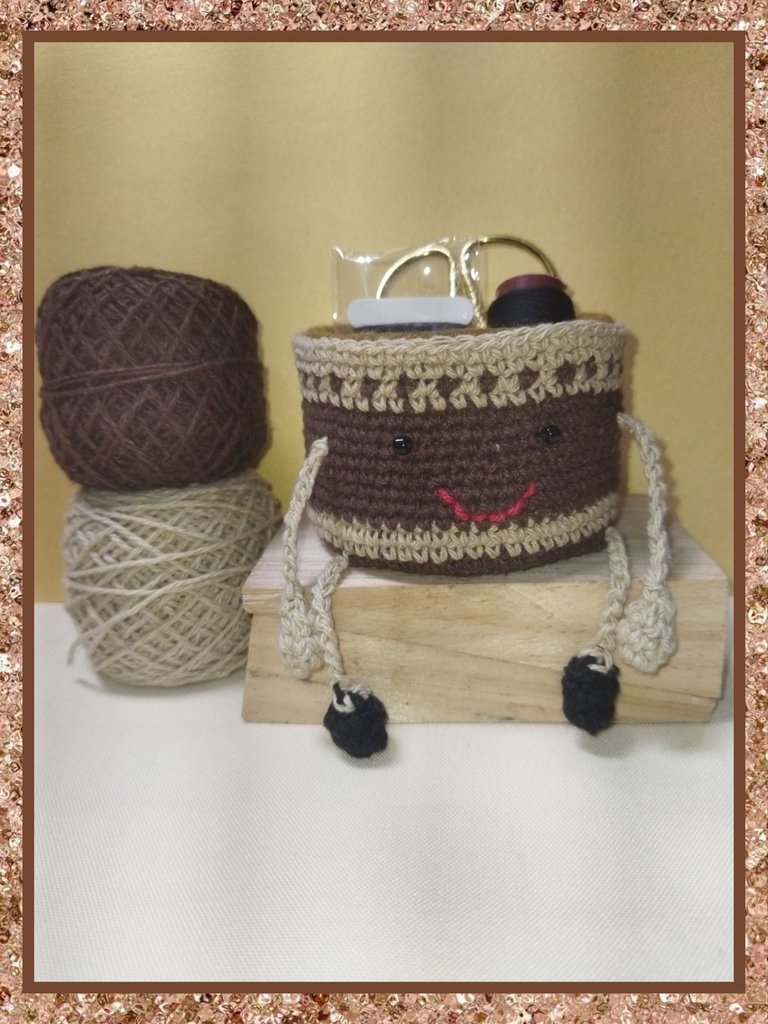
And so we have a nice mini organizer so we don't misplace small objects that are difficult to obtain and we want to have on hand. We can also use it as a jewelry box, flower pot and any other use you can think of. I hope you like it. See you next time.
Y así tenemos un lindo mini organizador para no traspapelar los objetos pequeños se nos hacen difícil de conseguir y queremos tener a mano. También podemos usar como joyero, macetero y cualquier otro uso que se te ocurra. Espero te guste Nos vemos en la próxima.

Muy bello 😍 desde que lo ví me encantó. Los colores que elegiste se ven muy bien combinados. Y el paso a paso 👍🏾 como siempre, muy comprensible. Éxitos en tu publicación 😉
Muchas gracias hermana, por siempre apoyar mi contenido 🫂🫂
this is really beautiful. One can truly crochet anything. Amazing.
Hellooooo. Yes, we can really adapt the fabric to whatever we want as long as it is not exposed to fire or corrosive or flammable solutions. Thanks for comment.
Wow, que bello, me encanta, lástima que no se tejer, debería dedicar un tiempo para aprender porque aquí veo unas manualidades preciosas tejidas que me quedo con las ganas. 😞
Querer es poder y es fácil, una vez que aprendes los puntos básicos y un poco de práctica puedes seguir con facilidad los patrones y hasta crear los tuyos propios. Estas a tiempo, puedes empezar con los hilos más económicos y las agujas no son costosas.
Mir que hermoso, especial para mis hilos, gran idea amiga... gracias por compartir.
Gracias a ti por comentar, puedes variar los colores a tu gusto y adaptarlo a cualquier envase que quieras reciclar. Ya tu tienes la experiencia, lo demás es pan comido, jejeje.
¡¡¡Buen trabajo!!! Gracias por publicar tu excelente contenido en Hive Diy, qué tierno te quedo tu mini organizador, no había visto unos tejidos y de verdad que se ven muy tiernos.
Tu comunidad artesana ahora es testigo

Que lindo es el arte del crochet tejido