Hola amigos de #hivediy. Ausente por unos días por motivos de estudios, trabajos y muchas otras ocupaciones, pero ya estoy de regreso a esta plataforma para seguir haciendo cosas hermosas que mostrarles. En esta ocasión les traigo un objeto de mucha utilidad y esta semana de estudios me sirvió de gran ayuda.
Mi hermana es una gran lectora y por lo general en sus libros podemos ver desde una lima hasta pedacitos de tela como señaladores. Siempre me preguntaba porqué, si leía y guardaba sus libros. Uds dirán qué sentido tiene un marcapáginas o marcalibros cuando tenemos libros electrónicos, pero si se fijan estos tienen una forma de apuntar y señalar la página que queremos señalar. Como les venía diciendo tuve que revisar varios textos físicos y allí entendí que ellos me ayudaban a tener la información que necesitaba a mano sin tener que buscar y buscar.
Para los que no sabíamos, ya que me incluyo, un marcapáginas es conocido como un señalador, punto de libro o separador de libro, y muchos nombres más. Por lo general, este es un objeto fino hecho de de papel o cartulina. Su fin es marcar el punto exacto en el que queda detenida la lectura o señalar alguna información de un libro para de esta manera regresar a él con facilidad.
Los marcapáginas pueden elaborarse de una infinidad de materiales como el cuero, metales, seda, madera, telas o fieltros. Si hacemos un paseo por la historia de los marcapáginas podemos encontrar pocos datos, sin embargo un existe un testimonio que en el año de 1924 se encontró entre las ruinas del monasterio egipcio de Apa Jeremias, cerca de Saqqara un marcapáginas de cuero, adornado con pergamino, que se remonta al siglo VI d. C. y aún está pegado a la cubierta de un códice copto.
También existe una prueba de un antiguo marcapáginas indio que data del siglo XVI y es de marfil con motivos geométricos. Se dice que se utilizó probablemente en los Coranes miniados y pertenece al Museo Real de Brunéi.
Asimismo existen otros marcapáginas que han aparecido en diferentes excavaciones, muchos de ellos presentan formas artísticas sorprendentes, más reciente nosotros hemos ido cambiando y elaborando marcapáginas de acuerdo a nuestros gustos y figuras. Aunque ya había hechos marcalibros en este comprendí la verdadera esencia de ellos, el porqué mi hermana tiene en sus libros muchos retazos y pedacitos de papel, limas de uñas y hasta etiquetas de ropa.
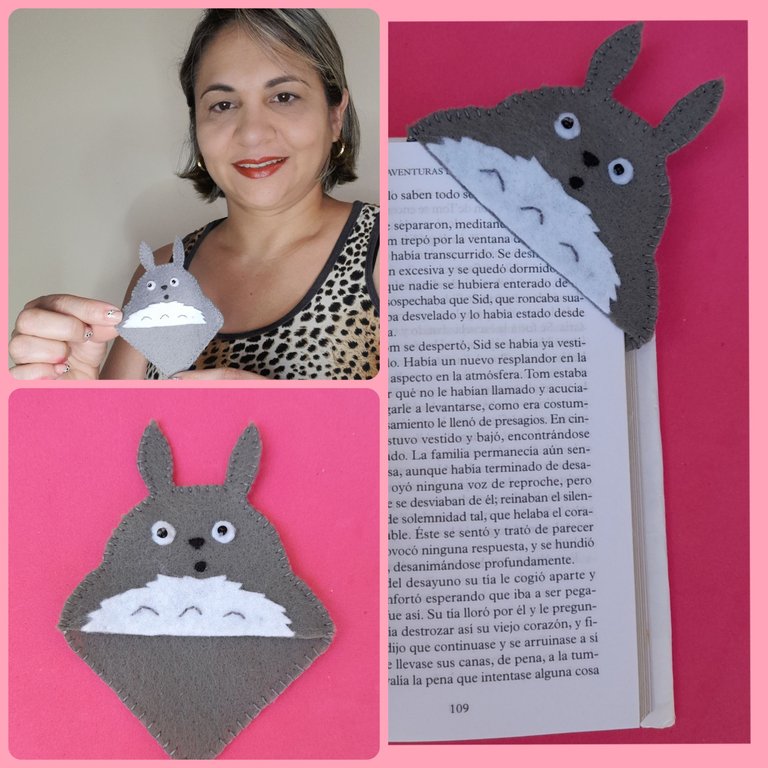
En vista de lo anterior hoy les traigo un proyecto muy sencillo, fácil y rápido de hacer: un marcapáginas con la figura de Totoro, un simpático personaje de uno de los anime más vistos y que se ha vuelto un culto para los fanáticos de este género. Sin más les dejo las instrucciones para elaborar un marcapáginas con la figura de totoro.
Hello friends of #hivediy. Absent for a few days for reasons of studies, jobs and many other occupations, but I'm back on this platform to continue making beautiful things to show you. On this occasion I bring you a very useful object and this week of studies was of great help to me.
My sister is a great reader and usually in her books we can see from a file to bits of cloth as bookmarks. She always asked me why, if she read and kept her books. You will say what is the point of a bookmark or bookmark when we have electronic books, but if you look at these they have a way of pointing and pointing to the page we want to point to. As I was telling you, I had to review several physical texts and there I understood that they helped me to have the information I needed at hand without having to search and search.
For those of us who didn't know, myself included, a bookmark is known as a bookmark, bookmark or bookmark, and many more names. Usually this is a thin object made of paper or cardstock. Its purpose is to mark the exact point where the reading is stopped or to point out some information in a book in order to return to it easily.
Bookmarks can be made from an infinite number of materials such as leather, metals, silk, wood, fabrics or felt. If we take a walk through the history of bookmarks we can find few data, however there is a testimony that in the year 1924 a leather bookmark, adorned with parchment, was found among the ruins of the Egyptian monastery of Apa Jeremias, near Saqqara. , dating back to the 6th century AD. C. and is still glued to the cover of a Coptic codex.
There is also evidence of an ancient Indian bookmark dating from the 16th century and made of ivory with geometric motifs. It is said that it was probably used in illuminated Korans and belongs to the Royal Brunei Museum.
There are also other bookmarks that have appeared in different excavations, many of them present surprising artistic forms, more recently we have been changing and making bookmarks according to our tastes and figures. Although I had already made bookmarks in this one, I understood the true essence of them, why my sister has many scraps and pieces of paper, nail files and even clothing labels in her books.
In view of the above, today I bring you a very simple project, easy and quick to make: a bookmark with the figure of Totoro, a cute character from one of the most watched anime and who has become a cult for fans of this genre. . Without further ado, she left you with the instructions to make a bookmark with the figure of totoro.
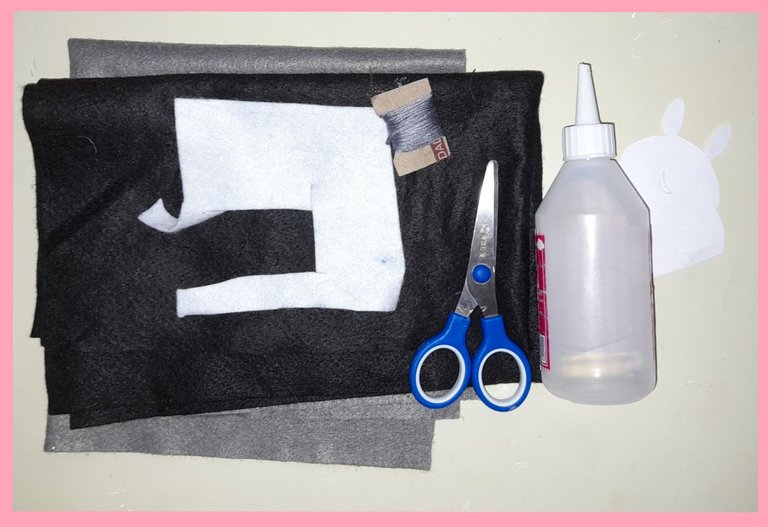
Materiales:
- Fieltro negro, blanco y gris.
- Hilo gris y negro.
- Alfileres.
- Tijeras.
- Silicón.
- Mostacilla.
- Patrones.
Materials:
- Black, white and gray felt.
- Gray and black thread.
- Pins.
- Pair of scissors.
- Silicon.
- Mostacilla.
- Patterns.
Paso a paso:
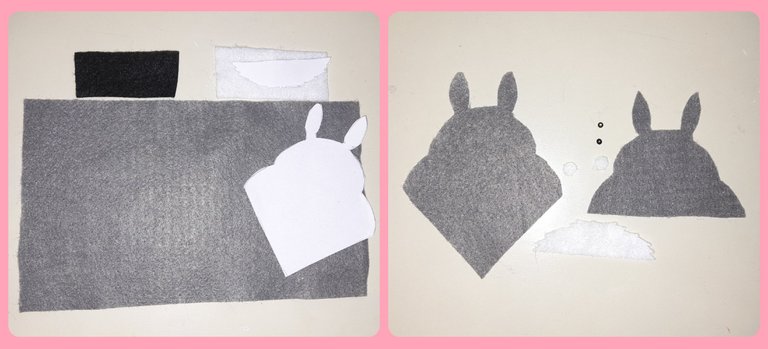
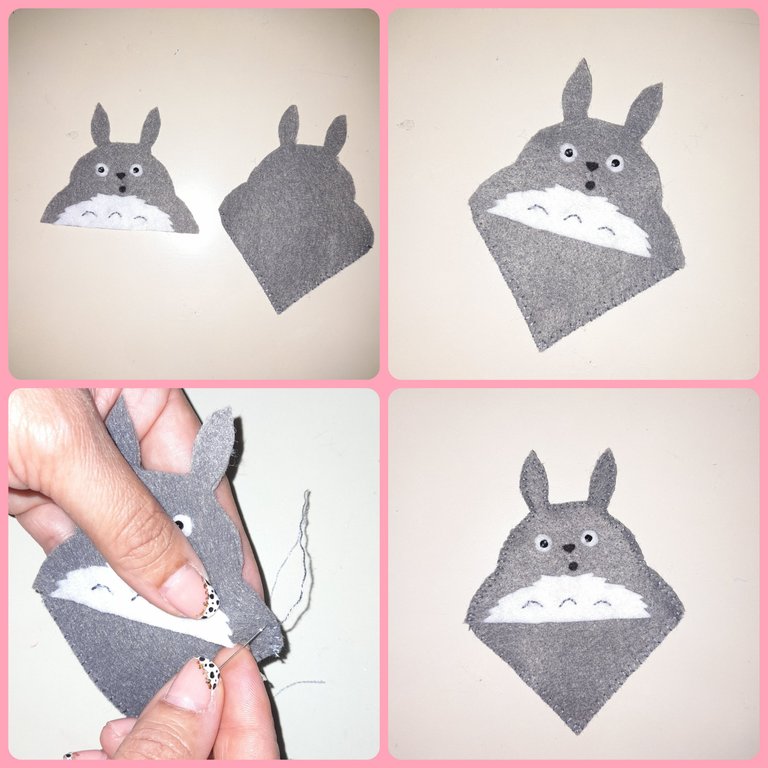
Recortamos los patrones en los fieltros ubicandolos en el color que corresponde.
Cortamos una pieza de la parte trasera, delantera,la nariz y el pecho, para los ojos recortamos dos círculos blanco.
Step by Step:
We cut out the patterns on the felts, placing them in the corresponding color. We cut a piece from the back, front, nose and chest, from the eyes we cut out two white circles.
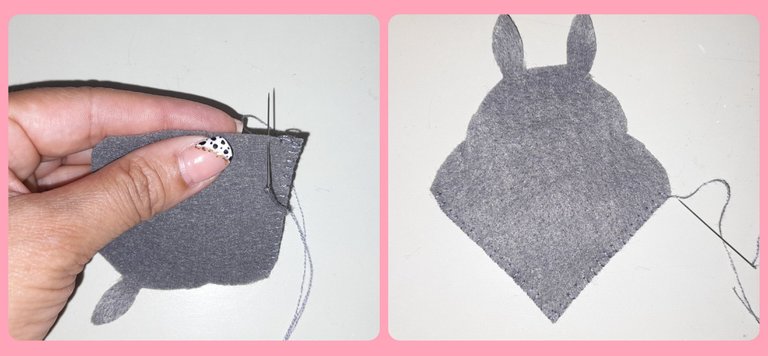
En la parte inferior del marcalibros pasamos una costura punto de ojal por toda
la orilla.
At the bottom of the bookmark we pass a buttonhole stitch seam all over the shore.
Para elaborar las facciones de Totoro, empezamos a elaborar los ojos, en los círculos blancos con unas puntadas cosemos las mostacillas una en cada círculo. Luego en el pecho con el hilo de bordar gris bordamos tres semicírculos.
To make Totoro's features, we begin to make the eyes, in the white circles with some stitches we sew the beads one in each circle. Then on the chest with the gray embroidery thread we embroider three semicircles.
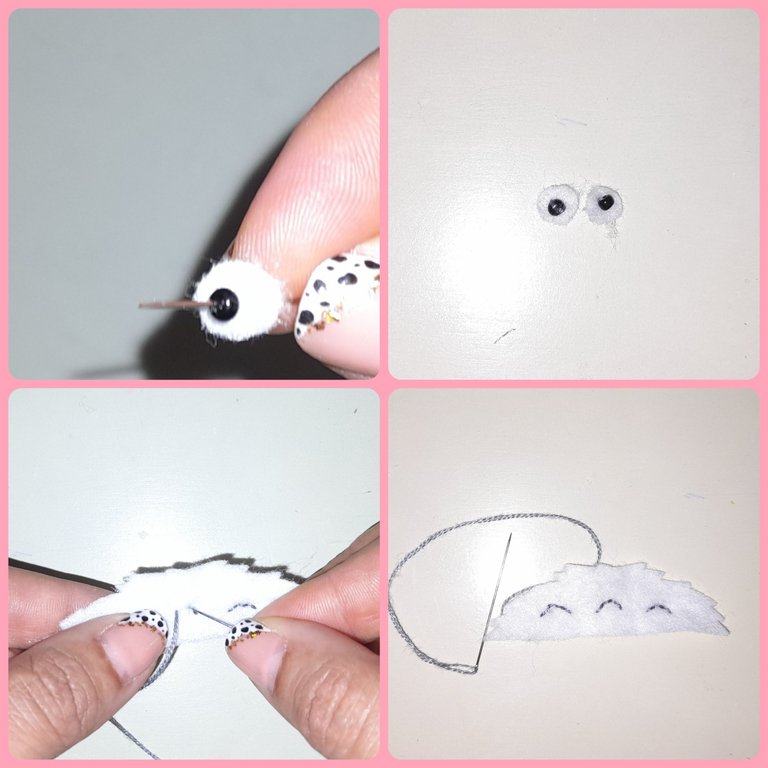
Luego con el silicón pegamos los ojos, la nariz, la boca y el pecho. Para armar el marcalibros colocamos la parte delantera sobre la trasera y pasamos una costura punto de ojal por toda la orilla.
De esta manera facil, rápida y sencilla tenemos listo este hermoso marcalibros.
Then with the silicone we glue the eyes, the nose, the mouth and the chest. To assemble the bookmark we place the front part on the back and pass a buttonhole stitch seam along the entire edge.
In this easy, fast and simple way we have this beautiful bookmark ready.
-Las fotos son de mi propiedad, tomadas un Samsung A21S,cámara de 48MP.
-Para la traduccion Google Traductor.
-The photos are my property, taken with a Samsung A21S, 48MP camera.
-For Google Translate translation.
[Imagen de referencia] (https://pin.it/6C3Td6S)


Saludos amiga, muy lindo el marcalibros, con material de provecho que de seguro tenemos muchos en casa, gracias por compartir tu paso a paso!
Hermoso 😍 marcalibros amiga, me encantó cómo te quedó gracias por compartir tu tutorial.
Besos!!
Thank you for sharing this amazing post on HIVE!
Your content got selected by our fellow curator @rezoanulvibes & you just received a little thank you via an upvote from our non-profit curation initiative!
You will be featured in one of our recurring curation compilations and on our pinterest boards! Both are aiming to offer you a stage to widen your audience within and outside of the DIY scene of hive.
Join the official DIYHub community on HIVE and show us more of your amazing work and feel free to connect with us and other DIYers via our discord server: https://discord.gg/mY5uCfQ !
If you want to support our goal to motivate other DIY/art/music/homesteading/... creators just delegate to us and earn 100% of your curation rewards!
Stay creative & hive on!