
Felíz noche comunidad Hive Diy, saludos a todos los miembros creativos amantes de las manualidades, espero se encuentren bien en este inicio de semana cargado de trabajo, hoy me encuentro en casa descansando y con un poco de gripe pero poco a poco vamos mejorando, sin embargo esto no impide que esté compartiendo con ustedes una nueva elaboración de manualidades decorativas.
Happy night Hive Diy community, greetings to all the creative members who love crafts, I hope you are well in this start of the week full of work, today I am at home resting and with a little flu but little by little we are improving, without However, this does not prevent me from sharing with you a new development of decorative crafts.
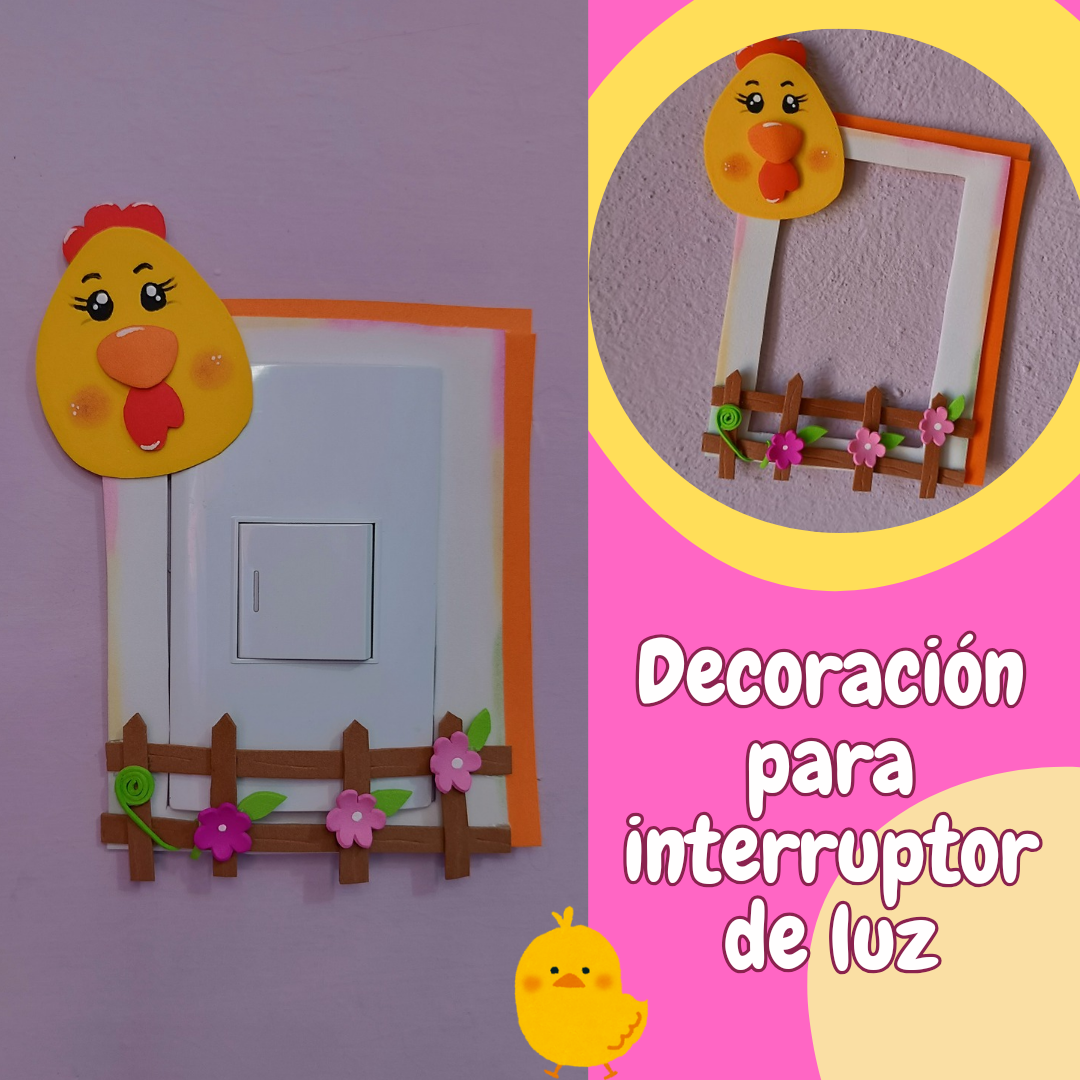
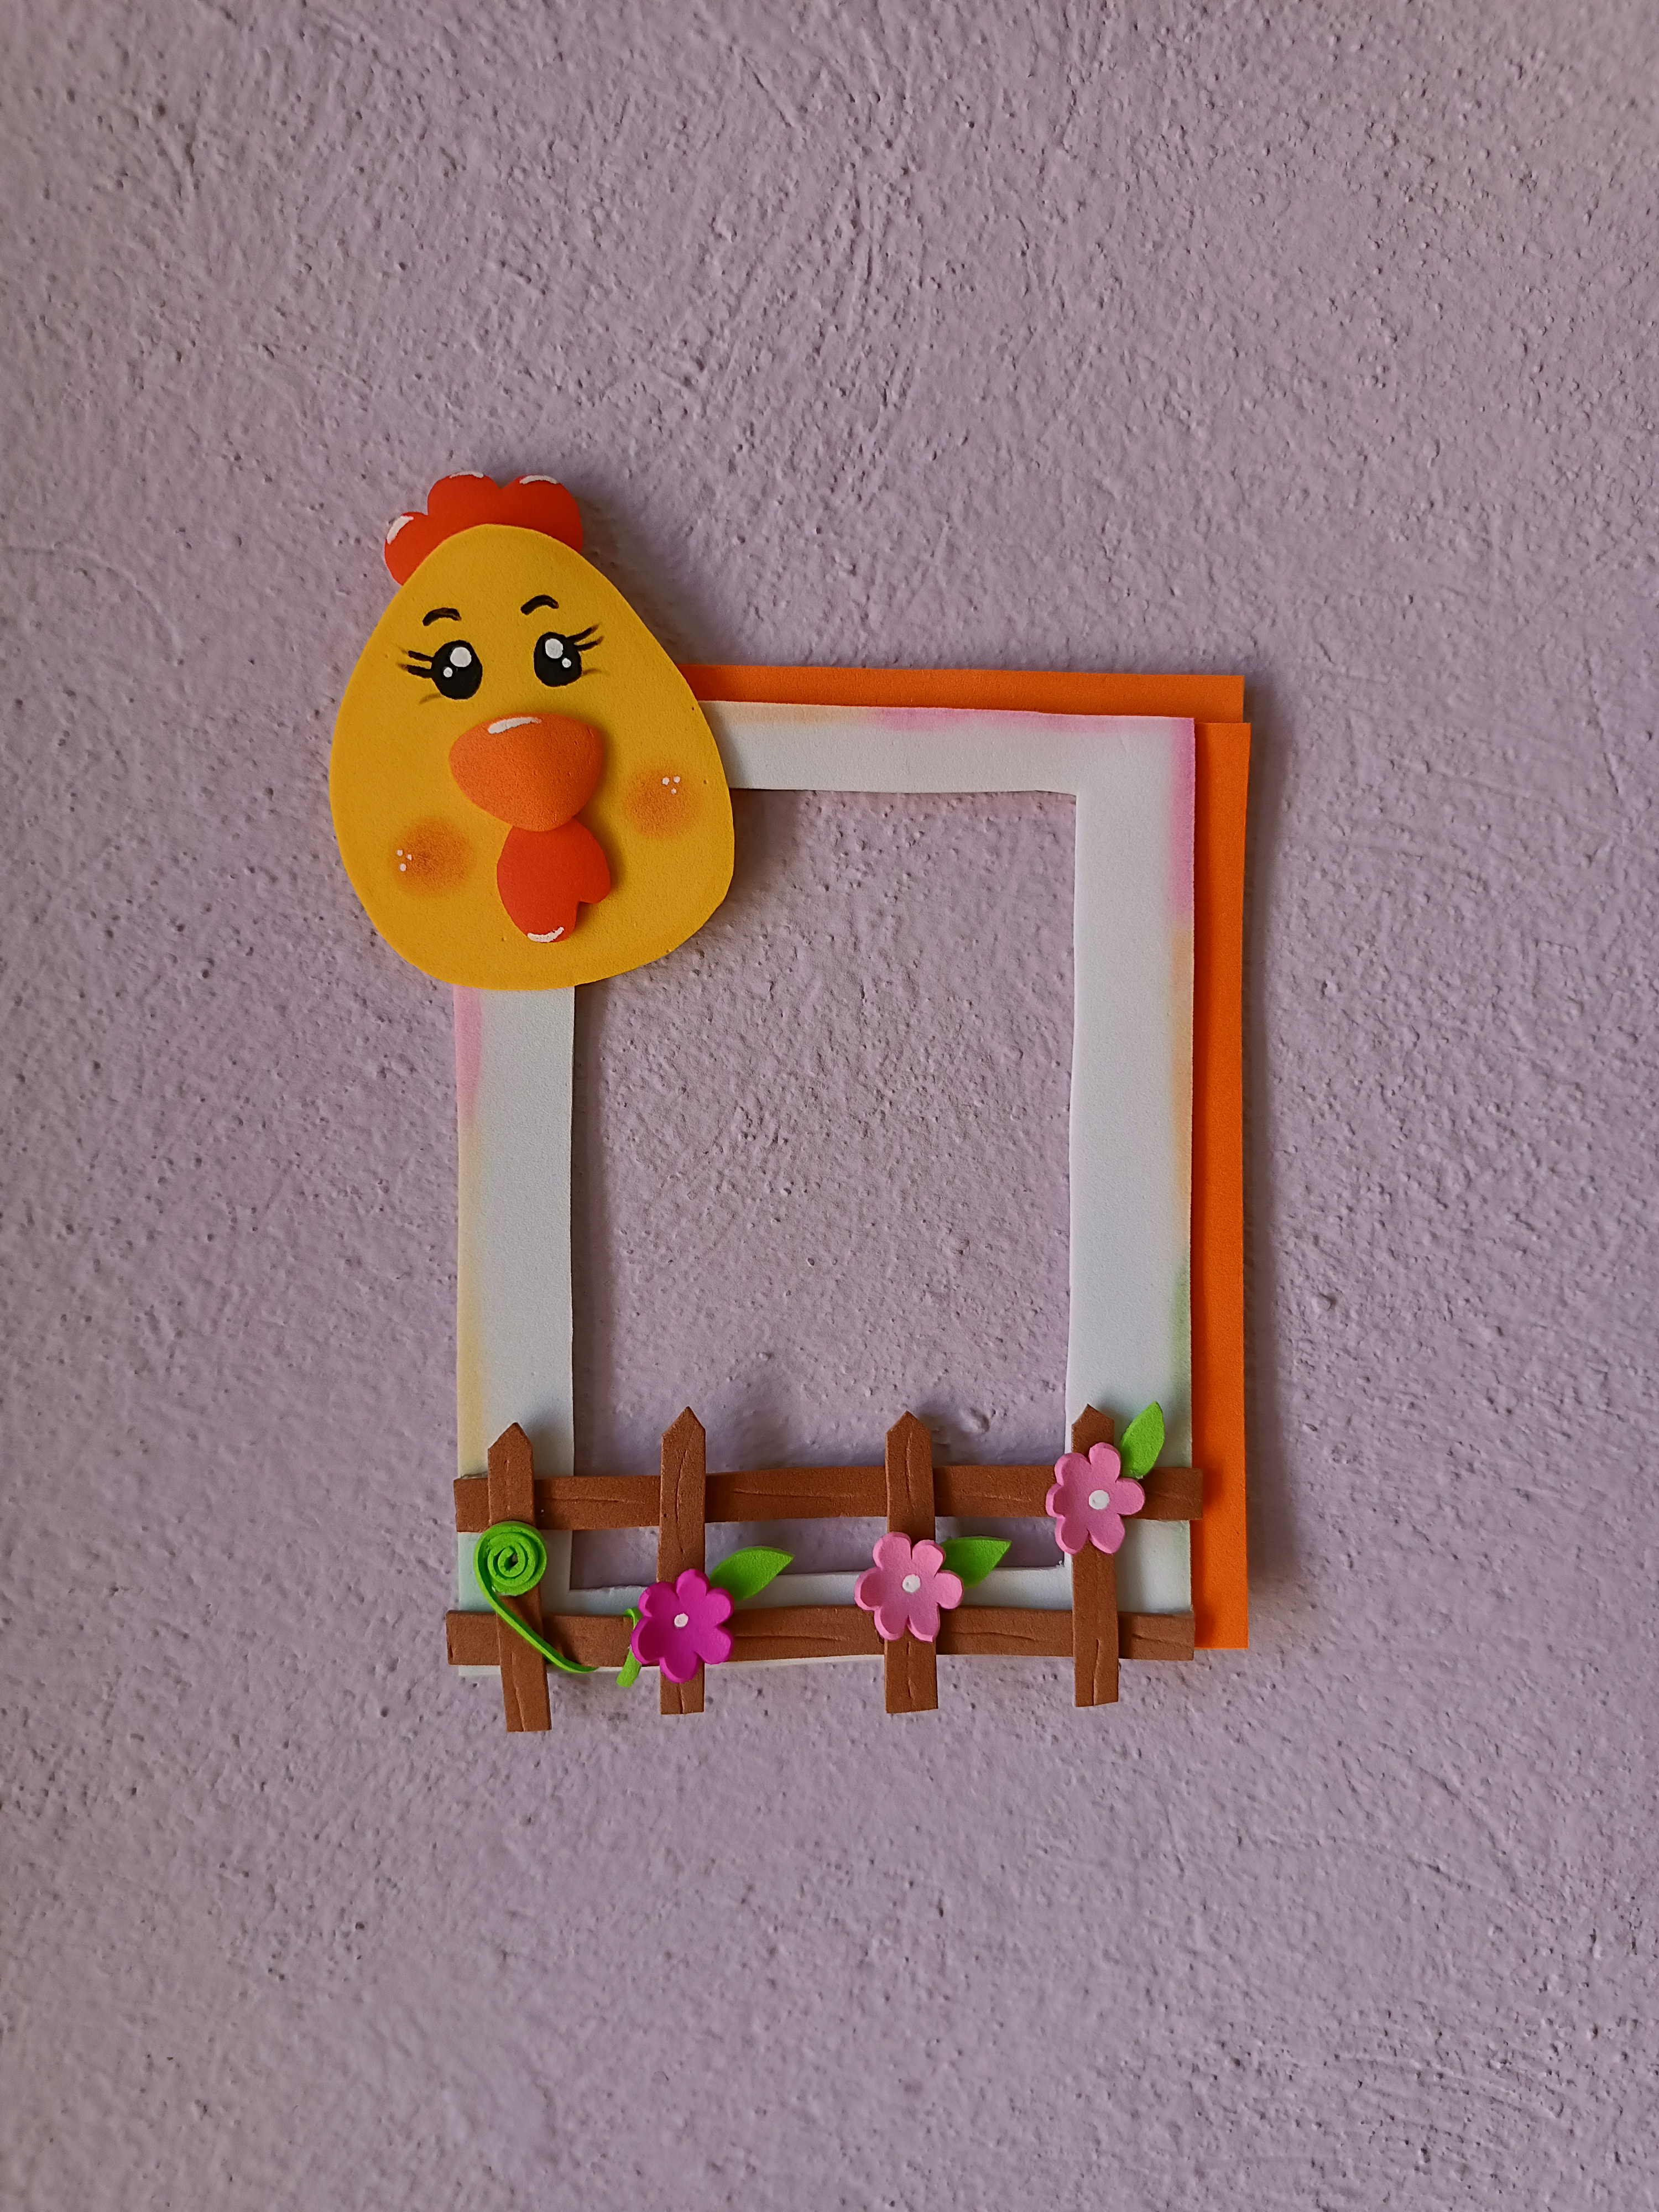
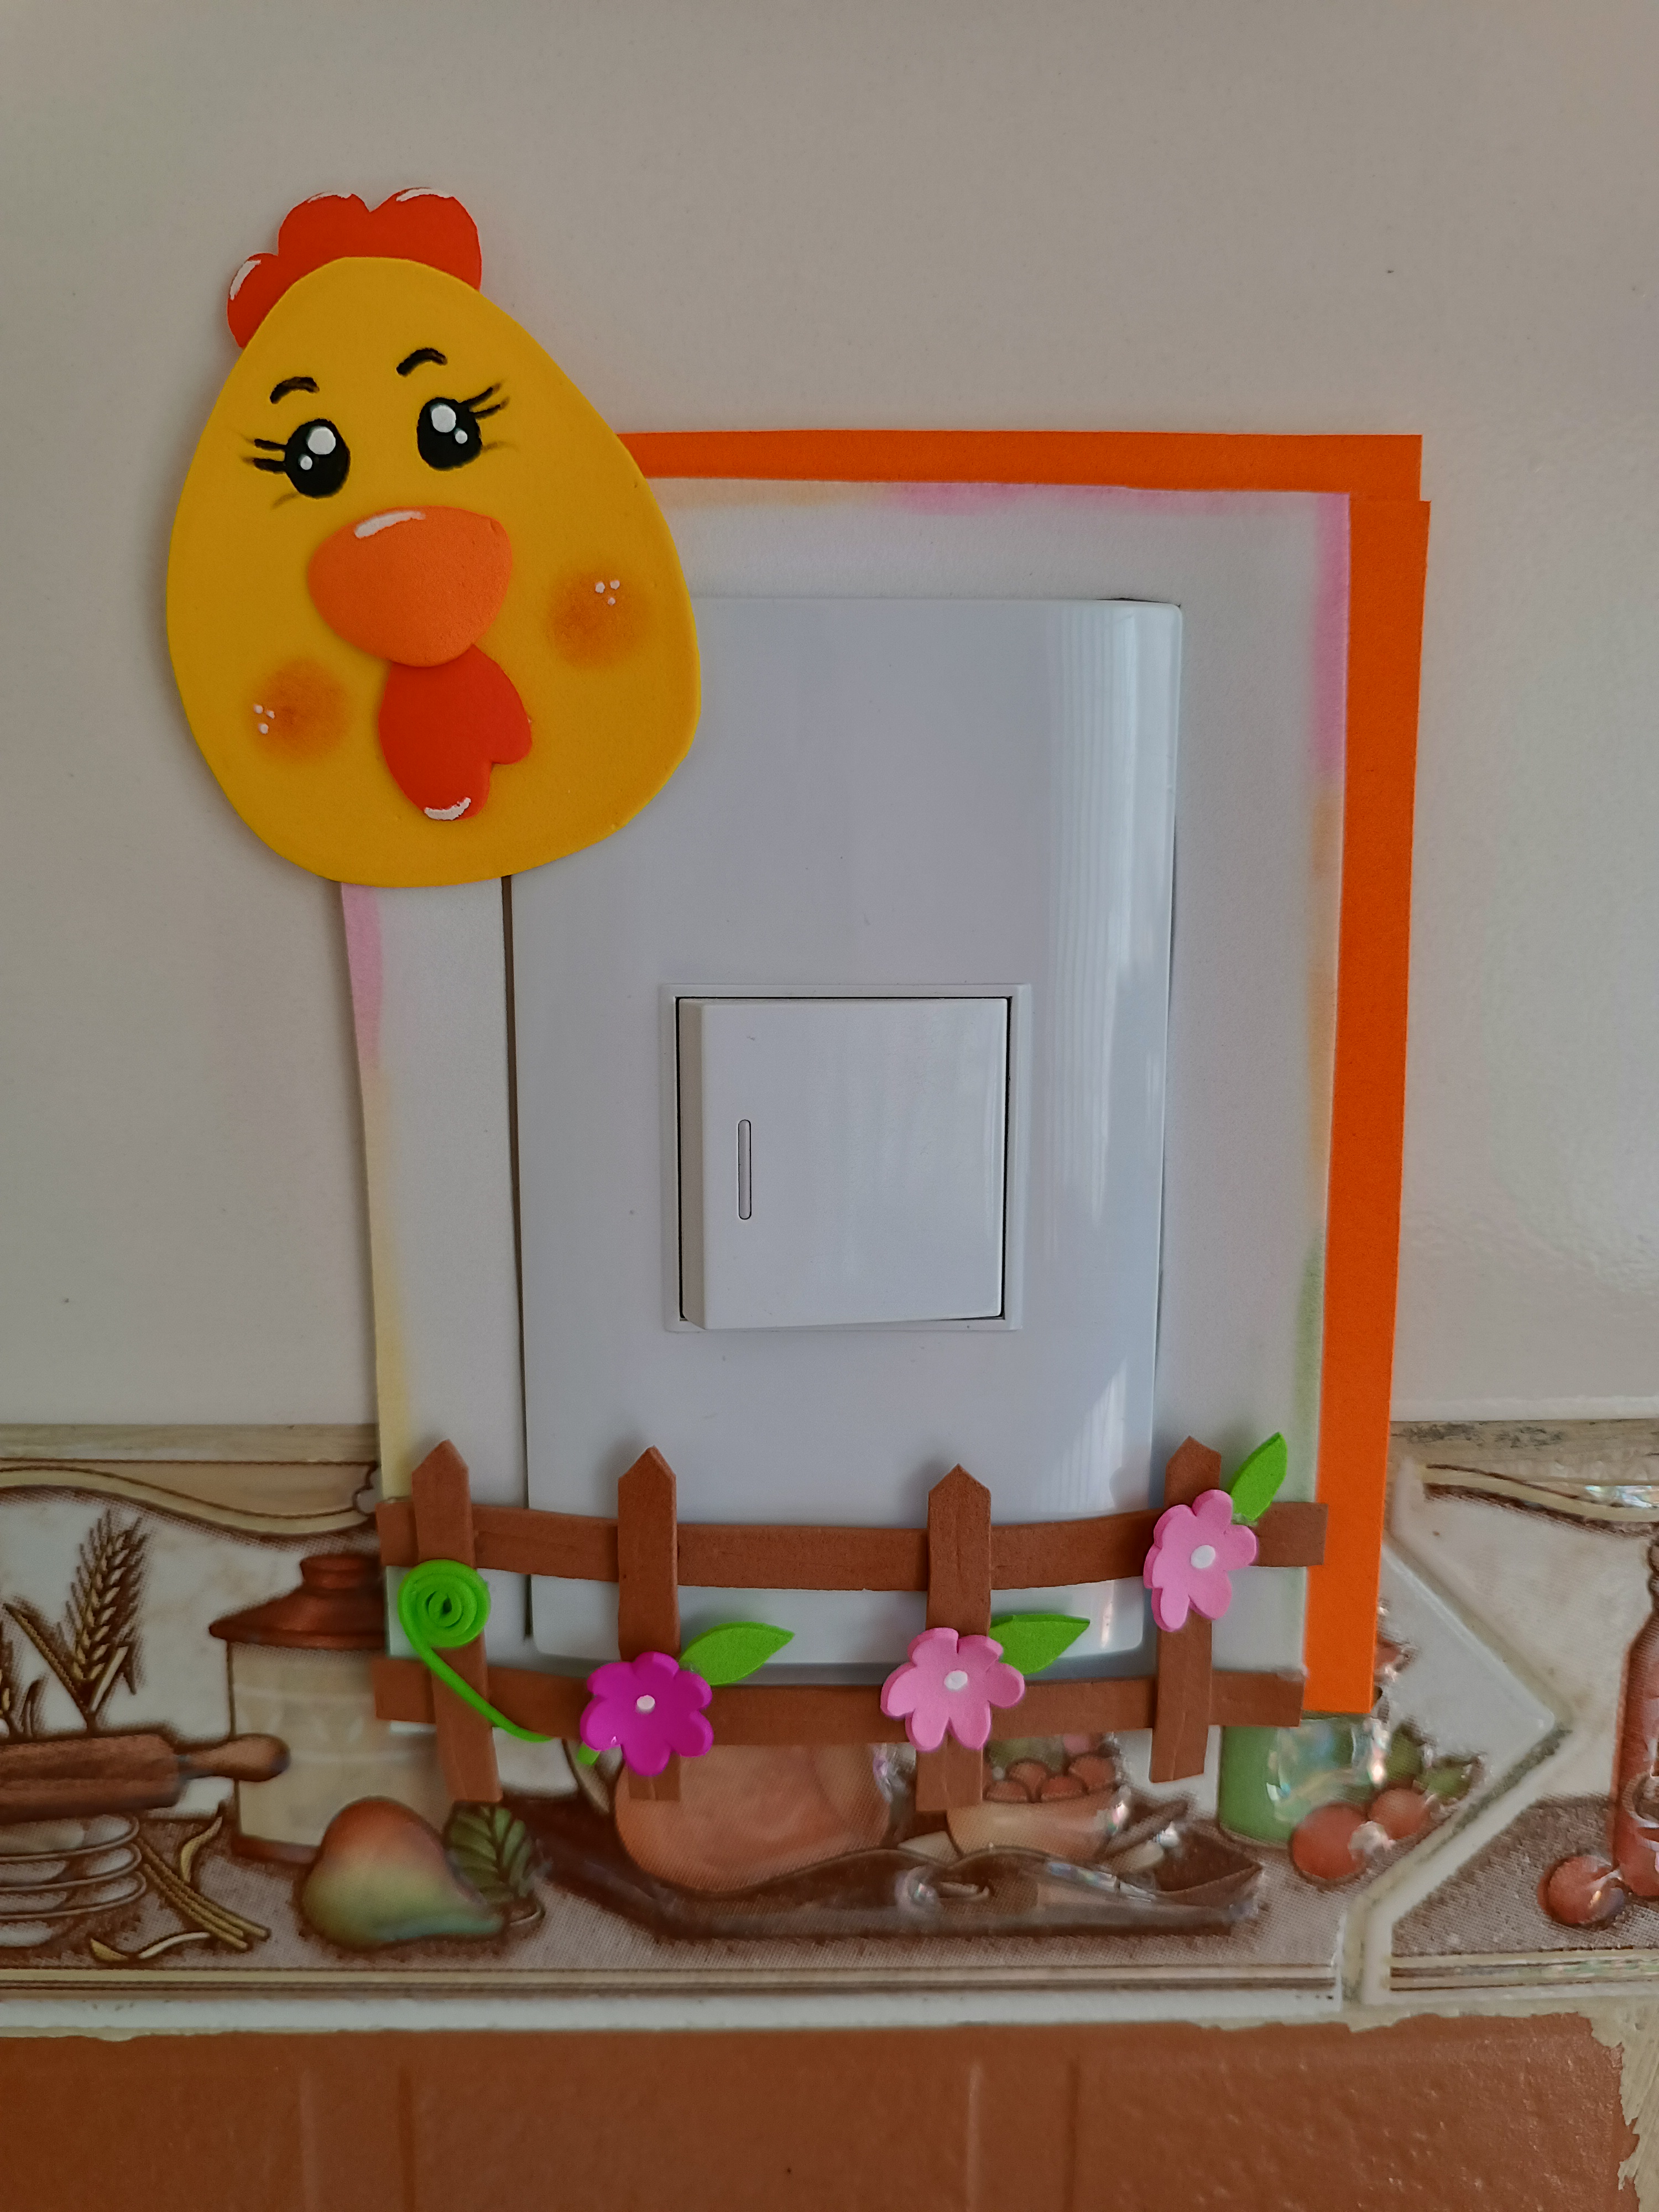
Les quiero compartir una linda y tierna decoración para interruptor de luz, me enfoqué en un diseño de granja con una reja de color marrón y flores, además de un lindo pollito, está decoración la utilicé para el interruptor de luz de la cocina, el resultado luce muy bien además de dar un toque diferente y divertido, a continuación les muestro los materiales y el paso a paso.
I want to share a cute and tender decoration for a light switch, I focused on a farmhouse design with a brown fence and flowers, as well as a cute chick, I used this decoration for the kitchen light switch, the result It looks very good as well as giving a different and fun touch, below I show you the materials and the step by step.
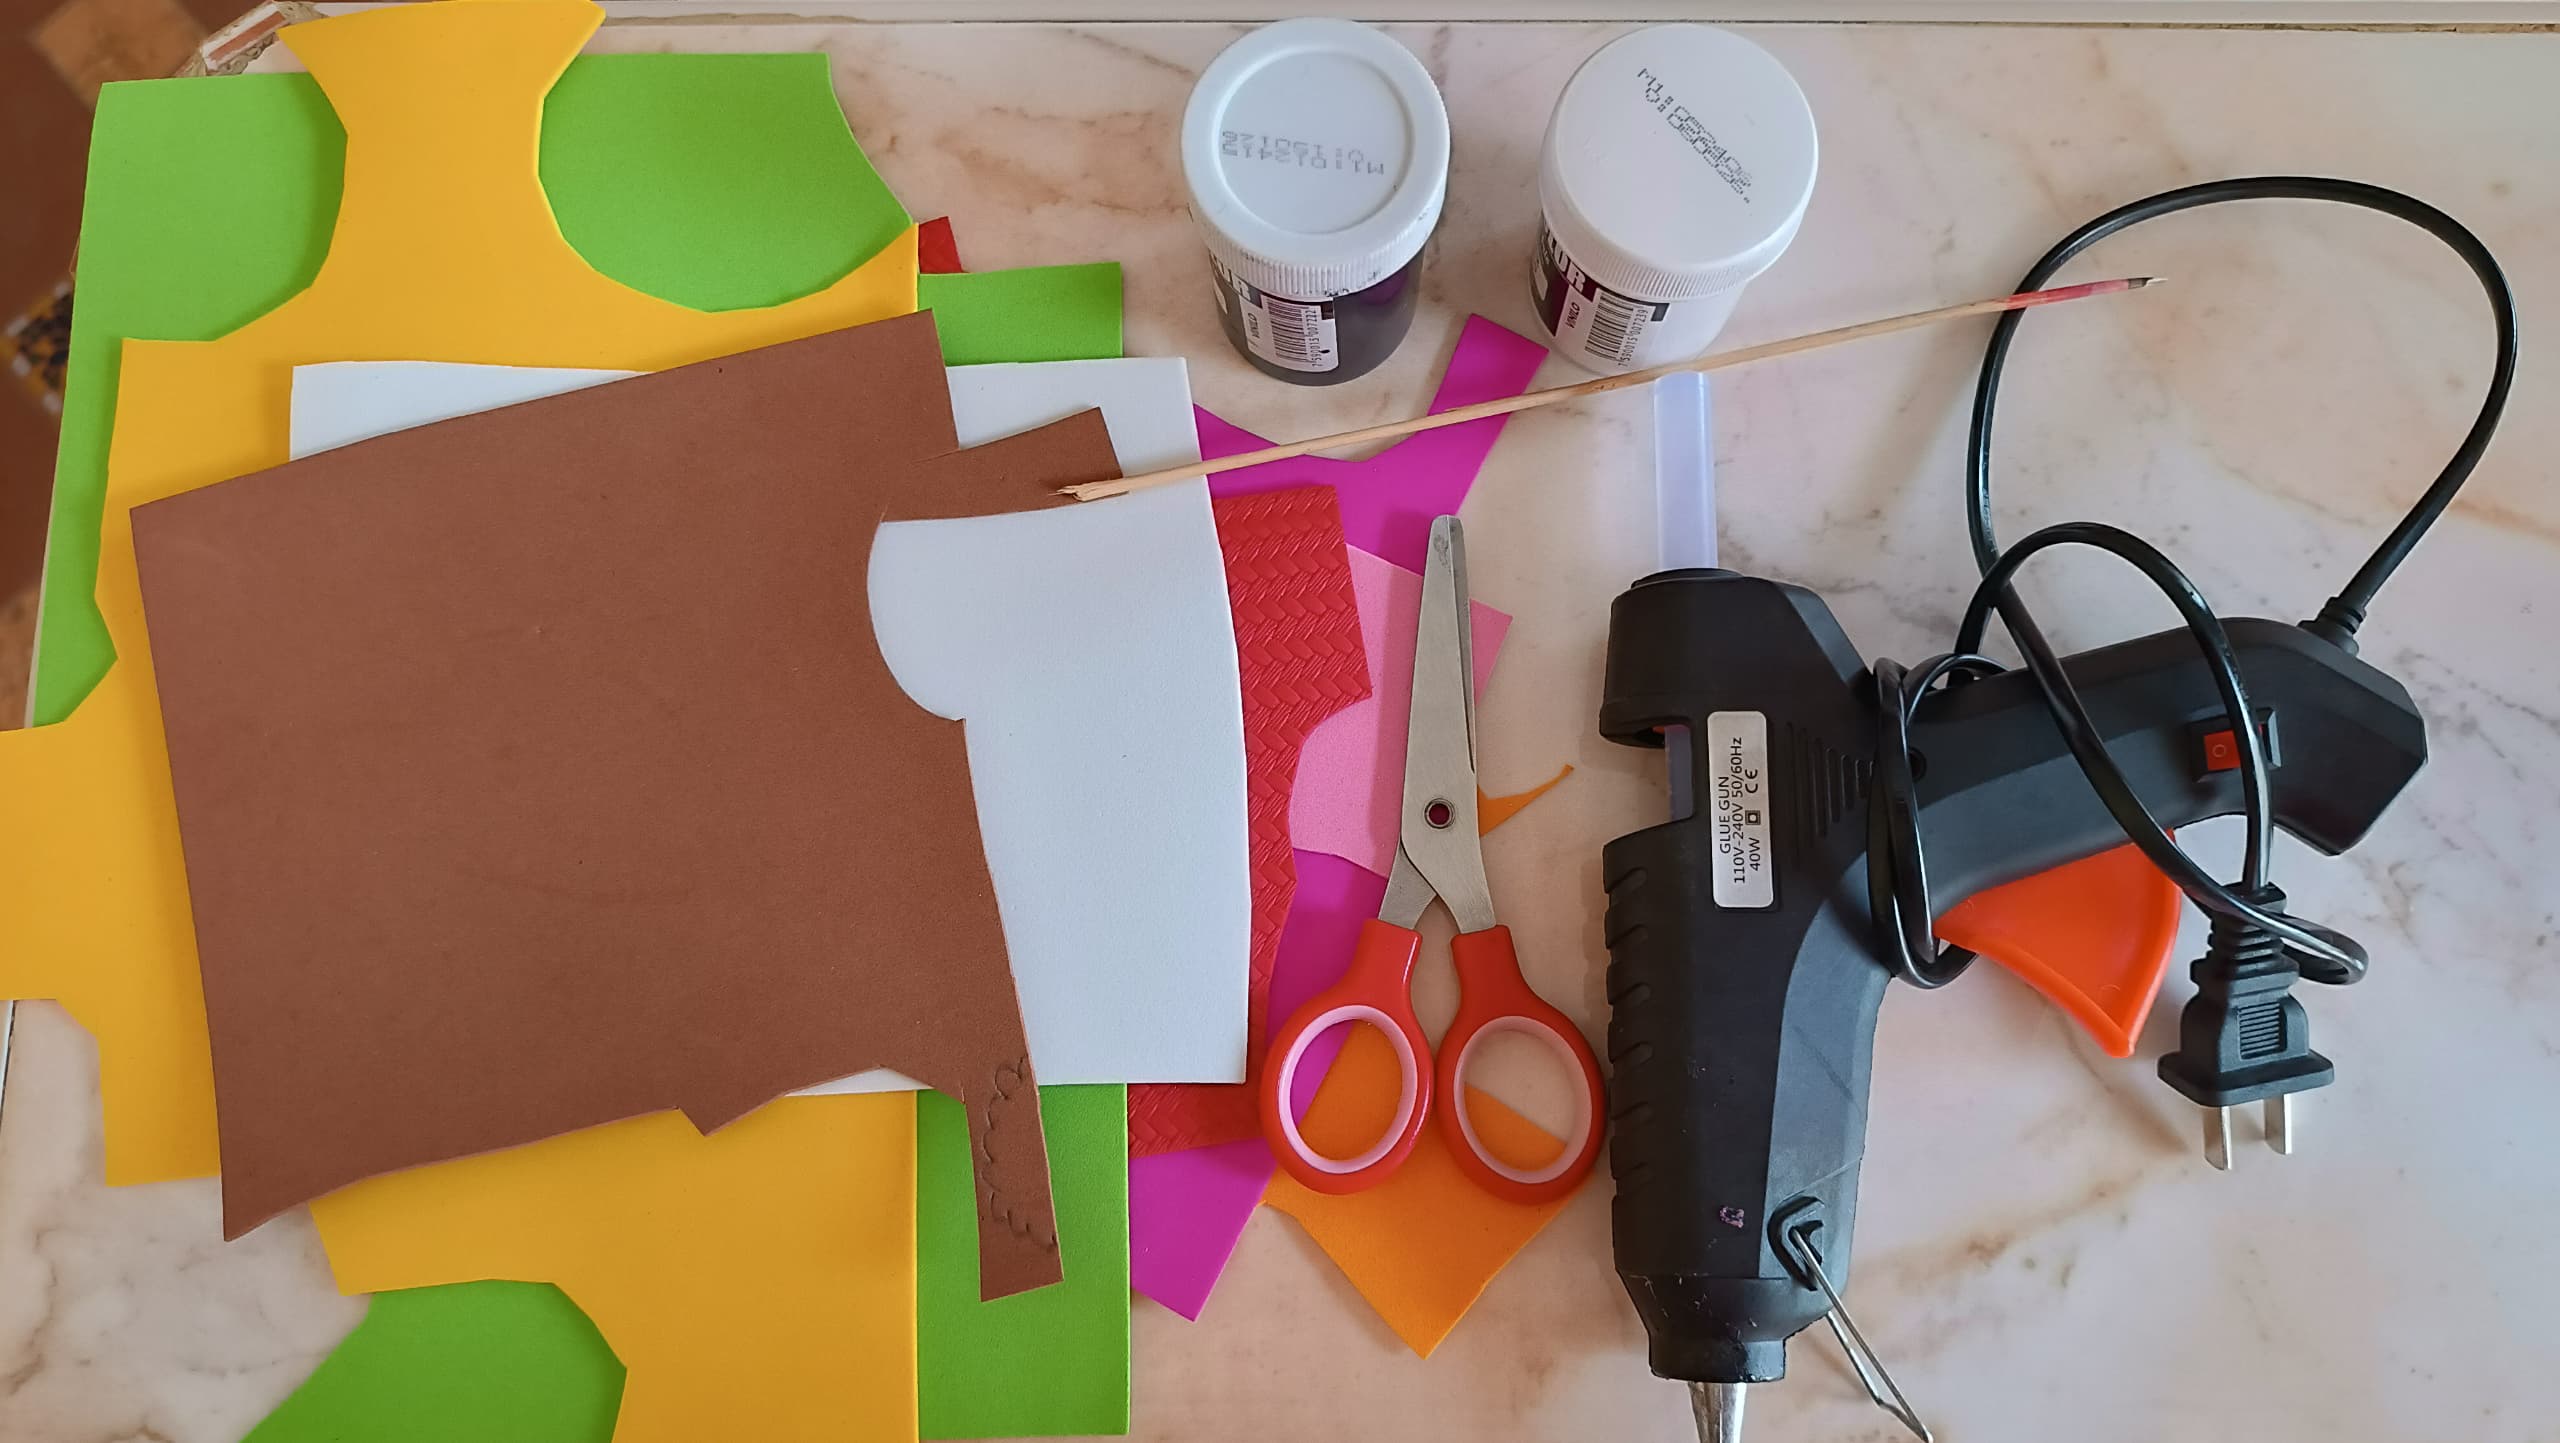
Materiales:
🧡Foami blanco.
🧡Foami naranja.
🧡Foami amarillo.
🧡Foami rojo.
🧡Pinturas.
🧡Tijera.
🧡Silicón.
🧡Palillo.
🧡Foami rosa y fucsia.
🧡Foami marrón y verde.
🧡Marcadores de colores.
🧡Sombra de ojos.
Materials:
White foam.
Orange foam.
Yellow foam.
Red foam.
Paintings.
Scissors.
Silicone.
Toothpick.
Pink and fuchsia foami.
Brown and green foami.
Colored markers.
Eyeshadow.
Paso a paso / Step by Step
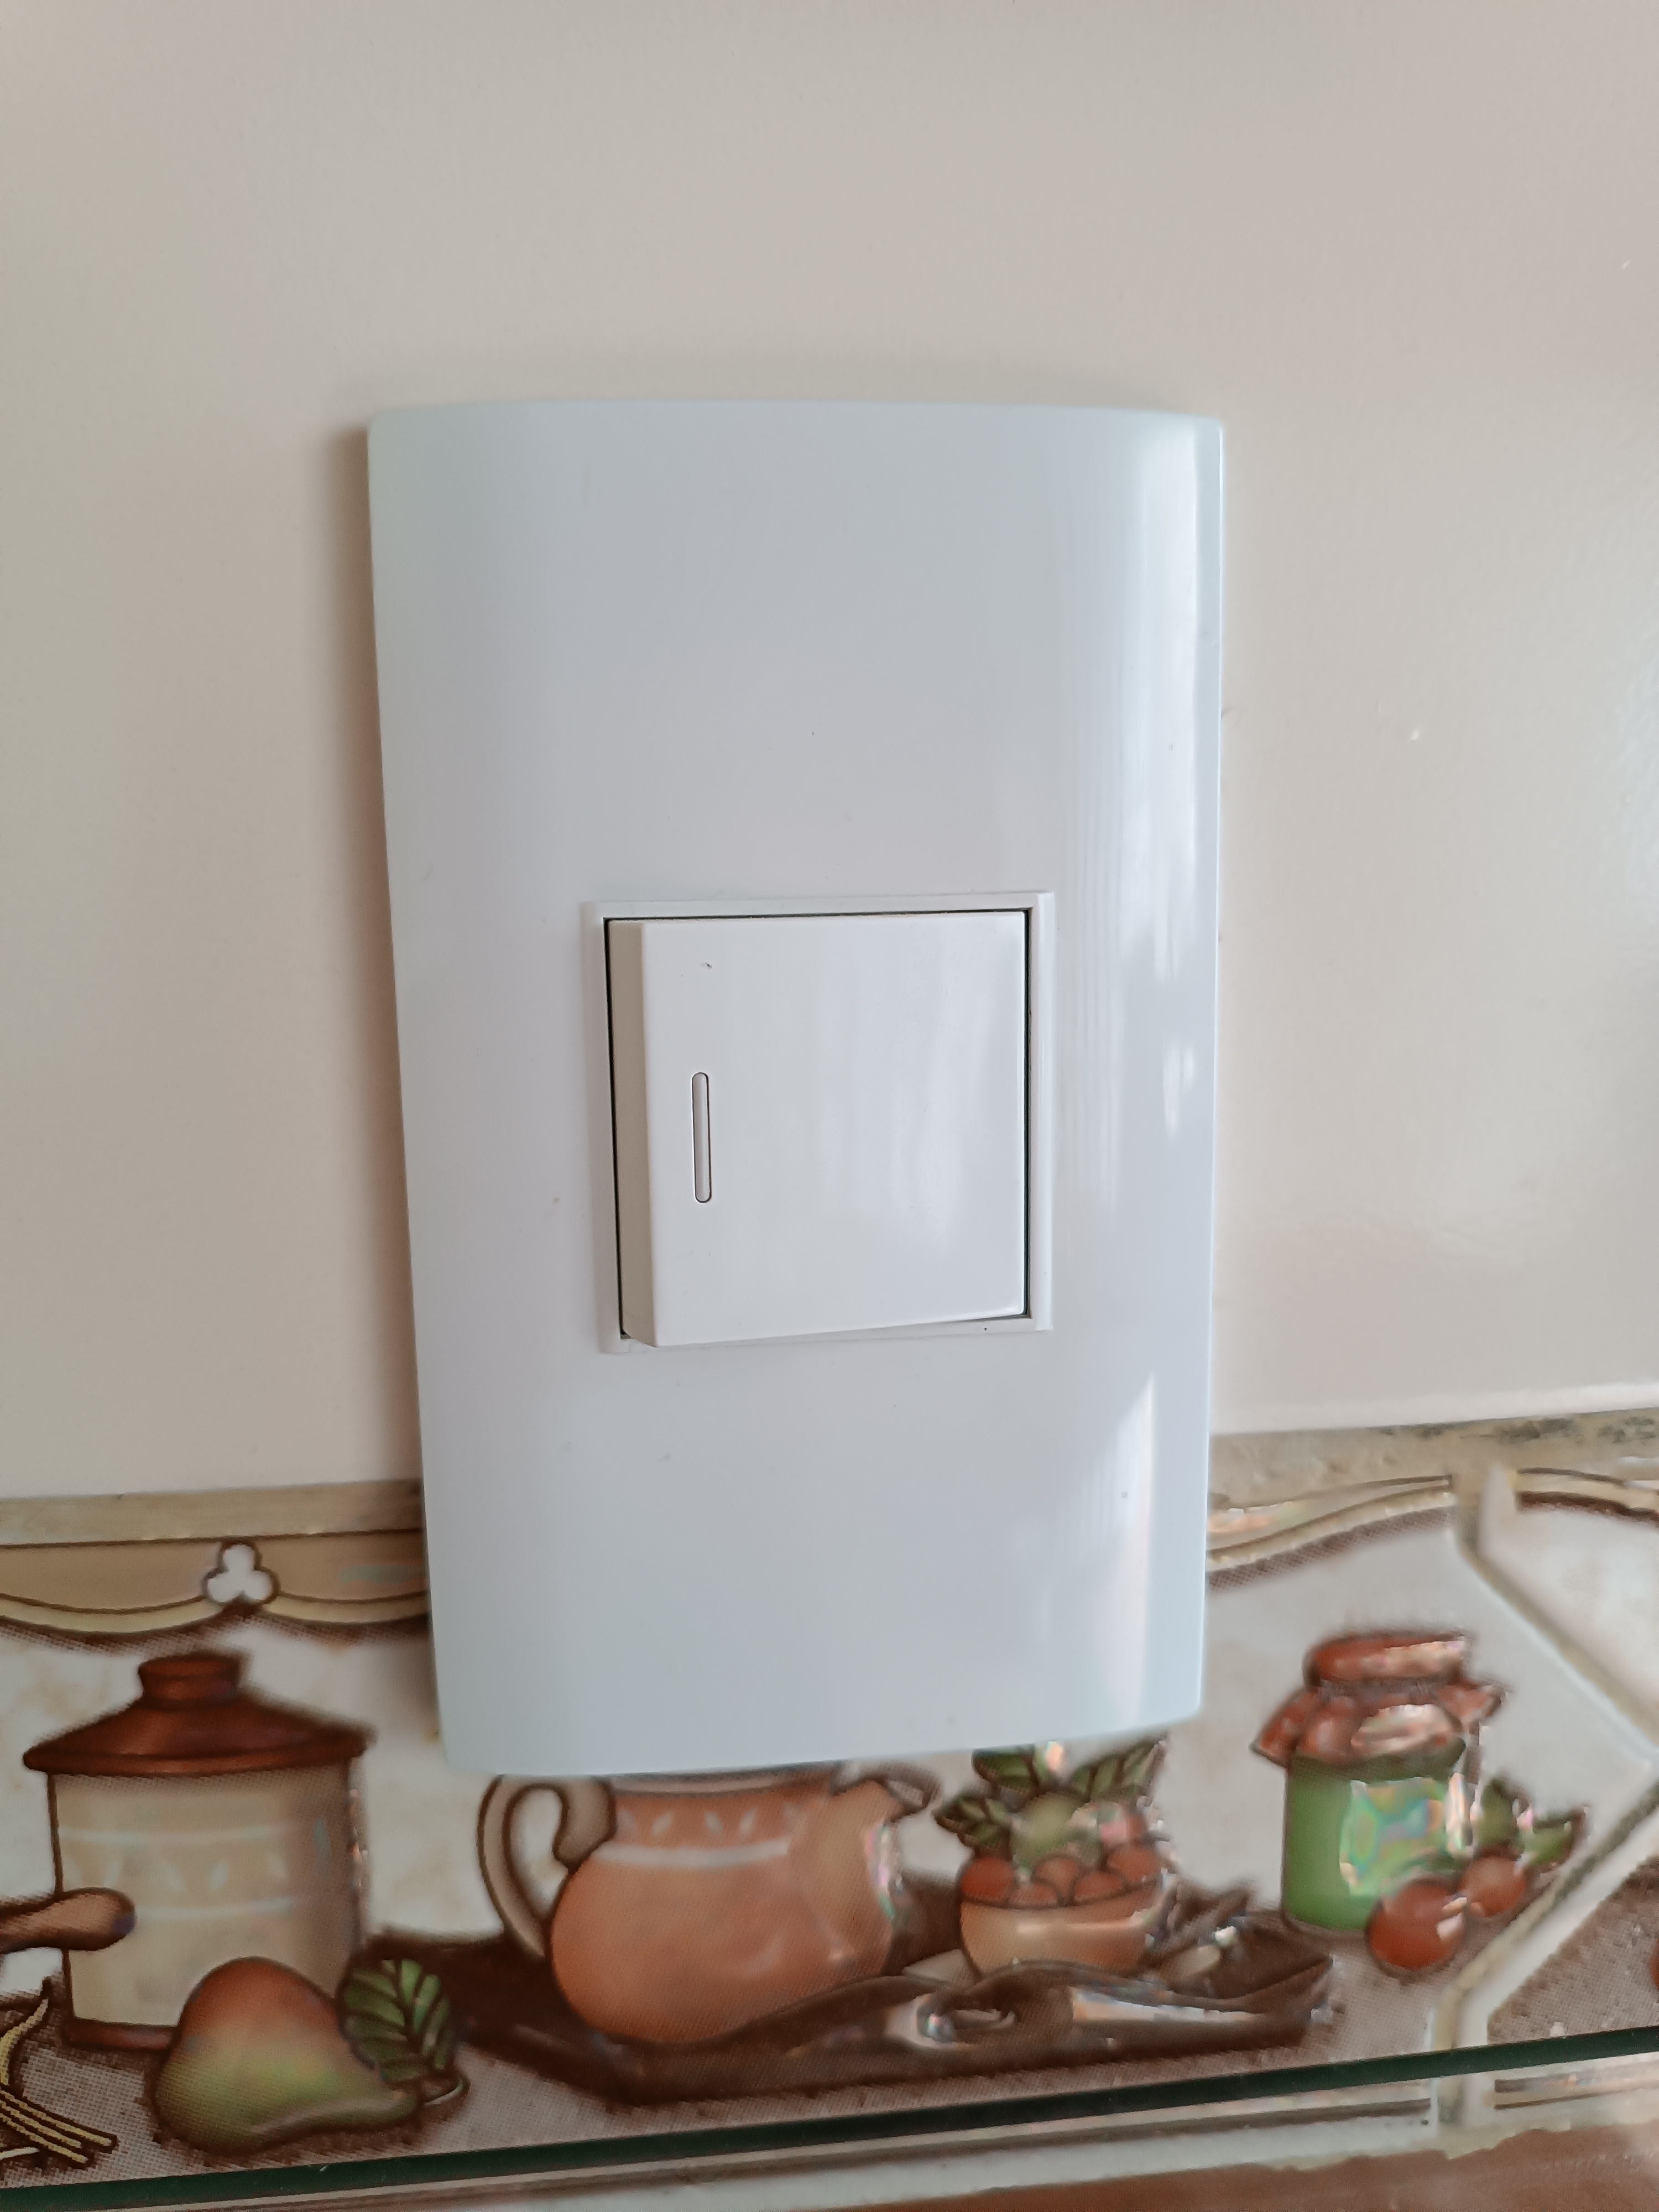
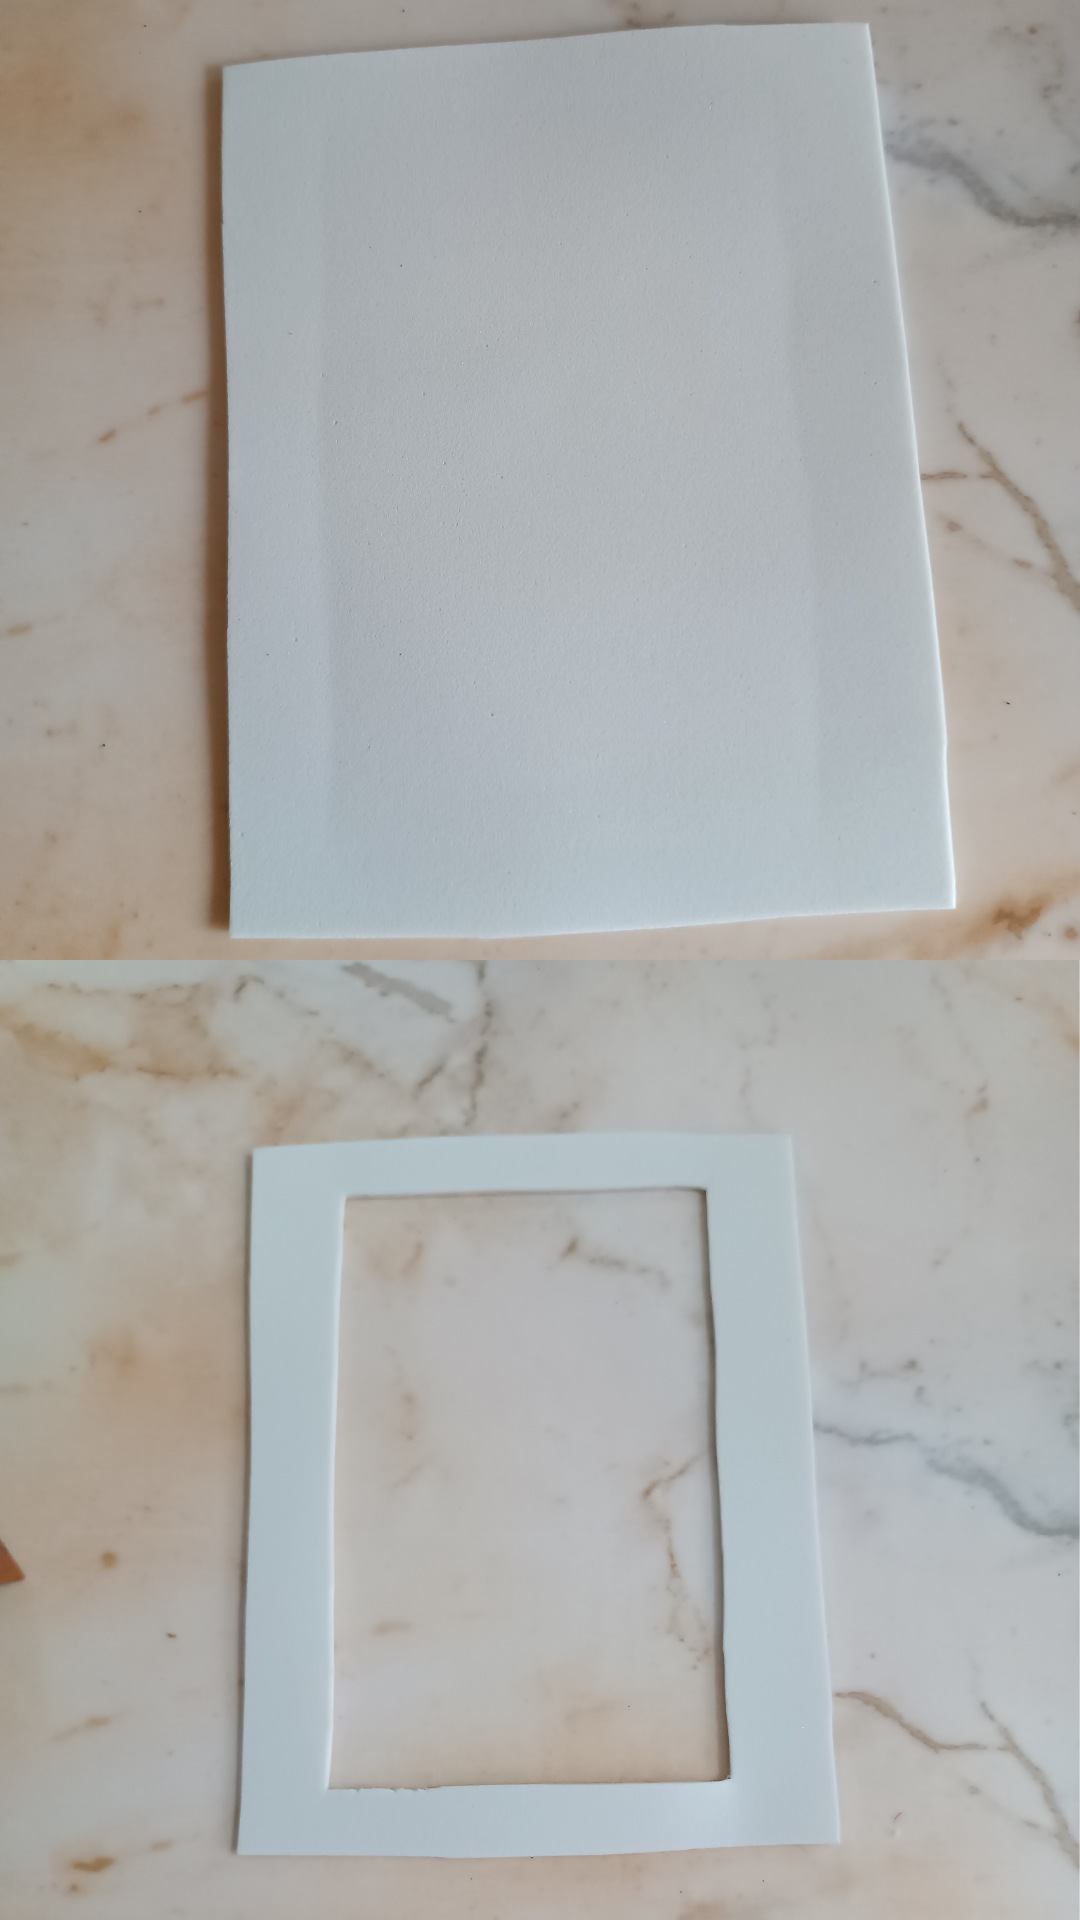
El primer paso es tomar las medidas del interruptor del luz de alto y ancho, de esta forma en el foami voy a dibujar un cuadro con esas medidas, ahora voy a dibujar otro cuadro al rededor de este con una medida de 1.5 cm de ancho, procedemos a recortar y nos queda en medio la forma del interruptor.
The first step is to take the measurements of the height and width of the light switch, this way on the foam I am going to draw a box with those measurements, now I am going to draw another box around it with a measurement of 1.5 cm wide, We proceed to cut out and we are left with the shape of the switch in the middle.
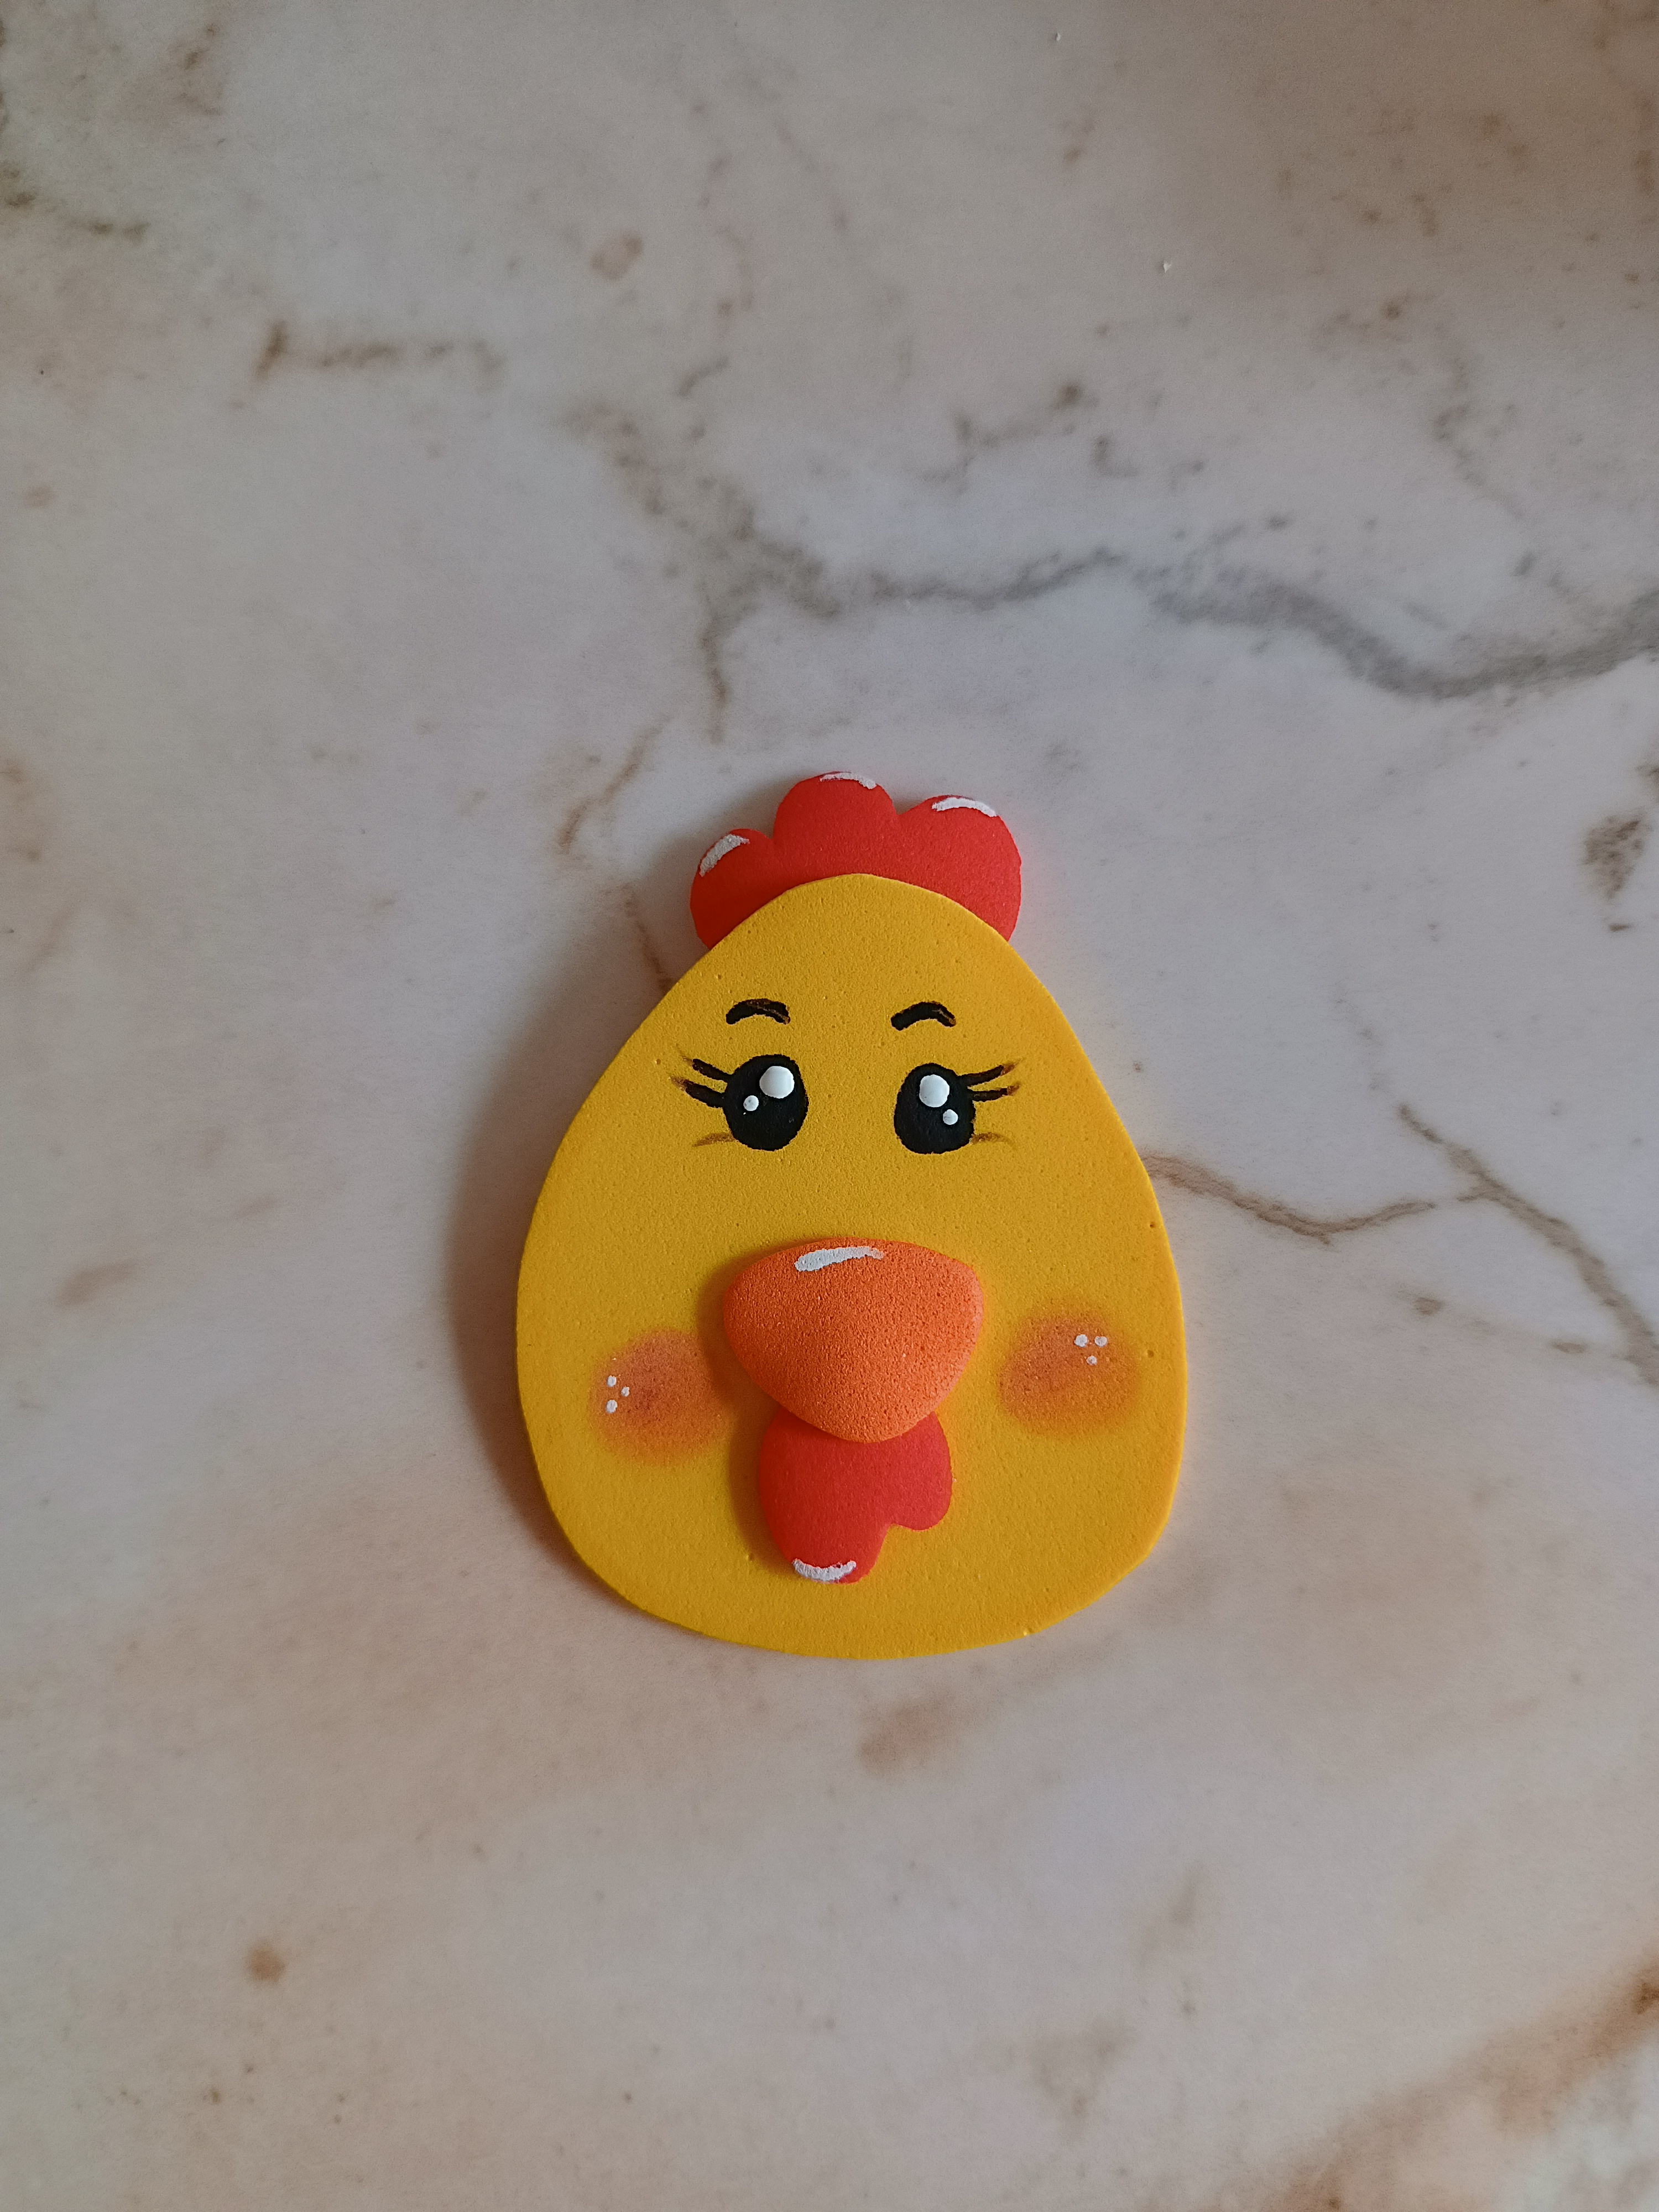
Luego voy con la decoración, para realizar el pollito comencé dibujando el rostro, cresta, pico, para esto utilicé foami amarillo, naranja y rojo, dibujé las partes por separado y luego fui uniendo cada una. Para dibujar los ojos, cejas y pestañas utilicé pintura la frío negra y blanca.
Then I go with the decoration, to make the chick I started by drawing the face, crest, beak, for this I used yellow, orange and red foam, I drew the parts separately and then I joined each one. To draw the eyes, eyebrows and eyelashes I used black and white cold paint.
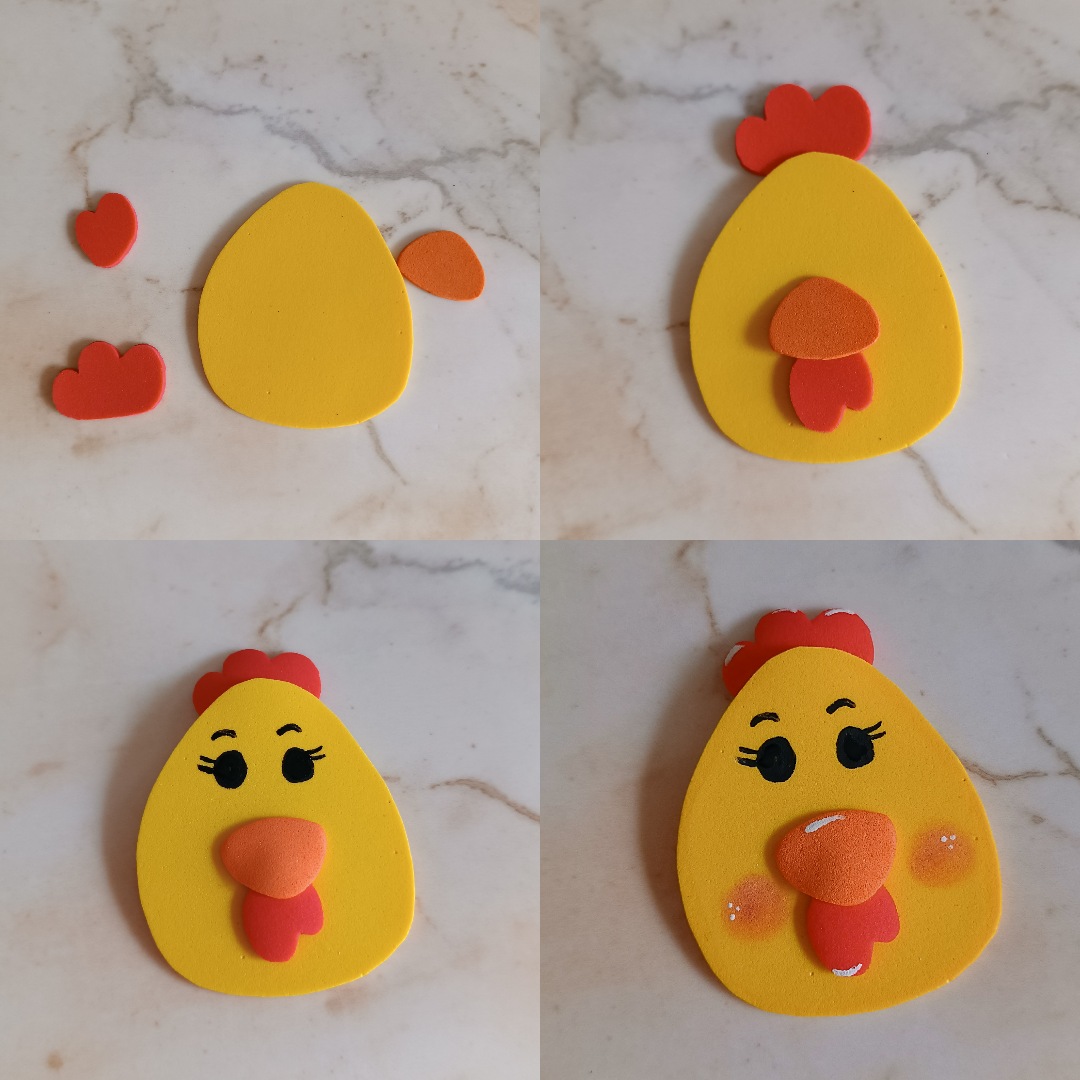
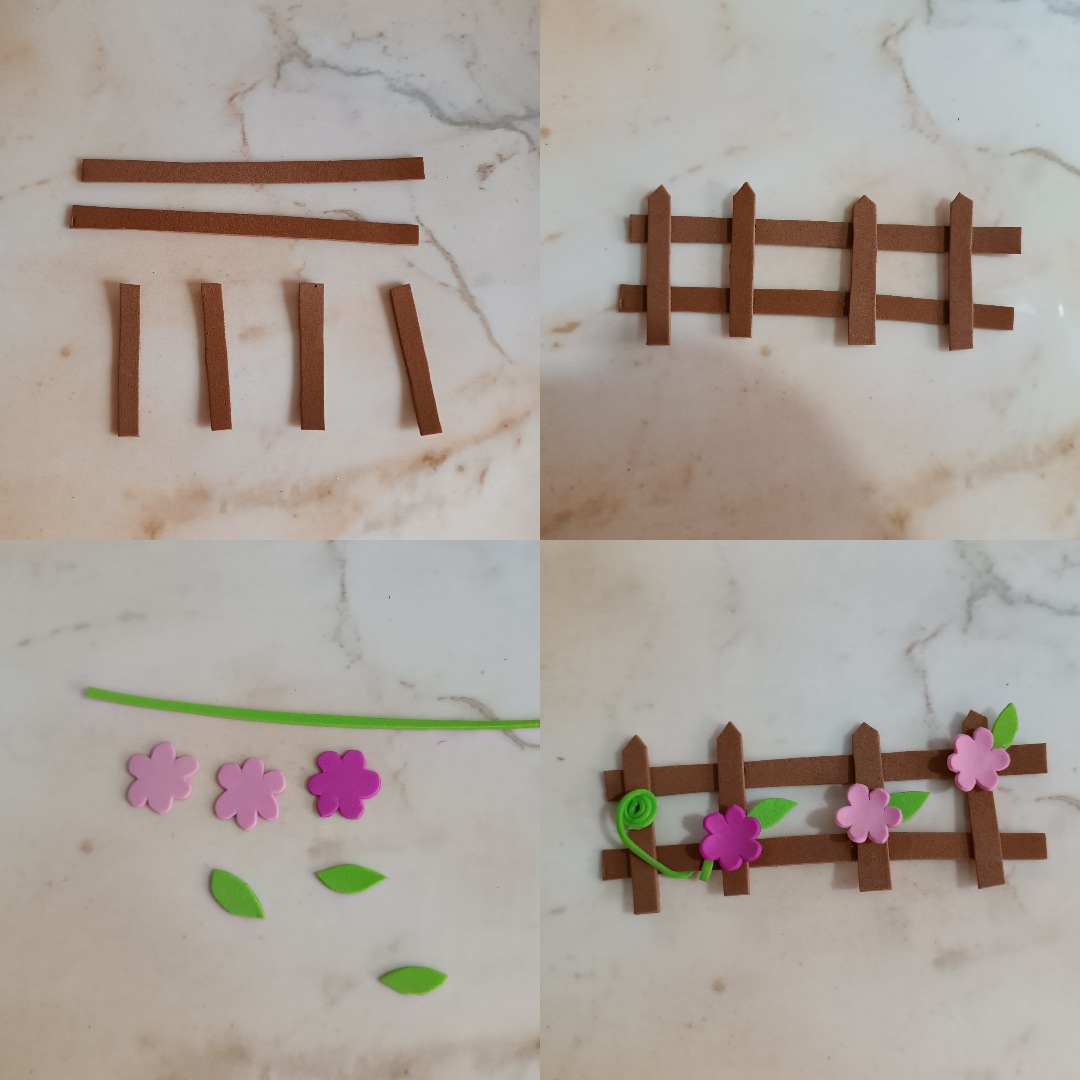
Con pintura blanca voy a resaltar solo algunos puntos específicos, también apliqué un poco de sombra de ojos color rosa en las mejillas para dar un efecto ruborizado, para realizar las rejas utilicé foami marrón, corté dos franjas largas del mismo tamaño del foami blanco, y cuatro franjas cortas las voy a unir en forma de reja.
With white paint I am going to highlight only some specific points, I also applied a little pink eye shadow on the cheeks to give a blush effect, to make the bars I used brown foam, I cut two long strips of the same size from the white foam, and I am going to join four short strips in the shape of a fence.
Realicé flores pequeñas en tono rosa y fucsia, apliqué calor con una plancha de cabello para dar forma, con foami verde realicé hojas y una en forma de espiral, también para dar color a los bordes del foami blanco utilicé marcador verde, amarillo, fucsia.
I made small flowers in pink and fuchsia tones, I applied heat with a hair straightener to shape them, with green foam I made leaves and one in a spiral shape, also to color the edges of the white foam I used green, yellow, fuchsia marker.
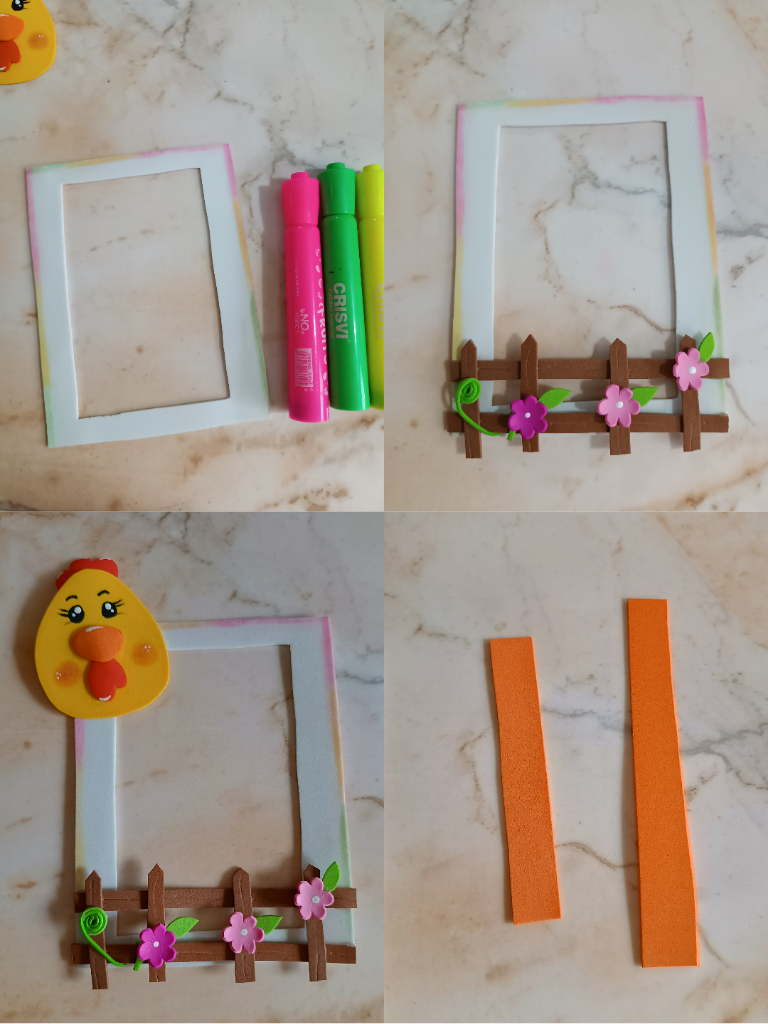
El último paso es cortar dos franjas de foami naranja y las ubiqué en la parte superior y en uno de los costados, coloqué el pollito en la parte superior y la reja en la parte inferior, de esta forma terminé ésta linda decoración espero les haya gustado el resultado.
The last step is to cut two strips of orange foam and I placed them at the top and on one of the sides, I placed the chick at the top and the fence at the bottom, in this way I finished this beautiful decoration I hope you liked it the result.
Muchas gracias por visitar mi publicación, nos vemos en una próxima oportunidad con más ideas creativas.
Thank you very much for visiting my publication, see you next time with more creative ideas.

Contenido original. - original content.
Los separadores y banner fueron realizados en Canva. - The dividers and banner were made in Canva.
Las fotografias son tomadas con mi teléfono Redmi Note 11s y editadas en PicsArt - The photographs are taken with my Redmi Note 11s phone and edited in PicsArt.
Traducción de: Google traductor - Translation of: Google translator.

Es una excelente idea para darle a los interruptores un poco mas de vida y alegria, esta muy tierno ese pollito en la granja ❤️ tengo muchos interruptores y me imagine esta decoracion en ellos jeje
Espero que te recuperes pronto de la gripe 🙏
Así es, le da vida a los interruptores jeje, muchas gracias por el apoyo y por sus buenos deseos 🤗 saludos 🙏🏽
Congratulations @marile21! You have completed the following achievement on the Hive blockchain And have been rewarded with New badge(s)
Your next payout target is 9000 HP.
The unit is Hive Power equivalent because post and comment rewards can be split into HP and HBD
You can view your badges on your board and compare yourself to others in the Ranking
If you no longer want to receive notifications, reply to this comment with the word
STOPImpressive! It looks pretty good. You kept working and made this even though you did not feel well. Great job! Hope you get well soon.
Thank you very much for the support and for your good wishes 🙏🏽 greetings 🤗
Congratulations, your post has been curated by @dsc-r2cornell. You can use the tag #R2cornell. Also, find us on Discord
Felicitaciones, su publicación ha sido votada por @ dsc-r2cornell. Puedes usar el tag #R2cornell. También, nos puedes encontrar en Discord
Muchas gracias 🫂
¡Enhorabuena!
✅ Has hecho un buen trabajo, por lo cual tu publicación ha sido valorada y ha recibido el apoyo de parte de CHESS BROTHERS ♔ 💪
♟ Te invitamos a usar nuestra etiqueta #chessbrothers y a que aprendas más sobre nosotros.
♟♟ También puedes contactarnos en nuestro servidor de Discord y promocionar allí tus publicaciones.
♟♟♟ Considera unirte a nuestro trail de curación para que trabajemos en equipo y recibas recompensas automáticamente.
♞♟ Echa un vistazo a nuestra cuenta @chessbrotherspro para que te informes sobre el proceso de curación llevado a diario por nuestro equipo.
🏅 Si quieres obtener ganancias con tu delegacion de HP y apoyar a nuestro proyecto, te invitamos a unirte al plan Master Investor. Aquí puedes aprender cómo hacerlo.
Cordialmente
El equipo de CHESS BROTHERS