En este último fin de semana de marzo les traigo esta lámpara. Quiero iluminar esta bella comunidad y que el mes de abril empiece con mucha luz y colores para todos.
Este tipo de proyectos con formas volumétricas es todo un reto. Lograr que me quede lo mejor posible lleva un trabajo especial con el cartón. Pero como siempre, ese material versátil se adapta y logra un resultado espectacular.
Hago varios modelos de lámparas, pero este en particular, es uno de mis preferidos. En esta oportunidad la hice por encargo de una clienta que conozco desde los tiempos que tenía la tienda. La encargó para dar de regalo a la hija de unos amigos suyos en su sexto cumpleaños.
Según ella el regalo fue todo un éxito. Así que, otra lámpara hecha por mis manos ilumina los sueños de otra pequeña.
Les dejo la lista de materiales, el paso a paso y la invitación a que hagan su propio proyecto, la creatividad no tiene límites.
English here
In this last weekend of March I bring you this lamp. I want to illuminate this beautiful community and that the month of April begins with lots of light and colors for everyone.
This kind of projects with volumetric shapes is a challenge. It takes a special work with cardboard to make it look as good as possible. But as always, this versatile material adapts and achieves a spectacular result.
I make several models of lamps, but this one in particular is one of my favorites. This time I made it at the request of a client I have known since the days when I had the store. She ordered it to give as a gift to the daughter of some friends of hers for her sixth birthday.
According to her the gift was a success. So, another lamp made by my hands illuminates the dreams of another little girl.
I leave you the list of materials, the step by step and the invitation to make your own project, creativity has no limits.
Necesitaré:
- Cartón corrugado de 0.6 mm
- Papel artesanal
- Papel blanco reutilizado
- Papel de seda de los colores del arcoiris, blanco y azul claro
- Película de acetato transparente
- Pegamento
- Acrílico azul claro
- Moldes
- Cúter
- Regla
- Pistola de silicona ultra fuerte
- Socket
- Cable eléctrico para lámpara con interruptor
- Pinceles
- Barniz
I will need:
- 0.6 mm corrugated cardboard
- Handmade paper
- Reused white paper
- Tissue paper in the colors of the rainbow, white and light blue
- Clear acetate film
- Glue
- Light blue acrylic
- Molds
- Cutter
- Ruler
- Ultra strong silicone gun
- Socket
- Electric cable for lamp with switch
- Brushes
- Varnish

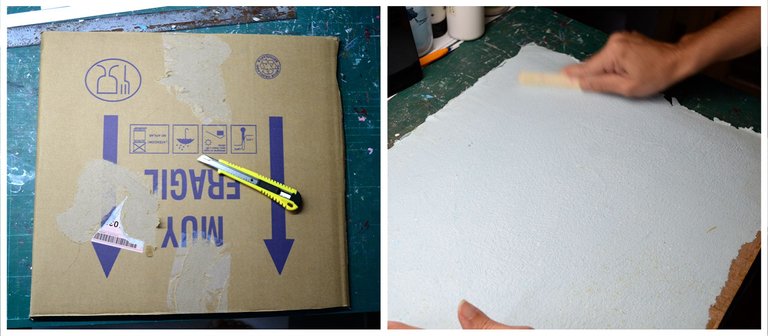
Lo primero será forrar un pedazo de cartón de 35 x 35 cm por detrás con papel blanco reutilizado y por delante con papel artesanal. Pegaré los papeles con una capa generosa de pegamento.
The first thing to do is to line a 35 x 35 cm piece of cardboard on the back with reused white paper and on the front with craft paper. I will glue the papers together with a generous layer of glue.
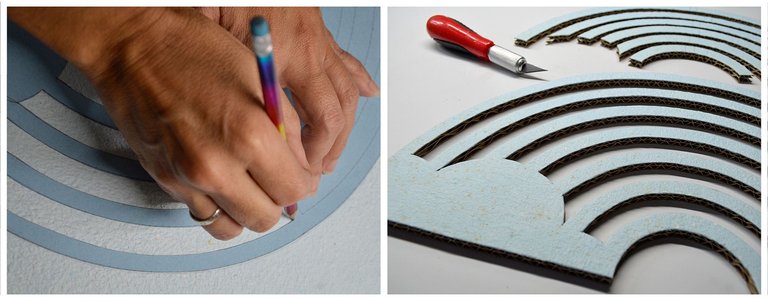
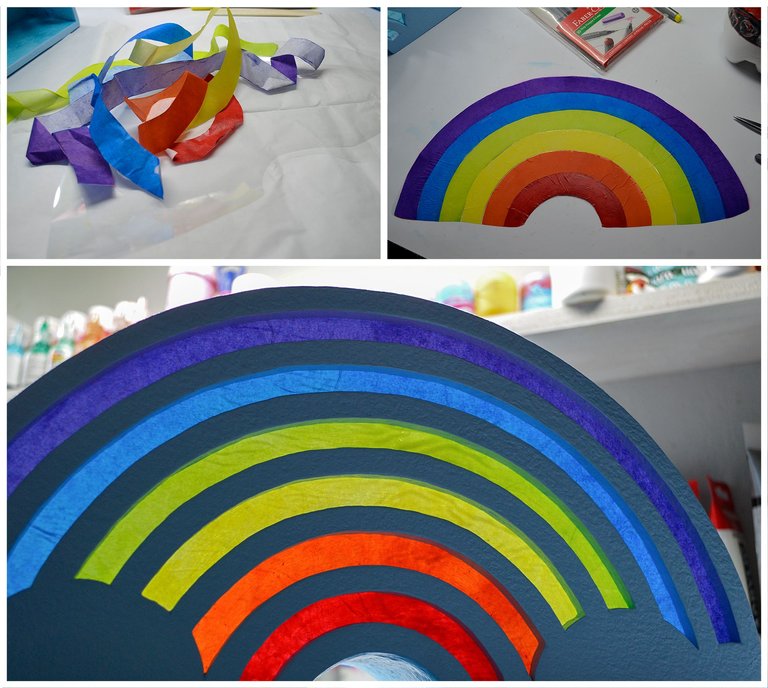
Después utilizaré el molde para marcar el diseño y calarlo.
I will then use the mold to mark the design and fretwork it.
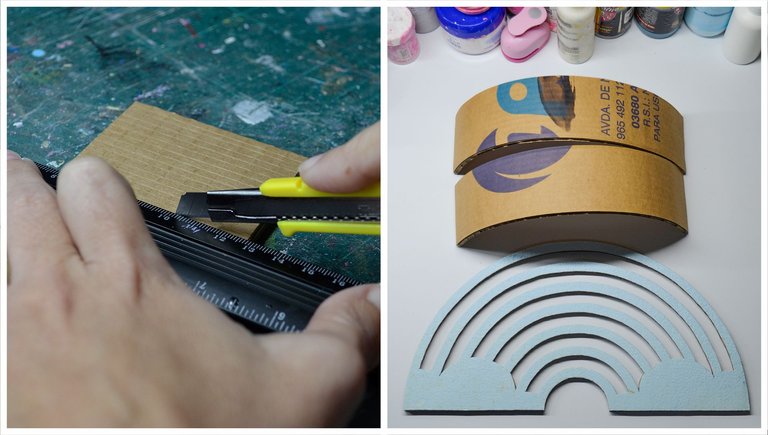
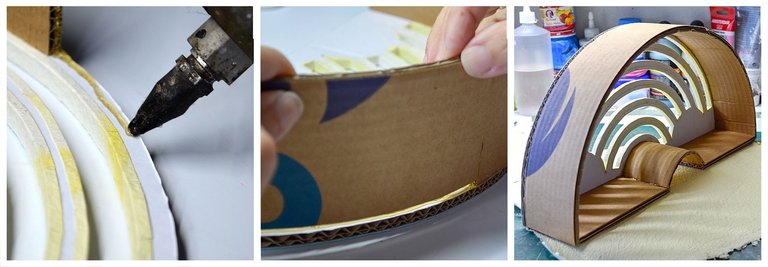
Para el lateral de la lámpara cortaré 3 tiras de cartón de 35 x 7cm que coincida con el sentido de las canales del corrugado. A dos de ellas le haré cortes muy pegaditos en sentido contrario a los canales. Esto me facilitará dar forma semicircular a estas piezas. Reservaré una sin cortes, que será la de la parte de abajo.
For the side of the lamp I will cut 3 strips of cardboard of 35 x 7cm that coincide with the direction of the corrugated channels. I will cut two of them very close together in the opposite direction to the channels. This will make it easier to give a semicircular shape to these pieces. I will reserve one without cuts, which will be the one at the bottom.
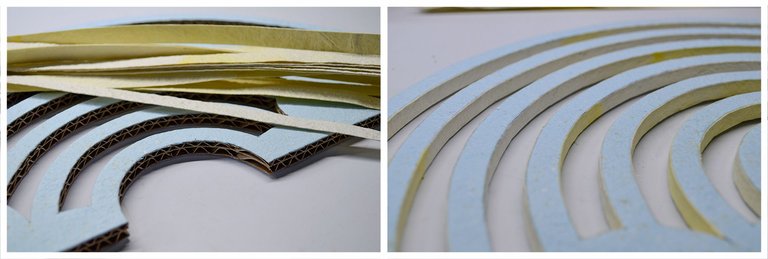
Antes de pegar las piezas, forraré los bordes expuestos del cartón con tiras de papel artesanal previamente cortadas.
Before gluing the pieces together, I will line the exposed edges of the cardboard with pre-cut strips of craft paper.
Con la pistola de silicona a la temperatura adecuada pegaré mis laterales a la pieza delantera. Son 2, así que debo empatar muy bien para que quede curioso. La tira sin cortes la pegaré en la parte de abajo y una pequeña pieza, también semicircular, que irá justo al centro, siguiendo la forma externa de mi arcoiris.
With the silicone gun at the right temperature I will glue my sides to the front piece. There are 2 of them, so I have to match them very well to make it look nice. I will glue the strip without cuts on the bottom and a small piece, also semicircular, which will go right in the center, following the external shape of my rainbow.
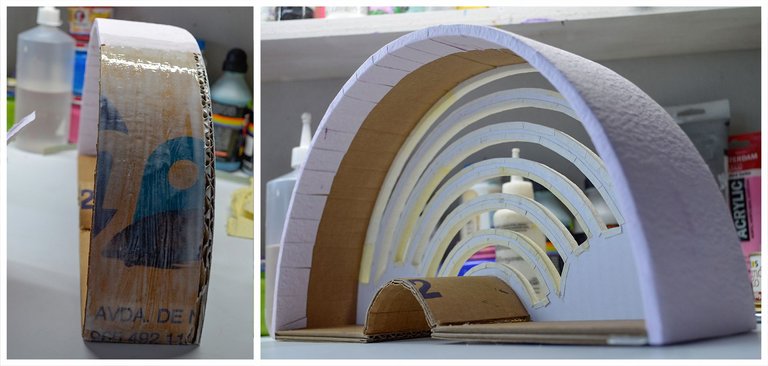
Ahora forraré todo el exterior con papel artesanal y seguidamente pintaré con acrílico azul claro.
I will now line the entire outside with craft paper and then paint with light blue acrylic.
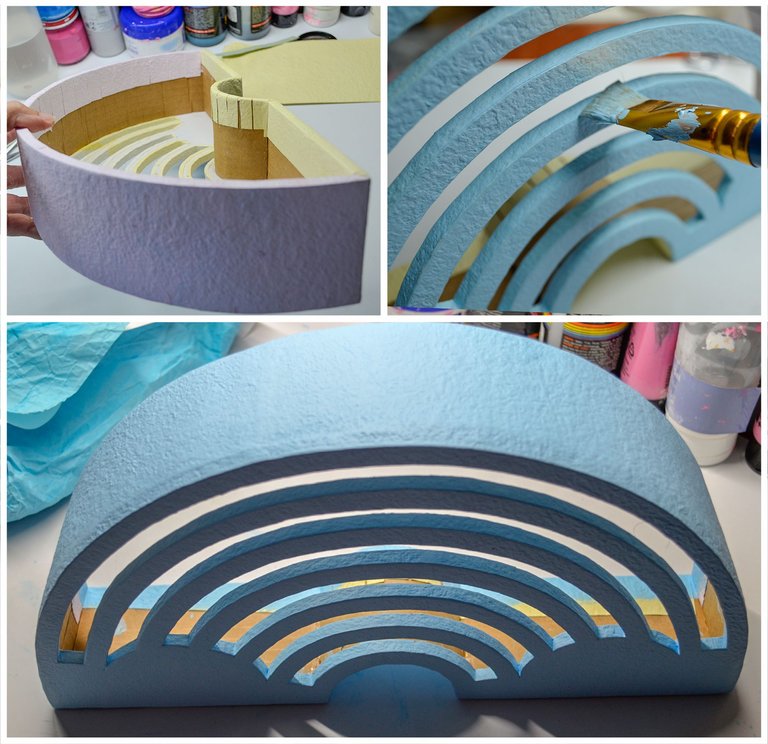
Para que quede con un acabado perfecto en el interior, cubriré con papel blanco reutilizado y sobre el pondré papel de seda azul.
For a perfect finish on the inside, I will cover with reused white paper and put blue tissue paper on top.
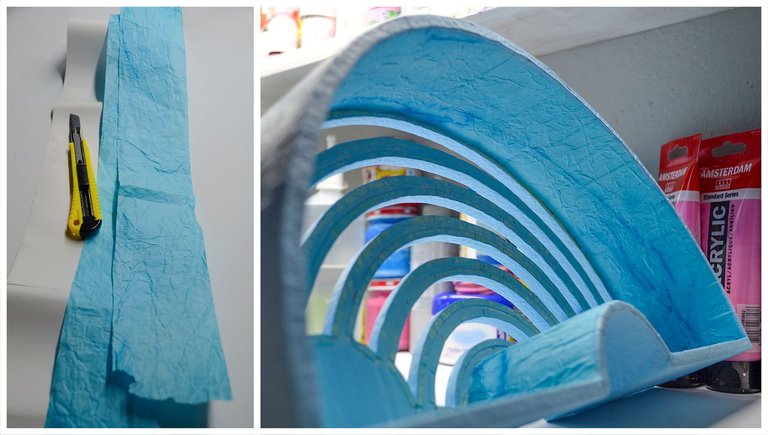
La pantalla la haré con una película de acetato transparente que cortaré a la medida del interior. Luego le pegaré las tiras de los colores del arcoiris previamente cortadas. Por último colocaré la pantalla dentro de la lámpara adhiriéndola con pegamento a las finas tiras de cartón.
I will make the lampshade with a transparent acetate film that I will cut to the size of the interior. Then I will glue the strips of the rainbow colors previously cut. Finally I will place the lampshade inside the lamp adhering it with glue to the thin strips of cardboard.
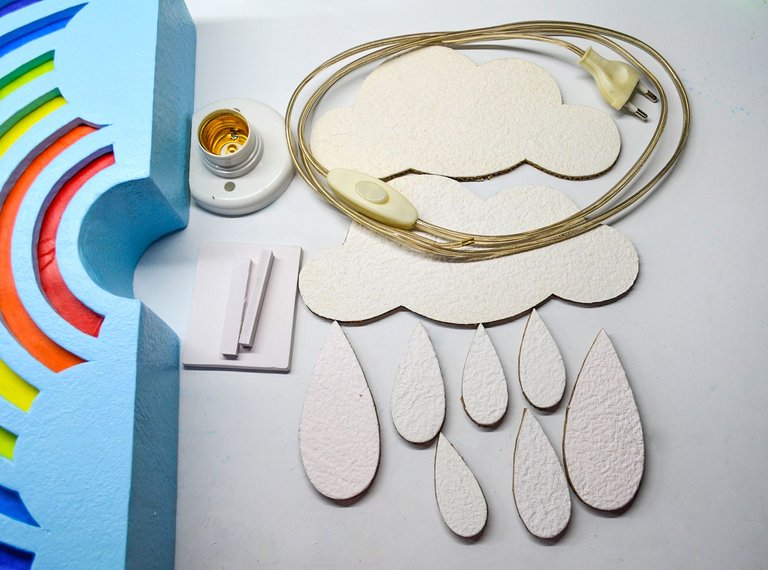
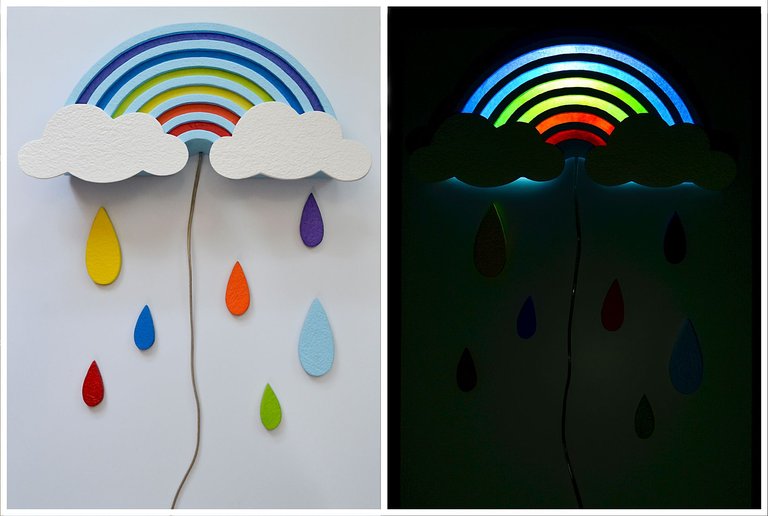
Cómo complementos del diseño haré 2 nubes y 7 gotas de agua. Todo esto lo marcaré, calaré, forraré sus bordes expuestos y pintaré de los colores correspondientes. Conectaré el cable al socket, que va puesto sobre una superficie de PVC que al ser ignífugo actúa como aislante. Lo pegaré con silicona sobre la pequeña pieza semicircular que está en el centro de la base. Finalmente daré una capa de barniz a todas las superficies de cartón y mi lámpara quedará lista para iluminar sueños.
As complements to the design I will make 2 clouds and 7 water drops. All of this I will mark, trace, line its exposed edges and paint in the corresponding colors. I will connect the cable to the socket, which is placed on a PVC surface that, being fireproof, acts as an insulator. I will glue it with silicone on the small semicircular piece that is in the center of the base. Finally I will give a coat of varnish to all the cardboard surfaces and my lamp will be ready to illuminate dreams.

Las imágenes y el texto son de mi autoría. Usé DeepL para la traducción porque el Español es mi idioma nativo.
The images and text are my own. I used DeepL for the translation because Spanish is my native language.
Wao que bonito amiga, me encantaron las luces de colores del arcoiris 😍 esta muy creativa y queda realmente decorativa 🦉
Oh, muchas gracias.💚 Es un diseño muy chulo. Es una lámpara velador y sus luces tenues cumplen perfectamente con su propósito. Lindo fin de semana.
Esto es muy bello y tu deseo de iluminarnos la vida, más aún.
🌈✨☕
Muchas gracias 💚🥰. Un abril lleno de luz y colores!!
Wow está hermoso!!
Muchas gracias 🤩
Una belleza sumamente prolija, cuidaste todos los detalles tanto exterior como interiormente de la lámpara. Me encanta, sin duda es un obsequio que una niña amaría tener en su habitación. Bendiciones para ti y tus manos especiales.
Muchas gracias por esas palabras llenas de elogios para mi trabajo y para mi. 🥰 Me enorgullece y satisface provocar esas reacciones con las cosas que creo. Saludos cordiales.
Que preciosidad. Me encantó, tienes un gran talento 🤗
Muchas gracias por tus bellas palabras. 🥰
It's precious! Your work is illuminating the dreams of a little one! Just good dreams can come being accompanied by this lamp 🌈
Thank you very much 🥰. I hope they are good dreams that my lamp illuminates and that the bad ones it transforms into good ones.
Oye está muy original y no pareciera que fuese cartón te felicito por tan lindo proyecto
Muchas gracias 🥰. Realmente el cartón es un material increíble. 💚
Aprecio el apoyo que siempre brinda a mi contenido 💚
Muchísimas gracias.