
✨🌜🌝🌛✨🌜🌝🌛✨🌜🌝🌛✨🌜🌝🌛✨
Hola hiver's y comunidad artesana! Cómo están todos ? ☺️ Hoy les traigo un proceso creativo de como reutilice una cajita de tablet que estaba en muy buenas condiciones y con un diseño bonito ,y ví que tenía potencial , así que pensé en una forma de decorarla bonita y hacerla como un cofre decorado que me sirviera para guardar cositas como joyas ,o los lacitos que he hecho mientras los entrego, y que sirve también como decoración para mí cuarto y que es un ganar /ganar.
Así que manos a la obra! Les dejo el proceso en fotos aquí!
Materiales
🌙 Cajita reciclada
🌙 Pintura negra
🌙 Pintura blanca
🌙 Pega escolar blanca
🌙 Pinceles
🌙 Palillos
🌙 Cartulina negra
🌙 Pistola de silicón/ barras de silicón
✨🌛🌝🌜✨
English Version
🌜🌝🌛✨🌜🌝🌛✨🌜🌝🌛✨🌜🌝🌛✨
Hello hiver's and artisan community! How are you all? ☺️ Today I bring you a creative process of how I reused a tablet box that was in very good condition and with a nice design, and I saw that it had potential, so I thought of a way to decorate it nicely and make it like a decorated chest that would serve me to store little things like jewelry, or the bows that I have made while I deliver them, and that also serves as decoration for my room so it's a win/win.
So let's get to work! I leave the process in photos here!
Materials
🌙 Recycled box
🌙 Black paint
🌙 White paint
🌙 White glue
🌙 Paintbrushes
🌙 Toothpicks
🌙 Black cardboard
🌙 Glue gun/glue sticks
✨🌛🌝🌜✨
 )
(
)
( )
)
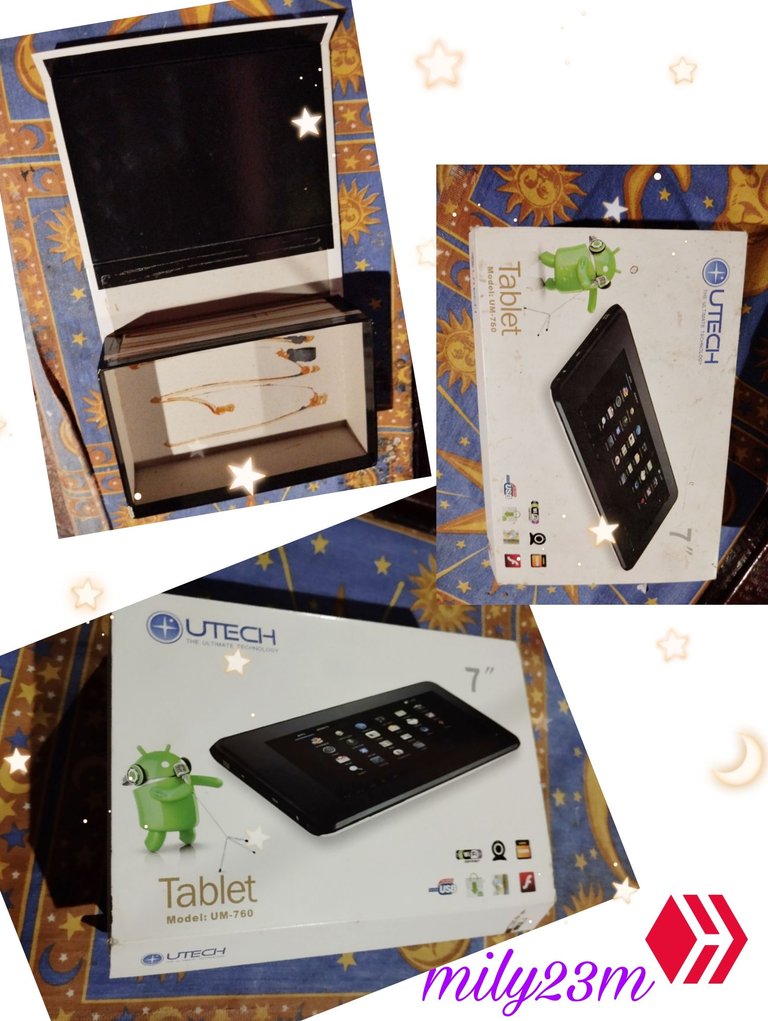
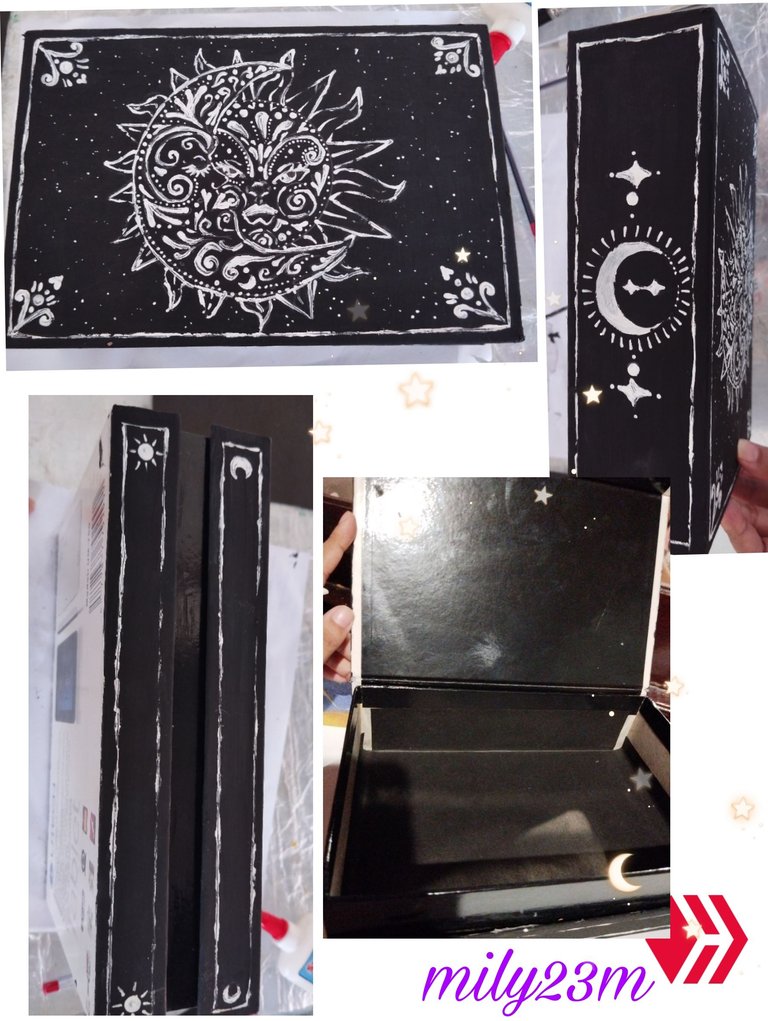
#1 Primero usé esta cajita de tablet que sacaron en mi casa para botarla , el diseño estaba muy genial ,y el cartón era grueso ,y forrado , también un punto a favor es que estaba forrado con terminaciones en negro por lo que solo tenía que tapar las caras de la caja , también algo que tenía la cajita era que tenía imanes en la solapa así que podía ser fácilmente una cajita para hacer un joyero o para adaptarla a otros usos. Limpie la cajita que está sucia , y espere que se secara ,para empezar a pintar, usé pintura al frío negra y mezclé una porción negra con pega blanca, esto para que la pintura se vaya adheriendo mejor a la superficie de la caja.
English Version
#1 First I used this tablet box that they took out at my house to throw away, the design was very cool, and the cardboard was thick, and lined, also a point in its favor is that it was lined with black finishes so I only had to cover the faces, also something that the box had was that it had magnets in the flap so it could easily be a box to make a jewelry box or to adapt it to other uses. I cleaned the dirty box and waited for it to dry, to start painting, I used black cold paint and mixed a black portion with white glue, this so that the paint would adhere better to the surface of the box.
 )
(
)
( )
)
English Version
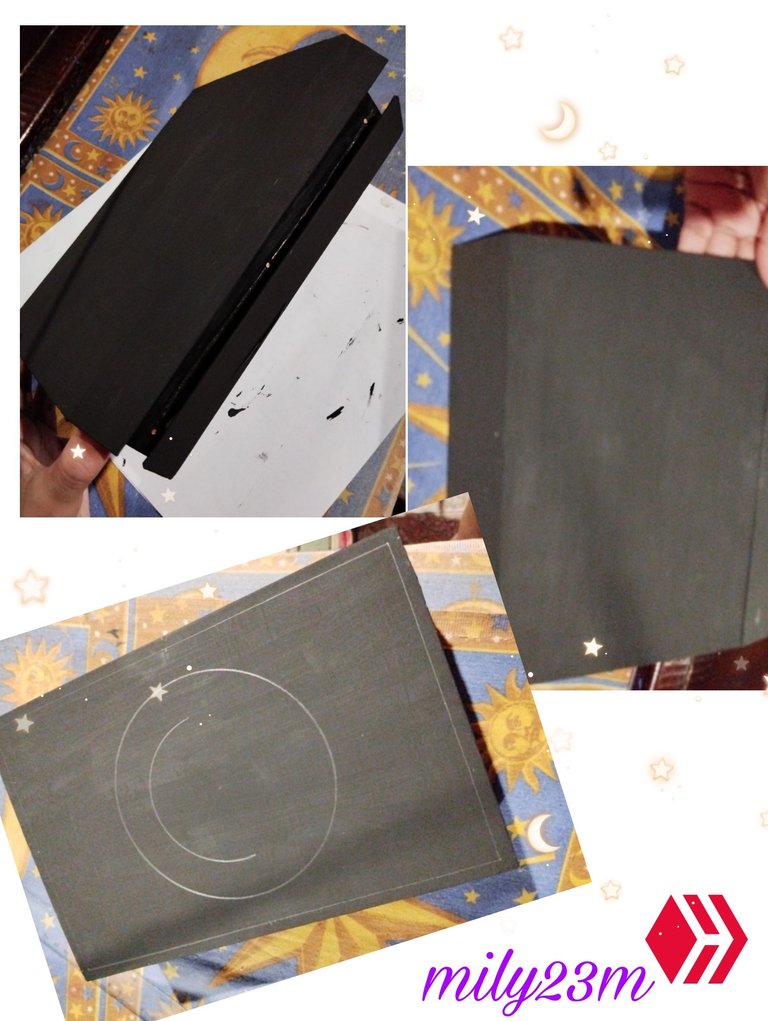
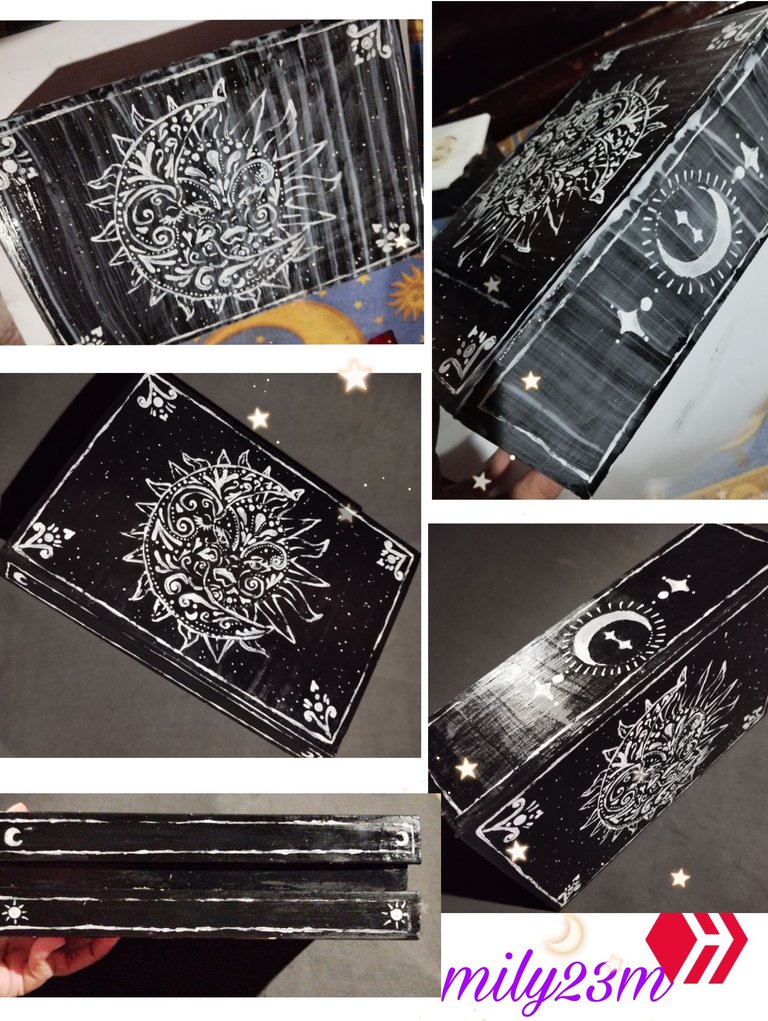
#2 The truth is I was thinking of giving it two coats of paint but due to the smooth surface the paint looked too light, so I ended up giving it 4 coats (hahaha in the end I did entertain myself while the power went out haha), now with these layers of paint the color looks much more uniform, and I took care of painting all the sides and also making sure the edge lines were painted well. Then I started to make the design I wanted adapting it to the space I had in the little box, I made some margins of 0.5 CM apart, and I made two circles of 11 CM and another inside this one of 9 CM only that the inside one I made a half circle, this to guide me in the design I was going to draw, something that I love to draw and do a lot is this design of "eclipses" with a conjugation of the sun and the moon with many arabesques and that have some designs that I have already done in my profile that I have published in previous times, I began to make the sketch of the moon, adding more designs and the face, I also made the sun trying to make the center match the sun's rays, I also made some designs in the corners, for the flap in front I also made margins on the top and bottom flap. For the design on the back with an inverted moon, and also putting 0.5 CM margins.
 )
(
)
( )
)
English Version
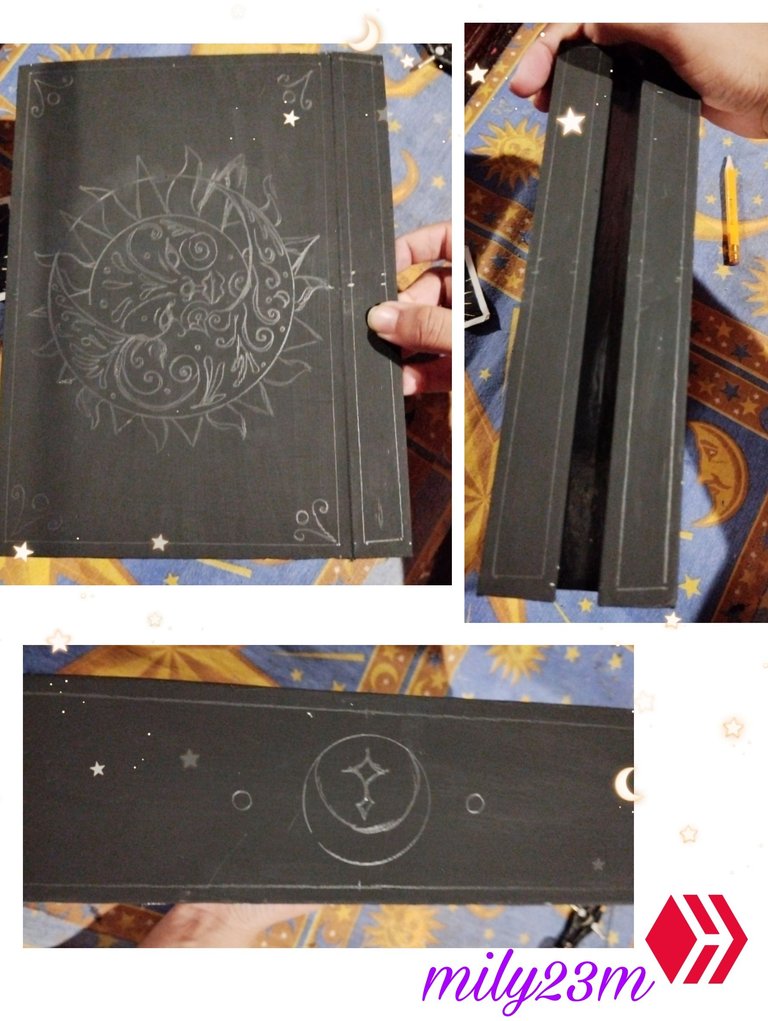
#3 With the white paint and a toothpick (a very fine brush in case you have one) I made the sun design with fine strokes trying to fill in all the spaces, whether with dots or arabesques, for the corners I completed the design adding more details, and I made the margins I tried to make them as straight as possible helping myself with the Ruler 📏 but it moved or stained 😳 so it turned out half messy haha. I also finished the margins on the front, and added some sun figures to the bottom margins, while some moons on the top margins. Since I saw that the moon design on the back looked very simple, I added a lot more details. Then I noticed that because there were some details left from the pencil with which I made the sketch, they were visible, with a fine brush and black paint I covered them so they would have a better finish throughout the box, and I added small dots on the lid of the box to fill in the empty spaces around the sun and the moon, so that they looked like stars. With black cardboard I covered the bottom of the box on the inside, and I glued the side of the box that was peeling off with hot silicone.
 )
)
English Version
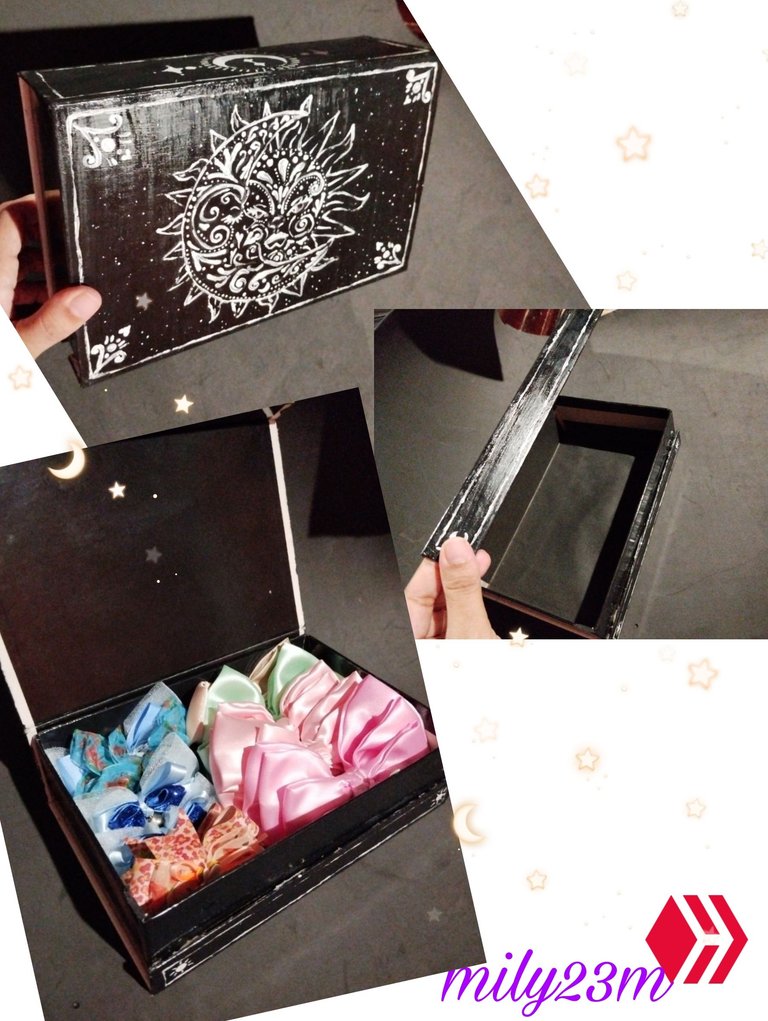
#4 Let the box dry very well, and with white school glue and a large brush I gave the whole box a coat to protect it. When it was dry I decided to give it another coat of glue to give it that shinier finish and to make it more protected.
 )
)
✨Que opinan amigos? ,les gustó? muchas gracias por leerme 💜☺️✨
Fotos tomadas por mí,en mi equipo redmi note 12, editadas en pics art y gifs creados en app creador de gifs, texto traducido en Google traductor.
English Version
✨🌜And here we have the result! 🌛✨It's a very nice little trunk that can work as a jewelry box, or to decorate something very nice, original, cheap and at the same time recycling something that was going to be thrown away, giving it a new life✨
✨What do you think friends? Did you like it, thank you very much for reading me 💜☺️✨
Photos taken by me, on my redmi note 12 device, edited in pics art and gifs created in the gif creator app, text translated in Google translator.
 )
)
The box looks like it's been reborn. A useful house tool now. Nice work
Thank you very much 😊💜 @diyhub, I love the idea of being able to give a new life to an object ♻️ thanks for the support 💜
Congratulations @mily23m! You have completed the following achievement on the Hive blockchain And have been rewarded with New badge(s)
Your next target is to reach 500 upvotes.
You can view your badges on your board and compare yourself to others in the Ranking
If you no longer want to receive notifications, reply to this comment with the word
STOPCheck out our last posts: