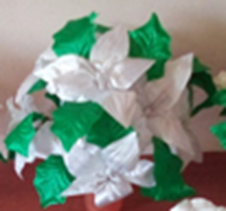
Saludos y un gran abrazo para mis amigos de Hive. Quiero mostrarles una linda manualidad que realicé para un matrimonio esta semana. Realicé unas rosas y unas orquídeas en tela de satén para la decoración.

Las preciosas rosas y orquídeas
Para empezar, repasé lo solicitado por la cliente, que fueron rosas y flores grandes, medianas y pequeñas para la decoración de su boda, las que salgan de la tela aportada, luego organicé el material e instrumentos requeridos:
- La tela de satén que fue provista por la cliente, en los colores blanco, crema y verde.
- Cable con varios alambres de cobre dentro.
- Corta frío o alicate para cortar alambre.
- Exacto o cutex.
- Pistola de Silicón.
- Barras de silicón.
- Tijeras para tela.
- Cinta floral o floratex color verde.
- Cartón para hacer los moldes.
- Alfileres, preferiblemente en un alfiletero.
- Aguja e hilo de coser blanco.
- Encendedor.
- Una vela, en una latita metálica.
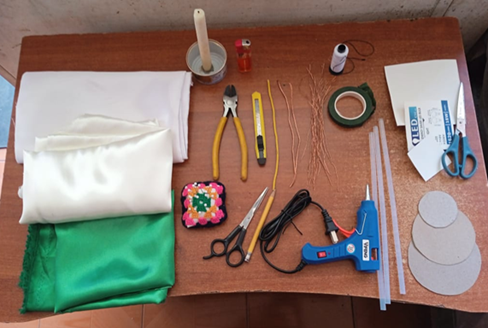
Materiales e instrumentos utilizados inicialmente
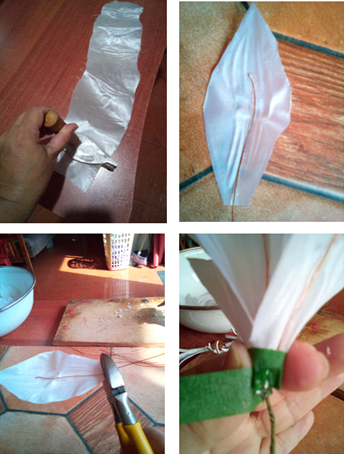
Ahora me dispuse a hacer los prototipos de rosas, una de pétalos grandes y otra con pétalos más pequeños que irá cosida.
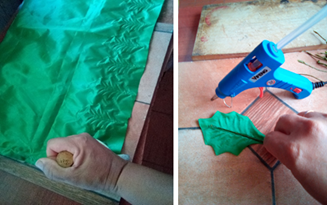
Para la rosa grande, coloqué el cuadrado de cartón de molde y recorté la tela doblada, de tal forma que permitiera rendir la tela y obtener más pétalos, es decir, optimizar al máximo la tela.
Coloqué un alfiler en el lote de cuadrados para tenerlos organizados y fijos, doblé a la mitad el lote de cuadrados y recorté los extremos superiores en forma redondeada y luego procedí a darle forma de pétalos con el calor de la vela, lo que hace que la tela se doble hacia abajo y se hagan pequeñas verrugas, simulando la textura y forma de un pétalo de rosa real.

Armando los pétalos grandes
Al finalizar con los pétalos de la rosa grande comencé con la rosa pequeña. Doblé la tela y con el molde redondo la recorté, les di forma a los pétalos en toda la circunferencia con la vela y luego cosí 10 pétalos y arruché el hilo hasta dejar, aproximadamente, 20 centímetros de pétalos continuos.
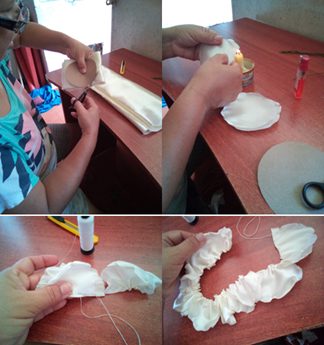
Armado de los pétalos de la rosa pequeña
Luego procedí a preparar los pistilos para los prototipos. Recorté unos 7 centímetros del borde final de la tela que viene como pelusa, lo pegué a un trozo de alambre y lo enrollé, pegando el último extremo; así hice los dos pistilos.
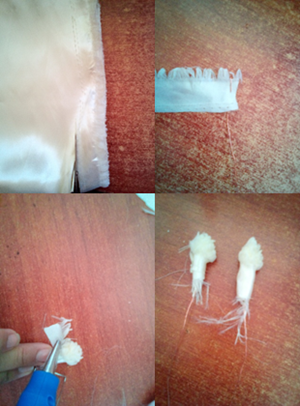
Haciendo los pistilos
Terminado este proceso me dispuse a hacer las hojas. Tomé el alambre, lo forré con el floratex, recorté la tela dando forma como de una casita, para facilitar el bordeado con la vela, le di la forma de hoja con el calor de la vela y la pegué al alambre, reforzándolo con floratex.

Elaboración de las hojas
Al terminar de armar las 4 hojas que necesitaba, armé la flor grande, pegando los pétalos con la pistola de silicón y pegando 2 hojas a los costados, luego terminé de forrar el alambre con floratex, quedando terminada la rosa grande.
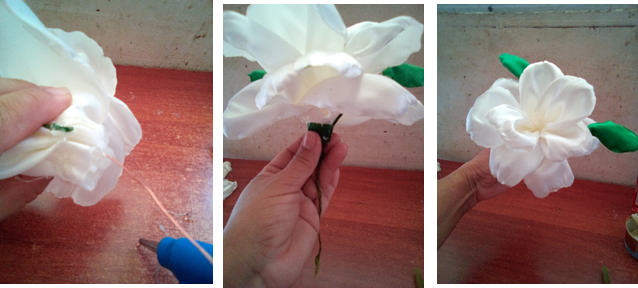
Armado de la rosa de pétalos grandes
Después armé la rosa pequeña, tomé el pistilo y en un extremo de los pétalos lo pegué a éste con la pistola de silicón y fui pegando y enrollando los pétalos hasta llegar al último, dando la forma a la rosa; pegué 2 hojas a los costados, luego terminé de forrar el alambre con floratex, quedando terminada la rosa pequeña.

Armado de la rosa pequeña
Las rosas quedaron bonitas, pero la grande no tenía firmeza en los pétalos y las hojas quedaron extrañas, parecían unos globos desinflados. Entonces decidí, cambiar la técnica para las rosas de pétalos grandes y las hojas.
Se me ocurrió preparar almidón para endurecer levemente la tela, tanto la que iba a utilizar para las rosas de pétalos grandes y las orquídeas, así como la de las hojas. Para las orquídeas y hojas utilicé troqueles; además, para agilizar el proceso de darle forma a los pétalos grandes y a las rosas cosidas, elaboré un mechero casero de alcohol, resultando mas eficiente que la vela. Por lo tanto, adicioné nuevos instrumentos:
- Almidón.
- Un troquel para los pétalos de las orquídeas.
- Un troquel para las hojas.
- Un mechero de alcohol.
- Foami escarchado (opcional)

Materiales e instrumentos adicionados en el proceso
De esta forma, procedí a troquelar todas las hojas que necesitaba, las recorté pegué con pistola de silicón en los alambres previamente forrados con floratex.
Troquelado y armado de hojas
Luego preparé los pistilos de las rosas de pétalos grandes y de las rosas cosidas, de igual forma que en los prototipos, pero con el alambre forrado con floratex. Recorté aproximadamente 7 centímetros de tela para cada pistilo, le pegué el alambre en un extremo y enrollé pegando en varias partes la tela hasta rematar al final. Luego con el encendedor sellé el extremo inferior del pistilo.
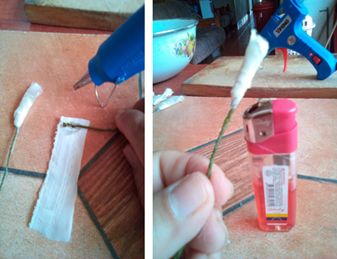
Preparación de pistilos de las rosas y sellado con el encendedor
Así mismo preparé los pistilos para las orquídeas; utilicé foami escarchado, le hice una serie de cortes en forma de flequillos, le di forma en la plancha de ropa, los recorté de aproximadamente 5 centímetros para cada pistilo, lo pegué en el alambre enrollándolo, quedando como una palmerita.
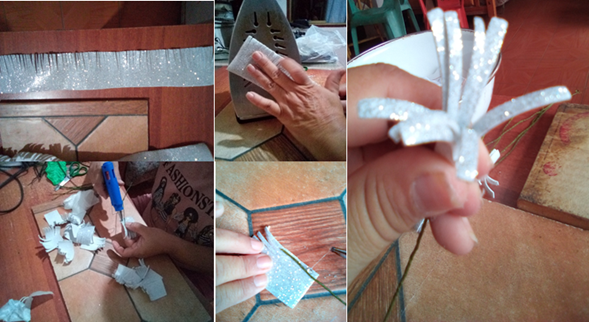
Armado de los pistilos de las orquídeas
Terminado ese proceso, preparé los pétalos de las rosas grandes, dándole forma con el mechero. La tela quedó como plastificada, perfecta para darle firmeza a las rosas.

Elaborando los pétalos para las rosas grandes
Pegué los pétalos como en el proceso de la rosa prototipo y luego recorté tela verde para hacerle los sépalos, pegando con pistola de silicón. Luego les pegué las hojas a los costados y terminé las rosas. Quedaron preciosas.
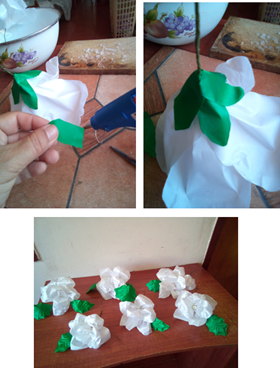
Pegando los sépalos y rosas terminadas
Inicié la elaboración de las orquídeas troquelando la tela, recortando los pétalos, les pegué alambre al dorso de los pétalos para darle movimiento, recorté el exceso de alambre con el corta frío, coloqué el pistilo y forré con floratex la base de la orquídea.
Armado de las Orquídeas
Orquídeas terminadas
De esta manera hice una manualidad que gustó mucho a la clienta, sobre todo que, con un metro de tela blanca, otro metro de tela crema y medio metro de tela verde, logré hacer 41 flores, entre rosas y orquídeas para la decoración de su boda.
Las fotografías pertenecen al autor
HOW I MADE ROSES AND ORCHIDS FOR A WEDDING DECORATION
Greetings and a big hug to my friends at Hive. I want to show you a nice craft I made for a wedding this week. I made some roses and orchids in satin fabric for decoration.
The beautiful roses and orchids
To begin with, I went over what was requested by the client, which were roses and large, medium and small flowers for her wedding decorations, the ones coming out of the fabric provided, then I organized the material and instruments required:
- The satin fabric that was provided by the client, in the colors white, cream and green.
- Cable with several copper wires inside.
- Cold cutter or pliers to cut wire.
- Exact or cutex.
- Silicone gun.
- Silicone sticks.
- Fabric scissors.
- Floral tape or green floratex.
- Cardboard to make the molds.
- Pins, preferably in a pincushion.
- Needle and white sewing thread.
- Lighter.
- A candle, in a metallic tin.
Materials and instruments used initially
I now set about making the prototype roses, one with large petals and one with smaller petals that will be sewn on.
For the large rose, I placed the cardboard square as a mold and cut out the folded fabric, in such a way that it would allow the fabric to yield and obtain more petals, that is, to optimize the fabric as much as possible.
I placed a pin in the batch of squares to have them organized and fixed, folded in half the batch of squares and cut out the top ends in a rounded shape and then proceeded to shape them into petals with the heat of the candle, which makes the fabric fold down and make small warts, simulating the texture and shape of a real rose petal.
Assembling the large petals
When I finished with the petals of the large rose I started with the small rose. I folded the fabric and with the round mold I cut it out, shaped the petals all around the circumference with the candle and then sewed 10 petals and ruffled the thread until I left, approximately, 20 centimeters of continuous petals.
Assembling the petals of the small rose
I then proceeded to prepare the pistils for the prototypes. I cut about 7 centimeters off the end edge of the fabric that comes as fluff, glued it to a piece of wire and rolled it up, gluing the last end; this is how I made the two pistils.
making the pistils
Having finished this process I set about making the leaves. I took the wire, lined it with the floratex, cut out the fabric giving it the shape of a little house, to make it easier to edge with the candle, gave it the leaf shape with the heat of the candle and glued it to the wire, reinforcing it with floratex.
Leaf making
When I finished assembling the 4 leaves I needed, I assembled the big flower, gluing the petals with the silicone gun and gluing 2 leaves to the sides, then I finished lining the wire with floratex, leaving the big rose finished.
Large petal rose assembly
Then I assembled the small rose, I took the pistil and at one end of the petals I glued it to it with the silicone gun and I was gluing and rolling the petals until I reached the last one, giving the shape to the rose; I glued 2 leaves to the sides, then I finished lining the wire with floratex, being finished the small rose.
Setting up the small rose
The roses turned out nice, but the big one had no firmness in the petals and the leaves were strange, they looked like deflated balloons. So I decided to change the technique for the roses with large petals and leaves.
I thought of preparing starch to slightly stiffen the fabric, both the one I was going to use for the large petal roses and the orchids, as well as the one for the leaves. For the orchids and leaves I used dies; also, to speed up the process of shaping the large petals and the sewn roses, I made a homemade alcohol burner, which was more efficient than the candle. Therefore, I added new instruments:
- Starch.
- A die for the orchid petals.
- A die for the leaves.
- An alcohol burner.
- Frosted foami (optional)
Materials and instruments added in the process
In this way, I proceeded to die-cut all the sheets I needed, cut them out, glued them with silicone gun on the wires previously lined with floratex.
Die-cutting and assembling of the leaves
I then prepared the pistils of the large petal roses and the sewn roses, in the same way as in the prototypes, but with the wire lined with floratex. I cut approximately 7 centimeters of fabric for each pistil, glued the wire at one end and rolled the fabric in several parts until the end. Then with the lighter I sealed the lower end of the pistil.
Preparing the pistils of the roses and sealing them with the lighter
In the same way I prepared the pistils for the orchids; I used frosted foami, I made a series of cuts in the shape of bangs, I gave it shape in the clothes iron, I cut them of approximately 5 centimeters for each pistil, I glued it on the wire rolling it, remaining as a little palm tree.
Arming the orchid pistils
Finished that process, I prepared the petals of the large roses, shaping them with the lighter. The fabric was left as plasticized, perfect to give firmness to the roses.
Making the petals for the large roses
I glued the petals as in the prototype rose process and then cut out green fabric to make the sepals, gluing with a silicone gun. Then I glued the leaves to the sides and finished the roses. They turned out beautifully.
gluing the sepals and finished roses
I started the making of the orchids by die-cutting the fabric, trimming the petals, glued wire to the back of the petals to give them movement, trimmed the excess wire with the cold cutter, attached the pistil and lined the base of the orchid with floratex.
Arming the Orchids
Finished orchids
In this way I made a craft that the client liked very much, especially that, with one meter of white fabric, another meter of cream fabric and half a meter of green fabric, I managed to make 41 flowers, between roses and orchids for her wedding decoration.
Photographs belong to the author
Posted Using InLeo Alpha
not surprised that your client will like the results. i also like to see your project :) so beautiful and details :)
Thank you for your comment, I really appreciate it and I hope my client had an excellent wedding.
Congratulations @norisplus! You have completed the following achievement on the Hive blockchain And have been rewarded with New badge(s)
Your next target is to reach 1750 upvotes.
You can view your badges on your board and compare yourself to others in the Ranking
If you no longer want to receive notifications, reply to this comment with the word
STOPCheck out our last posts:
Exitos!!
Gracias ❤️