𝔽𝕚𝕝𝕚𝕘𝕣𝕒𝕟𝕒

Buenas, hoy quiero compartir mi primera publicación el la fabulosa comunidad de #HiveDiy para enseñarles paso a paso cómo diseñar un corazón y un topper para torta con el arte del Filigrana.
Para quienes no sepan lo que es, el Filigrana es una técnica orfebre, utilizada en la joyería artesanal. Consiste en rellenar con finísimos hilos de metal, generalmente oro o plata, formas o figuras previamente elaboradas por el artesano, que conforman complejas piezas de joyería, formando un dibujo semejante a un encaje.
Pero además de este tipo existe otro que se trabaja con papel y cartulina, que es el que les presento hoy ya que no soy joyera ni trabajo con olfebrería. Cuando se trabaja el filigrana con papel o cartulina se realiza un dibujo o una marca en el papel en el momento de su fabricación y se adorna con tiras de cartulina con diferentes formas.
Yo les enseñaré a realizar un Corazón y un Topper para Torta. ❤️🍰
Si te interesa saber más, sigue leyendo. A continuación presentaré la lista de los materiales.
𝕄𝕒𝕥𝕖𝕣𝕚𝕒𝕝𝕖𝕤

Como pueden observar, los materiales son bastante accesibles. Y sencillos de utilizar. Sin embargo si un niño hará este trabajo, recomiendo supervición de sus padres para el uso de la tijera y el exacto. Dicho esto, continúo explicando los pasos.
ℙ𝕒𝕤𝕠𝕤 𝕒 𝕊𝕖𝕘𝕦𝕚𝕣
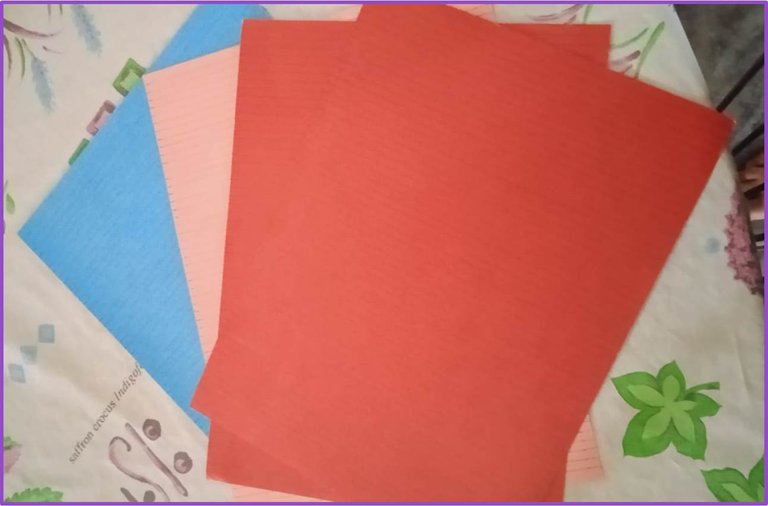
- Paso 1: Como pueden observar en la foto, el primer paso es dividir todas las cartulinas haciendo uso del lápiz y la regla, en líneas de un grosor máximo de 0,5 mm. Puedes hacerlo a lo largo de la hoja o a lo ancho. Yo preferí hacerlo a lo ancho para obtener más tiras.

- Paso 2: En este paso se procede a realizar el dibujo de lo que querramos crear en filigrana. Yo en este caso hice un Corazón de aproximadamente 8 cm o 10 cm de ancho y alto. Las letras en la parte de arriba las hice a mano alzada, al igual que el corazón pero existen letras moldes y formas que sirven de moldes para hacer dibujos, letras o números.

- Paso 3: Aquí se encargarán de recortar las tiras de cartulina con cuidado para que no pierdan la forma ni queden unas más gruesas que otras. Este paso es necesario que se realice bajo la supervición de un adulto si un niño piensa realizarlo. También pueden recortarse con un exacto. Como vieron, salieron varias tiras.
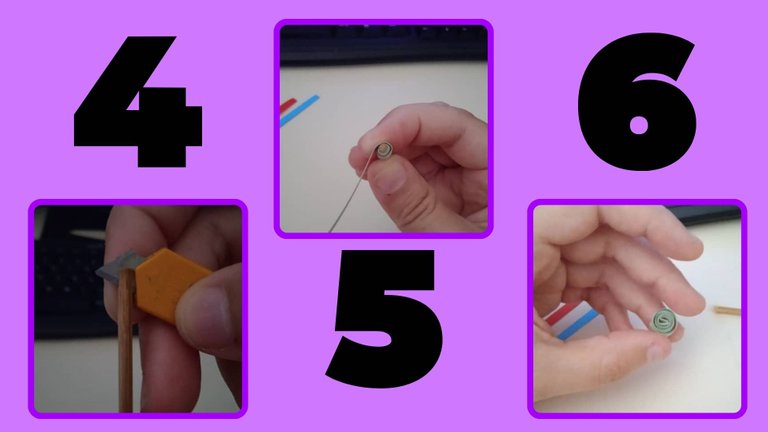
- Paso 4: El cuarto paso consiste en tomar el palito de altura o palillo grande y cortar un poco la parte superior haciendo una pequeña incisión fina. Esto para introducir la cartulina y usarlo de agarre para luego enrollarlo.
- Paso 5: Consiste en tomar una de las tiras, introducirla en la ranura del palillo y comenzar a darle vuelta con las manos hasta formar un circulo pequeño.
- Paso 6: Este paso puede ser un poco dificil, ya que dependerá de cuánto apretaste el círculo jeje, puedes soltarlo un poco para que cuando lo saques del palillo no se te desarme. Si se te desarma, vuelve a intentar el paso 5 y repetir el 6.

- Paso 7: Aqui sólo colocarás un puntito de pega en el borde para cerrar el círculo que hiciste anteriormente.
- Paso 8: Sostenerlo unos segundos hasta que se pegue bien el borde.
- Paso 9: En este paso les muestro como hacer una figura sencilla para usarlo más adelante. A esta figura se le llama Gota y se elabora solamente haciendo presión en uno de los lados del círculo.

- Paso 10: Aqui les muestro la misma técnica con el palito de altura pero esta vez utilizando una pinza de cejas bastante fina en la punta. Simplemente se presiona la tira de cartulina lo más cerca del borde y se procede a enrollarlo.
- Paso 11: Aqui muestro la forma que le dejé al final. Quice hacer el círculo apretadito. Aqui también se saca con cuidado para que no pierda su forma al liberarlo de la pinza.
- Paso 12: Al igual que la tira anterior, le coloco un punto de pega blanca en el borde y luego lo pego hasta que quede todo junto.
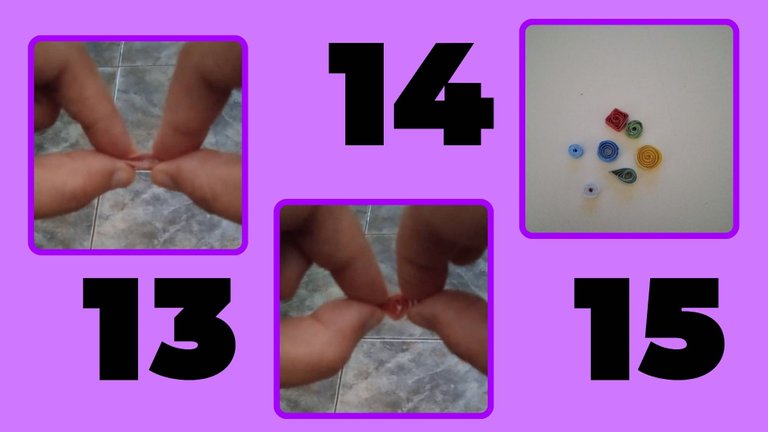
- Paso 13: En este paso quise mostrar otra figura clásica y sencilla que se hace en el filigrana. Es el Cuadrado. Consiste primero en doblar por los dos lados el círculo abierto.
- Paso 14: Luego tomar los lados restantes y hacer el mismo doblez hasta que queden marcados.
- Paso 15: Aqui pueden observar algunas de las formas que voy a utilizar para armar el corazón y el topper. Entre ellas están el Círculo apretadito, la gota, el circulo abierto y el cuadrado.
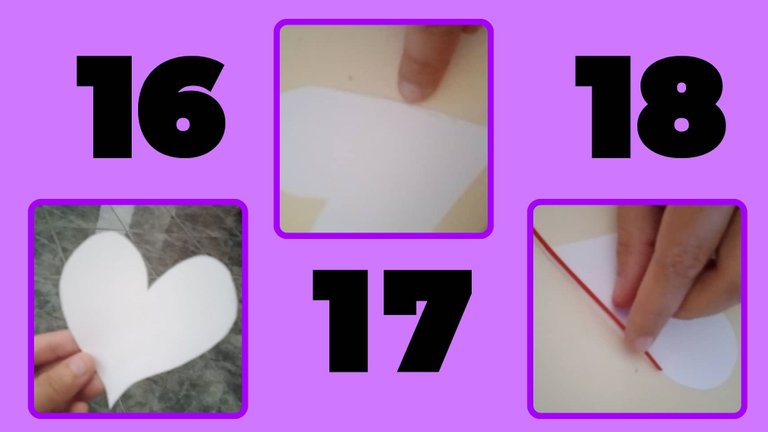
- Paso 16: Se recorta la forma de corazón o la figura que se desea elaborar en una cartulina blanca para que destaque el fondo.
- Paso 17: Luego se coloca una linea fina de pega blanca en el borde de la figura, justo donde muestra mi dedo.
- Paso 18: Luego se toma una tira del color que prefieras. Yo elegí el rojo, por ser un corazón. Se va pegando poco a poco la tira, doblando o curveando donde se deba hacer hasta completar toda la figura. Recomiendo hacer el recorrido con la tira de cartulina primero antes de pegarla para facilitar la adición. Esta parte también es un poco tediosa porque hay que esperar a que se seque para seguirla pegando.
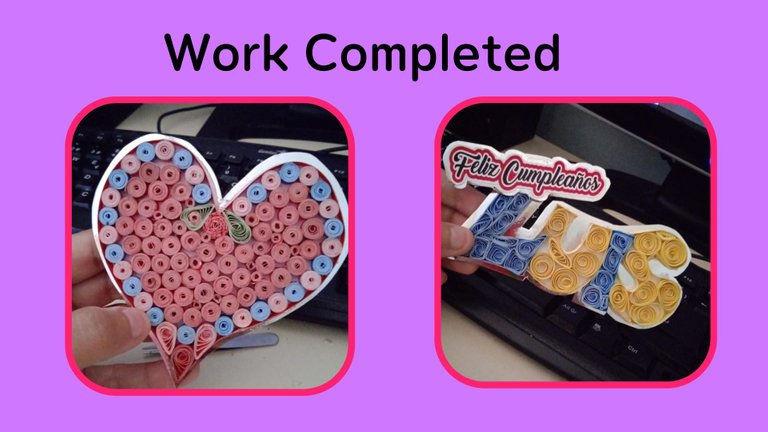
𝔸𝕤𝕚 ℚ𝕦𝕖𝕕𝕒

Como pueden observar, hay que hacer varias de las formas básicas para rellenar todo el espacio. Para el topper le agregué la frase feliz cumpleaños y un fondo plateado con una cartulina metalizada.
Para usarlo, pueden pegarle un imán en la parte de atrás y decorar la nevera de su cocina.
Bien amigos, espero que les haya gustado mi idea. Déjame saber en los comentarios ¿qué te pareció? ¿lo intentarías?
Todas las Imágenes son de Mi Propiedad y Fueron tomadas con mi teléfono Redmi Note 9A.
Banners diseñados con Canva
Traducido con DeepL

ENGLISH VERSION
English
ℚ𝕦𝕚𝕝𝕝𝕚𝕟𝕘
Hello, today I want to share my first post in the fabulous #HiveDiy community to show you step-by-step how to design a heart and a cake topper with the art of Quilling.
For those who do not know what it is, the Quilling is a goldsmith technique used in handcrafted jewelry. It consists of filling with very fine metal threads, usually gold or silver, shapes or figures previously elaborated by the artisan, which form complex pieces of jewelry, creating a pattern similar to lace.
But in addition to this type there is another one that is worked with paper and cardboard, which is the one I present to you today since I am not a jeweler and I do not work with jewelry. When the Quilling is worked with paper or cardboard, a drawing or a mark is made on the paper at the time of its manufacture and it is decorated with strips of cardboard with different shapes.
I will teach you how to make a Heart and a Cake Topper. ❤️🍰
If you are interested in learning more, read on. Below is the list of materials.
𝕄𝕒𝕥𝕖𝕣𝕚𝕒𝕝𝕤

As you can see, the materials are pretty accessible. And simple to use. However, if a child will be doing this work, I recommend parental supervision for the use of the scissors and the exact. That said, I continue to explain the steps.
𝕊𝕥𝕖𝕡𝕤 𝕥𝕠 𝕗𝕠𝕝𝕝𝕠𝕨:
- Step 1: As you can see in the photo, the first step is to divide all the cardboard using the pencil and the ruler, in lines of a maximum thickness of 0.5 mm. You can do this along the length of the sheet or across the width. I preferred to do it widthwise to get more strips.
- Step 2: In this step, we proceed to make the drawing of what we want to create in filigree. In this case, I made a heart of approximately 8 cm or 10 cm wide and high. The letters at the top I made them freehand, just like the heart, but there are letter molds and shapes that serve as molds to make drawings, letters, or numbers.
- Step 3: Here they will be in charge of cutting out the cardboard strips carefully so that they do not lose their shape or get thicker than others. This step needs to be done under the supervision of an adult if a child is going to do it. They can also be cut out with an exact. As you saw, several strips came out.
- Step 4: The fourth step is to take the tall stick or big stick and cut a little bit of the upper part making a small thin incision. This is to introduce the cardboard and use it as a grip to roll it up.
- Step 5: It consists of taking one of the strips, inserting it into the groove of the toothpick, and starting to turn it with your hands until a small circle is formed.
- Step 6: This step can be a little difficult, as it will depend on how much you tighten the circle hehe, you can loosen it a little so that when you take it out of the toothpick it doesn't fall apart. If it comes apart, try step 5 again and repeat step 6.
- Step 7: Here you will only place a dot of glue on the edge to close the circle you made earlier.
- Step 8: Hold it for a few seconds until the edge sticks well.
- Step 9: In this step, I show you how to make a simple shape for later use. This figure is called Drop and it is made only by pressing on one of the sides of the circle.

- Step 10: Here I show you the same technique with the height stick but this time using relatively thin eyebrow tweezers at the tip. Simply press the cardboard strip as close to the edge as possible and proceed to roll it up.
- Step 11: Here I show the shape I left at the end. I wanted to make the circle tight. Here it is also taken out carefully so that it does not lose its shape when it is released from the clamp.
- Step 12: As with the previous strip, I place a dot of white glue on the edge and then glue it all together.
- Step 13: In this step, I wanted to show another classic and simple figure that is made in filigree. It is the Square. It consists first of folding the open circle on both sides.
- Step 14: Then take the remaining sides and make the same fold until they are marked.
- Step 15: Here you can see some of the shapes I am going to use to make the heart and the topper. Among them are the tight circle, the drop, the open circle, and the square.
- Step 16: Cut out the heart shape or the figure you want to make on white cardboard so that the background stands out.
- Step 17: Then a thin line of white glue is placed on the edge of the figure, just where my finger shows.
- Step 18: Then you take a strip of the color of your choice. I chose red because it is a heart. Glue the strip little by little, bending or curving where you need to do it until you complete the whole figure. I recommend doing the route with the cardboard strip first before gluing it to facilitate the addition. This part is also a bit tedious because you have to wait for it to dry before continuing to glue it.
𝕀𝕥'𝕤 𝕕𝕠𝕟𝕖 𝕝𝕚𝕜𝕖 𝕥𝕙𝕒𝕥:
As you can see, you have to make several of the basic shapes to fill all the space. For the topper, I added the phrase Happy birthday and a silver background with metallic cardboard.
To use it, you can stick a magnet on the back and decorate your kitchen fridge.
Well friends, I hope you liked my idea. Let me know in the comments what you thought, would you try it?
All images are my property and were taken with my Redmi Note 9A phone.
Banners designed with Canva
Translated with DeepL

Que hermoso trabajo Ivanna!! Me encanta el paso a paso y el resultado final... te quedó genial!😀
Muchas gracias! me alegra mucho que te gustara 😄
Mucho!❤️
Me encanto esta presentación.
Admiro a las personas que tienen el pulso para lograr creaciones, tan simples y profesionales. ¡Felicidades por eso!
Saludos.
oohhh gracias por considerarme profesional para esto aunque pienso que hay personas que lo hacen mejor que yo jejeje yo soy principiante
Congratulations @pannavi! You have completed the following achievement on the Hive blockchain And have been rewarded with New badge(s)
Your next target is to reach 3500 upvotes.
You can view your badges on your board and compare yourself to others in the Ranking
If you no longer want to receive notifications, reply to this comment with the word
STOPCheck out our last posts:
Gracias Gracias!
¡Eso es perfecto @pannavi! ¡Eres un verdadero profesional de Hive! ¡Adelante hacia esa nueva meta!
Por cierto, también necesitamos tu ayuda. ¿Podemos pedirle que apoye nuestra propuesta para que nuestro equipo pueda continuar con su trabajo?
Todo lo que necesita hacer es hacer clic en el botón "soporte" en esta página: https://peakd.com/proposals/248.
Gracias!
Conocia esa tecnica pero no sabia que se llamaba asi, aprendi algo nuevo jeje muy bonito te quedo, me imagino la paciencia que debe llevar hacer algo asi 😲
Si requiere mucha paciencia y bueno yo lo hago poco a poco jejeje hacerlo todo en un día cansa un poco, aunque hay lugares donde venden las tiras ya cortadas y los instrumentos propios para esto, así que agiliza un poco el trabajo en ese aspecto..
Ohhhhh vamos mejorando, que bien amiga, muy bien explicado este paso a paso, te felicito, éxitos!!
Gracias gracias amiga! este es mi primer paso a paso, más adelante espero animarme otra vez con otra manualidad 😄
Hermoso de verdad y que paciencia. Yo lo.hubiera revoleado todo jajajjaa genial bella se te da bien las manualidades . No me gusta realizar lo pero me gusta admirar el trabajo artesano. Soy de esas que siempre algo se compra. Son bellezas realmente y hechas a mano 💕
Definitivamente hay que tener paciencia para hacerlo, sobre todo si no se cuenta con los instrumentos específicos que ahorran trabajo jeje, como las tiras ya cortadas y el dispositivo para enrollar las tiras de forma automática.. venden todo eso en otros lugares, pero aqui donde vivo no, así que hay que adaptarse 😄