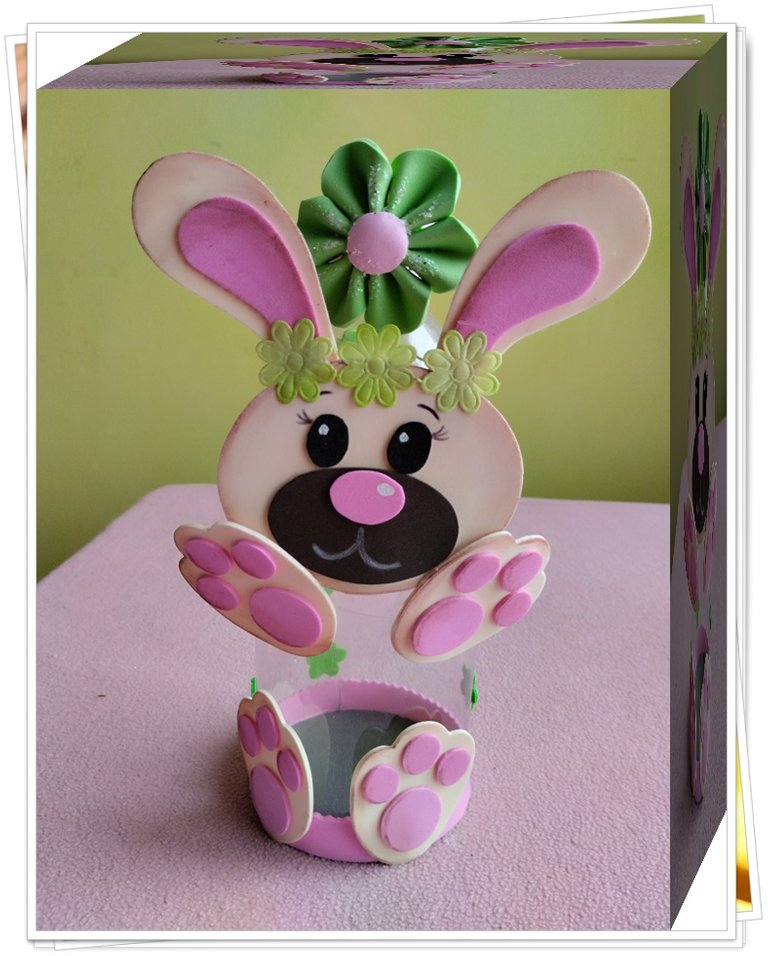
Saludos hivers creativos, hoy vengo a compartir con ustedes un tutorial de cómo realizar un dulcero con una linda conejita a partir de una botella plástica. Este será su uso principal, sin embargo, una vez que nos hallamos comido las chucherías, lo podemos utilizar para guardar diferentes accesorios (cintillos, colas, hebillas, lazos o aquellos que consideremos pertinentes). Continúo trabajando con materiales de reciclaje, así contribuyo a reducir la contaminación y extiendo el mensaje de concientización para la protección del medio ambiente, pues el impacto del cambio climático es un asunto serio que nos afecta a todos.
Este detalle quise hacérselo a mi tía Yenny, ya que próximamente será su cumpleaños, quise tener este gesto con ella como muestra de agradecimiento por todos sus cuidados y por tanto cariño. Ella siempre ha estado presente en mi vida, brindando su mano amiga y ofreciendo las mejores palabras para animarme en los peores momentos. Su capacidad para dar es extraordinaria, así que es propicio que retribuya un poco esa generosidad.
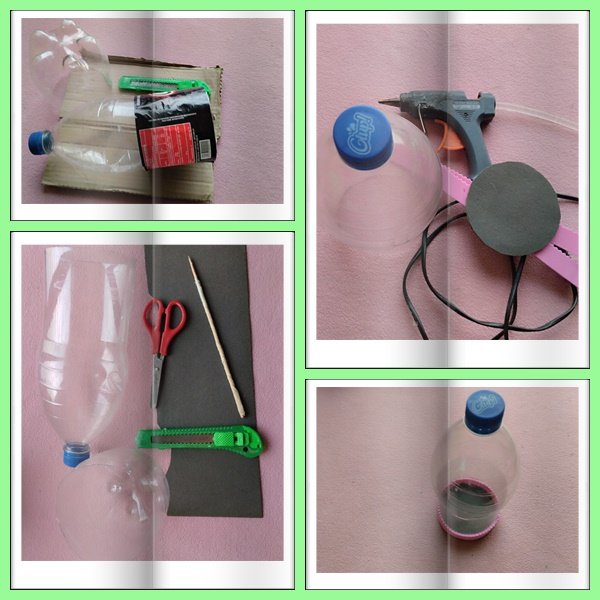
Ahora describiré los materiales que requerimos:
-Botella plástica
-Cartón
-Cartulina negra
-Silicón en barra
-Pistola de silicón
-Foami (color piel, rosado, verde, negro, marrón)
-Foami escarchado (verde)
-Hojas recicladas
-Lápiz
-Colores
-Exacto
-Tijera
-Flores de tela
Greetings creative hivers, today I come to share with you a tutorial on how to make a candy box with a cute bunny from a plastic bottle. This will be its main use, however, once we have eaten the sweets, we can use it to store different accessories (ribbons, tails, buckles, bows or those that we consider relevant). I continue to work with recycled materials, thus contributing to reduce pollution and spreading the message of awareness for the protection of the environment, as the impact of climate change is a serious issue that affects us all.
I wanted to give this gift to my aunt Yenny, since it will soon be her birthday, I wanted to have this gesture with her as a token of gratitude for all her care and affection. She has always been present in my life, offering her helping hand and the best words to cheer me up in the worst moments. Her ability to give is extraordinary, so it is only fitting that I give back a little of that generosity.
I will now describe the materials we require:
-Plastic bottle
-Cardboard
-Black cardboard
-Silicone stick
-Silicone gun
-Foami (skin color, pink, green, black, brown)
-Frosted Foami (green)
-Recycled leaves
-Pencil
-Colors
-Exacto
-Scissors
-Cloth flowers
Procedimiento:
Busqué una botella de plástico de dos litros, le corté la parte de abajo y así quedó de una medida considerable para nuestro proyecto. La parte recortada no se utilizará, la guardaré para otro trabajo.
En cartón saqué un círculo, este serviría de base inferior, lo forré con cartulina negra por ambos lados. Luego, le coloqué una tira de foami rosada para que pudiera engancharse, usé la tijera en forma de zin zag. Inmediatamente, vestí la tapa superior con foami rosado.
Decidí realizar la figura de un conejo, ya que me parecen animales muy tiernos y hermosos, pero no quería colocarlo en cuerpo completo, sino que saqué los moldes de la cabeza y las cuatro patas.
Procedure:
I looked for a two-liter plastic bottle, cut off the bottom part and thus it was of a considerable size for our project. The cut part will not be used, I will save it for another project.
I cut a circle out of cardboard, this would serve as the bottom base, I lined it with black cardboard on both sides. Then, I placed a strip of pink foami so that it could be hooked, I used the scissors in a zin zag shape. Immediately, I dressed the top cover with pink foami.
I decided to make the figure of a rabbit, as I find them very cute and beautiful animals, but I did not want to place it in full body, but I took the molds of the head and the four legs.
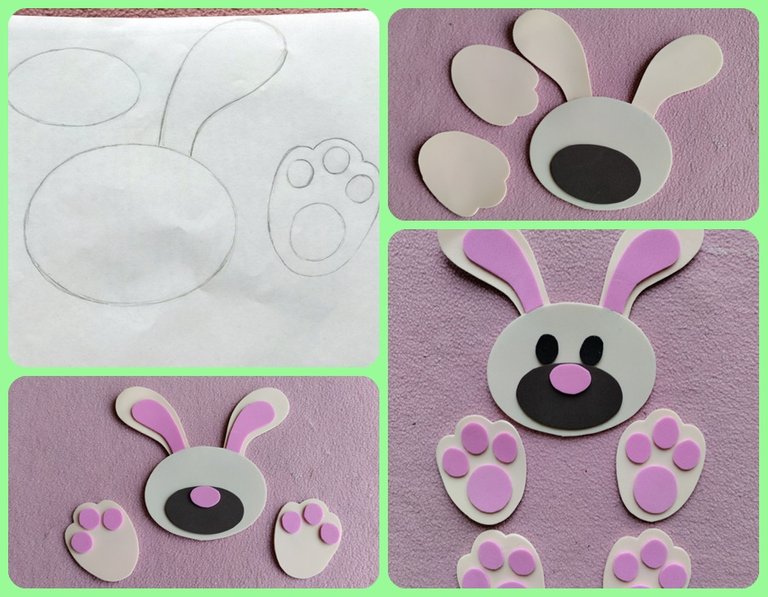
Recorté los moldes y los saqué en foami color piel, los detalles internos de las orejas y las patas fueron en color rosado. La trompa en marrón, la nariz en rosado y los ojos en negro.
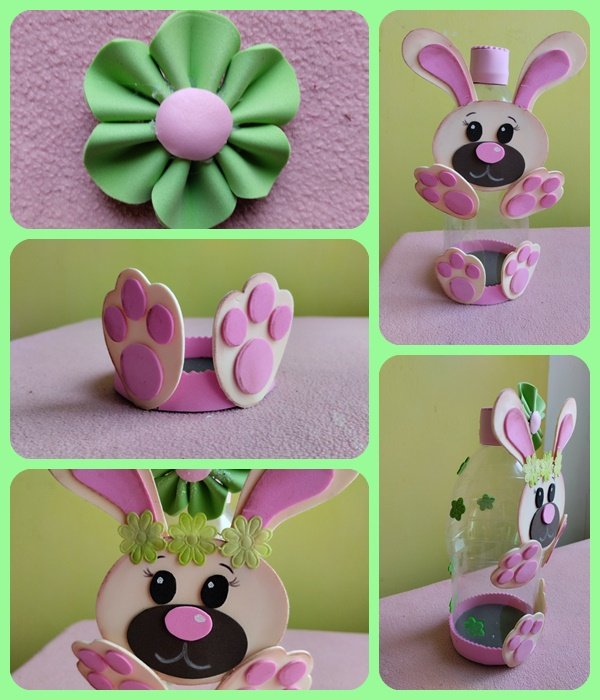
Con un poco de agua humedecí la punta de algunos colores e hice efectos a la cara y a las patas. También delineé la boca, las cejas y las pestañas. Seguidamente, pegué la estructura a la botella. Las patas traseras quedaron sujetas a la tapa posterior, de modo que pudiera abrirse y cerrarse con facilidad. En la cabeza del conejo le puse un cintillo, el cual estaba formado por tres flores de tela.
Para la flor saqué 6 cuadrados y los moldeé en forma de pétalos, posteriormente los uní con silicón en el medio para que quedaran en relieve. Los pegué bien juntitos, luego les hice un círculo. Una vez que estuvo listo la añadí a la tapa superior.
Decoré la zona transparente de la botella con pequeñas flores de foami escarchado. Como se puede apreciar, los colores que utilicé para el diseño fueron rosado y verde claro, pues considero que tienen una buena armonía cuando se observan conjunto.
I cut out the molds and made them in skin colored foami, the inner details of the ears and paws were in pink. The trunk in brown, the nose in pink and the eyes in black.
With a little water I wet the tip of some colors and made effects to the face and paws. I also outlined the mouth, eyebrows and eyelashes. Then I glued the structure to the bottle. The back legs were attached to the back lid so that it could be opened and closed easily. On the bunny's head I attached a headband, which was made of three fabric flowers.
For the flower I took 6 squares and molded them in the shape of petals, then I joined them with silicone in the middle so that they would be in relief. I glued them together, then I made a circle. Once it was ready, I added it to the top lid.
I decorated the transparent area of the bottle with small frosted foami flowers. As you can see, the colors I used for the design were pink and light green, because I think they have a good harmony when seen together.
Esto es todo por ahora, fue un gusto mostrarles este paso a paso. Nos seguimos leyendo. Bendiciones y éxitos.
Todas las fotografías son de mi archivo personal.
El texto fue traducido con www.DeepL.com/Translator (versión libre).
That's all for now, it was a pleasure to show you this step by step. We will keep reading. Blessings and success.
All pictures are from my personal archive.
The text was translated with www.DeepL.com/Translator (free version).

~~~ embed:1635834127189524481 twitter metadata:MTY0MDA1NDkzfHxodHRwczovL3R3aXR0ZXIuY29tLzE2NDAwNTQ5My9zdGF0dXMvMTYzNTgzNDEyNzE4OTUyNDQ4MXw= ~~~
The rewards earned on this comment will go directly to the people( @ramisey, @yolimarag ) sharing the post on Twitter as long as they are registered with @poshtoken. Sign up at https://hiveposh.com.
Muy bonito, creativo, y fácil de hacer, y como dices se le puede dar diferentes usos
Así es, amiga. Lo importante es darle la utilidad que queramos y necesitemos. Gracias por visitar mi blog. Saludos.
#posh
This is a great upcycled work. The bunny face looks cute.
Grateful for the appreciation of my work, it was a pleasure to share with you. Best regards.
Keep up the great work.
¡Enhorabuena!
✅ Has hecho un buen trabajo, por lo cual tu publicación ha sido valorada y ha recibido el apoyo de parte de CHESS BROTHERS ♔ 💪
♟ Te invitamos a usar nuestra etiqueta #chessbrothers y a que aprendas más sobre nosotros.
♟♟ También puedes contactarnos en nuestro servidor de Discord y promocionar allí tus publicaciones.
♟♟♟ Considera unirte a nuestro trail de curación para que trabajemos en equipo y recibas recompensas automáticamente.
♞♟ Echa un vistazo a nuestra cuenta @chessbrotherspro para que te informes sobre el proceso de curación llevado a diario por nuestro equipo.
🥇 Si quieres obtener ganancias con tu delegacion de HP y apoyar a nuestro proyecto, te invitamos a unirte al plan Master Investor. Aquí puedes aprender cómo hacerlo.
Cordialmente
El equipo de CHESS BROTHERS
Gracias por el apoyo. Saludos.
Que lindo amiga, muy creativo. Felicidades!👍🥰
Agradecida por tu comentario, me alegra que te haya gustado. Fue un placer compartirlo. Bendiciones para ti.
Una cuchura total😍 me encanta, aparte de dulcero, seria un buen organizador escolar jeje, lo pondre en practica pero con un conejo jeje para mi hijo🥰
Me alegra que mi idea te haya sido de utilidad, hazlo es muy sencillo. Agradecida por tu visita. Recibe un cálido saludo desde la distancia.