
En días pasados, Sara estaba arreglando sus colas y las hebillas en su bolso, las colocaba ahí porque no tenía otro lugar donde guardarlas. Entonces se me ocurrió hacer un organizador sencillo y práctico para regalárselo. Empecé a buscar en internet ideas que pudieran ayudar a plantear este proyecto, entre tantas figuras observadas, elegí un unicornio, este animal mítico me parece muy hermoso y, además, fácil de hacer, por supuesto, lo adapté a los materiales que tenía disponibles, a mis gustos y a los de la pequeña.
Materiales:
- Cartulina doble faz.
- Cinta dorada.
- Marcador negro.
- Fomi naranja y rosado.
- Pega y silicón en barra.
- Pistola de silicón.
- Papel crepé.
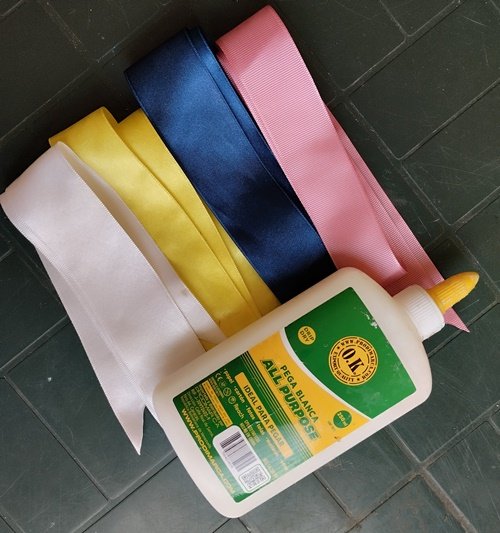
- Cintas: blanca, rosada, amarilla y azul.
- Hoja reciclada.
- Lápiz.
- Exacto.
- Tijera.
Hi, dear community. I give you the warmest welcome to my blog, I hope you're doing well, enjoying the benefits of life and collecting smiles, nothing better than good humor to attract good vibes.
A few days ago, Sara was arranging her tails and buckles in her purse, she was putting them there because she had no other place to put them. Then it occurred to me to make a simple and practical organizer to give it to her. I started looking for ideas on the internet that could help me plan this project, among so many figures observed, I chose a unicorn, this mythical animal seems very beautiful to me and, in addition, easy to make, of course, I adapted it to the materials I had available, to my tastes and to those of the little one.
Materials:
- Double-sided cardboard.
- Golden tape.
- Black marker.
- Orange and pink foam.
- Glue and silicone in a bar.
- Silicone gun.
- Crepe paper.
- Ribbons: white, pink, yellow and blue.
- Recycled sheet.
- Pencil.
- Exact.
- Scissors.
Procedimiento:
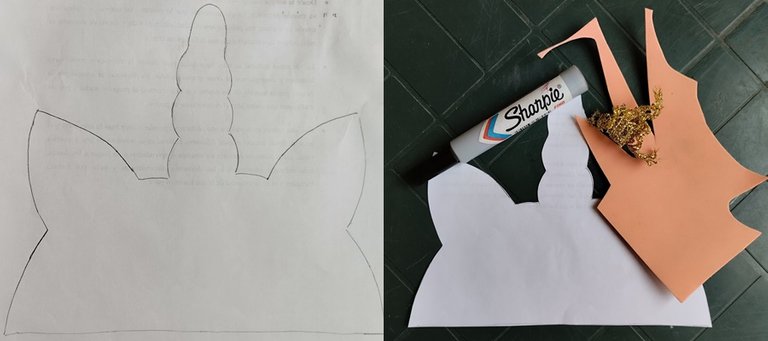
En principio elaboré el patrón del unicornio, solo sería la mitad de la cara del animal. Lo recorté y lo marqué en cartulina blanca, lo saqué doble para que quedara firme. Posteriormente, procedí a pegar las dos tapas, lo dejé secando y le coloqué un libro pesado arriba para evitar cualquier curvatura. Lo hice de esta manera, pues este material es blando, por lo que ustedes pueden usar cartón o alguna portada de cuaderno y, luego, pintarlo.
Moldeé el interior de las orejas en foami rosado, dos iguales para pegarlas de cada lado. Quise darle un toque de originalidad y elegancia al cuerno, así que busqué cinta dorada decorativa, le di varias vueltas hasta que quedó completamente cubierto, esto también le concedió relieve a la figura, me gustó el resultado.
Procedure:
I started by making the unicorn pattern, it would only be half the face of the animal. I cut it out and traced it onto white construction paper, I cut it out twice so it would be sturdy. Afterwards, I proceeded to glue the two pieces together, I let it dry and put a heavy book on top to avoid any curvature. I did it this way because this material is soft, so you can use cardboard or a notebook cover and then paint it.
I molded the inside of the ears out of pink foam, two of them to glue on each side. I wanted to give the horn a touch of originality and elegance, so I looked for some decorative gold ribbon, I wrapped it around several times until it was completely covered, this also gave the figure some relief, I liked the result.
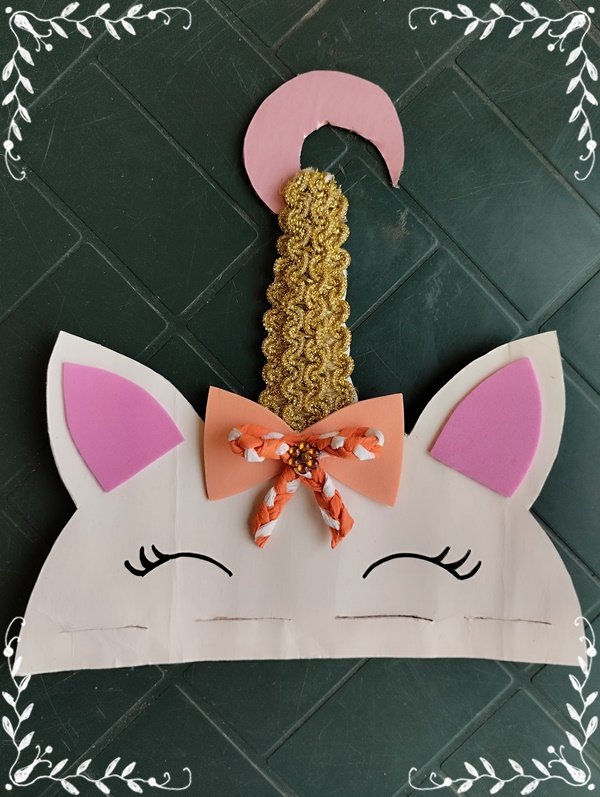
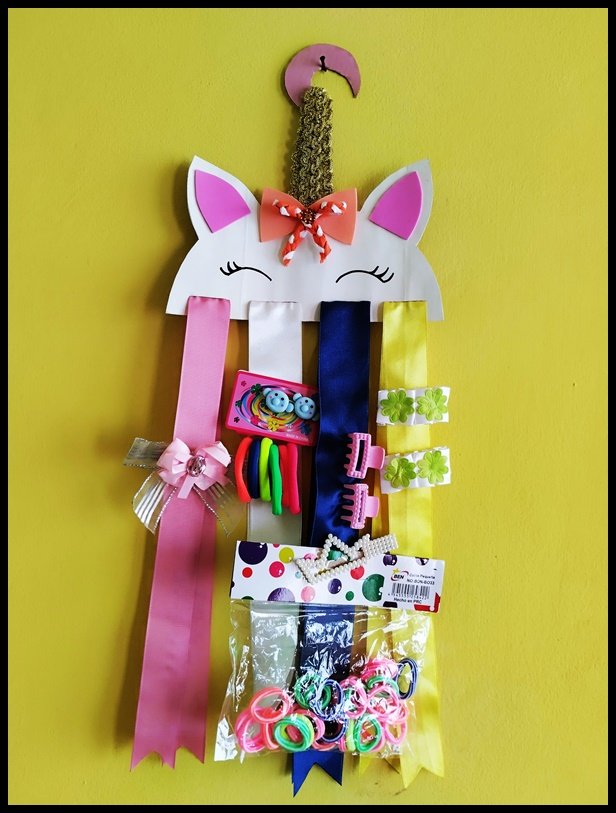
Con el marcador negro le pinté los ojos, en este caso, una curva con pestañas para simular que estaban cerrados. En la parte inferior, realicé con el exacto cuatro zanjas delgadas. La idea era introducir las cintas por dichas aberturas, que quedaran ajustadas y no se movieran, procuré ubicar cada color para lograr una combinación armoniosa.
With the black marker I painted the eyes, in this case, a curve with eyelashes to simulate that they were closed. At the bottom, I made four thin ditches with the exact one. The idea was to introduce the tapes through said openings, which would be adjusted and not moved, I tried to locate each color to achieve a harmonious combination.
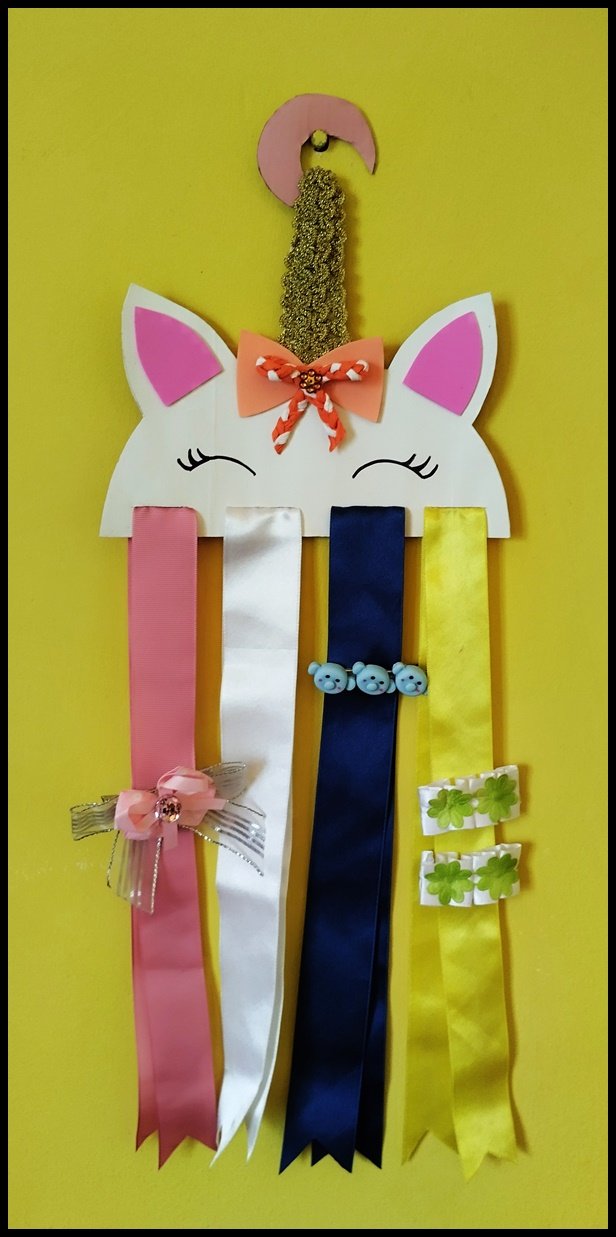
Así concluimos esta manualidad, estoy satisfecha con el producto final y lo mejor es que Sara también. Aproveché para comprar algunas colas y ganchos. La niña estaba feliz con el regalo, ahora tendría sus accesorios para el cabello en un solo lugar, disponibles a la mano y visibles, decorando la habitación.
Ahora me despido, espero que este trabajo haya sido de su agrado. Nos leemos en una próxima ocasión, bendiciones para todos.
With that, we finish this craft. I'm satisfied with the final product, and Sara is too. I took the opportunity to buy some glue and hooks. The little girl was happy with the gift- now she would have all her hair accessories in one place, within reach and in plain sight, decorating her room.
Now I say goodbye. I hope you enjoyed this work. I'll talk to you again soon. Blessings to all.

Todas las fotografías utilizadas en este post son de mi archivo personal, editadas con el programa PhotoScape.
Traducido y formateado con Hive Translator por @noakmilo.
All photographs used in this post are from my personal archive, edited with PhotoScape software.
Translated and formatted with Hive Translator by @noakmilo.
Hola amiga, quedó muy bonito tu trabajo!
Gracias por compartir.
Gracias, amiga, me alegra que te haya gustado. Fue un placer compartir con ustedes. Saludos.
posh
https://leofinance.io/threads/ramisey/re-leothreads-nx4xveqm
The rewards earned on this comment will go directly to the people ( ramisey ) sharing the post on LeoThreads,LikeTu,dBuzz.
Gracias por el apoyo, amigos.
Congratulations @ramisey! You have completed the following achievement on the Hive blockchain And have been rewarded with New badge(s)
You can view your badges on your board and compare yourself to others in the Ranking
If you no longer want to receive notifications, reply to this comment with the word
STOPCheck out our last posts:
Gracias, amigos, por las notificaciones.
Nos alegra otorgarte la insignia por tus logros en Hive @ramisey. Gracias por ser parte de la comunidad y por tu dedicación.
Wow! Excellent idea! Thus a simple solution to something so easily needed was not thought of.
Yes, it was a practical and simple solution to a small organizational problem, glad you liked it. Regards.
Te quedó muy hermoso, hija. Me gusta porque es muy útil, quizás haga uno para regalar. Gracias por la idea. Dios te bendiga.
Gracias por el halago, me alegra que te haya gustado, madre. Es un gusto compartir mis ideas con esta maravillosa comunidad. Te envío un cálido abrazo.