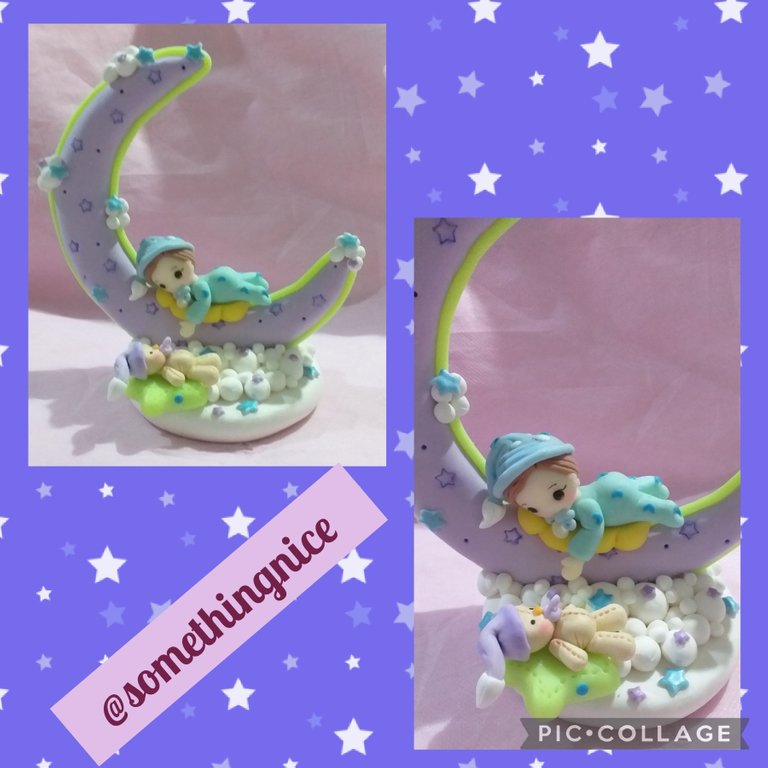
Good and beautiful night creative friends!!! I hope you are all very well. Trying to catch up to present new and beautiful works. This time I bring you an ornament that can be used as a cake decoration, setting or to decorate the baby's room.
Buenas y bella noche amigos creativos!!! Espero que se encuentren todos muy bien. Tratando de ponerme al día para presentarles nuevos y bellos trabajos. En esta ocasión les traigo un adorno que puede usarse como adorno de torta, ambientación o para decorar la habitación del bebé.
I did this work following the steps of a magazine from the collection of Leticia Suárez del Cerro from several years ago. Even though nowadays we use the web a lot from time to time, I go back to my beginnings and go through magazines to find something I like and since I feel very comfortable with all her projects because, as I already told on some occasion, I dedicated myself to cold porcelain thanks to her. and I had the opportunity to take the full course at one of their institutes.
Este trabajo lo hice siguiendo los pasos de una revista de la colección de Leticia Suárez del Cerro de hace varios años. Si bien hoy en día usamos mucho la web cada tanto vuelvo a mis inicios y paso revistas para encontrar algo que me guste y como me siento muy cómoda con todos sus proyectos porque como ya conté en alguna oportunidad me dediqué a la porcelana fría gracias a ella y tuve la oportunidad de hacer el curso completo en uno de sus institutos.
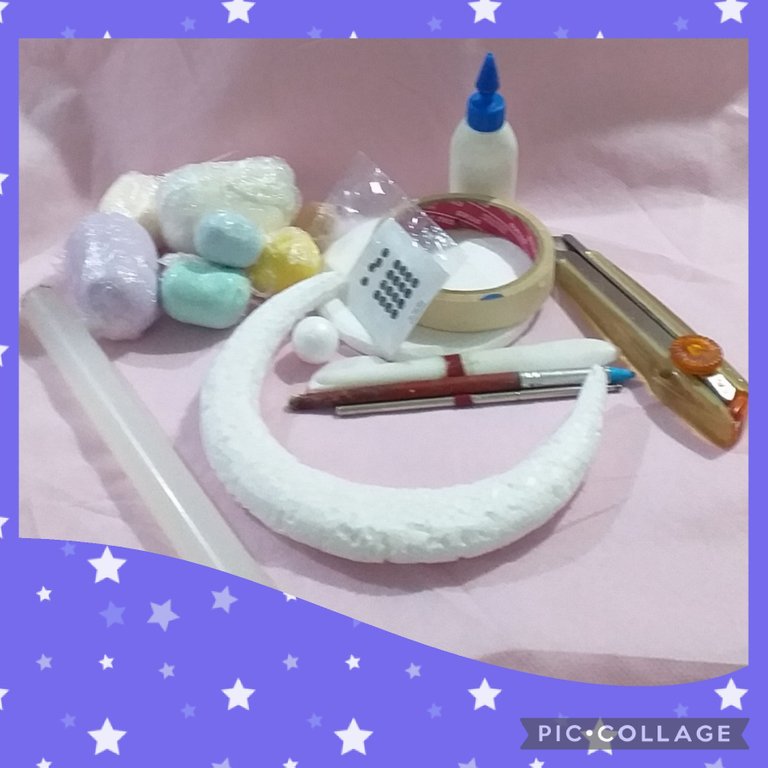
Materials
🌜 cold porcelain
🌜 vinyl glue
🌜 stakes
🌜 rolling pin
🌜 styrofoam sphere
🌜 cover and piece of styrofoam
🌜 cutter
🌜 paper tape
🌜 self-adhesive eyes
🌜 star cutter (optional)
Materiales
🌜 porcelana fría
🌜 cola vinilica
🌜 estecas
🌜 palo de amasar
🌜 esfera de telgopor
🌜 tapa y trozo de telgopor
🌜 cutter
🌜 cinta de papel
🌜 ojos autoadhesivos
🌜 cortante de estrella (opcional)
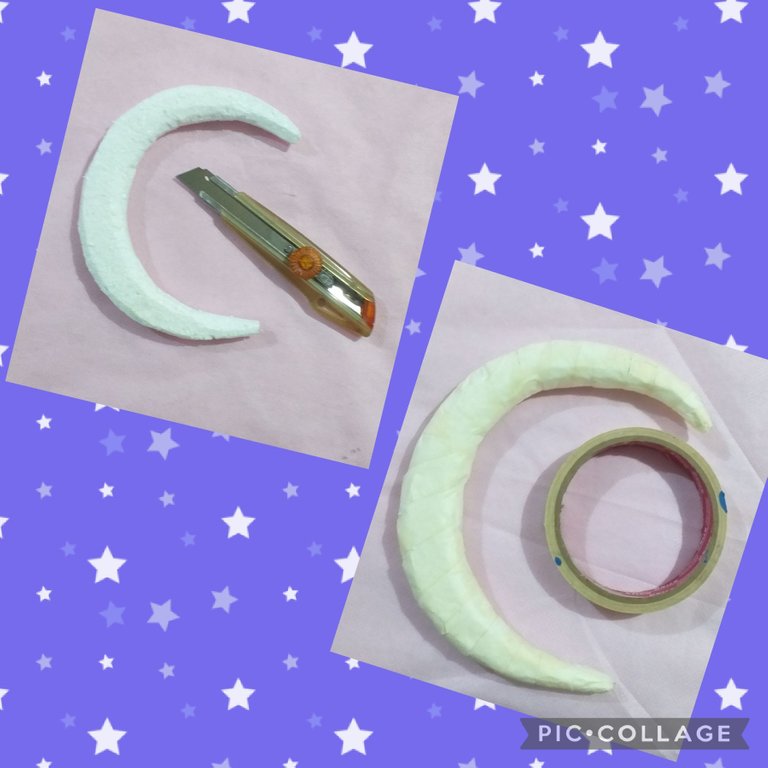
Draw a crescent on a piece of Styrofoam, cut with the cutter, carve so that it is round.
Cover the entire surface with paper tape.
Dibujar una medialuna en un trozo de telgopor, cortar con el cutter, tallar para que quede redondita.
Cubrir toda la superficie con cinta de papel.
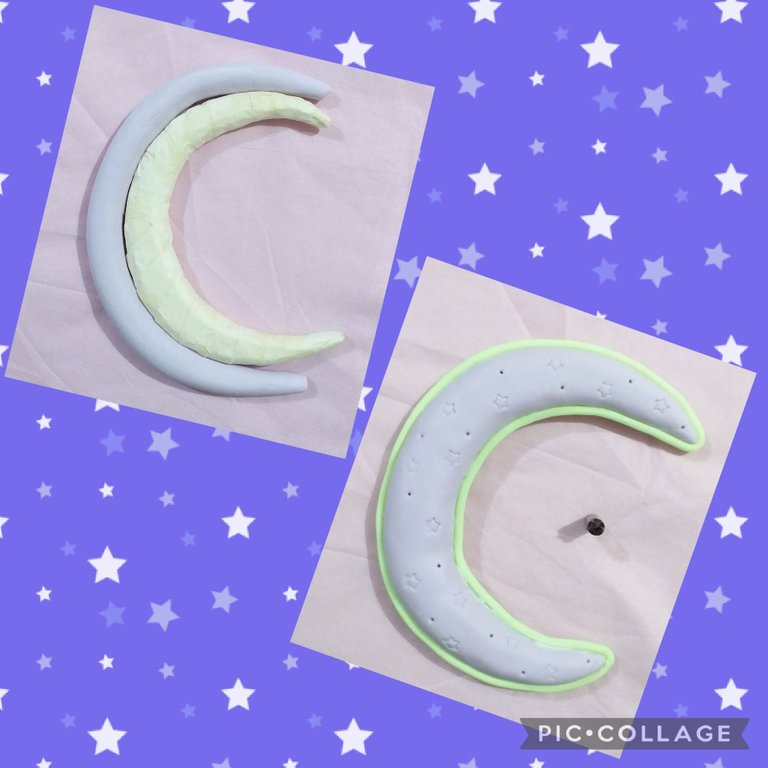
With cold porcelain of the desired color, we form a crescent, stretch with the rolling pin, cover the entire surface, melt the union with water so that it is not noticeable.
Stretch a strip of another color and stick around the contour.
Use the star cutter to mark and with a stake add some points as small details.
Con porcelana fría del color deseado damos forma de medialuna, estirar con el palo de amasar, cubrir toda la superficie, fundir la unión con agua para que no se note.
Estirar una tira de otro color y pegar en todo el contorno.
Utilizar el cortante de estrella para marcar y con una esteca agregar algunos puntos como pequeños detalles.
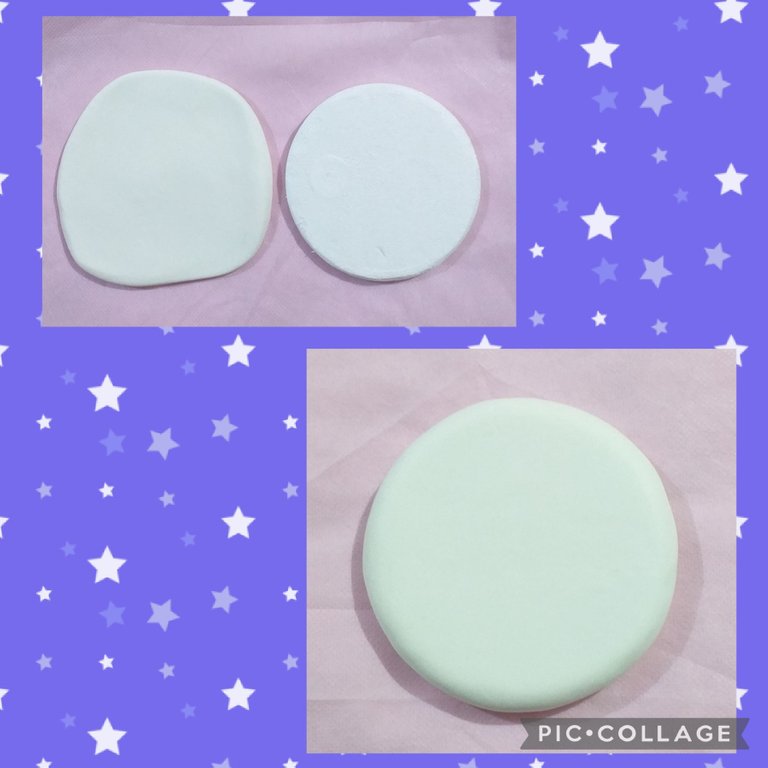
Use a Styrofoam lid (from ice cream pots or mark and cut into a piece), stretch white cold porcelain, put vinyl glue, cover one side, remove the excess, repeat the step on the other side. Melt the joint with water.
Utilizar una tapa de telgopor (de potes de helado o marcar y cortar en algún trozo), estirar porcelana fría de color blanco, poner cola vinilica, cubrir de un lado,quitar el excedente, repetir el paso del otro lado. Fundir la unión con agua.
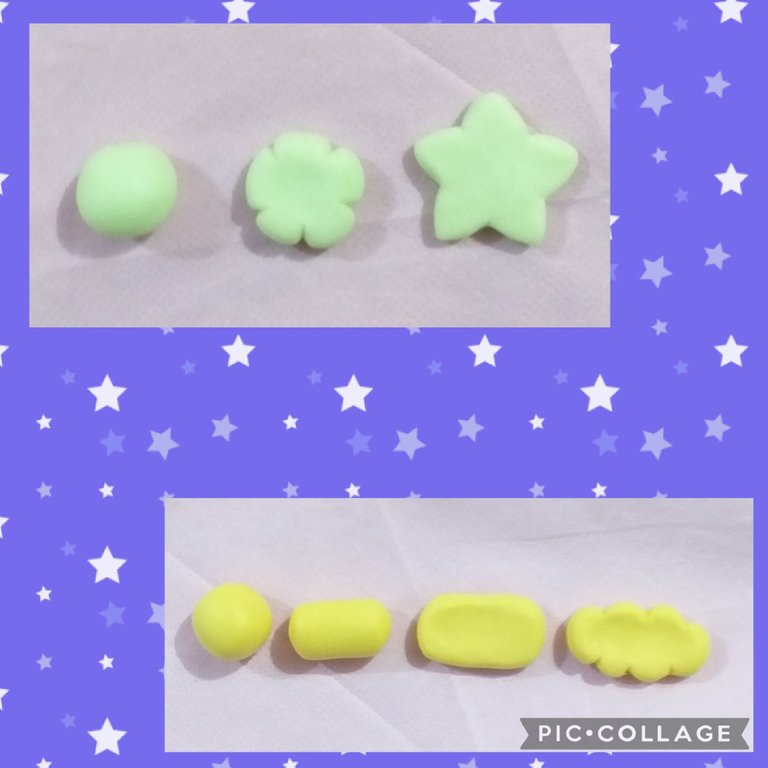
To make the star where the bear is resting, make a ball, flatten it, make five cuts and shape it into a point.
For the pillow where the baby rests, make a small ball, shape it into a cylinder, flatten it, make several cuts on the sides and round it off.
Para hacer la estrella donde esta apoyado el osito hacer una bolita, aplanar,marcar cinco cortes y dar forma de punta.
Para la almohada donde se apoya el bebé hacer una bolita, dar forma de cilindro, aplanar marcar varios cortes en los lados y redondear.
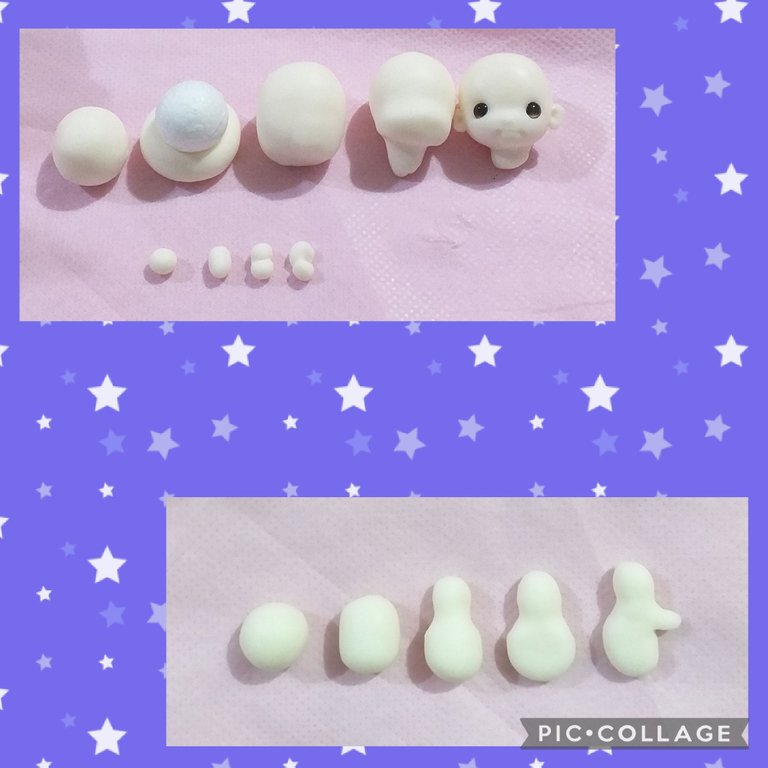
For the baby's head, make a skin-colored ball, insert the sphere, close, mark the separation of the face and forehead, from the same nose take a portion for the neck, mark the nose and mouth, stick the self-adhesive eyes.
For the ears, make two equal balls, shape into a cylinder, mark the middle and hollow out on one side. Remember to do a left side and a right side.
For the hands, make two equal balls, stretch to form a cylinder, mark the wrist, flatten and make a cut in the shape of a "1" to form the thumb.
Para la cabeza del bebé, hacer una bolita color piel, introducir la esfera, cerrar, marcar la separación de la cara y la frente, del mismo morro sacar una porción para el cuello, marcar la nariz y la boca, pegar los ojos autoadhesivos.
Para las orejas hacer dos bolitas iguales, dar forma de cilindro, marcar el medio y ahuecar en un lado. Recordar hacer un lado izquierdo y uno derecho.
Para las manos hacer dos bolitas iguales, estirar dando forma de cilindro, marcar la muñeca, aplanar y hacer un corte en forma de "1" para formar el dedo pulgar.
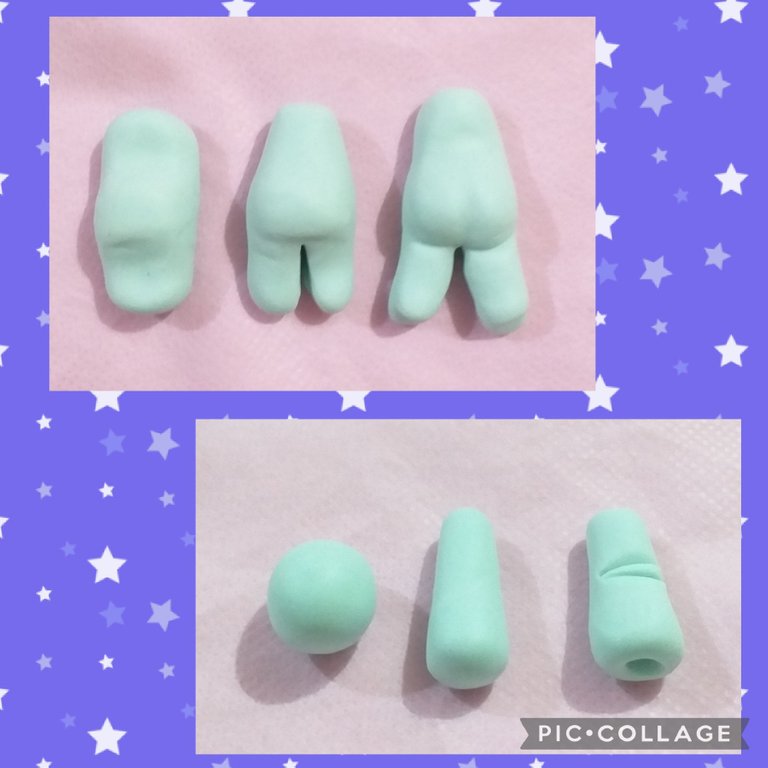
For the body, make a ball, mark towards the sides leaving more dough in the center, in the upper part form the torso and in the lower part make a cut in the middle to form the legs.
Round the tail and mark the middle, make lines to simulate wrinkles.
For the arms, make two equal balls, stretch leaving wider at one end, hollow out to be able to insert your hand and mark to simulate wrinkles.
Para el cuerpo hacer una bolita, marcar hacia los lados dejando más masa en el centro, en la parte superior formar el torso y en la parte inferior hacer un corte en el medio para formar las piernas.
Redondear la cola y marcar al medio, hacer líneas para simular arrugas.
Para los brazos hacer dos bolitas iguales, estirar dejando más ancho en un extremo,ahuecar para poder introducir la mano y marcar para simular arrugas.
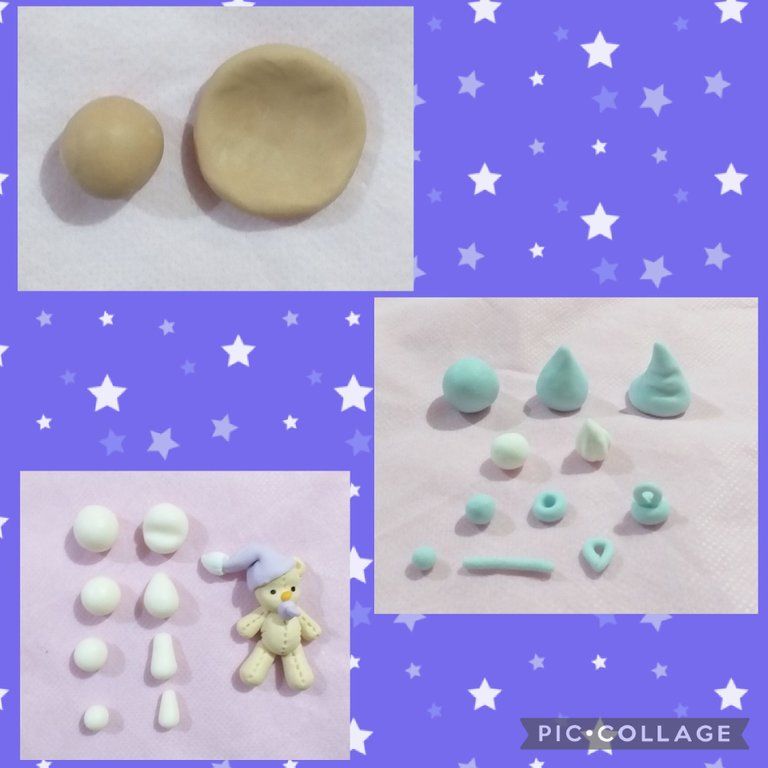
For the hair, make a ball, hollow out to form a helmet.
For the hat, make a ball, shape it into a drop, mark wrinkles.
For the pompom at the end, make a ball of another color, shape it into a drop and mark it to simulate the strands.
For the pacifier, make a ball and hollow it out. Stretch a roll, cut a piece and join the ends. Paste in the hole of the pacifier.
For the bear, make a ball for the head, mark the separation of the forehead and the snout. And divide in the middle, paste a very small ball for the nose. Make a hole for the mouth.
For the body, make a ball and shape it into a drop.
For the legs make two equal balls, stretch leaving thinner at one end.
For the arms we repeat the procedure but with smaller balls.
For the ear, make a ball and hollow it out.
Repeat the step of the hat and the pacifier.
Mark lines on the bear's body, head, and limbs to simulate sewing.
Para el pelo hacer una bolita, ahuecar para formar un casco.
Para el gorro hacer una bolita, dar forma de gota, marcar arrugas.
Para el pompón de la punta hacer una bolita de otro color, dar forma de gota y marcar para simular los mechones.
Para el chupete hacer una bolita y ahuecar. Estirar un rollo, cortar un trozo y unir las puntas. Pegar en el hueco del chupete.
Para el oso, hacer una bolita para la cabeza, marcar la separación de la frente y el morro. Y dividir al medio, pegar una bolita muy pequeña para la nariz. Hacer un hueco para la boca.
Para el cuerpo hacer una bolita y dar forma de gota.
Para las patas hacer dos bolitas iguales, estirar dejando más fino en un extremo.
Para los brazos repetimos el procedimiento pero con bolitas más pequeñas.
Par la oreja hacer una bolita y ahuecar.
Repetir el paso del gorro y el chupete.
Marcar líneas en el cuerpo, cabeza y extremidades del oso para simular la costura.
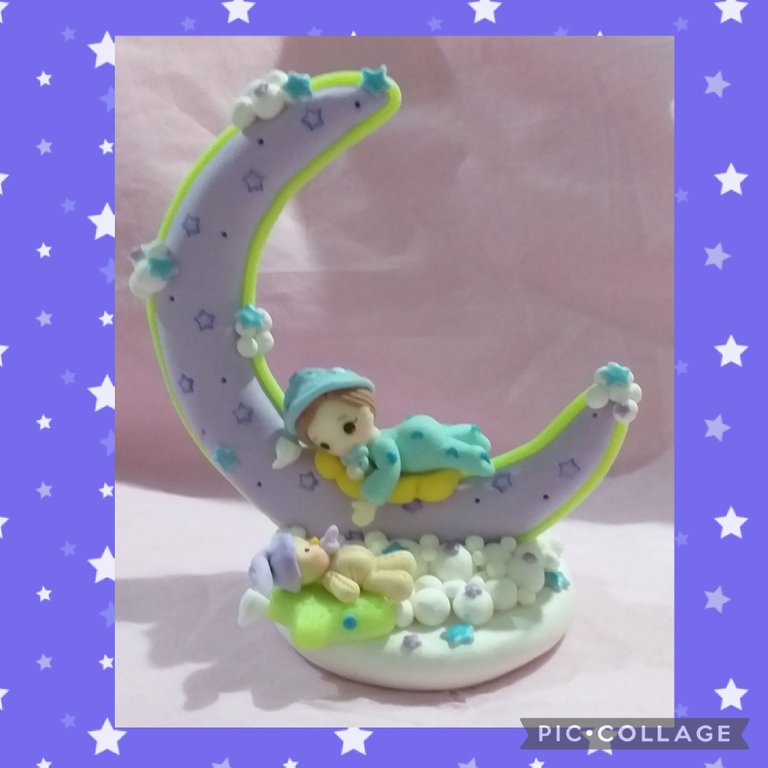
Join everything with vinyl glue. At the base I made many balls of different sizes to simulate the clouds, I also made some to stick on the crescent.
With two different sized star cutters I cut several and glued them everywhere. Lastly I put on makeup. For this post I took photos with my Samsung Galaxy j4 cell phone and used the PicCollage app and Google Translate.
Hope you liked it. Greetings. Andrea ❤❤❤
Unir todo con cola vinilica. A la base le hice muchas bolitas de diferentes tamaños para simular las nubes, también hice algunas para pegar en la medialuna.
Con dos cortantes de estrella de diferentes tamaños corte varias y las pegué por todos lados. Por último maquillé. Para este post tomé fotos con mi teléfono celular Samsung Galaxy j4 y utilicé la aplicación PicCollage y el traductor de Google.
Espero les haya gustado. Saludos. Andrea ❤❤❤

Me encanto, en general todo lo hecho en porcelana me fascina y mas cuando tiene tantas piezas pequeñas y detalles solo tengo una duda ¿Qué tan pesado quedo el resultado final?
Hola @nitsuga12 gracias por tus elogios.😊 No queda pesado porque la base y la luna son de telgopor y todo lo que es blanco está hecho con porcelana soft que es un tipo de masa súper liviana. Se puede usar como adorno de torta tranquilamente porque no hay posibilidades de que se hunda😂 y si te gustó este post te invito a que veas mi próxima publicación ya que va a estar lleno de detalles 😁
Muy hermoso... dan ganas de tener un bebé para decorar su pieza con esto. Bue. Jajaja. Me encantan todos los pequeños detalles, un trabajo impecable como siempre. Te felicito ❣️
Jajajajaja muchas gracias @lauramica ❤😊
Me encanta mucho sus trabajos, son muy lindos y delicados. Saludos
Muchas gracias @janettbrito76 ❤😊
Que hermosa creación simplemente bellísimo.😺💋
Mil gracias @mayifiestas 💕😊
Esta hermoso!
Muchas gracias @afa.hb03 ❤😊
@somethingnice very creative👌 so beautiful 👏👏👏
Thank you @sujatha ❤😊
Ainss pero que ternurita. Felicidades por tan lindo y delicado trabajo. Saluditos @somethingnice 🤗🥰😘🌹❤️✨
Muchísimas gracias @dayadam ❤😊
Realmente muy hermoso tu trabajo, estoy fascinada.
Bendiciones para ti.
Muchas gracias @elmundodebetty ❤😊
Que hermoso trabajo linda @somethingnice. 💕✨
Siempre quedo encantada con tan lindos y delicados trabajos , se nota el amor y el cariño que le pones a cada una de tus piezas.
Quiero uno así para mí.☺️
Muchas gracias @valenpba . Es verdad que siempre le pongo mucho amor a lo que hago porque me encanta por eso siempre trato de aprender más pero todavía falta mucho camino...😊