Happy and blessed Thursday my dear and appreciated people of Hive Diy! It is a pleasure to share with you constantly, first of all I wish you a very good afternoon, hoping that your day is going great, likewise, that you are happy, healthy, with lots of creativity, productivity and the desire to create more and more crafts to share in our beautiful and authentic community.♡
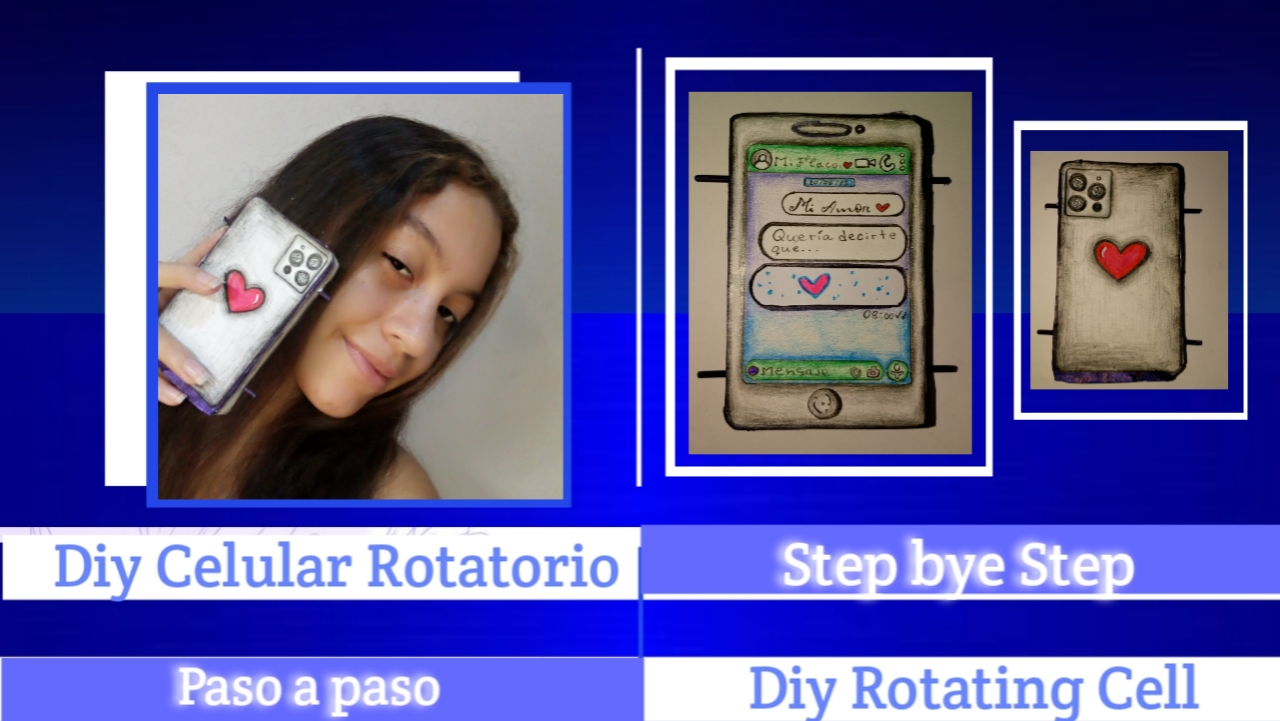
A poco de comenzar esta semana les traigo un Diy de una pequeña manualidad súper tierna, más que especial para regalar a nuestro novio, amig@, familiar, entre otros, la cosa está en qué es un detalle que perfectamente se le puede dar a nuestras personas especiales, a esas personas que queramos impresionar con un detalle único como el amor o cariño que sentimos por ellos.
Just starting this week I bring you a Diy of a super cute little craft, more than special to give to our boyfriend, friend, family, among others, the thing is that it is a detail that can perfectly be given to our special people, to those people we want to impress with a unique detail as love or affection we feel for them.
Así sencillamente, les voy a enseñar cómo realicé paso a paso un celular rotatorio, es decir, que es interactivo, de manera que al girar el mecanismo, este hace que los mensajes de un supuesto chat de WhatsApp (o bien podría ser cualquier otra red social), vayan cambiando, mostrando las palabras y frases que coloquemos a nuestro gusto, para enviar ese mensaje de amor de una forma diferente y creativa. La verdad, a mí me encantó y hasta me lo quiero quedar, pero ya tiene destino para alguien especial, pero bueno, queda demasiado lindo, así que, seguidamente les tengo todos los detalles de elaboración, están más que invitados a ver a continuación todo el proceso bien explicado.
So simply, I am going to show you how I made step by step a rotating cell phone, that is, it is interactive, so that when you rotate the mechanism, it makes the messages of a supposed WhatsApp chat (or could be any other social network), change, showing the words and phrases that we place to our liking, to send that message of love in a different and creative way. The truth is, I loved it and I even want to keep it, but it is already destined for someone special, but well, it is too cute, so, I have all the details of elaboration, you are more than invited to see below the whole process well explained.
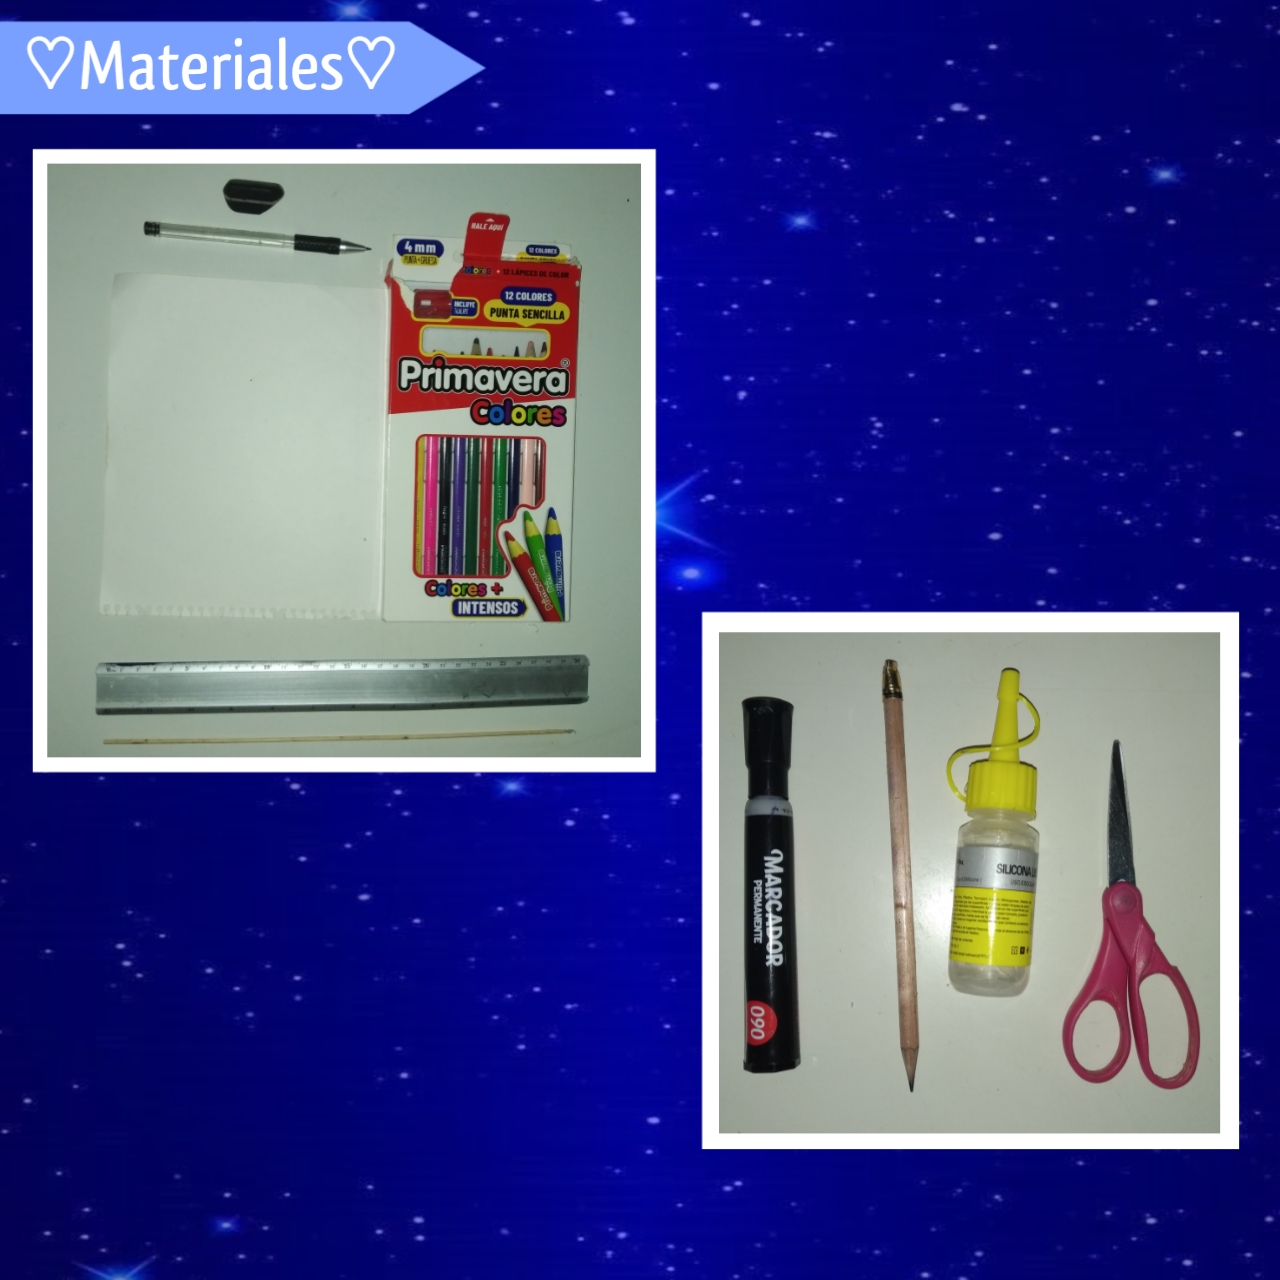
♡Materials♡
- Cartulina blanca
- Silicón o pegamento blanco
- 1 palillo de altura
- Colores
- Marcadores
- Tijera
- Regla
- Lápiz
- Borrador
- White cardboard
- Silicone or white glue
- 1 height stick
- Colors
- markers
- Scissors
- Ruler
- Pencil
- Eraser
♡👣Step by Step👣♡
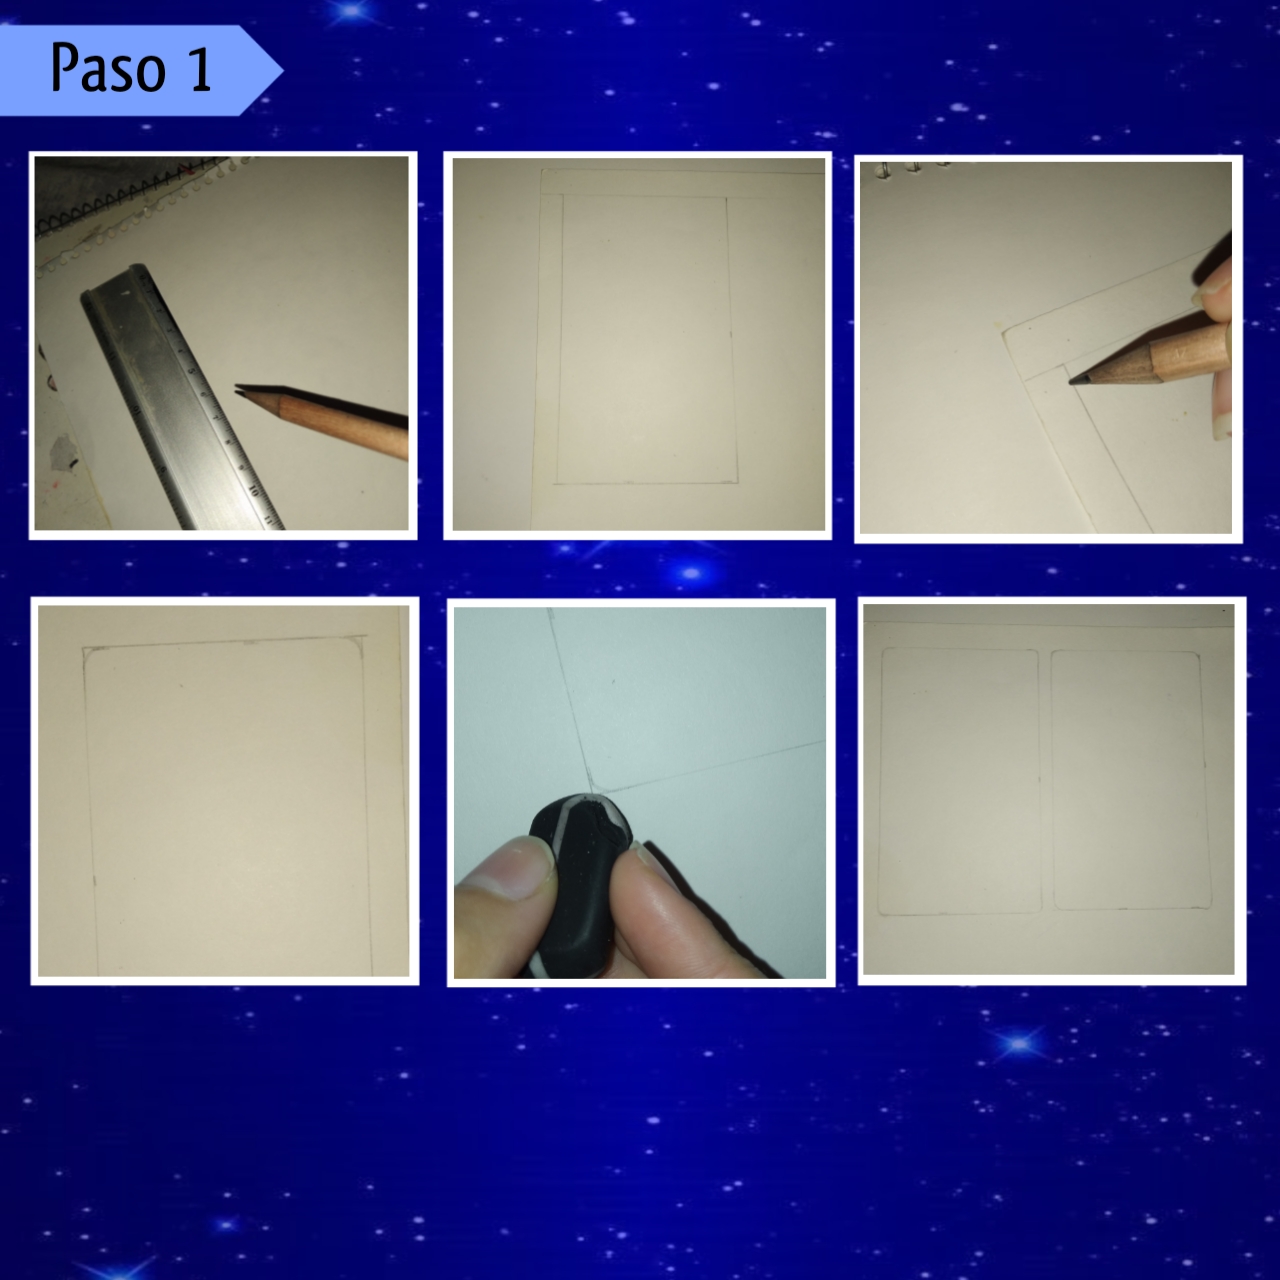
Paso 1:
Step 1:
Para empezar tomaremos nuestra hoja de cartulina blanca, regla, y un lápiz, para marcar claramente con cuidado dos rectángulos, ambos del mismo tamaño, en este caso son de 11 cm de largo x 6.5 cm de ancho, luego para comenzar con el diseño del teléfono, curveamos cada esquina de estos con una pequeña curva en todas las esquinas, ahora nos queda borrar las esquinas restantes y las líneas que queden por ahí con la ayuda de un borrador.
To start we will take our sheet of white cardboard, ruler, and a pencil, to clearly mark carefully two rectangles, both of the same size, in this case are 11 cm long x 6.5 cm wide, then to start with the design of the phone, we curve each corner of these with a small curve in all corners, now we have to erase the remaining corners and the lines that are left around with the help of an eraser.
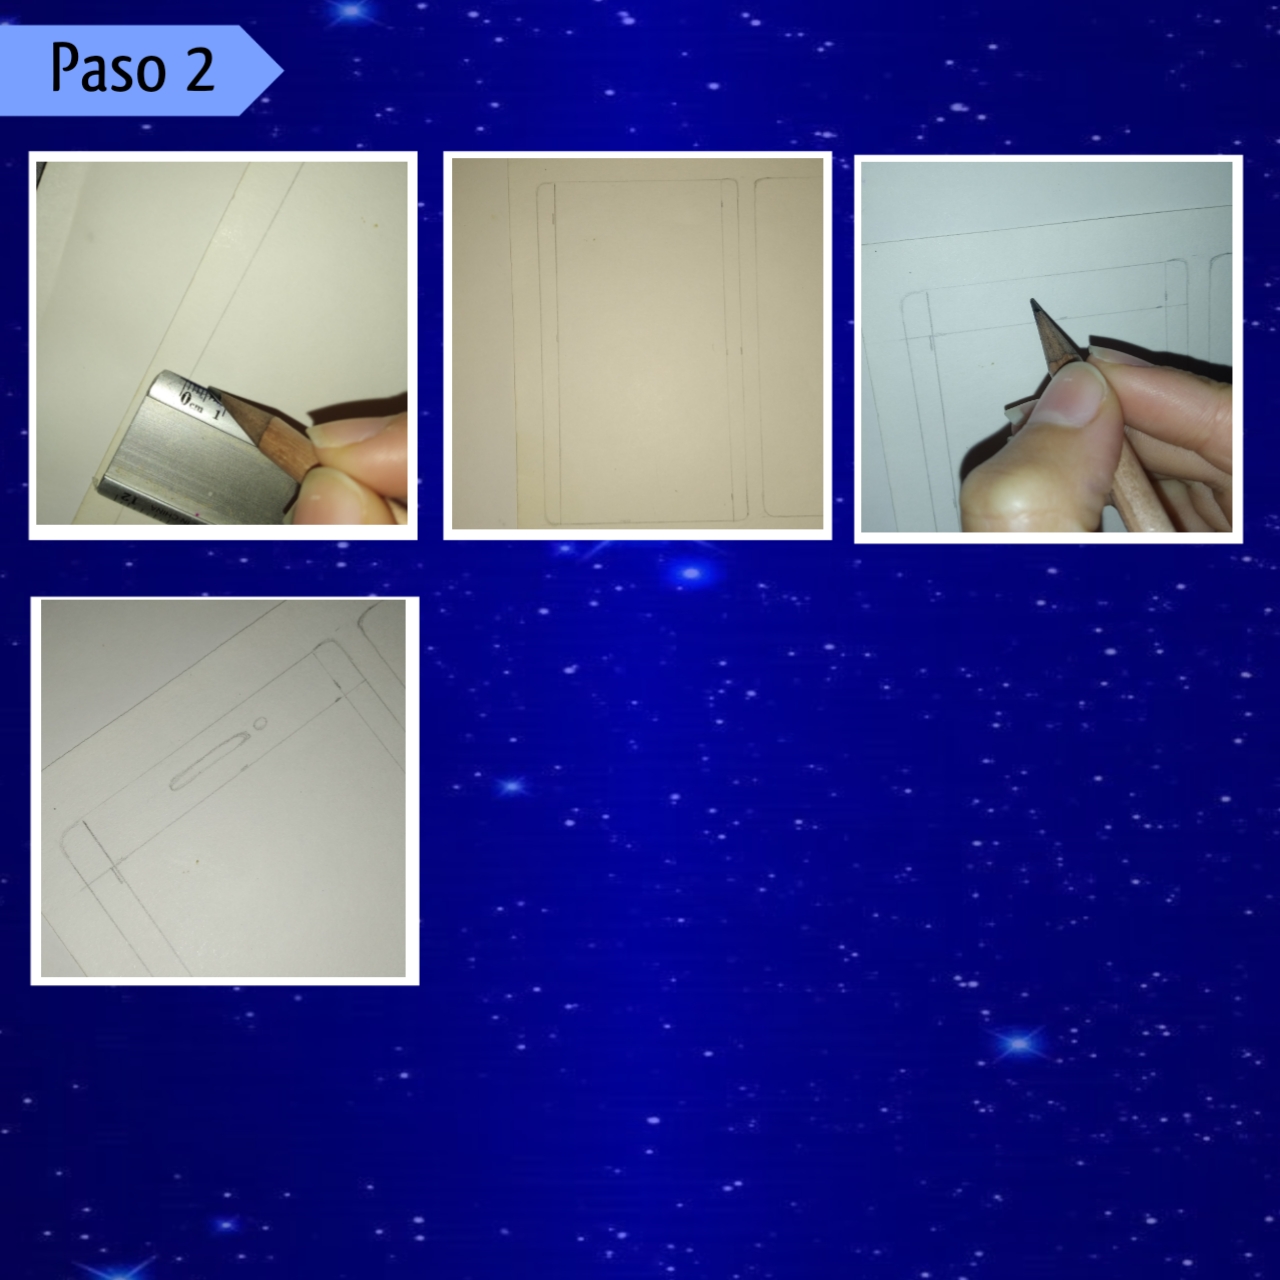
Paso 2:
Step 2:
Ahora para hacer la pantalla del teléfono, le marcaremos una línea recta de punta a punta de 0.5 cm de ancho a cada extremo por la parte de adentro, seguidamente vamos a trazar otra línea recta, pero está vez es horizontal y va en la parte de arriba, su medida es de 1cm de ancho nuevamente por la parte interior, para culminar con el borde del teléfono, vamos a marcar una línea recta y otra vez horizontal, ahora en la parte de abajo y de 1.5 cm de ancho, así para adelantar otro poco, en la parte de arriba hice el tipo de mini rectángulo ovalado y un pequeño círculo junto a el, ahora tomamos el borrador y borramos las líneas sobrantes.
Now to make the phone screen, we will mark a straight line from end to end of 0.5 cm wide at each end on the inside, then we will draw another straight line, but this time it is horizontal and goes on top, its measure is 1 cm wide again on the inside, to finish with the edge of the phone, we will mark a straight line and again horizontal, now at the bottom and 1. 5 cm wide, so to advance another little, at the top I made the type of mini oval rectangle and a small circle next to it, now we take the eraser and erase the excess lines.
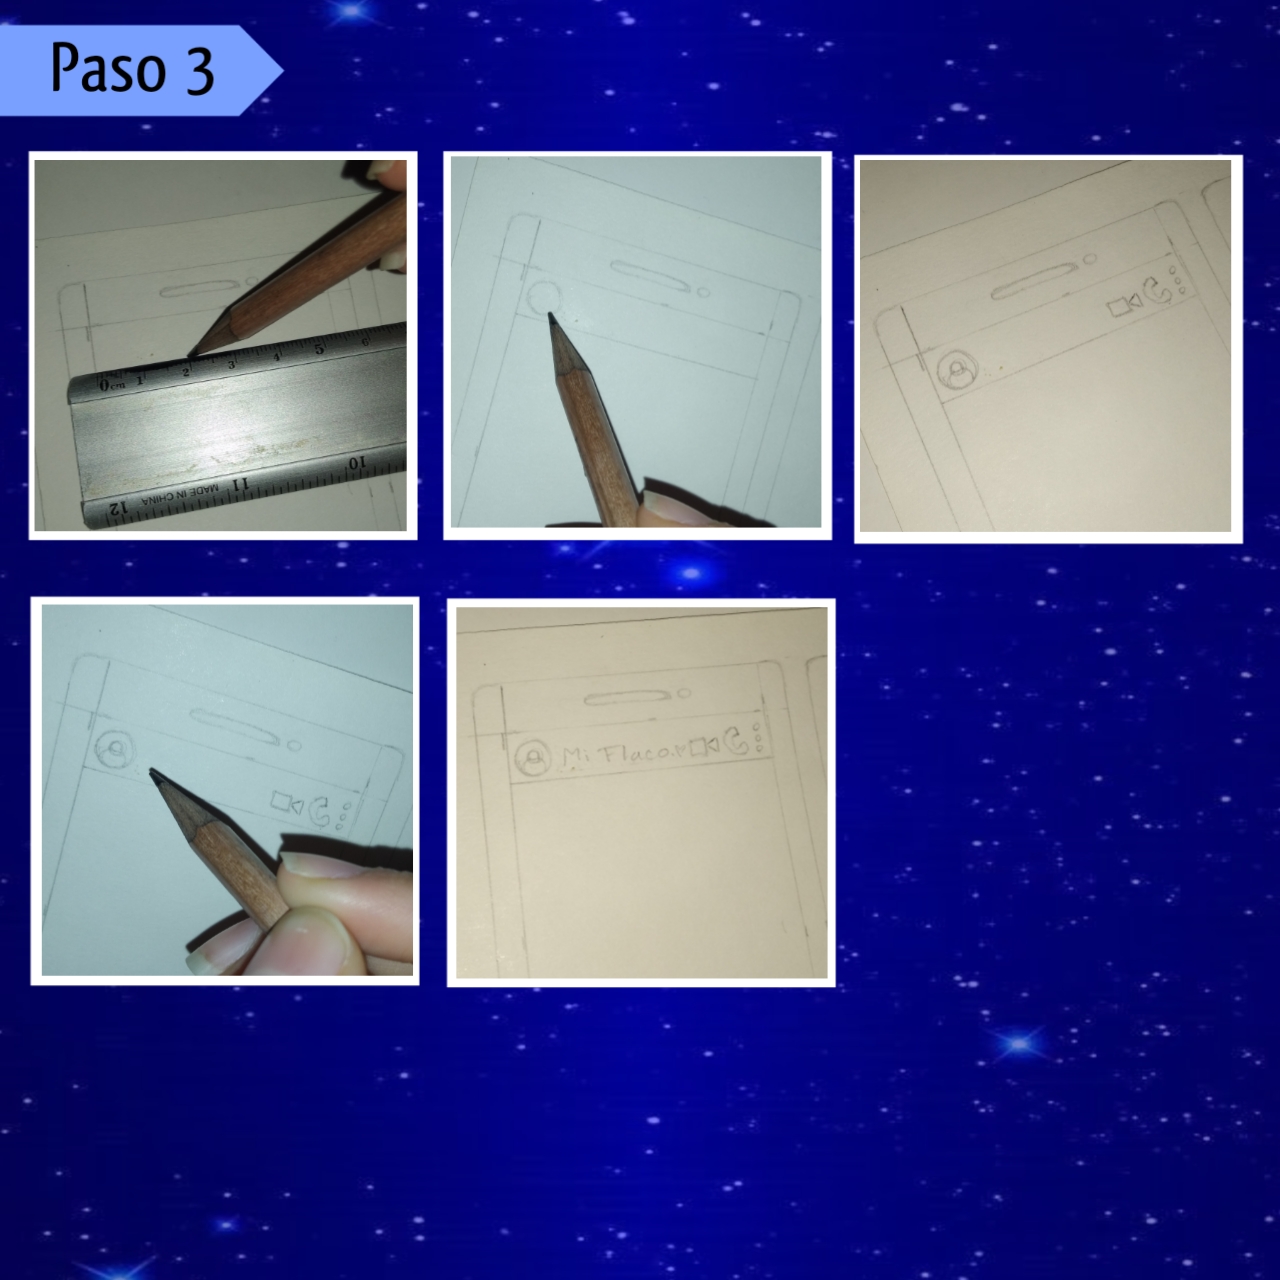
Paso 3:
Step 3:
Seguimos con el diseño, justo debajo de la última línea de arriba de manera horizontal, haremos otra, nada más un poco más gruesa y empezaremos a recrear el chat de WhatsApp, así que pueden guiarse de ahí mismo, se hace el pequeño círculo dentro de la línea anterior y dentro de este va la silueta de la foto, a continuación va el nombre o apodo de la persona que recibirá el obsequio y luego siguen los tres íconos en el otro extremo.
We continue with the design, just below the last line above horizontally, we will make another, just a little thicker and start to recreate the WhatsApp chat, so you can be guided from there, the small circle is made within the previous line and within this is the silhouette of the photo, then goes the name or nickname of the person who will receive the gift and then follow the three icons at the other end.
Paso 4:
Step 4:
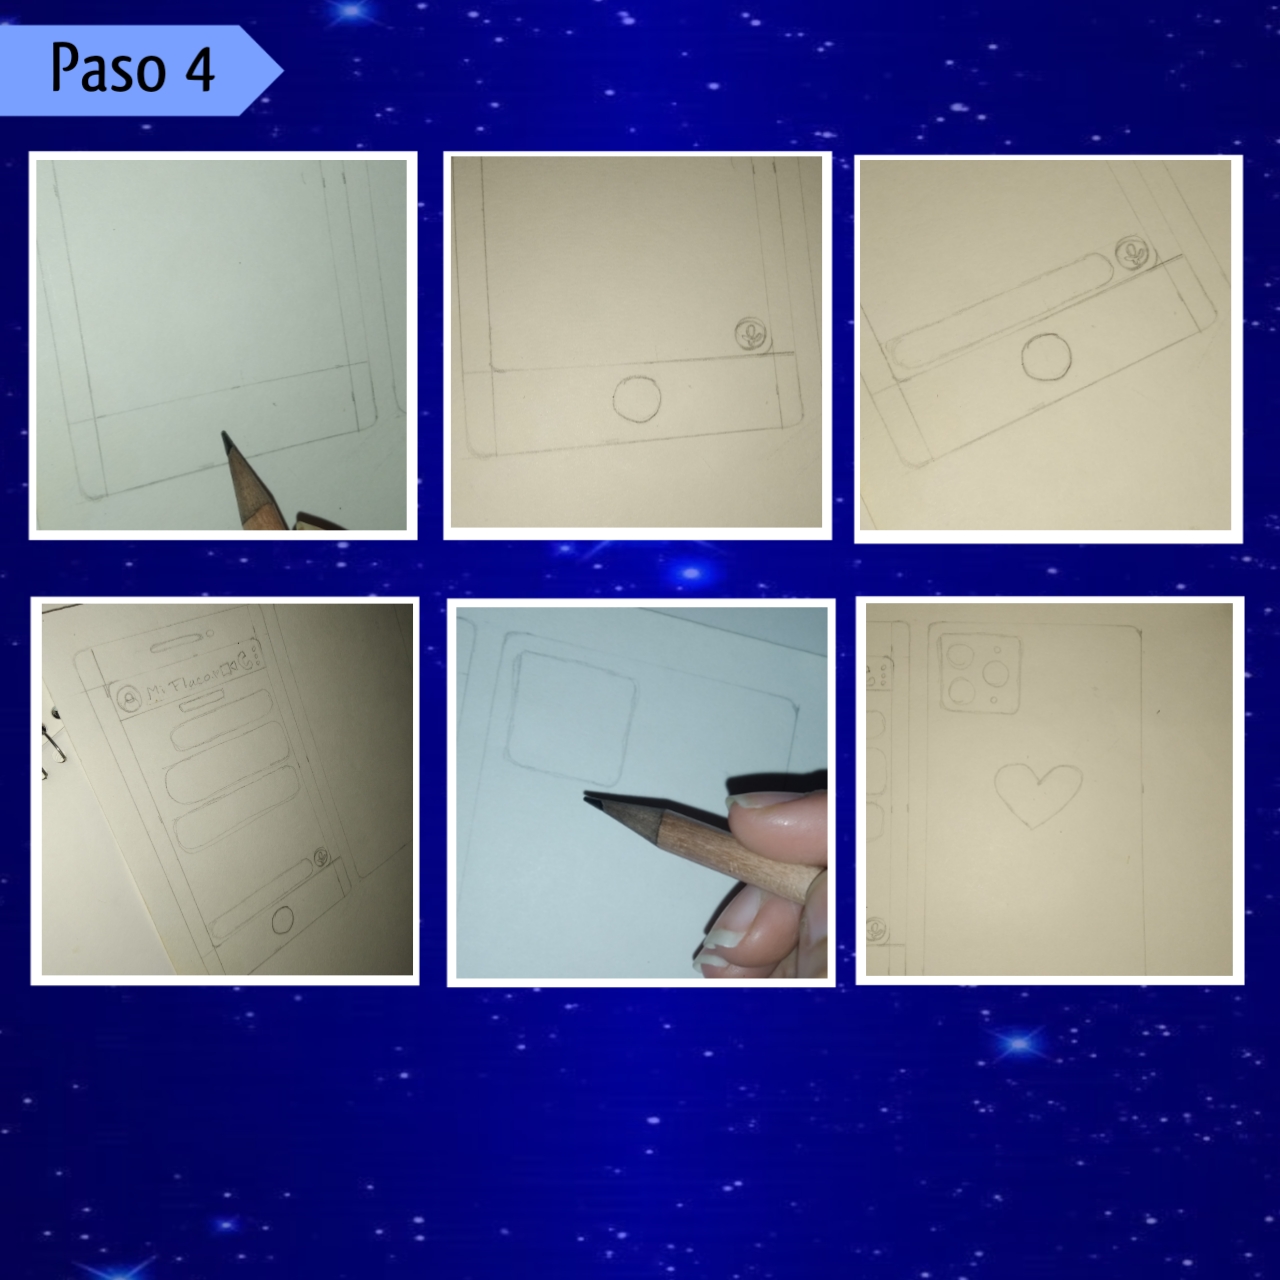
Después pasamos a la parte de abajo, aquí marcaremos de manera centrada un círculo un poco más pequeño que la línea, luego seguimos con los demás detalles, es decir el micrófono de la conversación, que se encuentra a la derecha, y al lado de este en la parte izquierda haremos la solapa dónde se escriben los mensajes, ambos hay que hacerlos dejando una pequeña separación de cada lado, para que no choquen con los bordes.
Then we move to the bottom, here we will mark a circle a little smaller than the line, then we continue with the other details, i.e. the microphone of the conversation, which is located on the right, and next to it on the left side we will make the flap where the messages are written, both must be done leaving a small gap on each side, so that they do not collide with the edges.
Seguido haremos en la pantalla de arriba hacía debajo, primero la solapa de la fecha, luego tres solapas de mensaje del ancho y largo que gusten, ya que depende de que van a escribir dentro, así estos van con una pequeña separación. Por último de este paso y el trazar con lápiz, pasaremos al segundo rectángulo, dónde haremos un diseño sencillo, así en la esquina superior izquierda haremos la cámara del tipo que queramos con sus detalles y en el centro de este un corazón.
Then we will make on the screen from top to bottom, first the date flap, then three message flaps of the width and length that you like, as it depends on what you are going to write inside, so they go with a small separation. Finally from this step and tracing with pencil, we will move to the second rectangle, where we will make a simple design, so in the upper left corner we will make the camera of the type we want with its details and in the center of this a heart.
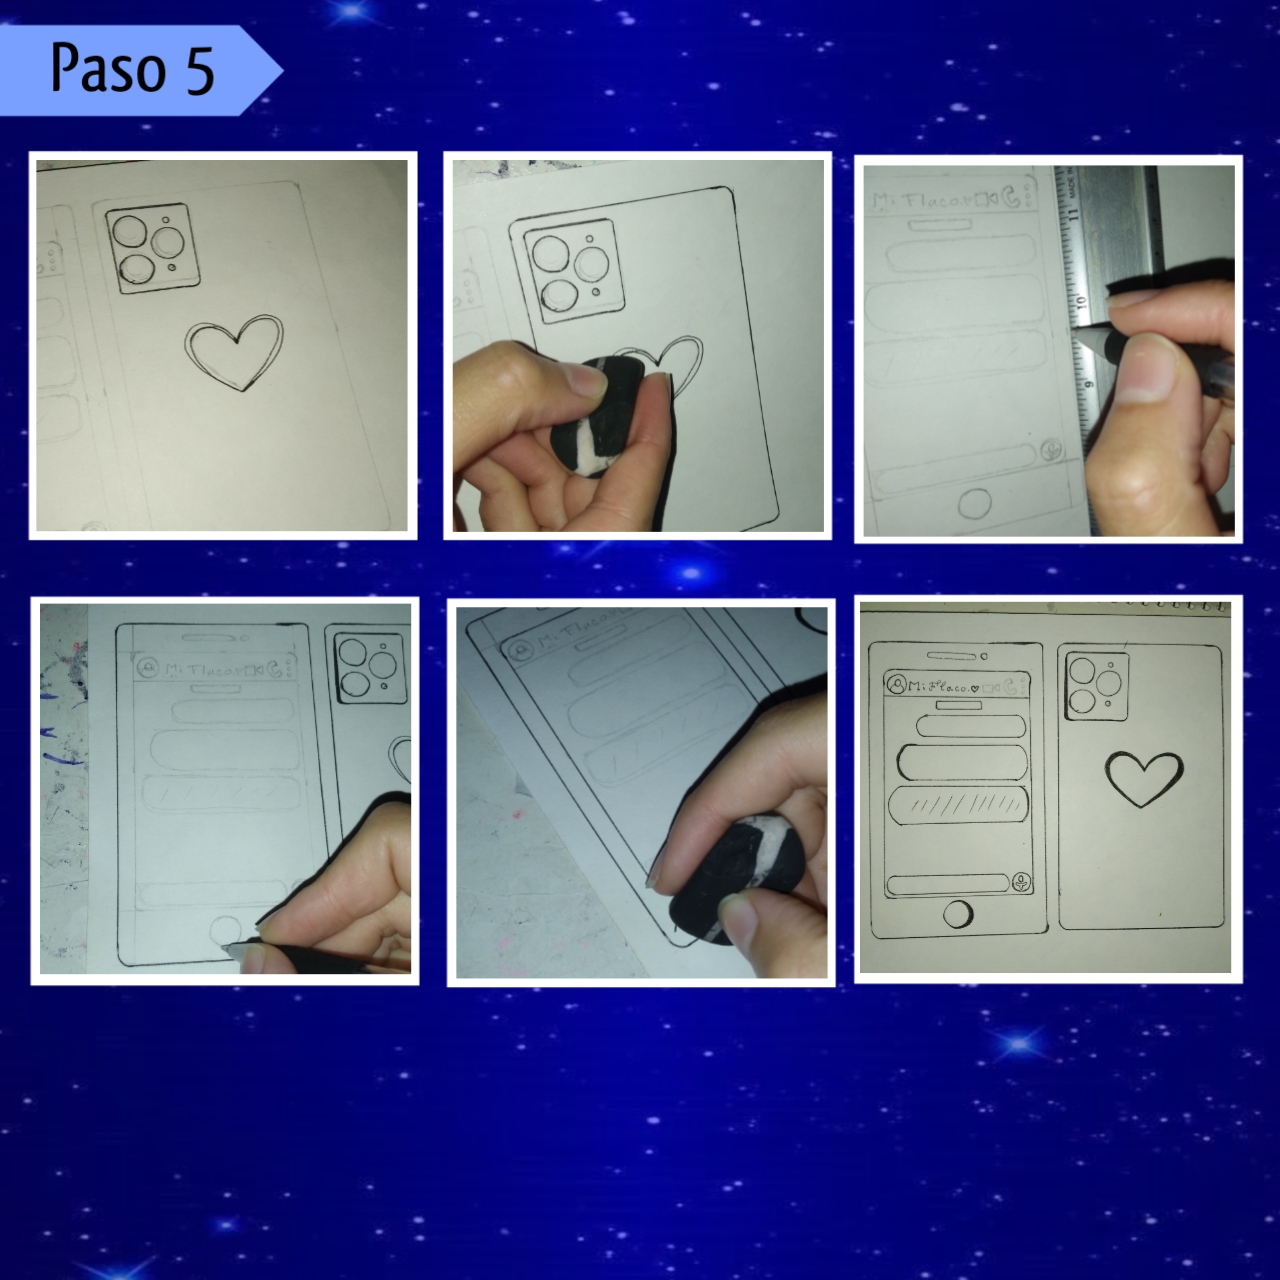
Paso 5:
Step 5:
Ya hecho nuestro boceto, es momento de trazar con marcador fino negro o algún lapicero del mismo color para terminar el dibujo y pasar a colorear, así inicié marcando la pieza trasera, ya que es la más sencilla, al terminar de trazar borre las líneas de lápiz con borrador, luego seguí con la otra pieza, apoyándome con una regla para los trazos con líneas rectas, así los demás detalles son sencillos, por lo que se hacen a mano alzada cuidadosamente, seguidamente nuevamente se borran los trazos de lápiz con el borrador. Cabe resaltar, que en esta parte no marque los iconos de arriba, porque los iba a hacer con pintura al frío, pero lo ideal sería con algún marcador o lapicero blanco y luego se remarca con el lapicero negro el borde.
Once our sketch is done, it is time to draw with black fine marker or a pencil of the same color to finish the drawing and move on to coloring, so I started marking the back piece, as it is the simplest, when I finished drawing erase the pencil lines with eraser, then I continued with the other piece, supported with a ruler for the strokes with straight lines, so the other details are simple, so they are done freehand carefully, then again erase the pencil strokes with the eraser. It should be noted that in this part I did not mark the top icons, because I was going to do them with cold paint, but ideally with a white marker or pencil and then the border is marked with the black pencil.
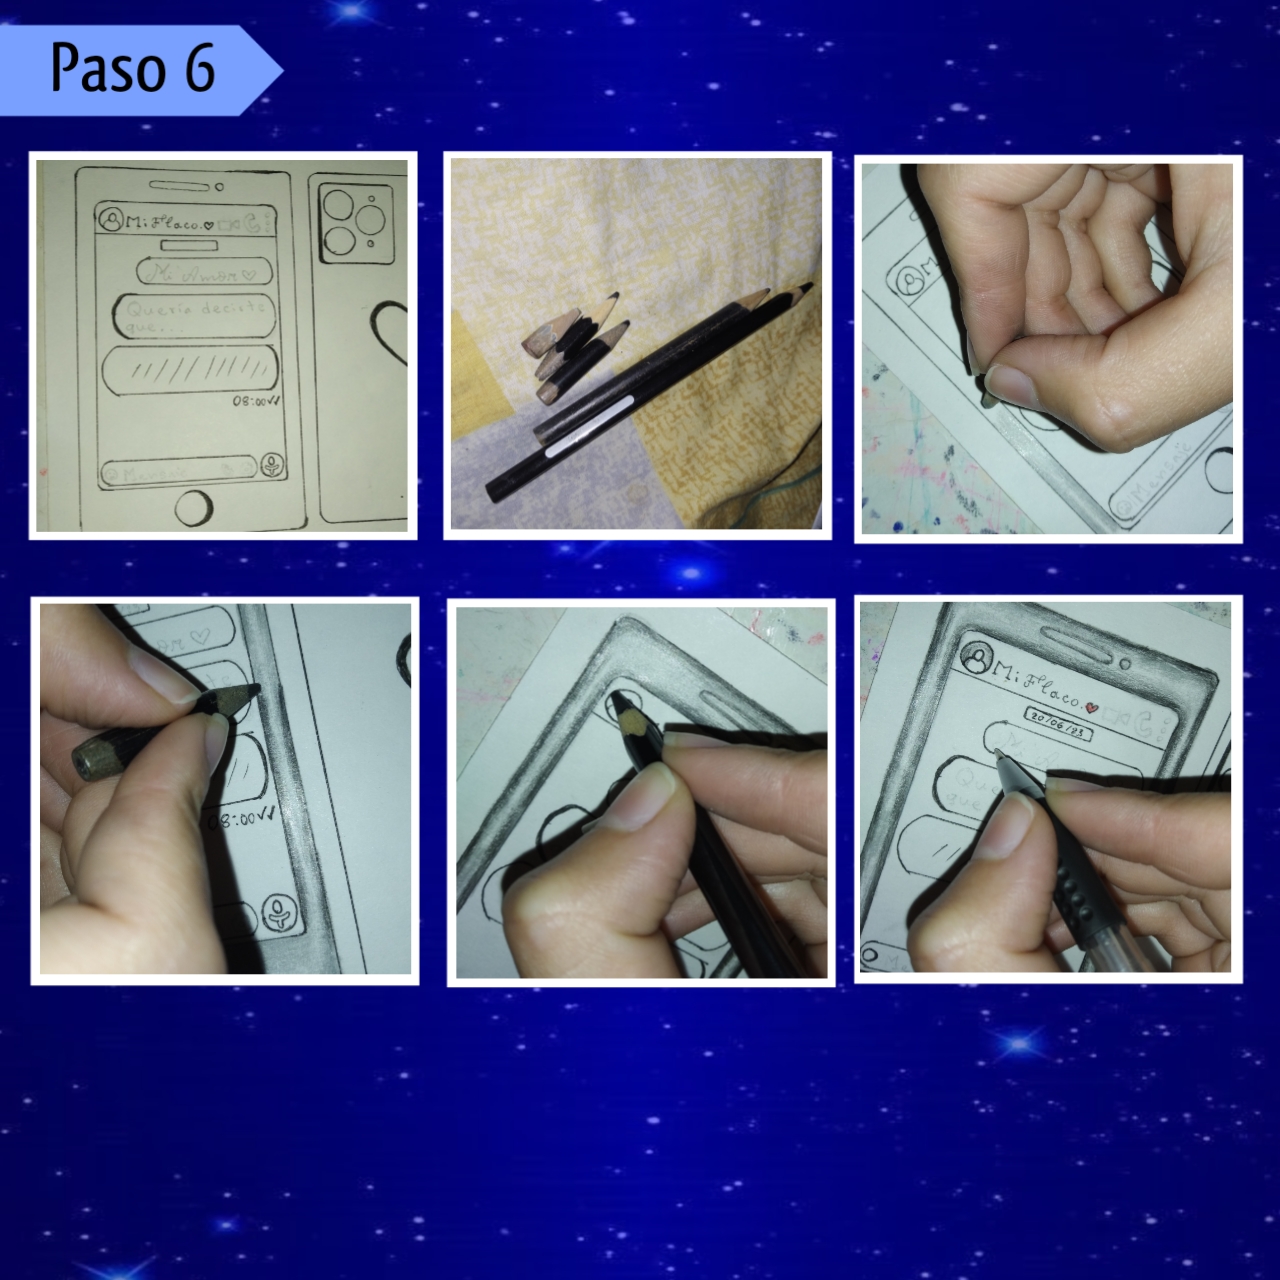
Paso 6:
Step 6:
En este paso, primero agregué otros detalles, en la barra de mensajes coloque unos pequeños íconos y la palabra "Mensaje" así también agregué una hora al azar debajo de los mensajes y las palomitas de enviado, intentando que se asemeje lo más posible al chat real de WhatsApp. Después tomé los colores grises y negros, así inicié a colorear todo el borde, lo difumine un poco y agregué los demás detalles negros e igualmente escribí con lápiz para calcular el espacio y seguidamente marque con lapicero estos.
In this step, first I added other details, in the message bar I placed some small icons and the word "Message" and I also added a random time under the messages and the sent popcorns, trying to make it as similar as possible to the real WhatsApp chat. Then I took the gray and black colors, so I started coloring the whole border, blurred it a little and added the other black details and also wrote with pencil to calculate the space and then marked with pen these
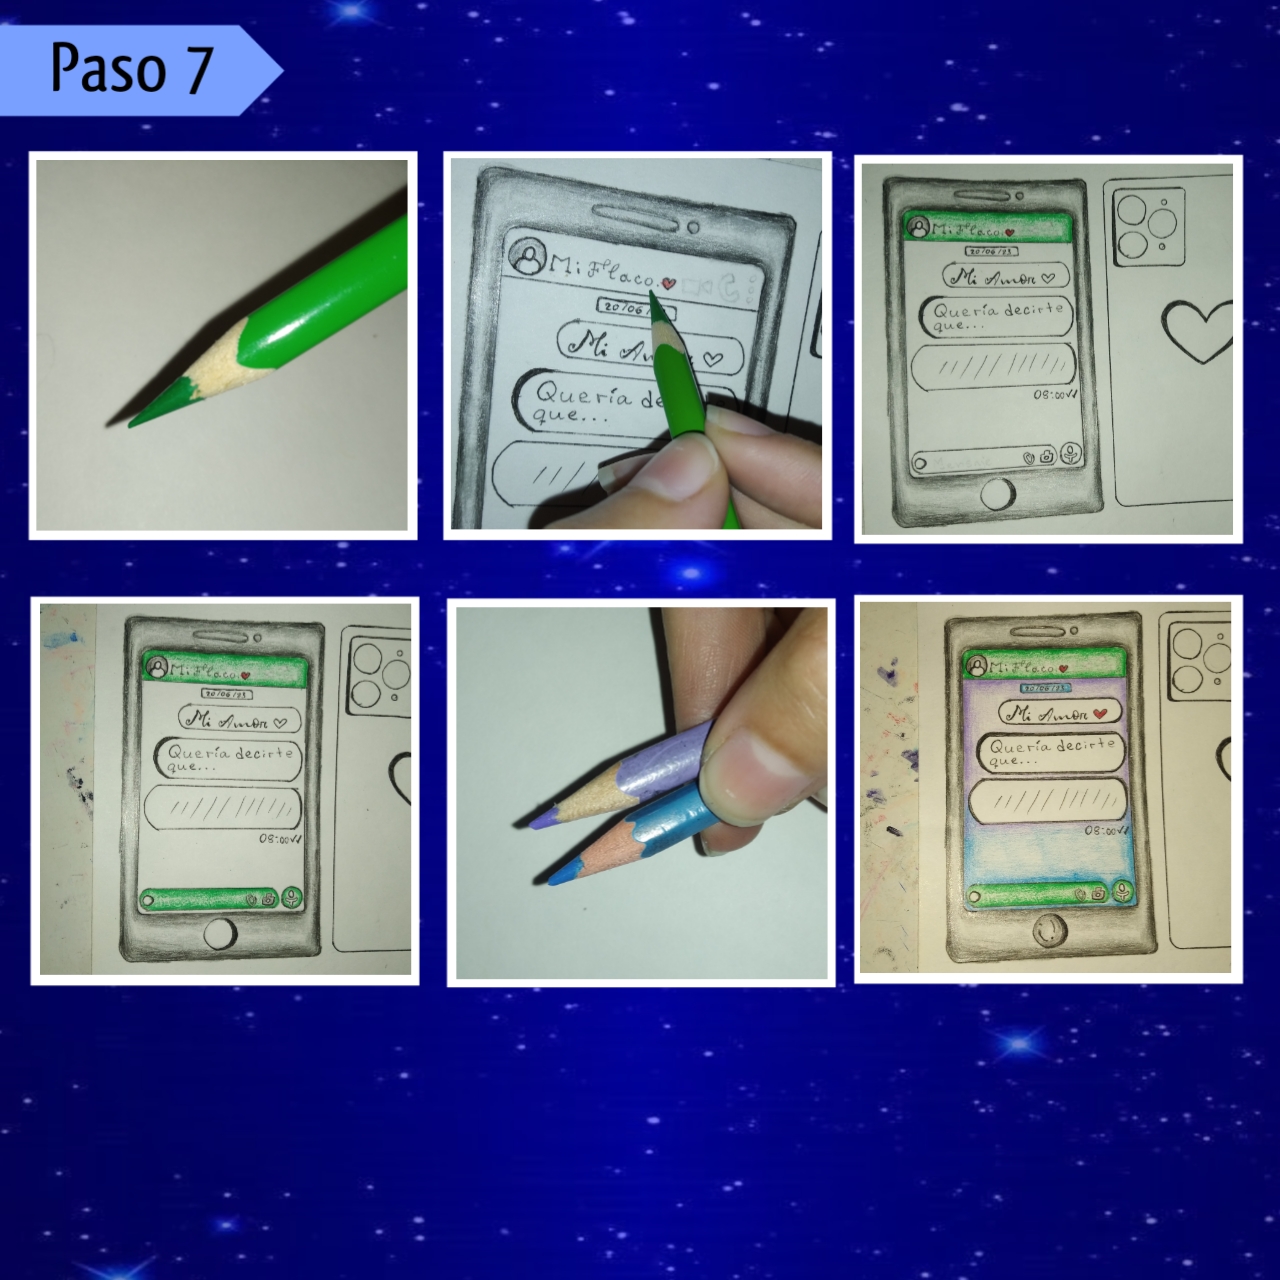
Paso 7:
Step 7:
Proseguimos a colorear el resto de la pantalla, para ésto tomé el color verde que tenía que más se parecía al predeterminado que tiene el WhatsApp, así coloree siguiendo el mismo patrón, luego tomé los colores a mi elección y pinte el fondo, este lo pueden hacer como gusten, yo difumine dos colores por mi elección, el lila y el azul cielo, para ser específicos, pero si gustan pueden hacerlo solo con uno, aquí también coloree la solapa de la fecha, de un color azul claro.
We continue to color the rest of the screen, for this I took the green color that was most similar to the default that WhatsApp has, so I colored following the same pattern, then I took the colors of my choice and paint the background, this can be done as you like, I blurred two colors by my choice, lilac and sky blue, to be specific, but if you like you can do it with only one, here I also colored the date flap, a light blue color.
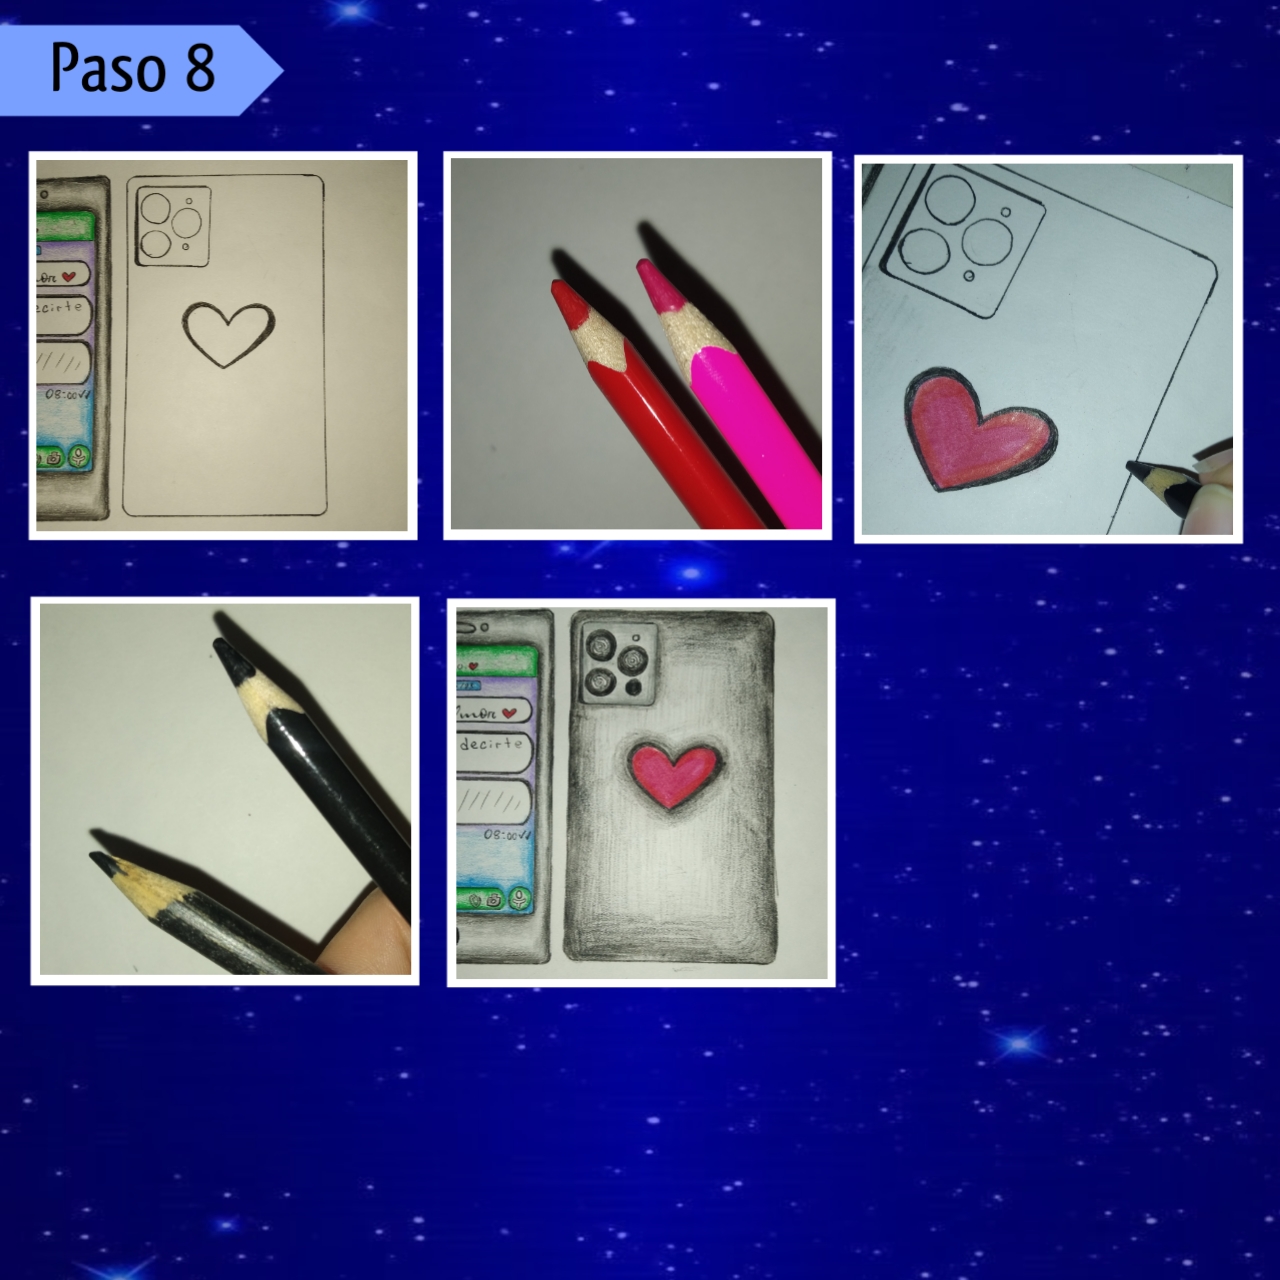
Paso 8:
Step 8:
Vamos a colorear la parte restante, es decir, la parte trasera del teléfono, de esta manera, tomé primero dos colores, uno rosa y el otro rojo, para pintar la base del corazón de rosa y difuminar los bordes hacía adentro con el rojo. Así, luego tomé un negro y un gris e igualmente coloree todo el fondo, aplicando primero el gris y luego difuminando el borde con el color negro, para seguir a colorear la cámara, para esto igualmente aplique gris y negro, también deje unos espacios en blanco para simular el reflejo.
Let's color the remaining part, that is, the back of the phone, in this way, I first took two colors, one pink and the other red, to paint the base of the heart in pink and blur the edges inwards with the red. Then I took a black and a gray and also colored the whole background, applying first the gray and then blurring the edge with the black color, to continue to color the camera, for this I also applied gray and black, I also left some white spaces to simulate the reflection.
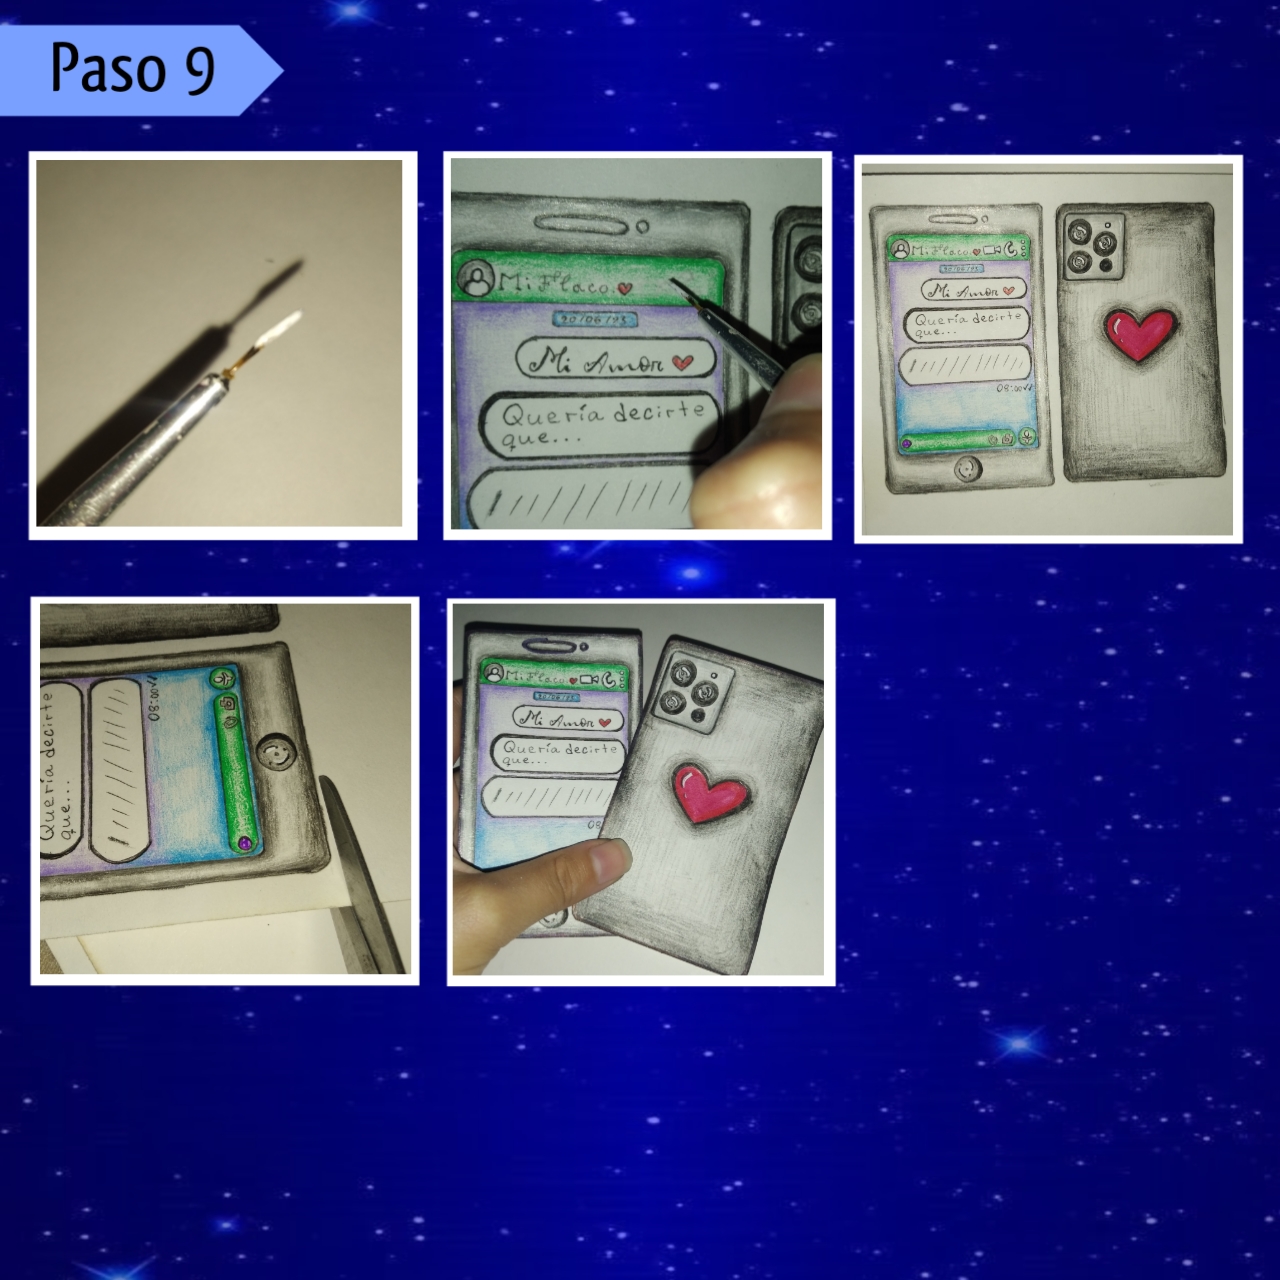
Paso 9:
Step 9:
En está parte tome un pincel fino, sumergí una parte de la punta en pintura al frío blanca y comencé a hacer los detalles que me faltaban, sobre todo los iconos que había dejado para esta parte de la parte de arriba de la pantalla, luego de rellenar estos, con un lapicero de color de tinta negra marque el borde de cada uno de ellos con cuidado, además agregué otros puntos de luz a algunas partes y resalté otros más. Así continúe tomando la tijera y recortando por todo el borde, cada una de estas partes, o sea, la pantalla y la parte de atrás.
In this part I took a fine brush, dipped a part of the tip in white cold paint and began to make the details that I was missing, especially the icons that I had left for this part of the top of the screen, after filling these, with a black ink color pen I marked the edge of each of them carefully, I also added other points of light to some parts and highlighted others. So I continued to take the scissors and cut all around the edge, each of these parts, that is, the screen and the back.
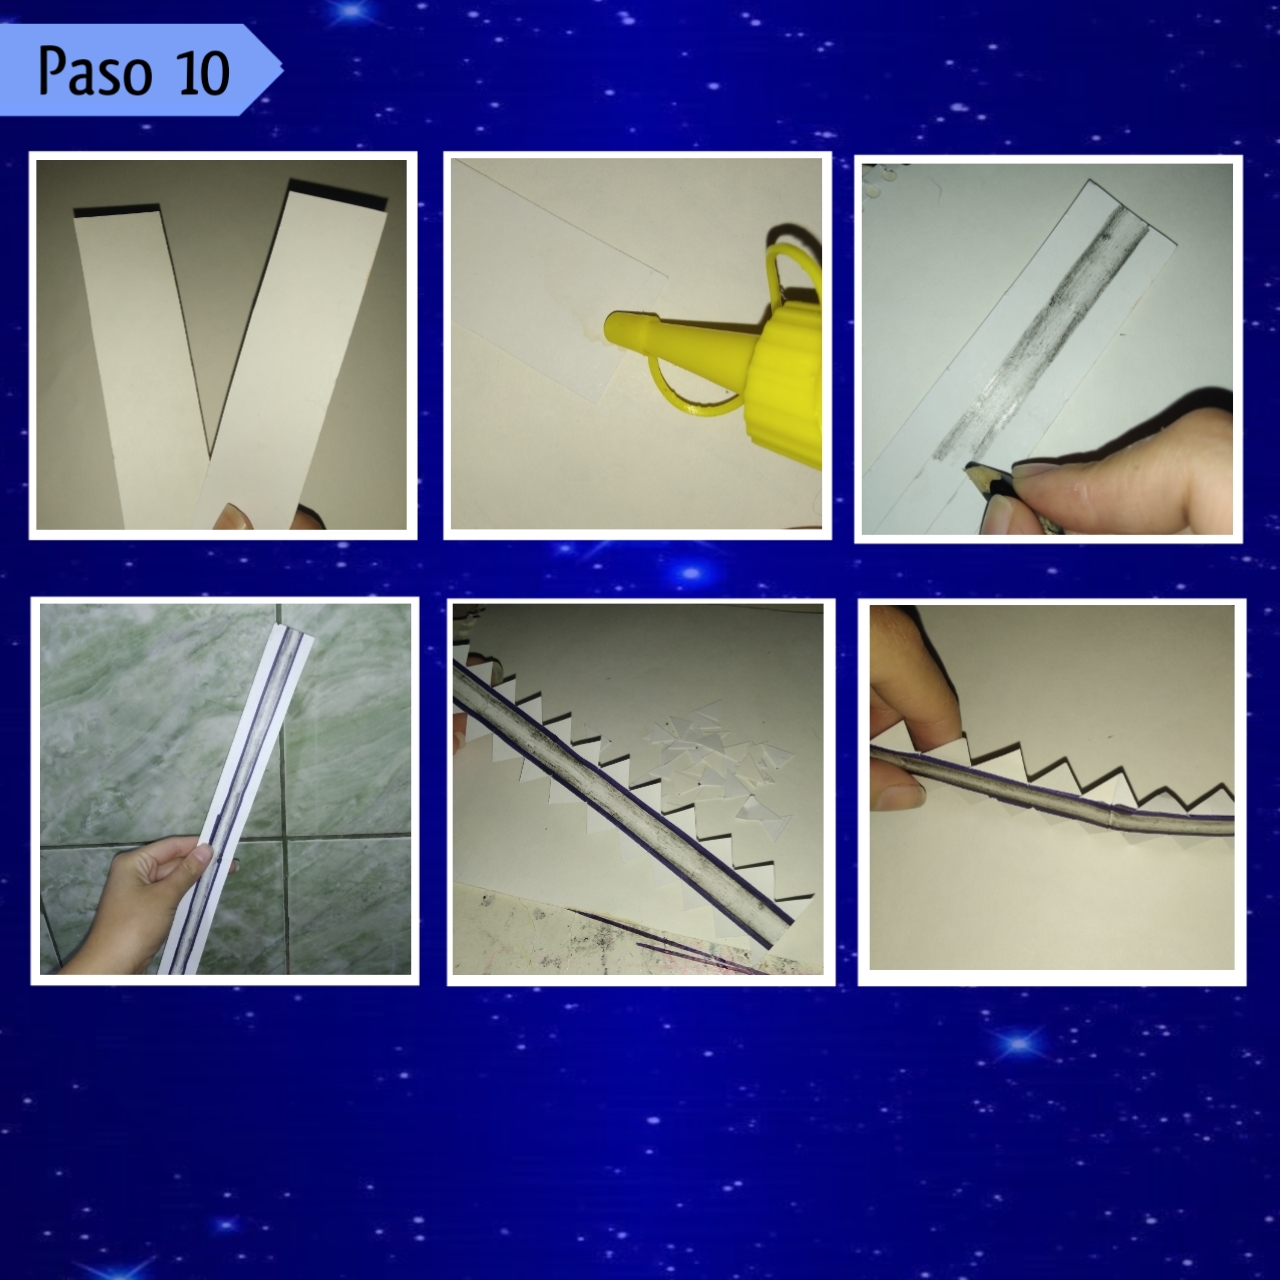
Paso 10:
Step 10:
Por otro lado, para continuar recorte en la misma cartulina blanca dos tiras de 3cm x 18cm, las cuales luego pegue con silicón al frío para hacer una sola tira a lo largo, continúe dividiendo está a lo largo nuevamente en tres partes, cada una de 1cm, después comencé a colorear del mismo color gris del teléfono, difuminando los bordes con un color un poco más oscuro, para darle el toque, después agregué marcador negro por ambas separaciones, luego recorte en triángulos pequeños el borde, para que se nos facilite a la hora de unir las piezas, así para terminarla marque los dobleces.
On the other hand, to continue I cut in the same white cardboard two strips of 3cm x 18cm, which I then glued with silicone to the cold to make a single strip lengthwise, continue dividing it lengthwise again into three parts, each 1cm, then I began to color the same gray color of the phone, then I added black marker for both separations, then cut in small triangles the edge, to make it easier to join the pieces together, and to finish it I marked the folds.
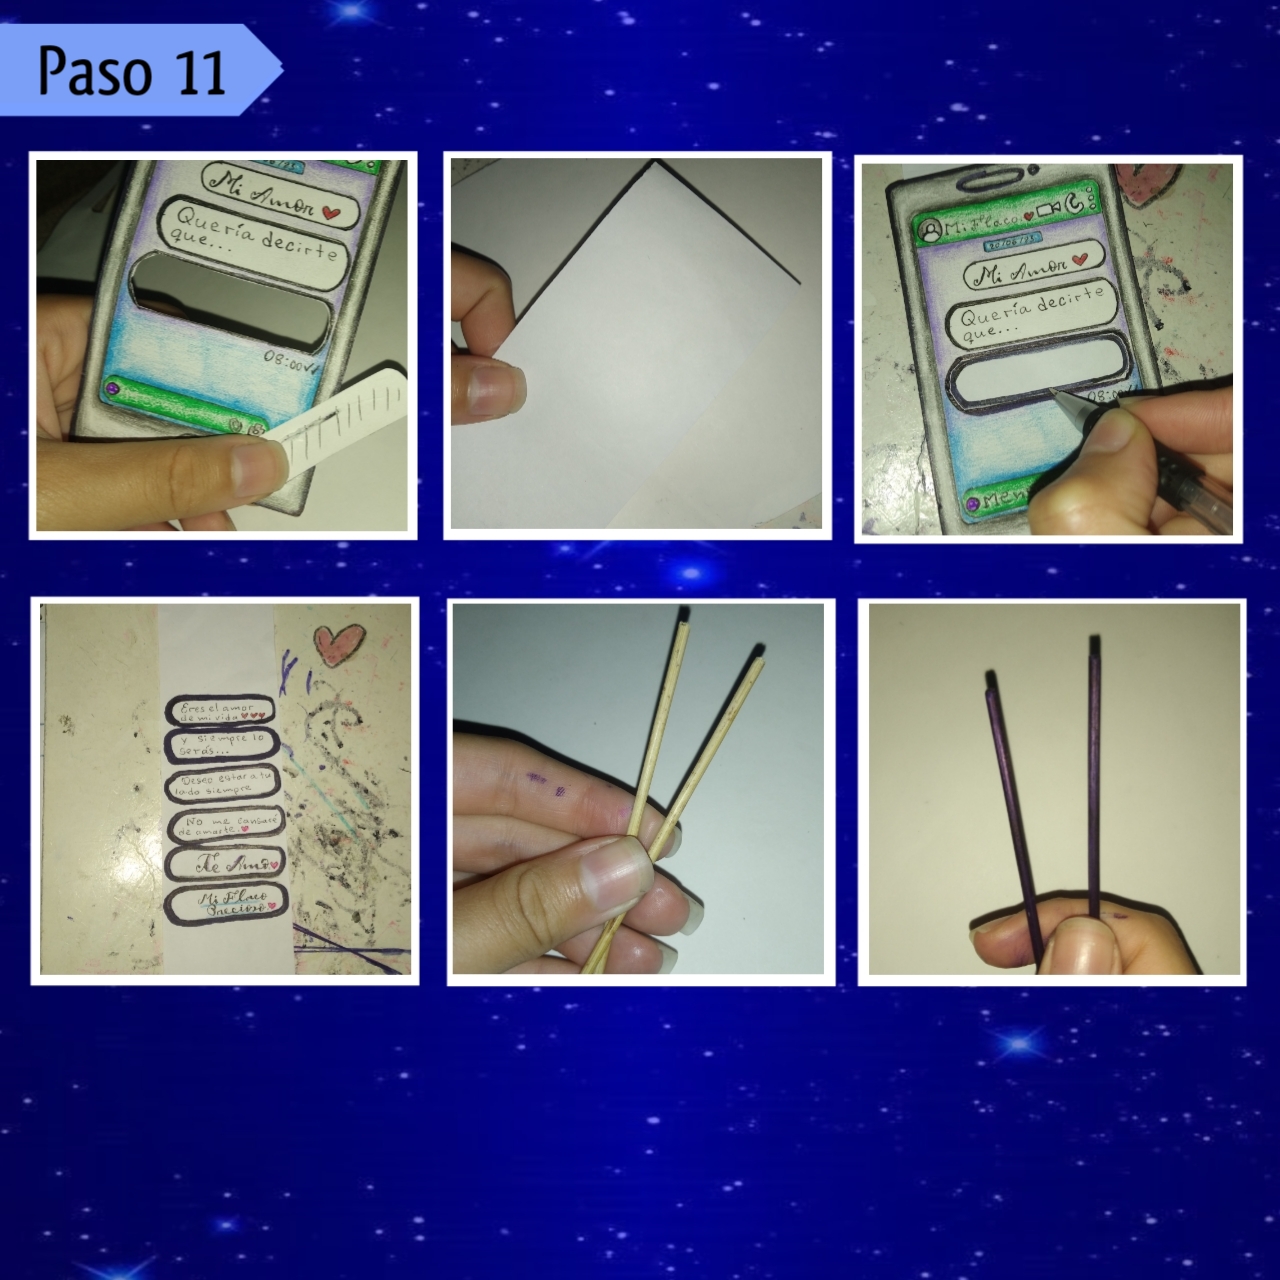
Paso 11:
Step 11:
Recortaremos ahora con una tijera la parte del mensaje que dejamos en blanco, seguido vamos a recortar un rectángulo de 5.5cm de ancho por 21cm de largo, así tomaremos la pantalla y la colocaremos de manera centrada en esta hoja, así con la ayuda de un lapicero o un marcador remarcamos la forma del mensaje varias veces dejando un espacio entre estos, yo lo remarque seis veces. Por otra parte, vamos a tomar nuestro palillo de altura y recortaremos de este, dos palillos que midan algo como 8.5cm, puede ser un poco más largo, todo depende de cómo lo quieran, luego para disfrazarlo más, los pinte por completo con marcador negro.
We will now cut with scissors the part of the message that we left blank, then we will cut a rectangle of 5.5cm wide by 21cm long, so we will take the screen and place it centered on this sheet, so with the help of a pen or a marker we will mark the shape of the message several times leaving a space between them, I marked it six times. On the other hand, we are going to take our height stick and we will cut from it, two sticks that measure something like 8.5cm, it can be a little longer, it all depends on how you want it, then to disguise it more, I painted them completely with black marker.
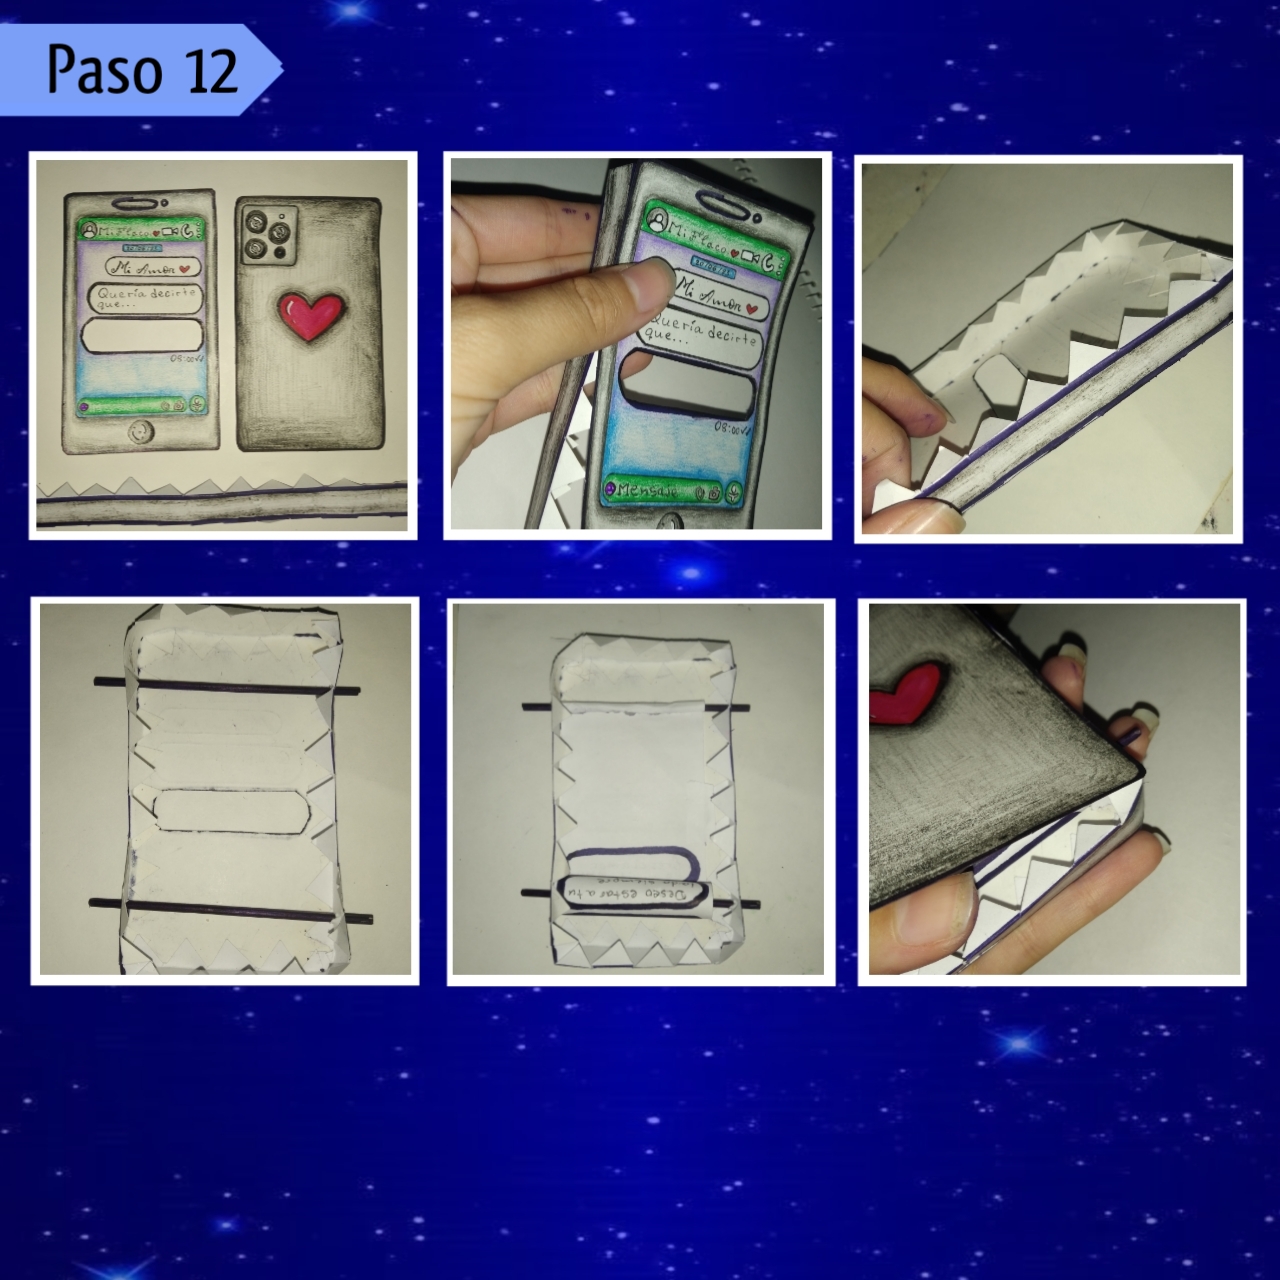
Paso 12:
Step 12:
En este preciso instante ya solo nos queda armar el teléfono, para esto tomaremos cada pieza que hemos hecho, comenzaremos agregando silicón a la tira de color gris, precisamente en los lados, en la parte de los triángulos, así la unimos a la pieza de la pantalla con cuidado. Ahora bien, haremos cuatro orificios, dos de cada lado, que queden frente con frente, dos en la parte de arriba y los otros en la parte de abajo, introduciremos los palillos aquí, haciendo que queden paralelos, luego debajo de estos pondremos el rectángulo con los mensajes, agregaremos silicón a los palitos y pegaremos ambos bordes al papel, también enrollamos un poco este. Por último, probamos que sirva el mecanismo al mover los palillos y pondremos silicón en la tira, para pegar cuidadosamente la parte de atrás y ya estaría.
At this precise moment we only have to assemble the phone, for this we will take each piece that we have made, we will start adding silicone to the gray strip, precisely on the sides, in the part of the triangles, so we join it to the piece of the screen carefully. Now, we will make four holes, two on each side, two on the top and the others on the bottom, we will introduce the sticks here, making them parallel, then under them we will put the rectangle with the messages, we will add silicone to the sticks and glue both edges to the paper, we will also roll it a little bit. Finally, we test that the mechanism works when we move the sticks and we will put silicone on the strip, to carefully glue the back part and that's it.

De está forma podemos hacer un lindo celular interactivo, para entregar ese mensaje de amor a nuestras personas especiales, es algo que lleva su trabajo, pero verdaderamente lo vale, queda divino, en el sentido de que es algo súper original y distinto, sin duda, cualquiera se impresiona con está belleza, un regalo más que creativo y único. Es una manualidad que se puede hacer con distinta apariencia, es decir, pueden elegir recrear cualquier tipo de teléfono que quieran, del tamaño que quieran y incluso pueden alargar el mensaje a dar, por lo que es totalmente adaptable a nuestro gusto, también podemos elegir el color y otras características, es muy personalizable, la verdad, lleva su tiempo, pero el resultado lo vale.
This way we can make a nice interactive cell phone, to deliver that message of love to our special people, it is something that takes work, but it is truly worth it, it is divine, in the sense that it is something super original and different, no doubt, anyone is impressed with this beauty, a gift more than creative and unique. It is a craft that can be done with different appearance, that is, you can choose to recreate any type of phone you want, the size you want and you can even lengthen the message to give, so it is fully adaptable to our taste, we can also choose the color and other features, it is very customizable, the truth, it takes time, but the result is worth it.
Así llega a su fin la manualidad del día de hoy, se alargó un poco el proceso, pero quise explicarlo con detalles y imágenes claras, para que pudieran entender lo mejor posible y si gustan poder hacerlo sin mucha dificultad. Cómo siempre ha sido un gusto compartir una vez más con ustedes, un nuevo Diy, a su disposición para recrear, no olviden que sí tienen alguna duda la pueden dejar en los comentarios y encantada les contestaré.
So comes to an end today's craft, the process was a little long, but I wanted to explain it with details and clear images, so you could understand as best as possible and if you like you can do it without much difficulty. As always it has been a pleasure to share once again with you, a new Diy, at your disposal to recreate, do not forget that if you have any questions you can leave them in the comments and I will be happy to answer them.
Nota: Quería publicar ayer miércoles o el martes, pero por cuestiones de internet no pude, pero bueno lo importante es que ya les traje el tutorial conmigo. Por otro lado, también quería colocar un GIF en la portada, para que pudieran observar lo maravilloso que se ve, estoy segura que verlo así les hubiese gustado más, aún así no pude, ya que paso un error y no se descargaba. Solo son aspectos que quería comentarles...
Note: I wanted to publish yesterday Wednesday or Tuesday, but due to internet issues I couldn't, but the important thing is that I brought the tutorial with me. On the other hand, I also wanted to put a GIF on the cover, so you could see how wonderful it looks, I'm sure you would have liked it more, but I couldn't, because there was an error and it wouldn't download. These are just some aspects that I wanted to tell you...
Sin nada más que mencionar, me despido con un enorme abrazo, espero que tengan una excelente tarde y que Dios los bendiga siempre, feliz tarde.
Without anything else to mention, I say goodbye with a big hug, I hope you have an excellent afternoon and may God bless you always, happy afternoon.
♡Gracias por leer♡
♡Thank you for reading♡
Photos of my authorship taken from my Xiaomi Redmi 7 phone, edited in the free version of PixeLab.
Tienes razón, se nota que esto requiere mucho tiempo y dedicación, pero es el tipo de obsequios que las personas suelen abrazar con mucho cariño. Te felicito por la presentación de tu post, es muy detallado el trabajo, sin mostrar un video el paso a paso a quedado de maravilla. Gracias por dar lo mejor de ti y compartirlo en Hive...
¡Así es! Algo especial requiere de tiempo especial. Muchas gracias por las felicitaciones, agradecida con tu comentario y apoyo, comentarios así me alegran el día.
Saludosss.🧡✨
Saludos @stefania16, es un lindo detalle para obsequiar, requiere trabajo y paciencia pero vale la pena hacerlo, gracias por compartir tu creatividad y este lindo proyecto.
Feliz jueves!
Sii, es algo bastante bonito, clara que lo vale y muchas gracias por comentar, saludos, Felíz noche.❤️
De maravilla, saludos.🥺💙